SNAIGE FF 6043 MXZW User manual

GB
FREE STANDING
ELECTRICCOOKER USER
MANUAL
FF 6043

Dear Customer,
Pieces of packaging (plastic bags, polystyrene etc.) must not be left within
reach of children, as they are potentially dangerous. Please dispose of
packaging thoughtfully by the appropriate means.
To this effect, we recommend that you read the entire guide carefully
before operating the product and keep it as a reference.
CONTENTS
1. IMPORTANT WARNINGS
2. TECHNICAL FEATURES OF YOUR OVEN
3. INSTALLATION OF YOUR OVEN
4. DESCRIPTION OF COOKER & CONTROL PANEL
5. USING OF YOUR COOKER
6. IF YOUR COOKER DOES NOT OPERATE
7. USING HEAT SHIELD
8. MAINTENANCE and CLEANING

IMPORTANT WARNINGS
WARNING: This appliance must be earthed!
Please find required information as power and ratings for your cooker
from rating label is which located behind of appliance.
Ensure that the electricity supply is turned OFF before installing your
appliance.
Ensure that the appliance is switched off before replacing the lamp to
avoid the possibility of electric shock.
If the supply cord is damaged, it must be replaced by the manufacturer,
its services agent or similar qualified persons in order to avoid hazard.
Keep the electrical cable of your cooker away from the hot areas; do not
let them touch the appliance. Keep them away from sharp sides and
heated surfaces.
Usage of your appliance creates moisture and heat in the room; make
sure that your kitchen is well ventilated.
Prolonged intensive use of the appliance may call for additional
ventilation, for example opening increasing the level of mechanical
ventilation where present.
When the cooker is hot never touch the oven glass by hand.
This appliance is for cooking purposes only. It must not be used for
other purposes, for example room heating. All our appliances are only
for domestic use, not for commercial use.
Before starting to use your appliance, keep curtains, paper or
inflammable things away from your appliance. Do not keep combustible
or inflammable things in or near the appliance.
This appliance can be used by children aged from 8 years and above and
persons with reduced physical, sensory or mental capabilities or lack of
experience and knowledge if they have been given supervision or
instruction concerning use of the appliance in a safe way and
understand the hazards involved. Children shall not play with the

appliance. Cleaning and user maintenance shall not be made by children
unless they are older than 8 and supervised.
Use glove when using cooker. Do not touch on hot surfaces
Do not carry cooker to hold from handle
Do not use cooker in potentially explosive atmospheres.
If the current rate of the fuse in your installation is less than 16 Amp,
have a qualified electrician fit a16 Amp fuse.
When the oven is being used, some parts may become hot; children
should be kept away and supervised at all times.
Do not splash cool water in an oven tray or inside the oven when the
surface of the appliance is still hot. Arising steam may cause burns and
sudden temperature exchange may cause damages on the surface of
the appliance
WARNING: Accessible parts may become hot during use. Young children
should be kept away.
WARNING: The appliance and its accessible parts become hot during
use. Care should be taken to avoid touching heating elements. Children
less than 8 years of age shall be kept away unless continuously
supervised.
Do not use harsh abrasive cleaners or sharp metal scrapers to clean the
oven door glass since they can scratch the surface which may result in
shattering of the glass.
If the current rate of the fuse in your installation is less than 32Ampere,
have a qualified electrician fit a 32A. fuse. (With rapid Hotplate models
40 A.)
This appliance is produced in accordance with the safety regulations.
Incorrect use will harm people and appliance.
The cooker must be supplied via a suitable double pole isolating switch,
having contact separation of at least 3 mm in all poles placed in a readily
accessible position adjacent to the unit.
Children should be supervised to ensure that they do not play with the
appliance. Never let them play with the appliance.
The cooker may be located in a kitchen, a kitchen/diner or bed-sitting
room but not in a room containing a bath or shower.

Caution: glass lids may shatter when heated. Turn off all the burners
before shutting the lid. Anyspillageshould be
removedfromthelidbeforeopening.
In models that have digital timer, after power cut set your digital timer
rightly. Otherwise, your oven will not operate.
Caution: Accessible parts may be hot when the grill is in use. Young
children should be kept away”
Do not put flammable, combustible, explosive liquid able or deformable
by heat any material in the oven against possible risk of danger even if
your appliance is not in use.
Bread may catch fire if the toasting time is too long. Close supervision is
necessary during toasting
For cleaning fan guard panel (optional) the cooker must be switched off
before removing the guard and after cleaning, the guard must be
replaced in correct position into the cooker.
WARNING:Before obtaining access to terminals, all supply circuits must
be disconnected.
WARNING: Unattended cooking on a hob with fat or oil can be
dangerous and may result in fire.NEVER try to extinguish a fire with
water, but switch off the applianceand then cover flame e.g. with a lid
or a fire blanket.
WARNING: Danger of fire: do not store items on the cooking surfaces.
WARNING: If the surface is cracked, switch off the appliance to avoid
the possibility of electric shock.
The appliance is not intended to be operated by means of an
external timer or separate remote-control system
WARNING:This appliance is not intended for use by persons (including
children) with reduced physical,
sensory or mental capabilities, or lack of experience and knowledge,
unless they have beengiven supervision or instruction concerning use of
the appliance by a person responsible fortheir safety.
Children should be supervised to ensure that they do not play with the
appliance.
TECHNICAL FEATURES OF YOUR OVEN
(*) Optional
SPECIFICATIONS
50 x 50
50 x 60
60 x 60
Outer width
500 mm
500 mm
600 mm
Outer depth
600 mm
600 mm
650 mm
Outer height
855 mm
855 mm
855 mm
Inner width
392 mm
392 mm
445 mm
Inner depth
402 mm
402 mm
445 mm
Inner height
324 mm
324 mm
345 mm
Lamp power *
15 W
Thermostat
50 - 250 °C
Bottom heating element
800 W
800 W
1300 W
Top heating element
650 W
650 W
850 W
Grill heating element *
1500 W
1500 W
2000 W
Supply voltage *
220-240V/380-415V or 230V/400V AC,
50 - 60 Hz.
Hot plate Ø145 mm
1000 W
Hot plate Ø180 mm
1500 W
Hot plate Rapid Ø145 mm
*
1500 W
Hot plate Rapid Ø180 mm
*
2000 W
Hot plate Ø80 mm
450 W
Hot plate Ø220 mm
2000 W
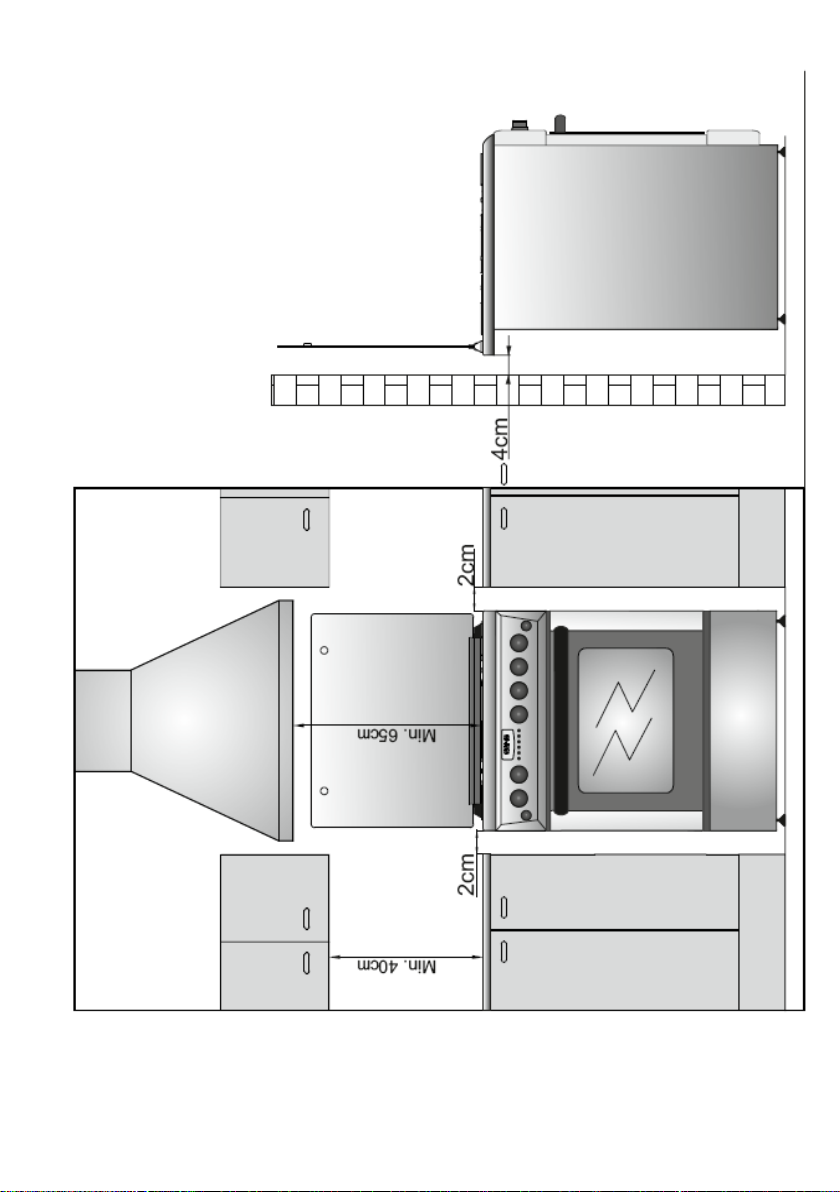
INSTALLATION OF YOUR OVEN
The adjustment conditions for this appliance are stated on the rating
label.
Your appliance requires 32-40 Ampere supply. If necessary, installation
by a qualified electrician is recommended.

Electrical connection of the oven should only be made to
connections/sockets with an earth system installed in compliance with
local regulations. If there are no connections/sockets with an earth
system in place where the oven will be installed, immediately contact a
qualified electrician to install. The manufacturer is not responsible for
damages that will arise because of the appliance not be connected to an
earth system.
Your oven is for use with 230V/400V AC, 50 –60 Hz or 220-240V/380-
415V AC, 50-60 Hz electric supply. If your supply is different from the
specified value, contact your authorized service agent.
When placing your oven to its location, ensure that it is at the counter
level. Bring it to the counter level by adjusting the feet if necessary.
Some models are supplied without a plug-an-lead set. In this case please
use a flexible cable to suitable for connection to mono phase: H05 VV-F
3 G 2,5 mm2, H05 VV-F 3 G 4 mm2 or for 3 phase: H05 VV-F 5 G 1.5
mm2
Connection schem
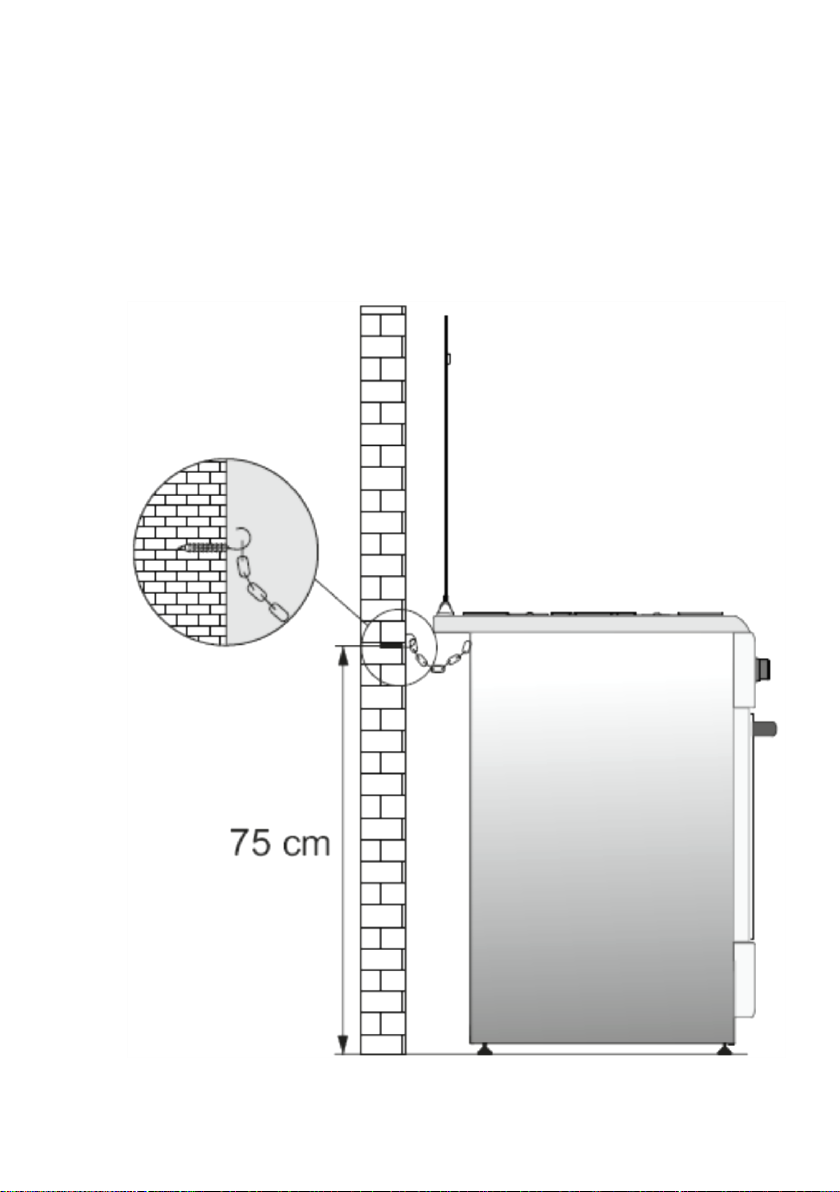
WALL FIXING (*) Optional
Before using the appliance, in order to ensure safe use, be sure to fix the
appliance to the wall using the chain and hooked screw supplied. Ensure
that the hook is screwed into the wall securely
WARNING!
In order to prevent tipping of the appliance, this stabilizing means must be
installed. Refer to the instructions for installation.
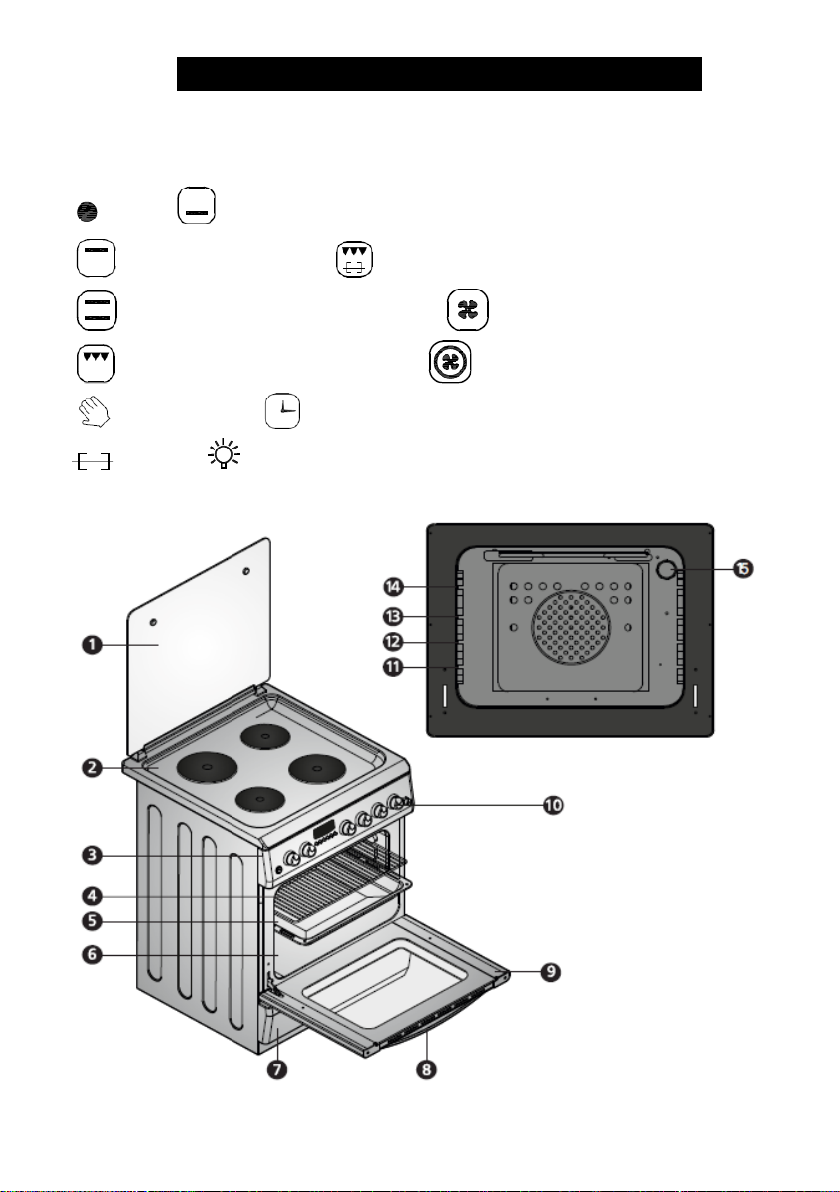
DESCRIPTION OF COOKER & CONTROL PANEL
DESCRIPTION OF COOKER
Symbols of functions on cooker:
Closed Oven heating element
Top heating element Grill&turnspit
Oven & grill heating element Turbo fan
Grillheating element Turbo fan &heating element
Manual using Timer
Turnspit Ovenlamp
5
1- Top lid 9- Ovendoor
2- Cooktop 10- Commandknobs
3- Command panel 11- Bottomshelve
4- Wiregrid 12- Middledownshelve
5- Tray 13- Middle top shelve
6- Cavity 14- Top shelve
7- Bottomcover 15- Ovenlamp (Option)
8- Doorhandle
USING OF YOUR COOKER
Beforeusingcookerpleaseremoveallflammabletapes,
sytrofoamoranyotherambalagematerials on cooker.
Alsotakeoutusermanualandotherflammablematerialsfrom inside of
cooker.
Using cooktopforHot Plates:
Hotplate power table for 3 levels
145
mm
LEVEL 1
250 W
LEVEL 2
750 W
LEVEL 3
1000 W
180
mm
250 W
1100
W
1500 W
Hotplate power table for 6 levels (Optional)
Hot Plate
LEVEL 1
LEVEL 2
LEVEL 3
LEVEL 4
LEVEL 5
LEVEL 6
145 mm
95 W
155 W
250 W
400 W
750 W
1000 W
180 mm
115 W
175 W
250 W
600 W
850 W
1500 W
145mm Rapid
135 W
165 W
250 W
500 W
750 W
1500 W
180mm Rapid
175 W
220 W
300 W
850 W
1150 W
2000 W
1. Electric hotplates have standard of 3 or 6 temperature levels (as
described herein table)
2. When using first time, operate your electric hotplate in maximum
position for 5 minutes. This will make the agent on your hotplate which
is sensitive to heat get hardened by burning.
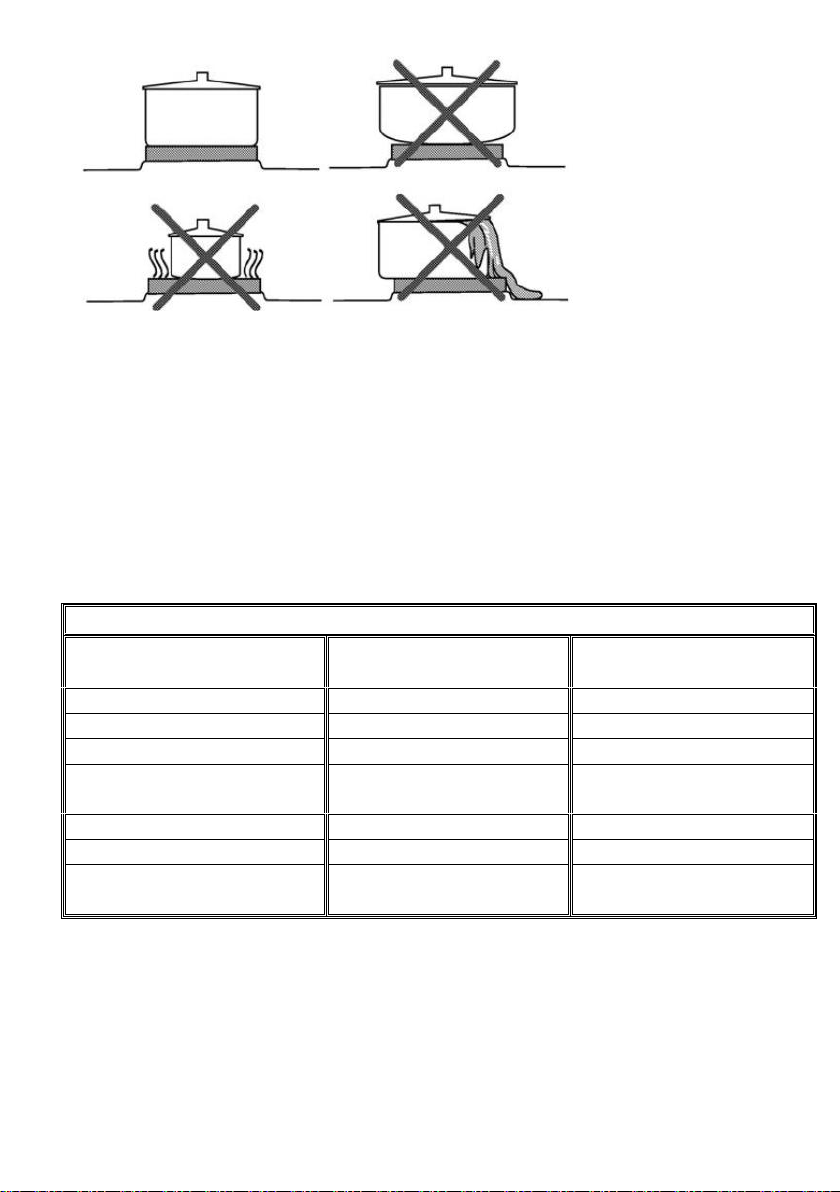
3. Use flat bottomed saucepans which fully contact with the heat as much
as you can, so that you can use the energy more productively.
4. Adjust temperature level by control knob of hotplate as turn to
clockwise direction.
5. ATTENTION! Do not operate the hot plate while there isn't a pot to heat
on it, and do not operate it on while the pot on it is empty.

6. Before cleaning the surface of the hot plates, turn off the hot plates and
let them cool down.
7. Do not use any hard, scratching or abrasive materials on the hot plates
for cleaning.
8. While cleaning, do not use chemical cleaners such as; thinner, fuel or
other corrosives.
9. Whilecleaning, use a woolspongealongwithwashing-upliquid.
Usingelectricaloven:
1Whenyouroven is operatedfirst time, an odorwill be
spreadoutwhichwill be sourcedfromusingtheheatingelements.
Inordertogetrid of this, operate it at 250°C for 45-60 minuteswhile it is
empty.
2Ovencontrolknobshould be positionedtodesiredvalue;
otherwiseovendoes not operate.
3Thermostatcontrolknobshould be
positionedtodesiredtemperaturevalue.
4Timercontrolknobshoud be positionedtodesiredtimingvalue.End of
adjustedcooking time, willheard ‘’bing’’ tonefromtimerandcookerwill
stop theoperate. Ifyouwanttousecookerwithouttimercontrol,
pleaseturntimercontrolknobtothemanualposition as symbol.
(Optional)
5Duringthe time whencooking is beingperformed in theoven, thedoor of
theovenshould not be openedfrequently. Otherwisecirculation of
theheatmay be imbalancedandtheresultsmaychange.
65 - 10 min. preliminaryheatingshould be donepriorcooking.
Cooking Time Table:
Meals
Temperature (°C)
Rack position
Cooking time (min.)
Creamed cake
150 - 170
2
30 - 35
Pastry
200 - 220
2
35 - 45
Biscuit
160 - 170
3
20 - 25
Cookie
160 –170
3
20 - 35
Cake
160 - 180
2
25 - 35
Braided cookie
200 - 220
2
30 - 40
Filo pastry
180 - 220
2
35 - 45
Savory pastry
160 - 180
2
20 - 30
Lamb meat
200 - 230
1
90 - 120
Veal
200 - 230
1
90 - 120
Mutton
210 - 230
1
90 - 120
Chicken (in
pieces)
210 - 230
1
75 –100
Fish
190 - 210
2
40 –50
Note:Theresultsmaychangeaccordingtotheareavoltageandmaterialhavingdi
fferentquality, amountandtemperatures.Using
cakeformswhilecookingcakegivesbetterresult.
IF THE APPLIANCE DOES NOT OPERATE
Electrical equipments
Proble
m
PossibleCauses
Suggested Solutions
Oven is
not
working
Fusemalfunctionorautomaticf
useblown
Checkthe general
fuseboxandcorrectifthereareanythrownbreake
rs. Checkthe general
fuseboxtoseeiftheautomaticfuseorthebreaker
sarethrownoff. Ifthe problem repeats,
calltechnical service toremovethereason of
thefuseblowing.
Thedevice is unpluggedto
(grounded) powersocket
Make sure theunit is plugged in
Ovenligh
t is not
working
Ovenlamp is defective.
Changethelamp.
There is noanycurrent
Checkthe general
fuseboxandcorrectifthereareanythrownbreake
rs. Checkthe general
fuseboxtoseeiftheautomaticfuseorthebreaker
sarethrownoff. Ifthe problem repeats,
calltechnical service toremovethereason of
thefuseblowing.
Oven is
not
heating
Oventemperatureand/orcooki
ngmode has not beenselected
Set thecookingmodeandtemperature

There is noanycurrent
Checkthe general
fuseboxandcorrectifthereareanythrownbreake
rs. Checkthe general
fuseboxtoseeiftheautomaticfuseorthebreaker
sarethrownoff. Ifthe problem repeats,
calltechnical service toremovethereason of
thefuseblowing.
Digital Timer/ Display (models with digital timer)
Problem
PossibleCauses
Suggested Solutions
Time display is
flashingorlitupclock.
Beforepowerfailureoccurs.
Set thecurrent time.
Turnoffthecookingmodeand re-
rotatethecookingmodeyoudesired
If the problem is not solved:
1) Cut the electricity connection of unit (turn off the circuit breaker)
2) Call the manufacturer, its services agent or similar qualified persons
IMPORTANT
Do not try to repair the device yourself. There are no any parts inside the
product may be repaired by customer.
USING HEAT SHIELD(*) Optional
A safety panel is designed to protect control panel and the buttons when
the oven is in Grill mode. Place the safety panel under control panel by
opening the oven front cover glass.
And then secure the safety panel in between oven and front cover by
gently closing the cover. Please use this safety panel in order to avoid the
heat to damage control panel and the buttons when the oven is Grill mode.
It is important for cooking to keep the cover open in specified distance
when cooking in grill mode.Safety panel will provide an ideal cooking
circumstance while protecting control panel and buttons.
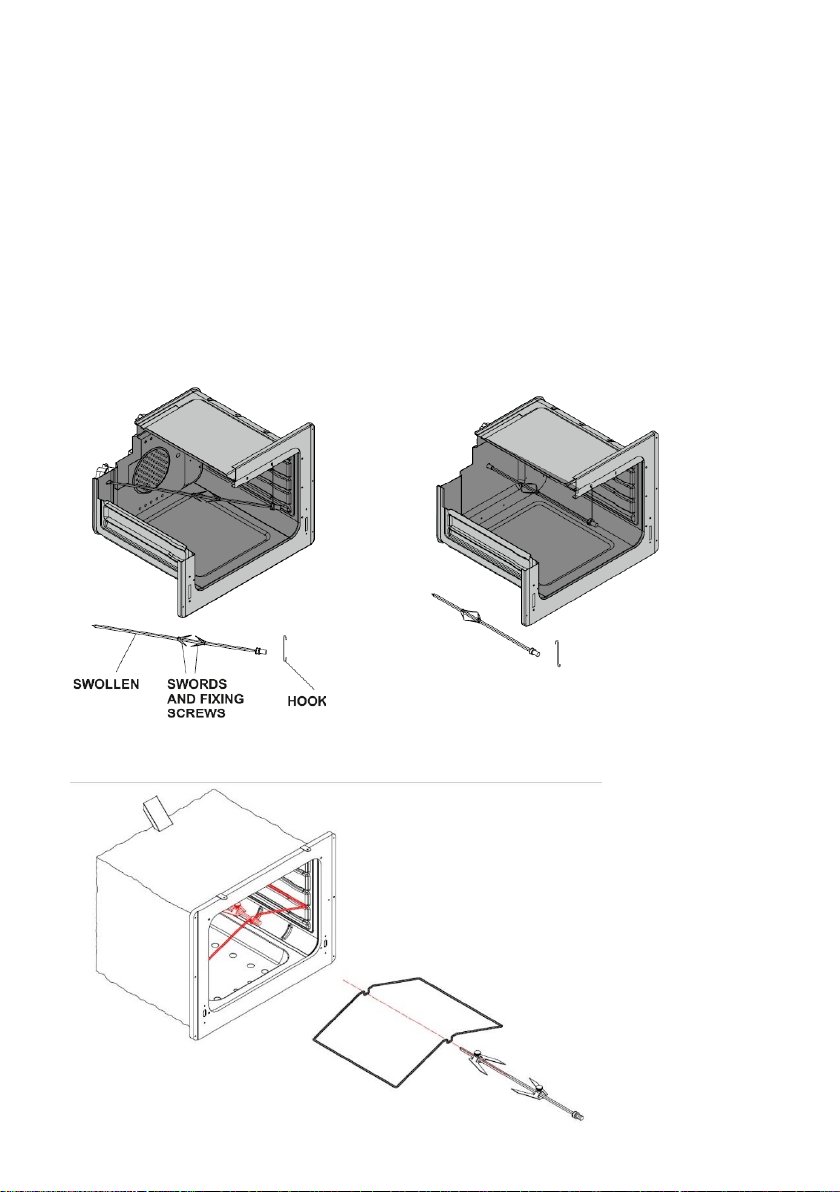
USING TURNSPIT(*) Optional
If your cooker has turnspit option please follows recommendations as
below;
Install turnspit hook to the fixing hole on the cavity. Put the cooking item
(chicken etc.) on grill swollen and fix by sword and screws. Than install
them on turnspit motor as shown in below figures and operate turnspit
system from command knob from control panel.

MAINTENANCE and CLEANING
1. Disconnect the plug supplying electricity for the oven from the socket.
2. While oven is operating or shortly after it starts operating, it is
extremely hot. You must avoid touching from heating elements.
3. Never clean the interior part, panel, lid, trays and all other parts of the
oven by the tools like hard brush, cleaning mesh or knife. Do not use
abrasive, scratching agents and detergents.
4. After cleaning the interior parts of the oven with a soapy cloth, rinse it
and then dry thoroughly with a soft cloth.
5. Clean the glass surfaces with special glass cleaning agents.
6. Do not clean your oven with steam cleaners.
7. Before opening the top lid of the oven, clean spilled liquid off the lid.
Also, before closing the lid, ensure that the cooker table is cooled enough.
8. Never use inflammable agents like acid, thinner and gasoline when
cleaning your oven.
9. Do not wash any part of your oven in dishwasher.
Removing of ovendoor:
Changing oven lamp:
Let the oven cavity and grill burner or heating elements cool down. Cut off the
electrical connection of your appliance before chancing the inner lamp. Change
with a 15-25W, 300 C˚ temperature resistant lamp.
WARNING:According to the usage time, there might be some yellowing around the hot
plates.
WARNING:The electric plates should never be used for “housewarming” purposes and
should always been operated with appropriate pots and pans. The pans and pots on
plates should never be empty.
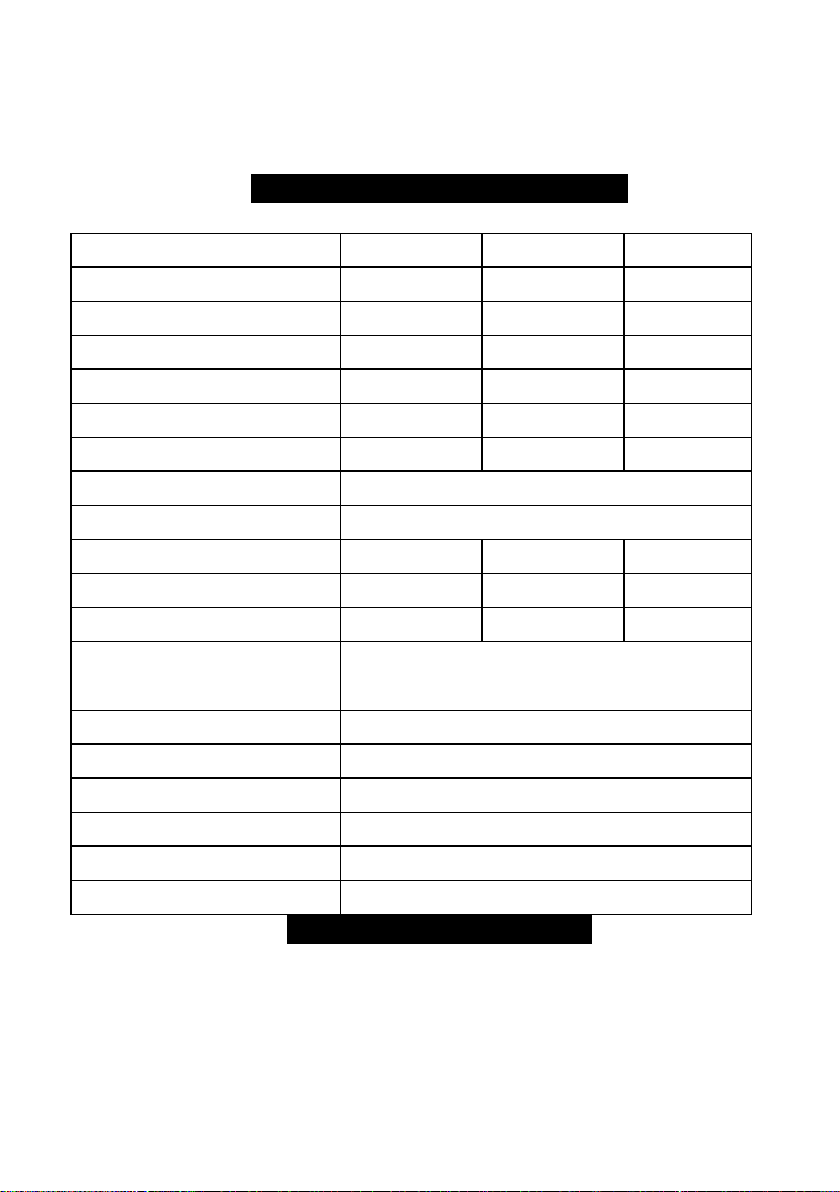
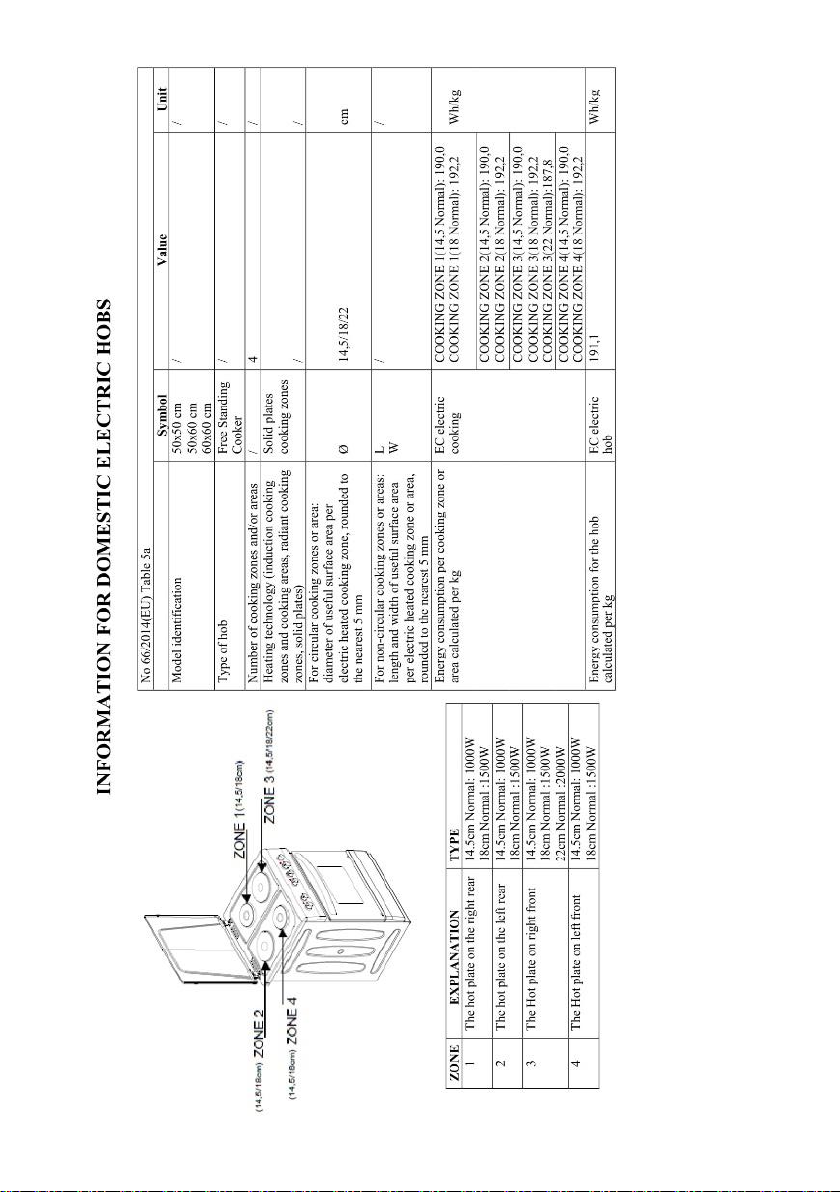
PRODUCT FICHE
Type :
50x50 &50x60 Plate Free
Standing Electric Cooker
60x60 Free Standing Electric
Cooker
Cavity Number:
1
1
Energy Source:
Electrical
Electrical
Volume:
52 lt
64 lt
Energy Consumption /
Convection Mode (EC):
0,72 kWh
0,78 kWh
Energy Efficiency Index (EEI):
95,6
95,4
Energy Class:
A
A
Measurement method:
EN 60350-1 / Regulation
(EU)66/2014
EN 60350-1 / Regulation
(EU)66/2014
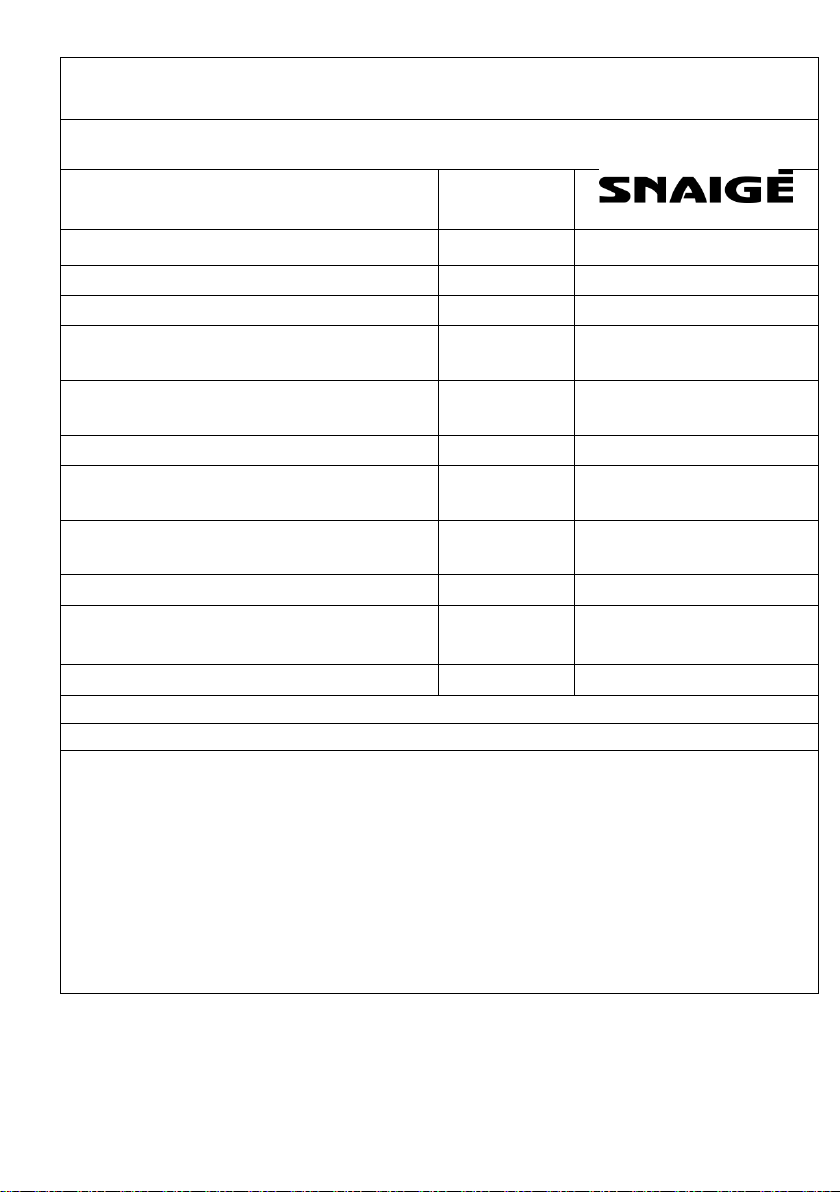
Продуктов фиш
Съгласно Регламент (ЕС) №66/2014
Информация за потребителски електрически фурни за готвене
Марка
Модел
FF6043 MXZW
Тип на фурната
Електрическа
Маса
kg
32
Итдекс на енергоефективност –
обикновена фурна
95,4
Итдекс на енергоефективност –фурна
с вентилатор
86,6
Енергиен клас
A
Енергоконсумация (електрическа) –
обикновена фурна
kWh/цикъл
0,785
Енергоконсумация (електрическа) –
фурна с вентилатор
kWh/цикъл
0,781
Брой кухини
1
Топлинен източник
Електрически
Обем
L
64
Тази фурна съответства на EN 60350-1
Съвети за спестяване на енергия
Фурна
Гответе ястията заедно, ако е възможно.
Придържайте се към кратко време за предварително нагряване.
Не удължавайте времето за готвене.
Не забравяйте да изключите фурната след готвене.
Не отваряйте фурната по време на готвене.
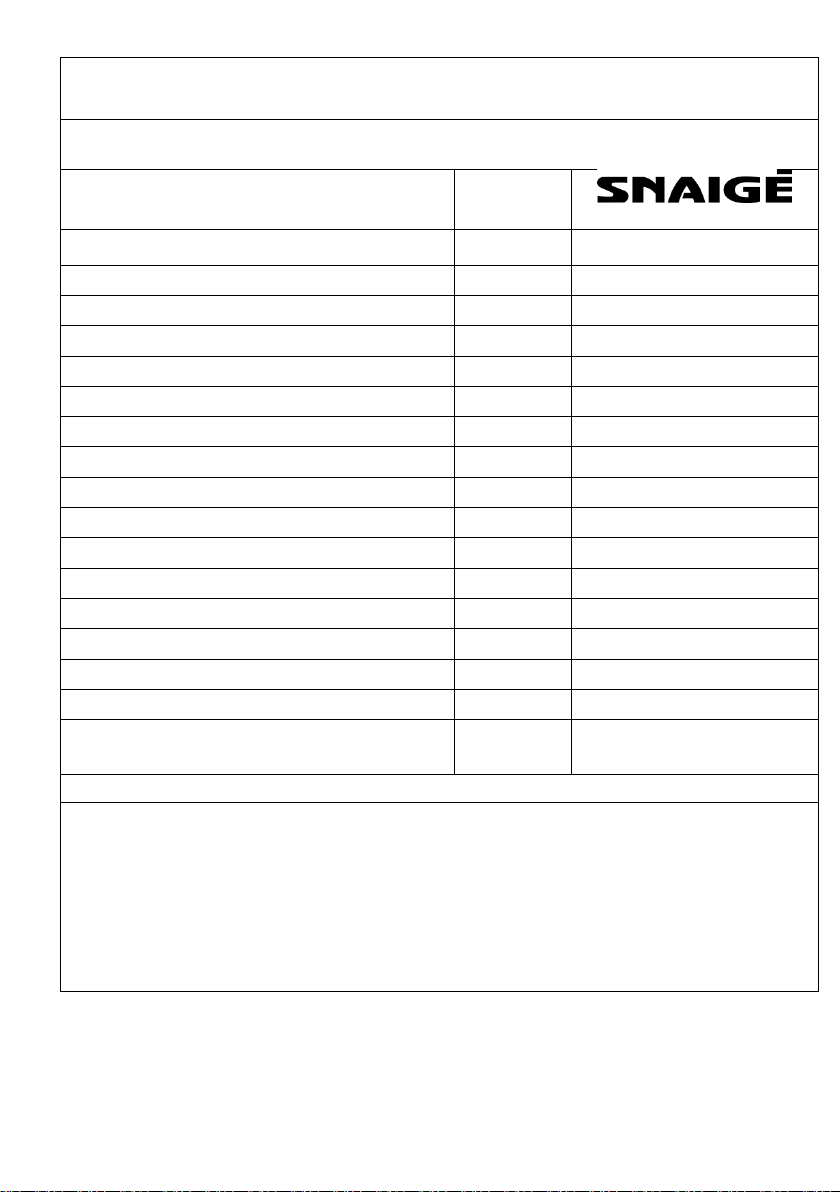
Продуктов фиш
Съгласно Регламент (ЕС) №66/2014
Информация за потребителски електрически плотове с котлони
Марка
Модел
FF6043 MXZW
Тип на котлоните
Електрически
Брой на зоните за готвене
4
Нагревателна технология – зона 1
Гореща плоча
Размер – зона 1
cm
Ø14,5
Енергоконсумация – зона 1
Wh/kg
192,2
Нагревателна технология – зона 2
Гореща плоча
Размер – зона 2
cm
Ø18,0
Енергоконсумация – зона 2
Wh/kg
189,3
Нагревателна технология – зона 3
Гореща плоча
Размер – зона 3
cm
Ø18,0
Енергоконсумация – зона 3
Wh/kg
190,0
Нагревателна технология – зона 4
Гореща плоча
Размер – зона 4
cm
Ø14,5
Енергоконсумация – зона 4
Wh/kg
192,2
Енергоконсумация на плота с котлони
Wh/kg
190,9
Плотът с котлони съответства на EN
60350-2
Съвети за спестяване на енергия
Котлони
Използвайте домакински съдове с плоска основа.
Използвайте домакински съдове с подходящ размер.
Използвайте домакински съдове с капак.
Минимизирайте количеството на течностите и мазнините.
След завиране на течността, намалете мощността чрез настройка на ключа.
Table of contents
Popular Cooker manuals by other brands


Instant
Instant DUO SLCO65000 user manual

Electrolux
Electrolux EKK 60331 Instruction booklet

Tiger
Tiger NFI-A user manual

Nordmende
Nordmende CSG50LPGWH Operating and installation instructions

Parkinson Cowan
Parkinson Cowan SIG 505 X Operating and installation instructions

Pronto
Pronto CA1E Operator's manual


2.30EQXi instruction manual")
