SNAIGE CD480 User manual
Vertical display cooler
Instructions for Use
1
SAFETY INSTRUCTIONS
Carefully read the Instruction manual! If instructions are not followed, there is a
risk of injury, damage of the appliance and loss of the right to free warranty
service. We recommend to keep the Instruction manual the whole time you have
the appliance. When you sell the appliance pass the Instruction manual to the
new owner of the appliance.
WARNING!
Do not cover the ventilation holes at the top and on the sides of the
appliance.
Do not use any mechanical means or electrical devices to hasten the thawing
process when cleaning the freezer compartment.
Do not use electrical appliances inside the food storage compartments of the
appliance, unless they are of the type recommended by the manufacturer.
If the supply cord is damaged it must be replaced by the manufacturer,
manufacturer service agent or a similarly qualified person, in order to avoid a
hazard.
Disposal of the appliance should be according to national rules.
Do not damage the appliance refrigeration system. It contains the refrigerant
gas R600a. If the refrigeration system is damaged:
•Do not use any open flame.
•Avoid sparks ― do not turn on any electrical appliances or
lighting fixtures.
•Immediately ventilate the room.
The appliance should be used only for storing foodstuffs.
This appliance is not designed for the storage of explosive substances such
as aerosol cans with a flammable propellant.
It is prohibited to store petrol and other flammable liquids near the appliance.
CONNECTION TO THE MAINS
The appliance should only be connected to an earthed socket installed in
accordance with the regulations. Make sure that the supply voltage
corresponds with the voltage marked on the rating label. This product
complies with all binding CE labelling directives.. The earthed electrical
socket by which the appliance is connected to the mains should be in an
accessible place.
2
IF THE APPLIANCE IS PRODUCED WITH THE SPECIAL SUPPLY CORD
IT CAN BE EXCHANGED ONLY BY THE SAME SPECIAL SUPPLY CORD
PROVIDED BY THE MANUFACTURER.
TO AVOID HAZARDS, DAMAGED POWER SUPPLY CORDS SHOULD BE
REPLACED ONLY BY THE MANUFACTURER, A MAINTENANCE
TECHNICIAN, OR A PERSON WITH AN EQUIVALENT QUALIFICATION.
DO NOT USE extension cords or connectors (adapters) or couplers.
The frequency and power of the electricity supply in your house must
conform to the general data parameters of the appliance as it is shown in the
product label.
When positioning the appliance, be careful that the electrical cord isn’t
squeezed in order to avoid its damage. Do not store heavy objects such as
cooling devices or other devices next the appliance in such a way that they
could squeeze and damage the electrical cord. This can cause a short circuit
and a fire.
Make sure that the plug of the electrical cord is not squeezed by the back
wall of the appliance or otherwise damaged.
A damaged plug can be the cause of a fire!
•If the appliance is unplugged (for cleaning, moving to another place, etc.), it
may be repeatedly SWITCHED ON AFTER 15 MIN.
•It is forbidden to use a technically damaged appliance.
•Do not place any switched on electrical devices (such as microwave ovens,
hair dryers, irons, electric kettles or other electrical devices) on top of the
appliance because this may cause ignition of plastic parts.
•Do not place any dishes with liquids on top of the appliance and do not keep
flowers in vases or other liquid-filled vessels on the appliance.
IF THE APPLIANCE IS OUT OF ORDER AND IT IS NOT POSSIBLE TO
REPAIR IT BY MEANS OF GIVEN RECOMMENDATIONS, UNPLUG IT,
OPEN THE DOORS AND CALL THE SERVICE EXPERT. ONLY A
SERVICE REPRESENTATIVE CAN REMEDY ALL TECHNICAL OR
CONSTRUCTION FAULTS.
ENVIRONMENTAL PROTECTION INFORMATION
This symbol indicates that once the appliance is no longer needed, it cannot
be disposed together with other miscellaneous municipal waste. It should be
collected and eliminated separately, i.e. in containers specially marked with
this symbol in large-dimension rubbish collection areas. Full information on
where to submit the old appliance safety can be obtained from local

3
government authorities, the shop where you bought the appliance or the
manufacturer’s representatives.
If you decided to scrap the appliance, make it impossible to use in order to prevent
possible misadventure. Pull out the electric plug from the electricity supply socket and
then cut off the cord. Tear off the gasket. Break the door lock if any.
WARNING! Do not dismantle the appliance yourself. Pass it on to recycling
companies.
TRANSPORT
THE MANUFACTURER WILL NOT BE RESPONSIBLE FOR ANY DAMAGE OF THE
APPLIANCE THAT RESULTS FROM NON-COMPLIANCE WITH THE
INSTRUCTIONS FOR TRANSPORTATION.
•The appliance should be transported only in the vertical position.
•When being transported, the appliance should be protected from atmospheric
conditions (rain, snow, dampness).
•The appliance should be firmly secured in place while being transported, to avoid
slippage or any shocks in the transport vehicle.
•If the appliance was transported not vertically, it may be connected to the
mains after 4 hours at least. If this is not done, the appliance compressor
may fail.
GENERAL INFORMATION
The cooling appliance is a vertical refrigerator cooler with a door made of glass,
designed for the short-term storage and display of fresh food products and for chilling
drinks. The cooling device can be used in catering establishments, shops, bars and
clubs. This cooling device is intended for commercial use only!
THE APPLIANCE IS ECOLOGICALLY CLEAN, CONTAINING NO MATERIALS HARMFUL TO
THE OZONE LAYER: the refrigerant used is R600a, the foaming agent used for the
appliance insulation is cyclopentane C5H10.
THE MANUFACTURER GUARANTEES RELIABLE OPERATION OF THE REFRIGERATOR
WHEN THE AMBIENT TEMPERATURE IS +16 TO +32 DEGREES CELSIUS AND THE
RELATIVE AIR HUMIDITY NOT GREATER THAN 60 PER CENT.
The appliance climate class is 3.
Inside temperature class –S(from –2 °C to +14 °C)
4
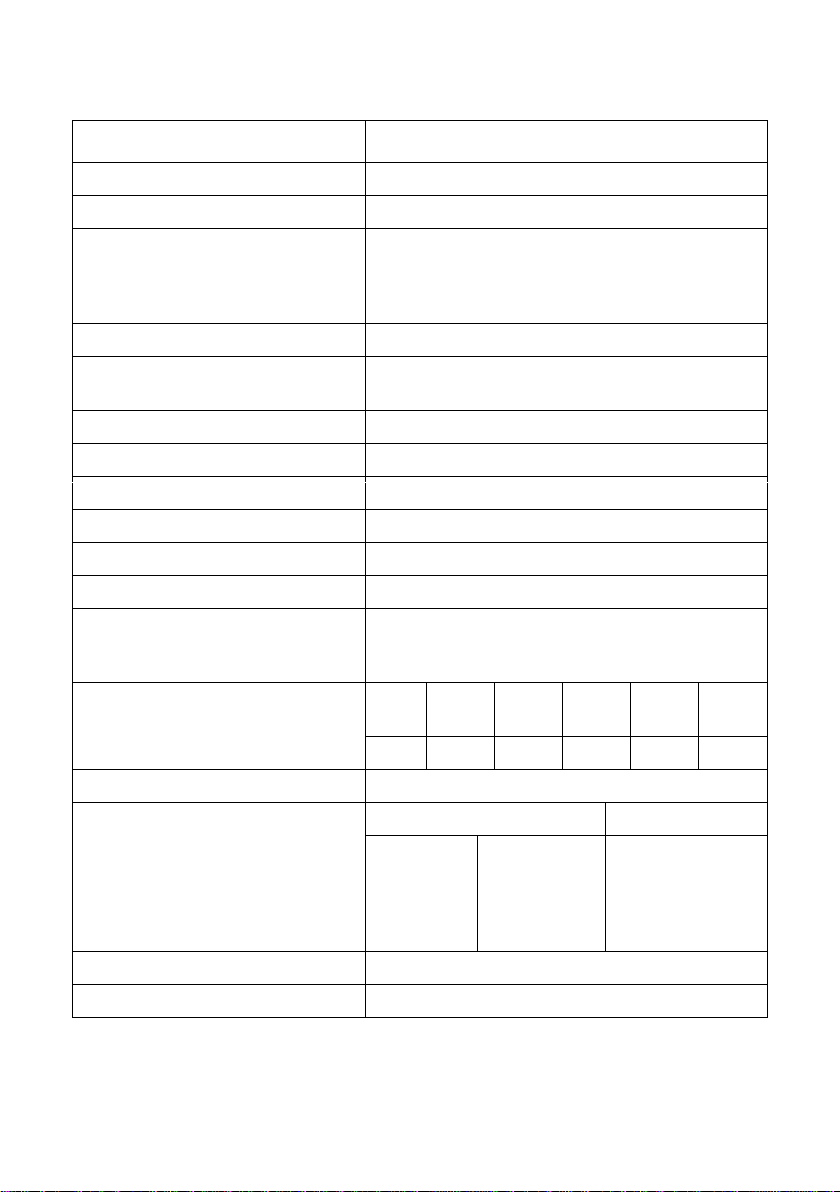
Product data sheet
Data according to requirements of standard EN ISO 23953-2:2005
Model
CD480
Total gross volume, L
480
Refrigerator net volume , L
455
External overall dimensions (H/W/D), mm:
for installation with the shield
for installation without the shield
for service
202,5 / 60 / 73
202,5 / 60 / 68,5
202,5 / 65,5 / 125
Shelf area, dm2
125
Temperature in the refrigerator chamber,
°C
from +2 to +14
Rated current, A
1,6
Mass, kg
90
Rated supply voltage
220 –240 V /50 HZ
Rated power input, W
265
Noise level, dB (A)
60
Door opening area, m²
0,84
General product exposure area, m²:
without the promotional shield
with the promotional shield
0,67
0,61
Quantity of bottles, pcs.:
0,33 l
PET
0,5 l
PET
0,75 l
PET
1,0 l
PET
1,5 l
PET
0,33 l
247
247
150
150
110
604
Maximum loading, kg
60
At switched on lighting
At switched off lighting
Energy consumption at ambient
temperature +25 °C:
kWh / 24 h
kWh / year
With the
promotional
shield
3,4
1241
Without the
promotional
shield
3,12
1139
2,00
730
Nominal imput of luminaire, W
36
Rated power of the promotional shield,W
14
NOTE. The manufacturer reserves the right to make future changes to technical parameters and
specifications.
5
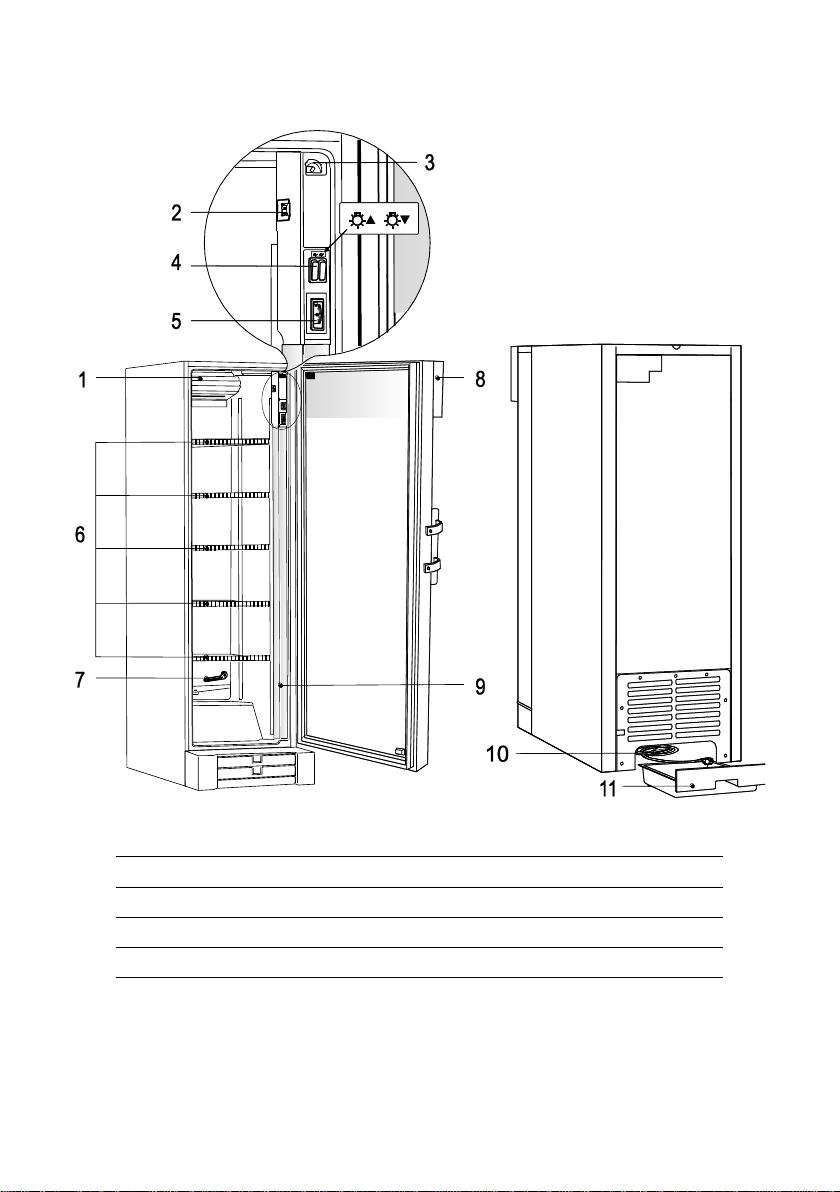
DESCRIPTION OF THE APPLIANCE, BASIC PARTS
*REMARK. The promotional shield is optional and must be ordered specially.
1
Blower
7
Thaw water channel cleaner
2
Thermostat knob
8
Promotional shield *
3
Blower switch
9
Interior light
4
Double switch -(ON/OFF)
10
Supply cord
5
Thermometer*
11
Thaw water drip tray
6
Adjustable height shelves

6
REVIEW OF MECHANICAL CONTROL (see Fig.1)
2 ― Thermostat knob. Connecting the appliance plug to the socket and setting the thermostat
knob 2to any position except for „0“, the appliance starts cooling (a compressor and a blower
run). Turning the thermostat knob clockwise the temperature in the appliance lowers.
3 ― Blower switch. Opening the door, the blower 1switches off.
4 ― On / off switch for interior light. By pressing the button of the double switch 4with the
arrow „downward“, the luminaire 9may be switched on. By pressing the other button with the
arrow “upwards” the luminaire of the promotional shield may be switched on.
PREPARING THE APPLIANCE FOR OPERATION
It is recommended to prepare the appliance for operation with a helper.
Remove boards of foamed polystyrene from the top and the bottom of the appliance.
They are intended for transportation only. Remove adhesive tapes and open the door.
Take out the plug with the supply cord 10 from the water tray 11 (fig. 1) which is
placed under a compressor (this is intended for transportation only.
W he n t h e a p pl i a nc e is run nin g , t he cor d c a n’t b e i n the
tr ay.
Take out two supports 1from a bag and screw them by
screws 2into marked places at the back of a appliance.
Take out the cover 1 from the bag
and insert the cover into the grid 2
placed under the door.
It is permissible the conversion of
the shelf 2. Maximum conversion of
the shelves is obtained by lowering front holders 1by five
steps.
In case of moving the appliance to another place, lift its front
in such a way that its supports couldn’t touch the floor.
In case of adjusting supports, mount the appliance slightly inclined backwards to provide a
spontaneous closing of its doors. It is very important that both front supports would abut on
the floor uniformly.
•If the appliance is brought in from the cold (temperature is not higher than +12 °C),
you should wait for two hours before connecting it to the mains.
The appliance should not be connected to the mains until all packing and
transport materials aren’t removed. Suitably dispose the packaging material.

7
POSITIONING
•Place the appliance in a dry, well ventilated room.
WARNING! The appliance should not be operated in an unheated room
or porch. Place the appliance away from heat sources such as kitchen
stove/oven, radiators, or direct sunlight.
WARNING! The appliance must not touch any pipes for heating, gas or
water supply or any other electrical devices.
•Do not cover the ventilation holes at the top of the appliance –it must be a good air
circulation around the appliance. There should be a gap of at least 10 cm between
the top of the appliance body and any furniture that may be above it. If this
requirement is not followed, the appliance consumes more electrical energy and its
compressor may overheat.
•If the appliance is placed in a corner, a gap of
at least 3 cm must be left between the
appliance body and the wall. Overall space
required for use of the refrigerator.
Overall dimensions for installation of the
refrigerator (see fig.).
•The appliance must stand on a level surface
and must not touch the wall. If necessary,
regulate the height of the appliance by
adjusting the levelling feet: by turning them
clockwise –the front of the appliance rises, by
turning them counter clockwise –it comes
down. If the appliance is tilted slightly
backward –the doors will close by themselves.
TEMPERATURE REGULATION
The temperature in the refrigerator compartment is controlled using the thermostat knob 2(see
fig. 1) by turning it to one side or the other. The temperature indication in digits is shown beside
the thermostat knob.
The temperature is regulated on the scale of five digits.
0= Compressor is switched off WARNING! Electric current is not switched off.
1= highest temperature (lowest cooling)
5= lowest temperature (highest cooling)
If foodstuffs in the refrigerator compartment are too cold, set the thermostat knob to 1, 2or 3. If
foodstuffs in the refrigerator compartment are being chilled not sufficiently, set the thermostat
knob to 4or 5. Please set the desired temperature in the appliance according to your own
requirements.
THE TEMPERATURE IN THE REFRIGERATOR COMPARTMENT MAY VARY DEPENDING ON
AMBIENT TEMPERATURE, THE AMOUNT OF FOODSTUFFS, THE TEMPERATURE OF THE
FOODSTUFFS AND HOW OFTEN THE APPLIANCE DOORS ARE OPENED AND CLOSED.
IF A ROOM IS COOL, THE APPLIANCE COOLS LESS. THE TEMPERATURE IN THE
APPLIANCE MAY THEREFORE RISE. Use the thermostat wheel to set a lower temperature.
8
DEFROSTING
The refrigerator compartment defrosts automatically. Drops of ice that form on the back wall of
the refrigerator compartment thaw during the time the compressor is not working and the
thaw water runs down the thaw water runoff channel to the tray on top of the compressor,
where it evaporates.
CLEANING AND CARE
REGULARLY CLEAN THE APPLIANCE.
Remember that when cleaning the appliance you must disconnect the
appliance from the electrical energy supply socket by pulling the plug
out of the electricity outlet.
•Protect the appliance inner surfaces and plastic parts from fats, acids and sauces. In
case of accidental spills –immediately clean with warm soapy water or dishwashing
detergent. Wipe dry.
•Clean the appliance inner surfaces with warm soapy water. Dishwashing detergent may
also be used.
•Wipe dry inner and outer surfaces.
•Regularly clean the hermetic gaskets of the doors. Wipe dry.
•REGULARLY CLEAN THE THAW WATER CHANNEL SPACE WITH
A SPECIAL CLEANER 7FOR THAT PURPOSE (Fig. 1).
•At least once a year clean dust away from the back part of the
appliance body and the compressor. A soft brush, electrostatic
cloth or vacuum cleaner may be used for cleaning.
•DO NOT use detergents containing abrasive particles, acid,
alcohol or benzene for cleaning the appliance inner and outer
surfaces. DO NOT use for cleaning cloths or sponges that have
coarse surfaces intended for scrubbing. Outer of the doors –glass
–clean with agents intended for glass cleaning.
•IF T H E A P P LI A N CE I S T O B E L E FT S W IT CH E D O FF F OR A N EX T E N D ED
P ER I OD , LE A V E I T S DO O R S O PE N .
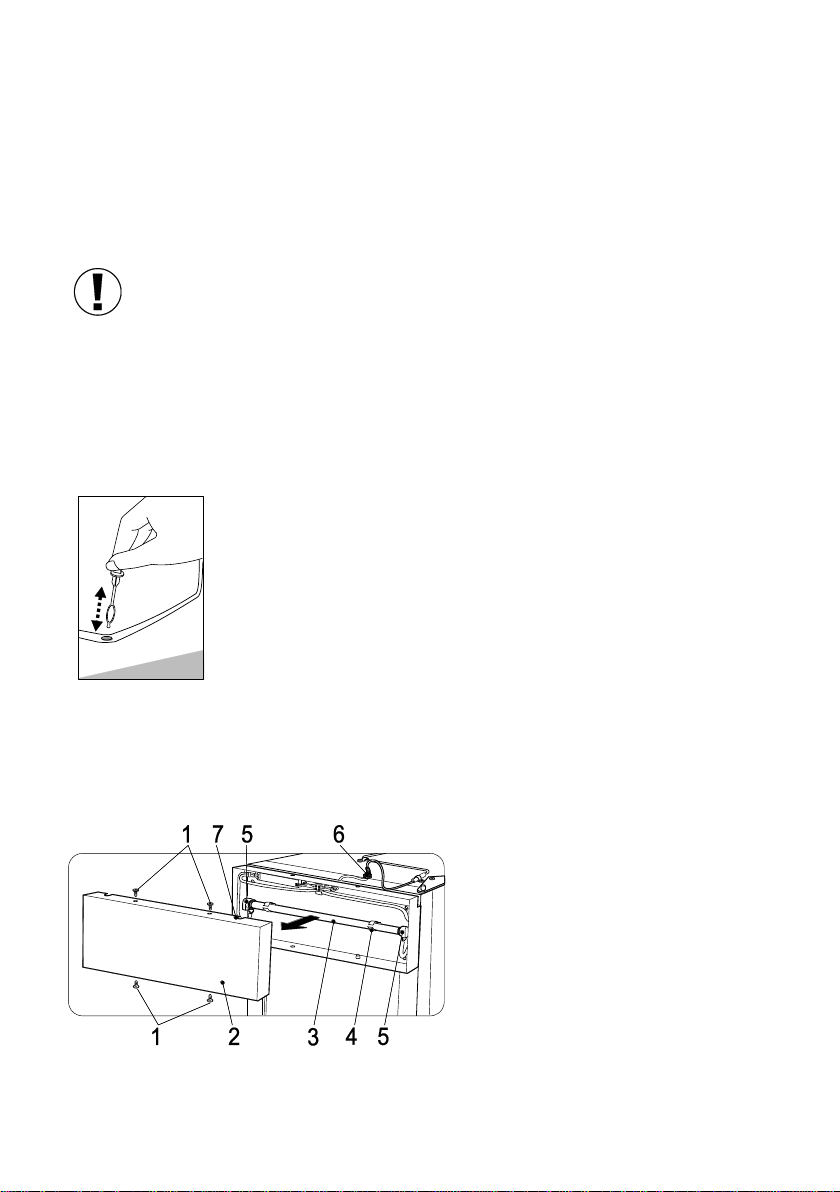
CHANGE OF THE LAMP OF THE PROMOTIONAL SHIELD
1. Turn off the appliance and pull the
plug out of the electricity supply
socket.
2. Unscrew four screws 1. Remove
the cover 2.
3. Take out the lamp 3from lamp
fixing holders 4. Remove lamp
holders from the lamp ends.
4. Change the lamp. Assemble
everything in reverse order.
REMARK. During putting the cover, the cable fixing bushing 6must be inserted into
the hole 7 of the cover.

9
CHANGING THE INTERIOR LIGHT BULB
•Turn off the appliance and pull the plug out of the
electricity supply socket.
•Unscrew the screw 1 and unlink the back wall of the
cover 2from the metal bracket 3 along all cover length
in the direction D (fig. a).
•Starting from the cover bottom and pushing the cover
wall from inside in the direction E, turn the cover acc. to
the arrow F and thus unlink the front cover part (fig. b).
•Remove the cover, turn the lamp by 900clockwise and
remove the lamp 4.
•After changing the lamp, insert the cover as it is shown in
fig. c, pushing it to the direction Gup to the support and
then, turning the cover to the direction H, hang its back
wall on the bracket along all cover length and then screw
it.
1 –screws;
2 –cover;
3 –bracket;
4 - luminescent lamp
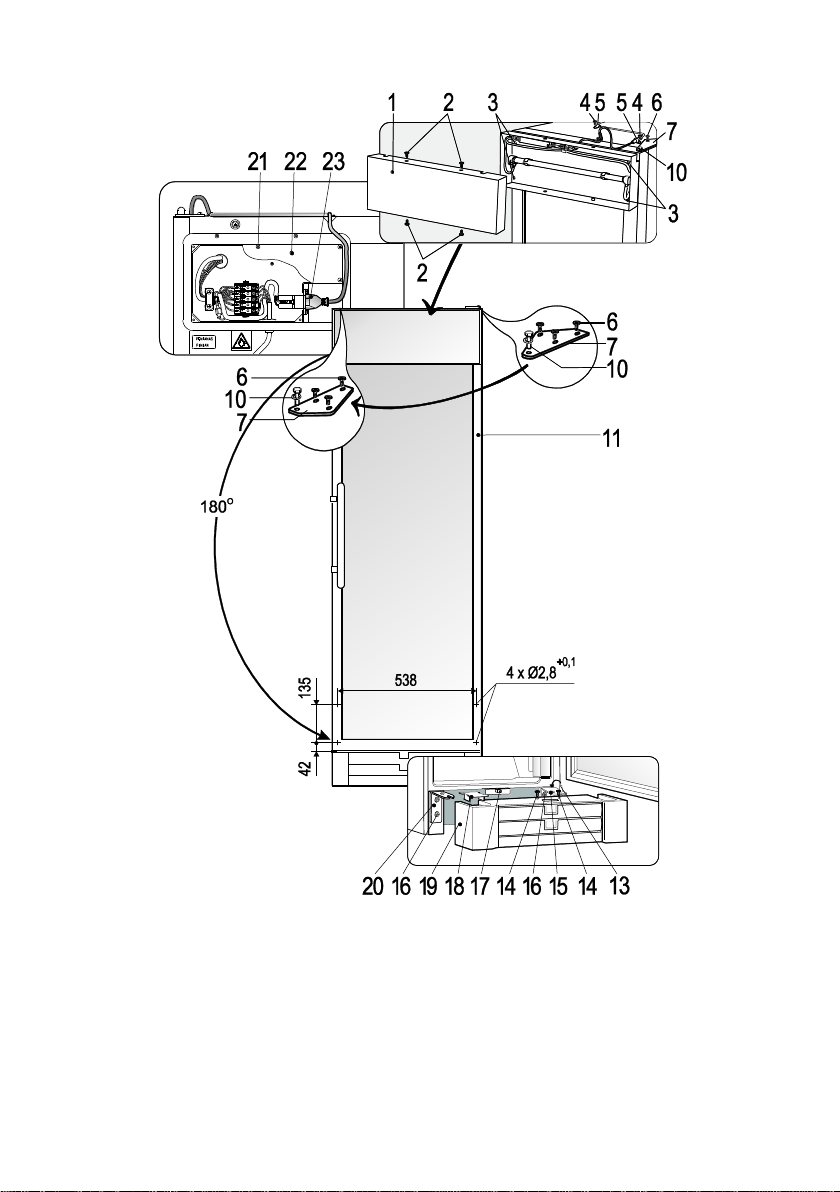
CHANGING THE OPENING DIRECTION OF THE
DOORS
It is recommended that changing the opening direction of the doors should be done
with a helper. You will need two spanners No. 8 and No. 10 and a head screwdriver.
When changing the opening direction of the doors, YOU CAN NOT lay the
appliance horizontally.
Do the actions below in the order they are listed:
WARNING! Turn off the appliance and pull the plug out of the electricity
supply socket.
10
1. Unscrew four fixing screws 2 of the promotional shield 1 and remove the shield;
2. In the front part unscrew two fixing screws 4 of holders 5 of the connection cable of
the promotional shield;
3. In the back part unscrew four screws 21, remove the cover 22 and disconnect the
supply plug 23 of the connection cable;
4. Unscrew four fixing screws 3 of the promotional shield and remove the promotional
shield;
5. Unscrew three fixing screws 6 of the upper door hanging bracket 7 and remove
the bracket together with the axle 10; Raising upwards, remove the door 11;

11
6. Unscrew fixing screws 14 of the bottom grid 19 and remove the grid by unlinking
grid hooks from the cabinet. The lock cam 17 must be in a horizontal position;
7. Remove the cover 18 on the left of the grid to the opposite side;
8. Unscrew four fixing screws 16 of the bottom door bracket 15 and two fixing screws
16 of door holding bracket 20. Remove brackets together with screws and washers.
9. Screw the axle 13 of the bottom door bracket into another threaded hole
symmetrically to a present position;
10. Screw brackets 15 and 20 counterchanging them;
11. Reverse the door by 180°and drill four holes (ø 2,8 +0,1) mm for fixing of the
promotional shield;
12. Hang the door on the left side;
13. Turn the bracket 7 by 180°(before that unscrewing the axle 10 with the spring
washer), screw the axle to the opposite bracket side;
14. Fix the bracket 7 to opposite cabinet side symmetrically to initial position;
15. Screw the bottom grid and fix the promotional shield to the door;
16. Put connection wires together with holders to another side of the cabinet, fix them
and connect the connection cable of the promotional shield.
OPERATION PROBLEMS AND THEIR SOLUTIONS
(TROUBLESHOOTING). What if …
•The appliance is plugged in to the mains but it does not work. Check if your
house electricity supply installations are in order. Check if the plug is correctly
inserted into the electricity supply socket.
•The noise has become louder. Check if the appliance is standing stable, on a level
place. To make it level, regulate the front feet. Check if the appliance is not touching
any furniture and if no part of the refrigeration system at the back part of the
appliance body is touching the wall. Pull the appliance away from any furniture or
walls. Check if the cause of increased noise isn’t due to bottles, cans or dishes in the
appliance that might be touching each other.
•Water has appeared at the bottom of the refrigerator compartment. Check
whether a thaw water channel space isn’t blocked. Clean the thaw water channel
space with a cleaner intended for that purpose.
•Water has appeared under the appliance. The thaw water collection tray has
slipped off the compressor. Place the tray on top of the compressor.
•When the appliance door is opened, the rubber sealing gasket pulls out. The
gasket is smeared with sticky foodstuffs (fat, syrup). Clean the sealing gasket and
the groove for it with warm water containing soap or dishwashing detergent and wipe
dry. Put the rubber sealing gasket back into the place.
•High temperature in appliance, the compressor operation pauses are short.
Ascertain whether the appliance door/doors are shutting tightly, whether the door
wasn’t kept open longer than necessary when taking out or putting in foodstuffs or
whether a large amount of warm food was placed in the appliance.
•The top of the appliance has condensation on it. The ambient relative air humidity is
above 60 %. Ventilate the room where the appliance stands and if possible remove the
cause of the humidity.

12
WARRANTY SERVICE
IF YOUR APPLIANCE IS NOT WORKING PROPERLY, ASCERTAIN WHETHER YOU CAN
REMEDY THE CAUSE OF THE FAULTY FUNCTIONING OF THE APPLIANCE YOURSELF. If
you cannot solve the problem yourself, contact the nearest refrigerator service
representative by telephone or in writing. When making contact necessarily indicate the
refrigerator model 1and number 2. You will find this data on the product label, which
is glued to the wall of the refrigerator compartment.
Table of contents
Other SNAIGE Freezer manuals


