Snap-On PTRS1000 User manual

PTRS1000
Air Reciprocating Saw
1
ZPTRS1000CE Rev. A (07/19)
ORIGINAL INSTRUCTIONS
VERTALING VAN DE OORSPRONKELIJKE GEBRUIKSAANWIJZING
TRADUCTION DES INSTRUCTIONS ORIGINALES
ÜBERSETZUNG DER ORIGINALANLEITUNGEN
TRADUZIONE DELLE ISTRUZIONI ORIGINALI
TRADUCCIÓN DE LAS INSTRUCCIONES ORIGINALES
原文説明書の翻訳

PTRS1000
Air Reciprocating Saw
2
ZPTRS1000CE Rev. A (08/19)
SAFETY INFORMATION
Read these instructions carefully before installing,
operating, servicing or repairing this tool. Keep these
instructions in an accessible place.
Safety Messages
Snap-on Tools Company provides safety messages to
cover reasonable situations that may be encountered
when operating, servicing or repairing air tools. It is the
responsibility of operators and servicing technicians to
be knowledgeable about the procedures, tools and
materials used, and to satisfy themselves that the
procedures, tools and materials will not compromise
their safety, that of others in the work place or the tool.
General Power Tool
Safety Messages
Read all safety warnings and all instructions.
Failure to follow the warnings and instructions may
result in electric shock, fire and/or serious injury.
SAVE ALL
WARNINGS AND
INSTRUCTIONS FOR
FUTURE
REFERENCE
Improper use of power tools and accessories can
cause broken tools.
• Read instructions before operating power tools.
• Be sure these instructions accompany the tool when
passed from one user to a new or inexperienced user.
Broken tools can cause injury.
Power tools can cause flying particles during use.
• Wear safety goggles, user and bystanders.
Flying particles can cause injury.
Power tools generate noise.
• Wear hearing protection, user and bystanders.
Prolonged exposure to noise can cause hearing loss.
Power tools vibrate.
• Avoid prolonged exposure to vibration, repetitive
motions and uncomfortable positions.
• Stopusingthetoolifdiscomfort,tinglingfeelingorpain
occurs. Seek medical advice before resuming use.
Prolonged exposure to vibration, repetitive motions
and uncomfortable positions can cause injury.
Risk of contamination from hazardous dust.
• Wear an approved dust mask or respirator when using
power tools that create dust.
• Some dust created by power sanding, sawing,
grinding, drilling and other construction activities
contains chemicals known to cause cancer, birth
defects or other reproductive harm.
• The sawing of certain materials may create hazardous
dust that may require special breathing apparatus.
Check before using tool.
• If devices are provided for the connection of dust
extraction and collection facilities, ensure these are
connected and properly used. Use of dust collection
can reduce dust-related hazards.
• Be sure that exhaust air does not point toward user or
any other person, material, or substances that could
become contaminated by oil droplets.
Inhaling exhaust air or hazardous dust can cause
injury.
Sudden changes in motion or position can occur
while using the tool.
• Anticipate and be alert for changes in motion during
start up and operation.
• Maintain a secure grip.
• Anticipate reaction force. Adjust your stance and hold
tool securely.

3
ZPTRS1000CE Rev. A (08/19)
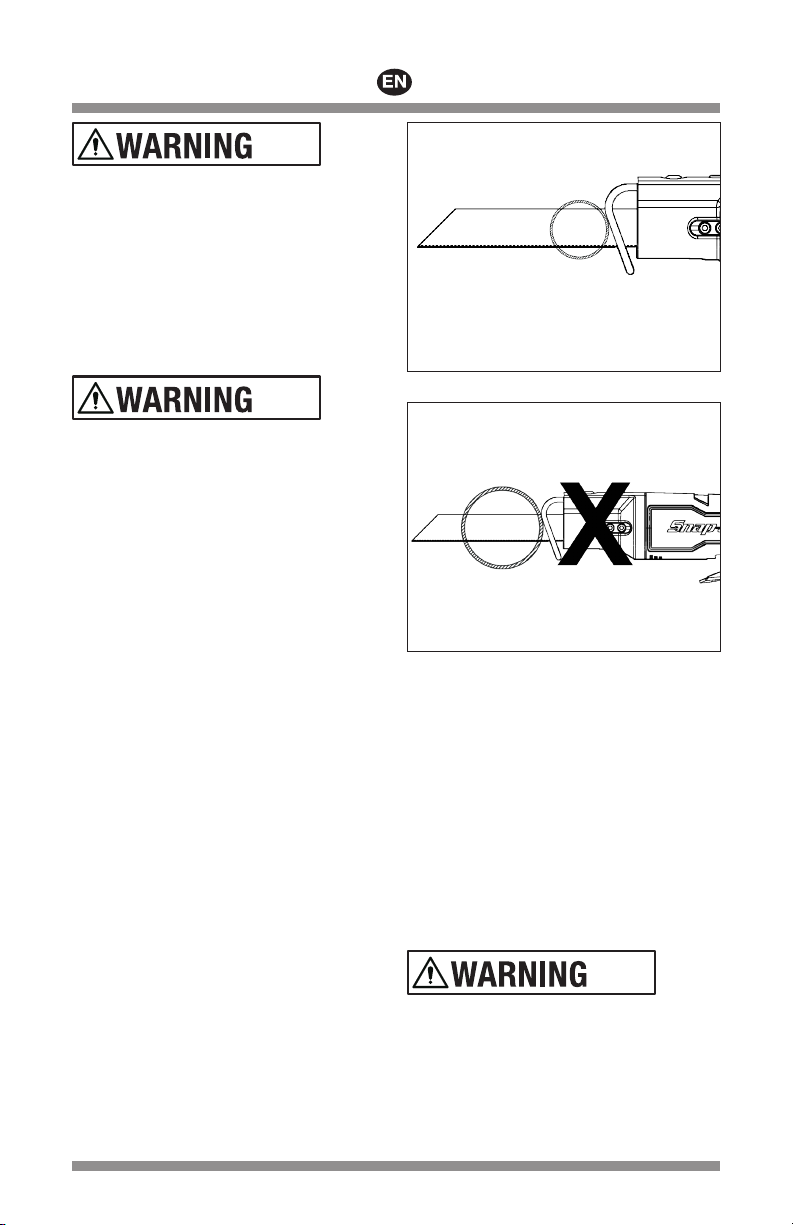
Risk of entanglement.
• Keep body parts away from moving parts.
• Dressproperly.Donotwearlooseclothingorjewellery.
Keep your hair, clothing and gloves away from moving
parts. Loose clothes, jewellery or long hair can be caught
in moving parts.
• Wear protective hair covering to contain long hair.
• Remove adjusting keys or wrenches before turning the
toolon.A wrenchora keyleft attachedto amovingpart of
the power tool may result in personal injury.
• Do not carry tool with your finger on the trigger.
• Do not lock, tape, wire, etc., the trigger in the ON
position.
• Do not use the power tool if the trigger does not turn it
on and off. If the tool fails to turn off by releasing the
trigger, do not drop the tool. Stop air flow using the
emergency shut-off valve. Mark the tool as broken and
have the tool serviced.
• Keep handle dry, clean and free from oil and grease.
• Always shut off air supply and disconnect tool from air
supply when changing accessories. Such preventive
safety measures reduce the risk of starting the power tool
accidentally.
Entanglement can cause injury.
Flammable vapors can explode.
• Do not use near flammable vapors or near a gas line or
gas tank.
• Direct tool exhaust air away from flames or hot
surfaces.
• Donotlubricatetools withflammableor volatileliquids
such as kerosene, diesel or jet fuel.
• Use only recommended lubricants.
Explosion and flames can cause injury.
Sawing metals create sparks that can ignite flammable
materials and vapors.
• Do not operate power tools in explosive atmospheres,
such as in the presence of flammable liquids, gases, or
dust.
Power tools create sparks which may ignite the dust
or fumes.
Lubricating oil is discharged with exhaust air.
• Operate tool in a well-ventilated area.
• Avoid breathing exhaust air.
Breathing air with oil mist can cause injury.
Electricity can cause electric shock.
• Do not use on or near live electrical circuits, or under
the influence of medication, drugs or alcohol.
• This tool is not insulated against electrical shock.
• Donot cutinto existingwalls orother blindareas where
electrical wiring may exist. If this situation is
unavoidable, disconnect all fuses or circuit breakers
feeding this worksite. Cutting accessory contacting a
“live” wire may make exposed metal parts of the power
tool “live” and could give the operator an electric shock.
Electric shock can cause injury
Work area can contain hazards.
• Keep work area clean and well lit. Cluttered or dark
areas invite accidents.
• Keep children and bystanders away while operating a
power tool. Distractions can cause you to lose
control.
• Stay alert, watch what you are doing and use common
sensewhen operatinga powertool. Donot usea power
tool while you are tired or under the influence of drugs,
alcoholor medication. A moment of inattention while
operating power tools may result in serious
personal injury.
• Before using the tool, make sure that a shutoff device
has been fitted on the supply line and the location is
well-known and easily accessible so that the air supply
to the tool can be shut off in an emergency.
• Never lay a tool down until the attachment has stopped
moving.
• Do not overreach. Keep proper footing and balance at
all times. This enables better control of the power
tool in unexpected situations.
• Do not allow bystanders to contact tool.
• Keep bystanders at a safe distance from the work area.
• Wear appropriate protective apparel, users and
bystanders.
• Direct exhaust air to avoid blowing air or debris from
the workpiece onto the user or bystanders.
• When operating in heights, be aware of things below
and around you.
• Whentool isnot inuse, shutoff theair supplyand press
trigger or lever to relieve air pressure.
• If tool is not to be used for a period of time, lubricate it,
disconnectitfrom theair supplyline andstore itin adry
place with moderate temperature.
• Store tools when not being used in a high, dry and
locked area that can not be accessed by children.
Work area hazards can cause injury.

4
ZPTRS1000CE Rev. A (08/19)
Risk of whipping compressed air hoses.
• Attach air lines securely.
• Check the air hose and fittings regularly for wear.
• Do not connect quick-connect couplings directly to the
tool.
• Use a whip air hose no longer than 60” (150 cm).
Whipping compressed air hose can cause injury.
Untrained users can create hazards.
• Use clamps or another practical way to secure and
support the workpiece to a stable platform. Holding the
work by hand or against your body leaves it unstable and
may lead to loss of control.
• Secure material before cutting. Never hold it in your
hand or across legs. Small or thin material may flex or
vibrate with the blade, causing loss of control.
• Use the right tool. Do not use a tool that is too light or
too heavy for the work.
• Use the power tool, accessories and tool bits etc., in
accordance with these instructions, taking into account
the working conditions and the work to be performed.
Use of the power tool for operations different from those
intended could result in a hazardous situation.
• Do not force the power tool. Use the correct power tool
for your application. The correct power tool will do the
job better and safer at the rate for which it was designed.
• Operateair toolsat 90psig(6.2 bar, 620kPa)maximum
air pressure.
• It is expected that users adopt safe working practices
and observe all local, regional or country legal
requirements when installing, using or maintaining
this tool.
Improper repairs or lack of maintenance can create
hazards.
• Do not modify or make temporary repairs. Use only
genuine Snap-on replacement parts for maintenance
and repair. Servicing and repairs should be performed
only by trained personnel.
• Do not use the tool if it vibrates too much, makes
unusual noises, has loose parts, or shows any other
sign of damage.
• If tool malfunctions, discontinue use and immediately
arrange for service and repair. If it is not practical to
remove the tool from service, shut off the tool air
supply, write a warning tag and attach the tag to the
tool.
• Do not remove any manufacturer fitted safety devices
(e.g., wheel guards, safety trigger, speed governors).
• If this tool becomes damaged beyond repair,
disassemble and degrease the tool. Then separate all
parts by material type and recycle.
Improper parts, repair or maintenance can cause
injury.
Air Reciprocating Saw
Safety Messages
Using damaged and incorrect saw accessories can
cause flying particles.
• Do not use chipped, cracked or damaged saw blades.
• Use accessories rated at tool SPM (product specific) or
higher.
• Fully insert and securely tighten blade into the collet
before operating tool.
Flying particles can cause injury.
Avoid contact with the sharp edge of the blade.
• Keep body parts away from the sharp edges of the
blade.
• Never operate the tool with a damaged blade.
• Keepcutting tools sharp andclean. Properly maintained
cutting tools with sharp cutting edges are less likely to
bind and are easier to control.
• Remove the blade from the tool before cleaning or
sharpening the blade.
• Always handle the blades by grasping the blade
housing. Never grasp the sharp edge of the blade.
• When removing the blade from the tool avoid contact
with skin and use proper protective gloves when
grasping the blade or accessory. Accessories may be
hot after prolonged use.
• Operate the tool with the blade pointed away from your
body.
• Maintain power tools. Check for misalignment or
binding of moving parts, breakage of parts and any
other condition that may affect the power tools
operation. If damaged, have the power tool repaired
before use. Many accidents are caused by poorly
maintained power tools.
• Keephandsawayfrom cuttingarea.Do notreachunder
material being cut. The proximity of the blade to your
hand is hidden from your sight.
• Make certain all adjusting screws and the blade are
tight before making a cut. Loose adjusting screws and
clamps can cause the tool or blade to slip and loss of
control may result.
Contacting the sharp blade can cause injury.
SAVE THESE
INSTRUCTIONS
Functional Description

5
ZPTRS1000CE Rev. A (08/19)
Figure 1: PTRS1000
A – Blade Guide
B – Adjustment Bolt
C – Grip
D – Exhaust Reflector
E – Trigger
F – Safety
G – Set Screws
H – Blade
Specifications
PTRS1000
Specifications at 90 psig (6.2 bar, 620 kPa)
Air Pressure, Working ................90 psig (620 kPa)
Free Running Speed .............................9,000 SPM
Air Consumption, Freespeed .. 2.4 CFM (15 SCFM)
Air Inlet Thread Size ..........................1/4"–18 NPT
Air Supply Hose Size.............5/8" ID min (16 mm)
Stroke Length .................................3/8" (9.5 mm)
Length ...........................................8.5" (215 mm)
Weight .........................................1.57 lbs (714 g)
Max Air Supply Hose Length ................ 30’ (10 m)
Noise* (Tested in accordance with ISO 15744)
Sound Pressure Level (A).................87.2 dB
Uncertainty, K.....................................3.0 dB
Sound Power Level (A).....................98.2 dB
Uncertainty, K.....................................3.0 dB
Vibration* (Tested in accordance with ISO 28927)
Vibration Level ..............................10.0 m/s2
Uncertainty, K................................1.49 m/s2
*These declared values were obtained by laboratory
type testing with the stated standards and are not
adequate for use in risk assessments. Values
measured in individual work places may be higher.
Values and risk of harm experienced by an
individual user are unique and depend upon the
environment and manner in which the user works,
the work piece and the workstation design, as well
as upon the exposure time and the physical
condition of the user.
Snap-on disclaims liability for the consequences of
using the declared values, instead of values
reflecting the actual exposure determined in an
individual risk assessment in a work place situation
over which we have no control.
Applications
Snap-on PTRS1000 Air Saw is a versatile, easy to use
tool with a dual-chuck mechanism allowing the additional
use of 0.035" thick reciprocating saw blades up to 6" in
length.
The tool is designed to cut through plastic, rubber, wood,
sheet metal, and up to 1/8" mild steel. Your tool includes
an ergonomic grip, 360-degree adjustable exhaust
deflector, and a variable speed paddle style trigger.
Air Supply
Air tools operate best on clean, moisture-free, well-
lubricated air at a constant pressure of 90 psig (6.2 bar,
620 kPa) maximum.
Figure 2: Air Supply
A – Receiver Tank, Minimum 40 Gallon
(151.5 liters)
B – Compressor, Sufficient Capacity
C – Drain, Daily
D – Pipe and Fittings, Minimum 1/2”
E – Top Air Intake
F – Shut Off Valve, Easily Reached
G – Filter
H – Air Regulator, Set at Working Pressure
I – Lubricator
J – Air Tool Connection
K – Low Spot, Water Trap
L – Drain, Daily
Piping System
The piping system should be large enough to avoid an
excessive pressure drop under maximum flow
conditions. All pipe fittings and hose outlets should be
1/2" and should be arranged so there are no low spots
that collect water which cannot be drained daily. Do not
use an air hose less than 3/8" ID or one that is too long
because pressure drop under maximum flow conditions
could reduce performance.
√Accessories are available for air tight connections.
AB
H
CD
G
F
E

6
ZPTRS1000CE Rev. A (08/19)
Air Compressor
The air compressor should have sufficient capacity to
deliver 2.4 cfm (15 SCFM) at 90 psig (6.2 bar,
620 kPa) at each outlet while the tool is running. The
receiver tank should have sufficient capacity to provide
surge balance for each air tool.
Filter
The Snap-on AHR424 Filter, or equivalent, should be
used to assure clean air for the tool. Water, dirt and scale
act as abrasives which could damage the air tool. A filter
unit should be installed between the compressor and the
air regulator and air lubricator.
Air Regulator
Regulated air pressure is necessary for proper
performance of the tool. The Snap-on AHR426
Regulator, or equivalent, will adjust and maintain the
recommended air pressure of 90 psig (6.2 bar, 620kPa).
Pressure less than this reduces efficiency, while pressure
greater than this increases blows and speed beyond the
rated capacity—creating potential hazards and possible
damage to the air tool. Check the air pressure at the
regulator while using the tool in a normal manner.
Air Line Lubricator
√Do not use a heavy grade of oil because stalling and
low performance will result.
The preferred method of lubricating the air motor is to
use an air line lubricator such as the Snap-on AHR428
Lubricator. It should be filled with Snap-on IM6 Air Motor
Oil or a good grade of SAE10W oil.
If an air line lubricator is not used, lubricate the air motor
by injecting approximately 1/8oz. (3.7 ml) of IM6 Air
Motor Oil into the air inlet of the tool each day before
using it. IM6 Oil is specially formulated for air tools and
no flushing solvent is needed.
Flushing
If the unit seems sluggish apply 3 or 4 squirts of IM6 Air
Motor Oil into the air inlet of the tool each day before
using, and again at the end of each work day.
Operation
Safety
Your tool is equipped with a trigger safety mechanism.
The trigger safety functions to prevent accidental start. In
order to use the tool, first rotate the safety forward and
then apply pressure to the trigger to achieve the desired
speed. (Figure 3)
Figure 3: Safety Operation
Variable Speed Paddle
Trigger
Your tool is equipped with a variable speed paddle
trigger. The tool can be turned “ON” or “OFF” by
squeezing or releasing the trigger. The blade plunger
stroke rate can be adjusted from the minimum to
maximum labeled stroke rate by the distance you
depress the trigger. Apply more pressure to increase the
speed and release pressure to decrease speed.
High speed settings are generally used for fast cutting or
when softer cutting materials such as wood, composite
materials, and plastics. Slower speed settings are
generally used when precision is required or when
cutting harder materials. Materials typically cut using
slower speeds include sheet metal, conduit and pipe.
Exhaust Deflector
Your tool is equipped with a 360 degree exhaust
deflector. Rotate the exhaust deflector in a position so
that debris is not directed toward the user or bystanders.
Always wear a mask, goggles, and hearing protection
to avoid injury. Exposure to debris can cause respiratory
irritation.
Air Strainer (PTRS1000)
An air strainer is built into the removable air inlet bushing
located at the rear of the tool. To clean, remove the
bushing and use an air hose to blow dirt and other
particles from the screen and bushing. Torque the air
inlet bushing to 120-140 in. lb. (13.6-15.8 N•m).
Preparing the Saw
Blade Selection
No one blade can be efficient on all cutting jobs. Different
materials require specially designed blades. Since your
reciprocating saw can cut so many materials, many
types of Snap-on blades are available. Be sure to use the
proper blade to insure proper cutting performance.
1
2

7
ZPTRS1000CE Rev. A (08/19)
Disconnect the air hose before changing blades.
IT IS NOT RECOMMENDED TO INSTALL THE BLADE
UPSIDE DOWN.
DO NOT REMOVE HOT BLADES.
ONLY USE RECOMMENDED BLADES. USING TOO
LONG OR TOO COARSE BLADES CAN RESULT IN
INJURY.
ONLY USE THE SUPPLIED SNAP-ON SET SCREWS
(SEE PARTS LIST). Using generic set screws on the
PTRS1000 can cause the blade to loosen during use,
resulting in injury.
CHECK SET SCREWS FOR LOOSENING AFTER
EXTENDED USE OR STORAGE.
Installing Blades
1. Users and bystanders should always wear safety
goggles around power tools.
2. Disconnect the tool from the air line.
3. Using the supplied hex tool, loosen both set screws
approximately 3 full rotations so that the blade can
slide in freely.
IT IS NOT NECESSARY TO FULLY REMOVE THE SET
SCREWS IN ORDER TO INSERT THE BLADE.
4. Place the blade in the collet and slide it in UNTIL IT
BOTTOMS OUT. You should hear a faint metallic
clicking when the blade bottoms out – if you do not
hear this and are using a painted blade, check to make
sure the paint is not binding on the collet. For your
safety, do not handle a hot blade.
5. Tighten the rear-most set screw (closest to the grip)
to 15-20 in-lbs.
6. Tighten the front-most set screw to 15-20 in-lbs. If
you are using the PTRS1000 with a 6" blade, this set
screw must align with the hole in the saw blade. (fig 5)
7. Pull on an unsharpened surface of the blade to ensure
it is secure. If it is loose, re-adjust as necessary.
8. Connect the tool to the air line and test the blade,
slowly increasing speed. Do not point the tool toward
anyone while doing this.
9. Use the saw as directed.
Note: Saw blades thicker than 0.057" should not be used.
Figure 4: PTRS1000 Set Screw Alignment
Removing Blades
After the tool has been set aside to cool down, loosen
both set screws and pull to remove the blade.
Adjusting the Blade Guide
(Depth of Cut)
The blade guide acts to absorb the cutting force against
the workpiece. If cutting in a location where clearance is a
concern, move the blade guide forward to adjust the
depth of cut. Using the supplied hex tool, loosen the
adjustment bolt (front-most bolt with the washer) to
adjust theblade guide forward orbackward as necessary.
Securely tighten the adjustment bolt before using the
tool.
If the depth of cut is not deep enough with a standard air
saw blade, the PTRS1000 is equipped with a dual-chuck
mechanism that allows it to use reciprocating saw blades
up to 6 inches in length.
DO NOT OPERATE THE TOOL WITHOUT THE BLADE
GUIDE PROPERLY INSTALLED.
Figure 5: Blade Guide Adjustment

8
ZPTRS1000CE Rev. A (08/19)
Do not use specialty blades that are very short or those
with a significant cant. Blade must not contact blade
guide. A blade which is too short or canted could jam
inside the blade guide and snap.
Using the Saw
—Securely clamp the work.
—Mark the line of cut and firmly grasp the tool
while cutting.
—Do not use the saw to attempt plunge/pocket
cuts. Always drill a starting hole.
If you saw into a blind area where live wiring exists, you
may be shocked or electrocuted.
—Keep the saw blade guide firmly against the
work to minimize counter-force (jumping) and
vibration.
—Squeeze the trigger to start the tool. Let the
saw reach full speed before starting the cut.
Guide the saw so that the blade will move
along the marked line.
Sawing Tips
Following a few simple tips will reduce the wear on the
workpiece, the tool and the operator.
—Blades cut on the draw or back stroke. On fine
work, such as paneling, fiberglass, etc., place
the good side of workpiece facing down.
—Use the correct saw blade for the material
being cut and keep extra blades on hand to use
when others become dull. Replace cracked or
bent blades immediately.
—Use the appropriate cutting speed and select
the appropriate cutting depth.
—To reduce the risk of injury, be sure the blade
always extends beyond the blade guide and
work throughout the stroke (Figure 6). Blades
may shatter if the front on the blade hits the
work and/or the blade guide (Figure 7).
—Maintain a minimum of three (3) teeth engaged
in the work. Finer teeth produce a smoother
but slower cut.
Figure 6: Correct
Figure 7: Not Correct
When cutting metal
—Apply a lubricant for easier, smoother, faster
cutting and longer blade life.
—For non-ferrous metals, aluminum, bronze or
brass, use a stick wax on the blade.
—For ferrous metals, iron and steel, use machine
or cutting oil along the surface to be cut.
—When cutting thin metal, “sandwich” the
material between two pieces of scrap wood.
Clamp or put in a bench vise. One piece of
lumber on top of the metal can be used with
adequate clamping. Place your cut lines or
design on the wood.
—Don’t force the cutting. Let the saw and blade
do the work.
The use of any accessories not specified in this manual
may create a hazard

9
ZPTRS1000CE Rev. A (08/19)
Service Instructions
Service of a tool requires extreme care and knowledge.
Service should be performed only by a qualified service
technician.
• Always check tool for damaged parts before use.
• Replace or repair damaged parts before use. Check
alignment of moving parts. Binding of moving parts or
broken parts may alter operation.
• Have damaged parts properly repaired or replaced by an
Authorized Service Center.
• Do not use tool if trigger does not turn it on and off.
• Maintain tools. Keep tools dry, clean and free of oil and
grease for better and safer performance.
• Forthe location of the nearestSnap-on repaircenter, call
Snap-on customer service at 1-877-762-7664.
Torque Specifications -
PTRS1000
Inlet Bushing ....... 120-140 in. lb. (13.6-15.8 N•m)
Set Screws ................. 15-20 in. lb. (1.7-2.3 N•m)
Adjustment Bolt ... ...... 15-20 in. lb. (1.7-2.3 N•m)
Inlet Adapter ............... 40-60 in. lb. (4.5-6.8 N•m)

PTRS1000
Pneumatische
reciprozaag
10
ZPTRS1000CE Rev. A (08/19)
VEILIGHEIDSINFORMATIE
Lees deze gebruiksaanwijzing aandachtig voordat u dit
gereedschap installeert, bedient of er onderhoud of
reparaties aan uitvoert. Bewaar deze gebruiksaanwijzing
op een gemakkelijk bereikbare plaats.
Veiligheidsinstructies
Snap-onTools Company biedt veiligheidsinstructies voor
situaties die redelijkerwijs kunnen ontstaan tijdens
gebruik, onderhoud of reparatie van pneumatisch
gereedschap. Het is de verantwoordelijkheid van
gebruikers en onderhoudsmonteurs om de procedures
en het gebruikte gereedschap en de gebruikte materialen
goed te kennen en om zelf te controleren of de
procedures, het gereedschap en de materialen geen
negatieve gevolgen zullen hebben voor de eigen
veiligheid, voor die van anderen in de werkomgeving en
voor het gereedschap.
Algemene veiligheidswaar-
schuwingen voor
pneumatisch/elektrisch
gereedschap
Lees alle veiligheidswaarschuwingen en instructies.
Het niet opvolgen van de waarschuwingen en instructies
kan een elektrische schok, brand en/of ernstig letsel
veroorzaken.
BEWAAR ALLE
WAARSCHUWINGEN
EN INSTRUCTIES
VOOR TOEKOMSTIG
GEBRUIK
Pneumatisch gereedschap en accessoires kunnen
door onjuist gebruik defect raken.
• Lees de gebruiksaanwijzing voordat u pneumatisch
gereedschap bedient.
• Zorg dat deze gebruiksaanwijzing bij het gereedschap
blijft wanneer de gebruiker het aan een nieuwe of
onervaren gebruiker doorgeeft.
Defect gereedschap kan letsel veroorzaken.
Pneumatisch gereedschap kan tijdens het gebruik
rondvliegende deeltjes veroorzaken.
• Draag een veiligheidsbril, dit geldt zowel voor
gebruiker als omstanders.
Rondvliegende deeltjes kunnen letsel veroorzaken.
Pneumatisch gereedschap maakt lawaai.
• Draag gehoorbescherming, dit geldt zowel voor
gebruiker als omstanders.
Langdurige blootstelling aan lawaai kan leiden tot
gehoorverlies.
Pneumatisch gereedschap trilt.
• Vermijd langdurige blootstelling aan trilling,
herhaalde bewegingen en ongemakkelijke houdingen.
• Staak het gebruik van het gereedschap als u ongemak,
een tintelend gevoel of pijn ondervindt. Raadpleeg een
arts voordat u het gereedschap weer gebruikt.
Langdurige blootstelling aan trilling, herhaalde
bewegingen en ongemakkelijke houdingen kunnen
letsel veroorzaken.
Besmettingsgevaar door gevaarlijk stof.
• Draag een goedgekeurd stofmasker of
ademhalingsapparaat bij gebruik van pneumatisch
gereedschap dat stof produceert.
• Sommige soorten stof die worden geproduceerd door
pneumatischschuur-,zaag-, slijp-enboorgereedschap
of andere bouwwerkzaamheden bevatten chemische
stoffen waarvan bekend is dat deze kanker,
geboorteafwijkingen of andere voortplantings-
problemen veroorzaken.

11
ZPTRS1000CE Rev. A (08/19)
• Bij het zagen van bepaalde materialen kan gevaarlijke
stof vrijkomen, zodat hierbij speciale
ademhalingsapparatuur moet worden gedragen.
Controleer dit voordat u het gereedschap gebruikt.
• Zorg dat eventueel meegeleverde accessoires voor de
aansluiting van stofafvoer- en opvangsystemen
worden aangesloten en goed worden gebruikt. Gebruik
van een stofopvangsysteem kan gevaren door stof
verminderen.
• Zorgt dat de afvoerlucht niet is gericht op de gebruiker
of personen, materialen of stoffen die door
oliedruppels verontreinigd zouden kunnen worden.
Inademen van afvoerlucht of gevaarlijk stof kan letsel
veroorzaken.
Er kunnen plotselinge veranderingen van beweging of
positie ontstaan tijdens het gebruik van het
gereedschap.
• Anticipeer en wees alert op bewegingsveranderingen
tijdens starten en gebruik.
• Houd het gereedschap goed vast.
• Anticipeer op reactiekrachten. Pas uw houding aan en
houd het gereedschap stevig vast.
Gevaar van verstrikking.
• Houd lichaamsdelen uit de buurt van bewegende
delen.
• Draag de juiste kleding. Draag geen losse kleding of
sieraden. Houd haar, kleding en handschoenen uit de
buurt van bewegende delen. Losse kleding, sieraden en
lang haar kunnen door bewegende delen worden
gegrepen.
• Stop lang haar weg in een haarnet.
• Verwijder stel- of moersleutels voordat u het
gereedschap inschakelt. Een stel- of moersleutel die aan
een bewegend deel van het pneumatische gereedschap
vastzit, kan lichamelijk letsel veroorzaken.
• Draag het gereedschap niet met uw vinger op de knop.
• Zet de knop niet met tape, draad etc. vast in de AAN-
stand.
• Gebruik het pneumatische gereedschap niet als het
niet met de schakelaar kan worden in- en
uitgeschakeld. Als het gereedschap niet wordt
uitgeschakeld als u de knop loslaat, laat het gereedschap
dan niet vallen. Stop de luchtstroom met behulp van de
noodafsluiter. Voorzie het gereedschap van een
aanduiding dat het defect is en laat het repareren.
• Houd het handvat droog, schoon en vrij van olie en vet.
• Schakel de luchttoevoer altijd uit en koppel het
gereedschap los van de luchttoevoer als u accessoires
vervangt. Deze voorzorgsmaatregelen verminderen het
risico dat het pneumatische gereedschap per ongeluk
wordt gestart.
Verstrikking kan letsel veroorzaken.
Ontvlambare dampen kunnen ontploffen.
• Niet gebruiken in de buurt van ontvlambare dampen of
een gasleiding of gastank.
• Richt de afvoerlucht van het gereedschap niet op open
vuur of hete oppervlakken.
• Smeer het gereedschap niet met ontvlambare of
vluchtige vloeistoffen zoals kerosine, diesel of
vliegtuigbrandstof.
• Gebruik alleen aanbevolen smeermiddelen.
Explosie en vlammen kunnen letsel veroorzaken.
Bij het zagen van metalen ontstaan vonken die
ontvlambare materialen en dampen kunnen
ontsteken.
• Gebruik pneumatisch gereedschap niet in een
explosieve omgeving zoals in de buurt van
ontvlambare vloeistoffen, gassen of stof.
Bij het gebruik van pneumatisch gereedschap
ontstaan vonken die de stof of dampen kunnen
ontsteken.
Er wordt smeerolie uitgeblazen met de afvoerlucht.
• Gebruik het gereedschap in een goed geventileerde
ruimte.
• Voorkom inademing van de afvoerlucht.
Inademen van lucht met oliedamp kan letsel
veroorzaken.
Elektriciteit kan een elektrische schok veroorzaken.
• Niet gebruiken op of in de buurt van onder spanning
staande elektrische circuits of wanneer u onder de
invloed van medicijnen, drugs of alcohol bent.
• Dit gereedschap is niet geïsoleerd tegen elektrische
schokken.
• Zaag niet in bestaande wanden of andere blinde
plaatsen met mogelijk elektrische bedrading. Als dit
onvermijdelijk is, moeten alle zekeringen of
stroomonderbrekers naar de betreffende plaats worden
uitgeschakeld. Zaaggereedschap dat met een onder
stroom staande draad in contact komt, kan blootliggende
metalen onderdelen van het pneumatische gereedschap
onder stroom zetten en de gebruiker een elektrische
schok bezorgen.
Elektrische schokken kunnen letsel veroorzaken
De werkomgeving kan gevaren bevatten.
• Houd de werkomgeving schoon en goed verlicht. Een
rommelige of donkere werkomgeving nodigt uit tot
ongevallen.
• Houd kinderen en omstanders uit de buurt tijdens het
gebruik van pneumatisch gereedschap. Door afleiding
kunt u de macht over het gereedschap verliezen.
• Blijf alert, let op wat u doet en gebruik uw gezonde
verstand tijdens het gebruik van pneumatisch
gereedschap. Gebruik pneumatisch gereedschap niet
als u vermoeid of onder de invloed van
geneesmiddelen, drugs of alcohol bent. Een moment
van onoplettendheid tijdens het gebruik van pneumatisch
gereedschap kan ernstig lichamelijk letsel veroorzaken.

12
ZPTRS1000CE Rev. A (08/19)
• Controleer voordat u het gereedschap gebruikt of de
voedingsleiding is uitgerust met een afsluiter en zorg
dat deze plaats goed bekend en gemakkelijk
toegankelijk is zodat de luchttoevoer naar het
gereedschap in een noodsituatie kan worden
afgesloten.
• Leg een gereedschap nooit neer voordat het hulpstuk
tot stilstand is gekomen.
• Reik niet te ver. Zorg altijd voor het juiste houvast en
evenwicht. Dit zorgt voor een betere controle over het
pneumatische gereedschap in onverwachte situaties.
• Staniet toe dat omstanders het gereedschap aanraken.
• Houd omstanders op een veilige afstand van de
werkomgeving.
• De gebruiker en omstanders moeten passende
beschermende kleding dragen.
• Richt de afvoerlucht zo dat deze lucht of het afval niet
van het werkstuk naar de gebruiker of omstanders
wordt geblazen.
• Let bij het werken op hoogte op dingen onder en
rondom u.
• Als het gereedschap niet wordt gebruikt, schakelt u de
luchttoevoeruiten druktu deknop inom deluchtdruk te
laten ontsnappen.
• Als het gereedschap langere tijd niet wordt gebruikt,
moet het worden gesmeerd, van de persluchtleiding
worden losgekoppeld en op een droge plaats met
gemiddelde temperatuur worden bewaard.
• Bewaar ongebruikt gereedschap op een hoge, droge
en vergrendelde plaats die voor kinderen niet
toegankelijk is.
Gevaren in de werkomgeving kunnen letsel
veroorzaken.
Risico van rondzwaaiende persluchtslangen.
• Maak luchtleidingen stevig vast.
• Controleer de luchtslang en -aansluitingen regelmatig
op slijtage.
• Sluit snelkoppelingen niet direct aan op het
gereedschap.
• Gebruik een zwaaibestendige luchtslang van ten
hoogste 150 cm (60 inch).
Rondzwaaiende persluchtslangen kunnen letsel
veroorzaken.
Onervaren gebruikers kunnen gevaren veroorzaken.
• Gebruik klemmen of andere middelen om het werkstuk
te ondersteunen en aan een stabiel platform te
bevestigen. Het werkstuk met uw hand of tegen uw
lichaam vasthouden is onstabiel en u kunt er de macht
over het gereedschap door verliezen.
• Bevestig het materiaal voordat u begint te zagen. Houd
het nooit in uw hand of op uw benen. Klein of dun
materiaal kan met het zaagblad meebewegen of -trillen,
waardoor u de macht over het gereedschap kunt
verliezen.
• Gebruik het juiste gereedschap. Gebruik geen
gereedschap dat te licht of te zwaar is voor het werk.
• Gebruik het pneumatische gereedschap en de
accessoires en hulpmiddelen zoals boortjes enz.
volgens deze gebruiksaanwijzing en houd daarbij
rekening met de werkomstandigheden en het uit te
voeren werk. Als het pneumatische gereedschap niet
voorhet beoogdedoel wordtgebruikt, zoueen gevaarlijke
situatie kunnen ontstaan.
• Forceer het pneumatische gereedschap niet. Gebruik
het juiste pneumatisch gereedschap voor de
toepassing. Met het juiste pneumatisch gereedschap
wordt het werk beter en veiliger uitgevoerd, en met de
snelheid waarvoor het werd ontworpen.
• Gebruik pneumatisch gereedschap met een maximale
luchtdruk van 6,2 bar, 620 kPa (90 psig).
• Gebruikers worden geacht veilig te werken en te
voldoen aan alle plaatselijke, regionale of nationale
wettelijkeeisen tijdensde installatie,het gebruikof het
onderhoud van dit gereedschap.
Verkeerde reparaties of gebrek aan onderhoud kunnen
gevaren veroorzaken.
• Breng geen wijzigingen aan en voer geen tijdelijke
reparaties uit. Gebruik alleen oorspronkelijke Snap-on
reserveonderdelen voor onderhoud en reparatie.
Onderhoud en reparaties mogen alleen door daartoe
getraind personeel worden uitgevoerd.
• Gebruik het gereedschap niet als het te veel trilt,
ongewone geluiden maakt, losse onderdelen heeft of
andere tekenen van beschadiging vertoont.
• Stop als het gereedschap niet goed werkt en zorg
onmiddellijk voor onderhoud en reparatie. Als het niet
praktisch is om het gereedschap buiten bedrijf te
stellen, moet de luchttoevoer naar het gereedschap
worden uitgeschakeld en moet een
waarschuwingslabel worden geschreven en aan het
gereedschap worden bevestigd.
• Verwijder geen door de fabrikant aangebrachte
veiligheidsvoorzieningen (bijv. wielkappen,
veiligheidsknoppen, toerentalregelaars).
• Als dit gereedschap beschadigd raakt en niet meer kan
worden gerepareerd, moet het gedemonteerd en
ontvet worden. Scheid vervolgens alle onderdelen op
basis van materiaaltype en recycle ze.
Onjuiste onderdelen of verkeerd uitgevoerde
reparaties of onderhoudsprocedures kunnen letsel
veroorzaken.
Veiligheidsinstructies voor
de pneumatische
reciprozaag
Het gebruik van beschadigde en verkeerde
zaagaccessoires kan leiden tot rondvliegende deeltjes.
• Gebruik geen gebroken, gebarsten of beschadigde
zaagbladen.

13
ZPTRS1000CE Rev. A (08/19)
• Gebruik accessoires die goedgekeurd zijn voor het
aantal slagen per minuut (SPM) van het gereedschap
(productspecifiek), of hoger.
• Steek het blad helemaal in de spanhuls en zet het goed
vast voordat u het gereedschap gebruikt.
Rondvliegende deeltjes kunnen letsel veroorzaken.
Vermijd aanraking van de scherpe randen van het
blad.
• Houd lichaamsdelen uit de buurt van de scherpe
randen van het blad.
• Gebruik het gereedschap nooit met een beschadigd
blad.
• Houd zaaggereedschap scherp en schoon. Goed
onderhouden zaaggereedschap met scherpe snijranden
komt minder snel vast te zitten en is gemakkelijker te
gebruiken.
• Verwijder het blad uit het gereedschap voordat u het
blad reinigt of slijpt.
• Pak de bladen altijd bij de bladsteel vast. Pak nooit de
scherpe rand van het blad vast.
• Bij het verwijderen van het blad uit het gereedschap
moet u contact met de huid vermijden en passende
beschermende handschoenen dragen wanneer u het
blad of de accessoire vastpakt. Accessoires kunnen na
lang gebruik heet zijn.
• Gebruik het gereedschap met het blad van uw lichaam
af gericht.
• Houd pneumatisch gereedschap in goede staat.
Controleer op verkeerd uitgelijnde of vastzittende
bewegende delen, gebroken onderdelen en alle
andere toestanden die van invloed kunnen zijn op de
werking van het pneumatische gereedschap. Laat
beschadigd pneumatisch gereedschap vóór gebruik
repareren. Veel ongevallen worden veroorzaakt door
slecht onderhouden pneumatisch gereedschap.
• Houd uw handen uit de buurt van de zaagplaats. Reik
niet onder materiaal dat wordt gezaagd. U kunt dan niet
zien hoe dicht uw hand bij het blad is.
• Zorg dat alle stelschroeven en het blad goed vastzitten
voordat u begint te zagen. Losse stelschroeven en
klemmenkunnen ertoeleiden dathet gereedschapof blad
losraakt, waardoor u de macht over het gereedschap kunt
verliezen.
Contact met het scherpe blad kan letsel veroorzaken.
BEWAAR DEZE
GEBRUIKSAANWIJ-
ZING
Functiebeschrijving
Afbeelding 1: PTRS1000
A. Bladgeleider
B. Stelbout
C. Handvat
D. Afvoerluchtdeflector
E. Bedieningsknop
F. Beveiligingsmechanisme
G. Stelschroeven
H. Blad
Specificaties
PTRS1000
Specificaties bij 6,2 bar/620 kPa (90 psig)
Luchtdruk, tijdens bedrijf ..........620 kPa (90 psig)
Vrijlooptoerental ................................. 9.000 SPM
Luchtverbruik, vrijloop .......... 2,4 SCFM (15 CFM)
Draadmaat luchtinlaat ................18 NPT - 1/4 inch
Afmeting luchttoevoerslang
.......................Binnendiameter 9,5 mm (3/8 inch)
Slaglengte..................................16 mm (5/8 inch)
Lengte......................................215 mm (8,5 inch)
Gewicht........................................714 g (1,57 lbs)
Max. lengte luchttoevoerslang ........... 10 m (30 ft)
Geluid* (getest volgens ISO 15744)
Geluidsdrukniveau (A)..................... 87,2 dB
Onzekerheid, K .................................. 3,0 dB
Geluidsvermogensniveau (A) ...........98,2 dB
Onzekerheid, K .................................. 3,0 dB
Trilling* (getest volgens ISO 28927)
Trillingsniveau.............................. 10,0 m/s2
Onzekerheid, K ..............................1,49 m/s2
*De hierboven vermelde waarden werden
verkregen via laboratoriumtests volgens de
aangegeven normen en zijn onvoldoende om
risico’s te beoordelen. De in individuele
werkplaatsen gemeten waarden kunnen hoger zijn.
De waarden en het risico op letsel die een
persoonlijke gebruiker ondervindt, zijn uniek en
afhankelijk van de omgeving en de werkwijze van de
gebruiker, van het werkstuk en van het ontwerp van
het werkstation, alsmede van de blootstellingstijd
en lichamelijke conditie van de gebruiker.
AB
H
CD
G
F
E

14
ZPTRS1000CE Rev. A (08/19)
Snap-on aanvaardt geen aansprakelijkheid voor de
gevolgen van het gebruik van de opgegeven
waarden, in plaats van waarden die de werkelijke
blootstelling weergeven, zoals bepaald in een
individuele risicobeoordeling in een werksituatie
waarover wij geen controle hebben.
Toepassingen
De Snap-on PTRS1000 pneumatische zaag is een
veelzijdig, gebruiksvriendelijk gereedschap met een
dubbel spankopmechanisme waarmee ook 0,89 mm
(0,035 inch) dikke en max. 152,4 mm (6 inch) lange
reciprozaagbladen kunnen worden gebruikt.
Het gereedschap is ontworpen om door kunststof,
rubber, hout, plaatstaal en tot 1/8 “zacht staal te snijden.
3,175 mm (1/8 inch) zachtstaal. Het gereedschap is
voorzien van een ergonomisch handvat, een 360°
verstelbare afvoerluchtdeflector en een peddelvormige
bedieningsknop voor variabel toerental.
Luchttoevoer
Pneumatisch gereedschap werkt het best met schone,
vochtvrije, goed gesmeerde lucht bij een constante druk
van maximaal 6,2 bar, 620 kPa (90 psig).
Afbeelding 2: Luchttoevoer
I. Luchtreservoir, minimum 151,5 liter
(40 gallon)
J. Compressor, voldoende capaciteit
K. Aftappunt (dagelijks te gebruiken)
L. Pijp en koppelingen, minimaal 12,7 mm
(1/2 inch)
M. Bovenste luchtinlaat
N. Afsluiter, gemakkelijk te bereiken
O. Filter
P. Luchtregelaar, ingesteld op werkdruk
Q. Smeerinrichting
R. Aansluiting voor pneumatisch gereedschap
S. Laag punt, waterafscheider
T. Aftappunt (dagelijks te gebruiken)
Leidingsysteem
Het leidingsysteem moet groot genoeg zijn om een
overmatige drukdaling te voorkomen onder maximale
doorstroomomstandigheden. Alle leidingkoppelingen en
slanguitlaten moeten 12,7 mm (1/2 inch) zijn en moeten
zo zijn aangelegd dat er geen lage plekken zijn waar zich
water kan verzamelen dat niet dagelijks kan worden
afgetapt. Gebruik geen luchtslang met een
binnendiameter van minder dan 9,5 mm (3/8 inch) of een
luchtslang die te lang is, omdat een drukdaling onder
maximale doorstroomomstandigheden de prestaties
kan verminderen.
√Er zijn accessoires verkrijgbaar voor luchtdichte
verbindingen.
Luchtcompressor
De luchtcompressor moet voldoende vermogen hebben
om 15 SCFM (2,4 cfm) bij een druk van 6,2 bar
620 kPa (90 psig) op elke aansluiting te leveren tijdens
gebruik van het gereedschap. Het luchtreservoir moet
groot genoeg zijn om schommelingen in de luchttoevoer
bij elk pneumatisch gereedschap op te vangen.
Filter
Het Snap-on AHR424 filter of een gelijkwaardig filter
dient ervoor te zorgen dat schone lucht naar het
gereedschap stroomt. Water, vuil en aanslag hebben een
schurende werking en kunnen het pneumatische
gereedschap beschadigen. Er dient een filter te worden
geïnstalleerd tussen de compressor en de luchtregelaar
en luchtsmeerinrichting.
Luchtregelaar
Voor een goede werking van het gereedschap is een
geregelde luchtdruk vereist. Gebruik de Snap-on
AHR426 regelaar, of een gelijkwaardige regelaar, om de
luchtdruk aan te passen en te handhaven op de
aanbevolen druk van 6,2 bar/620 kPa (90 psig). Een
lagere druk leidt tot een lagere efficiency, terwijl een
hogere druk de snelheid verhoogt tot boven de nominale
capaciteit, waardoor gevaren en beschadiging van het
pneumatische gereedschap kunnen ontstaan. Controleer
de luchtdruk bij de regelaar terwijl u het gereedschap op
normale wijze gebruikt.
Smeerinrichting van de
luchtleiding
√Gebruik geen zware olie, omdat de motor dan afslaat of
de prestaties afnemen.
Voor het smeren van de persluchtmotor wordt de
voorkeur gegeven aan een luchtleidingsmeerinrichting
zoals Snap-on AHR428 smeerinrichting. Deze moet
worden gevuld met Snap-on IM6 persluchtmotorolie of
een SAE10W-olie.
Als er geen smeerinrichting in de luchtleiding wordt
gebruikt, moet de persluchtmotor worden gesmeerd

15
ZPTRS1000CE Rev. A (08/19)
door dagelijks vóór het gebruik ongeveer 3,7 ml (1/8 oz.)
IM6 persluchtmotorolie in de luchtinlaat van het
gereedschap te spuiten. IM6-olie is een speciale formule
die geschikt is voor pneumatisch gereedschap en geen
spoeloplosmiddel vereist.
Spoelen
Als het gereedschap traag lijkt, spuit dan dagelijks vóór
gebruik en aan het einde van elke werkdag 3 à 4 keer IM6
persluchtmotoroliein de luchtinlaat van het gereedschap.
Bediening
Beveiligingsmechanisme
Dit gereedschap heeft een bedieningsknop met
beveiligingsmechanisme. Het beveiligingsmechanisme
voorkomt per ongeluk starten. Om het gereedschap te
gebruiken, moet u eerst het beveiligingsmechanisme
naar voren draaien en vervolgens druk uitoefenen op de
bedieningsknop om het vereiste toerental te verkrijgen.
(Afbeelding 3)
Afbeelding 3: Veilige bediening
Peddelvormige
bedieningsknop voor
variabel toerental
Dit gereedschap heeft een peddelvormige
bedieningsknop voor variabel toerental. Dit gereedschap
kan worden in- en uitgeschakeld door de bedieningsknop
in te drukken of los te laten. De plunjerslagsnelheid van
het blad kan worden ingesteld tussen de minimale en
maximale aangegeven slagsnelheid afhankelijk van hoe
ver u de bedieningsknop indrukt. Door meer druk uit te
oefenen, wordt het toerental verhoogd en omgekeerd.
Hoge toerentallen worden meestal gebruikt voor snel
zagen of bij zachtere zaagmaterialen zoals hout,
composietmaterialen en kunstof. Lagere toerentallen
worden meestal gebruikt als precisie vereist is of bij het
zagen van hardere materialen. Materialen die meestal
met lagere toerentallen worden gezaagd zijn o.a.
metaalplaat, mantelbuizen en leidingen.
Afvoerluchtdeflector
Dit gereedschap heeft een 360° afvoerluchtdeflector.
Draai de afvoerluchtdeflector zo dat vuil van de gebruiker
of omstanders vandaan wordt gericht.
Draag altijd een masker, een veiligheidsbril en
gehoorbescherming om letsel te voorkomen.
Blootstelling aan vuil kan irritatie van de luchtwegen
veroorzaken.
Luchtzeef (PTRS1000)
De verwijderbare luchtinlaatbus aan de achterkant van
het gereedschap is voorzien van een luchtzeef. Om deze
te reinigen, verwijdert u de bus en blaast u met een
luchtslang alle vuil en andere deeltjes uit het scherm en
de bus. Haal de luchtinlaatbus weer aan tot 13,6-15,8
N•m (120-140 in-lb).
Voorbereiding van de zaag
Keuze van het zaagblad
Geen enkel zaagblad is geschikt voor alle
zaagwerkzaamheden. Verschillende materialen vereisen
speciaal ontworpen bladen. Omdat deze reciprozaag
zoveel materialen kan zagen, zijn er vele soorten Snap-on
zaagbladen verkrijgbaar. Zorg dat u het juiste blad
gebruikt voor optimale zaagprestaties.
Koppel de luchtslang los voordat u een zaagblad
verwisselt.
ONDERSTEBOVEN INSTALLEREN VAN HET BLAD
WORDT AFGERADEN.
VERWIJDER HET ZAAGBLAD NIET ALS HET HEET IS.
GEBRUIK ALLEEN DE AANBEVOLEN ZAAGBLADEN.
HET GEBRUIK VAN TE LANGE OF TE GROVE BLADEN
KAN LETSEL VEROORZAKEN.
GEBRUIK UITSLUITEND DE MEEGELEVERDE SNAP-ON
STELSCHROEVEN (ZIE ONDERDELENLIJST). Door het
gebruik van algemene stelschroeven voor de PTRS1000
kan het blad tijdens het gebruik losraken, waardoor letsel
wordt veroorzaakt.
CONTROLEER NA LANGDURIG GEBRUIK OF OPSLAG
OF DE STELSCHROEVEN NOG GOED ZIJN VASTGEZET.
1
2

16
ZPTRS1000CE Rev. A (08/19)
Installeren van Zaagbladen
1. Gebruikers en omstanders moeten altijd een
veiligheidsbril dragen rondom pneumatisch
gereedschap.
2. Koppel het gereedschap los van de luchtleiding.
3. Draai beide stelschroeven met de meegeleverde
inbussleutel ca. 3 volle omwentelingen los zodat de
blad er gemakkelijk in kan worden geschoven.
DE STELSCHROEVEN HOEVEN NIET HELEMAAL TE
WORDEN VERWIJDERD OM DE BLAD IN TE STEKEN.
4. Plaats de blad in de spanhuls en SCHUIF DEZE
HELEMAAL TEGEN DE ONDERSTE AANSLAG. U moet
een lichte metalen klik horen als de blad de aanslag
raakt – als u deze klik niet hoort en een gelakt
zaagblad gebruikt, moet u controleren of de lak niet
aan de spanhuls bindt. Om veiligheidsredenen mag u
geen het blad vastpakken.
5. Haal de achterste stelschroef (het dichtst bij het
handvat) aan tot 15-20 in-lbs.
6. Haal de voorste stelschroef aan tot 15-20 in-lbs. Als u
de PTRS1000 met een zaagblad van 6 inch gebruikt,
moet u deze stelschroef uitlijnen met het gat in het
zaagblad. (afb. 4)
7. Trek aan een onscherp oppervlak van de blad om te
controleren of deze goed vastzit. Als de accessoire
loszit, moet u deze goed vastdraaien.
8. Sluit het gereedschap aan op de luchtleiding en test
de blad, waarbij u het toerental langzaam verhoogt.
Richt daarbij het gereedschap niet op iemand anders.
9. Gebruik de zaag volgens de instructies.
NB: Gebruik geen zaagbladen die dikker zijn dan 0,057
inch.
Afbeelding 4: Uitlijnen van de PTRS1000 stelschroef
Verwijderen van
Zaagbladen
Nadat het gereedschap is weggezet om af te koelen,
draait u beide stelschroeven los en trek u de blad eruit.
Afstellen van de
bladgeleider (zaagdiepte)
De bladgeleider vangt de zaagkracht tegen het werkstuk
op. Als u op een plaats moet zagen waar de werkruimte
beperkt is, kunt u de bladgeleider naar voren zetten om
de zaagdiepte te regelen. Draai de stelbout (de voorste
bout met de onderlegring) met de meegeleverde
inbussleutel los en schuif de bladgeleider naar voren of
naar achteren. Draai de stelbout dan weer vast voordat u
het gereedschap gebruikt.
Voor het geval dat de zaagdiepte van een standaard
pneumatisch zaagblad niet groot genoeg is, is de
PTRS1000 uitgerust met een dubbel
spankopmechanisme waarmee u zaagbladen tot max.
15,2 cm (6 inch) lang kunt gebruiken.
GEBRUIK HET GEREEDSCHAP NIET ZONDER GOED
GEÏNSTALLEERDE BLADGELEIDER.
Afbeelding 5: Instelling van de bladgeleider
Gebruik geen speciale bladen die zeer kort zijn of met een
aanzienlijke schuine kant. Het blad mag de bladgeleider
niet raken. Een blad dat te kort of te schuin is, kan in de
bladgeleider vast komen te zitten en breken.
Gebruik van de zaag
—Klem het werkstuk goed vast.
—Markeer de zaaglijn en houd het gereedschap
tijdens het zagen goed vast.
—Gebruik de zaag niet om uitsparingen/holtes te
zagen. Maak altijd eerst een startgat.
Als u in een blinde ruimte met onder spanning staande
draden zaagt, kunt u een elektrische schok krijgen of
worden geëlektrocuteerd.

17
ZPTRS1000CE Rev. A (08/19)
—Houd het zaagblad stevig tegen het werkstuk
om tegenkrachten (springen) en trillingen tot
een minimum te beperken.
—Druk de bedieningsknop in om het
gereedschap te starten. Wacht totdat de zaag
op volle toeren is gekomen voordat u met
zagen begint. Leid de zaag zo dat het blad de
gemarkeerde lijn volgt.
Zaagtips
Hieronder vindt u enkele tips die slijtage van het werkstuk
en het gereedschap zullen verminderen en nuttig zijn
voor de gebruiker.
—Bladen zagen op de trek- of terugstoot. Plaats
bij werkzaamheden met fijne materialen zoals
panelen, glasvezel etc. de goede kant van het
werkstuk omlaag.
—Gebruik het juiste zaagblad voor het materiaal
dat u zaagt en houd extra bladen bij de hand
voor gebruik als de gebruikte bladen stomp
worden. Vervang gebarsten of gebogen
zaagbladen onmiddellijk.
—Gebruik de juiste zaagsnelheid en kies de juiste
zaagdiepte.
—Om het gevaar van letsel te verminderen, moet
het blad altijd voorbij de bladgeleider uitsteken
en een volle slag kunnen maken (Afbeelding 7).
Bladen kunnen versplinteren als de voorkant
van het blad het werkstuk en/of de bladgeleider
raakt (Afbeelding 8).
—Zorg dat er zich altijd minimaal drie (3) tanden
in het werkstuk bevinden. Fijnere tanden zagen
soepeler, maar langzamer.
Afbeelding 6: Juist
Afbeelding 7: Onjuist
Bij het zagen van metaal
—Breng een smeermiddel aan voor
gemakkelijker, soepeler en sneller zagen en
voor een langere levensduur van het blad.
—Breng bij non-ferrometalen, aluminium, brons
of messing een kleverige was aan op het blad.
—Gebruik bij ferrometalen, ijzer en staal
machine-, snij- of zaagolie op het te zagen
oppervlak.
—Zet het materiaal bij het zagen van dun metaal
als een “broodje” vast tussen twee stukken
afvalhout. Gebruik een klem of bankschroef.
Eén stuk hout bovenop het metaal kan worden
gebruikt met voldoende klemkracht. Teken de
zaaglijnen of de te zagen vorm op het hout.
—Gebruik geen overmatige kracht bij het zagen.
Laat de zaag en het blad het werk doen.
Het gebruik van niet in deze handleiding vermelde
accessoires kan gevaar opleveren
Onderhoudsinstructies
De reparatie van een gereedschap vereist grote
behoedzaamheid en kennis. Reparaties mogen
uitsluitend door een gekwalificeerde
onderhoudsmonteur worden uitgevoerd.
• Controleer het gereedschap altijd op beschadigde
onderdelen voordat u het gebruikt.
• Vervang of repareer beschadigde onderdelen vóór
gebruik. Controleer de uitlijning van bewegende delen.
Als bewegende delen vastzitten of als onderdelen
gebroken zijn, kan de werking van het gereedschap
veranderen.
• Laat beschadigde onderdelen op de juiste manier
repareren of vervangen bij een erkend
onderhoudscentrum.
• Gebruik het gereedschap niet als het niet met de
bedieningsknop kan worden in- en uitgeschakeld.

18
ZPTRS1000CE Rev. A (08/19)
• Onderhoud het gereedschap. Bewaar gereedschap op
een droge, schone, olie- en vetvrije plaats voor een betere
en veilige prestatie.
• Bel voor het dichtstbijzijnde Snap-on reparatiecentrum
de Snap-on klantenservice op 1-877-762-7664 (binnen
de VS).
PTRS1000
Inlaatbus.............13,6-15,8 N•m (120-140 in.-lb.)
Stelschroeven.............1,7-2,3 N•m (15-20 in.-lb.)
Stelbout ......................1,7-2,3 N•m (15-20 in.-lb.)
Inlaatadapter...............4,5-6,8 N•m (40-60 in.-lb.)

PTRS1000
Scie alternative à air
comprimé
19
ZPTRS1000CE Rev. A (08/19)
INFORMATIONS DE
SÉCURITÉ
Lisez attentivement ces instructions avant d’installer,
d’utiliser, d’entretenir ou de réparer cet outil. Conservez
ces instructions dans un endroit accessible.
Consignes de sécurité
Snap-on Tools Company fournit des messages de
sécurité qui couvrent les situations que l’utilisateur peut
raisonnablement rencontrer lors du fonctionnement, de
l’entretien ou de la réparation des outils à air comprimé. Il
est de la responsabilité des utilisateurs et des techniciens
de service d’être informés des procédures, outils et
matériaux utilisés et de s’assurer que ces procédures,
outils et matériaux ne présentent aucun danger pour eux,
pour d’autres personnes présentes sur leur lieu de
travail, ou pour l’outil.
Avertissements généraux
de sécurité concernant les
outils électriques
Lisez tous les avertissements de sécurité et toutes les
instructions.
Le non-respect des avertissements et des instructions
peut constituer un risque d’électrocution et provoquer un
incendie et/ou de graves blessures corporelles.
CONSERVEZ TOUS
LES AVERTISSEMENTS
ET TOUTES LES
INSTRUCTIONS AFIN
DE POUVOIR VOUS Y
RÉFÉRER
ULTÉRIEUREMENT
Mal utilisés, les outils électriques et leurs accessoires
peuvent casser.
• Lisez les instructions avant d’utiliser des outils
électriques.
• Assurez-vous que ces instructions accompagnent
l’outil et sont remises avec lui à un nouvel utilisateur,
ou à quelqu’un d’inexpérimenté.
Un outil cassé peut causer des blessures.
Les outils électriques peuvent être à l’origine de
projections.
• Opérateur et observateurs : portez des lunettes de
sécurité !
Les projections peuvent causer des blessures.
Les outils électriques font du bruit.
• Opérateur et observateurs : portez une protection
auditive !
L’exposition prolongée au bruit peut causer la perte de
l’ouïe.
Les outils électriques vibrent.
• Évitez toute exposition prolongée aux vibrations et aux
mouvements répétitifs, et évitez les positions
inconfortables.
• Cessez d’utiliser l’outil en cas de gêne, de picotement
ou de douleur. Consultez un médecin avant d’en
reprendre l’utilisation.
Une exposition prolongée aux vibrations, des
mouvements prolongés et des positions
inconfortables risquent de causer des blessures.
Risque de contamination par poussières dangereuses.
• Portez un masque anti-poussière ou un masque
respiratoire approuvé lors de l’utilisation d’outils qui
génèrent de la poussière.
• Certaines poussières générées par le ponçage, le
sciage, le meulage, le perçage et autres activités liées
à la construction contiennent des produits chimiques
qui peuvent provoquer des cancers, des déficiences
congénitales et autres troubles de la reproduction.

20
ZPTRS1000CE Rev. A (08/19)
• Le sciage de certains matériaux peut produire une
poussière dangereuse susceptible d’imposer le port
d’un appareil respiratoire particulier. Assurez-vous-en
avant d’utiliser l’outil.
• Si des dispositifs sont prévus pour le branchement
d’appareils d’extraction et de collecte des poussières,
assurez-vous qu’ils sont correctement branchés et
utilisés. L’utilisation de dispositifs de collecte des
poussières peut réduire les dangers liés aux poussières.
• Assurez-vous que l’air expulsé de l’outil n’est pas
dirigé vers l’utilisateur ou une autre personne, ou vers
des matériaux ou des substances susceptibles d’être
contaminés par les gouttelettes d’huile.
L’inhalation de l’air expulsé de l’outil ou de poussières
dangereuses peut provoquer des blessures
corporelles.
Des changements soudains de mouvement ou de
position peuvent se produire pendant l’utilisation de
l’outil.
• Restezalerte etanticipez leschangements dedirection
au moment de la mise en route et pendant le
fonctionnement.
• Maintenez l’outil fermement.
• Anticipez la force de réaction. Ajustez votre posture et
maintenez l’outil fermement.
Risque d’enchevêtrement.
• Maintenez une bonne distance entre l’outil et les
parties du corps.
• Portez des vêtements appropriés. Ne portez ni
vêtements amples ni bijoux. Maintenez cheveux,
vêtements et gants éloignés des pièces en
mouvement. Les vêtements amples, les bijoux et les
cheveux longs peuvent se coincer dans les pièces en
mouvement.
• Portez une protection retenant les cheveux longs.
• Enlevez les clés de réglage ou autres avant de faire
fonctionner l’outil. Une clé accrochée à une pièce en
mouvement de l’outil électrique peut entraîner des
lésions corporelles.
• Ne transportez pas l’outil avec le doigt sur la gâchette.
• N’utilisezpasde rubanadhésif, defil ouautre dispositif
pour bloquer la gâchette en position MARCHE.
• N’utilisez pas l’outil électrique si la gâchette de
marche/arrêt ne fonctionne pas. Si l’outil ne s’arrête pas
lorsque vous relâchez la gâchette, ne lâchez pas l’outil.
Arrêtez le flux d’air à l’aide de la valve d’arrêt d’urgence.
Signalez que l’outil est cassé et faites-le réparer.
• Assurez-vous que la poignée de l’outil est toujours
sèche et exempte d’huile ou de graisse.
• Coupez toujours l’alimentation en air comprimé et
débranchez l’outil du tuyau d’arrivée d’air avant de
changer les accessoires. Ces mesures préventives
diminueront le risque de mise en marche intempestive
de l’outil électrique.
L’enchevêtrement peut provoquer des blessures.
Les vapeurs inflammables risquent de causer une
explosion.
• N’utilisez pas l’outil à proximité de vapeurs
inflammables ou à proximité d’une conduite ou d’un
réservoir de gaz.
• Dirigez la sortie d’air de l’outil pour qu’elle ne soit pas
orientée en direction de flammes ou de surfaces
brûlantes.
• Ne lubrifiez pas l’outil avec des liquides inflammables
tels que du pétrole, du gazole ou du kérosène.
• N’utilisez que les lubrifiants recommandés.
Une explosion ou un incendie peut provoquer des
blessures.
Le sciage de métaux provoque des étincelles
susceptibles d’enflammer les matériaux et les vapeurs
inflammables.
• Ne faites pas fonctionner d’outils électriques dans des
milieux potentiellement explosifs qui contiennent des
liquides inflammables, des gaz ou de la poussière.
Les outils électriques provoquent des étincelles
susceptibles d’enflammer les poussières et les
émanations.
L’air d’échappement de l’outil est chargé d’huile de
graissage.
• N’utilisez l’outil que dans un endroit bien aéré.
• Évitez de respirer l’air expulsé de l’outil.
Inhaler de l’air chargé de brouillards d’huile peut
causer des lésions.
L’électricité peut causer des décharges électriques.
• N’utilisez pas l’outil sur ou à proximité de circuits
électriques, ni sous l’influence de médicaments, de
drogue ou d’alcool.
• Cet outil n’est pas isolé contre les risques
d’électrocution.
• Ne découpez pas des murs existants ou des zones sans
visibilité qui peuvent cacher des fils électriques. Si
vous ne pouvez pas l’éviter, débranchez tous les fusibles
et disjoncteurs qui alimentent le lieu de travail. Le contact
de l’accessoire de coupe avec un fil sous tension peut
provoquer la mise sous tension des parties métalliques
de l’outil électrique et un risque d’électrocution chez
l’opérateur.
Une décharge électrique peut causer des lésionsy
Le lieu de travail peut comporter des dangers.
• Maintenez l’espace de travail propre et bien éclairé.
Les zones encombrées ou mal éclairées sont la cause
d’accidents.
• Lorsque vous utilisez un outil électrique, les
observateurs et les enfants doivent être maintenus à
distance. Toute inattention peut vous faire perdre le
contrôle de l’outil.
Table of contents
Languages:
Popular Saw manuals by other brands

Black & Decker
Black & Decker BT2000L instruction manual

Metabo
Metabo KGS 301 Operating instruction

BorMann
BorMann PRO BBP3980 user manual

Parkside
Parkside PKGS 1400 CROSSCUT MITRE SAW Operating and safety instructions

F.F. Group
F.F. Group RS 1050 E PLUS Original instructions

VEVOR
VEVOR DC425 owner's manual