SnoreMender 3 User manual
Page 1/4 SnoreMender 3 Instructions
SNOREMENDER®3 INSTRUCTIONS
These instructions, and our FAQ, are available at www.snoremenders.com
When SnoreMender cannot be used
The SnoreMender can not be used in the following situations:
- If you have an excessively receding jaw (overbite 5mm (3/16 inch) or more)
or a protruding lower jaw.
- If you suffer from Gum Disease / Jaw Pain / TMJ dysfunction (TMD) / Loose
Teeth.
- If you have Dentures / Implants / Braces / Bridgework (not including crowns)
/ Other Weaknesses in your front 6 upper or front 8 lower teeth you should
check with us or your dentist, to make sure they are strong enough to
support the SnoreMender.
- People under 18 years old MUST NOT use the SnoreMender.
How to Use
If you experience prolonged discomfort, bleeding, loose or moving teeth, jaw pain,
bite changes or other problems related to using your SnoreMender, please
immediately discontinue use and contact us for advice.
With proper use there is no permanent effect of the SnoreMender on jaw or teeth -
please make sure you read the usage instructions carefully.
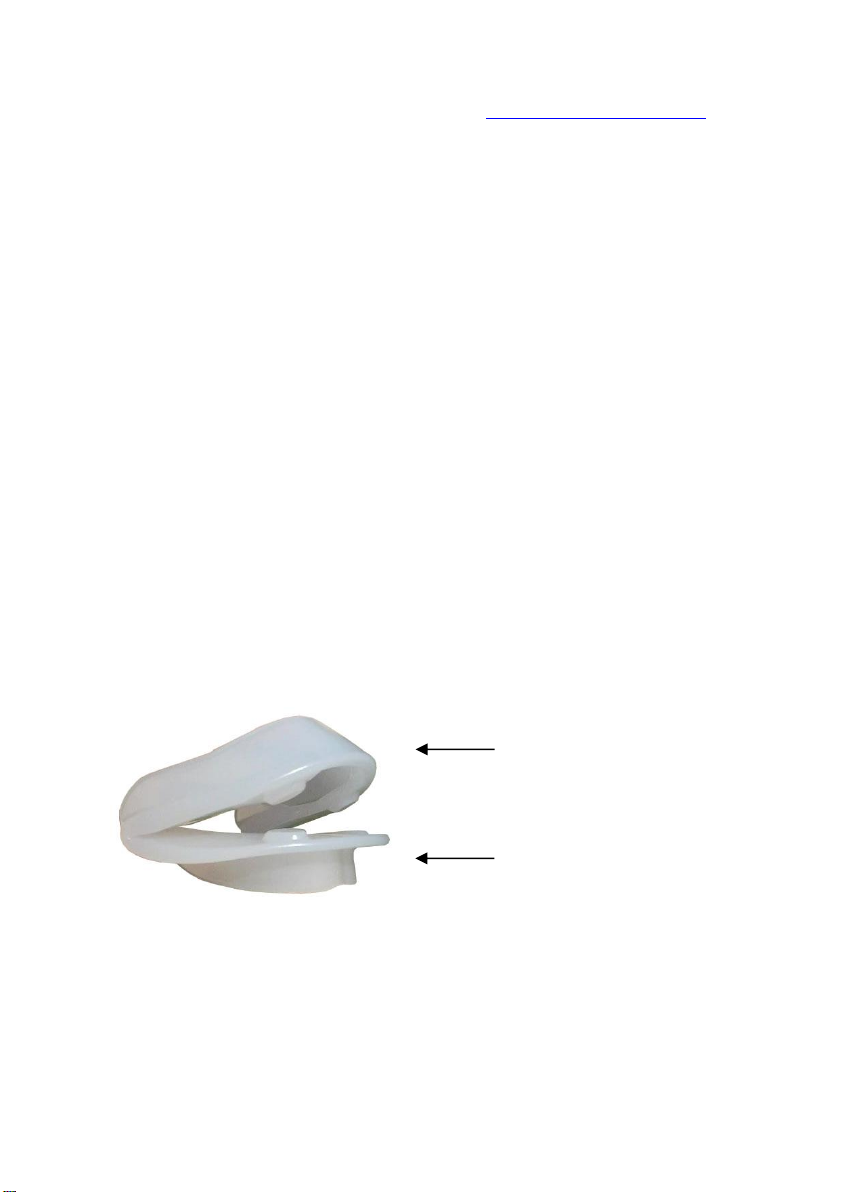
To Use: Before going to sleep, fold the SnoreMender and place in the mouth.
The SnoreMender may hold your mouth open wide at first. This goes away in a
couple of days, but you can speed it up by putting some boiling water in a cup and
holding the hinges in the water for 30 seconds with it folded closed.
The SnoreMender works by moving the lower jaw slightly forwards which can be felt
as a forward pressure on the lower teeth, indicating correct use.
The SnoreMender should work immediately, but the jaw and teeth may ache for the
first few weeks, which is normal as your body adjusts. This usually goes away within
Fits behind Lower teeth
Fits over Upper teeth

Page 2/4 SnoreMender 3 Instructions
a few minutes of removing the SnoreMender but teeth may feel sensitive for longer
at first.
The key is to persevere - give yourself time to get used to it. Our staff includes
long time users of SnoreMenders –if you have any difficulties, please see our FAQ
at www.snoremenders.com or email us at help@snoremenders.com
If the teeth continue to ache significantly, after the first 8 weeks of use, please check
the "If the SnoreMender is too strong" section of the instructions.
Occasionally at night your SnoreMender may fall out. This is normal and should
happen less over time - if it keeps falling out, please see adjustments below.
Sometimes the SnoreMender may cause excess saliva or a dry mouth - your mouth
will usually adjust within two to four weeks.
Cleaning and Maintaining SnoreMender
Warning - never overheat your SnoreMender –Max 100°C / 212°F !!!
1. Wash by hand in warm water, with soap, and rinse.
2. If you want to keep more springiness in the hinges, once clean, hold the
SnoreMender opened out flat and run hot tap water over the hinges for 30
seconds to soften them slightly. Then dry and store in the box.
If the SnoreMender is rubbing the gums
You can use a nail file and file the edges down, or nail scissors to trim them. You will
need to press firmly with the file. It is best to do one half first, so you can see how
much you have filed. About 1 mm (1/32 inch) is usually enough.
You can smooth any rough edges by using the nail file gently.
If it rubs elsewhere, please email help@snoremenders.com for advice.
If the SnoreMender Slips out of place
Sometimes the lower part of the SnoreMender may be a little too wide, so it will not
fit behind the lower teeth without squeezing it into place, and it will then sometimes
'pop off the teeth'. In this case, the following adjustment should help:
1. Put 3 cups of boiling water in a bowl.
2. Hold the lower front half of the device in the water for 90 seconds.
3. Squeeze the lower front part together firmly to make it narrower.
4. Hold in position and put in cold water for 30 seconds to cool.
If you make it too narrow, you can just put it back in the hot water for a few seconds
and it will return to the original shape.
If the slippage is elsewhere, please email help@snoremenders.com for advice.

Page 3/4 SnoreMender 3 Instructions
If the SnoreMender Is Too Strong
There is always an adjustment period when you start using an anti-snoring
mouthpiece so, if possible, we recommend you use it without adjustment for 1-2
weeks. However, if it is too strong to wear, or it is still making the teeth ache after
two weeks use, the following adjustment will reduce the strength.
The goal is to lengthen the middle of the upper tray (typically
by 5mm / a sixth of an inch), to reduce the jaw advancement
and pressure on the teeth and jaw.
1. Put 3 cups of boiling water in a bowl.
2. Put the upper front part in the water for 60 seconds.
3. Put your fingers inside the top half of the SnoreMender and pull it apart, to
stretch the front area of the upper part.
4. Hold in position for 60 seconds while it cools.
5. If you stretch it too much you can put the stretched part back in the hot water
and it should shrink back to the original size.
If that does not help, please email help@snoremenders.com for advice.
If the SnoreMender is Not Working
If the SnoreMender is not stopping snoring it may not be extending the lower jaw
enough to open the airway. This adjustment will increase jaw advancement:
1. Put 3 cups of boiling water in a bowl.
2. Hold the lower front piece (NOT the hinges) in the water for 60
seconds, while it softens.
3. Pull the lower tray outwards (by putting thumb through middle
and pulling away from hinges) and hold for 60 seconds. You
should feel it lengthening.
4. You should see it is now narrower and elongated.
5. You can try it several times, until you get the length required -
start cautiously and get the feel of how hard to pull it.
If that does not help, please email help@snoremenders.com for advice. We make an
extra strength version of the SnoreMender and there is no charge to switch to it if
required.
After
Before
Before
After

Page 4/4 SnoreMender 3 Instructions
Other fitting problems - general moulding
Sometimes the teeth may be misaligned, or there may be parts of the mouth that the
SnoreMender is rubbing. The following adjustment will make the SnoreMender fit
better:
1. Put 3 cups of boiling water in a bowl.
2. Put the whole device in the water for 60 seconds.
3. Put the device in the mouth and bite down gently, to force it into place.
4. Hold in position for 90 seconds while it cools.
If that does not help, please email help@snoremenders.com for advice.
Overactive Gag Reflex - Acclimatisation
The following steps should help while you acclimatise:
- Warm it slightly in warm water before wearing.
- Hold it in place with your fingers, so your body knows you are in control of it.
- Start a few seconds at a time and build up your ability to not gag.
Replacing Your SnoreMender
Eventually your SnoreMender will need replacing - typical lifetimes are between 9
and 18 months. If you notice it becoming less effective, please visit
www.snoremenders.com to purchase a replacement.
Table of contents
Other SnoreMender Personal Care Product manuals


