SnowEx SS-4000 User manual

Owner’s Manual
This Manual Must Be Read Before Operating The Equipment
© TrynEx International 2013
(REV A) F51067A
1
CUSTOMER COPY
Madison Heights, Michigan 48071
800-SALTERS
www.snowexproducts.com
SS-4000
Serial No. T1-100000 and higher

2 © TrynEx International 2013 (REV A) F51067A
Table of Contents
Have a question or need assistance?
SnowEx Customer Care
(800) SALTERS
or (248) 586-3500
Monday trough Friday 8:00 AM to 4:30 PM EST
Fax: (248) 691-8378
E-mail: customercare@trynexfactory.com
Website: www.snowexproducts.com
Introduction .................................................................................................................................................................................................. 3
Safety ........................................................................................................................................................................................................ 4-5
Operating Instructions .............................................................................................................................................................................. 6-15
Component Vocabulary ....................................................................................................................................................................... 6
General Safety .................................................................................................................................................................................... 7
Operating in Winter ............................................................................................................................................................................. 7
Operator Controls ............................................................................................................................................................................. 8-9
Starting/Stopping Motor .................................................................................................................................................................... 10
Adjusting Handlebar Height ............................................................................................................................................................... 11
Transport .......................................................................................................................................................................................... 11
Adjusting Ejection Direction .............................................................................................................................................................. 12
Adjusting Brush Pressure .................................................................................................................................................................. 13
Plow Blade ....................................................................................................................................................................................... 14
Debris Collector Box (Optional Accessory) ......................................................................................................................................... 15
Maintenance Instructions ....................................................................................................................................................................... 16-20
Oil and Gas ....................................................................................................................................................................................... 16
Tire Pressure .................................................................................................................................................................................... 17
Adjusting Control Cables ................................................................................................................................................................... 18
Replacing/Changing Brushes ............................................................................................................................................................ 19
Maintenance Plan ............................................................................................................................................................................. 20
Cleaning ........................................................................................................................................................................................... 20
Troubleshooting .......................................................................................................................................................................................... 21
Notes ..................................................................................................................................................................................................... 22-23

3© TrynEx International 2013 (REV A) F51067A
Introduction
This operating manual is intended to help you to get to know the SS-4000 and how to operate it safely, correctly and economically. If you
observe these instructions, you will prevent hazards, reduce repair costs and breakdown times, and increase the reliability and service life of
the machine.
This manual must be read and used in conformity to existing workplace regulations. The manual must be made available where the machine
is being used.
The manual must be read and used by every person who will be working with or on the machine, such as for
• Operation (including preparation, repair during operation, & clean-up)
• Repairs (maintenance, inspection, overhaul), and/or
• Transport.
All established technical regulations for safety and proper working practice must be observed in addition to this manual and any applicable
regulations for the prevention of accidents. Should you lose your Owner’s Manual or would like extra copies, they can be purchased at your
SnowEx dealer.
THIS SIGN SHOULD ALERT YOU:
The Society of Automotive Engineers has adopted this Safety Alert Symbol to pinpoint characteristics that,
if not carefully followed, can create a safety hazard. When you see this symbol in this manual or on the
machine itself, be alert! Your personal safety and the safety of others is involved.
DenedbelowaretheSafetyAlertMessages.
DANGER
Information that, if not carefully followed, can cause death.
WARNING
Information that, if not carefully followed, can cause serious personal injury or death.
CAUTION
Information that, if not carefully followed, can cause minor injury or damage to equipment.
IMPORTANT
This symbol is used to call out information that is important to follow carefully.
Note: Some of the photos in this manual show the SS-4000 with the optional Mult-Purpose Brush Kit SBK-020.
IMPORTANT EQUIPMENT INFORMATION
Record important machine information here for quick reference. This information can be found on the serial number plate located at the back
of the machine on the wheel drive enclosure.
Model _______________________________________
Serial # _______________________________________
Engine Model ________________________________
Engine Serial # ________________________________
Date Purchased ________________________________
Dealer where purchased
_______________________________________________
See separate Warranty Information Card for your warranty coverage.
Model: SS-4000
Engine: Honda GXV160
HP: 4.3
Weight: 238 lbs Manuf. 2013
Serial No. T1-100000
TrynEx International LLC
531 Ajax Drive
Madison Heights MI 48071
USA
Example

4 © TrynEx International 2013 (REV A) F51067A
Safety
See additional Safety Information at the beginning of Operating Instructions and Maintenance Instructions
Your SS-4000 is manufactured to state-of-the-art technical regulations. Despite this, it is possible that
operation will result in danger to life and limb for the operator or third parties, impairments to the machine
and other physical assets.
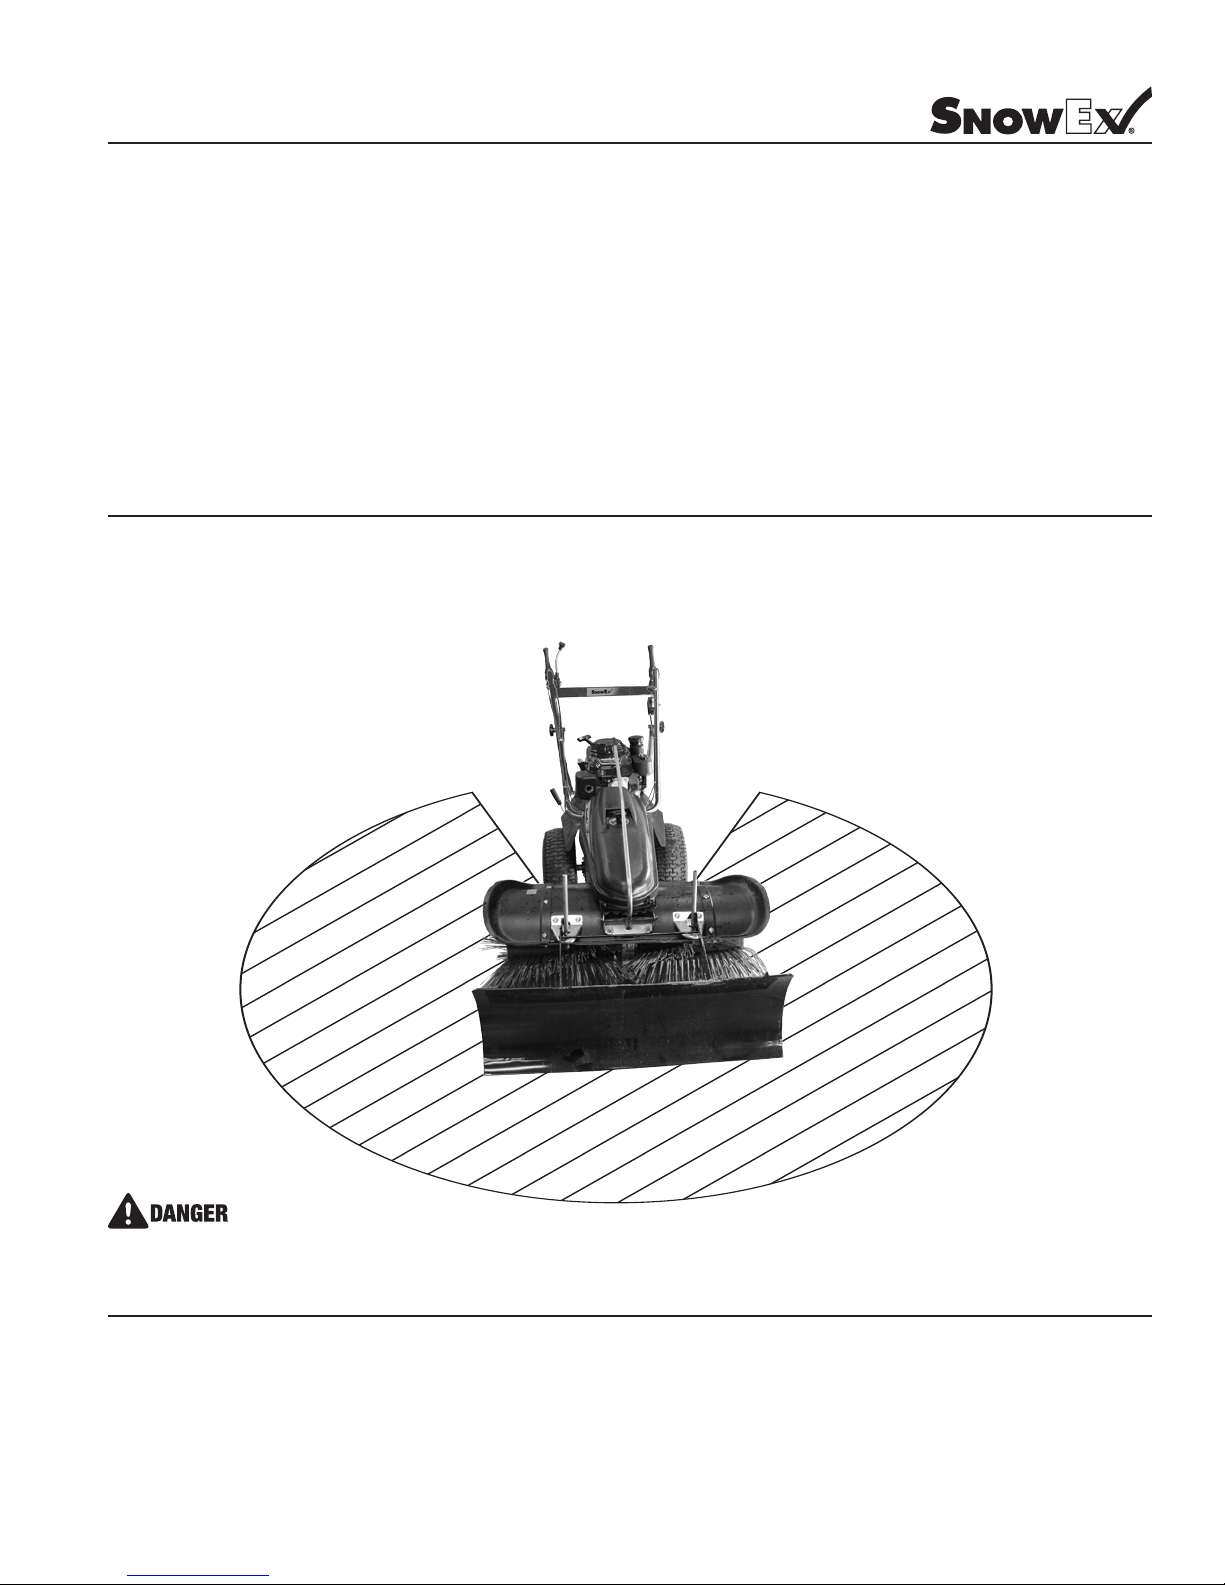
The machine is intended exclusively for use for brushing operations in property maintenance and snow
clearance. Examples of intended use are: snow clearing; sidewalk, driveway & parking lot cleaning (with
multi-purposebrushes);springdebrisclean-up;dethatching;clearingdebrisfromarticialturf;andleaf
clean-up (with Multi-Purpose brushes). Any operation over and above these uses will be considered as a
non-intended use. SnowEx will not be held liable for any resulting damages. The operator alone is respon-
sible for any risk. Intended Use also includes observance of the Owner’s Manual and keeping to all service
and maintenance procedures.
Always keep the Owner’s Manual available at the machine’s place of work. In addition to this Owner’s
Manual, furnish all users with information regarding legal or other important regulations regarding accident
prevention. These duties can include handling hazardous materials; wearing personal safety equipment; and
trafcregulations.YoushouldsupplementthisOwner’sManualwithinstructionscoveringinformationrelated
touseofpoweredmachinery;andoperatingequipmentnearpeople,othermachinesandtrafc.
Donotsmokeorhaveanyopenamenearthemachine.Gasolinevaporscouldexplode.
Only use the machine in perfect condition and according to applicable regulations. Be aware of your sur-
roundings and alert to what you are doing to reduce hazards. You should always repair faults which could
inuencethesafetyofthemachine.
Personnel operating the machine must read the Owner’s Manual before using – especially all safety in-
formation. This includes people who occasionally work on or operate the machine such as for service and
transport. A clear understanding of how to operate the machine will reduce dangers involved with operating
powered equipment.
You must check that personnel operating the machine are paying attention to safety and hazards and under
observance of this Owner’s Manual. Operating personnel may not have long hair, or wear loose clothing or
jewelry, including rings – these items can catch and be pulled in by moving parts.
Keep all safety and hazard information for the machine complete and in readable condition. If the machine is
altered with regard to its safety or changes its operational behavior, stop operation immediately and report
the malfunction to the responsible department or person.
The SS-4000 may only be operated with brushes approved by SnowEx.
Donotcarryoutanyalteration,additionorrebuildingtothemachinewhichcouldinuenceitssafeopera-
tion. This especially applies to addition and alteration to safety devices and machine controls, and to welding
work on load-bearing components.
Personal protection equipment must be worn to prevent accidental injury. Observe all safety and hazard
information for the machine.
Rotatingbrushescauseyingdebris,wearsafetyglasseswithsideprotection.
Wear high-visibility clothing, especially when working around other machines, people and vehicles.
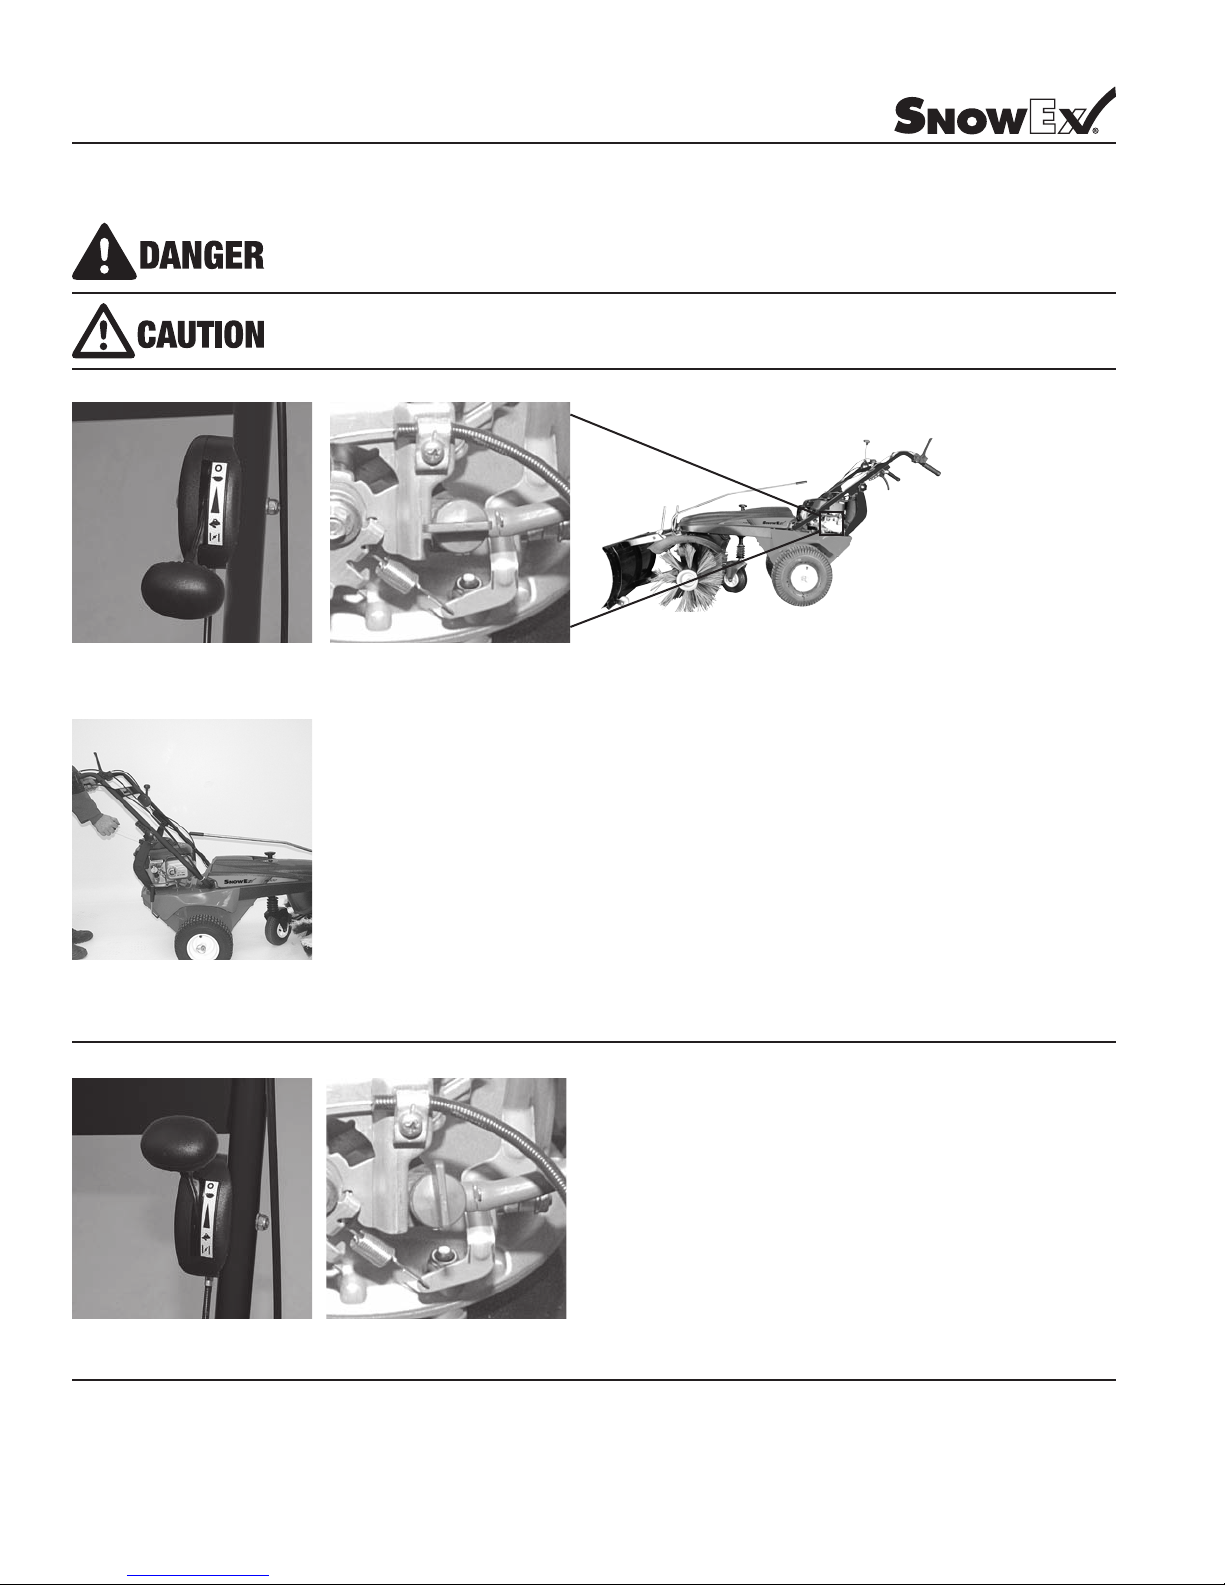
Be aware of and avoid pinch points when assembling and operating. Pinch points can exist around levers
and when putting two parts together (during assembly).
Usebarriersandtrafcconeswhenworkinginareasofpedestrianandvehicletrafctokeepeverythingata
safe distance.
UsegenuineSnowExpartsforreplacement.Thesemeetthespecictechnicalrequirements.Observeall
deadlines indicated in the Owner’s Manual for maintenance checks and service
Suitable and adequate mechanic’s equipment is required for performing maintenance and service proce-
dures.
TheSS-4000ispoweredbygasoline.Knowthelocationofreextinguishersandobserveresafetyproce-
dures.
This page contains safety information to highlight safety hazards and precautions involved with operating your SS-4000. This page must be
read and understood by all personnel who have any part with the assembly, use and care of this machine.

5© TrynEx International 2013 (REV A) F51067A
D
A
N
G
E
R
Z
O
N
E
Safety
PERSONNEL
Work on or with the machine may only be carried out by reliable personnel. Observe statutory minimum legal ages. Only operate the machine
with trained personnel.
Clearlydenepersonnelresponsibilityforoperation,serviceandmaintenance.Ensurethemachineisoperatedonlybyauthorizedpersonnel
Determinemachineoperatorresponsibilities–includingroadtrafcregulations.
Persons in training may only operate the machine under the supervision of an experienced operator.
Work on any part of this machine must be carried out by an experienced mechanic.
Work on drive mechanisms, brakes and steering equipment may only be carried out by suitably trained persons.
DANGER ZONE
Keep all bystanders away from the machine at least 30 feet (10 meters); out of the danger zone as described in the diagram below.
Flying objects; Keep safe distance
from the machine when engine is
running.

6 © TrynEx International 2013 (REV A) F51067A
Operating Instructions
Component Vocabulary
Receiver
Bar
Brush Angle
Adjustment
Engine
Brush Height
Adjustment
Support
Wheel
Brushes
Plow Blade
Handlebar
Drive
Wheels
Gear
Selection
Lever
Reverse
Forward
Brush Speed
Adjustment
Brush
Engagement
Throttle
Control

7© TrynEx International 2013 (REV A) F51067A
Operating Instructions
General Safety / Operating in Winter
GENERAL SAFETY
Do not operate the machine in an unsafe manner! Make yourself familiar with the surroundings before start-
ing work in a new location. The working surroundings include any obstacles in the work area or on roads,
thegroundload-bearingcapacityandanynecessaryworkplacesafetyprecautionsinlivetrafc.
Take precautions to ensure that the machine is only operated in a safe and functional condition! Only oper-
ate the machine if all protective and safety devices are present and working!
Check the machine for externally visible damage and faults before operation! If malfunctions occur stop
the machine and secure it immediately! Repair malfunctions immediately! Only start the machine from the
operator’s position! Ensure that no one can be endangered by starting the machine before switching it on or
operating it!
Check that braking, steering, and brushing are fully functional before operation!
Beforeoperatingthemachine,alwayscheckthataccessoriesarettedcorrectly!Alwaysobserveapplicable
trafcregulationsbeforeoperatingonpublicroads,pathsorparks,andensurethatthemachineisina
conditionsuitableforuseintrafc
Always ensure that suitable lighting is available before working in poor light or darkness! Always keep a suf-
cientdistancebetweenthemachineanddrop-offs,holesorslopes!
Do not permit any method of working which will affect the stability of the machine!
Never traverse across slopes; always travel up and down, not across.
Adjust the speed to suit the conditions on inclines! Change gear before the incline, not on it! Always secure
the machine against rolling away and unauthorized operation before leaving it unattended!
OPERATING IN WINTER
Checkregularlythattheairlterisdry.Iftheairlterhasbecomewet,letitdryovernight.Thereisapos-
sibilityoftheenginenotstartingduetoacloggedairlter.
Spray the throttle cable with silicone spray at both ends, and the throttle linkage before operating to prevent
the cable or throttle mechanism from freezing up.
Before putting the machine away, sweep it clear of snow.
Avoid freezing the machine. Store the machine in a frost-free room.
Silicone Spray attracts dust and binds it to the machine. It is only a suitable lubricant in wintry and snowy
conditions.
DonotspraySiliconeSprayonhotengine.Itcouldcauseare.Followtheinstructionsonthespraycan.

8 © TrynEx International 2013 (REV A) F51067A
Operating Instructions
Operator Controls
If the brushes are switched on and the SS-4000 is not in gear the machine can roll backwards.
The handlebar must be securely engaged at the required height.
Avoid injury and damage; Make completely sure that there are no persons or objects within the danger zone.
With long sleeves, the handlebar can get stuck inside the sleeve; This could prevent the drive from disen-
gaging and result in injury. Set the bar lower if wearing long sleeves or tightly button the sleeves.
HANDLEBAR CONTROLS
DRIVING AND SWEEPING
Brush Speed
Throttle
Control
Brush
Engagement
Reverse
Forward
Sweeping and Driving can be engaged independent of each other. Having the brush engaged without the transmission engaged will cause
the machine to roll backward. The brush can be engaged and disengaged as necessary while driving.
The brush speed can be adjusted to your preference – pushing the lever forward will increase the speed; pulling back will decrease the
brush speed. If the brush starts to leave debris behind, increase the rotation speed (see ‘Adjusting Brush Speed’) and select a lower gear (see
‘Gear Selection’).
The SS-4000 is also equipped with a reverse gear. Come to a complete stop before engaging the reverse gear. Ensure the area behind is
clear before backing up. Do not operate brush in reverse.

9© TrynEx International 2013 (REV A) F51067A
Operating Instructions
Operator Controls
SELECTING A GEAR
FREEWHEEL
ADJUSTING BRUSH SPEED
Come to a complete stop before changing gears.
The SS-4000 is equipped with a three-speed transmission. First Gear is the slowest setting and engaged by pulling the shift lever all the way
back. Third Gear is the fastest setting and is engaged by pushing the lever all the way forward. Second Gear is in the middle. You will feel the
lever lock into a detent and hear a “click.”
Gear Lever Location.
There is a freewheel mechanism on each wheel. The freewheel makes turning the machine easier. One or both wheels can be locked for
working on inclines and when clearing snow.
The freewheel is disabled by putting the linchpin through both wheel and axle, locking the two together.
When removing snow with the plow, locking the wheel on the windrow-side will reduce the lateral force on the handlebars.
Freewheel. Locked. Plowing.
The speed of the brushes can be increased using the lever on the right handlebar. The brush speed must only be adjusted when the brush is
switched on.
When sweeping dust, use a low brush speed.
When sweeping leaves or similar material, use a high brush speed.
When sweeping snow, use a high brush speed.
When using the Debris Collector Box, use a medium brush speed.
Remember that an increased brush speed will throw debris farther, therefore increasing the danger zone.
Freewheel
Locked

10 © TrynEx International 2013 (REV A) F51067A
Operating Instructions
Starting/Stopping Motor
Neverrunthemotorinanenclosedorconnedspace.Theexhaustfumescontainpoisonousgases.
Ensure that the transmission and brush are switched off before starting. The handlebar must be secure at
the required height.
Beforestartingthemotor,ensurethereissufcientoil.Themotorisnotlledwithoilwhenthemachineis
delivered.
Move throttle control to the
choke position. Adjust Choke.
Close Throttle. Close Fuel Valve.
Pull starter coil. Stand behind
the handlebars. Do not press
any levers.
Make sure fuel valve is on.
STARTING
SHUTTING DOWN

11© TrynEx International 2013 (REV A) F51067A
Operating Instructions
Adjusting Handlebar Height / Transport
There are seven settings for adjusting the handlebar height.
Loosen the knob on both sides and choose the desired position
Observe the seven possible settings.
You can fold the handlebar forward to save space when storing.
TRANSPORT
Use a Ratchet Strap around front and around rear axle when transporting. Always use two straps on the axle – one on each side.

12 © TrynEx International 2013 (REV A) F51067A
Operating Instructions
Adjusting Ejection Direction
Therearevedifferentsettingsavailablefortheejec-
tion direction.
Here: Forward Ejection Direction. The swept material
will heap up in front of the brushes. You should give
preference to angled brush settings.
With an angled setting, the material will be swept to one
side.
Here: Material will be ejected to the left.
To adjust brush angle: Lift the lever; Turn the brush in
the desired direction; Release the lever and ensure the
lever is latched in place.
Here: Material will be ejected to the right.
A sideways setting is recommended if using the op-
tional Debris Collector. This will allow sweeping against
a wall or curb. (Debris Collector Box is an Optional
Accessory).
If you use a plow, an angled direction must be used.
Here: Ejection to the Left.

13© TrynEx International 2013 (REV A) F51067A
Operating Instructions
Adjusting Brush Pressure
Turn clockwise (+): raise brush
Turn counter-clockwise (-): lower brush
Thebrushheightcanbeadjustedinneincrementsbyadjusting
the height of the support wheel.
The adjustment knob is located above the support wheel.
Lower the brush by turning the knob in the direction of the
“minus”arrowuntilitjusttouchestheoor.Turntheknobthree
more turns and the brush height is just right for sweeping.
Support Wheel
IMPORTANT
If the brushes are heavily worn, or if you are brushing cobblestones or brick pavers, lower the brush one more turn.
Pleasenote:ifthebrushpressureistooheavy,thecleaningeffectisdecreasedbecausethebrushbersarebenttoomuch.
If you do not intend to use the SS-4000 for a long period of time, release the pressure on the brush by raising the brush.

14 © TrynEx International 2013 (REV A) F51067A
Operating Instructions
Plow Blade
To install the Plow Blade, Lift the Plow and hold it at an angle; slide it over the receiver bar and lower it into position.
An angled setting must be used when plowing snow.
The plow can be removed when clearing small amounts
of snow – one inch or less (2.5 cm).
For snow over one inch (2.5 cm), use the plow blade.
The SS-4000 can clear a maximum of 5-1/2 inches (14
cm) snow in one pass. If snow is heavy, the capacity will
be less.
See “Freewheel” to adjust freewheel correctly for plow-
ing snow.
1 2
3

15© TrynEx International 2013 (REV A) F51067A
Operating Instructions
Debris Collector Box (Optional Accessory)
SS-4000 with Debris Collector Box.
Mount as shown below, paying at-
tention to the alignment with brush
hood.
To dump the debris into a separate
container, remove the Collector Box from
the sweeper and use the handle to tow it
to your other container.
To dump the debris, simply pull the
handle from the operating position so the
debris can fall out.

16 © TrynEx International 2013 (REV A) F51067A
Maintenance Instructions
Oil and Gas
Capacities:
Oil 20 oz. (0.6 L)
Gasoline 1.5 qt. (3 L)
Use 86 octane or higher unleaded gasoline.
Gas
Oil
1. Remove oil cap; wipe dipstick clean.
2. Replacedipstickintheoilllerneck;donotscrewdown.
3. Remove dipstick; check oil level. The oil should be up to the upper
marking.
4. Ifoillevelislow,lluptotheuppermarkingonthedipstickwith
the recommended oil (see Honda Owner’s Manual).
5. Seemarkingonthedipstickforlllevel.
Full Level

17© TrynEx International 2013 (REV A) F51067A
Maintenance Instructions
Tire Pressure
IMPORTANT
If the tire pressure is too low, the inner-tube will rub against the wheel and be damaged.
Over-Inationcancausethetiretoburst.
Check the tire pressure for both the support and drive wheels regularly.
Unscrewthevalvecapanduseatireinationdevicetocheckorinatethetireasnecessary.Alwaysreplacethevalvecapwhenyouhave
nishedinating.
DRIVE WHEELS
22 psi (1.5 bar).
SUPPORT WHEEL
30 psi (2 bar).
On Rough Surfaces:
22 psi (1.5 bar)

18 © TrynEx International 2013 (REV A) F51067A
Turn the throttle cable the
direction you desire using
an 8 mm wrench.
Loosen the top nut with a
10 mm wrench.
Tighten the nut. Check
the adjustment by press-
ing the lever down.
Reverse Lever: there
should be about 3-1/8
inches (80 mm) of space
between the handlebar
and lever when there
starts to be a resistance
to the lever.
Brush Drive and Forward
Levers: there should be
about 5-1/2 inches (140
mm) of space between
the handlebar and lever
when there starts to be a
resistance to the lever.
Maintenance Instructions
Adjusting Control Cables
IMPORTANT
It may be necessary to reset the cables after machine has been operating for a few hours.

19© TrynEx International 2013 (REV A) F51067A
Maintenance Instructions
Replacing/Changing the Brushes
Loosen the nut on the
axle. Use two 19 mm
wrenches.
Remove the axle with the
right brush. Parts after disassembly.
If replacing the Multi-
Purpose Brushes, or
changing to them: The
black row of bristles must
touch the ground before
the white row when the
brush rotates.
If replacing the Snow
Brushes (standard), or
changing to them: The
rows must curve upward
from the left.
Note: Multi-Purpose
Bristle shown for clarity.
Refer to the Assembly Instructions for installing the new brushes.
Remove the left brush.
IMPORTANT
Checkthebrushesafterevery20hoursuse.Thebrushesmustbereplacedifyouarenolongersatisedwiththebrushing
result, or if the brush diameter is below 8-5/8 inches (220 mm).
Axle
Nut
Locknut
Washer
Cap
Left Brush
Right Brush

20 © TrynEx International 2013 (REV A) F51067A
Maintenance Instructions
Maintenance Plan / Cleaning
before every
use
after the following operating hours after 3 month
min.
at least
anually
after every
cleaning
5 10 25 50 100
Check screws and nuts C
Checkmotoroillevel,rellifnecessary C
First motor oil change S
All further motor oil changes S S
Checkairlter C
Cleanairlterelement,earlierifnecessary M M
Replaceairlterelement,earlierifnecessary M
Replace fuel hoses S (2 Years)
Clean cool air screen M
Cleanbafeplate,coolingribs,earlierifneces-
sary S
Clean spark plugs, adjust gap S
Replace spark plugs S
Clean exhaust M
Lubricate all moving parts M M
Check hand lever play setting C
Check brush wear, earlier if necessary C
Stretch chain drive C S
KEY
S Maintenance by Specialist
C Check by Operator
M Maintenance by Operator
IMPORTANT
If you are not intending to use the machine for a long time, it should be properly stored. Please contact your local dealer for
suitable storage practices in your geographic location.
CLEANING
To keep your SS-4000 in good condition, you should clean it regularly.
Remove loose dirt or dust with a car wash brush. Wash plastic surfaces with water and soap. Use normal car cleaning soap. Rinse off all
cleaners thoroughly with clean water.
Togiveplasticpartsaglossnish,useaplasticscareproduct.
Observe the instructions on the cleaning solution package.
You can use glycerine as a corrosion protection for heavily soiled parts.
Do not use pressure washers, the high pressure may force water into bearings, seals and the motor, causing damage.
Other manuals for SS-4000
3
Table of contents
Other SnowEx Snow Blower manuals