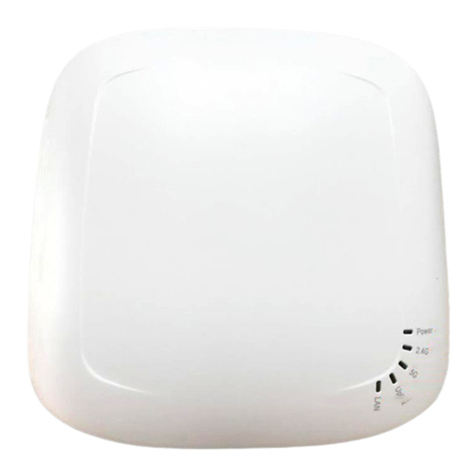
SOARNEX EWA-210 User manual

Rev. 1.0 Feb. 2018
吸頂式無線
快速安裝指南
EWA-210 N300 PoE AP
吸頂式無線
EWA-212 AC1200 PoE AP
吸頂式雙頻開發無線
EWA-217 AC1750 PoE AP
吸頂式雙頻開發無線
PoE AP
EWA-210, 212,217 QIG_29072466EWA2100.indd 1 2018/3/2 �� 05:29:49

中
打開包裝盒,仔細取出設備,箱內應包含下列項目:
1. EWA无線PoE AP x1
EWA-210 (N300 吸頂式無線PoE AP) 或
EWA-212(AC1200 吸頂式雙頻開發無線PoE AP) 或
EWA-217(AC1750 吸頂式雙頻開發無線PoE AP)
2. 1* 5 英尺(1.5M) 网線 x1
3. 快速安裝指南x 1
4. 電源适配器(12V DC, 1A) x1(選配) 适用于EWA-210,
EWA-212;
電源适配器(12V DC, 1.5A) ×1 (選配) 适用于EWA-217
5. 安裝包x 1
包裝清單
EWA-210, 212,217 QIG_29072466EWA2100.indd 2 2018/3/2 �� 05:29:49

中
1. 无線PoE AP与路由器或交換机鏈接。您也可以將設備设
通過网絡端口直接鏈接到你的計算机上。如果你連接到路
由器或交換机,請确保您的計算机連接到同一网絡。
2. 電源適配器插入無線PoE AP。
3. 等待60 秒,然后确認設備前面的 LED 狀態指示燈亮
起,該无線 PoE AP啟動完成。
4.每台無線PoE AP 都預設各自的WiFi名稱(SSID) 和WiFi 密
碼。你可以在設備的白色標籤上找到該設備默認的WiFi 名
稱(SSID) 和WiFi密碼以此來登錄管理設備。
如果 EWA无線PoE AP被复位設置,則設備的WiFi 名稱
(SSID)和 WiFi密碼將恢复到默認設置。
初始接入点設置
EWA-210, 212,217 QIG_29072466EWA2100.indd 3 2018/3/2 �� 05:29:49

中
1. 拆下无線PoE AP上的安裝板。
2. 在牆上或者天花板上,定位安裝板到 AP 規划的安裝位
置,標記出螺絲孔位置。确保設備有足夠的空間滑動和滑
出安裝板。
3. 鑽出標記的螺絲孔,然后將塑料牆板錨定錨入螺絲孔。
4. 使用該設備附帶的螺絲,固定安裝板。
5. 將无線PoE AP 滑動安裝到安裝板,并連接网線。
硬件安裝
EWA-210, 212,217 QIG_29072466EWA2100.indd 4 2018/3/2 �� 05:29:50

中
軟件控制
1. 从网站www.soarnex.com 下載管理軟件
"SOARNEX AP Utility"。
2. 運行程序。該程序會嘗試自動檢測您的設備。如果沒
有,点擊搜尋按鈕。
3. 選擇需要設置的設備,并單擊設備設置。
EWA-210, 212,217 QIG_29072466EWA2100.indd 5 2018/3/2 �� 05:29:50

中
4. 設置設備頁面會顯示基本的WiFi 网絡設置。如果您的网
絡需要一个靜態IP 地址,選擇靜態配置,並輸入靜態IP。
如果你不确定,IP 默認動態配置模式。
5. 要配置您的无線网絡,从下拉菜單中選擇頻帶,并輸
入您的設置。如果您使用的是2.4GHz 和5GHz 的网絡,
必須將它們單獨配置。密碼是你當前的 WiFi 密碼。默認
WiFi 密碼位于的无線PoE AP底部的白色標籤上。
EWA-210, 212,217 QIG_29072466EWA2100.indd 6 2018/3/2 �� 05:29:50

中
6. 當您完成后,輸入无線PoE AP登錄密碼,然后單擊确定
保存更改。 該實用程序將保存設置。
7. 如果這是您第一次訪問該設備,或者設備已經被重置,
默認密碼為 admin。各自重复步驟2到6來完成配置。
8. 无線网絡配置結束后,可以通過登錄无線PoE AP WiFi
网絡确認連接。 如果可以成功連接,則配置完成。
EWA-210, 212,217 QIG_29072466EWA2100.indd 7 2018/3/2 �� 05:29:50

中
9. 要訪問設備的高級設置,啟動軟件控制工具,找到您的
无線PoE AP,点擊 IP地址,并選擇"Yes"來配置設備。
10. 這將啟動默認的Web瀏覽器,并自動進入无線PoE AP
高級設置。
11. 在登錄界面,輸入用戶名和密碼。如果這是您第一次
訪問該設備,或者如果无線PoE AP已复位,將使用默認的
登錄凭据。(用戶名: admin,密碼:admin)
EWA-210, 212,217 QIG_29072466EWA2100.indd 8 2018/3/2 �� 05:29:50

中
12. 選擇所需的語言,然后單擊登錄繼續。
13. 狀態屏幕將顯示无線PoE AP的信息,和設備的无線网絡。
14. 有關高級設置和功能的詳細信息,請參閱用戶手冊。
EWA-210, 212,217 QIG_29072466EWA2100.indd 9 2018/3/2 �� 05:29:51

EN
Declaration of Conformity
SOARNEX TECHNOLOGY CORPORATION
3F., NO.158, RUIHU ST., NEIHU DIST., TAIPEI CITY11494, TAIWAN (R.O.C)
Product Information
Model Number: EWA-210
Product Name: N300 Wireless Ceiling Mount PoE AP
Trad Name: SOARNEX
Safety:
EN 60950-1:2006+A11:2010+A12:2011+A2:2013
EMC:
EN 301 489-1 V2.1.1(2017-02)
EN 301 489-17 V3.1.1(2017-02)
EN 55032:2012+AC:2013
EN 55024:2010
Radio Spectrum & Health:
EN 300 328 V2.1.1 (2016-11)
EN 62311:2008
Energy Eciency:
Regulation (EC) No. 1275/2008, Regulation, No. 278/2009, No. 801/2013
EWA-210, 212,217 QIG_29072466EWA2100.indd 10 2018/3/2 �� 05:29:51

EN
Declaration of Conformity
Those products are here with conrmed to comply with the Directives.
Directives: EMC Directive 2014/30/EU
RoHS Directive 2011/65/EU
REACH Regulation (EC) No. 1907/2006
Low Voltage Directive 2014/35/EU
R&TTE Directive 1999/5/EC
EMF Directive 1999/519/EC
Eco design Directive 2009/125/EC
Person is responsible for this declaration.
Place of Issue: TAIPEI, TAIWAN (R.O.C)
Date: Feb. 1, 2018
Name: Signature:
Title:
Li, Yi Wu
Director
EWA-210, 212,217 QIG_29072466EWA2100.indd 11 2018/3/2 �� 05:29:51

Wireless Ceiling Mount PoE AP
Rev. 1.0 Feb. 2018
Quick Installation Guide
EWA-210 N300 Wireless Ceiling Mount
PoE AP
EWA-212 AC1200 Dual Band Concurrent
Wirless Ceiling Mount PoE AP
EWA-217 AC1750 Dual Band Concurrent
Wirless Ceiling Mount PoE AP
EWA-210, 212,217 QIG_29072466EWA2100.indd 12 2018/3/2 �� 05:29:51

EN
Contents of Packing
Open the shipping carton and carefully unpack its
contents. The carton should contain the following items.
1. EWA Wireless Access Point (AP) x 1
EWA-210 (11N Wireless Ceiling Mount PoE+
Access Point) or
EWA-212 (AC1200 Dual Band Concurrent Wireless
Ceiling Mount PoE+ Access Point) or
EWA-217 (AC1750 Dual Band Concurrent Wireless
Ceiling Mount PoE+ Access Point)
2. 5ft (1.5m) Network Cable x 1
3. Quick Installation Guide x 1
4. Power Adapter (12V DC,1A) x 1 for EWA-210,EWA-212
Power Adapter (12VDC, 1.5A) x1 for EWA-217
5. Mounting Kit x 1
EWA-210, 212,217 QIG_29072466EWA2100.indd 13 2018/3/2 �� 05:29:51

EN
Initial Access Point Setup
1. Connect the wireless access point to router or Switch.
You may also connect the device directly to a network
port on your computer. If you are connecting to a router
or switch, make sure your computer is connected to the
same network.
2. Plug the power adapter into the wireless access point.
3. Wait 60 seconds, then conrm that the status LEDs on
the front of the unit are Illuminated. The wireless access
point is now active.
4. Each wireless access point comes pre- encrypted with
a unique WiFi Name (SSID) and WiFi password. You can
nd your device’s SSID and WiFi password on the white
labels on the device. Use this information to connect to
the wireless access point. If the wireless access point
is reset, the SSID and WiFi Key will also be reset to the
default login credentials located on the white lables.
EWA-210, 212,217 QIG_29072466EWA2100.indd 14 2018/3/2 �� 05:29:51

EN
Hardware Installation
1. Remove the mounting plate from the wireless access
point.
2. Place the mounting plate on the wall or ceiling
where the device will be located, and mark the location
of the screw holes. Ensure that the device has enough
clearance to slide on and o the mounting plate.
3. Drill out the marketed screw holes, and insert the
plastic wall anchors into the screw holes.
4. Secure the mounting plate, using the screws that
came with the device.
5. Place the wireless access point on the mounting
plate, and attach the network cable.
EWA-210, 212,217 QIG_29072466EWA2100.indd 15 2018/3/2 �� 05:29:51

EN
Software Controller Management
1. Download Software Controller “SOARNEX AP Utility”
2. Run the utility. The utility will attempt to detect your
device automatically. If it does not, click on the Discover
button.
3. Select your device by checking the box next to your
wireless access point, and click on Device Settings.
EWA-210, 212,217 QIG_29072466EWA2100.indd 16 2018/3/2 �� 05:29:52

EN
4. The Device Settings page will show your basic Wi-Fi
network settings. If your network requires a static IP
address, select the Static button and enter static IP
address . If you are not sure, leave IP Mode on the
default setting (DHCP is default IP Mode).
5. To congure your wireless network, select the Band
from the dropdown menu, and enter your settings. If
you are using both 2.4 GHz and 5 GHz networks, they
must be congured individually. The Key is your current
WiFi password. The default key is located on the white
sticker on the bottom of the wireless access point device.
EWA-210, 212,217 QIG_29072466EWA2100.indd 17 2018/3/2 �� 05:29:52

EN
6. When you are nished, enter the password for the
wireless access point and click OK to save your chang-
es. The utility will save your settings.
7. If this is the rst time you are accessing the devices,
or if the unit has been reset, the default password is
admin. Repeat steps 2 to 6 to congure your other
networks.
8. Once your wireless networks are congured, conrm
connectivity by logging into wireless access point WiFi
network. If you can successfully connect, your
conguration is complete.
EWA-210, 212,217 QIG_29072466EWA2100.indd 18 2018/3/2 �� 05:29:52

EN
9. To access the unit’s advanced settings, launch the
Software Controller Utility, locate your wireless access
pint, Click on the IP Address, and select Yes to congure
your device.
10. This will launch your default web browser and auto-
matically direct it to wireless access point for advanced
settings.
11. On the Login screen, enter the username and
password. If this is your rst time accessing the device,
or if the wireless access pint has been reset, the default
login credentials are.
(Username: admin, Password : admin)
EWA-210, 212,217 QIG_29072466EWA2100.indd 19 2018/3/2 �� 05:29:52

EN
12. Select the desired Language, and then click Login to
continue.
13. The status screen will display information about the
wireless access point, and the unit’s wireless networks.
14. For detailed information on advanced settings and
features, please refer to User’s Manual.
EWA-210, 212,217 QIG_29072466EWA2100.indd 20 2018/3/2 �� 05:29:52
This manual suits for next models
2
Table of contents
Other SOARNEX Wireless Access Point manuals
Popular Wireless Access Point manuals by other brands
Cambium Networks
Cambium Networks E400 Hardware installation guide
Ubiquiti
Ubiquiti NanoStation M quick start guide
Ubiquiti
Ubiquiti UniFi Dream Machine Beacon quick start guide
CommScope
CommScope RUCKUS R760 Quick setup guide
Ziwell
Ziwell Wireless LAN Device Series ZWA-G120 user manual
SMC Networks
SMC Networks 2655W FICHE datasheet
