Solaire Medical Inner Space Evolve User manual

Installation Instructions – Evolve Cabinets
Follow these installation instructions for Evolve upper, base, tall, and scope cabinets with AireCore or
wood composite construction.
Tools needed:
• Flat head screwdriver
• Level
Preparing for cabinet installation
Step 1
• Identify the location and placement of your cabinets and clean floor
and surrounding area.
Step 2
• If infill panels are needed, attach infill panel directly to the inside
of the cabinet with wood screws before installing cabinets.
Storage solutions for healthcare
Installation Instructions – Evolve Cabinets 2
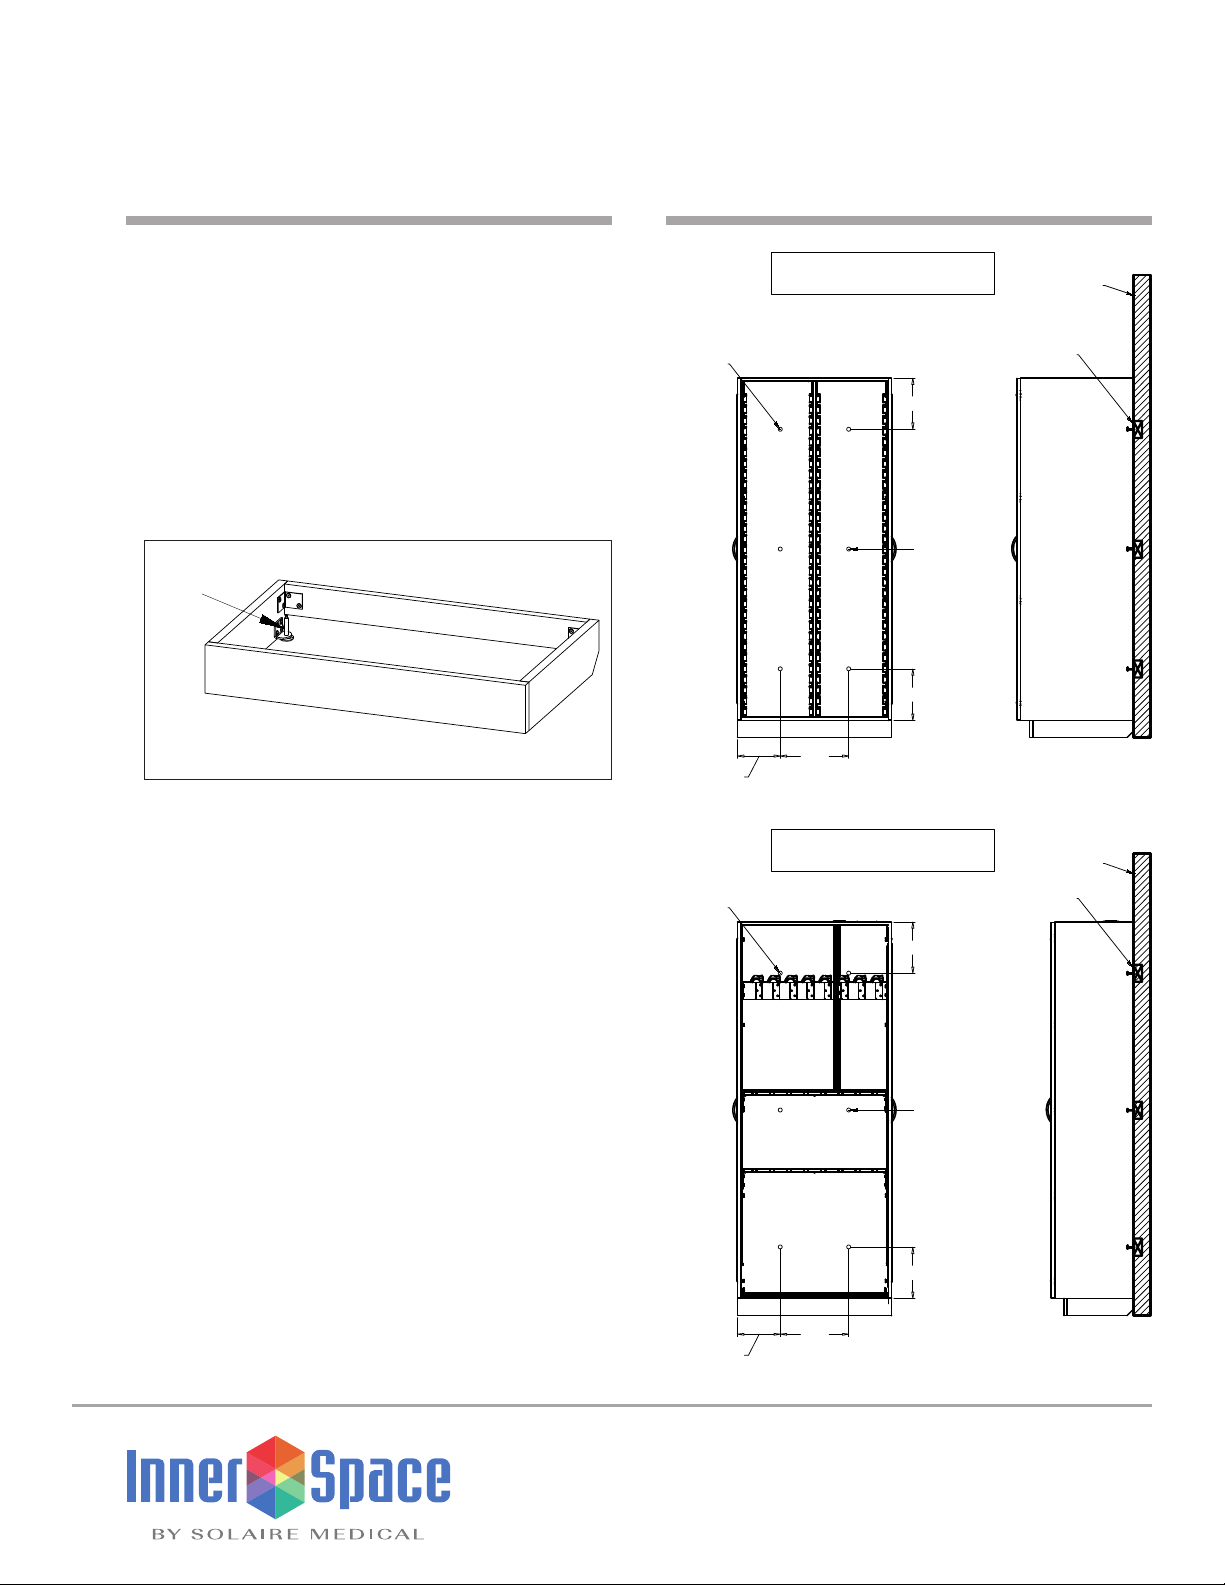
Installing a single base, tall, or scope cabinet
Step 1
• Position base against the wall. Access leveling feet inside of base,
and, with a flat head screw driver, adjust the four leveling feet until
the cabinet is level.
Step 2
• Mount the base directly to wall studs using appropriate fasteners
for the type of wall construction.
Step 3
• Place the cabinet onto the base.
Step 4
• Plumb the cabinet and secure it to the wall through the back panel
using appropriate fasteners. See figure for placement.
Questions? Call a Technical Services representative at 888-435-2256
(16")
VARIES DEPENDENT ON
STUD SPACING
12"
12"
CENTERED
(OPTIONAL
MOUNTING
LOCATION)
SUGGESTED
MOUNTING
LOCATION
SUGGESTED
MOUNTING
LOCATION
STUD
NOTE: USE APPROPRIATE
FASTENERS FOR WALL TYPE
(16")
VARIES DEPENDENT ON
STUD SPACING
12"
12"
SUGGESTED
MOUNTING
LOCATION
NOTE: USE APPROPRIATE
FASTENERS FOR WALL TYPE
SUGGESTED
MOUNTING
LOCATION
STUD
SUGGESTED
MOUNTING
LOCATION
STUD
414"
SUGGESTED
MOUNTING
LOCATION
414"
(16")
VARIES DEPENDENT ON
STUD SPACING
5"
SUGGESTED
MOUNTING
LOCATION
5"
(16")
VARIES DEPENDENT ON
STUD SPACING
NOTE: USE APPROPRIATE
FASTENERS FOR WALL TYPE
CENTERED
(OPTIONAL
MOUNTING
LOCATION)
LEVELING FEET
IMAGE OF BASE
Cabinet Base
Leveling feet
Storage solutions for healthcare
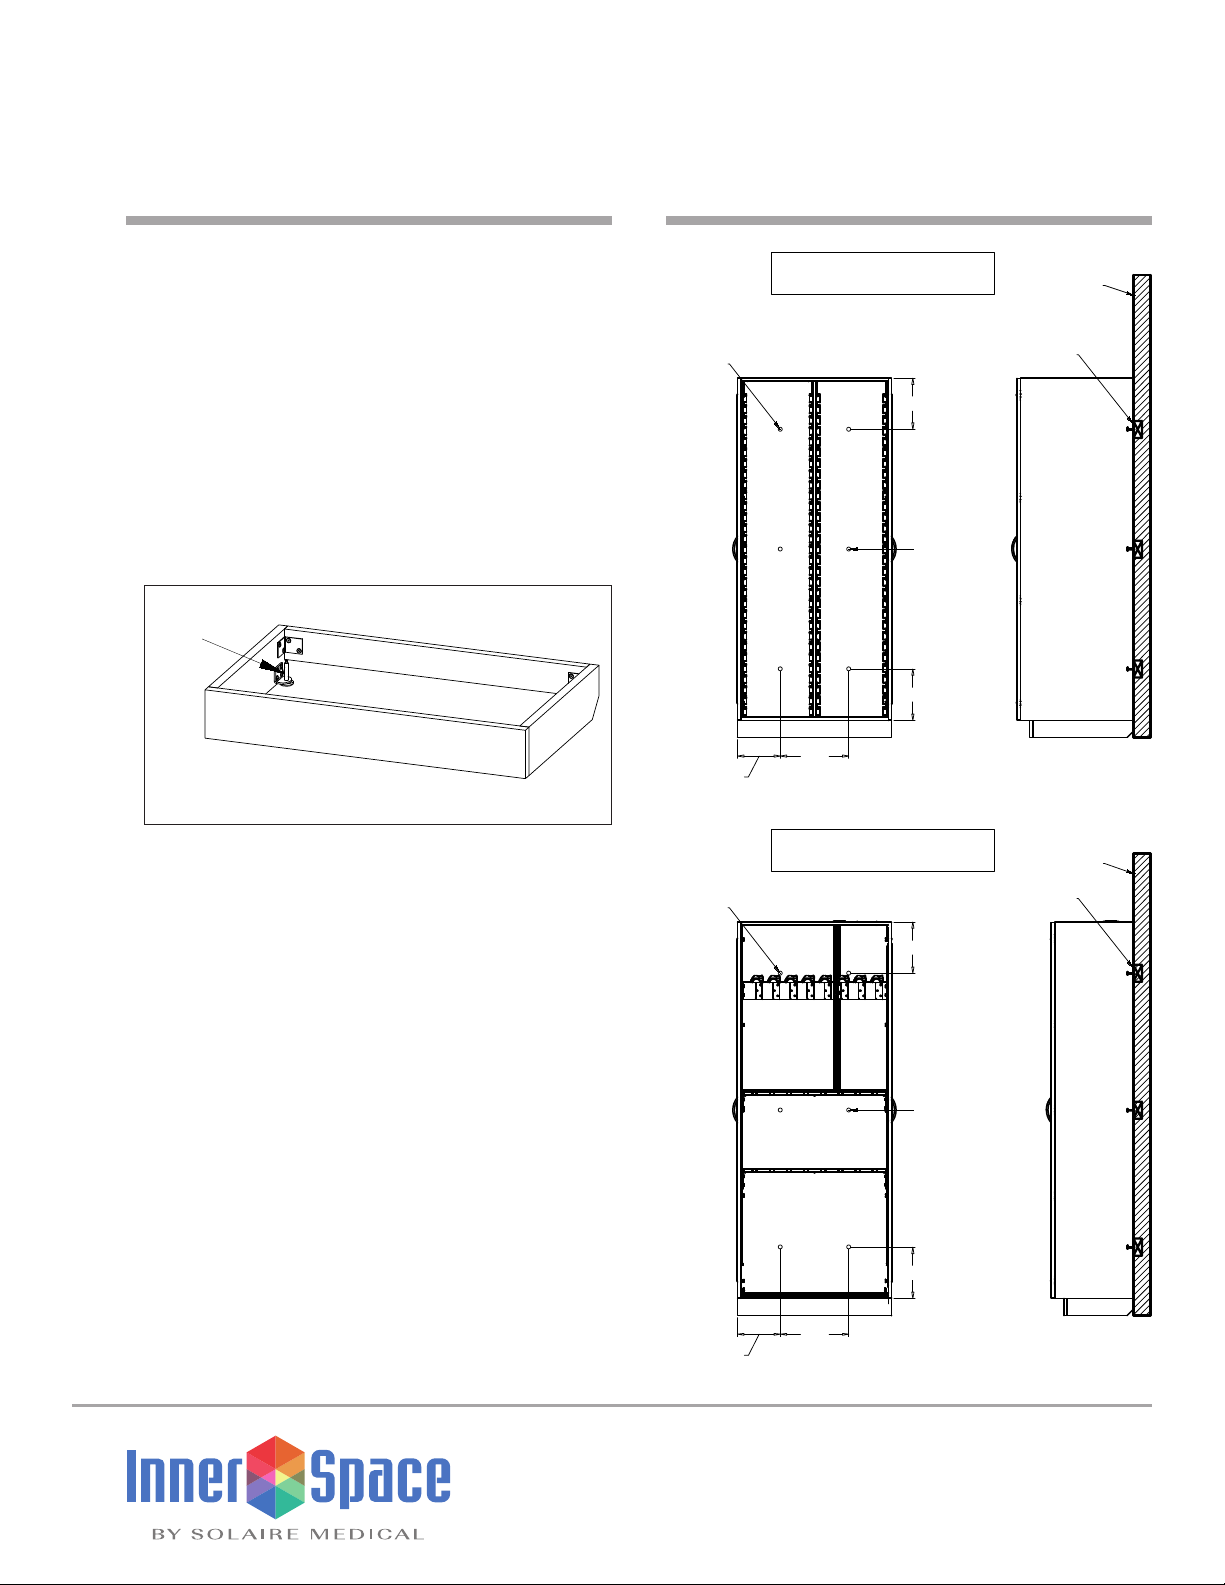
Installing multiple base, tall, and scope cabinets
Step 1
• Attach the run of bases together using wood screws, making sure
the bases are flush front to back and top to bottom. Position the
run of bases against the wall. Access leveling feet inside of bases,
and, with a flat head screwdriver, adjust the feet until the run of
bases is level.
Step 2
• Mount the bases directly to wall using appropriate fasteners for the
type of wall construction.
Step 3
• Place the end cabinet on the base. For cabinet with no finished
ends or two finished ends, center the cabinet. For cabinet with one
finished end, flush the adjacent cabinet and base end panels.
Step 4
• Plumb the cabinet and secure it to the wall through the back panel
using appropriate fasteners. See figure for placement.
Step 5
• Repeat Steps 1-4 with additional cabinets, making sure each is
level and plumb.
Questions? Call a Technical Services representative at 888-435-2256
Installation Instructions – Evolve Cabinets 3
(16")
VARIES DEPENDENT ON
STUD SPACING
12"
12"
CENTERED
(OPTIONAL
MOUNTING
LOCATION)
SUGGESTED
MOUNTING
LOCATION
SUGGESTED
MOUNTING
LOCATION
STUD
NOTE: USE APPROPRIATE
FASTENERS FOR WALL TYPE
(16")
VARIES DEPENDENT ON
STUD SPACING
12"
12"
SUGGESTED
MOUNTING
LOCATION
NOTE: USE APPROPRIATE
FASTENERS FOR WALL TYPE
SUGGESTED
MOUNTING
LOCATION
STUD
SUGGESTED
MOUNTING
LOCATION
STUD
414"
SUGGESTED
MOUNTING
LOCATION
414"
(16")
VARIES DEPENDENT ON
STUD SPACING
5"
SUGGESTED
MOUNTING
LOCATION
5"
(16")
VARIES DEPENDENT ON
STUD SPACING
NOTE: USE APPROPRIATE
FASTENERS FOR WALL TYPE
CENTERED
(OPTIONAL
MOUNTING
LOCATION)
LEVELING FEET
IMAGE OF BASE
Cabinet Base
Leveling feet
Storage solutions for healthcare
Installation Instructions – Evolve Cabinets 4
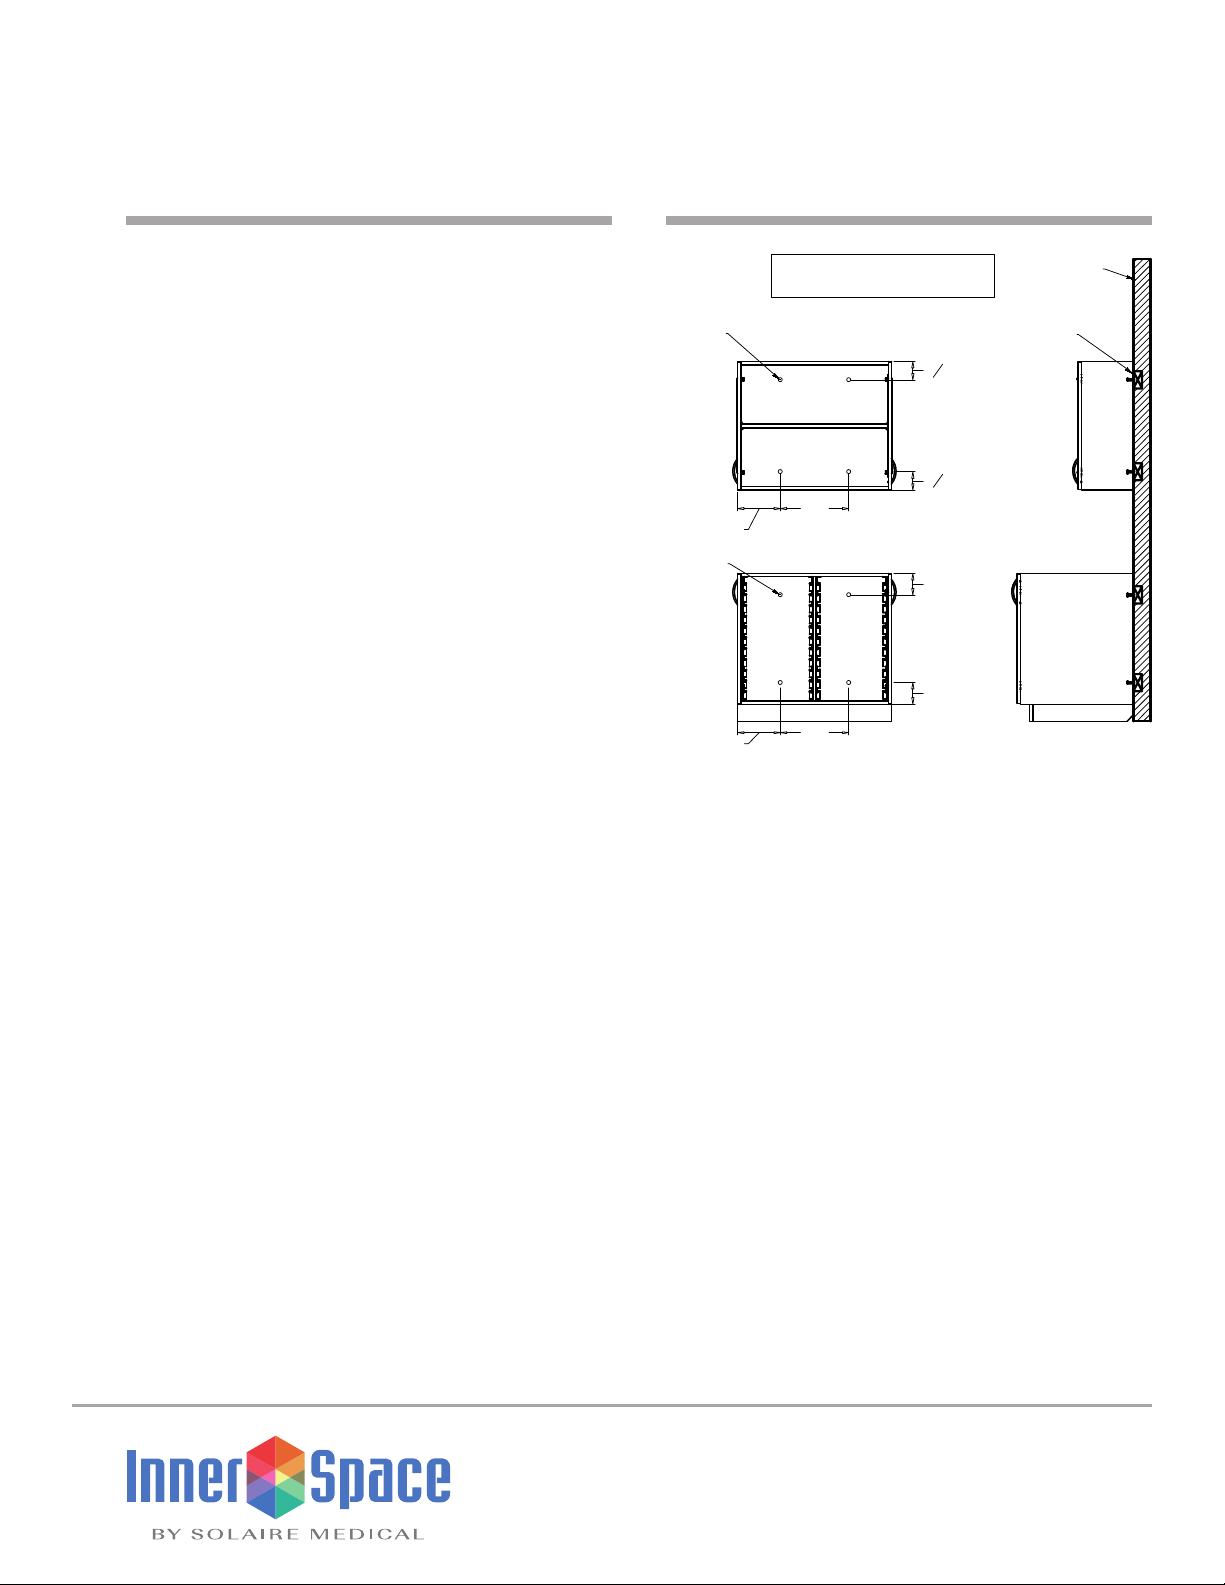
Installing upper wall cabinets
Step 1
• Determine location of upper cabinet or cabinet run. Using a level,
draw a line marking location of the bottom of the cabinet.
Step 2
• Position cabinet bottom at marked line, making sure cabinet is
level and plumb, and mount the cabinet directly to wall studs using
appropriate fasteners for the type of wall construction. See figure
for fastener placement.
Step 3
• To eliminate gaps in a cabinet run, drill pilot holes 1½" from the
interior front edge of cabinet and 1½" from the inside top and
bottom of cabinet. Tighten side-by-side cabinets with 1¼" wood
screws.
Questions? Call a Technical Services representative at 888-435-2256
(16")
VARIES DEPENDENT ON
STUD SPACING
12"
12"
CENTERED
(OPTIONAL
MOUNTING
LOCATION)
SUGGESTED
MOUNTING
LOCATION
SUGGESTED
MOUNTING
LOCATION
STUD
NOTE: USE APPROPRIATE
FASTENERS FOR WALL TYPE
(16")
VARIES DEPENDENT ON
STUD SPACING
12"
12"
SUGGESTED
MOUNTING
LOCATION
NOTE: USE APPROPRIATE
FASTENERS FOR WALL TYPE
SUGGESTED
MOUNTING
LOCATION
STUD
SUGGESTED
MOUNTING
LOCATION
STUD
414"
SUGGESTED
MOUNTING
LOCATION
414"
(16")
VARIES DEPENDENT ON
STUD SPACING
5"
SUGGESTED
MOUNTING
LOCATION
5"
(16")
VARIES DEPENDENT ON
STUD SPACING
NOTE: USE APPROPRIATE
FASTENERS FOR WALL TYPE
CENTERED
(OPTIONAL
MOUNTING
LOCATION)
Storage solutions for healthcare

Installation Instructions – Evolve Cabinets 5
Attaching slope tops to Evolve cabinets
For cabinets with roll-top doors
Step 1
• Align the clips on the top of the cabinet and the bottom of the
slope top. Place the slope top on the cabinet. Make sure all
4 clips are engaged.
For cabinets with hinged doors
Step 1
• Measure the distance from the front edge of the slope top to
the center support. See Step 1 figure.
Step 2
• Place the slope top on the cabinet. See Step 2 figure.
Step 3
• To determine screw placement to connect the slope top to the
cabinet, take these measurements and mark locations.
See Step 3 and 4 figure.
1: screw location from Step 1
2: measure 6" toward center from both the right and left side
of the cabinet
3: measure 1¼" from the back of the cabinet
Note: Recommend pre-drilling the marked screw locations.
Step 4
• Attach the slope top to the cabinet from the inside of the cabinet
using 1¼" wood screws (total of 4 screws).
Questions? Call a Technical Services representative at 888-435-2256
6"6"
114"
MEASUREMENT
FROM STEP 1
SCREW PLACEMENT
STEP 1
STEP 2
STEP 3 AND 4
UNDERSIDE OF
THE CABINET TOP
6"6"
114"
MEASUREMENT
FROM STEP 1
SCREW PLACEMENT
STEP 1
STEP 2
STEP 3 AND 4
UNDERSIDE OF
THE CABINET TOP
6"6"
114"
MEASUREMENT
FROM STEP 1
SCREW PLACEMENT
STEP 1
STEP 2
STEP 3 AND 4
UNDERSIDE OF
THE CABINET TOP
Step 1
Step 2
Steps 3 and 4
Measurement
from step 1
Screw
placement
Center
support
Storage solutions for healthcare

Solaire Medical | P.O. Box 2808 | Grand Rapids, Michigan 49501
888-435-2256 phone | 616-743-5944 fax | solairemedical.com
© 2018 Solaire Medical, Grand Rapids, MI 49501
® InnerSpace is a registered trademarks of Solaire Medical, Grand Rapids, MI 49501
75K0918
Solaire Medical specializes in storage solutions for all areas of your
healthcare facilities. We offer the InnerSpace®portfolio of products,
a cohesive system of carts, cabinets, and modular casework that
improves staff and facility efficiency and an organization’s bottom line.
When you purchase our products, you’re buying products made in
the U.S.A. and from a direct manufacturer that delivers on-time and
error-free.
Contact our service team with your requests or to connect with a
sales representative. We’re here to help you specify the best storage
products for your needs, whether a standard option or customized
solution. We offer complimentary storage analysis, design services,
CAD support, and logistics and installation assistance.
Call to schedule a free storage consultation.
Evolve
Cabinets
Evolve
Casework
Roam
Supply Carts
Rover
Workstations
Tempo
Procedure Carts
Other Solaire Medical Indoor Furnishing manuals

Popular Indoor Furnishing manuals by other brands

Regency
Regency LWMS3015 Assembly instructions

Furniture of America
Furniture of America CM7751C Assembly instructions

Safavieh Furniture
Safavieh Furniture Estella CNS5731 manual

PLACES OF STYLE
PLACES OF STYLE Ovalfuss Assembly instruction

Trasman
Trasman 1138 Bo1 Assembly manual

Costway
Costway JV10856 manual


