Solaris Strobes Quasar 15K User manual

Quasar 15K
Operating Manual
Revised: 102814

Quasar Operating Manual
2
CONTENTS
OVERVIEW 3
Safety precautions 3
Main features 4
INSTALLATION 5
Unpacking 5
Checking accessories 5
Controls and switches 6
Best location for installation 6
CONNECTING THE UNIT 7
Connection to mains power 7
Connection to a DMX 512 network 7
UNIT CONFIGURATION 8
Menu Operation 8
Menu Option 1: DMX Address 9
Entering DMX mode 9
DMX Features 9
Chaining Multiple Units 9
Menu Option 2: Fixture Modes 10
Operating the Unit 14
Recommended Controllers 15
ADDITIONAL INFORMATION 15
Maintenance 15
Changing the Flash Tube 15
MENU MAP 16
TECHNICAL SPECIFICATIONS 17
CONTACT INFORMATION 18

3
Quasar Operating Manual
OVERVIEW
Thank you for purchasing the Solaris Quasar professional
strobe. Please read this manual carefully before operation and
keep it for future reference.
CAUTION! To avoid danger of fire and electric shock, do not
expose the unit to water or moisture and do not attempt to
remove its cover. Repairs should be done by qualified and
authorized personnel only. During operation, the unit’s
discharge tube may draw power exceeding limit values.
CAUTION! Do not look directly or indirectly into the
discharge tube without eye protection such as welder’s
goggles.
1. Prior to installation, ensure that the mains voltage is
between 190-260 VAC and the mains frequency is
between 50-60 Hz.
2. Make sure that the mains outlet used for powering the unit
is of the earthed/grounded type and in perfect condition.
3. Should any kind of liquid or solid material penetrate the
unit, terminate operation immediately, then unplug the
connector from the mains outlet, and contact an authorized
repair facility.
4. Do not cover the vents on the unit. Adequate ventilation is
required for satisfactory operation and ensures long
operating life.
5. Even when turned off, the unit is powered if the connector
is plugged into the mains outlet.

4
Quasar Operating Manual
6. If you do not intend to use the strobe for a long period of
time, unplug the connector from the outlet. When
disconnecting from AC power, grab the mains connector
securely and pull. Do not pull on the power lead.
7. Replacing the connector should only be done by an
authorized repair person. Do not tamper with or remove
the mains plug from the end of the cord. Improper
connection may cause fire owing to the unit’s high power
consumption.
8. Note to qualified service personnel: Before changing the
discharge tube, switch off the equipment, unplug the
mains lead, and wait for the strobe to cool down.
Main Features
•Quasar, DMX 512, turbo, normal
•Extra-high intensity flashes
•Optional Continuous duty (100 Hz)
•DMX-512 In/Out
•Software controlled overdrive protection (ETV)
•Auto-detection of mains frequency
•Overheating protection
•Extra-high accuracy of flashes
•3-phase compatibility
•Internal/external controllability: pulse, manual, DMX
•Chain compatibility (MASTER –SLAVE)
•Compact
•Self-test functions
•LED indication

5
Quasar Operating Manual
INST
ALLA
TION
Unpacking
Do not dispose of the shipping box and the packaging, as they
are useful for transporting the unit. Before shipping, make sure
the unit is packed the same way it was at the factory. During
unpacking, check if the unit is undamaged and clean. If the
unit is damaged, contact the freight company immediately. If
the unit has become wet in the box, make sure it is completely
dry before power-up. If operation should fail, contact the
freight company with your complaint.
Checking Accessories
After unpacking the unit, check all accessories and the
condition of the discharge tube (use the mirror behind the
tube). If the tube is damaged, report it to the freight company
immediately.
Accessories:
•XOP 15 (or equivalent) discharge tube
•Mains lead with powerCON connector
•Operating manual
•Rack ears
•2 barn doors

6
Quasar Operating Manual
Controls and switches
ENTER
DMX THRU
DMX IN
1 2 3 5 4 6
1. Menu / Enter Button
2. Up / Down Menu Navigation buttons
3. Menu LED
4. DMX Out/Thru
5. DMX Input
6. powerCON Mains Input Connector
Best Location for Installation
Install the unit in a location with adequate ventilation. Avoid
locations where the strobe may be exposed to heat, dust,
vibration, or physical shock. Choose a location that enables
easy connection of both the mains lead and control cables.
Install the unit first before connecting the leads.
CAUTION: The operating temperature of this fixture may
exceed 120° C (240° F). Even after shutting down, touching
the body of the unit may cause burns. Always wait for the
fixture to cool down before handling. Do not place the unit
near flammable materials.

7
Quasar Operating Manual
CONNECTING THE UNIT
Connection to 230 V mains
•Use connectors with protective earthed ground only.
•Connect the unit with controls set at minimum values.
•Check connection. Loose connections may cause
malfunction.
•Programmed settings are retained even after a power
loss. When powering up, the unit will return to its last
known settings.
Connection to a DMX-512
Network
•Use standard (XLR 5) connectors. Check for loose
connections, as they are a common source of malfunction.
•Use high-quality professional DMX cables only.
•The last strobe unit in a chain should have a TMB Arnold
(or equivalent 120 Ω termination plug) installed into its
DMX THRU XLR connector.
•It is possible to change input connections and DMX base
address while the strobe is turned on. The unit will
recognize, execute, and indicate commands even during
operation.

8
Quasar Operating Manual
UNIT CONFIGURA
TION
Configuration of the Quasar unit is performed using the
integrated menu system. Selection of menu options occurs
using the Menu/Enter Key and the Up and Down navigation
buttons. Menu options and user input are shown on an
alphanumeric display. These panel features are depicted
below:
DMX addressing and Fixture Mode are configured using
these panel controls to operate the unit menu.
Menu
Operation
Fixture Mode is set across eleven (11) Menu options.
Pressing the MENU/ENTER button will alternate between
fixture mode and DMX address.

9
Quasar Operating Manual
Menu Option 1: DMX Address
Entering DMX Mode
Press the MENU/ENTER button once. The current DMX base
address (Channel 1) will be depicted on the numeric display.
Pressing the UP/DOWN navigation buttons will increment
or decrement the base address on the display. Asingle tap will
alter the displayed address by one, while pressing and holding
a navigation button will cause the address to change rapidly.
Valid addresses will range from 1 to 511. Once the desired
Base Address for Channel 1 is reached, pressing the MENU/
ENTER Button will save this address as the new DMX Base
Address.
DMX Features
The Quasar unit can be remotely controlled using industry
standard DMX-512 protocol. In DMX Mode, Channel 1
dictates the Strobe Rate. DMX values from 1-90% increase
the frequency of strobe flash from 1-24 Hz. Above 90%
activates Continuous Mode (constant light output). Channel
2 accepts values which dictate flash intensity above 10%.
Chaining Multiple Units
Independent unit control of multiple flash units requires unique
channel addresses to be programmed into each fixture. If
identical control of multiple units from a single control source is
desired, each unit may have the same DMX base address.

10
Quasar Operating Manual
Menu Option 2: Fixture Modes
The Quasar Fixture has eleven (11) modes of operation (see
menu map, pg. 16).
A- Automatic Mode. Use for standalone operation. The mode
contains menus for Intensity, Duration, and Repeat Rate.
AE2 - Automatic Effect Mode. Use for stand-alone operation.
The mode contains menus for Intensity, Effect Speed, and
Effect Select.
AC1 - Atomic Compatible Mode (1 Channel). This mode is
comparable to an Atomic in 1 Channel mode. Allows for
control of Rate on 1 channel of DMX.
DMX Channel
Value
Percent
Function
1
0-5
0-2
Blackout
6-249
3-97
Flash Rate Slow to Fast
250-255
98-100
Continuous On Effect
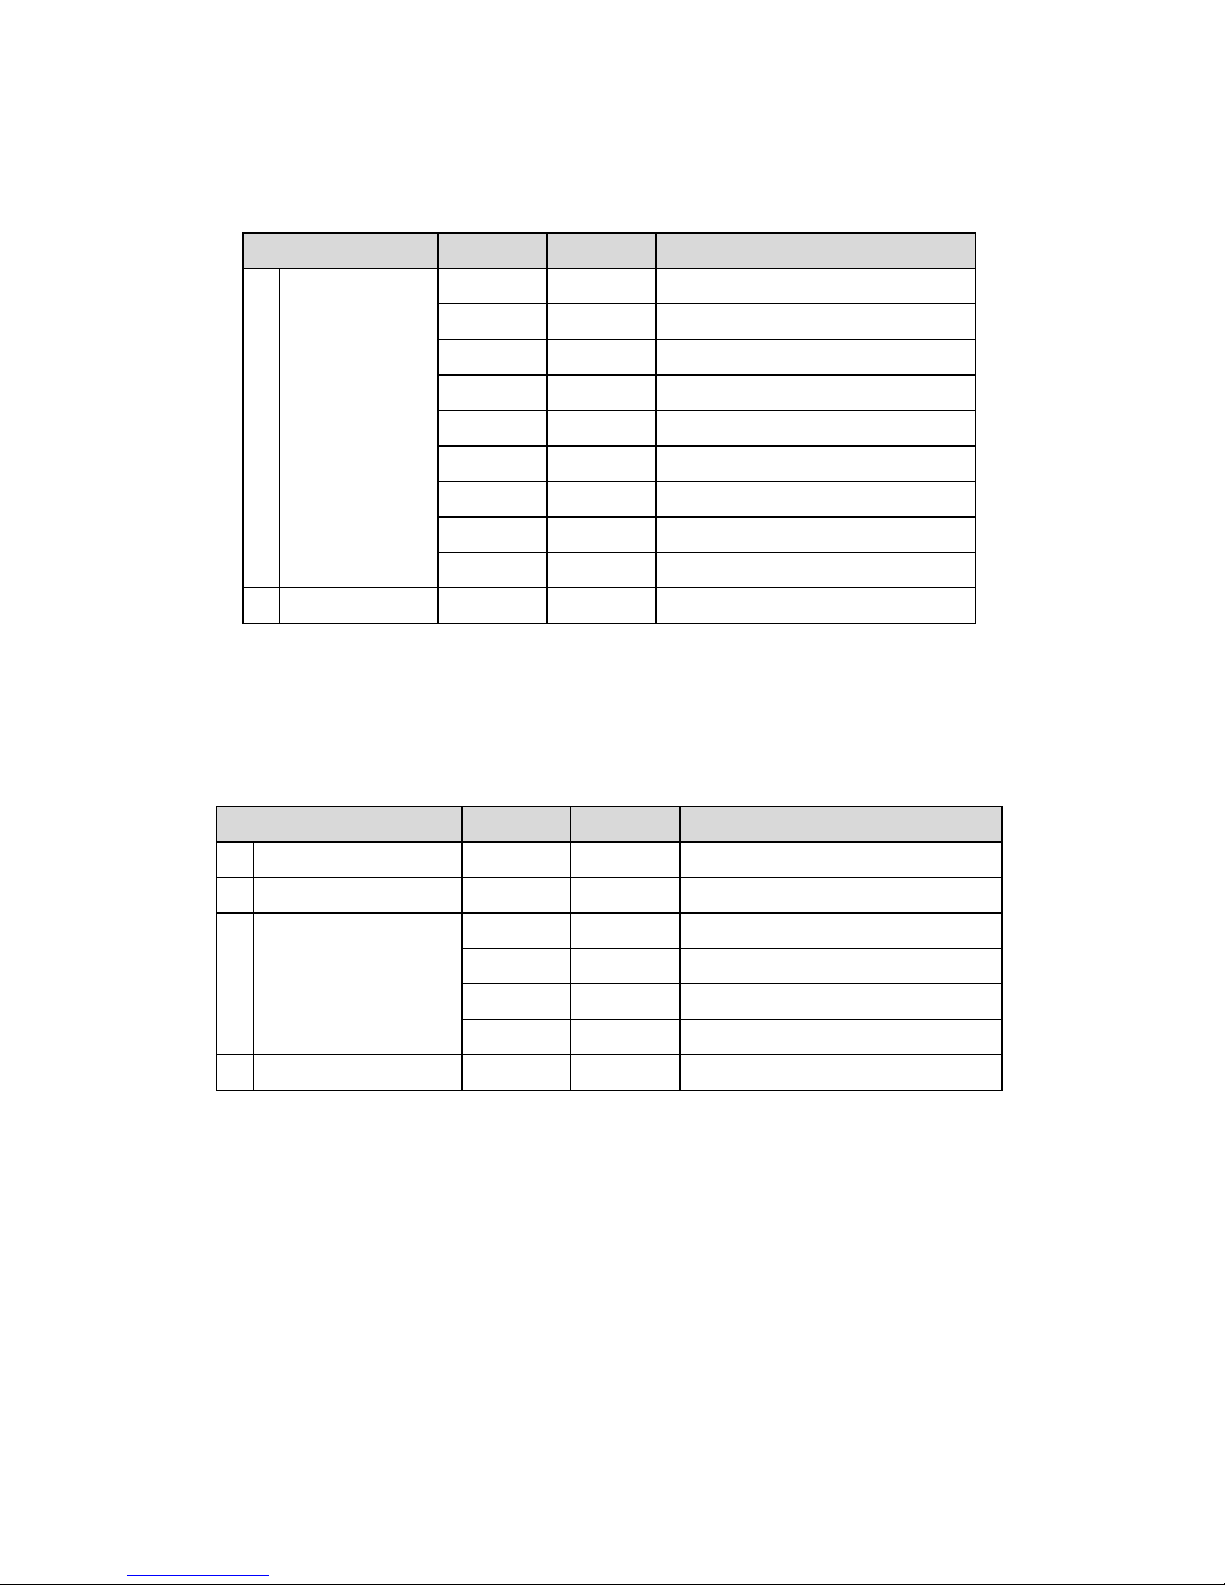
AC3 - Atomic Compatible Mode (3 Channel). This mode is
comparable to an Atomic in 3 Channel mode. Allows for
control of Intensity, Duration, and Rate on 3 channels of DMX.
DMX Channel
Value
Percent
Function
1
Intensity
0-5
0-2
Blackout
6-255
3-100
1-100%
2
Duration
0-255
0-100
0-650ms @50Hz
or, 0-530ms @ 60Hz
3
Rate
0-5
0-2
No Flash
6-255
3-100
0.5-25Hz @ 50Hz or,
0.6-30Hz @ 60Hz

11
Quasar Operating Manual
AC4 - Atomic Compatible Mode (4 Channel). This mode is
comparable to an Atomic in 4 Channel mode. Allows for
control of Intensity, Duration, Rate, and Effect on 3 channels
of DMX.
DMX Channel
Value
Percent
Function
1
Intensity
0-5
0-1
Blackout
6-255
2-100
1-100%
2
Duration
0-255
0-100
0-650ms @50Hz or,
0-530ms @ 60Hz
3
Rate
0-5
0-1
No Flash
6-255
2-100
0.5-25Hz @ 50Hz or,
0.6-30Hz @ 60Hz
4
Effect
0-5
0-2
No Effect
6-42
2-16
Ramp up
43-85
17-33
Ramp down
86-128
34-50
Ramp up-down
129-171
51-67
Random
172-214
68-84
Lightning
215-255
85-100
Spikes
SLF - Self Test. This mode will flash the strobe in order to test
for proper lamp operation.
FS –Fixture Settings. Allows control of power reduction,
display intensity, and menu mode.
d- DMX Mode. Controls Rate and Intensity on 2 channels of
DMX.
DMX Channel
Value
Percent
Function
1
Rate
0-230
0-90
Slow to Fast
231-255
91-100
Continuous On Effect
2
Intensity
0-255
0-100
0 -100%
12
Quasar Operating Manual
dE2 - DMX Effect Mode (2 Channel). Controls Rate/Effect and
Intensity on 2 channels of DMX.
DMX Channel
Value
Percent
Function
1
Rate/Effects
0-117
0-45
Rate Slow to Fast
118-127
46-50
Continous On Effect
128-148
51-58
Ramp up (slow to fast)
149-168
59-66
Ramp down (slow to fast)
168-188
67-74
Ramp up-down (slow to fast)
189-209
75-82
Ramp down-up (slow to fast)
210-229
83-90
Random (slow to fast)
230-250
91-98
Spikes (slow to fast)
251-255
99-100
No effect
2
Intensity
0-255
0-100
0-100%
dE4 - DMX Effect Mode (4 Channel). Controls Rate, Intensity,
Effect, and Effect Speed on 4 channels of DMX.
DMX Channel
Value
Percent
Function
1
Rate
0-255
0-100
Slow to Fast
2
Intensity
0-255
0-100
0-100%
3
Effect
0-26
0-10
No Effect
27-247
11-97
Random Lighting slow to fast
248-251
98
constant on
252-255
99-100
nothing
4
Effect Amplitude
0-255
0-100
Size Small to Large
13
Quasar Operating Manual
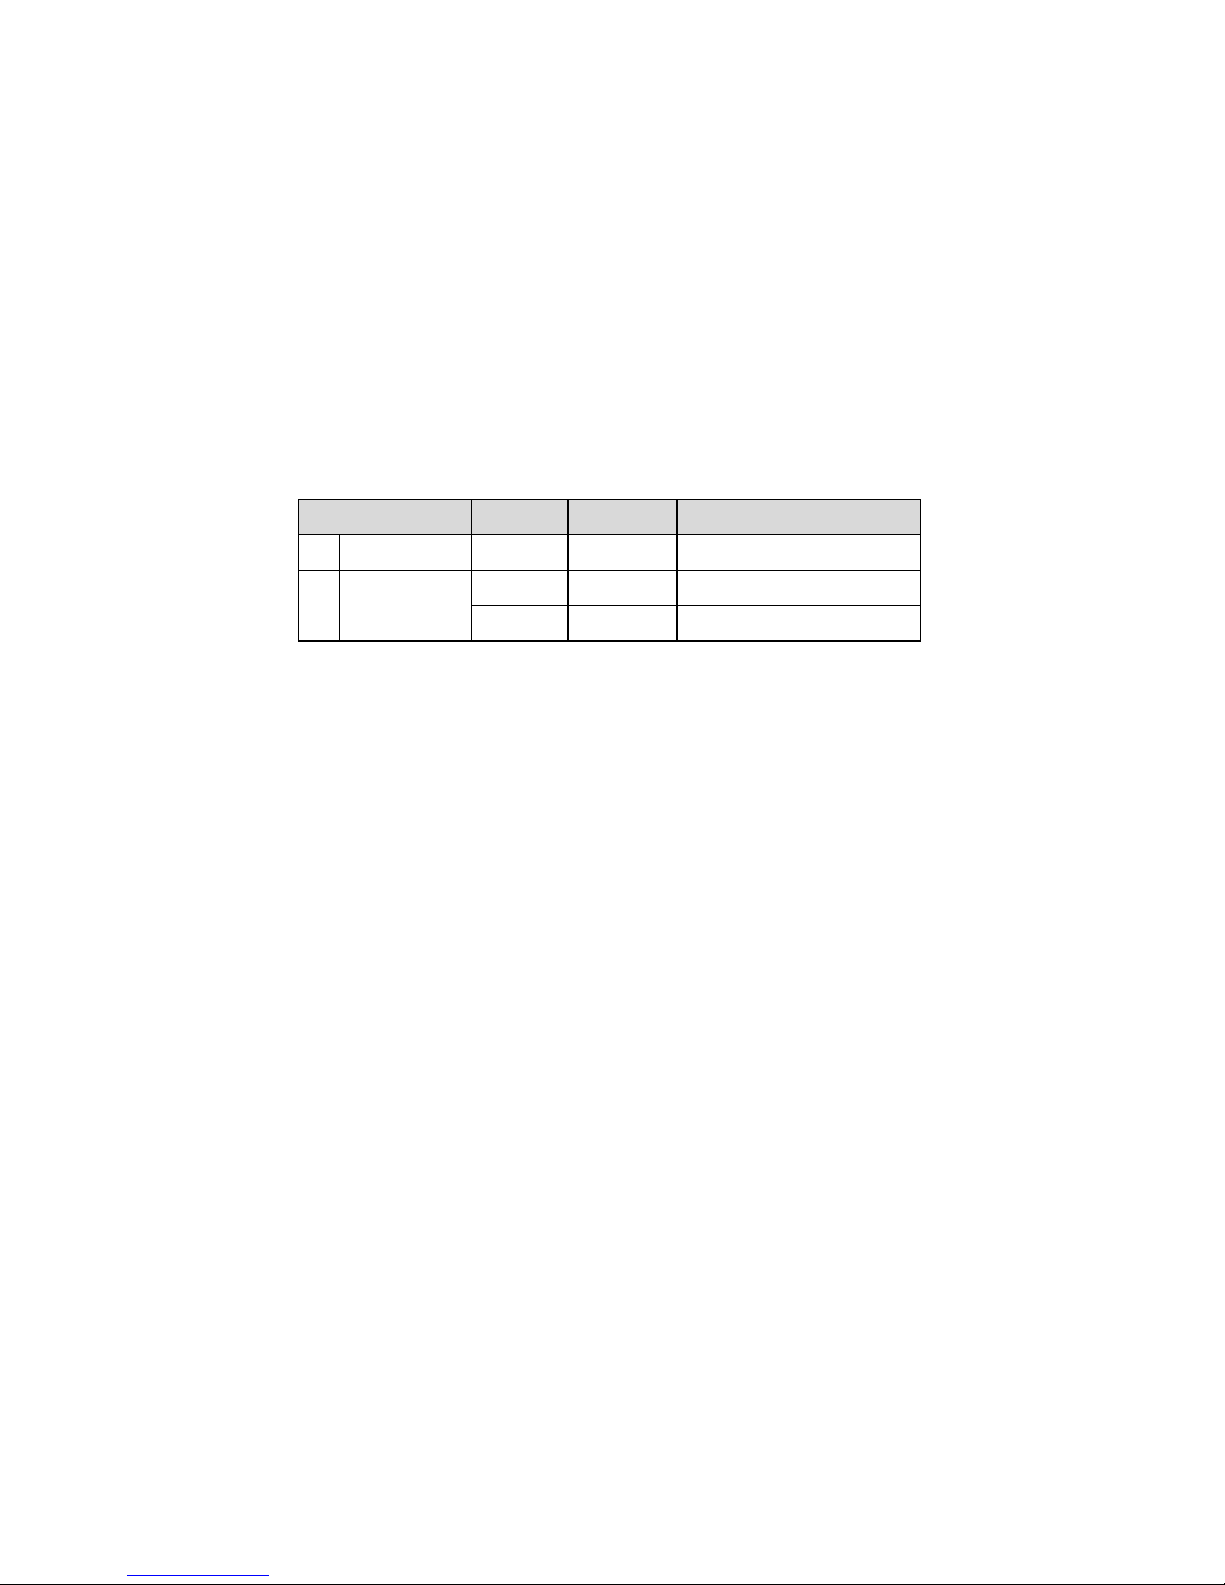
H- Allows the unit to be controlled by optional Solaris Remote
or High End®flash control protocol. Similar to DMX operation,
two sequential channels are programmed. In H mode fixture
Intensity and flash Strobe Frequency are controlled by the
refresh rate of the H signal on Channel 1.
The H mode provides preset effects which are selected based
upon the value issued to Channel 2. These values and the
effect selected are depicted below.
DMX Channel
Value
Percent
Function
1
Intensity
0-255
0-100
0-100%
2
Control
0-10
0-1
Constant Fast Strobe
11-255
2-100
Constant On Effect

14
Quasar Operating Manual
Operating the
unit
After proper installation, connection, and Menu Setup, you can
start using all the outstanding features that the Quasar offers.
•Extra-high intensity output. This can be achieved by
selecting Turbo Mode, which will double the unit’s light
output (except when in Continuous mode).
•Continuous flashes. The unit can fire flashes at a rate of 100
or 120 Hz if the mains frequency is 50 or 60 Hz, respectively.
Such a high rate of flashes is perceived as continuous
illumination. Regardless of the kind of controller system
being used, this function is always available.
•During operation, the flash tube is under constant electronic
overdrive protection (EVD). In Continuous Mode and with
maximum intensity, the protection allows flashes for 3.5
seconds, with a subsequent downtime of 51.2 seconds. In
Turbo and Normal Modes, the protection times are 11.7 and
52.5 seconds, respectively. Even if the unit is used for
shorter periods of time, the system switches the tube off as
soon as overall duration reaches the given protection time.
Protection time increases with lower intensity.
In order to ensure maximum safety, the strobe has two more
protection systems against overheating. Both systems are
designed to activate in unusual operating conditions and are
“self-resetting”.

15
Quasar Operating Manual
When turned on for the first time, the unit automatically
detects mains frequency. No manual setting is required.
•Quasar can produce more accurate “jitter free” flashes,
even at frequencies higher than 10Hz.
•Any fixture connected to any phase can be controlled in the
same way. When using more than one strobe, it is
advisable to assign different phases to the fixtures owing to
high power draw.
Recommended Controllers
•Solaris Quasar Controller
•High End Dataflash AF1000 Mini Controller (Switch the
JUMPER from DMX to DFLASH position on the
PCB).
ADDITIONAL INFORMA
TION
Maintenance
Keep the fan and surrounding area free of dust and
dirt.
The
mirror can be cleaned without having to dismantle the unit.
Simply blow air through the grid. The mirror does require any
further cleaning. More thorough cleaning of the mirror and its
surroundings should ONLY be done by the manufacturer or
qualified and authorized repair personnel.
Changing the Flash
Tube
The Quasar flash tube may only be changed by the
manufacturer or a qualified repair person authorized by the
Manufacturer.

16
Quasar Operating Manual
MENU MAP

17
Quasar Operating Manual
TECHNICAL SPECIFICATIONS
LAMP
Maximum continuous flash
discharge
57,000 Joules
Single flash discharge
150 Joules
Frequency of continuous mode
100 / 120 Hz
Flash tube type
Special Quasar tube (with plugs)
Color temperature
6,000° Kelvin
PERFORMANCE
Intensity control
0-100 %
Adjustable flash frequency
0-20/24 Hz
Power draw (Turbo)
6 kW
Max. power draw (Continuous)
15 kW
Modes
Normal
Turbo
DEVICES
Electronic overdrive protection
3.5 seconds max.
Overheating protection
Dual, self-resetting
Programmed Self-Test
1
CONTROL
Channel 1
Frequency
Channel 2
Intensity
# of possible starting addresses
511 max.
Connection type
XLR 3-Pin or 5-Pin
Data conversion
From DMX to PULSE
Protocol
DMX-512
POWER
Nominal mains voltage
190-260 VAC, 50/60 Hz
Maximum power consumption
Continuous
60 A (3.5 sec.)
Turbo
32 A (11.5 sec.)
FIXTURE
Protection from breaking flash tube
Protective grid
Mounting
Adjustable swivel yoke
Corrosion protection
Electrostatic sintering
Unit weight
7.8 lb. (3.6 Kg)
Shipping weight
10.6 lb. (4.8 Kg)
Unit Dimensions (HxWxD)
7.5” x 21.5” x 5.5”
(19 x 54.6 x 14 cm)
Shipping Dimensions (HxWxD)
10.5” x 23.75” x 9”
(27 x 60.5 x 23 cm)

18
Quasar Operating Manual
CONTACT INFORMATION
TMB Worldwide
TMB LA: +1 818.899.8818
TMB NY: +1 201.896.8600
TMB UK: +44 (0)20.8574.9700
TMB Canada: +1 519.538.0888
TMB Beijing: +86 10.8492.1587
e-mail: [email protected]
web: www.tmb.com
TMB 24/7 Technical Support
US/Canada: 1 877.TMB.DUDE (1 877.862.3833)
UK: 0800.652.5418
International: +1 818.794.1286
Table of contents
Popular Dj Equipment manuals by other brands

Audio Gear Obsession
Audio Gear Obsession SUMMINGFACILITY user manual

Auralex Acoustics
Auralex Acoustics ProGO-26 Assembly and user's guide

STARVILLE
STARVILLE xBrick Full-Colour 16X3W user manual

Chauvet
Chauvet COLORado Panel Q40 user manual

Anolis
Anolis Divine 60 UV user manual

Toro
Toro GrandStand 74527 Operator's manual


