Solectek SkyWay-EB series User manual

Installation
3-1
SkyWay-EB
Series
3. Deployment
This section describes step-by-step procedures to prepare the mounting and installation of a SkyWay-EB
link.
3-1. Site Preparation
The following preparations should be considered prior to installing the SkyWay-EB units.
Line of Sight
Absolute ling of sight (LOS) is necessary for proper operation of the link. Though the Fresnel zone for
millimeter waves is fairly small, a minimum of 1 meter of clearance on a rooftop is recommended.
Mast
The mast for unit installation must be fi xed on solid foundation. Vibrations caused by wind may
degrade the link performance or even cause link downage.
Site Permission
The installation location should be approved by the building owner or superintendent. Installation
methods and wiring of various cables must meet local requirements.
Cable Length
The installer must determine the total length of the cable run between the radio unit and the connection
point for power, data, and management cables.
3-2. Tools and Equipment
The following tools and equipment are needed to install SkyWay-EB units. Installers should check the
following prior to installation:
Fish Tape
A steel fi sh tape will be needed to pull various cables through the conduit. An example is shown in Fig. 1
below.
Figure 3-1 Steel Fish Tape

I
nstallation
3-2
SkyWay
-EB
Series
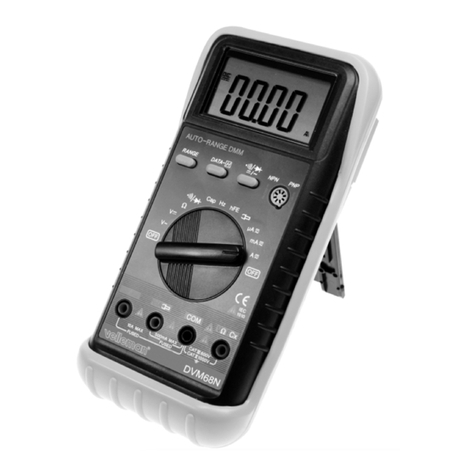
Digital Multimeter
A multimeter/voltmeter will be needed to take RSSI readings during the antenna alignment procedure. You
will need alligator clips or similar termination on the radio side of the probe cables.
It is essential that the RSSI connection is secure so that reliable continuous readings can be taken during
the antenna alignment procedure.
A Set of Phillips Screw Drivers
Phillips screw drivers will be needed to open/close the back cover of the enclosure and fasten various
cables in place.
3-3 Material Preparation
The following material must be ordered and prepared prior to installation:
48VDC Power Supply - There are two options for provisioning the power supply:
A local 48V power source (typical of telecom installation sites).
The AC-48VDC power adapter provided within the SkyWay-EB Series package. .
The minimum power requirement for the radio is 20 W and 0.5 A.
Serial Management Cable
24-Guage wire (AWG24) is recommended.
The maximum cable length is 200m.
Fiber optic data cable
Multimode fi ber cable terminated with LC connectors is needed.
The max length for a multimode fi ber connection is as follows:
62.5/125 um fi ber
275m
50/125 um fi ber
550m
Power cable
18 Gauge wire (AWG18) is recommended.
The maximum cable length is 280m.
Electrical Conduit
An outdoor grade electrical conduit is commonly used to provide protection for the cables in
outdoor installation.
The installer will need to prepare a 3⁄4 inch US standard conduit with internal steel reinforcement
and PVC cover.
•
Í
Í
Í
•
Í
Í
•
Í
Í
•
Í
Í
•
Í
Í

Installation
3-3
SkyWay-EB
Series
3-4 Cable Termination
Prepare the cables
Power cable – terminate with spade lug connectors on the radio side by crimping your wire inside
the protective jacket. The spade lugs are provided in the SkyWay-EB product package. An example of
a terminated cable is shown in Fig. 3-2.
Figure 3-2
Management cable – terminate with spade lug connectors on the radio side and with a DB9
connector on the network side.
Figure 3-3
Fiber-optic data cable – no modifi cation necessary. Need to make sure to end caps are in place until
you are ready to make connection.
•
Í
Í
Í

I
nstallation
3-4
SkyWay
-EB
Series
Electrical Conduit
Cut the conduit cleanly on both ends with appropriate tools such as an electric saw.
Smooth out the sharp edge so as not to damage cables on contact.
Figure 3-4
3-5 Cable Installation
Disassemble all parts of the fi tting assembly located at the bottom of the enclosure, as shown in Fig. 3-5.
Figure 3-5
Insert the cables through the conduit using a fi sh tape. Finish the cable/conduit work prior to mounting
the gear.
•
Í
Í
•
•

Installation
3-5
SkyWay-EB
Series
Figure 3-6
Before you begin the cable connection, make sure to slide the compression nut on the conduit. Make
sure that the more closed side (with markings) is facing away from the enclosure. Then, slide in the o-
ring on the conduit and screw in the ferrel piece as shown in Fig. 3-7.
Figure 3-7
•

I
nstallation
3-6
SkyWay
-EB
Series
Remove the back cover of the enclosure.
Figure 3-8
Slide the cables through the compression piece, through the enclosure, and then through the retaining
piece, as shown in Fig. 3-9.
Figure 3-9
•
•

Installation
3-7
SkyWay-EB
Series
Tightly screw in the compression nut, as shown in Fig. 3-10 to complete the conduit connection. The o-
ring will provide water seal at this cable entry point.
Figure 3-10
Connect the cables to appropriate ports. Do not take out the screws – spade lug connectors can be slid
in with the screws loosened. Please refer to the following tables for the correct cable connection.
3-5-2. Connecting the AC Power Source
There are 3 terminal blocks to connect the power source inside the SkyWay-EB units. The connection is
fastened with M3 bolts.
As for the electric wire coming from the outside, use the wire with the diameter of 0.75mm or larger to
stably supply the electricity.
It is recommended to use the ring type tinned copper terminal end or PVC insulated type tinned copper
terminal end to connect the terminal block and the wire. The internal diameter of the solderless terminal
should be 3.2mm.
Table 3-1 Terminal Blocks Connecting the Power Source
Terminal
NC Terminal
(+)V Terminal
(-)V Terminal
When using a - 48V source
NO connection
Ground wire
-48 V wire
When using a +48V source
NO connection
+48V
Ground wire
•
•

I
nstallation
3-8
SkyWay
-EB
Series
3-5-3. Communication Terminals (Signal I/O Ports)
The
SkyWay-EB Series
supports fi ber optic cables for connection to your indoor networking equipment
(switch, router, etc). The following table 3-2 shows the specifi cation of standard optical termination using
LC connectors.
The communication terminals of the
SkyWay-EB Series
are connected as shown in Fig. 3-11. The RX
terminal on the radio unit is connected to TX of the networking equipment, and the TX terminal on the
radio unit is connected to the RX terminal of the networking equipment.
Figure 3-11 Network Connection
The optical fi ber type of
SkyWay-EB Series
is shown in Table 3-2.
Table 3-2 Optic Fiber Type
Model Type
All Models
I/O Terminal
850 nm / MM / LC
Figure 3-12

Installation
3-9
SkyWay-EB
Series
Loosen the RSSI and GRN screws so that multimeter cables can be connected.
Figure 3-13
Put the back cover back on until you are ready to start the alignment procedure.
Figure 3-14
•
•

I
nstallation
3-10
SkyWay
-EB
Series
3-6 Alignment
Mount the unit on an appropriate place using a pole or other mounting options.
Adjust the unit in the general direction of the other unit.
Remove the back cover of the unit and Connect your multimeter for the continuous RSSI readings that
you will need to use for alignment. The multimeter should be fi xed in a position that you can easily read
the data while adjusting the radio unit.
The RSSI / GRD ports are shared with the other wires for internal use. Please be careful to insure that the
other wires are still secured connected.
Adjust the mounting kit to begin the alignment. The multimeter readings are the best way to discover
the bore site between the antennas.
Refer to the RSSI measurement date sheet (provided in the package) to insure that you are reaching the
minimum RSSI threshold and the antennas are in suffi ciently good alignment.
Once the alignment is done, remove the multi-meter from the ports and close the back cover.
3-7 Terminal Location Diagram for Wire Connection
Figure 3-15
3-7-1. Checking the cables
Make sure that the following conditions are met:
The correct power source (48V DC) is used. The SkyWay-EB unit uses a 48V DC power source.
The cables are properly connected.
The optic connector is connected and the OSD LED is lit.
Connect the RS-485 cable to the serial terminal of the PC (The adaptor is used) and execute SkyWay-
EB User Interface.
Check the receive power through the user interface program.
•
•
•
•
•
•
•
•
•
Í
Í
•
Table of contents
