manuals.online logo
Brands
  1. Home
  2. •
  3. Brands
  4. •
  5. Drok
  6. •
  7. Multimeter
  8. •
  9. Drok 200141 User manual

Drok 200141 User manual

DROK DC MultimeterParameter:Test range and display format:200141Operating voltage range: DC 6.5-100VMeasuring voltage range: DC 6.5-100VRated power: 100A/10000WAccuracy: ≤1% Shunt: 100A/75mVSize pof Shunt: 107x23mm /4.2" x 0.9"Wiring diagram:Note:Voltage Range: 6.5~100V (display 6.50~99.99V) Key Operations:No load (only detect the voltage, no shunt or load connected):Loadtested device/power supply100A/75mV shuntThe positive and negative pole of the power supply of the meter can be directly connected to the positive and negative pole of the power supply/tested device.With load (connected with shunt and load):Please note that the negative pole of the DC meter cannot bedirectly connected to the negative pole of the power supply end.It should be connected to the terminals of the external shunt.Current Range: 0~100A (display 0.00~99.99A) Power Range: 0~10kW within 1kW, display 0.0~999.9W; above 1kW, display 1000~9999W. Energy Range: 0~9999kWh within 10KWh, display 0~9999Wh; above 10kWh, display 10~9999kWh. Backlight Control.Short press the key to turn on or turn off the backlight. Backlight on/off status automatically saved when power offAccumulated energy data reset.Step 1. Hold press the key till the display area displays “CLr”, and then loose the key.Loadtested device/power supply100A/75mV shuntFrontBack
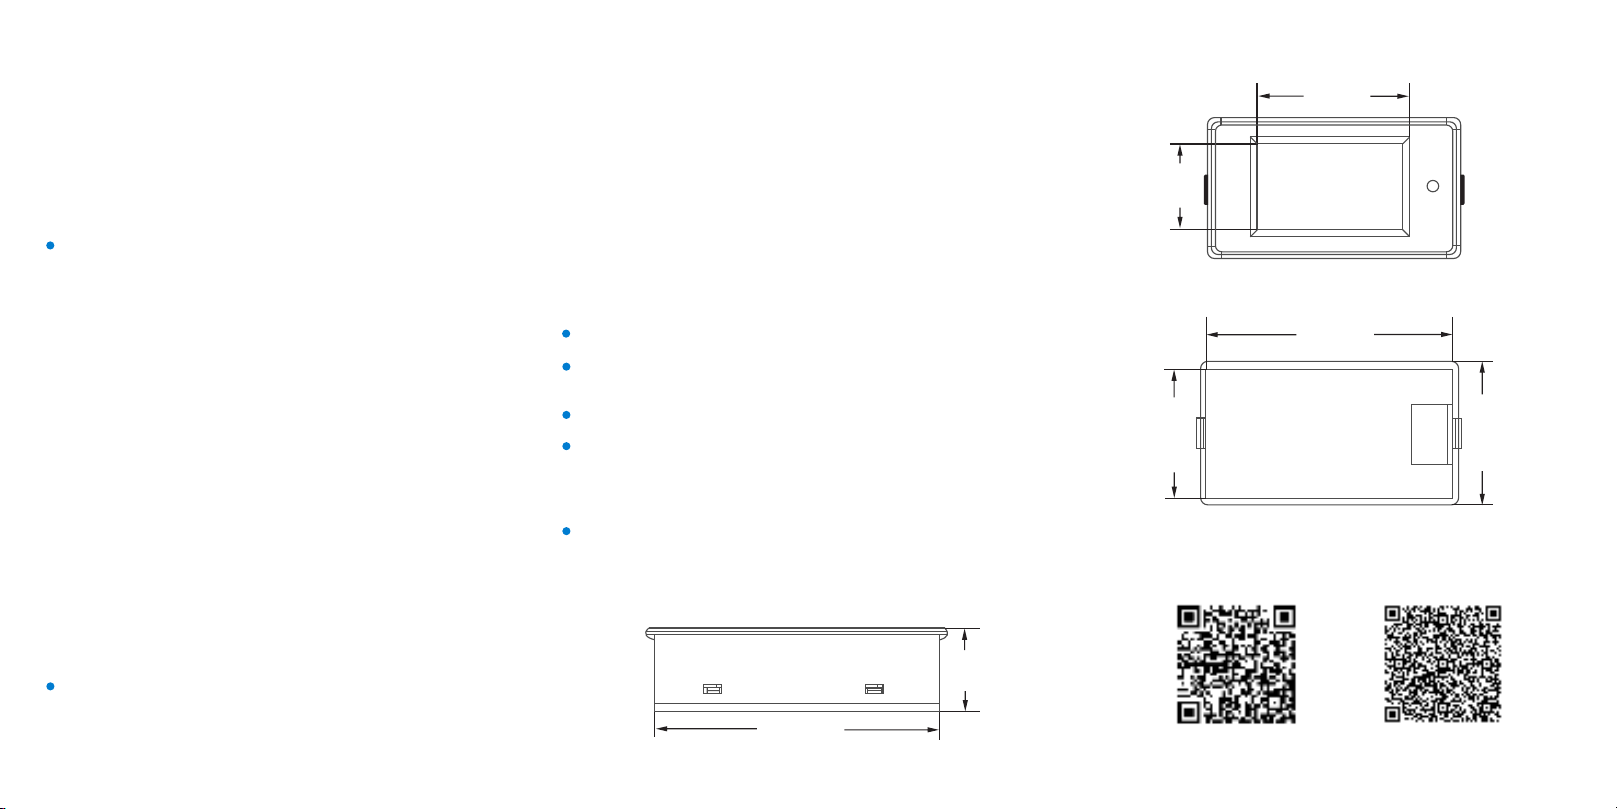
Step 2. At this time, the energy display area flashes to indicatethat it is at “accumulated energy data reset” status. Shunt range setting.Cautions:Recommend product on Amazon:Volt Transformer Power Regulator Line84.6mm
44.6mm49.6mm
84.6mm24.4mm51mm30mmThis module is only applicable for 6.5~100V DC power. Step 3. Short press the key, the accumulated energy will be cleared, and it will stop flashing and exit reset status.Alarm voltage value setting.Step 1. Hold press the key till the power display area displays “SET”, and then loose the key.Step 2. At this time, the meter is at “alarm voltage value setting” mode. The voltage display area displays the present over-voltage alarm value, and the current display area displays the present under-voltage alarm value, and the least significant digit starts to flash.Step 3. At this time, if short press the key, it will add 1 to this digit. Step 4. After setting the alarm value, hold press the key till the screen displays “PASS” indicating set successfully and exitthe setting mode.Please set the shunt range before using.The attached shunt is 100A/75mV.Step 2. At this time, the current display area displays “100A”. Short press the key, it will switch between “100A” and “50A”, so as to indicate whether the range of the shunt is “100A/75mV” or “50A/75mV”. Please note that only these two ranges of shunt can be applied to this meter.Step 3. Hold press the key until it exits the setting mode. Or no key operation for 3 seconds, it will be automatically savedand exit the setting mode. The voltage and current of the load cannot exceed the rated voltage and current of the meter. Wiring order cannot be wrong. Please connect the shunt to the negative terminal according to the wiring diagram. If it is connected to the positive terminal, it will cause internal short-circuit or cannot function properly. This meter is only suitable for indoor use. Please do not use it outdoor. Size:If there is no key operation for 5 seconds, the accumulated energy will NOT be cleared, and it will stop flashing and exit reset status.If no key operation for 3 seconds, it will automatically switch the adjusting digit. There are 6 digits to be adjusted, from the least significant digit to the most significant digit, fromthe over-voltage value to the under-voltage value. The settable alarm voltage value range is 6.5-99.9V. Step 1. Hold press the key till the power display area displays “CURR”, and then loose the key.Visit DROK Store on Amazon:

Popular Multimeter manuals by other brands

Centech 95342 Assembly and operation instructions

Centech

Centech 95342 Assembly and operation instructions

digi-tech tm9gj59brm quick start guide

digi-tech

digi-tech tm9gj59brm quick start guide

Top Tronic T835 instruction manual

Top Tronic

Top Tronic T835 instruction manual

Unit UT70C operating manual

Unit

Unit UT70C operating manual

Pro's Kit MT-1509 user manual

Pro's Kit

Pro's Kit MT-1509 user manual

Unit UT8806E user manual

Unit

Unit UT8806E user manual

Unit MIE0146 user manual

Unit

Unit MIE0146 user manual

Unit UT39B manual

Unit

Unit UT39B manual

Unit UT61D quick start guide

Unit

Unit UT61D quick start guide

DER EE DE-5003 user manual

DER EE

DER EE DE-5003 user manual

Axio MET AX-C708 manual

Axio MET

Axio MET AX-C708 manual

Unit UT2000 series operating manual

Unit

Unit UT2000 series operating manual

Isotech ICM36R instruction manual

Isotech

Isotech ICM36R instruction manual

Isotech IDM61 instruction manual

Isotech

Isotech IDM61 instruction manual

Promax PD-183 instruction manual

Promax

Promax PD-183 instruction manual

Delton 6688G Operator's manual

Delton

Delton 6688G Operator's manual

Fluke 116 Specifications

Fluke

Fluke 116 Specifications

IME Nemo D4-e manual

IME

IME Nemo D4-e manual

manuals.online logo
manuals.online logoBrands
  • About & Mission
  • Contact us
  • Privacy Policy
  • Terms and Conditions

Copyright 2025 Manuals.Online. All Rights Reserved.