Solgaz OW-INOX User manual

1
SOLGAZ Sp. z o.o.
www.solgaz.eu
Assembly and operating instructions
of OW-INOX
Range hood
Thank you for choosing our cooker hood. Please read the instruction
manual carefully before use.

2
SPIS TREŚCI
1. Important safety information……………………………………........................3
Installation .........................................................................................….3
Child Safety.............................................................................................3
During Use..............................................................................................3
Maintenance and Service……………………………………………………………………3
2. Installation……………………………….................................................................4
3. Operating instructions…............................................................................6
Electronic Controls....................................................................................6
Remote control……………………….............................…..................................6
Recirculation……………………….............................…....................................7
Extraction…..……………………….............................…....................................7
4. Cleaning.........................................................................................…..7
5. Abnormity and Solution..................................................................…..8
6. Warranty, Service………..................................................................…….10

3
1. Important safety information
These warnings are provided in the interests of your safety. Ensure that you understand them
all before installing or using this appliance. Your safety is of paramount importance.
Installation
Installation work must be undertaken by a qualified electrician or a competent per-
son.
This hood must be installed in accordance with the installation instructions and all
measurements must be adhered to.
It is dangerous to alter the specifications or modify this product in any way.
When installed between adjoining wall cabinets the wall cabinets must not overhang
the hob.
If the room where the hood is to be used contains a fuel burning appliance such as a
central heating boiler then its flue must be of the room sealed or balanced flue type.
If other types of flue or appliances are fitted ensure that there is an adequate supply
of air to the room.
The ducting system for this appliance must not be connected to any existing ventila-
tion system which is being used for any other purpose.
If site conditions make it necessary to extend the length, the size of the additional
ducting must not be of a lesser cross sectional area and the ducting outlet must pro-
vide minimal flow resistance. Failure to follow this instruction will increase the noise
level and overload the motor. THE GUARANTEE WILL ALSO BE INVALIDATED.
Child Safety
This appliance is designed to be operated by adults. Children should not be allowed
to tamper with the controls or play with the appliance.
During Use
This product is for domestic use only.
Never leave frying pans unattended during use as over-heated fats and oils might ca-
tch fire.
Never do flambé cooking under this cooker hood.
Do not leave naked flames under the hood
Maintenance and Service
This appliance can be a hazard if the metal filters are not washed regularly.
If charcoal filters are fitted the type and frequency of cooking will determine when
the charcoal filter will require changing. In any case, these must be replaced every
three/four months.
Under no circumstances should you attempt to repair the appliance yourself. Repairs carried
out by inexperienced persons may cause injury or more serious malfunction.

4
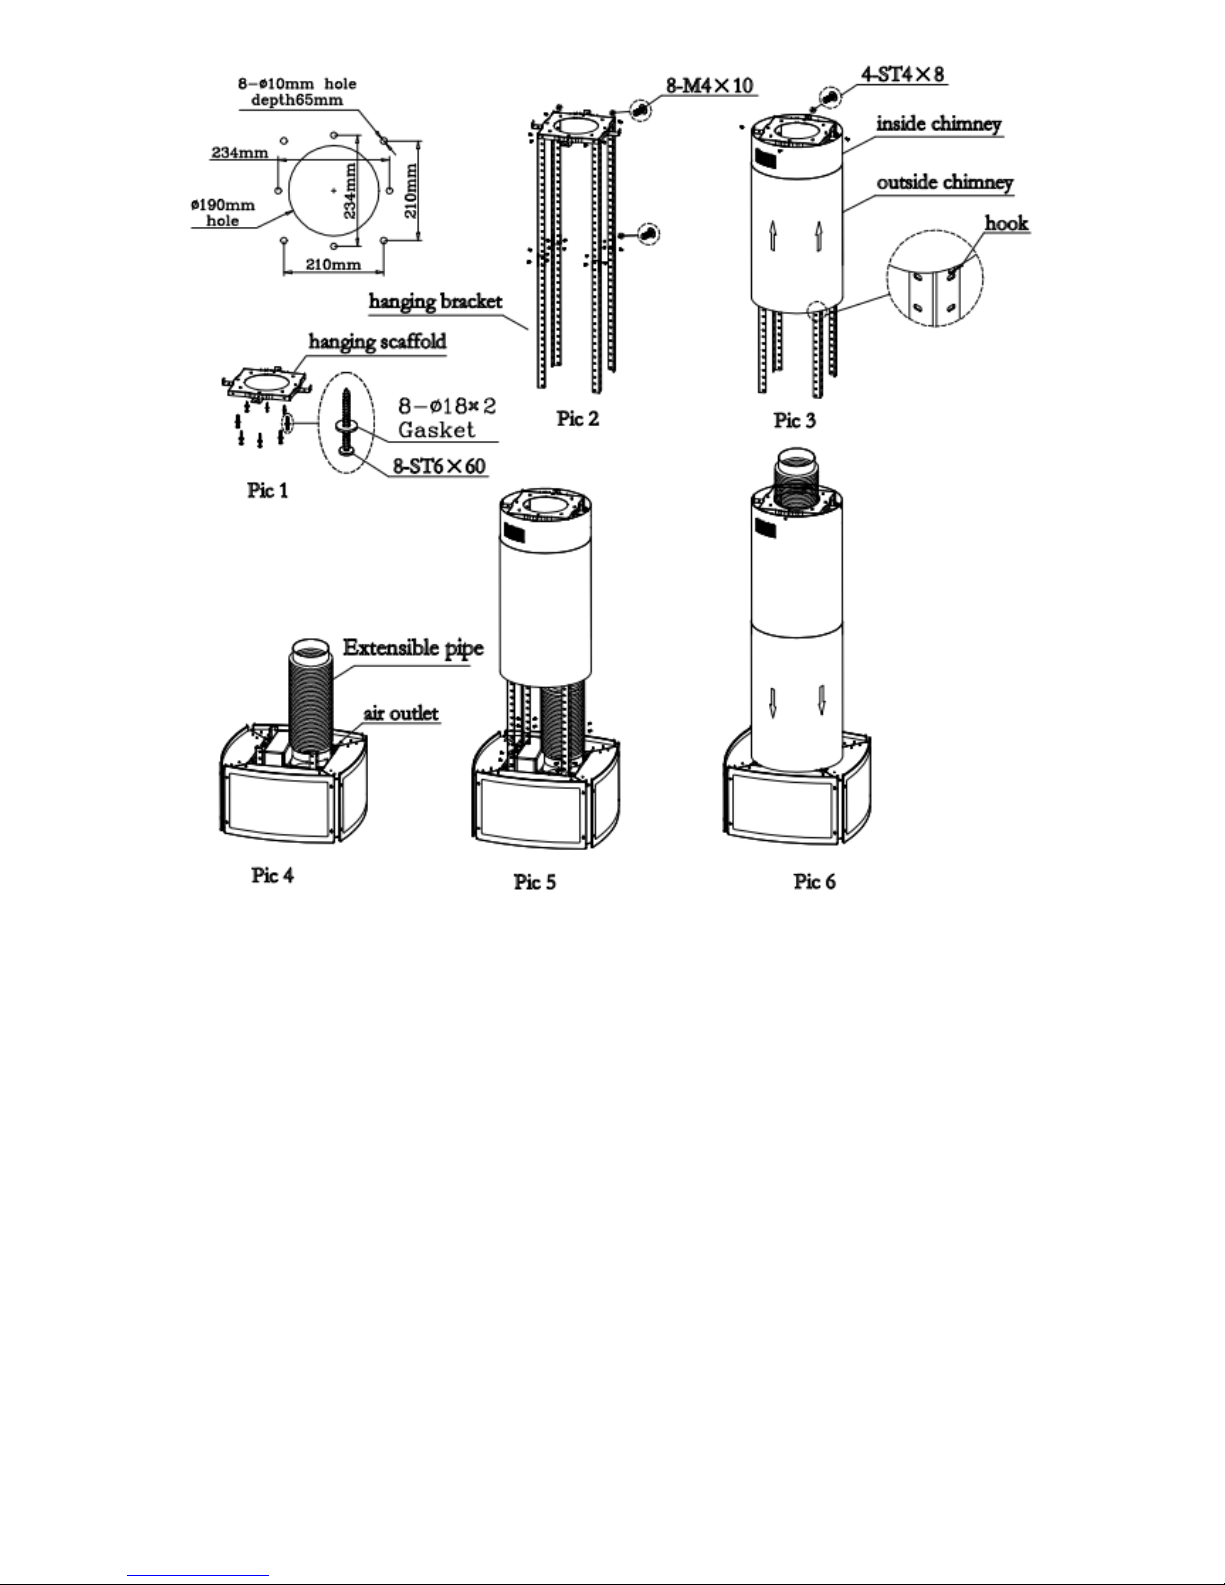
2. Installation
1. The cooker hood should be placed at a distance of 65-75cm (26-30inch) from the cooking surface
for the best effect. See the picture bellow:
2. Install the hook on a suitable place once the installation height is fixed,and keep it in line.The fixed
position of the inside chimney bracket is the place of chimney.
3. Fix the extensible pipe according to the lead direction and way, and then put the cooker hood on
the hook. See Pic 3.
4. Put the glass according to the lead direction and way on the cooker hood, and then use the screws
to fix the glass, also lead the extensible pipe outside of the room, meanwhile adjust the height of the
inside chimney to the position of the inside chimney bracket and fix on it by screw, here should be
sure the inside chimney can be flexed freely. See Pic 4.
5. Put the two chimneys together onto the cooker hood body, meanwhile adjust the height of the
inside chimney into the suitable height, and fix the inside chimney to the inside chimney bracket by
screw. Finally, fix the body with safety screw. See Pic 5.
6. Make sure of installation position, fix the hanging scaffold at proper place, and check firmness and
smoothness of installation. See the pic 1.
7. Adjst to proper height, joint the bracket, install on hanging scaffold. See the pic 2.
8. Fix inside chimney on hanging scaffold, enclose outside chimney on it at proper position, insert
hook into bracket to fix outside chimney temporarily. See the pic 3.
9. Fix air outlet in the vent on hood’s body, connect extensible pipe with air outlet. See the pic 4.
10. Extend the hose out off hanging scaffold, fix hood’s body on bracket. See the pic5.
11. Detach the hook, move outside chimney downward till reaching hood’s body. Pay attention not to
strike the glass. See the pic 6.
5

6
3. Operating instructions
Electronic Controls
A B C D E
A – Timer.
B - Speed adding and power on.
C - Smoke sensor keypad.
D - Speed descending and power off.
E – Lighting.
Remote control
Turn on / off
Timer
Smoke sensor keypad
Lighting
Speed changing
Timer

7
Recirculation
If the cooker hood is to be used in the recirculation mode the special charcoal filter
must be used. This is available from your supplier as an accessory.
The contaminated air is cleaned by passing through the filters and then back into the
kitchen.
The charcoal filter absorbs od ours arising from cooking.
In use it will slowly become saturated in grease and less effective.
The charcoal filter normally requires changing after at least every three/four moths
or more frequently if the hood is used for more than three hours per day.
Extraction
The contaminated air enters the cooker hood passing through the metal grease filter
and out through the ducting into the atmosphere.
When used in the extraction mode the charcoal filter must not be fitted.
Never do flambé cooking under this cooker hood.
Take extra care when frying and never leave frying pans unattended during use, as
over-heated fats and oils can catch fire.
Do not leave naked flames under the cooker hood.
Ensure heating areas on your hob are covered with pots and pans when using the
hob and cooker hood simultaneously.
Ensure not to damage the charcoal filter when cleaning or replacing as the activated
charcoal inside is saturated with grease, which will stain if it comes into contact with
clothing or furnishings.
Before carrying out any maintenance or cleaning isolate the cooker hood from the
mains electricity supply.
The cooker hood must be kept clean, a buildup of grease or fat can be a fire hazard.
4. Cleaning
Cleaning the metal mesh grease filters
Clean the grease filter at least every 2 months. Never operate the appliance without the grease filter.
Notes
Do not use any aggressive, acidic or alkaline cleaning agents.
8
When cleaning the metal mesh grease filters, also clean the holder for the metal mesh grease
filters in the appliance using a damp cloth.
Removing metal grease filter
1. Open the lock and fold down the metal grease filter. While doing this, place the other hand under
the metal grease filter.
2. Take the metal grease filter out of the holder.
3. Clean the metal grease filter.
Installing the metal mesh grease filter
1. Insert the metal mesh grease filter. While doing this, place the other hand under the
metal mesh grease filter.
2. Fold the metal mesh grease filter upwards, locking it in place.
5. Abnormity and Solution
Fault
Cause
Solution
Light on, but motor does
not work
The leaf blocked
Get rid of the blocking
The capacitor damaged
Replace capacitor
The motor jammed bearing damaged
Replace motor
The internal with of motor off or a bad
smell from the motor
Replace motor
Light does not work, motor
does not work
Beside the above mentioned, check the following:
Light damaged
Replace lights
Power cord looses
Connect the wires as per the
electric diagram
Oil leakage
One way valve and the air ventilation
entrance are not tightly sealed
Take down the one way valve
and seal with glue
Leakage from the connection of U-
shaped section and cover
Take U-shaped section down
and seal with soap or paint
Shake of the body
The leaf damaged and causes shaking
Replace the leaf
The motor is not tightly hanged
Lock the motor tightly
The body is not tightly hanged
Fixed the body tightly
Insufficient suction
The distance between the body and
the gas top too long
Readjust the distance

9
Too much ventilation from open
doors or windows
Choose a new place and
resemble the machine
The machine inclines
The fixing screw not tight enough
Tighten the hanging screw and
make it horizontal
The hanging screw not tight enough
Tighten the hanging screw and
make it horizontal

10
6.WARRANTY, SERVICE
Warranty
Warranty in accordance with the warranty card
The manufacturer is not responsible for the destruction of the range hood, resulting from improper
use.
Service
We guarantee correct operation of range hood purchased by You, however,
if there would be any problems associated with its use, then SERVICE will
provide you with professional help.
Please enter (data from the rating plate):
TYPE _______ MANUFACTURER’S SERIAL NUMBER __________________________
SOGLAZ
Spółdzielcza Str. No 3,
PL-58124 Marcinowice, Poland
Table of contents


