Solid Signal Xtreme Signal HDB91X Operation instructions
Solid Signal shows you...
HOW TO
DO IT
Assemble the
Xtreme Signal
HDB91X

2 ©2013, SolidSignal.com Reproduction is permitted provided copyright information is intact.
Your guide to free HDTV
The Xtreme Signal HDB91X antenna from Solid Signal is a great
combination of durability and performance. It’s the right antenna for you if you:
• Need an outdoor antenna for good reception
• Live more than 50 miles away from the broadcast towers
• Watch primarily UHF channels
• Need a small antenna to comply with HOA or condo association rules
• Are comfortable mounting an antenna on a mast
If that sounds like you, there’s no doubt you’ll enjoy great FREE HDTV by using this
durable, economical antenna.
How do I know if I need only UHF channels?
A site like TVFool.com will help you gure out the actual broadcast channels you need.
Remember, since the digital transition, broadcasters use the PSIP system to translate
between actual channel numbers and the channel numbers you see. Anything over
channel 12 is considered UHF.
Before you start:
Make sure that you review local ordinances for grounding and buy the grounding
supplies you need. Also, make sure your ladder is safe and don’t go up on a roof or into
an attic if there is any chance of electricity. Be safe!
Also, remember that all assembly should be done by hand. It should not be necessary
to use tools to tighten anything more than hand tight (except in one case where a
10mm wrench is needed) and if you overtighten the nuts you may risk damage to the
antenna.
3 ©2013, SolidSignal.com Reproduction is permitted provided copyright information is intact.
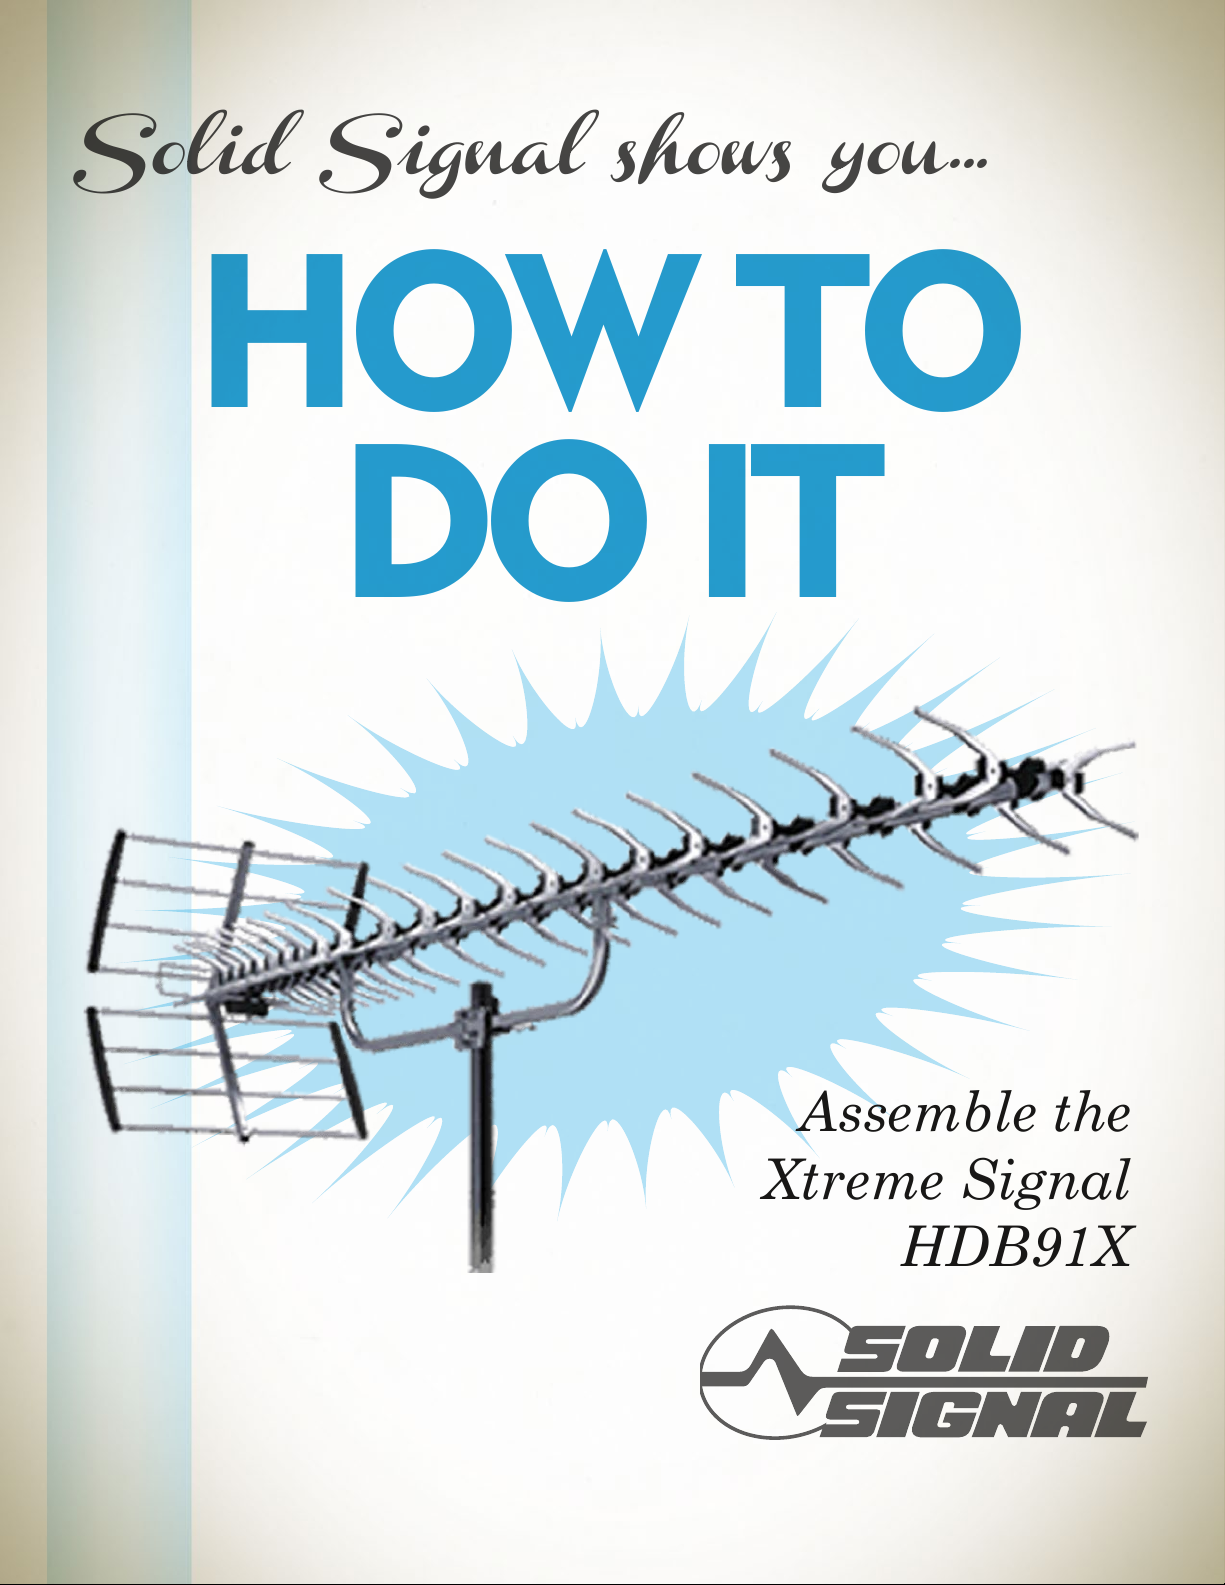
WHAT’S IN THE BOX
Here’s what you should expect to
see in the box, shown here from
top to bottom:
• Two segments with widely
spaced elements.
• One segment with narrowly
spaced elements.
• Dipole antenna assembly.
• Mount with cable clamp.
• Two reectors.
• Mast bracket (shown below,
disassembled)
There is also a bag of assorted
clamps and the instruction guide,
with one rubber boot.
4 ©2013, SolidSignal.com Reproduction is permitted provided copyright information is intact.
The main antenna is almost completely
assembled when you get it. All you need
to do is separate the antennas (the
x-shaped part) from the reector (the
bars with the plastic.)
Find the wingnuts roughly halfway
between the outer edge of the main
antenna and the center and loosen them
slightly. Pull the antenna away from the
reector until it cannot go any further.
Tighten the wingnuts to keep the antenna
separated from the reector.
You will need to do this with both
assemblies. There are two wingnuts on
each assembly.
OPENING THE ELEMENTS
BEFORE YOU START
This antenna has a lot of parts and assembly will take you 10-15 minutes even if you are an experienced
technician. Here are some tips to make things go more quickly:
Keep everything pointing and facing the same way: While it doesn’t make a lot of difference which end
is up when you’re all done, you’ll find that assembling the antenna goes a lot faster if you make sure
the front of all the elements faces the same way, and the tops are all on top.
Don’t overtighten. The antenna is made of aluminum and will dent or tear if pressed too hard.
Careful with the elements. Always hold the antenna by the aluminum tubing and not by the elements, which
are prone to bending. If you do accidentally bend an element, it can be gently bent back into place.
A second person isn’t a bad idea. There are times where an extra pair of hands will help the job go
more smoothly.
5 ©2013, SolidSignal.com Reproduction is permitted provided copyright information is intact.
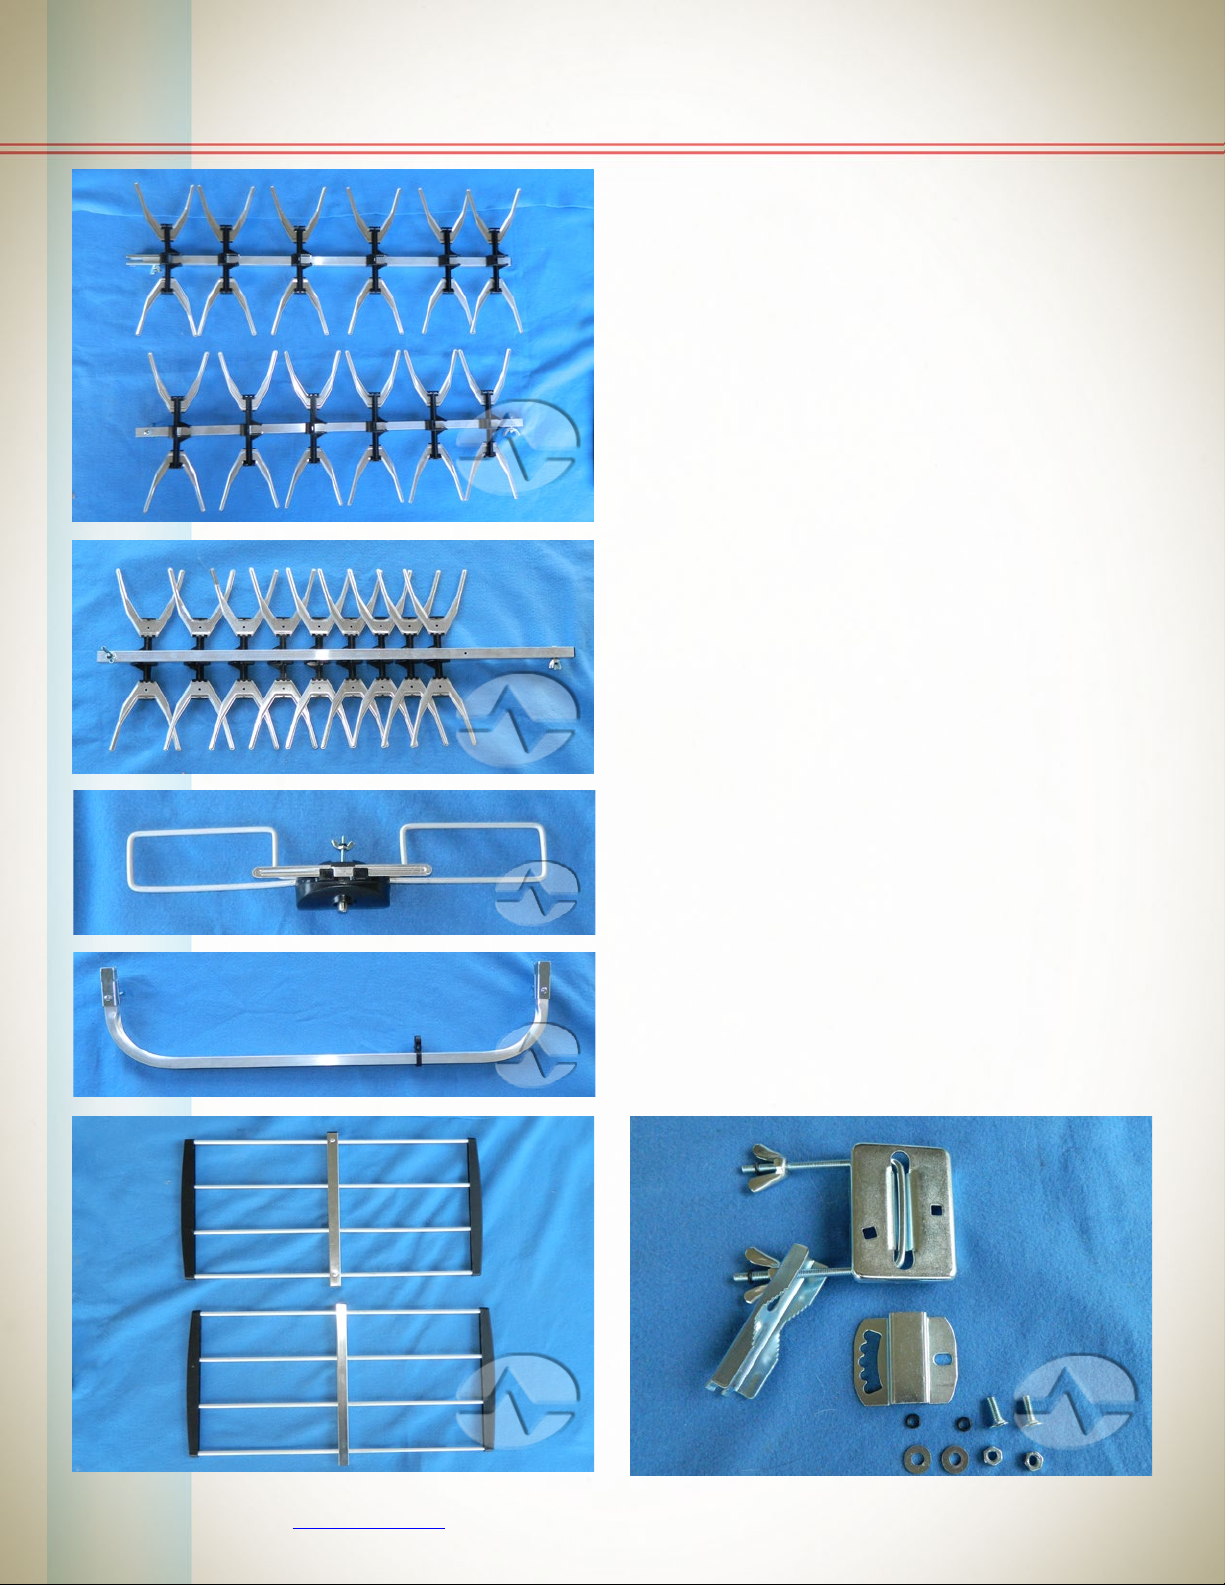
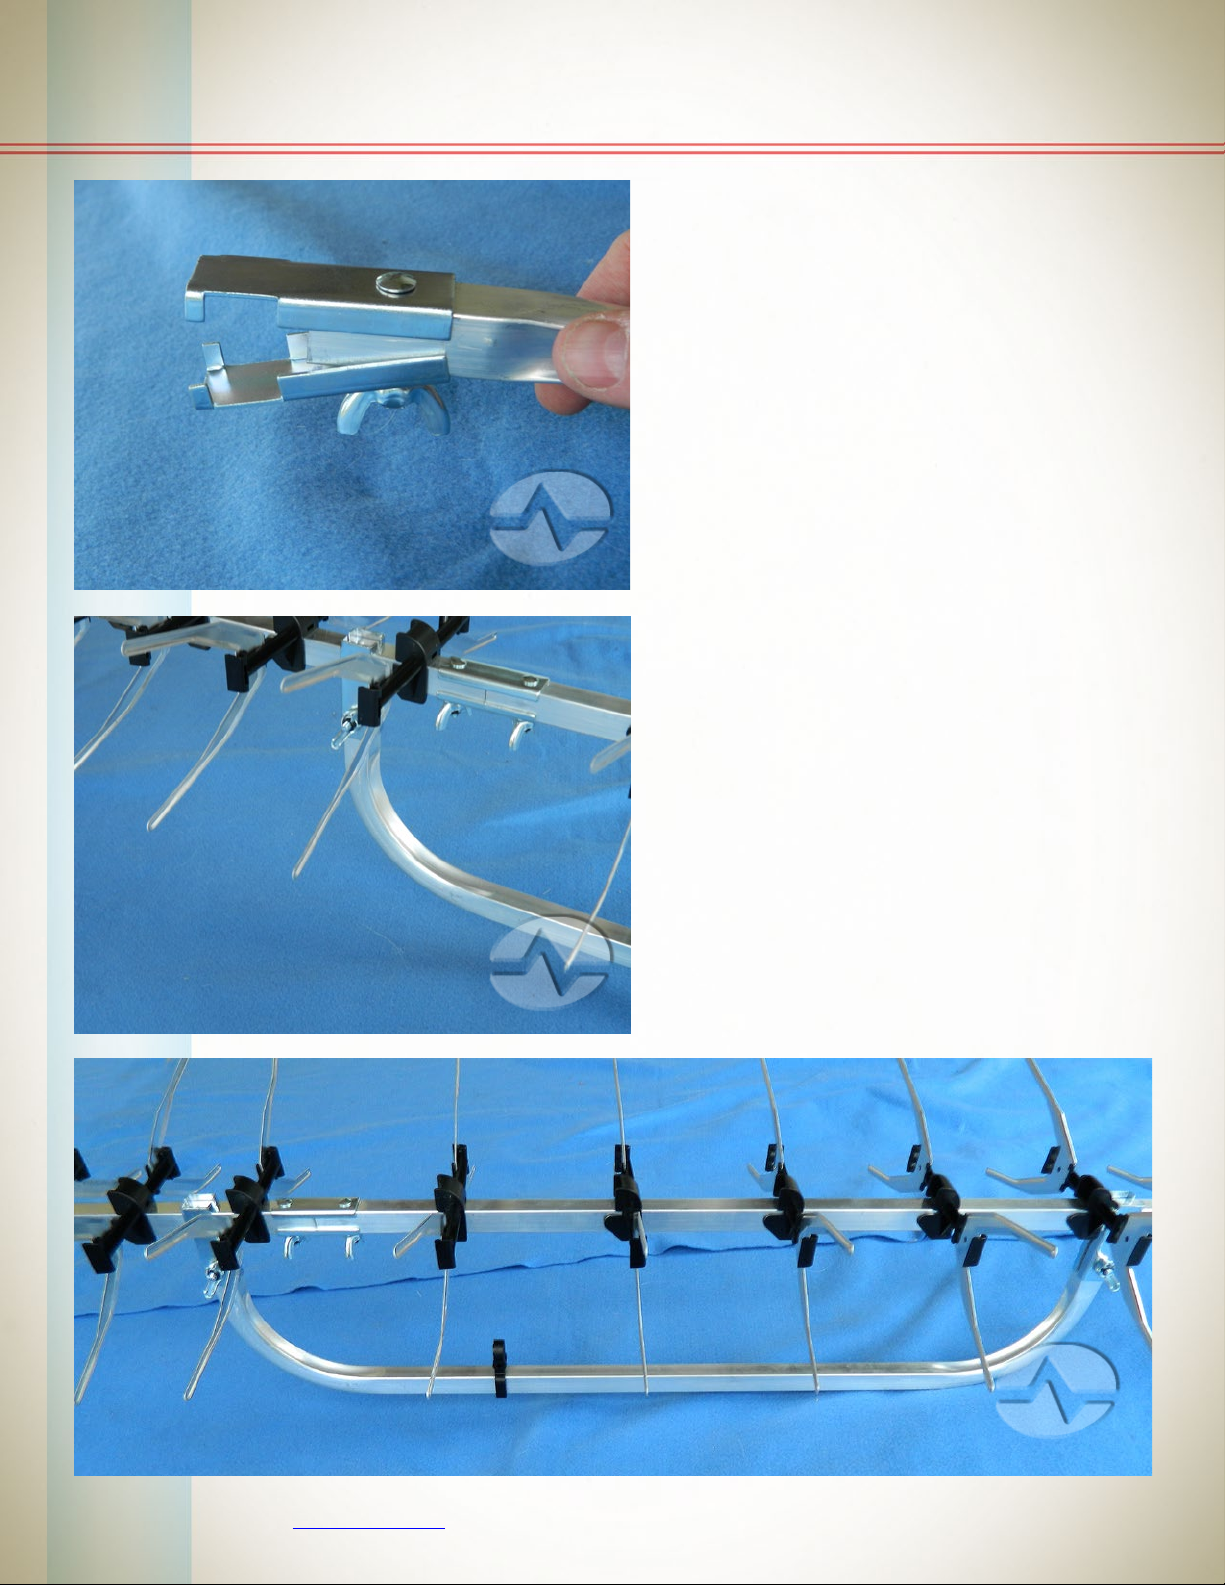
OPENING THE ELEMENTS
This image
shows one of the
segments before
and after putting
the elements in
position.
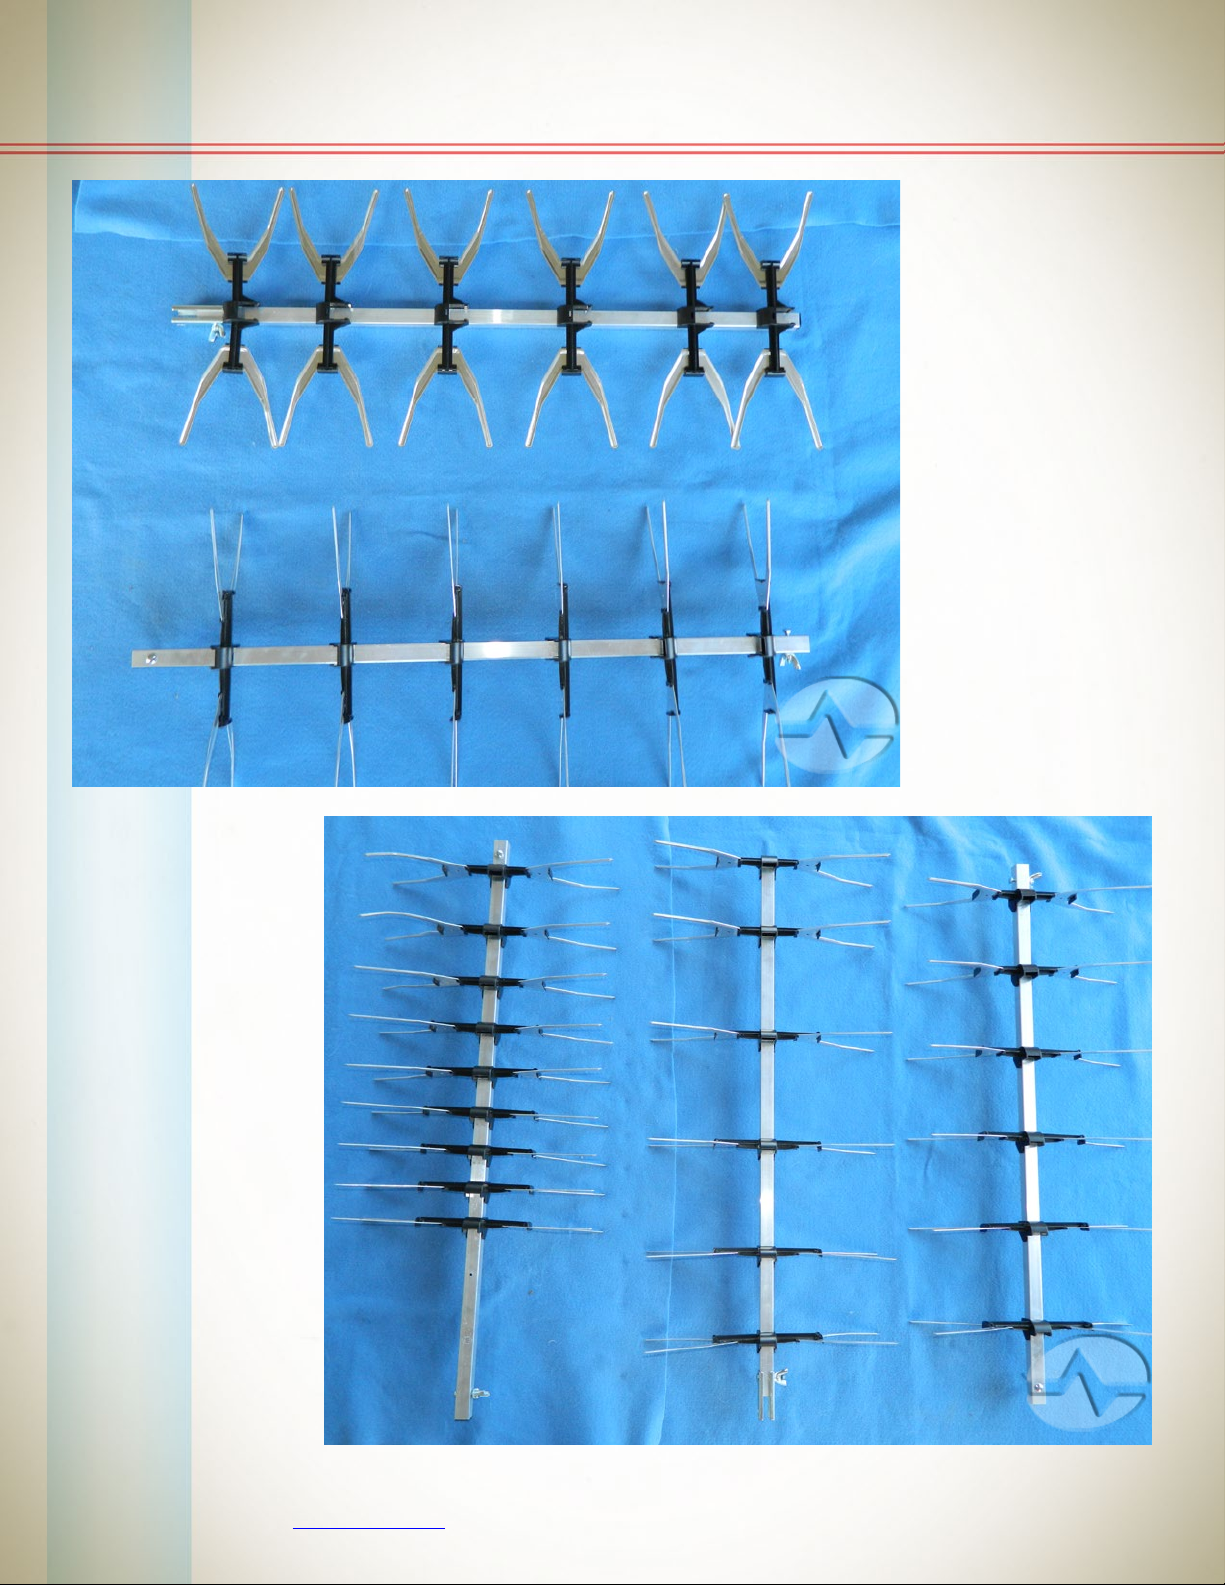
When you are
done all the
segments should
look like this. It’s
a good idea to
get them ready
by facing them
all the same way
and making sure
the same side is
up on all three
segments.

6 ©2013, SolidSignal.com Reproduction is permitted provided copyright information is intact.
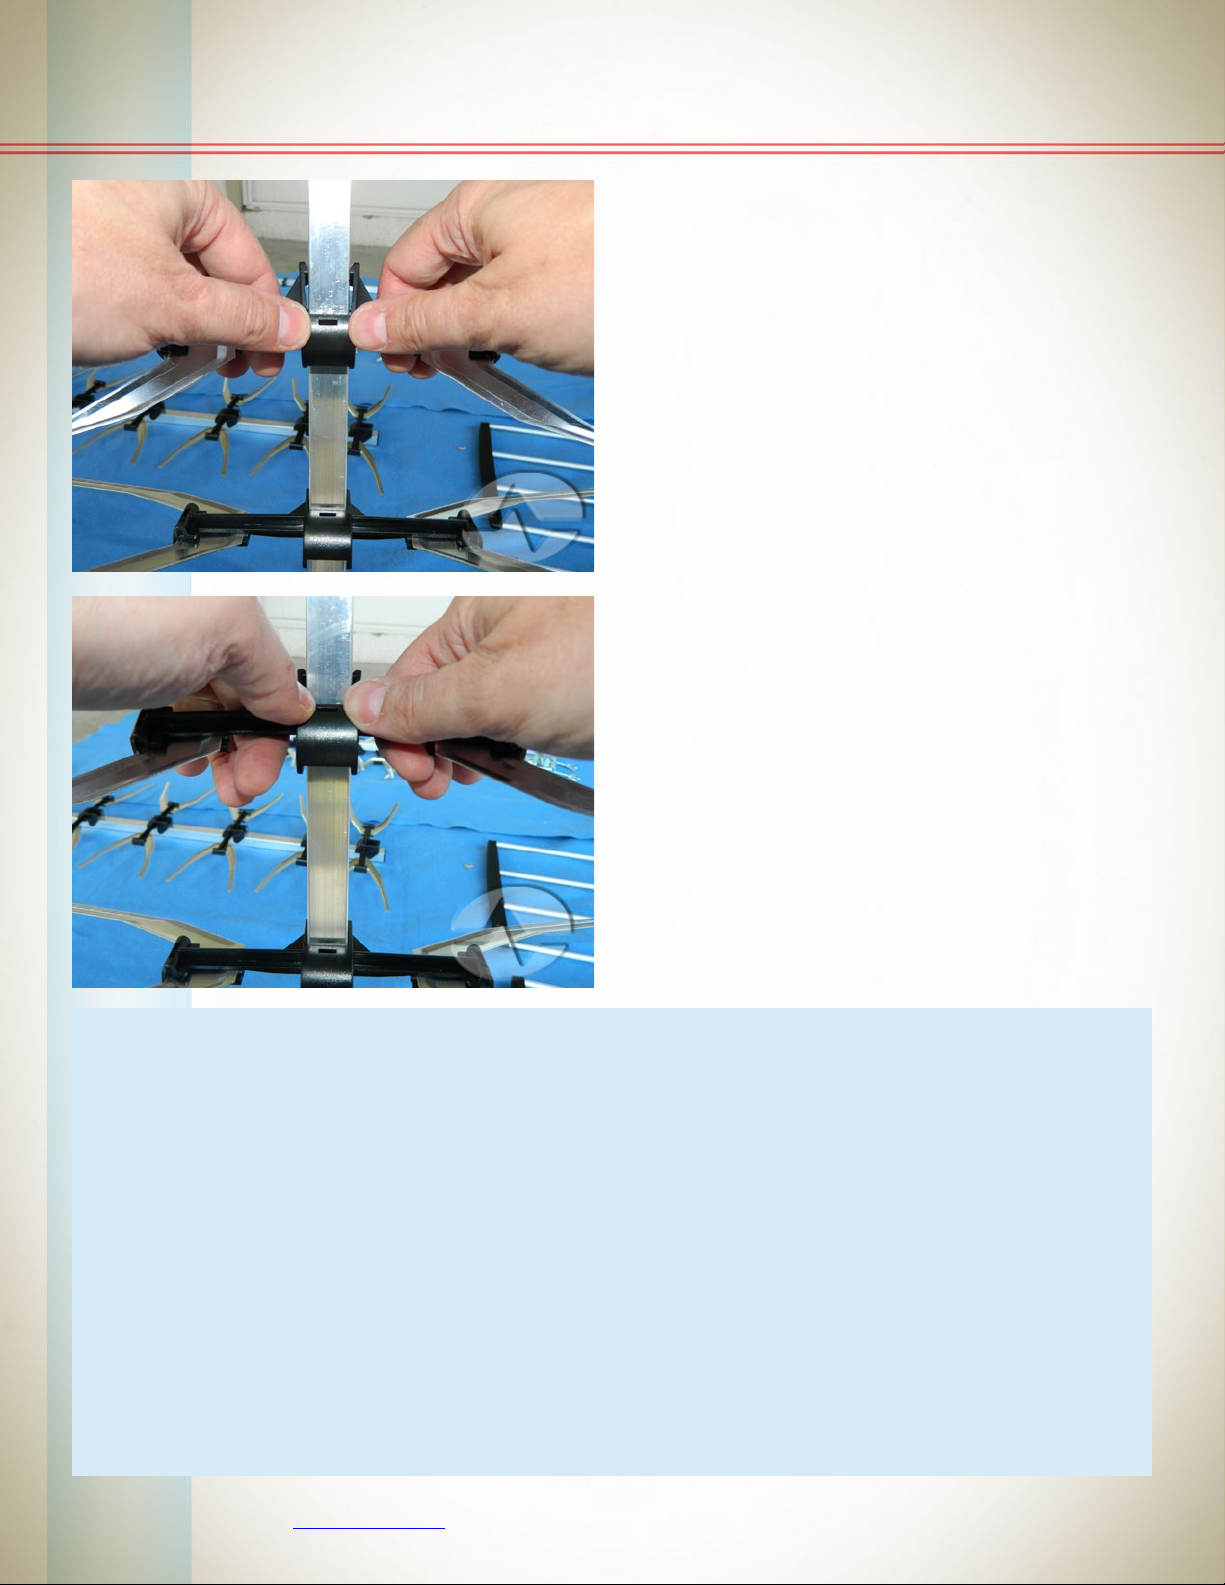
ASSEMBLING THE ANTENNA SEGMENTS
The antenna segments are attached with
brackets and wingnuts. These brackets
may be already attached or they may be
in the parts bag. If they are attached,
start by loosening the wingnuts attached
to the brackets to allow the bracket to
spread wide.
The bracket can be slid over the segments
even with the wingnuts attached, but here
one of the wingnuts has been removed to
show the bracket more clearly. Notice that
on both segments, the antenna elements
are facing the same way. Also, the pre-
drilled holes should make it easy to tell
what attaches to what. The two widely
spaced segments go together, with the
tightly spaced segment on the end.
When all the segments are attached you
will have a long antenna section that
looks like the image at bottom. Notice
that the tightly spaced elements are at
the end and not in the middle.
Next, attach the dipole. It goes on the side
with the tightly spaced elements. There
is a horizontal metal bar about the size
of a popsicle stick. That should be facing
the elements and the coaxial connection
on the dipole should be facing down.
Attach the dipole from underneath and
secure it with a wingnut.

7 ©2013, SolidSignal.com Reproduction is permitted provided copyright information is intact.
ATTACHING THE REFLECTORS
The back end of the antenna (where the
elements are most tightly spaced) has
a wingnut and bolt. Remove these two
items and set them aside.
Place the reector brackets on either
side of the antenna and connect the bolt
and wingnut, leaving it loose.
It should now be possible to slide the
reectors into the top and bottom of the
bracket with gentle pressure. Do not
push too hard. When both reectors are
in place, tighten the wingnut.
If you’re having problems attaching the
reectors, you may have better luck
putting only one reector bracket on,
seating both reectors, then attaching
the other bracket. It helps to have a
second person if you’re doing it this way.
When the reector is assembled the
antenna will look like this. Note that the
reectors are not designed to bear weight.
8 ©2013, SolidSignal.com Reproduction is permitted provided copyright information is intact.
ATTACHING THE MOUNT
The mount uses the same
connection system as the rest of
the antenna but the brackets only
have one set of holes. This lets you
attach the mount anywhere on
the antenna for proper balancing.
Start by loosening the wingnuts
so the bracket can t around the
antenna.
Slide the brackets over the
antenna and tighten the wingnut.
The plastic cable clip should be
toward the back.
T
he nished mount looks like the
image at bottom.
9 ©2013, SolidSignal.com Reproduction is permitted provided copyright information is intact.
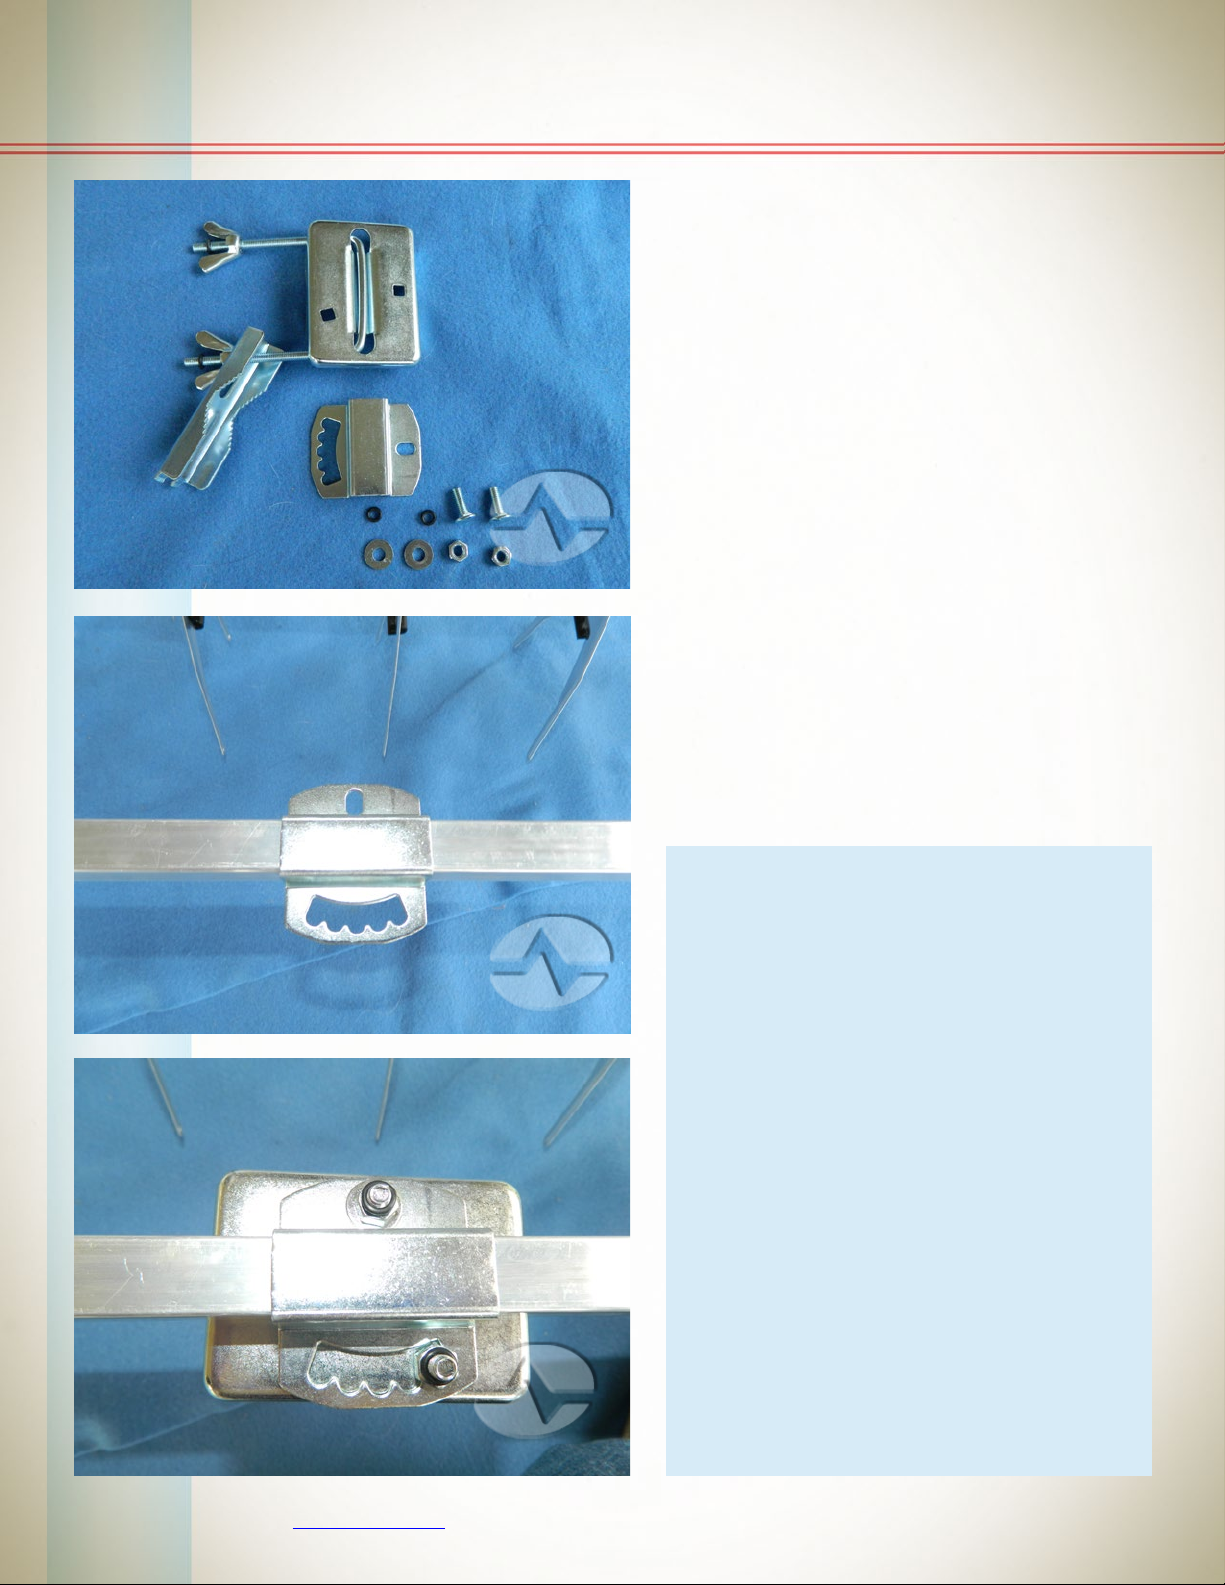
ATTACHING THE MAST BRACKET
Now, disassemble the mast
bracket if it is pre-assembled, as
shown.
Put this part of the bracket on the
mount. It mounts sideways. Note
at the top of the photo you see the
bottom of the antenna. This is to
allow it to properly mount to the
mast.
Securely attach the bolts as
shown and tighten with a
wrench. The mast bracket can be
set to compensate for a mast that
isn’t plumb by tilting it before
tightening the nuts.
TIME TO TIGHTEN
Now that the antenna is completely
assembled, go back and check that
all wingnuts are nice and tight. Lift the
antenna and support it using only the
mount (a second person can help here)
and see if there is any sagging due to
loose connections. Also make sure that
every bolt has a rubber gasket on the
end, which will provide some protection
in case the wingnuts get loose
Remember not to overtighten. Other
than tighening the mast bracket, no tools
should be necessary.

10 ©2013, SolidSignal.com Reproduction is permitted provided copyright information is intact.
FINISHING UP
Mount the antenna on a mast by
sliding the mast mount over the mast
and tightening the clamps onto the
mast. Attach your antenna cable to
the bottom of the antenna, using the
supplied weatherproof boot to shield the
connection. The cable can run through
the plastic cable clamp on the mount.
Find a convenient location for a
grounding block and attach the
antenna cable to it. Run the cable from
the grounding block into the house.
Finally, use your TV’s menu to scan for off-air channels.
Here’s a video from our Xtreme Signal team with
even more installation tips!

©2013, SolidSignal.com Reproduction is permitted provided copyright information is intact.
SolidSignal.com is your source
for DIRECTV equipment, supplies,
and support. We have over 10
years’ experience in installing and
supporting satellite equipment. Our
technical staff is ready to answer
all your questions!
visit SOLIDSIGNAL.COM
for the best selection of
equipment and supplies
for the high-end installer
or do-it-yourselfer!
FORUMS.SOLIDSIGNAL.COM
is your source for
24-hour support!
BLOG.SOLIDSIGNAL.COM is
your information destination
for news, reviews, and tips!
Table of contents
Other Solid Signal TV Antenna manuals


