Solt SP7-100 User manual
■ Thank you for purchasing Solt wireless calling system products.
■ Please read this user's guide carefully before using and follow the instructions.
■ Specification and instructions are subject to change without notice.
User's Guide
SP7-100
User's Guide
3
.............................................................
....................................................
.................................
...............
......................................................................
..............................................................................
.............................................................
......................................
......................................
............................
...
.......
.........
................
........................
...................
.......................
......
3
4
5
6
7
8
9
10~11
12
13
14
15
16
17
18~19
20
21
22
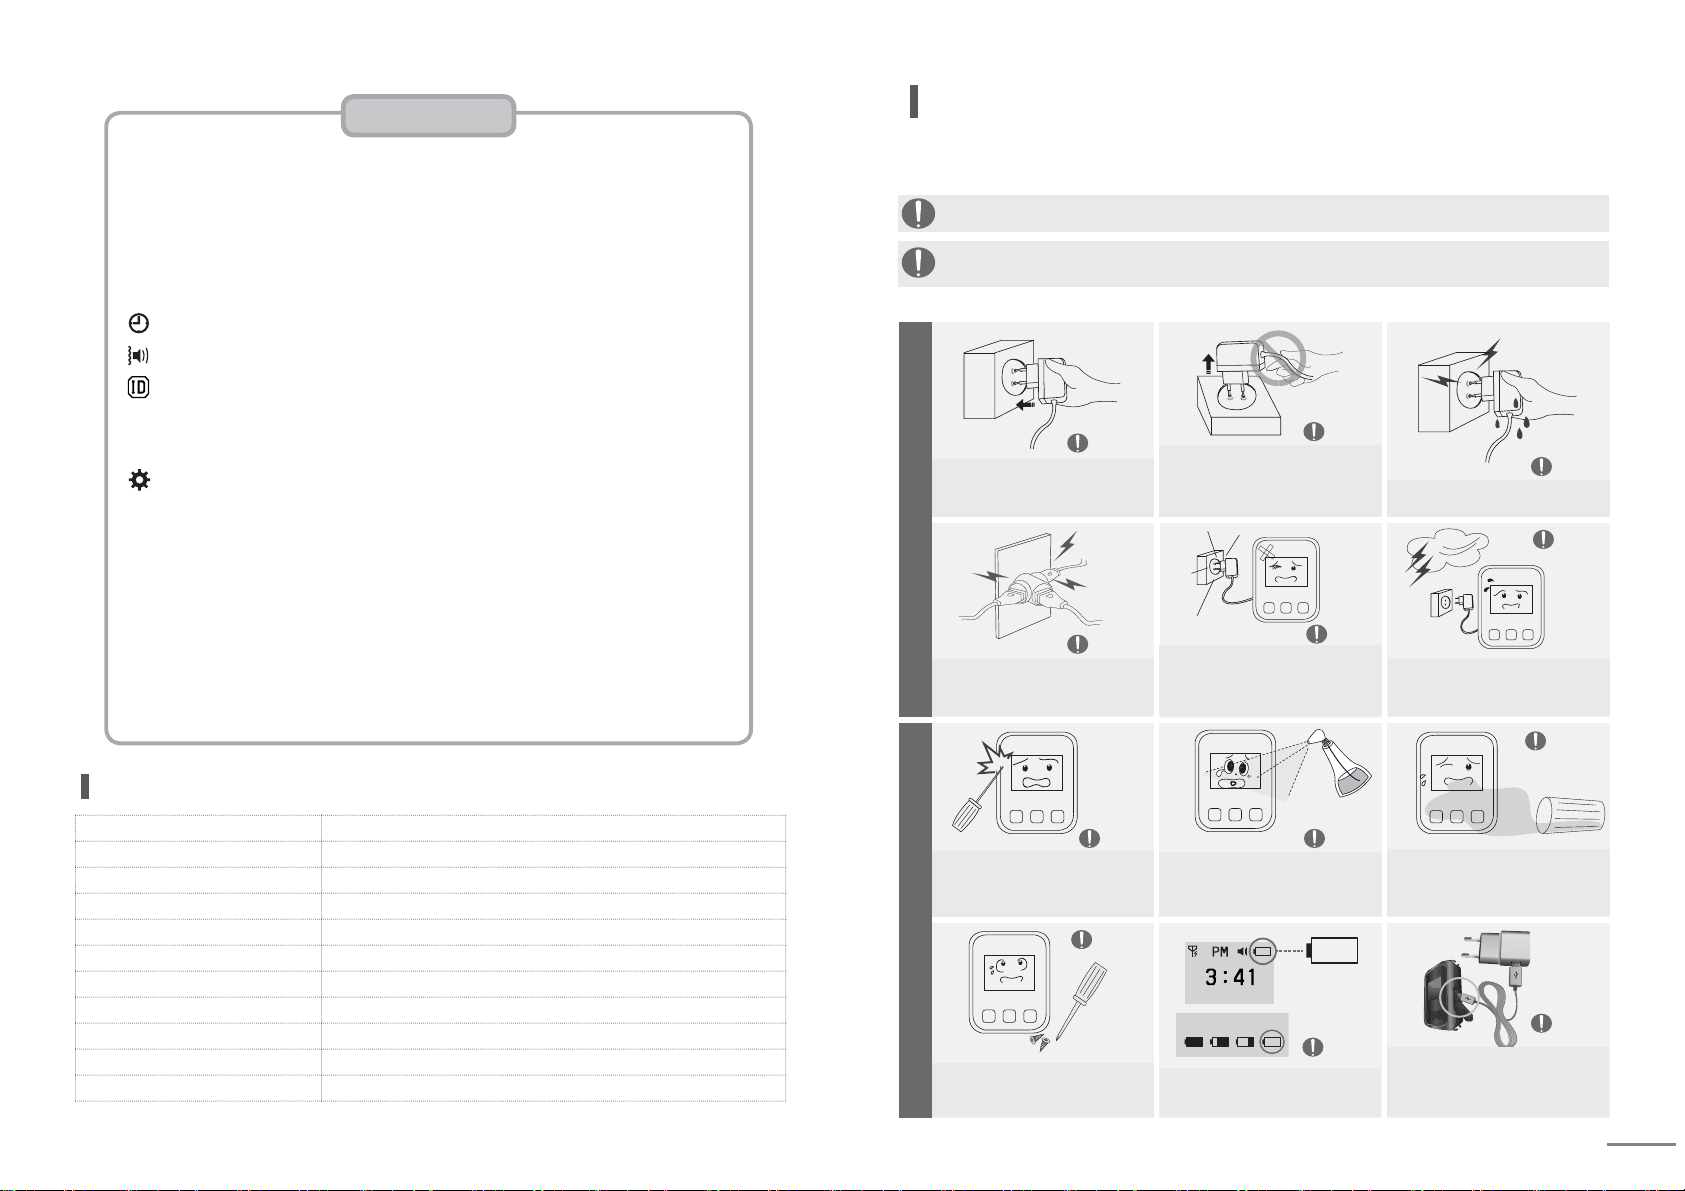
Be sure to unplug the power plug while
holding it firmly. If cord is unplugged
by pulling out, some parts of the cord
can be disconnected and it may cause
risky situation. [It may cause fire.]
Do not touch the power plug with wet hand.
[There is a risk of electric shock.]
Important Safety Instructions
Warning
Caution
Warning Caution
Caution
Caution
Caution
Caution
Caution
CautionCaution
Caution
Warning
Warning
Be sure to insert the power plug to
the end of the inner part.
[If the connection is unstable, it may
cause fire.]
Do not use one socket for multiple
devices at the same time. [It may cause
fire due to overheating of the socket.]
Do not disassemble or modify the
unit. If repair of the unit is required,
please contact the service center.
Do not harm or damage the unit with
sharp object such as nail, pencil, or pen.
[It will damage the surface of the unit
and cause malfunction.]
This is for the case with the possibility of serious injury or death if this is not observed.
This is for the case with the possibility of minor injury or damage to the product
if this is not observed.
If power plug is dropped or case is
broken, unplug the power cord. [If it is
used as it is, it may cause fire or
elec-
tric shock. Please contact service center.]
Do not clean the unit with water,
benzene or paint thinner.
[Damage to the insulation of electrical
parts may cause malfunction.]
When the battery icon indicates as
marked in a circle, use it after
recharging for more than 2 hours.
If foreign object enters the unit,
please contact service center.
[This may cause damage to the
internal parts.]
In case of thunderstorm or lighting or
if the power plug is not used for long
time, unplug the power cord. [There
is the risk of electric shock or fire.]
Power precautions
Safety Instruction contains the information to prevent the unexpected risk or damage in
advance by using the product in correct way and it should always be observed all the times.
Use the supplied adapter.
[Malfunctioning of supplied adapter
during its use is not covered by
manufactures' warranty.]
Specification
Model SP7-100
Frequency (MHz) 433.0500 ~ 434.7900
Freq Stability ±5 ppm
Data Rate 1800 bps
Channel space 12.5 KHz
Modulation FSK (±3KHz)
Sensitivity -118dBm (at Direct)
Power Supply DC 3.7V/250mA Li-Polymer Battery (Rechargeable)
Dimension (mm) 37W × 49L × 13.5H
Standby Time about 30 hours
Antenna Helical (Internal)
Use precautions
Battery charging level.
Important Safety Instructions
Contents / Recharging Instructions
Name of each part / Screen Layout (Idle screen)
Screen Layout (Receiving Screen / Cancel receiving screen )
List of setting modes
Time Setting
Sound / Vibration Setting
Bell ID Setting
Other Settings
(1) New bell ID registration
(2) Calling number change
(3) Whole calling number deletion
(1) STAT : Checking the detail set by Other Settings
(2) CONT : Adjusting the contrast of LCD screen
(3) DUPT : Duplicated receiving prevention time
(4) SOND : Number of call alarm repetition
(5) COPY : Registration transmission
(6) NORX : Receiving restriction number
(7) RSSI : Receiving sensitivity check
(8) REMD : Unchecked calling number notification
4 5
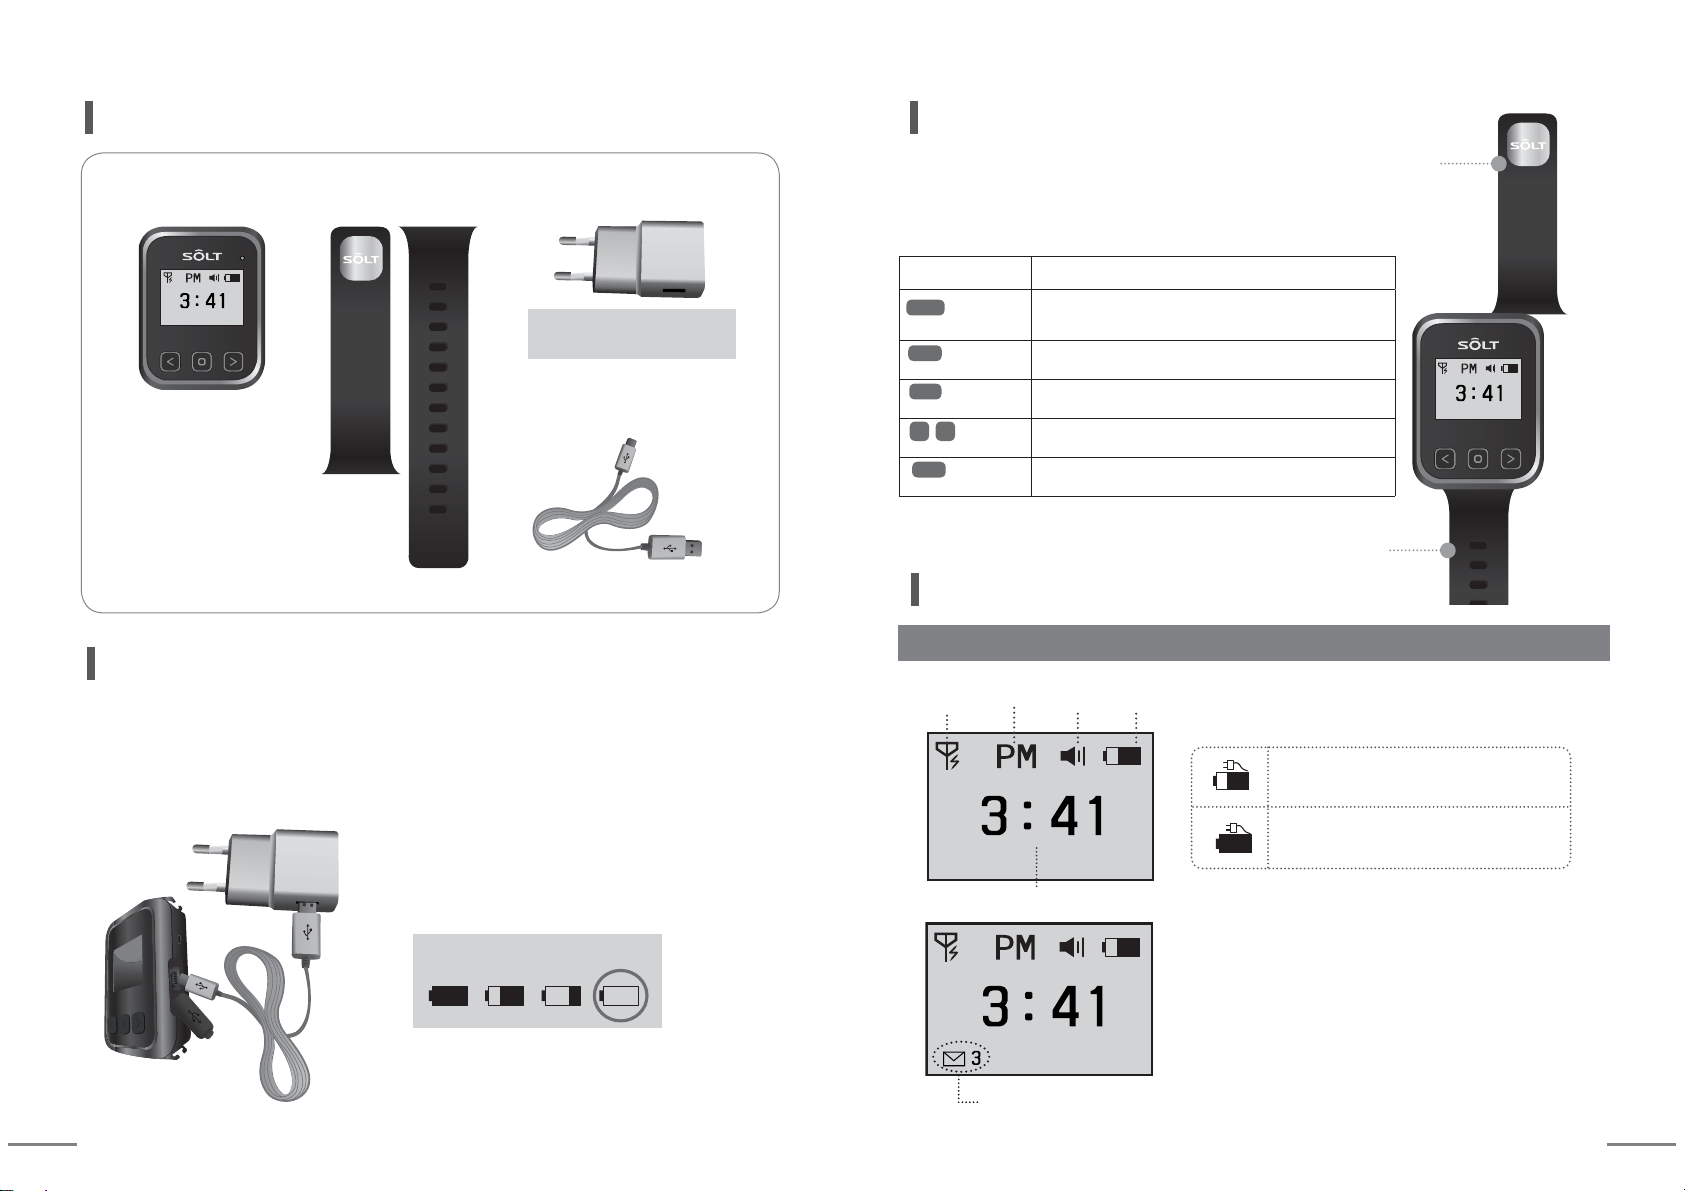
[Main Body] [Adapter - DC5V 1A][Wrist Band]
Lower Band
Contents
PRGH
VHW
SZU
[Charging cables - micro USB]
Buttons Description
Press it more
than 2 seconds
Entering into Mode / Exit to idle screen
Conversion of numbers, English letters and special characters
Press it more
than 2 seconds
Move to upper mode
Press it more
than 2 seconds
Power ON/OFF
Press it
once shortly
Mode Shift, Digit Location Shift, Shift to receiving screen
Press it
once shortly
Mode Selection, Setting Value Selection and Change
<
<
MODE
PRGH
VHW
SZU
Wrist type upper band
(How to combine main body and band :
Push the band to the left fitting into the groove of main body.)
←
←
←
Wrist type lower band
Name of each part
Upper Band
① Open the USB cover of pager.
② Connect micro USB jack to the connector of pager.
③ Plug the cord into the outlet after connecting
adaptor and USB cable.
When the battery icon indicates as marked
in a circle, use it after recharging for more
than 2 hours.
※ Please use only supplied adaptor.
Defect of the product caused by the use of other products will be repaired with charge.
Limited accessary warranty. Malfunctioning of supplied adapter during its use is not
covered by manufactures' warranty.
①
②
③
Recharging Instructions
Battery charging level.
Unchecked call Icon, Number of Unchecked Calls
Screen Layout
Idle screen
※ When there are unchecked calling numbers in idle screen,
the number of unchecked calls is displayed.
Current Time
When you press SET button at receiving screen,
unchecked call icon is disappeared. When you
check all received call numbers, only current time
is displayed.
Charging in progress battery icon
Charging completed battery icon
Reception
available AM/PM Sound
Vibration
Remaining
battery
SET
SET
PWR
Input : 100-240V~50/60Hz
Onput : DC5V 1A

6 7
Receiving sequence / Total number of calls
Current Time
Receiving
number
Receiving
number
Unchecked
call Icon
Receiving time
Receiving Screen : Screen example of receiving number [A11]
· [A11] calling number is displayed in the middle, and receiving time is displayed at left bottom.
·
Total number of re ceived calls and re c eiving sequenc e o f c a l l i n g numbers are displayed at right bottom.
[A11] is secondly received number out of total 3 receiving numbers.
· Total 50 calling numbers can be stored.
(When 51st calling number is received, 1st receiving calling number is disappeared.)
Cancel receiving screen : Example screen of [A11] cancellation among receiving numbers
·[A11] is displayed together with OK icon at right bottom.
·After cancellation, [A11] is deleted from receiving list, and total number of calls is
decreased.
Cancel Button of [A11]
▶
▶
When you press SET button,
unchecked call icon is disappeared.
OK Icon
Screen Layout
You can set following listed modes using set button of main body.
Setting mode screen
Idle screen
You can enter into setting mode by pressing
MODE button for more than 2 seconds at idle screen.
※ Note: Calling signal cannot be received at setting mode.
(Calling signal can be received at idle screen only.)
If you press MODE button at setting mode screen for
more than 2 seconds, Idle screen is displayed.
Time Setting ㆍ24hours digital watch function
Sound / Vibration Setting ㆍCall notification method setting
Bell ID Setting
ㆍNew bell ID registration
ㆍCalling number change
ㆍWhole calling number deletion
Other Settings
(1) STAT : Checking the detail set by Other Settings
(2) CONT : Adjusting the contrast of LCD screen
(3) DUPT : Duplicated receiving prevention time
(4)
SOND
: Number of call alarm repetition
(5) COPY : Registration transmission
(6) NORX : Receiving restriction number
(7)
RSSI
: Receiving sensitivity check
(8)
REMD
: Unchecked calling number notification
List of setting modes
Entering into Setting Mode
Exit from setting mode to idle screen
Current Time
8 9
Note
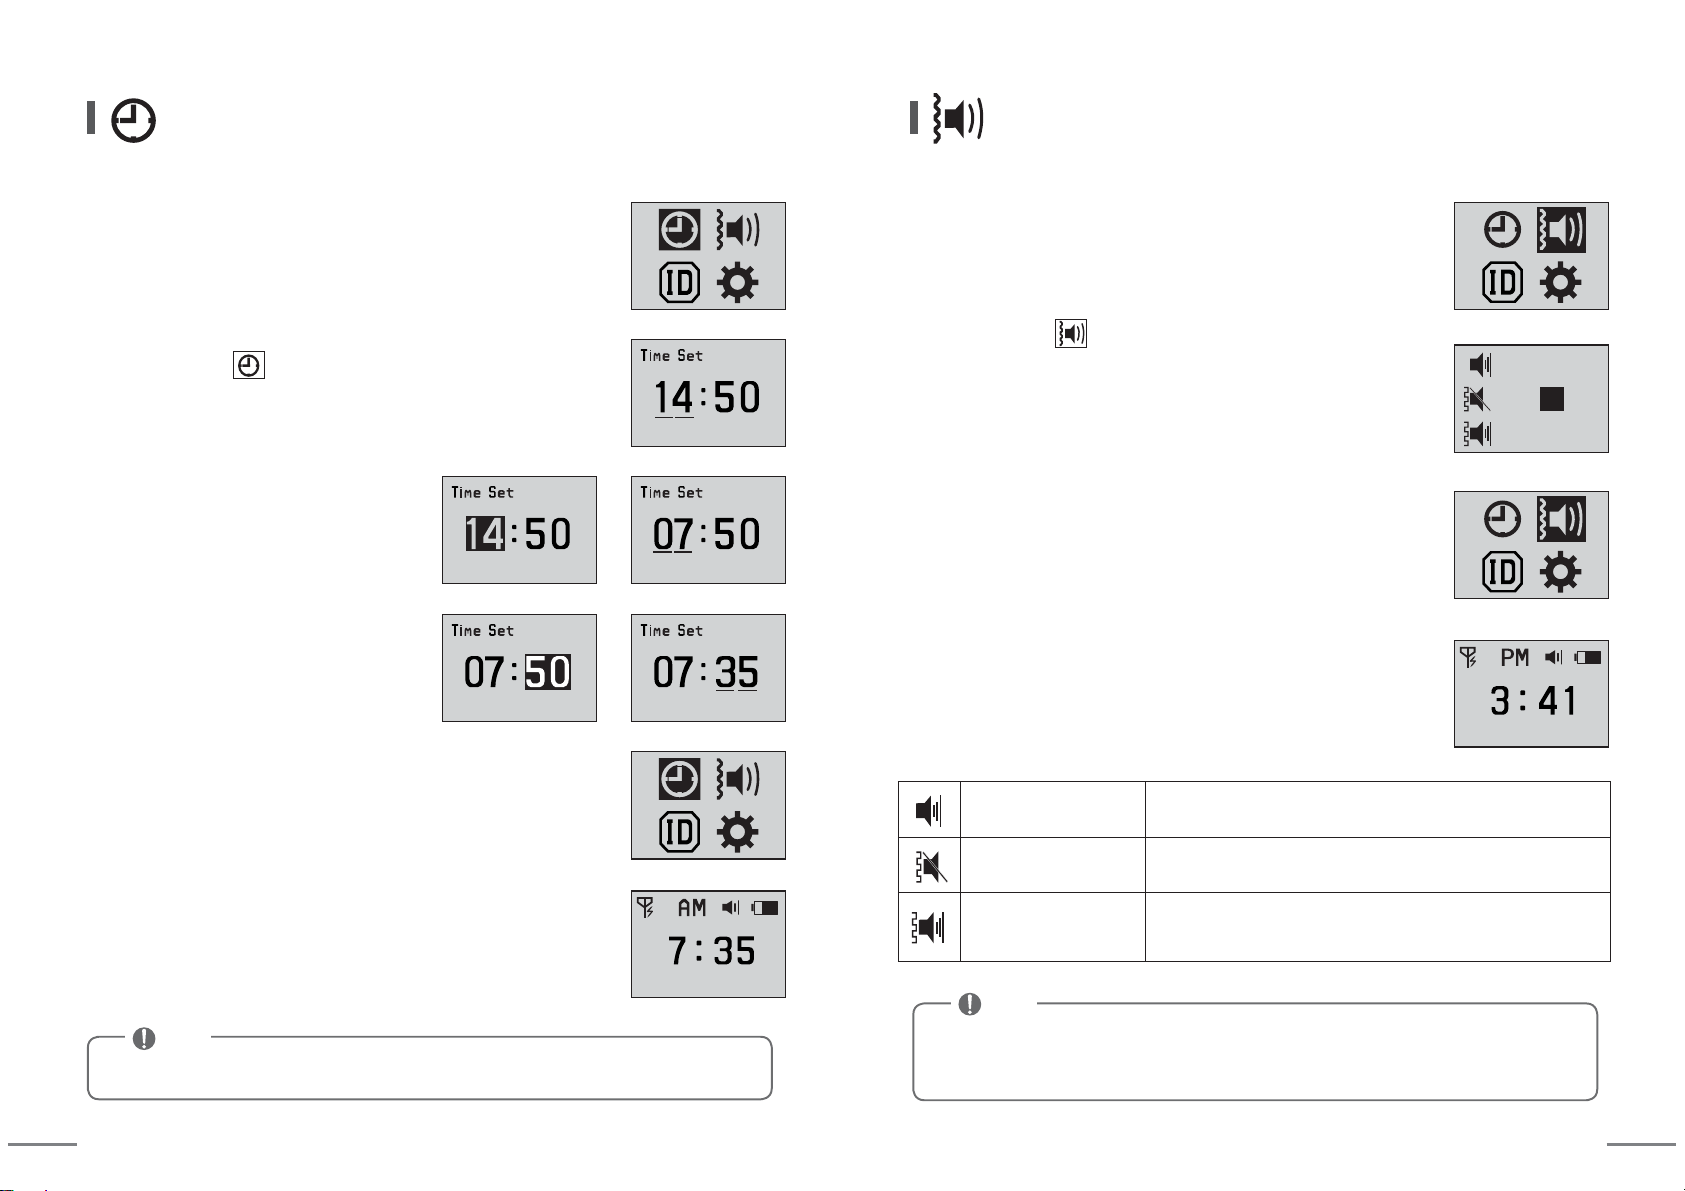
You can set the time of Pager.
Time Setting
⑥ When you press SET button for more than 2 seconds,
setting is completed.
⑦ When you press MODE button for more than 2 seconds,
idle screen is displayed.
⑤
After setting 'Minute' using arrow keys,
press SET button.
④ Move cursor using arrow keys and
select 'Minute' using SET button.
③ Select 'Hour' using SET button and
after setting 'Hour' using arrow keys,
press SET button.
② After moving to using arrow keys, enter into setting mode
by pressing SET button.
② After moving to using arrow keys, enter into setting mode
by pressing SET button.
▶
▶
① You can enter into Setting Mode by pressing MODE button
for more than 2 seconds at idle screen.
① You can enter into Setting Mode by pressing MODE button
for more than 2 seconds at idle screen.
You can set sound or vibration when receiving calls.
Sound / Vibration Setting
⑤
When you press MODE button for more than 2 seconds,
idle screen is displayed.
④
When you press SET button for more than 2 seconds
after selecting Type, setting is completed.
③ If you select Type using arrow keys, you can check
sound or vibration.
① ② ③
① ② ③
① ② ③
Sound Mode Only sound output is made and there are ① ② ③ types.
Vibration Mode
Only vibration output is made and there are ① ② ③ types.
Sound/Vibration Mode
Sound and vibration outputs are made at the same time
and there are ① ② ③ types.
※ If battery is completely discharged and goes out, set time can be initialized.
※
Cancel reception notifying methods(sounds/vibrations) are fixed
depending on each [sound mode, vibration mode, sound/vibration mode].
Note
10 11
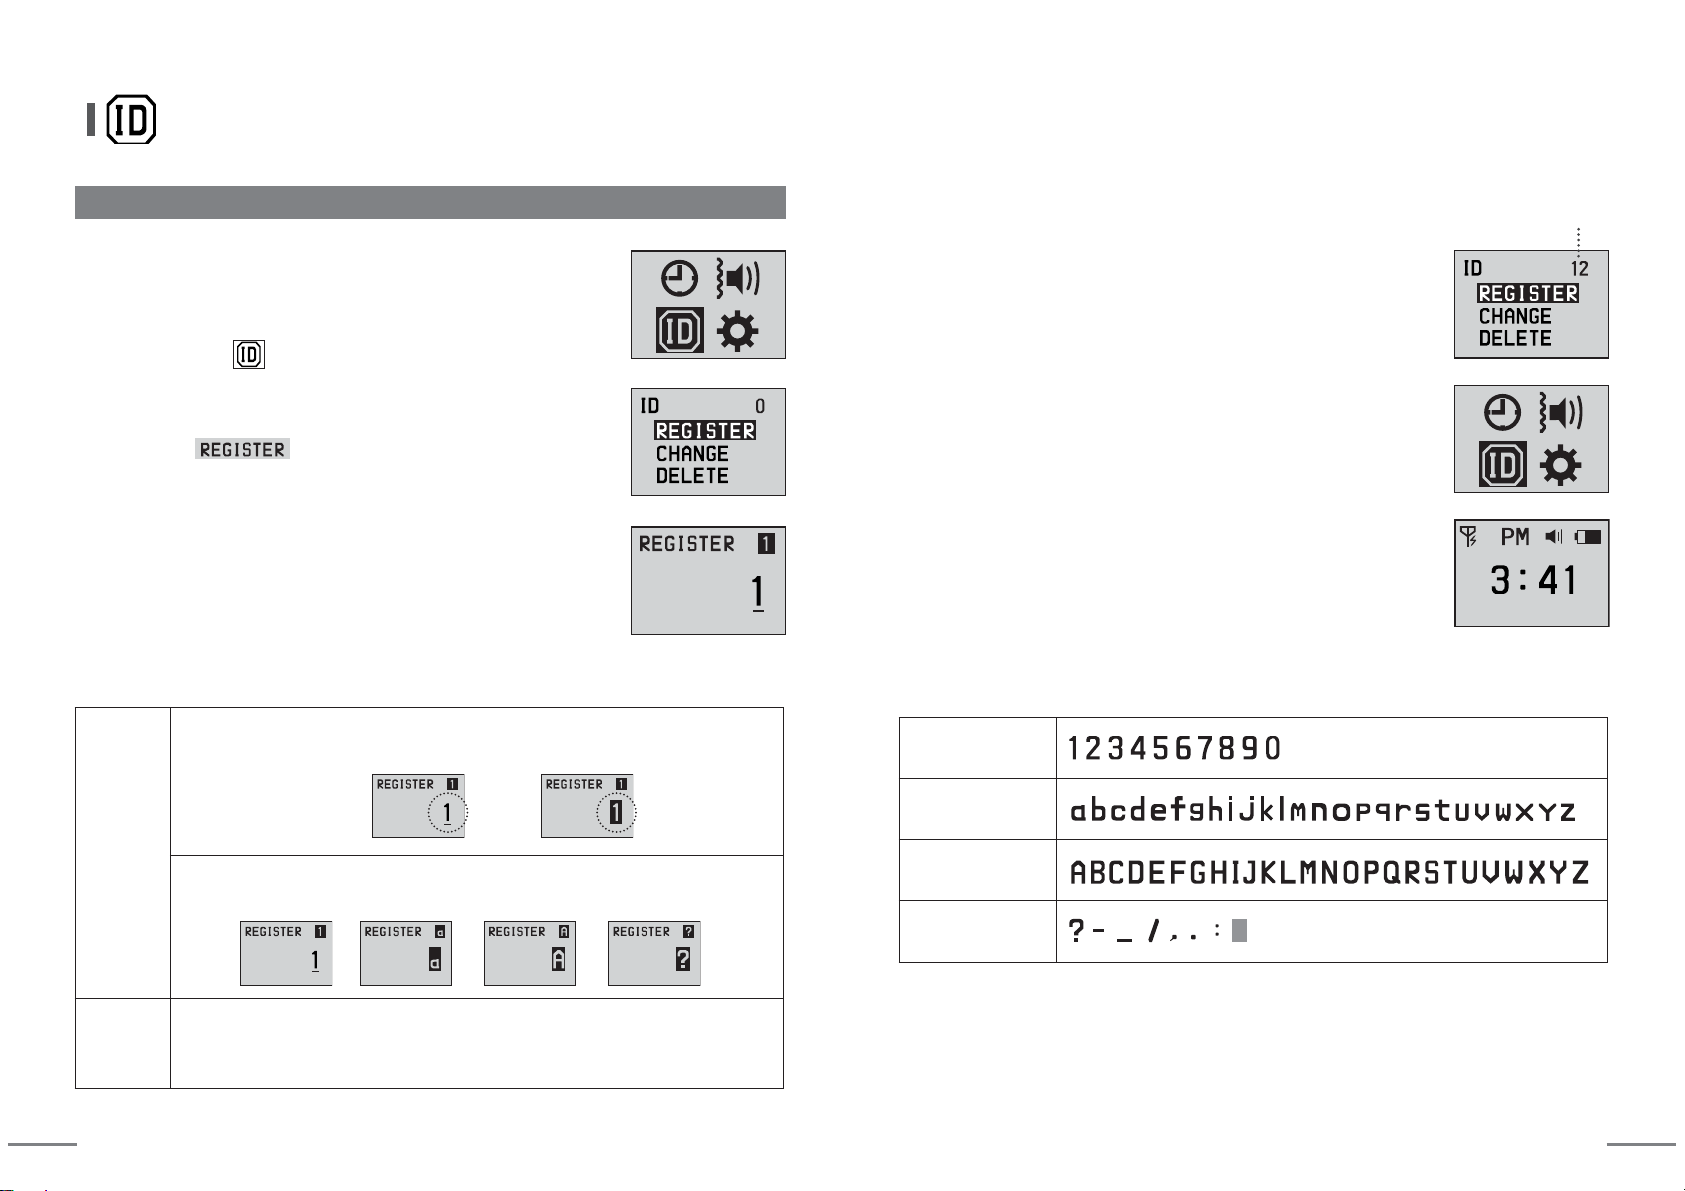
(1) New bell ID registration (Available number of calling bell registration: about 900)
New bell ID registration
③ Enter into Mode using SET button.
④ When calling bell that is to be registered as No.1 is pressed,
it is registered with 'beep' sound. Number of cursor location
is changed to '2', and when calling bell that is to be registered
as No.2 is pressed, it is registered.
Thus each time next calling bell is pressed in order, sequential
registration is made from No.1.
(④-1)
If you want to change to other characters, refer to following table.
⑤ When you press SET button for more than 2 seconds,
registration is completed and returns to previous stage.
⑥ When pressing SET button for more than 2 seconds,
it returns to previous stage.
Character
Change
When character inversion is made by pressing SET button, you can select
other characters using arrow keys.
[Character Inversion]
▶
When you press MODE button for more than 2 seconds, you can select
<Numbers, English Lower Case Letters, English Capital Letters, Special Characters>.
Digit Loca-
tion Shift
(Cursor
Movement)
You can move cursor location using arrow keys.
Registered total number of calling bells.
※ Expressible Characters
Numbers
English Letters
(Lower case letters)
English Letters
(Capital Letters)
Special Characters
(Blank)
⑦
When you press MODE button for more than 2 seconds,
idle screen is displayed.
② After moving to using arrow keys, enter into setting mode
by pressing SET button.
① You can enter into Setting Mode by pressing MODE button
for more than 2 seconds at idle screen.
12 13
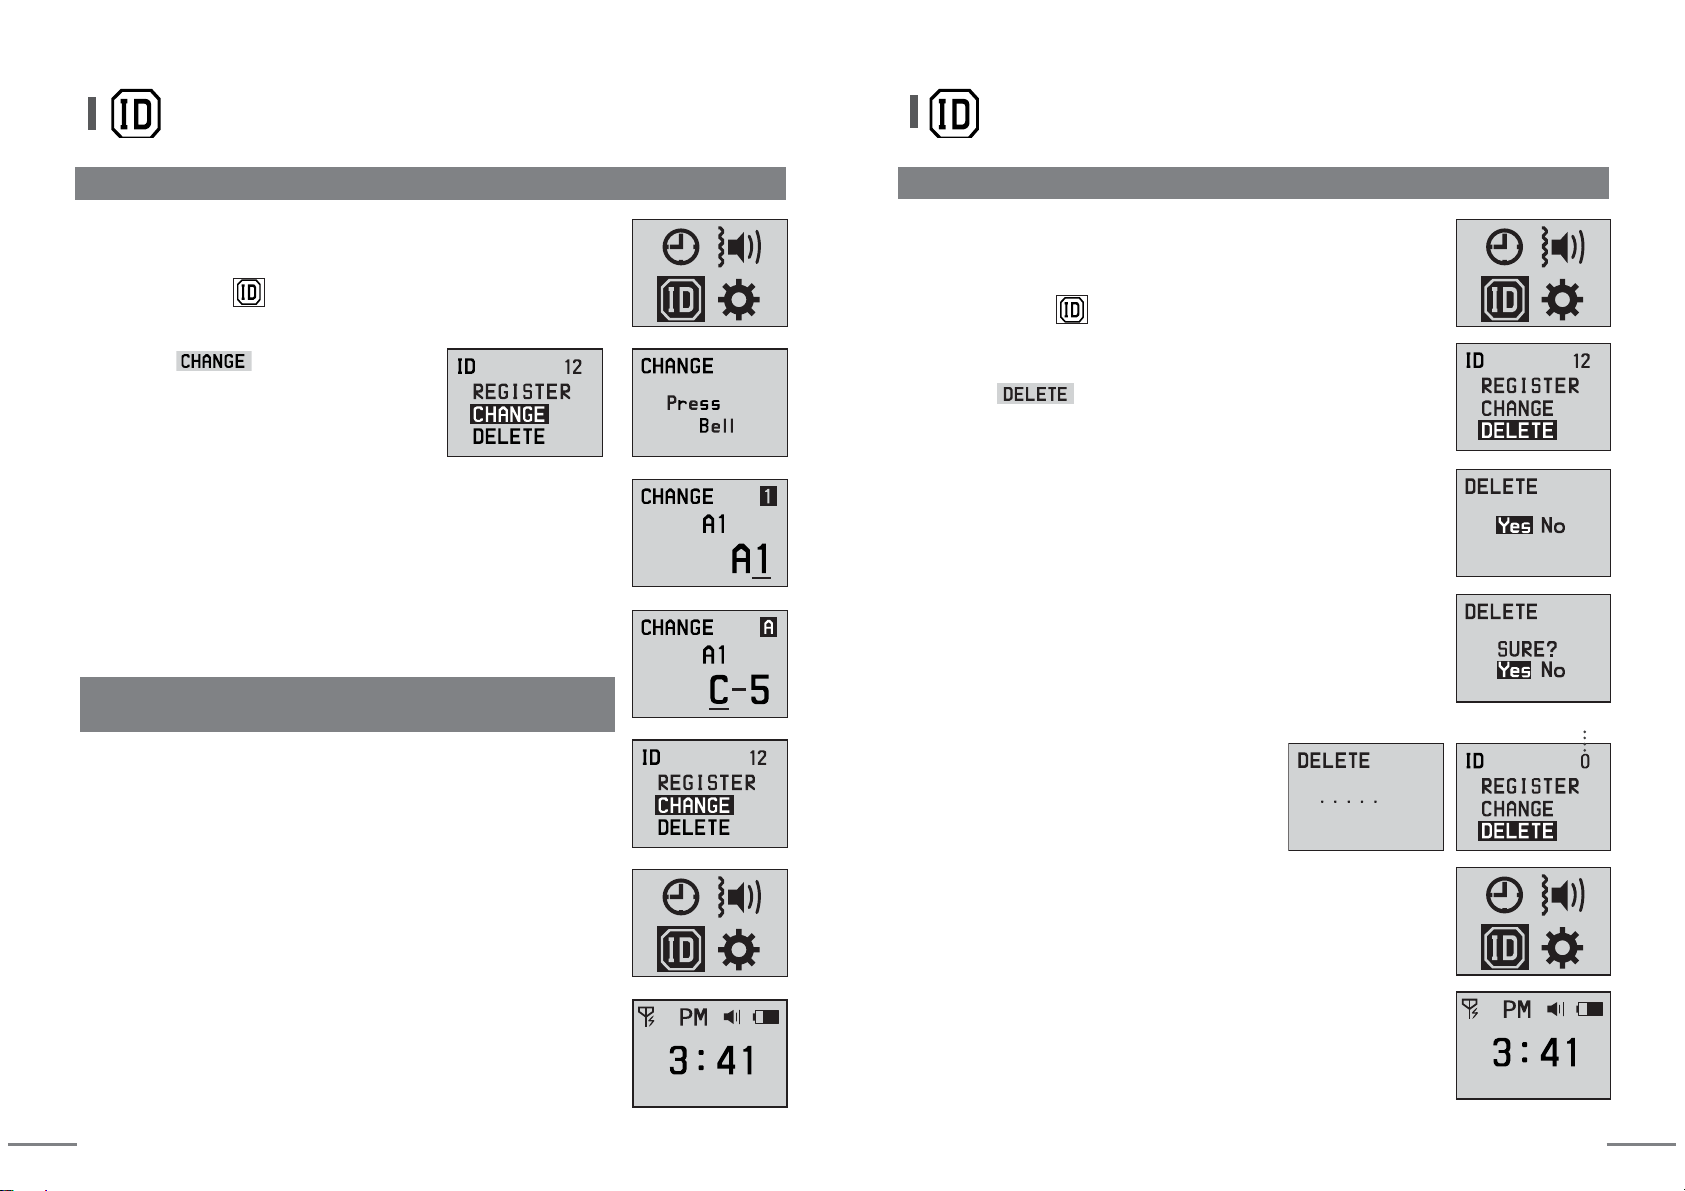
Calling Number Change
③ Move to mode using arrow
keys and enter into change mode by
pressing SET button.
(2) Calling Number Change (Mode that changes registered calling number)
④ When you press calling bell that you want to change among
registered calling bells, relevant number is displayed with
'beep' sound.
Example: Change [A1] to [C-5].
(Refer to 'New Calling Number Registration (④-1)' for character
change method.)
⑤ After changing to desired characters, when you press SET button
for more than 2 seconds, changed number is stored and
'Press Bell' is displayed.
ㆍ'Press Bell' is displayed.
⑥
If you want to change other calling number, repeat ④~⑤ process.
⑦ When pressing SET button for more than 2 seconds,
it returns to previous stage.
④
If you want whole deletion, move to [YES] and press SET button.
If you want to cancel whole deletion, move to [NO] and press
SET button.
⑤ When you make whole deletion, registered all calling numbers
are deleted, therefore, you need to check one more time.
If you want whole deletion, move to [YES] and press SET button.
⑥ After 'beep' sound is made, whole deletion
is completed and returns to previous stage.
Number of registered calling bells becomes '0'.
Registered total number of calling bells.
⑦ When pressing SET button for more than 2 seconds,
it returns to previous stage.
⑧ When pressing SET button for more than 2 seconds,
it returns to previous stage.
⑧
When you press MODE button for more than 2 seconds,
idle screen is displayed.
⑨
When you press MODE button for more than 2 seconds,
idle screen is displayed.
Whole calling number deletion
(3) Whole calling number deletion (Mode that deletes all registered calling numbers)
③ Move to mode using arrow keys and enter into
change mode by pressing SET button.
② After moving to using arrow keys, enter into setting mode
by pressing SET button. ② After moving to using arrow keys, enter into setting mode
by pressing SET button.
① You can enter into Setting Mode by pressing MODE button
for more than 2 seconds at idle screen. ① You can enter into Setting Mode by pressing MODE button
for more than 2 seconds at idle screen.
Registered
number
Changed
number
14 15
④ When pressing SET button for more than 2 seconds,
it returns to previous stage.
⑥
When you press MODE button for more than 2 seconds,
idle screen is displayed.
⑤ When pressing SET button for more than 2 seconds,
it returns to previous stage.
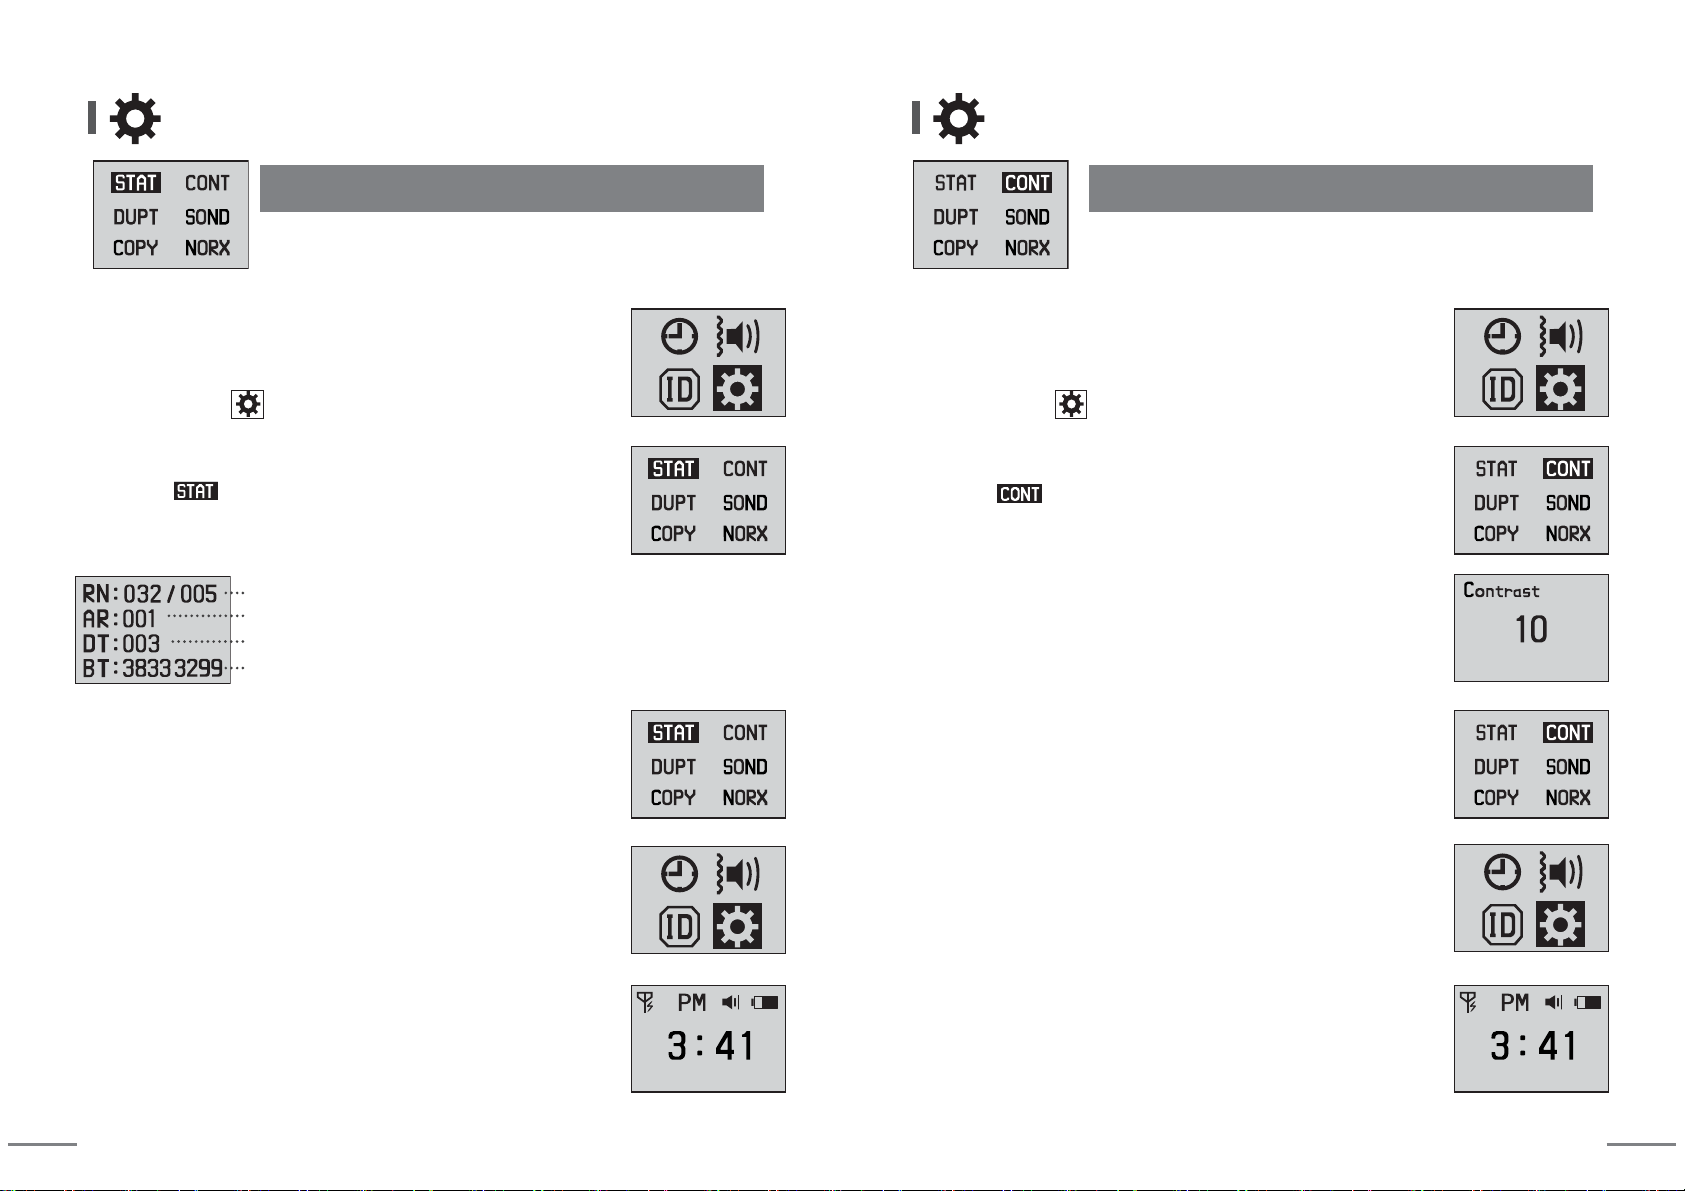
Total registered bells(32 bells) / Receiving-restricted bells(5 bells)
Number of call alarm repetition : call to be alarmed one(1) time
When receiving same calling numbers for 3 seconds, it is displayed only once.
Battery calibration value(Only for manufacturer's checking purpose)
③ Move to mode using arrow keys and enter into change
mode by pressing SET button.
⑴ Checking the detail set by Other Settings
Other Settings Other Settings
(2) Adjusting the contrast of LCD screen
③ Move to mode using arrow keys and enter into change
mode by pressing SET button.
④
Set desired value using arrow keys. (default setting value is 10.)
You can select it from 00 to 20.
⑤ When pressing SET button for more than 2 seconds,
it returns to previous stage.
⑦
When you press MODE button for more than 2 seconds,
idle screen is displayed
⑥ When pressing SET button for more than 2 seconds,
it returns to previous stage.
① You can enter into Setting Mode by pressing MODE button
for more than 2 seconds at idle screen.
② After moving to using arrow keys, enter into setting mode
by pressing SET button.
② After moving to using arrow keys, enter into setting mode
by pressing SET button.
① You can enter into Setting Mode by pressing MODE button
for more than 2 seconds at idle screen.
16 17
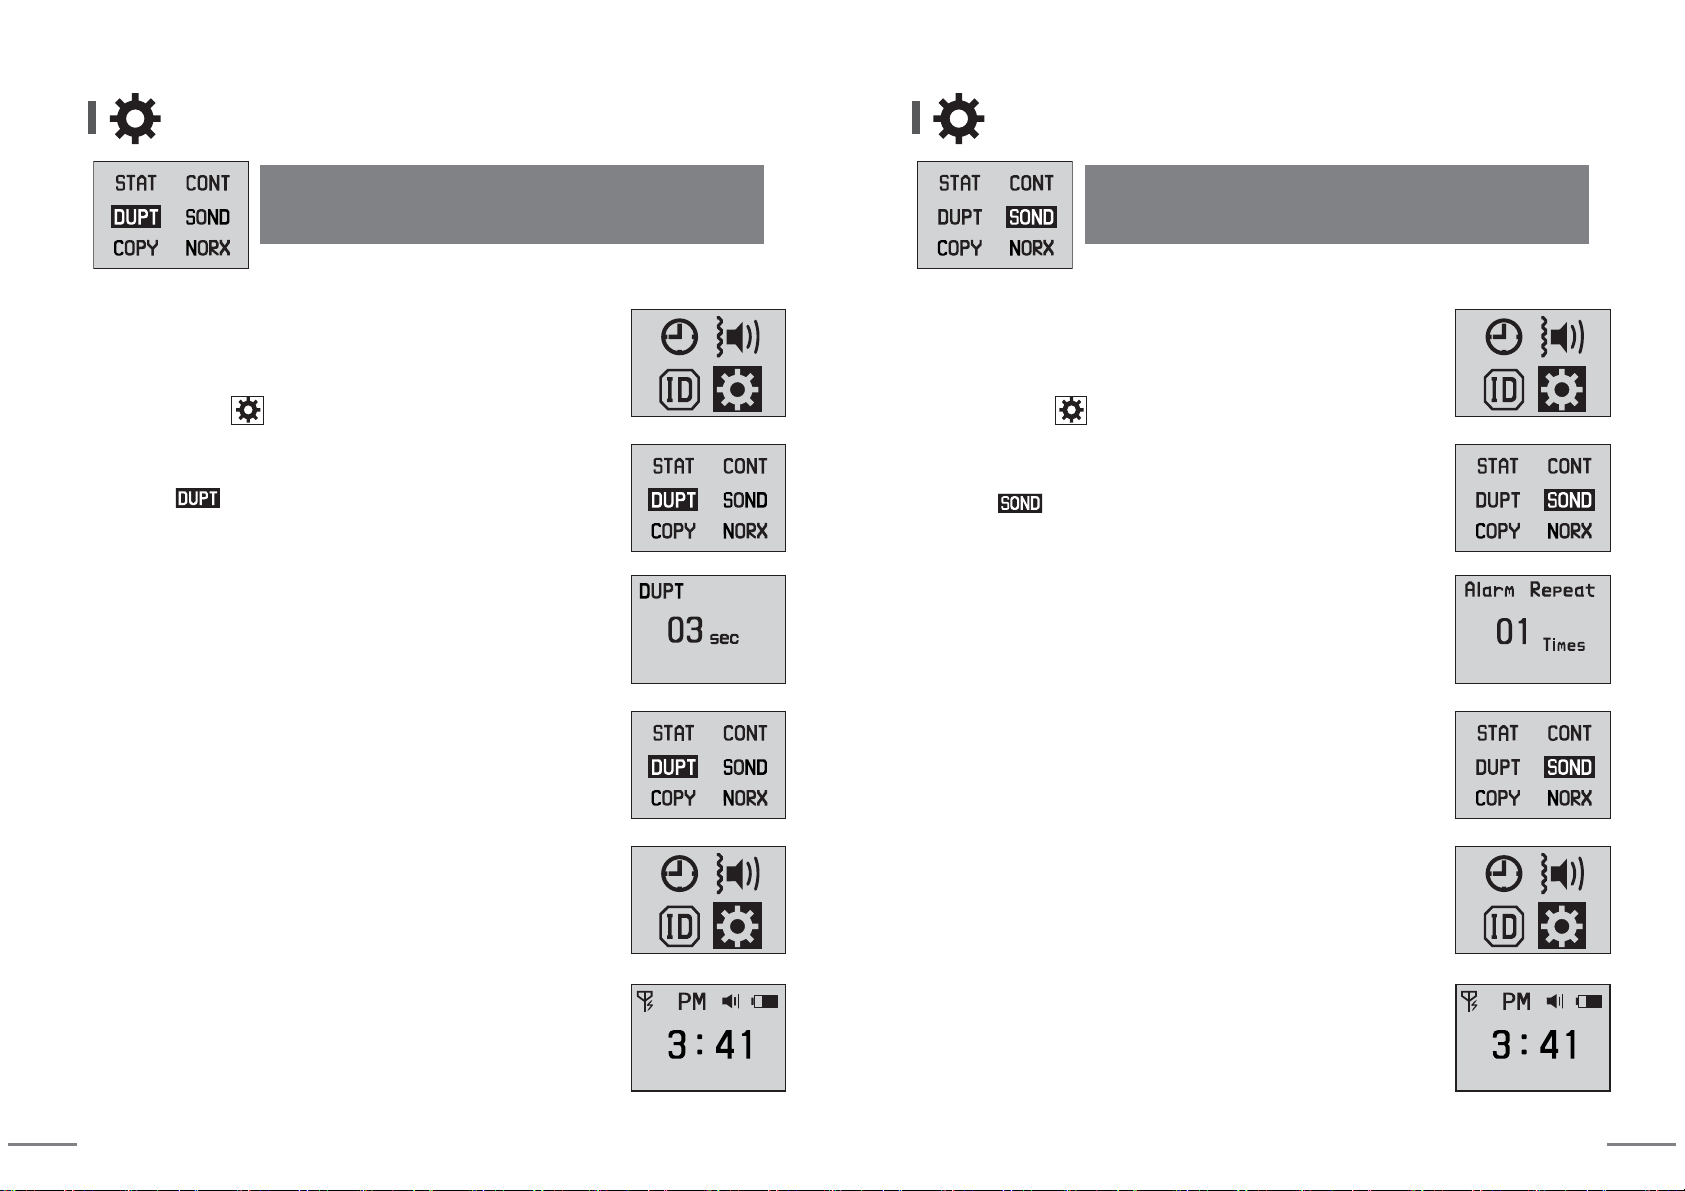
Other Settings
(When receiving same calling numbers, it allows only one
reception during set time period.)
⑶ Duplicated receiving prevention time
④
Set desired value using arrow keys.
Initial setting value is [03] and 3 seconds (setting range: 00~99).
(When receiving same calling numbers for 3 seconds, it is displayed
only once.)
⑤ When you press SET button for more than 2 seconds,
storing is completed and returns to previous stage.
⑦
When you press MODE button for more than 2 seconds,
idle screen is displayed.
⑥ When pressing SET button for more than 2 seconds,
it returns to previous stage.
③ Move to mode using arrow keys and enter into change
mode by pressing SET button.
② After moving to using arrow keys, enter into setting mode
by pressing SET button.
① You can enter into Setting Mode by pressing MODE button
for more than 2 seconds at idle screen.
Other Settings
(It is a function that sets repeated numbers of sound or
vibration for calls.)
⑷ Number of call alarm repetition
⑤ When you press SET button for more than 2 seconds,
storing is completed and returns to previous stage.
⑦
When you press MODE button for more than 2 seconds,
idle screen is displayed.
⑥ When pressing SET button for more than 2 seconds,
it returns to previous stage.
④
Set desired value using arrow keys.
ㆍInitial setting value is [01] and it means one time notification against a call.
(setting range: 00~99)
ㆍ
When setting as [00], receiving notification is repeated continuously,
and when pressing any button, receiving notification stops.
③ Move to mode using arrow keys and enter into change
mode by pressing SET button.
② After moving to using arrow keys, enter into setting mode
by pressing SET button.
① You can enter into Setting Mode by pressing MODE button
for more than 2 seconds at idle screen.

18 19
(Option item)
Dedicated Data Transmission cable
Other Settings
ㆍConnect 2 pagers using dedicated cable.
(Transmission time varies depending on the registered capacity.)
Pager screen that receives data
(The registered Bell IDs are deleted.)
: Data can be transmitted only in idle mode.
Pager screen that transmits data
(Refer to following sequence.)
(Function that duplicates registered all calling numbers to
other pagers.)
⑸ Registration transmission
③ Move to mode using arrow keys and enter into change
mode by pressing SET button.
② After moving to using arrow keys, enter into setting mode
by pressing SET button.
① You can enter into Setting Mode by pressing MODE button
for more than 2 seconds at idle screen.
ⓐ
Pager screen that transmits data
SET Button. Transmission Start Being Transmitted Transmission Completion
ⓑ
Pager screen that receives data
(※ Data can be transmitted only in idle mode.)
idle screen
Beep sound + Backlight turns on
Rebooting after completing
transmission
...............................
④
When you press SET button, transmission starts, and when transmission is completed,
'OK' icon is displayed.
⑦
When you press MODE button for more than 2 seconds,
idle screen is displayed.
⑥ When pressing SET button for more than 2 seconds,
it returns to previous stage.
⑤ When pressing SET button for more than 2 seconds,
it returns to previous stage.
※ When the cable is not connected well or when the mode of a receiving pager is not idle one.
SET Button.
Transmission Start
After 'WAIT' displayed for 15 seconds
"ERR" appears on the screen.
Mode moves to previous stage.
...............................
20 21
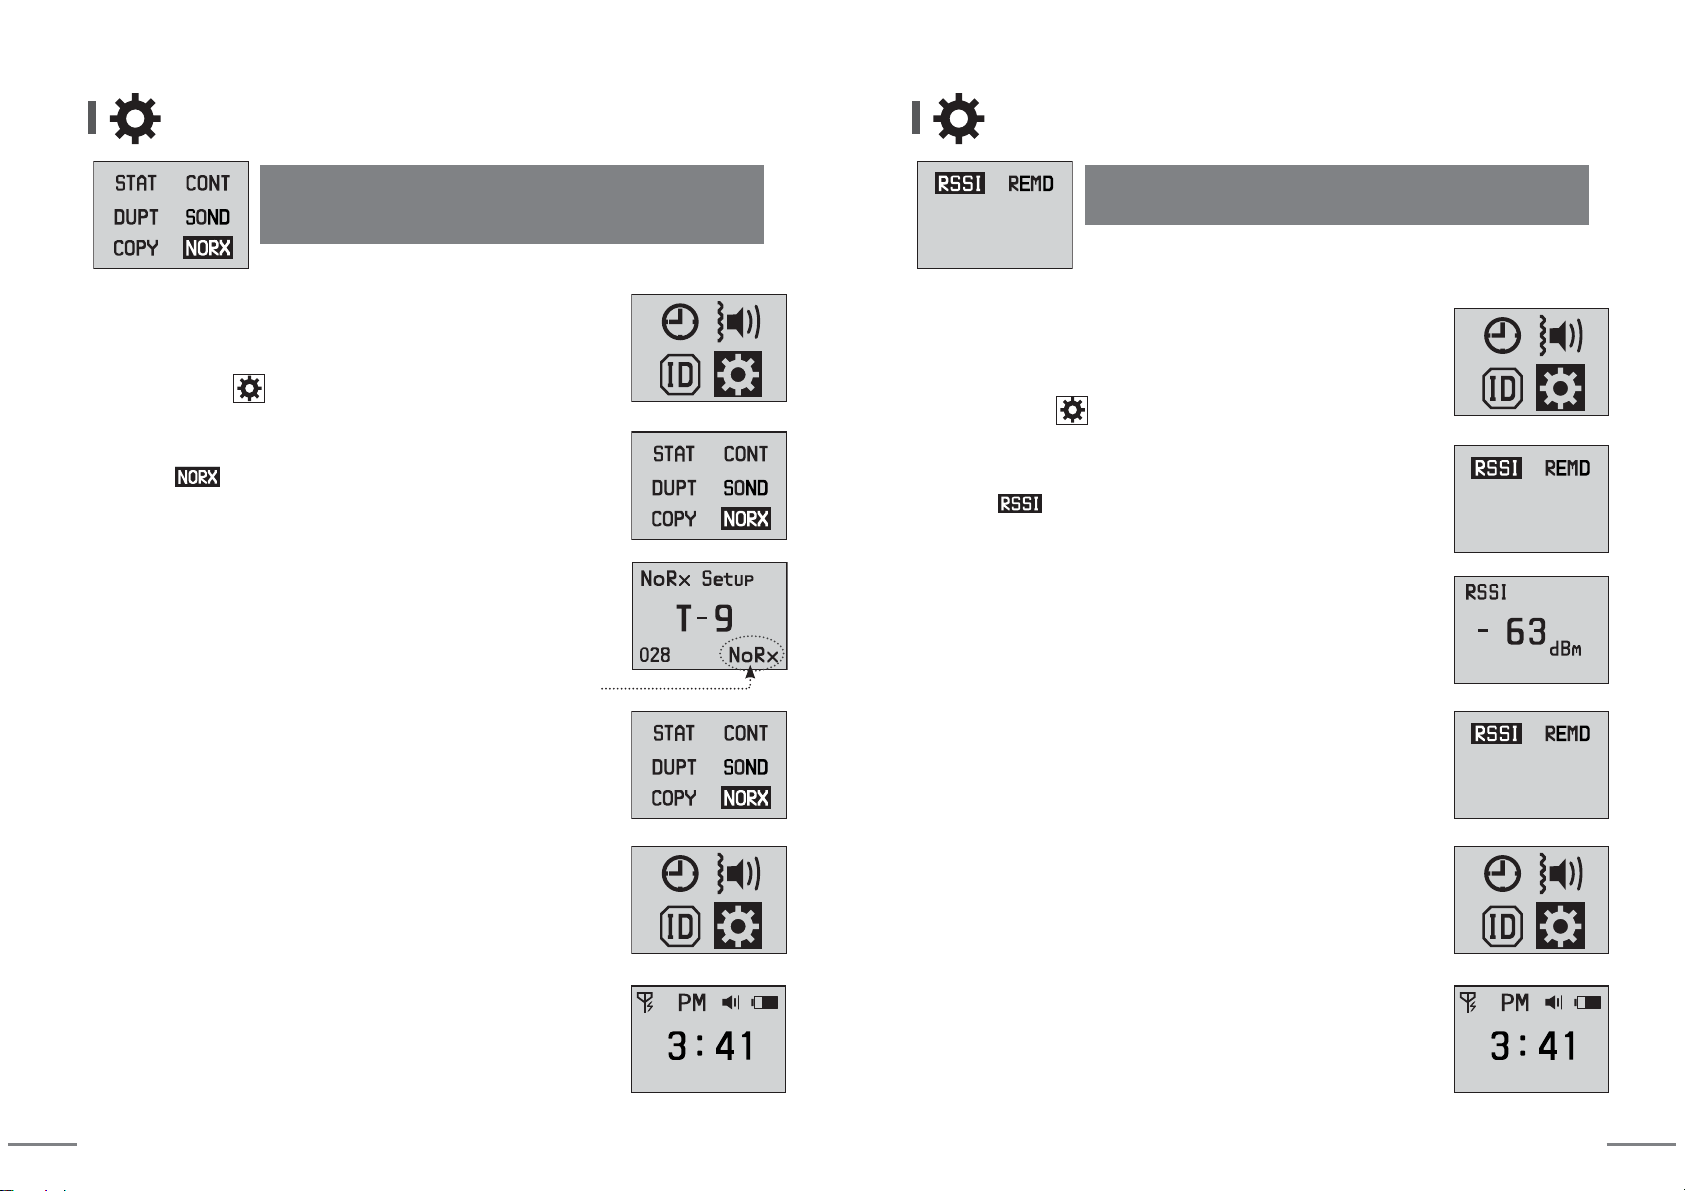
(Initial setting value is reception [Rx].)
Other Settings
④
After searching unwanted receiving number using arrow keys,
when you press SET button, it is set as no- reception [NoRx].
When you press SET button once again, it is set as reception [Rx].
(Function that sets unwanted receiving number out of
registered calling numbers.)
⑹ Receiving restriction number
③ Move to mode using arrow keys and enter into change
mode by pressing SET button.
② After moving to using arrow keys, enter into setting mode
by pressing SET button.
① You can enter into Setting Mode by pressing MODE button
for more than 2 seconds at idle screen.
⑤ When you press SET button for more than 2 seconds,
storing is completed and returns to previous stage.
⑦
When you press MODE button for more than 2 seconds,
idle screen is displayed.
⑥ When pressing SET button for more than 2 seconds,
it returns to previous stage.
Pager does not receive call from [T-9].
Other Settings
④
When you press a calling bell, you can check receiving
signal strength.
(Function that checks receiving signal strength.)
⑺ Receiving sensitivity check
③ Move to mode using arrow keys and enter into change
mode by pressing SET button.
② After moving to using arrow keys, enter into setting mode
by pressing SET button.
① You can enter into Setting Mode by pressing MODE button
for more than 2 seconds at idle screen.
⑦
When you press MODE button for more than 2 seconds,
idle screen is displayed.
⑥ When pressing SET button for more than 2 seconds,
it returns to previous stage.
⑤ When pressing SET button for more than 2 seconds,
it returns to previous stage.

22
LED light
PRGH
VHW
SZU
Other Settings
④
Select desired setting out of [ON], [OFF] using arrow keys.
·When you set as [ON], upper right LED light flickers every minute
if there is unchecked calling number. (Initial setting value is OFF.)
(Function that notifies unchecked calling number.)
⑻ Unchecked calling number notification
③ Move to mode using arrow keys and enter into change
mode by pressing SET button.
② After moving to using arrow keys, enter into setting mode
by pressing SET button.
① You can enter into Setting Mode by pressing MODE button
for more than 2 seconds at idle screen.
⑤ When you press SET button for more than 2 seconds,
storing is completed and returns to previous stage.
⑦
When you press MODE button for more than 2 seconds,
idle screen is displayed.
⑥ When pressing SET button for more than 2 seconds,
it returns to previous stage.

Table of contents


