SOLZAIMA Pepper 70 User manual

Instruction Manual
English
Local Heating Cookers
Pepper 70|Pepper 90
This product is an equipment for cooking and heat production for space heating, so you
should always read the Instruction Manual carefully before you start using your new
equipment.
Mod. 97 – A


Thank you for purchasing a SOL AIMA appliance.
Please read this manual carefully and retain it for future reference.
* All products here detailed meet the requirements of the EU Construction Products
Regulation (No. 05/2011) and bear the EC conformity marking;
* SOLZAIMA disclaims any responsibility for damage to the unit when installed by non-
qualified personnel;
* SOLZAIMA disclaims any responsibility for damage to units not installed and operated
in compliance with the instructions included in this manual;
* All local regulations, including but not limited to national and European standards,
must be observed when installing, operating and servicing the unit;
* The Local Heating Cookers are tested according to the EN12815 Standards;
* Whenever you need assistance you should contact the supplier or installer of your
equipment. You should provide the serial number of your cooker that is on the
nameplate placed on the ash basket support box.
* Technical assistance should be carried out by the installer or supplier of your
equipment, except in special cases, after assessment by the installer or technician
responsible for the assistance, who will contact SOLZAIMA if he deems it necessary;
You may contact us via email, using the following address: apoio.cliente@solzaima.pt

Contents
1. Solzaima ...................................................................................................... 1
2. Technical Specifications .................................................................................. 2
. Knowing the equipment... ...............................................................................
4. Installation ...................................................................................................
5. Instructions for Use........................................................................................ 9
6. Troubleshooting ........................................................................................... 15
7. End of Life of a Wood Cooker ........................................................................ 15
8. Sustainability .............................................................................................. 16
9. Glossary ..................................................................................................... 16
10. Warranty ................................................................................................ 18
11. Statement of Performance ........................................................................ 26

1
1. Solzaima
Solzaima's vision has always been to provide clean, renewable and more cost-effective
energy. This is why we have been manufacturing biomass units and heaters for the past
45 years.
As a result of the persistence and unconditional support from a network of partners,
Solzaima is currently the leading manufacturer of biomass heating units, especially with
its range of central heating stoves with backboilers.
We provide approximately 20.000 homes a year with biomass heating solutions. This
market has been growing at annual rate of 20%, indicating that consumers are
becoming increasingly aware of ecological and more cost-effective heating solutions.
Solzaima is the only Portuguese manufacturing company to have obtained ISO 9001
International Quality Certification and ISO 14001 International Environmental
Certification– because we believe in high standards and aim to lead by example.
2
2. Technical Specifications
Local Heating Cookers are equipment intended for cooking and for heating the
environment where the equipment is installed. The stoves are intended for domestic use
and may not be used for commercial purposes.
Features Pepper 70 Pepper 90 Units
Weight 110 125 kg
Height 850 850 mm
Width 750 950 mm
Depth 650 650 mm
Oven Dimensions (WxHxD) 260x 0x440 260x460x440 mm
Diameter of the fume
discharge pipe 120 120 mm
Maximum heating capacity 150 175 m³
Maximum wood length* 250 250 mm
Rated thermal power 6, 6,8 kW
Fuel consumption 1,9 2,05 kg/h
Thermal yield at rated
thermal power 76,4 76, %
CO Emissions 13%O
2
0,88 0,96 %
Max. fume temperature 205 179 °C
Draught in the chimney 1 1 Pa
Energy classification A A
-
Table 1 - Technical Specifications of each Equipment
* The firewood should have a moisture content of less than 20%.

3
1
2
4
5
6
7
3. Knowing the equipment...
Figure 1 - Wood burning cooker Pepper
1. Combustion chamber door
2. Ash drawer door
. Combustion regulator
4. Wooden drawer
5. Smoking outlet on the side
6. Oven door
7. Cleaning access door
4. Installation
Attention: all local regulations and standards must be observed when installing this
equipment.
Check immediately upon receipt that the product is complete and in good
condition.
If there is any defect or malfunction, do not install the equipment and ask for
the presence of the equipment supplier or a brand technician on site.

4
4.1. Combustion Air and Gas Circulation
4.1.1. Theoretical notions for chimneys installations
There are some existing factors that can cause significant changes in the depression
created in your chimney and consequently on the smoke draft that will have on your
equipment.
The combustion created in your equipment, generally increases greatly the temperature
at the beginning of your chimney in view of the exterior temperature. This fact causes
low pressure in the inner part of your chimney (near the cooker) which conjugated with
a superior pressure on the outdoor air to chimney creates the strength that causes a
natural movement of the flue gases through the chimney flue, which we name of natural
draft or “chimney effect”, which also generates the inlet of air necessary for combustion
inside the stove. The taller your chimney is, the greater the difference of pressures and
therefore the greater the natural suction or chimney effect.
This effect has on its base a physical measuring that indicates that the minimum height
of the chimneys must not be inferior to 4 metres, in relation to an average altitude of the
land, to average ambient temperature differences, and to average temperatures of the
wood cooker functioning. However, this measurement is not compulsory, once there can
be chimneys functioning well with less height and other chimneys with superior height
functioning worse. In order to install efficient chimneys, the reasons for this
phenomenon must be understood. Beyond these geographic factors (altitude, exposure
to the sun, direction) and of atmosphere (rain, fog, snow) that influences the chimney
draft and it’s depression as well as the ability to draw the smoke from the stove, there is
still another factor to consider that in many cases is crucial – the wind.
In fact, the predominant wind (which depends many times on the land morphology and
house implanting zones) can cause many relevant changes to the depression created in a
chimney, that is, wind with a predominant arising flow, causes an increase of depression
on the chimney and that justifies better drafts. Contrary, a predominant descendant
wind causes decrease of the depression effects, which means that it eliminates the
capacity and extraction of chimneys. A predominant crosswind has an effect that
depends on how the chimney is installed.
For one to understand this effect, we can evince that a descendant wind at 45° with a
velocity of 8 m/s (on a wind beaufort scale from 0 (calm) to 12 (hurricane), corresponds
to a wind of 5 (fresh breeze) causes a pressure increase effect about 17 Pa, which can
eliminate the effect that a chimney has, for example a normal depression of 12 Pa.

5
Besides the direction and force of the wind and surrounding land morphology, the
location and form of installing the chimney in relation to the residency is also a factor to
consider.
The differences of depression caused by exterior wind, are also felt inside the house and
the installation of cookers on the zone exposed directly to wind can increase the
depression on the chimney, fact that competes with the depression caused by the wind
on the house exterior, that functions inversely, that is, the minor depression zone will be
the zone directly exposed to the wind. Generally, this isn’t a problem and the depression
caused by the height of the chimney eliminates this effect, but every time that this
situation is verified, it can be compensated by installing the chimney in a zone least
exposed, increasing the capability of the chimney depression.
6
4.1.2. Installation Advices
* This type of unit should be installed in a well-ventilated area. Any air intake grilles
should be placed in locations that are not liable to become blocked, so that the place of
installation has sufficient air in the order to avoid a poor draft;
* The combustion air enters the unit through a system that controls the burn intensity.
This flow should be kept clear at all times;
* The ventilators that extract air from the room, must not be used;
* Use of this unit at the same time as other heating devices that require an air supply
may necessitate additional air inlets. The installer should assess the situation in light of
total air flow requirements;
* For your unit to function in normal conditions the combustion gas draft must create a
draught of 12 Pa one metre above the throat of the flue. If this is not achieved in your
chimney, your wood-burning cooker may not work properly, for example, by throwing
smoke outdoors or consuming excess wood. For proper installation, at least 78,7 inches
(2 metres) of metal rigid flue tube with the same diameter as the unit's smoke outlet
should be fitted vertically above the unit. If this not achieved on your chimney, your unit
might not function correctly, leading to smoke to the exterior or excess of wood
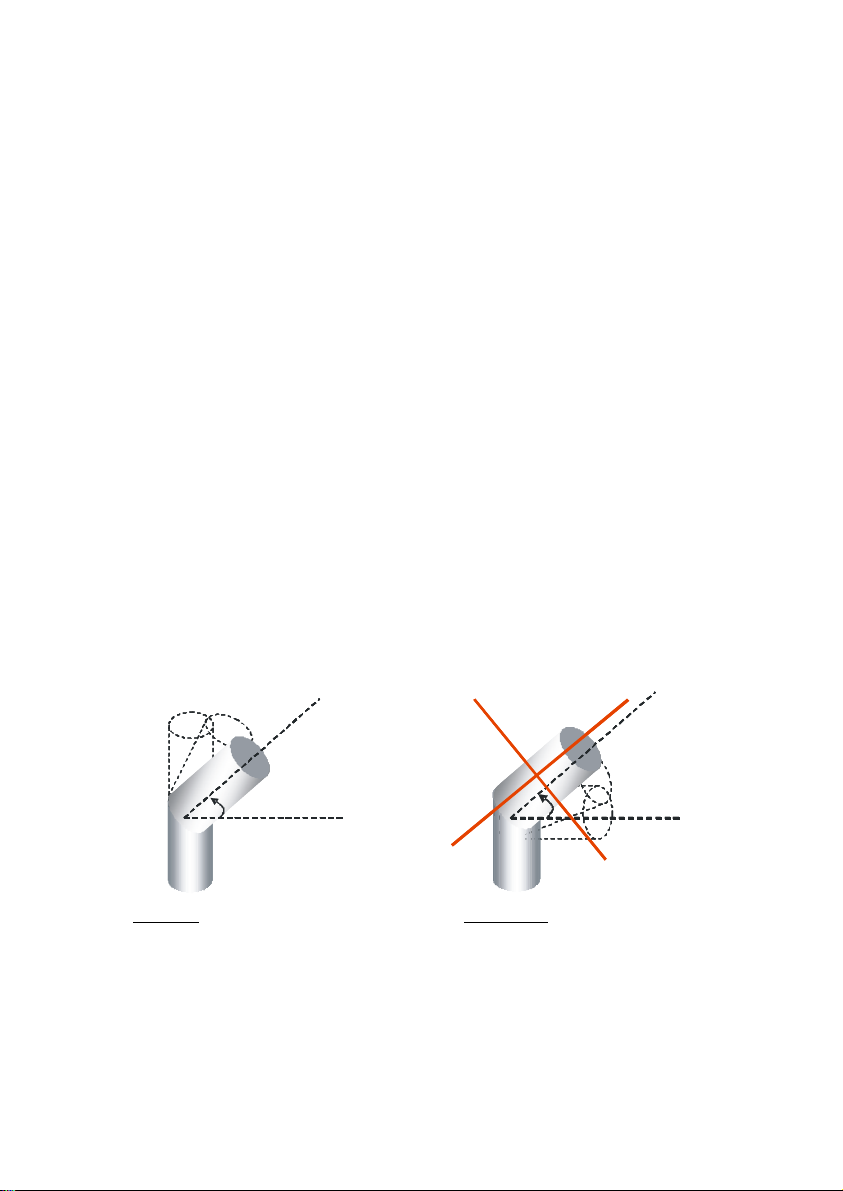
consumption. After this section, sections of tubing with a maximum angle of 45° may be
used (in this case the chimney should be cleaned once a year); the following figure
illustrate correct and incorrect angles for installing a bend.
45º45º45º
45º45º
Correct angle for bends Incorrect angle for bends
* A single-walled tube installed on the outside of a building or in areas subject to
thermal variations, results in the condensation of water vapour in the combustion gases.
Instead, use of a double-walled, insulated tube is recommended;
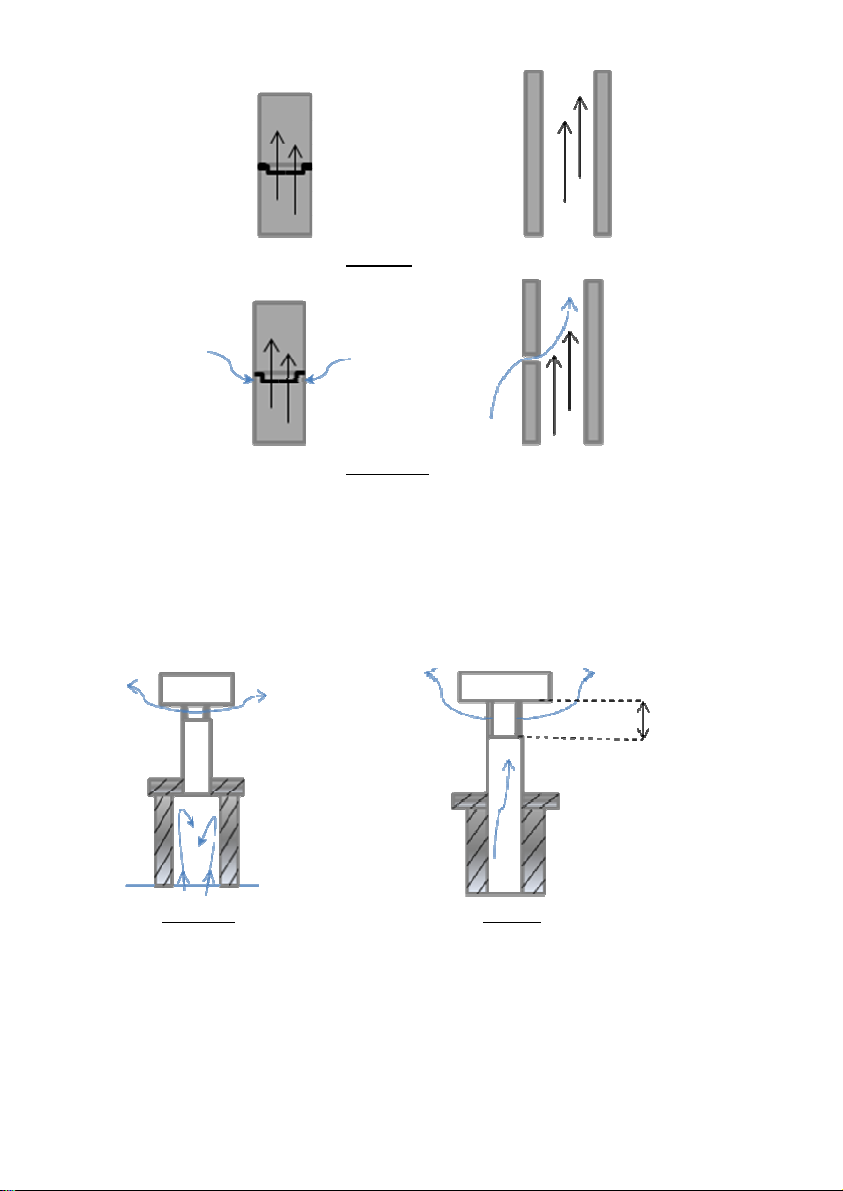
* The tube unions must be well sealed to prevent air entering through possible gaps;
7
Correct sealing
Incorrect sealing
* The tube unions must not allow strangulation (reductions), therefore the inner walls
must be perfectly smooth and free of obstacles. The caps must be placed correctly so as
to avoid a difficult draft;
Incorrect Correct
* The flue outlet should allow for good air circulation and be placed at least 1 m above
the top of any obstacle located within a distance of 9,8 feet ( m); if case of a better
draft is required, the height of the chimney should be increased;
Minimum distance
equal to pipe
diameter

8
Incorrect Correct
* The same flue should not be used for more than one unit or open fireplace. With
shared chimneys, each flue should reach its outlet independently and these should be at
the same level to ensure that the air circulation expels the gases;
* Brick chimneys should not be too wide, as the smoke will cool as it disperses, reducing
the draught. In case of draught problems, a revolving chimney cowl can be installed or
place a metallic tube in the inner part to improve the draft.
4.2. Installation Location Requirements
* The floor on which the unit will stand must be able to support a permanent load of 2,2
pounds (1kg)/cm². If the load capacity of the floor is insufficient, a solid plate can be
used to distribute the load over an area larger than the unit’s base;
* The equipment must be installed on a base of refractory bricks, or other type of
material with non-combustible characteristics, if it is a combustible material (example:
wood, etc...), a metal plate extending on the sides of the stove by 0 cm and the front
by 50 cm must be placed.
* No combustible materials may be used near the walls of the wood-burning stove
(safety distances must be observed, see Figure 2);
* The materials in front of the wood-burning stove must be able to withstand radiation
heating through the equipment's glass and should therefore not have combustible
characteristics;
* Refractory cement or other refractory material should be applied on the chimney walls;
* In order to assure a good functioning of your wood burning cooker, the air intake to
the insertion zone of the equipment must be made by following the sketch bellow.
The intake 1, from the exterior of the residence must always be guaranteed and must
have an area at least 100 cm
2
and without obstacles in such a way that the air intake is
sufficient for a good function; in case this situation isn’t possible, you will have to
contemplate in the installation air inlet for the combustion (intake 2) from the interior of
the residence, bearing mind the isolation degree of your residence and proximity of other
Least 1 m above
the highest point

9
devices that consume air for its functioning (ex. Kitchen exhaust fans or bathroom)
making the functioning of your equipment difficult on the combustion and draft.
Figure 2 - Safety distances
5. Instructions for Use
Attention: all regulations and standards must be complied with when installing this unit.
5.1. Fuel
* Only firewood should be used in this type of unit. It may not be used as an incinerator,
nor should other materials such as coal, painted wood, varnishes, thinners, liquid fuels,
glues or plastics be used. Also avoid burning common combustible materials such as
cardboard and straw.
* The firewood should have a low water content (less than 20%) in order to ensure
efficient combustion and avoid creosote build-up in the smoke duct and on the glass.
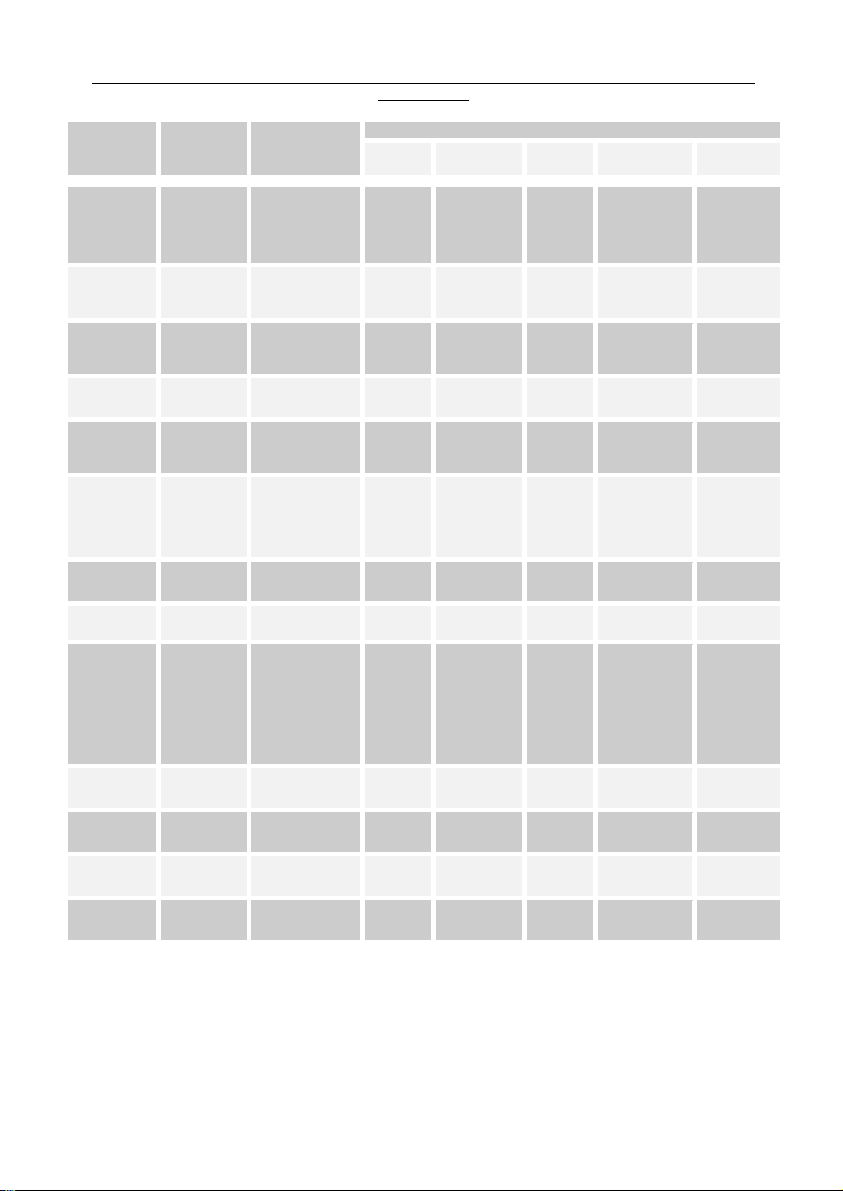
* See Table 2, which lists some of the types of wood that can be used in these units.
1
Table 2 - ist of types of firewood that may be used in SO ZAIMA fires, their geographical distribution and calorific
value/reactions
Common
Name
Scientific
Name Distribution
Characteristics
Smoke Heat Lighting Combustion
Speed
Hardness
Pine Pinus
Europe, except
Finland;
Northern
S eden and
Nor ay.
Little High Easy Fast Soft
Cork Oak
(+)
Quercus
suber
Southern Europe
Little Very High Easy Regular Hard
Eucalyptus Eucalyptus
Mediterranean
Region
Lot Regular Difficult Slo Hard
Holm Oak
(+)
Quercus
ilex
Southern Europe
Little Very High Difficult Slo Hard
Olive tree Olea
Mediterranean
Region
Little Very High Difficult Slo Hard
Oak Quercus
Across Europe
Little High Difficult Slo Hard
Ash Fraxinus
Across Europe
Regular High Difficult Slo Hard
Birch Bétula
Across Europe
Little Very High Easy Fast Soft
Beech Fagus
Europe, except
Iberian
Peninsula and
Northern
Europe,
including United
Kingdom.
Little High Difficult Slo Hard
Elm Ulmos
Across Europe
Regular High Difficult Slo Hard
Maple Acer
Across Europe
Little Regular Regular Slo Soft
Poplar Populus
Across Europe
Little High Easy Fast Soft
Chestnut Castanea
Across Europe
Regular High Difficult Slo Hard
(+): greatest commercial availability
11
5.1.1. Power
The power of your wood cooker indicates its heating capacity, i.e. the energy your
equipment transfers from the firewood to your home (usually measured in kW) and is
directly related to the amount of firewood that you place in it.
The rated output is the measure of a standard load of firewood when tested in
laboratories during a certain amount of time.
The power output is a manufacturer's recommendation from tests to the equipment with
firewood loads within a reasonable operation range. This power output range will present
different firewood consumptions per hour.
5.2. First Use
* Ask the installer to light the unit to ensure that all is functioning correctly;
* The equipment’s paint is cured by the heat when it is first used, which may give rise to
additional smoke. If this happens, you should air the room by opening external windows
and doors.
5.3. Normal Use
* Lighting:
Before lighting for the first time, check that the wood-burning cooker is properly
connected to the chimney, as described in the previous items.
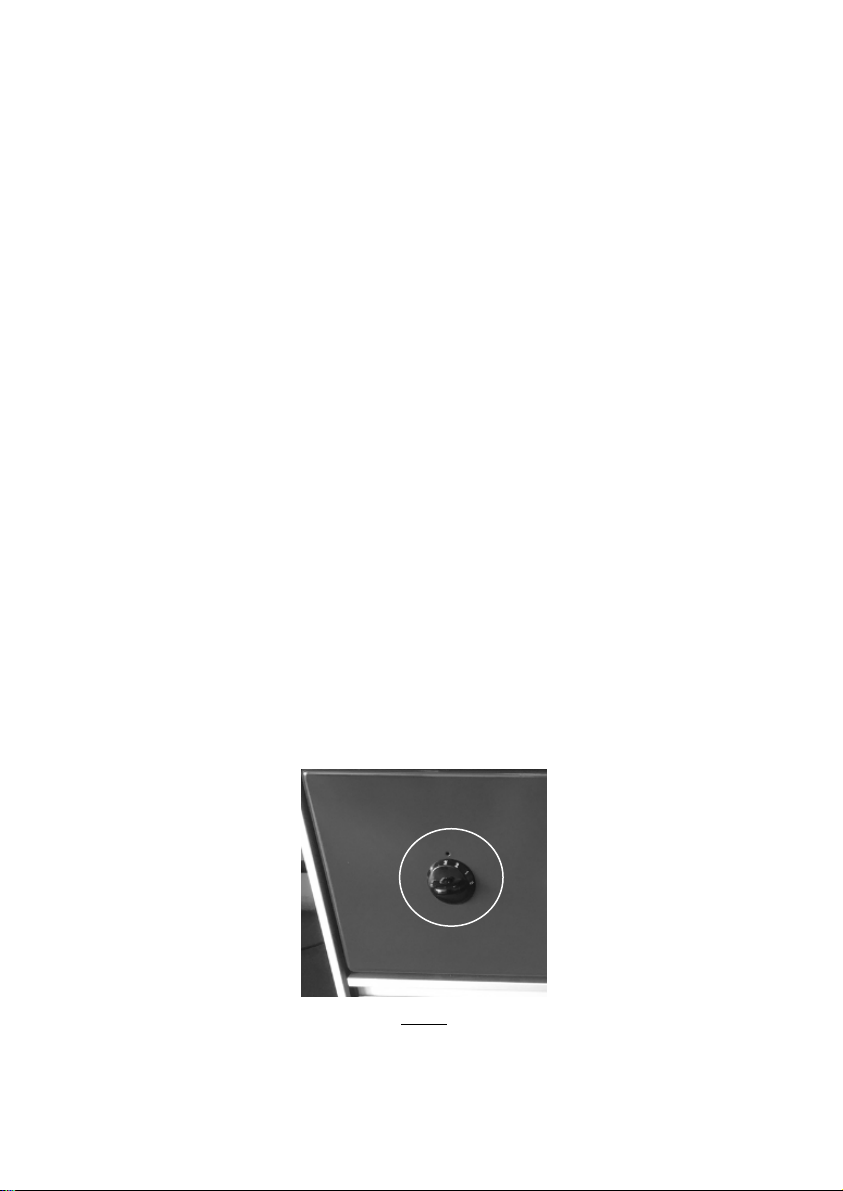
Before starting the ignition, the primary air combustion regulator located in the ash
drawer door (Figure 1, item ) shall be open in position (Figure ).
Figure 3
12
Pull the draft control to open it (Figure 4).
Figure 4
The wood-burning cooker is lit with the ash drawer door and the ash grate door open. To
open the ash grille door, lift it slightly and then pull the door.
After the fire is well set, you should put firewood, not overfilling the combustion
chamber. When the firewood is well fired, you should place the primary air combustion
regulator in a suitable position and close the chimney draught regulator (Figure ). This
operation improves the performance of the equipment. During this process, the
combustion chamber door and the ash drawer door must be closed.
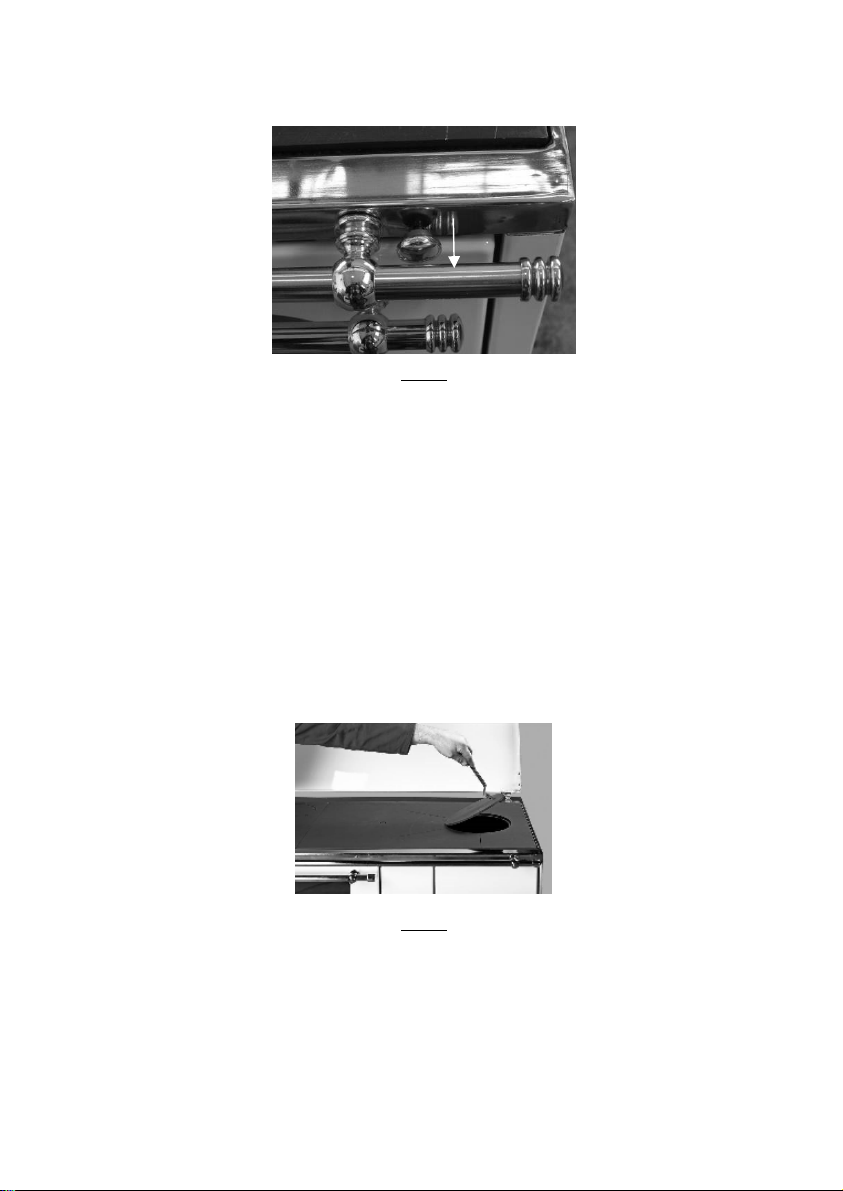
The wood-fired cooker can also be supplied from the top, by lifting the lid of the hot
plate using the key as shown in Figure 5.
Figure 5
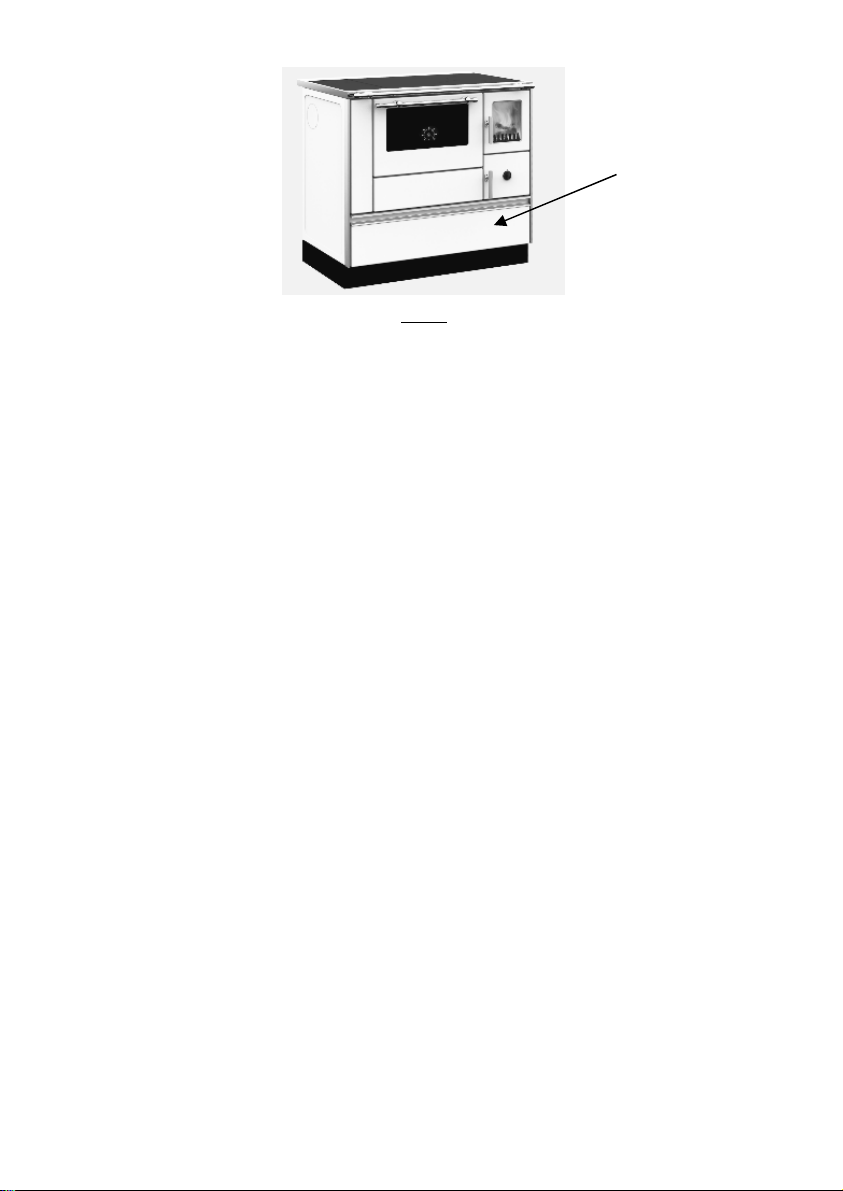
The fuel can be stored in the drawer as shown in Figure 6, flammable materials should
not be stored in this compartment and wood should not be in contact with the
combustion chamber. Use the fuel specified in Table 2. Do not burn coal dust, sawdust,
or waste that generates large amounts of smoke.
13
Firewood drawer
Figure 6
Note: in order to avoid overheating of the cooker, it is recommended that the fuel
consumption does not exceed 1,8 kg/h.
5.4. Safety
* The metallic parts and the glass, accessible to the user reach high temperatures,
avoiding contact with the hottest parts;
* Whenever you need to lay wood or are in contact with the equipment when it is in
operation, you should wear a heat-resistant glove or any other protection that prevents
heat transmission;
* In case of fire in the flue, immediately close the door, flue damper (where
applicable) and secondary air intake;
5.5. Cleaning and Maintenance
* You should remove ash from the drawer on a regular basis (after the stove is switched
off), so that the combustion air is not prevented from entering through the ash grate;
* The glass should only be cleaned when completely cold; the glass should be cleaned
with a suitable product (**) by following the instructions for use and not allowing the
product to come into contact with the sealing ring and painted metal parts, which could
trigger oxidation. The sealing ring is glued, so should not be moistened with water or
cleaning products. If it becomes detached, it can be reattached with contact glue after
cleaning the groove with fine sandpaper;
* Do not clean the enamelled surfaces and the stove structure with a brush or metal
sponge, as this may damage the enamel and safety coating, but use a damp cloth,
cleaning agents or neutral detergent. Clean the oven after each use while it is still hot.

14
After cleaning, leave the oven door open for a few minutes to avoid bad odors the next
time you heat the oven;
* You should not clean the cast or plate iron parts with detergent or water, but rather
with just a dry cloth to remove the dust, otherwise the metal elements may oxide. You
may treat the cast iron parts with a special polish if you so require (**), it is
recommended to clean the cooker once a month or more often if necessary;
* To clean the hotplate, metal mops or abrasive sponges should be used, the plate
should be cleaned with a damp cloth and at the end with a dry cloth. We must make sure
that the grooves on the plate remain without any kind of rubbish inside, to allow it to
dilate without deforming it. Avoid leaving pans on the hot plate when it is cold;
* Edges can be created by corrosion, which is difficult to remove;
* The combustion of firewood over time causes dirt and leaves residues in the chimney
pipes, so the user should clean the duct elements and the chimney outlet periodically, at
least once a year, in order to avoid clogging and fires in the chimney;
* It is only recommended to use spare parts supplied by the Manufacturer - SOLZAIMA;
* If you do not use the unit for a prolonged period, check to make sure that the flue
pipes are clear before lighting it.
(
**
) Seek advice from your supplier/installer.

15
6. Troubleshooting
Nº. Problem Possible Cause Solution
1 Condensation in the
combustion chamber Fuel with a high humidity content Use fuel with recommended
humidity
2 The wood-burning cooker
doesn't burn properly?
Low draught in the chimney Ensuring a correct chimney
circulation
Incorrect sealing of wood-burning
cooker (parasitic air intake on
combustion)
Ensure correct sealing of wood-
burning cooker (doors, chimney,
etc...)
3 Not enough heat to bake or
cook
Combustion regulator set to a low
temperature
Increase the water temperature
using the Combustion Regulator
or briefly open the Ash Drawer
door
4 Excessive heat for baking or
cooking
Combustion regulator set for high
temperature
Reduce the water temperature
using the Combustion Regulator
5 Cooker makes smoke when
first used High temperature ink cure of the
combustion chamber
It is normal for the wood-burning
cooker to smoke during the first
ignition
6 Cooker makes smoke when
used
Chimney, smokestack and wood-
burning cooker dirty
Cleaning the chimney, smoke vent
and wood-burning cooker
Fuel with a high humidity content Use fuel with recommended
humidity
Overfueled combustion chamber Putting fuel in the combustion
chamber in several steps
Low draught in the chimney Ensuring a correct chimney
circulation
Table 3
7. End of Life of a Wood Cooker
* Around 90% of the materials used in the manufacture of these units is recyclable, thus
helping to reduce environmental impact and contributing to the sustainable development
of the planet.
* End-of-life units should be taken to licensed waste operators. We advise you to contact
your local council for collection.

16
8. Sustainability
* Solzaima designs solutions and equipment "moved" by biomass as their primary
energy source. This is our contribution for the sustainability of our planet – an
economically viable and environmentally-friendly alternative, following environmental
best management practices to ensure an efficient carbon cycle management.
* Solzaima cares about being up to date with and assessing the existing forest area
while efficiently responding to energetic demands, with a constant watch on biodiversity
and natural wealth, critical aspects to the quality of life in our planet.
* SOLZAIMA is a member of the Sociedade Ponto Verde, which manages waste
packaging from products placed on the market by member companies; as such, the
packaging that comes with your unit (i.e. plastic and cardboard) can be taken to your
nearest recycling point.
9. Glossary
* bar: unit of pressure equal to exactly 100 000 Pa. This pressure is very close to
standard atmospheric pressure.
* cal (calorie): equal to the amount of heat required to increase the temperature of one
gram of water by one degree centigrade.
* Groove: housing for the sealing ring.
* cm (centimetres): unit of measurement.
* CO (carbon monoxide): Lightly flammable, colourless, odourless and very dangerous
gas, due to its toxicity.
* CO
2
(carbon dioxide): Gas needed by plants on the one hand for photosynthesis, and
emitted into the atmosphere on the other, contributing to the greenhouse effect.
* Combustion: a process that releases energy. Combustion is basically a chemical
reaction that requires three things in order to take place: fuel, oxidant and ignition
temperature.
* Oxidant: chemical substance that feeds combustion (essentially oxygen) and is
essential for it to take place.
* Fuel: anything that can undergo combustion, in this case wood.
* Creosote: chemical compound created by combustion. This compound is sometimes
deposited on the glass and flue of an insert fire.
This manual suits for next models
1
Table of contents
Popular Range manuals by other brands


Kelvinator
Kelvinator KC54B instruction manual

Viking
Viking Professional Freestanding Dual Fuel Quick reference guide

GE
GE JS968TKWW - ProfileTM 30" Slide-In Electric... Dimensions and installation information

Whirlpool
Whirlpool GY396LXPT Dimensional information

American Range
American Range ARR-6062GD Features

Caliber
Caliber INDOOR Professional Range Series user guide


