6Issue 02 DEC.20
Step 13 - Fit Glass to Glass Corner Seal
X
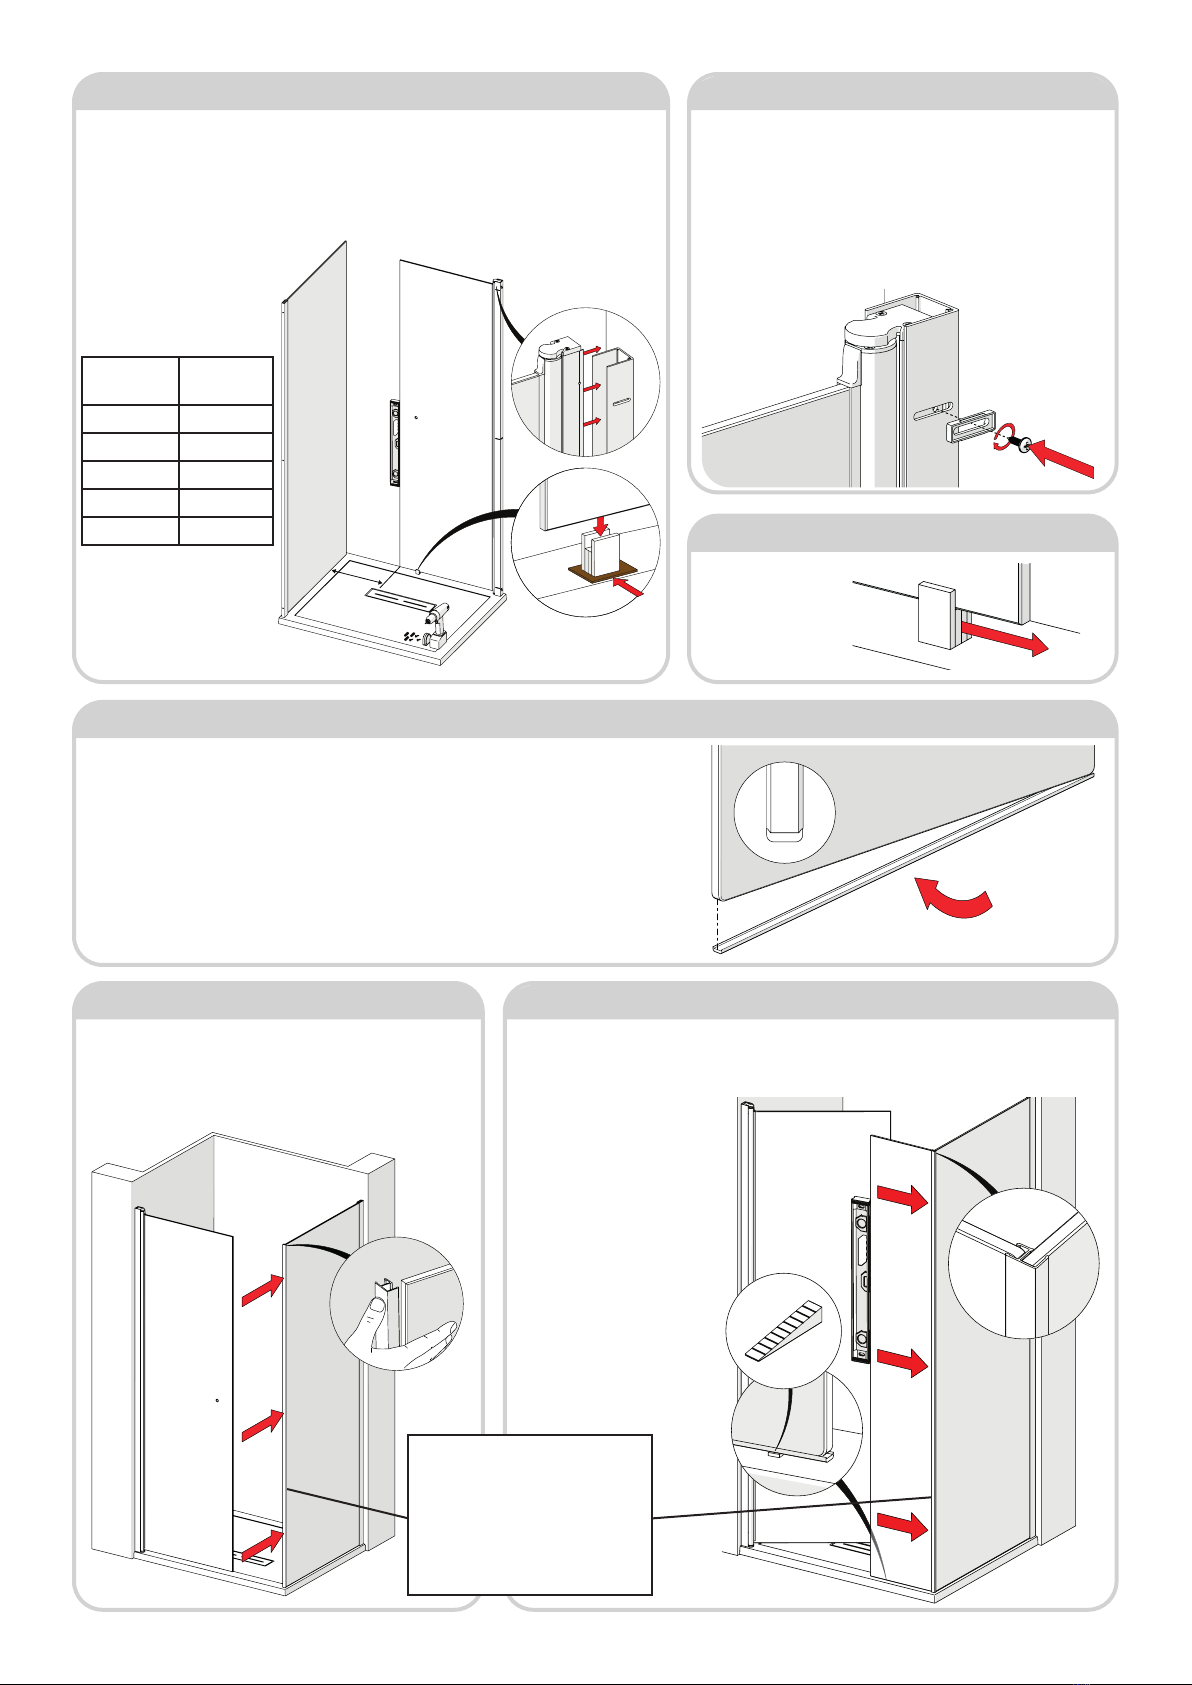
1. Carefully t Door Glass Assembly into wallpost. Slot the glass into the ‘BLOCK’ already
positioned, as shown. This will take the weight of the door. Use your level to make sure
the door edge is ‘plumb’ vertical. If not ‘plumb’ vertical use additional packing
(e.g cardboard) to raise the ‘Packer’, as shown.
2. Position vertical edge of the Door Glass ‘X’ mm to the In-Line Panel wallpost, as shown -
refer to table to the below.
Door Size
(nominal)
‘X’
Dimension
800 134
900 234
1000 334
1200 534
1400 734
Step 9 - Position Door Assembly
1. Remove ‘Packer’
from under the Door
Glass by sliding out, as
shown below. Do not
discard.
Step 11 - Remove Door ‘Packer’
Inside view
1. Take the three ‘Wallpost Screw Mouldings’ from the Door
Installation Pack and place them into the slots on the Door Wallpost
from the inside of the enclosure, as shown.
2. Fix the door Assembly in position using the 3 x No.6x13 PH S/S
Shallow, as shown.
Note: if you find the brush seal isn’t in contact with the pivot barrel
simply loosen the middle screw and level outwards the inner profile until
the brush seal makes contact with the barrel. Retighten screw.
Step 10 - Fix Door Assembly
1. Fit glass to glass corner seal to edge of side glass panel.
Note orientation of seal. Make sure the seal is fully inserted
from top to bottom, use your thunb to apply pressure, as
shown.
1. Take note of label ‘This surface to outside’ this will determine which is the bottom edge of
your installation.
2. Clean glass edge, then make sure it’s completely dry.
3. Acquire the WTR-0001 Trim from the In-line Panel Corner Pack. Peel off a small length of the
bottom trim adhesive tape and apply to bottom up to the vertical edge. Continue along length of
trim, peeling away the tape as you go, until the full trim length is adhered to the panel.
Use small upturned edges on bottom trim against chamfered glass edges to ensure trim is tted
centrally.
Step 12 - Fit Bottom Trim To In-Line Panel
Step 14 - Fit In-line Panel
1. Carefully insert the In-line Panel into corner seal, ensuring panel is parallel to tray edge.
2. Ensure In-line Panel is square to rst panel. Corner seal must be fully inserted onto both
panels.
3. Ensure outer edge of side
panel is vertical, as shown, using
spirit level. Often shower trays
have different angled top faces,
in order to help keep the glass
supported use the ‘Shim (M193-
01)’ supplied. On the inside
of the enclosure measure the
gap between the bottom of the
glass and top of the tray, select
the height required from the
shim strip supplied, break off and
insert under rail. The shim will
be concealed by silicone sealant
later.
If tight, lubricate corner seal and glass
edges with a damp CLEAN cloth to
ease tment - the water will evaporate
over a short period. DO NOT USE
silicone spray or any other substance
other than water, these will not fully
dry out and will compromise the grip
and rigidity of the joint.
Inside view


