manuals.online logo
Brands
  1. Home
  2. •
  3. Brands
  4. •
  5. Toto
  6. •
  7. Plumbing Product
  8. •
  9. Toto WASHLET A100 User manual

Toto WASHLET A100 User manual

Ɣ
Turn on the electricity and water supply for the product only after all other installation
work is complete.
Ɣ
Do not damage the connection components on the water supply hose (C-3).
Ɣ
The water supply pressure ranges from 0.05 MPa (7.25 PSI) <dynamic, 10 L/min or more> -
0.75 MPa (108.75 PSI) <static>; and, only for Europe and Russia, from 0.1 MPa (14.5 PSI)
<dynamic> - 1.0 MPa (145 PSI) <static>.
Use the unit within the said pressure range.
Ɣ
The temperature of the water supply should be within a range of 0 to 35°C (32 to 95°F). Make
sure the temperature is within this range.
Ɣ
Working ambient temperature is within the range of 0 to 40°C (32 to 104°F). Make sure the
temperature is within this range.
Ɣ
Do not use water supply hoses (C-3) and junction valve (A-6) other than those supplied with
the product.
*Because a water flow test is conducted on each product at the factory, water may remain
inside the product. This water does not indicate a problem with the product.
Ɣ
Check that the product is electrically grounded appropriately.
(If a ground is not installed, a breakdown or electrical current leak may result in electrical shock.)
Ɣ
Prepare an outlet position in advance that conforms to the regulations in your country.
Ɣ
Ne mettez en marche l'alimentation électrique et l'alimentation en eau du produit
que lorsque tous les autres travaux d'installation sont terminés.
Ɣ
N'endommagez pas les extrémités de branchement du flexible d'alimentation en eau (C-3).
Ɣ
La plage de pression d’alimentation en eau est comprise entre 0,05 MPa (7,25 PSI)
<dynamique 10 L/min ou plus> et 0,75 MPa (108,75 PSI) <statique> ; et, uniquement pour la
Russie et l’Europe, entre 0,1 MPa (14,5 PSI) <dynamique> et 1,0 MPa (145 PSI) <statique>.
Utilisez l’unité dans la plage de pression indiquée.
Ɣ
La température de l'alimentation en eau devrait se trouver dans une plage de 0 à 35°C (32 à
95°F). Assurez-vous que la température se trouve dans cette plage.
Ɣ
La température ambiante de fonctionement varie entre 0 à 40°C (32 à 104°F). Assurez-vous
que la température est dans cette zone.
Ɣ
N'utilisez pas de tuyau souple d'alimentation en eau (C-3) et la soupape de jonction (A-6)
autres que celles fournies avec le produit.
*Compte tenu du fait que chaque produit subit un test d'écoulement de l'eau en usine, il peut
rester de l'eau dans le produit. La présence de l'eau n'indique pas une anomalie du produit.
Ɣ
Vérifiez qu'une mise à la terre appropriée soit installée.
(Si la mise à la terre n'est pas installée, en cas de panne ou de fuite de courant électrique,
l'absence de mise à la terre pourrait engendrer un choc électrique.)
Ɣ
Disposez d'avance une prise conforme aux réglementations de votre pays.
Ɣ
Conecte la electricidad y el suministro de agua para el producto solo después de
haber terminado todo el trabajo de instalación.
Ɣ
No dañe los extremos de conexión de la manguera de suministro de agua (C-3).
Ɣ
La rango de presión de suministro de agua varía entre 0,05 MPa (7,25 PSI) <dinámica,
10 l/min o más> y 0,75 MPa (108,75 PSI) <estática>; solo para Europa y Rusia, entre 0,1 MPa
(14,5 PSI) <dinámica> y 1,0 MPa (145 PSI) <estática>.
Use la unidad dentro de dicho rango de presión.
Ɣ
La temperatura del suministro de agua debe estar dentro de un rango de 0 a 35°C (32 a
95°F). Asegúrese de que la temperatura se encuentre dentro de este rango.
Ɣ
La temperatura ambiente de trabajo es de entre 0 a 40°C (32 a 104°F). Asegúrese de que la
temperatura se encuentre dentro de este rango.
Ɣ
No use otras mangueras de suministro de agua (C-3) y dispositivos de unión (A-6) que no
sean los incluidos con el producto.
*
Debido a que en fábrica se realiza una prueba de circulación de agua, es posible que quede
agua dentro del producto. Esto no significa que haya algún problema con el producto.
Ɣ
Verifique que esté instalada la conexión a tierra correcta.
(Si la conexión a tierra no está instalada y se produce una interrupción del servicio o una
fuga de corriente eléctrica, puede presentarse una descarga eléctrica).
Ɣ
Prepare con anterioridad un lugar para el tomacorriente, que cumpla con las normas de su país.
Precautions before installation
/
Avant d'installer le Washlet
/
Antes de instalar el Washlet
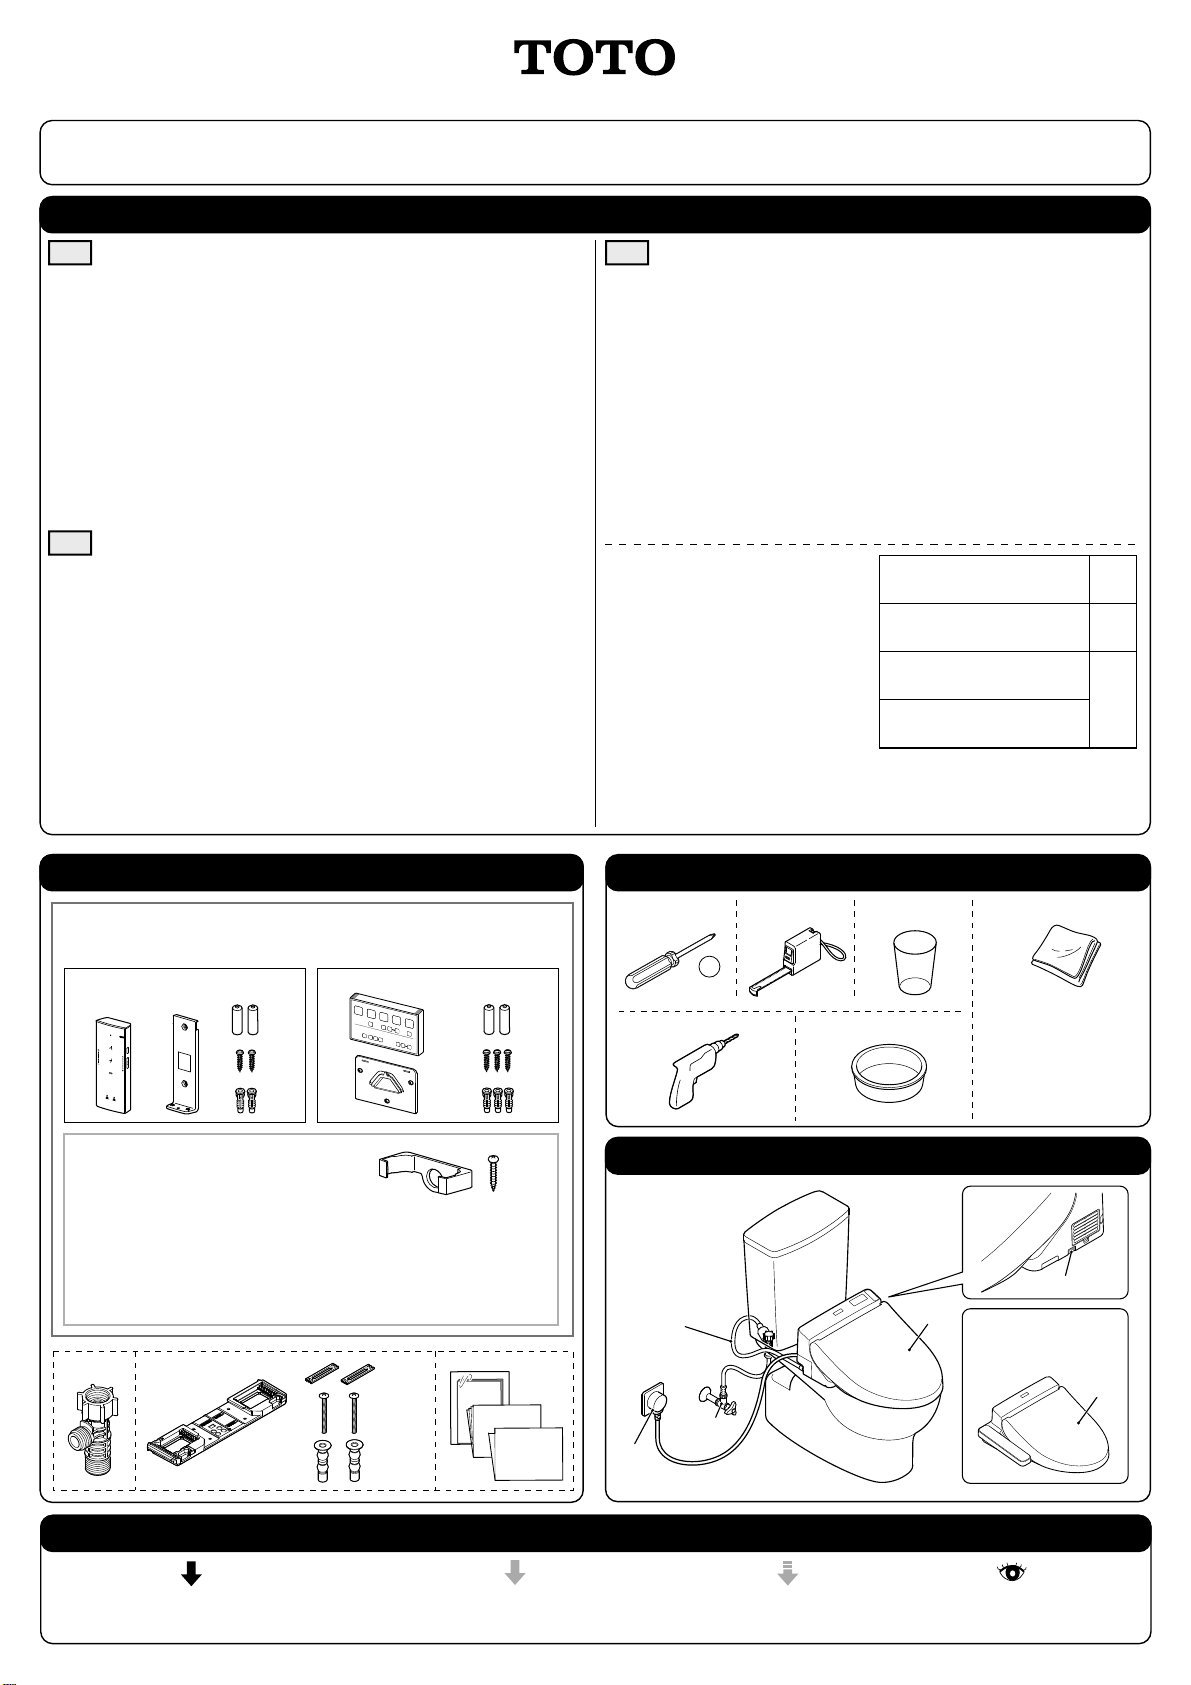
Included parts
/
Pièces incluses
/
Partes incluidas Required items / Outils nécessaires / Herramientas necesarias
Part diagram
/
Pièces diagramme
/
Diagrama de partes
Symbols and their meanings
/
Signification des indications
/
Significado de las indicaciones
2020.10.12 D07B56
Installation Guide / Guide d'installation / Guía de instalación
Ɣ
Before installation, be sure to read this installation manual and the separate safety precautions sheet. Mount parts properly according to the directions.
Ɣ
Avant l'installation, veuillez bien lire ce manuel d'installation et la feuille séparée sur mesures de sécurité. Montez correctement les pièces conformément aux instructions.
Ɣ
Antes de realizar la instalación, asegúrese de leer este manual de instalación y la hoja de precauciones de seguridad entregada por separado. Monte las partes correctamente de acuerdo con las instrucciones.
EN ES
FR
Ɣ&KHFNWKHWDEOHRQWKHULJKWDQGFDUU\
out wiring and installation works
appropriate for the product’s power
requirements.
Ɣ9pULILH]OHW\SHGDQVODWDEOHGHGURLWH
puis câblez et installez le produit de
manière appropriée.
Ɣ9HULILTXHODWDEODGHODGHUHFKD\UHDOLFH
los trabajos de cableado e instalación
apropiados según los requerimientos de
alimentación del producto.
Power cord length
Longueur du cordon d'alimentation
Longitud del cable de alimentación
Maximum power consumption
Consommation électrique maximum
Consumo máximo de energía
Rated power consumption
Consommation nominale
Consumo de energía nominal
Voltage
Tension
Voltaje
1.2 m
(3.94 ft)
120 V
406 W
A-2
A-3
A-4
A-5
A-3
A-4
A-5
A-1
A-2
A-1
A-6
[With Remote Control]
[Avec télécommande]
[Con control remoto]
Anti-theft parts for remote control
Pièces antivol pour télécommande
Partes antirrobo para el control remoto
*Please ask home owner if they would like the remote control anti-theft kit installed before
starting installation. Please leave the anti-theft kit with the owner if it is not installed.
*Veuillez demander au propriétaire si'l désire que la trousse antivol à commande à distance
soit installée avant de commencer cette installation. Veuillez laisser la trousse antivol au
propriétaire si elles ne doivent pas être installées.
*Pregúntele al propietario del hogar si quiere que se instalen los montajes antirrobo para el
control remoto antes de comenzar esta instalación. Déjele estas piezas al propietario si no
quiere instalarlas.
B-1 B-3 B-4
B-6
B-2
B-5
㸩
Use B-4 to prevent damage to
the product.
Utilisé B-4 pour éviter
l'endommagement du produit.
Se usa B-4 para impedir dañar
el producto.
A-11
ⓐⓑ
ⓐ
A-8
A-9
A-10
A-7
[Without Remote Control]
[Sans télécommande]
[Sin control remoto]
Tasks that must be conducted by the installer.
Les tâches doivent être effectuées par l'installateur.
Tareas que deben ser realizadas por el instalador.
Actions that the Washlet should perform automatically.
Actions que le Washlet devrait effectuer automatiquement.
Acciones que el Washlet debe realizar automáticamente.
Work flow direction.
Flux de travail.
Dirección del flujo de trabajo.
Visual confirmation required.
Confirmation visuelle requise.
Trabajo que se debe verificar.
C-1
C-3
C-5
C-1
C-4
C-2
Remote control mounting [With Remote Control] /
Montage de la commande à distance [Avec télécommande]
Instalación del control remoto [Con control remoto]
Information for the installer
/
Aux entrepreneurs en installation
/
Información para los contratistas de la instalación
Trial run
/
Mise en service
/
Puesta en funcionamiento
Installation procedure
/
Procédé d' installation
/
Procedimiento de instalación
When mounting on a
plaster board or tiled wall.
Lors du montage sur un
panneau en plâtre ou sur
un mur carrelé.
Cuando se instala en una
pared de yeso o con
azulejos.
ĭPPx2
(dia.1/8'' x2) ĭPPx
GLD[
❶❸
❷
PP
(1-5/16")
A-5
ĭPPx2
(dia.1/4'' x2)
ĭPPx
GLD[
PP
(1-5/16")
Side wall
Mur latéral
Pared lateral
PP
1,060mm

760mm
(29-7/8")
250mm
(9-7/8")
250mm
(9-7/8")
400mm

ⓐ
ⓐⓑ
ⓐⓑ
Rear wall
Mur arrière
Pared posterio
ⓐⓑ
PP

1,060mm
 760mm
(29-7/8")



 
Ɣ
Fill in the necessary information on the warranty card and be sure to hand it to the customer.
Ɣ
Inscrivez les renseignements nécessaires sur la carte de garantie et veillez à la remettre au client.
Ɣ
Rellene con la información necesaria la tarjeta de garantía y asegúrese de entregársela al cliente.
Ɣ
Please explain the features and operation of the product to the customer.
Ɣ
Veuillez expliquer les fonctionnalités et le fonctionnement du produit au client.
Ɣ
Por favor, explíquele al cliente las funciones del producto y cómo usarlas.
Ɣ
If the product will not be used for a long time (like when it is installed in an unoccupied, newly constructed building), turn off the breaker on the distribution board or disconnect the power plug.
Ɣ
Si vous ne comptez pas utiliser le produit pendant une longue période, comme lorsque vous installez une nouvelle construction, désactivez le disjoncteur du panneau de répartition ou débranchez la fiche d'alimentation.
Ɣ
Si el producto no se utilizará durante un período prolongado, como en el caso de realizar la instalación en un edificio construido recientemente, apague el disyuntor en el tablero de distribución o desconecte el enchufe de alimentación.
 
Hold down
Maintenez appuyé
Mientras presiona
H
old down
(about 1 minute)
Maintenez appuyé
(environ 1 minute)
Mientras presiona
(aproximadamente 1 minuto)

 ⓐⓑ
Temporarily place the remote control in the position determined in
󱯣and confirm the signal reception of A-1.
Placez temporairement la télécommande à l'emplacement déterminé
dans 󱯣et assurez-vous de la réception du signal de A-1.
Coloque temporalmente el control remoto en la posición determinada en 󱯣
y confirme la recepción de la señal de A-1.
 
  
❶
ⓐ
ⓑ
Anchored by magnet.
Ancré par aimant.
Fijado mediante imán.
❷ⓐ
ⓑ



Hold down
Maintenez appuyé
Mientras presiona
Close the water
shutoff valve (C-4).
Fermez la valve
d'alimentation en
eau (C-4).
Cierre la válvula de
corte de agua (C-4).

Open the water shutoff valve (C-4).
Ouvrez la valve d'alimentation en
eau (C-4).
Abra la válvula de corte de agua
(C-4).
A-2
A-2
A-4
A-4
A-2 A-5
A-4
C-4
A-4
A-2
B-5
B-4
B-4
B-4
% B-4
A-1 A-1
C-4
A-10
A-2
A-1
A-2A-1
B-5
A-1ⓐ
A-1ⓑ
$
A-1
A-1
$
C-2
& A-6
B-4
A-1
A-1
C-5
A-1 A-1
A-6
B-6
Insert C-1 into A-7 until a click sound is heard. (After C-1 is
mounted, make sure that it can not be removed even if it is pulled.)
Insérez l'élément C-1 dans l'élément A-7 jusqu'à ce qu'un déclic se
fasse entendre. (Après le montage de l'élément C-1, assurez-vous
qu'il ne soit pas possible de le
retirer, même en le tirant.)
Coloque C-1 en A-7 hasta que
se oiga un clic. (Luego de que
C-1 esté instalado, asegúrese
de que no se pueda retirar
incluso si se tira de este).
Failure to tighten screw A-9 completely
will cause moving sideways of C-1.
Ne pas serrer complètement la vis A-9
entraînera un déplacement latéral de C-1.
Si no aprieta completamente el tornillo A-9 , se producirá un
desplazamiento lateral de C-1.
A-7
A-9
A-8
A-7 A-10
A-9
A-7
A-7
C-1
 
 

BACK
FRONT
A-7 B-2
A-10 A-10
A-9
A-8 A-8
C-1
A-7
A-9
B-1
7/8"
PP
7/8"
PP
B-6
❷❶
Alignez le centre de
C-1 et A-7 et
ajustez les positions
de fixation de A-9.
Alinee el centro de
C-1 y A-7 y ajuste la
posición de
colocación de A-9.
Align the center of C-1 and A-7 and
adjust the mounting position of A-9.

Other Toto Plumbing Product manuals

Toto TBN01001U Installation instructions

Toto

Toto TBN01001U Installation instructions

Toto JAZZ TX472SJZ User manual

Toto

Toto JAZZ TX472SJZ User manual

Toto TRADITIONAL TS301N6 Installation instructions

Toto

Toto TRADITIONAL TS301N6 Installation instructions

Toto EGO II TX447SES User manual

Toto

Toto EGO II TX447SES User manual

Toto GO TLG01309U Installation instructions

Toto

Toto GO TLG01309U Installation instructions

Toto LLT152 User manual

Toto

Toto LLT152 User manual

Toto L1634 User manual

Toto

Toto L1634 User manual

Toto TBV02401 User manual

Toto

Toto TBV02401 User manual

Toto WH053 Instruction Manual

Toto

Toto WH053 Instruction Manual

Toto Washlet S400 SW563 User manual

Toto

Toto Washlet S400 SW563 User manual

Toto GS TBG03201U Installation instructions

Toto

Toto GS TBG03201U Installation instructions

Toto TLP02309 User manual

Toto

Toto TLP02309 User manual

Toto Vivian TS220T Installation instructions

Toto

Toto Vivian TS220T Installation instructions

Toto UWN903 Series User manual

Toto

Toto UWN903 Series User manual

Toto NEOREST Operating and maintenance instructions

Toto

Toto NEOREST Operating and maintenance instructions

Toto NEOREST SE User manual

Toto

Toto NEOREST SE User manual

Toto JAZZ TX10AJ User manual

Toto

Toto JAZZ TX10AJ User manual

Toto WASHLET SN922M User manual

Toto

Toto WASHLET SN922M User manual

Toto Washlet TCF6621 User manual

Toto

Toto Washlet TCF6621 User manual

Toto 0G386RY Operation and maintenance manual

Toto

Toto 0G386RY Operation and maintenance manual

Toto TBV03427B User manual

Toto

Toto TBV03427B User manual

Toto STD-S TLE27001 Series User manual

Toto

Toto STD-S TLE27001 Series User manual

Toto RENESSE TL170SD User manual

Toto

Toto RENESSE TL170SD User manual

Toto TLP03301 User manual

Toto

Toto TLP03301 User manual

Popular Plumbing Product manuals by other brands

Hans Grohe ShowerSelect 15763 1 Series Installation/User Instructions/Warranty

Hans Grohe

Hans Grohe ShowerSelect 15763 1 Series Installation/User Instructions/Warranty

Kohler Moxie K-14292 Homeowner's guide

Kohler

Kohler Moxie K-14292 Homeowner's guide

Moen Felicity S442 series Specifications

Moen

Moen Felicity S442 series Specifications

Spectrum Brands Pfister Bacci 040-BAL Quick installation guide

Spectrum Brands

Spectrum Brands Pfister Bacci 040-BAL Quick installation guide

Hans Grohe Versostat2 15348000 Instructions for use/assembly instructions

Hans Grohe

Hans Grohe Versostat2 15348000 Instructions for use/assembly instructions

PEERLESS P299196LF Series manual

PEERLESS

PEERLESS P299196LF Series manual

Clearlight Red Light Therapy Tower user manual

Clearlight

Clearlight Red Light Therapy Tower user manual

Project Source 51-K814-PS-BN manual

Project Source

Project Source 51-K814-PS-BN manual

Sanela SLU 30 Instructions for use

Sanela

Sanela SLU 30 Instructions for use

Hans Grohe Chrome 28570001 Service and warranty information

Hans Grohe

Hans Grohe Chrome 28570001 Service and warranty information

Sanela SLS 02T Instructions for use

Sanela

Sanela SLS 02T Instructions for use

Kohler K-110 installation guide

Kohler

Kohler K-110 installation guide

Pfister Pfirst Series quick start guide

Pfister

Pfister Pfirst Series quick start guide

Moen Show House SOLACE TS576 Specifications

Moen

Moen Show House SOLACE TS576 Specifications

KWC ONO touch light PRO quick start guide

KWC

KWC ONO touch light PRO quick start guide

JACLO Aquavolo Duetto installation instructions

JACLO

JACLO Aquavolo Duetto installation instructions

Hans Grohe Mondial 15975 Series Installation

Hans Grohe

Hans Grohe Mondial 15975 Series Installation

METHVEN KAHA EKIT08/KH installation guide

METHVEN

METHVEN KAHA EKIT08/KH installation guide

manuals.online logo
manuals.online logoBrands
  • About & Mission
  • Contact us
  • Privacy Policy
  • Terms and Conditions

Copyright 2025 Manuals.Online. All Rights Reserved.