sonible d Series User manual

d:series
amplifier
manualmanual
manual version 2.1
firmware version 3.0
01/2020
sonible GmbH
Haydngasse 10/1
8010 Graz Austria
phone: +43 316 912288
www.sonible.com

2
d:series amplifiers
manual
important safety instructions
important safety instructions
The lightning flash with arrowhead symbol, within an equilateral triangle is intended to alert the
user to the presence of uninsulated ‘dangerous voltage’ within the product’s enclosure that
may be of sufficient magnitude to constitute a risk of electric shock to persons.
The exclamation point within an equilateral triangle is intended to alert the user to the
presence of important operating and maintenance instructions in the literature accompanying
the appliance.
WARNING: To reduce the risk of fire
or electrical shock, do not expose this
appliance to rain or moisture.
AVIS: Risqué De Choc Electrique - Ne Pas Ouvrir
CAUTION: To reduce the risk of electrical
shock, grounding of the centre pin of the
power plug must be maintained.
AVIS: Cet appareil doit être raccordé à une prise
secteur avec terre de protection.
1. Read these instructions.
2. Keep these instructions.
3. Heed all warnings.
4. Follow all instructions.
5. Do not use this apparatus near water.
6. Clean only with a dry cloth.
7. Do not cover any ventilation openings. Install
in accordance with the manufacturer’s
instructions.
8. Do not install near heat sources such as
radiators, heat registers, stoves, or other
apparatus (including amplifiers) that produce
heat.
9. Do not defeat the safety purpose of the
polarized or the grounding-type plug. A
polarized plug has two blades with one wider
than the other. A grounding type plug has
two blades and a third grounding prong. The
wide blade or the third prong are provided
for your safety. If the provided plug does not
fit into your outlet, consult an electrician for
replacement of the obsolete outlet.
10. Protect the power cord from being walked on
or pinched particularly at plugs, convenience
receptacles, and the point where they exit from
the apparatus.
11. Use only attachments/accessories specified by
the manufacturer.
12. Use only with the cart, tripod, bracket, or table
specified by the manufacturer, or sold with the
apparatus. When a cart is used, use caution
when moving the cart/apparatus combination
to avoid injury from tip-over.
13. Unplug this apparatus during lightning storms
or when unused for a long period of time.
14. Refer all servicing to qualified service
personnel. Servicing is required when the
apparatus has been damaged in any way, such
as power-supply cord or plug is damaged,
liquid has been spilled or objects have fallen
into the apparatus, the apparatus has been
exposed to rain or moisture, does not operate
normally, or has been dropped.
15. Do not expose this equipment to dripping or
splashing and ensure that no objects filled
with liquids, such as vases, are placed on the
equipment.
16. To completely disconnect this equipment from
the AC Mains, disconnect the power supply
cord plug from the AC receptacle.
17. The mains plug of the power supply cord shall
remain readily operable.
18. No naked flame sources, such as lighted
candles, should be placed on the apparatus.
19. The product should be connected to a mains
socket outlet with a protective earthing
connection.
SAFETY COMPONENT
(MUST BE REPLACED BY ORIGINAL PART)

3
d:series amplifiers
manual
important service instructions
WEE recycling / disposal instructions
important service instructions
WEEE recycling / disposal instructions
CAUTION: These servicing instructions are for use by qualified personnel only. To reduce the risk of
electric shock, do not perform any other servicing than that contained in the manual unless you are
qualified to do so. Refer all servicing to qualified service personnel.
The wheelie bin symbol found on the product or in the manual indicates that this product must not be
disposed of with other waste. It is in our category the manufacturer’s responsibility to properly dispose
of their waste electrical and electronic equipment (WEEE) at the end of its life. Due to the differences in
each EU country’s management of WEEE, please contact your local distributor or sonible directly. We
are committed to facilitate our own electronic-waste-management system, for the free of charge return
of sonible GmbH products. Arrangements are made with the dealer where you purchased the equipment
from, for the returning of all unusable equipment at no cost, to the factory in Graz, for environmental
protective disposal.
This equipment conforms to the requirements of the EMC Directive 2004/108/EC and the requirements
of the Low Voltage Directive 2006/95/EC. Standards applied: EMC Emission EN55103-1, E3
EMC Immunity EN55103-2, E3, with S/N below 1% at normal operation level. Electrical Safety EN60065, Class I
Security regulations as stated in the EN 60065 (VDE 0860 / IEC 65) and the CSA E65 - 94 have to be
obeyed when servicing the appliance.
Use of a mains separator transformer is mandatory during maintenance while the appliance is opened,
needs to be operated and is connected to the mains.
Switch off the power before retrofitting any extensions, changing the mains voltage or the output voltage.
The minimum distance between parts carrying mains voltage and any accessible metal piece (metal
enclosure), respectively between the mains poles has to be 3mm and needs to be minded at all times.
The minimum distance between parts carrying mains voltage and any switches or breakers that are not
connected to the mains (secondary parts) has to be 6 mm and needs to be minded at all times.
Replacing special components that are marked in the circuit diagram using the security symbol is only
permissible when using original parts.
Altering the circuitry without prior consent or advice is not legitimate.
Any work security regulations that are applicable at the locations where the appliance is being serviced
have to be strictly obeyed. This applies also to any regulations about the work place itself.
All instructions concerning the handling of MOS-circuits have to be observed.

4
d:series amplifiers
manual
table of contents
table of contents
important safety instructions 2
important service instructions 3
WEEE recycling / disposal instructions 3
table of contents 4
1 - welcome 6
1.1 - d:series amplifiers 6
1.2 - main features 6
1.3 - products and options overview 7
2 - startup 8
2.1 - unpacking and inspection 8
2.2 - scope of delivery 8
2.3 - mounting 9
2.4 - air flow and thermal management 10
2.5 - protection circuitries 11
2.6 - responsibility of the user 12
3 - overview 13
3.1 - front panel 13
3.2 - rear panel 14
3.3 - DSP option 15
4 - connections, pinout and cabling 16
4.1 - mains connection via powerCON 16
4.2 - inputs 16
4.3 - outputs (euroblock) 19
4.4 - bridging 19
4.5 - network 20
4.6 - panic mute switch 21

5
d:series amplifiers
manual
table of contents
5 - control surface 22
Menu structure of the control surface 23
5.1 - meter screen 24
5.2 - system screen 24
5.3 - routing screen 28
5.4 - network screen 32
5.5 - dsp screen 33
5.6 - stealth screen 37
6 - remote control 38
6.1 - establishing a network connection 38
6.2 - remote control of more than one d:series amplifier 39
6.3 - control tabs 39
7 - maintenance & update 45
7.1 - maintenance and care 45
7.2 - firmware update 48
8 - frequently asked questions 49
9 - signal flow 50
10 - technical specifications 51
10.1 - data sheet 51
10.2 - mechanics and dimensions 53
11 - declaration of conformity 54
12 - warranty 55
13 - legal disclaimer 55

6
d:series amplifiers
manual
welcome
main features
1 - welcome
Thank you for choosing sonible’s d:series for your audio installation.
The d:series amplifiers are a no compromise power amplifier for high-end multichannel setups. With
its clear focus on professional interfacing, audio quality and compact size, the d:series amplifiers are a
perfect fit for a wide range of science, research or industry applications.
1.1 - d:series amplifiers
1.2 - main features
The d:series amplifiers are a space-saving innovative audio amplifier for high-end multichannel setups with
powerful low noise preamps and the possibility of digital input integration. The various options of inputs
and further features allow users to integrate it as flexibly as possible. Whether you are planning to use it
for a fixed installation setup in science, research or industry, for acoustical measurements or perhaps for
an installation at live events, we built the amp for durability, reliability and compatibility. We are confident
that you will be pleased with the benefits and overall quality of this innovative and versatile amp.
This manual will guide you through the features and functionalities of the d:series multichannel amplifier.
Read this manual carefully to become fully acquainted with the configuration options and control layers of
the amp.
Please feel free to contact us and send any questions, comments and suggestions to
The d:series amplifier provides a number of features and technologies that offer maximum flexibility to
realize sophisticated projects in sound reinforcement.
Compactness
Using high grade class D amplifying technology and very efficient switch mode power supplies, the
d:series provides you an unique packing density. With the mid-range amplification channels packed in a
3RU housing, optional digital inputs and with a weight of approximately 20kg, the d:series amplifiers are
the clear technological leaders in the market.
User interface
The d:series amplifier can conveniently be configured and monitored via a 6.5" touch screen.
Remote
When connected to a LAN, the d:series amplifier can be remote-controlled via web interface or HTTP API.
Protection
The d:series incorporates several security precautions to avoid damage of speakers and the amplifiers
components.
Detailed description concerning the main features can be found in the corresponding chapters of
the manual.
d:series amplifiers
manual
welcome
product and options overview
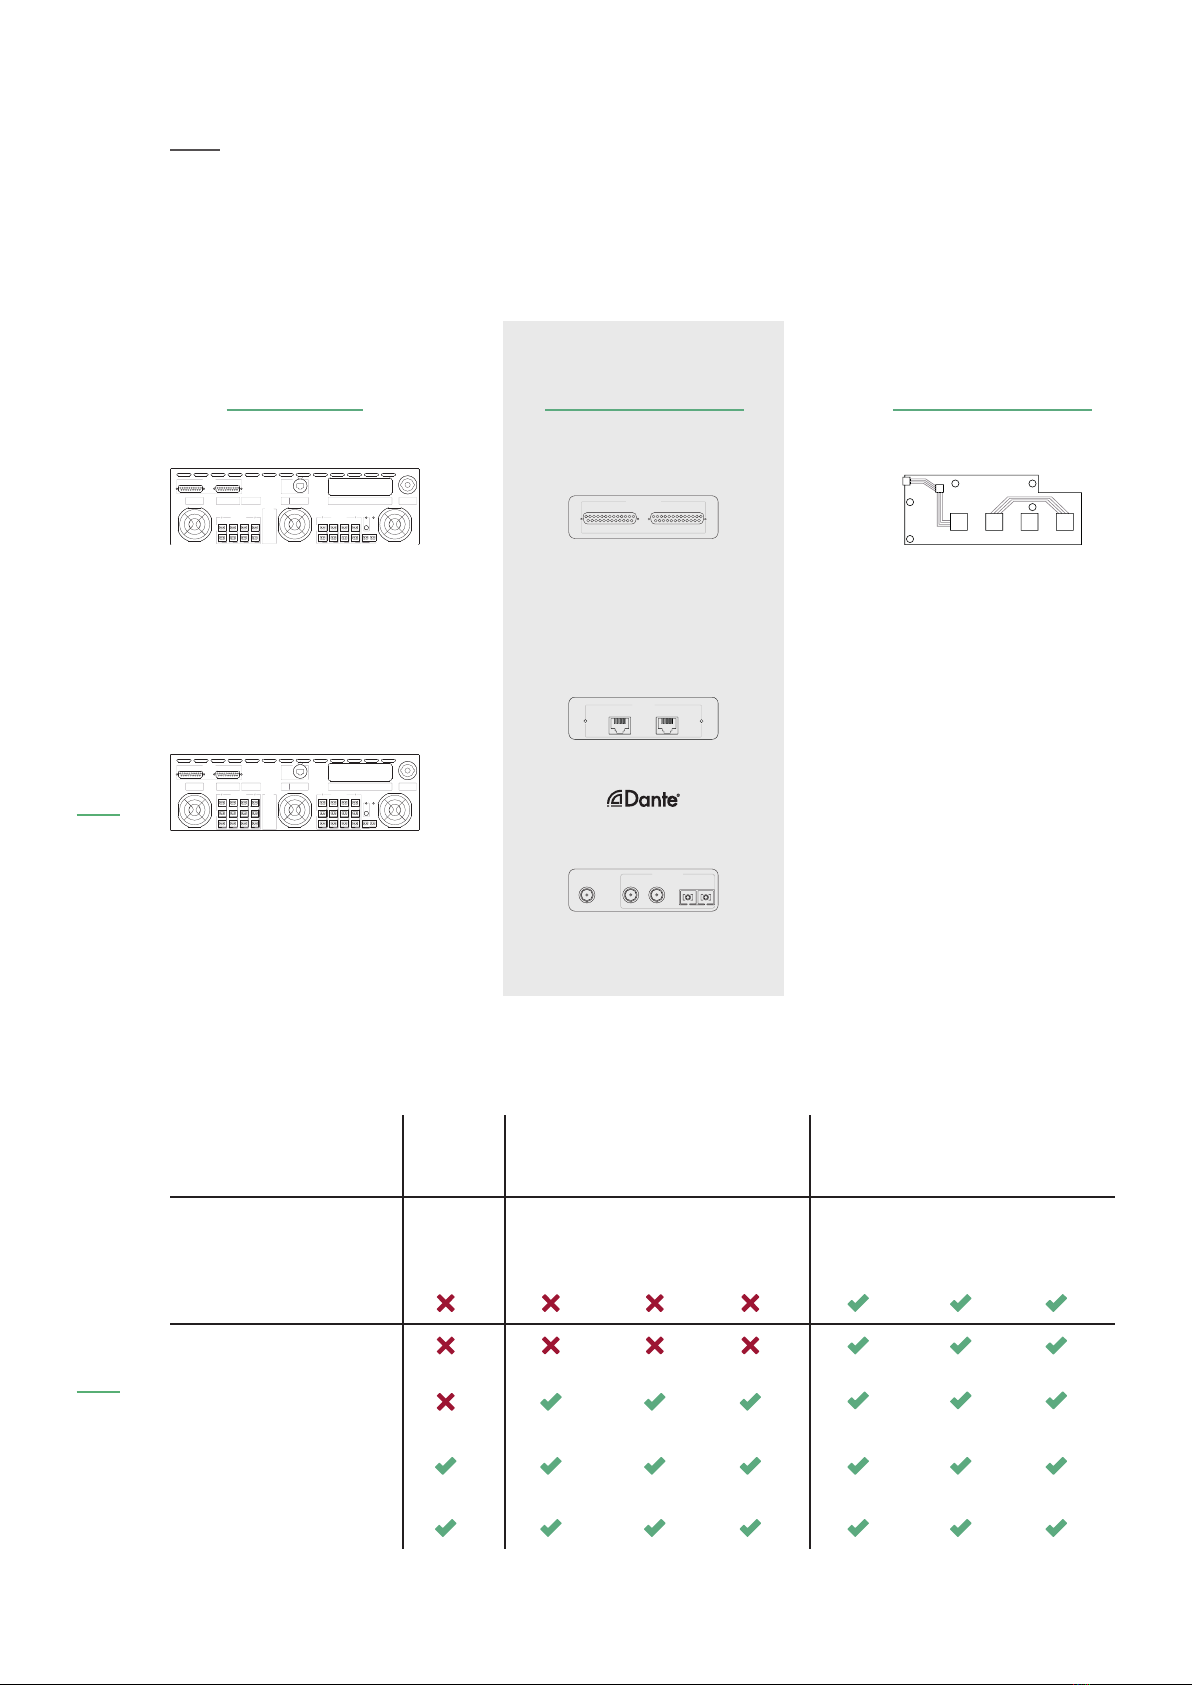
1.3 - products and options overview
The d:series amplifier can be customized to meet your needs: Enhance the base model with its analog
inputs by choosing a digital input option and adding a DSP module.
Options overview
analog
base units
optional
digital modules
optional
DSP module*
d:16
16 channels
250W at 4Ω
equalizer
delay
compressor
limiter
d:24
24 channels
250W at 4Ω
AES/EBU
S/PDIF
MADI *only in combination
with a digital module
options analog
AES/EBU
& S/PDIF MADI Dante
AES/EBU
& S/PDIF
+ DSP
MADI +
DSP
DANTE
+ DSP
inputs
analog inputs 16/24 16/24 16/24 16/24 16/24 16/24 16/24
digital inputs - 24 128 64 24 128 64
high end DACs
features
DSP
routing per channel
(of digital inputs)
remote control
via web interfave
touch display
8
d:series amplifiers
manual
startup
unpacking and inspection
2 - startup
2.1 - unpacking and inspection
2.2 - scope of delivery
Open the packing carefully and take out the power amplifier. Inspect the power amp’s enclosure for
damages that might have happened during transportation. Each amplifier is examined and tested in detail
before leaving the manufacturing site to ensure that it arrives in perfect condition at your place.
If there is any sign of damage to the power amplifier, please do not operate the unit and inform the
transport company immediately. Being the addressee, you are the only person who can claim damages in
transit. Keep the cardboard box and all packing materials for inspection by the transport company.
Keeping the cardboard box including all packing materials is also recommended, if the power amplifier
shows no external damages. When shipping the power amp, make sure to always use its original box
and packing materials. Packing the power amplifier like it was packed by the manufacturer guarantees
optimum protection from transport damage.
The following items are part of the package:
1 d:series
power amplifier
1 power cord
(powerCON 32A; specific to country)
rack mount kit
(including screw set)
Compatible 2-pin Euroblock plugs
(d:24 - 24 pcs. / d:16 - 16 pcs.)
Compatible 4-pin Euroblock plug
for panic mute bypass (1pc.)
Please so not ship the power amp in any other than its original packing

9
d:series amplifiers
manual
startup
scope of delivery
2.3 - mounting
The amplifier is three rack units high (3RU) and fits
into a standard EIA 19" rack or cabinet. The depth
of the amplifier is 517mm (20,4"). The weight of the
analog version is approximately 20 kg (44 lbs).
When mounting the d:series amplifier into a 19"
rack, please use the provided rear rack-mount ears
to avoid mechanical stress. To mount it into the
rack, use appropriate rack mounting screws with
washers.
To fix the rack angles to the rack-mount ears,
please use the delivered screws (M3 TX10).
AES/EBU input card MADI input card
Dante input card DSP module
Optional components:

10
d:series amplifiers
manual
startup
air flow and thermal management
2.4 - air flow and thermal management
The d:series unit is a powerful amplifier. Due to the idle loss and the heat arising under heavy working
conditions, it is necessary to cool the circuits adequately. Therefore, the amp is equipped with five fans
with an air flow direction ‘front-to-rear’ and additional air slots for passive convection cooling.
Therefore, it is mandatory to ensure an unrestricted airflow of the cooling system. When mounting the
amplifier in a rack, it is important that cool airflow is provided at the front panel of the amplifier and warm
air can be exhausted from the rear.
We highly recommend to leave 1RU space above and underneath each amplifier in the rack. If the
amplifier was not maintained correctly, all necessary repairs and consequential costs will not be
covered by the warranty.
The system screen on the control surface allows you monitoring relevant temperature states of the amplifier
(see chapter 5.2 ‘system screen’, page 24).
A detailed graphic of the fan curves can be found in chapter 5.6 ‘stealth screen’ (page 37).
Never block the ventilation louvers of the d:series amplifier! Without
sufficient cooling, the amplifier will automatically enter a protection mode
and shut down the power supply for the amplifier modules if necessary.
Don’t place the d:series amplifier near heat sources, like blowers, stoves
or any other heat radiating devices. We also highly recommend not to
place the amplifier directly above or underneath other devices in racks.

11
d:series amplifiers
manual
startup
protection circuitries
2.5 - protection circuitries
Soft-startup
To ensure that the main fuse does not trip if one or more power amplifiers are switched on simultaneously,
the amplifier is equipped with a low inrush circuitry for soft-startup of the system.
To avoid damage of system components such as speakers and the amplifiers electrical components, the
d:series amplifier has got safeguard mechanisms for DC error, overcurrent and over voltage at the
speaker outputs.
Overcurrent protection
To avoid the damage of the amplifier due to short circuit, the output current is limited to 15A per amplifier
channel.
Per-Channel-Error protection
In case of a DC error at the amplifier outputs, the power supply of the affected amplifier channels is being
shut down immediately for security reasons.
In case of defects of an amplifier module, two fine wire fuses will cut the power supply for the affected
module to protect the loudspeakers.
The fuses have to be replaced by sonible. Please contact us for further information.
Overtemperature protection
The d:series amplifier is equipped with three temperature sensors to protect the electrical components
in case of overtemperature. One sensor is located at the end of the cooling tunnel and the other two are
located at the power supplies. If the overall temperature is reaching 90°C for any reason, the protection
shuts down the power supply. The amp modules operated by the affected power supply will be shut down
as well. When the normal operating temperature is reached, the power supply will be activated again.
To avoid thermal shut down, ensure enough airflow and ventilation as described in the previous section
(see chapter 2.4 ‘air flow and thermal management’, page 10).

12
d:series amplifiers
manual
startup
responsibility of the user
2.6 - responsibility of the user
Operating voltage
The power amplifier receives its power supply via the mains connector, which is provided as a powerCON
connector.
Depending on the ordered unit, the d:series amplifier supports mains voltage with 100-120 VAC or
220-240 VAC (50-60 Hz). The power supply unit which has an impact on the mains voltage is factory-fitted
and cannot be changed arbitrarily on site.
During installation, always separate the power amplifier from the mains. Connect the power
amplifier only to a mains network which corresponds to the requirements.
The d:series amplifier is delivered with a prefabricated power cord. If you have to change the main
plug for any reason and if you are not 100% confident of your competence to replace the mains
plug, engage qualified personnel to do that job.
Grounding
Your amplifier has to be connected to a grounded socket outlet. Use balanced input connections and
cabling to avoid hum and interference noise.
Dangers at the loudspeaker outputs
The d:series amplifiers are capable of producing dangerously high voltage output that is present at
the output connectors. To protect yourself from electric shock, do not touch non insulated parts of the
speaker cables during operation of the power amplifier.
The external wiring connected to the speaker terminals have to be installed by a qualified instructed
person or ready-made leads or cords of appropriate capacity shall be used.
As the amplifier outputs produce high voltage, do not connect or disconnect speaker cables when the
mains power is on. Also, attach the safety cover on the speaker terminals for safe operation and to comply
with electrical product approvals.
The powerCON is a connector without breaking capacity, i.e. the powerCON must not be connected
or disconnected under load or live.
Speaker system damage
The d:series power amplifiers provide high power output that might be dangerous for human beings
as well as for the connected speaker systems. High output voltages can damage or even destroy the
connected speaker systems, especially, when the d:series amplifier outputs are bridged by the user. Prior
to connecting any loudspeakers, make sure to check the speaker system’s specifications for continuous
and peak power handling capacities.
Maintenance
For safe and reliable operation, the dust filter of the front panel, behind the grilles, can be removed and
cleaned to ensure maximum airflow through the device.
If the dust filter is not maintained when needed there will be safety risks. There is also a risk that the unit
will malfunction since it is dependent on constant airflow from front to rear. If the dust filters are not clean
and the unit malfunctions, any resultant problems will not be covered by the warranty.
A detailed instruction on maintenance work can be found in chapter 8 ‘maintenance & update’ (page 45).
If the amplifier malfunctions due to dirty dust-filters, any required repairs
or resultant drop out costs are not covered by the warranty.
13
d:series amplifiers
manual
overview
front panel
3 - overview
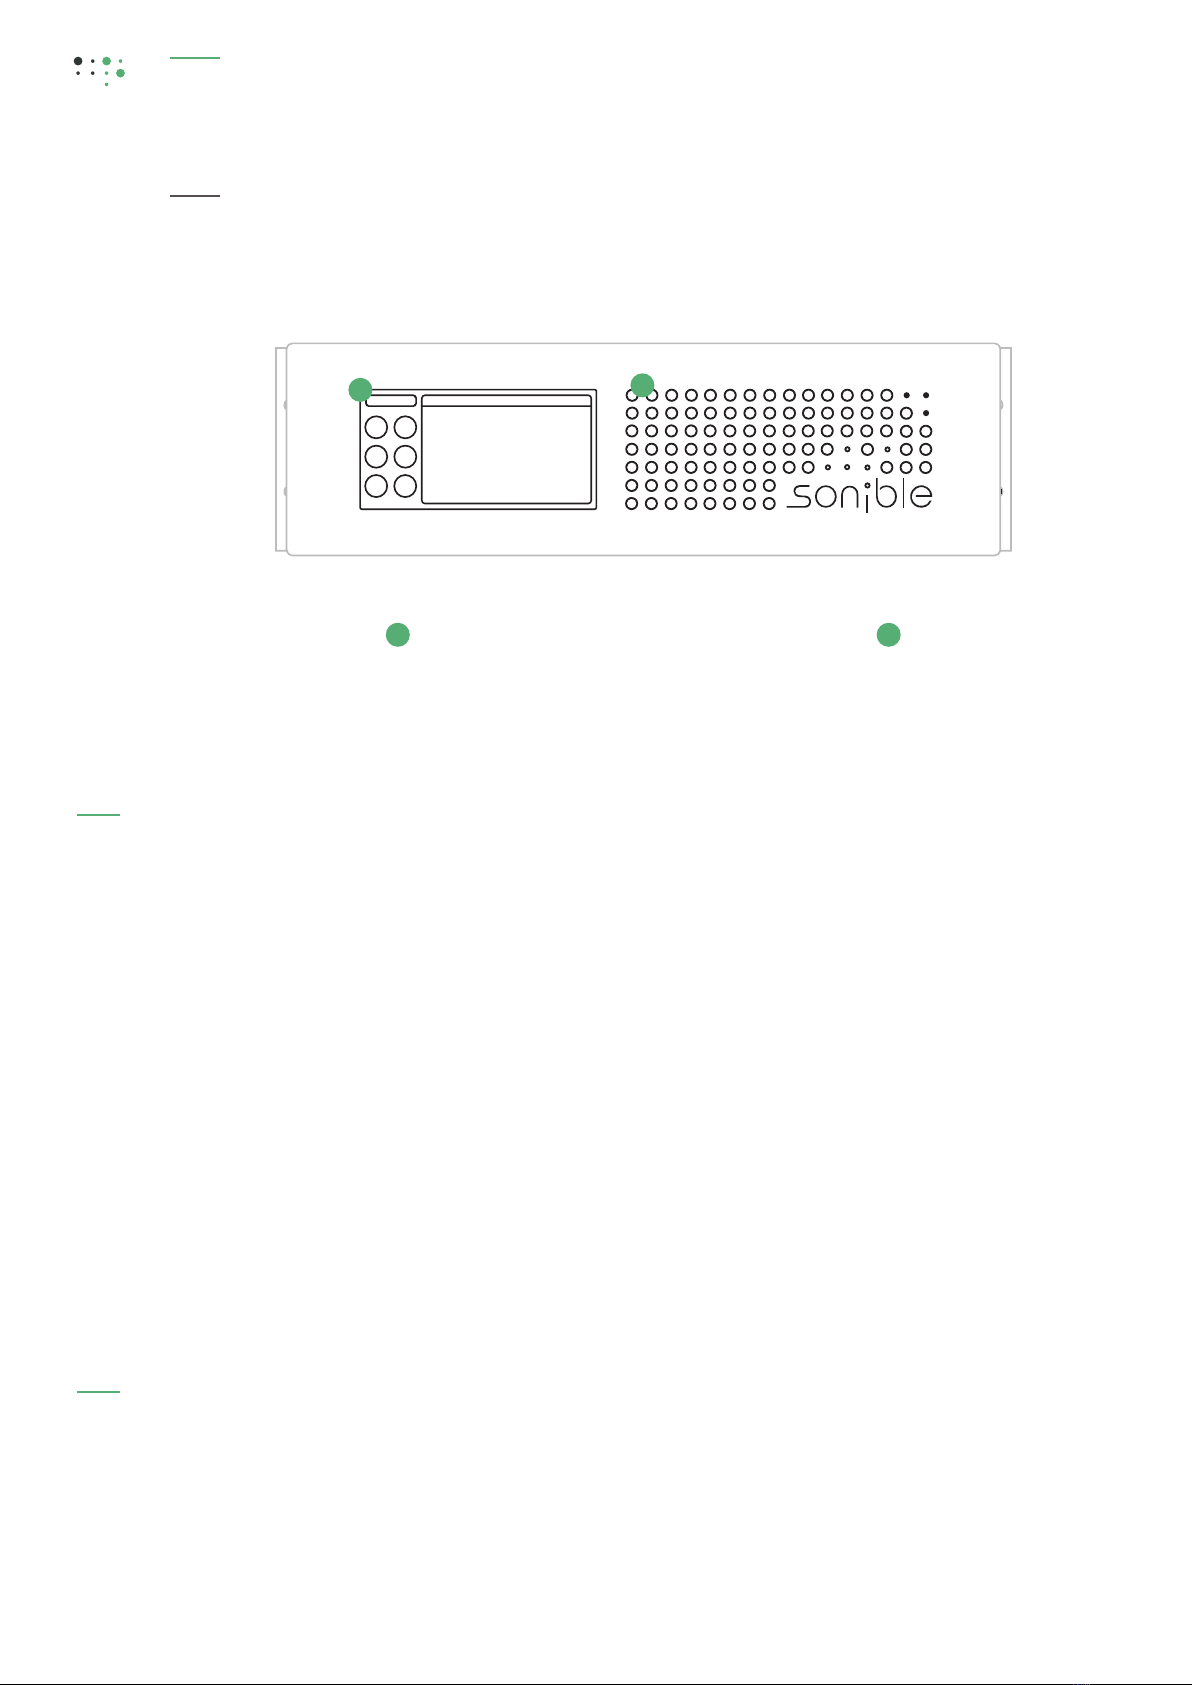
3.1 - front panel
Touch panel
The amplifier can be configured by using the 6.5"
touch display on the front panel. Besides, the
display provides detailed status information (e.g.
temperatures, fan speeds) as well as network
configuration settings and real time level metering.
A detailed description can be found in chapter 5
‘control surface’ (page 22).
Dust filter
The dust filter is located behind the front panel.
A detailed description regarding the service of the
dust filter can be found in chapter 7 ‘maintenance
& update’ (page 45).
2
1
1 2

14
d:series amplifiers
manual
overview
rear panel
Speaker output section (Euroblock)
For each channel of the speaker outputs the
amplifier is equipped with a 2-pin terminal block.
A detailed description can be found in chapter 4.3
‘outputs (euroblock)’ (page 19).
Network connection (etherCON)
Using a CAT5 cable (or higher), integrate the
d:series into a TCP/IP network for remote control.
A detailed description can be found in chapter 4.5
‘network’ (page 20).
Panic mute switch connector
A detailed description can be found in chapter 4.6
‘panic mute switch’ (page 21).
Status LED ‘on’
The status LED ‘on’ turns green when the amps
power switch is on and the amplification circuits
are active.
Status LED ‘mute’
The panic mute LED flashes red when the panic
mute function is active and all amplifier outputs are
muted. It does not distinguish if the mute has been
triggered by the hardware panic mute button or by
the software mute.
Digital input option slot
The optional digital input cards are available in the
following formats: AES/EBU, MADI and Dante. The
digital input slots are factory-fitted and cannot be
changed arbitrarily.
Digital input cards can not be hot swapped
Detailed descriptions concerning the digital input
slots can be found in chapter 4.2 ‘inputs’ (page 16).
Power connector (powerCON 32A)
A detailed description can be found in chapter 4.1
‘mains connection via powerCON’ (page 16).
Power switch
The power switch is a soft-button with memory
function. In case of power loss the amplifier will set
the state until the device is provided with power
again.
When pressing the power switch, the controller
boots up and the amplification circuits will be
activated. Independent to the status shown at the
control surface (touchscreen), the amp modules
are active until the amp is switched off again.
Analog input section
(DB-25 Tascam pinout)
The d:series amplifier has analog inputs in the form
of three standard DB-25 sockets (eight channels
each). The pinout is configured in Tascam standard
configuration for analog connections.
A detailed description can be found in chapter 4.2
‘inputs’ (page 16).
3 4
6
10
5
8
9
11
7
3
4 4
3.2 - rear panel
5
6
89
10 11

15
d:series amplifiers
manual
overview
DSP option
3.3 - DSP option
d:series amplifiers provided with one of the digital input cards (AES/EBU,
MADI or Dante) can be equipped with a DSP module which offers the following
functions per (digital input) channel:
• input gain and delay
• crossover (high and low cut filters)
• 5-band channel equalizer
• dynamics (compressor, limiter)
• matrix mixer (optional for Dante only)
The DSP option and it’s functionalities can not be used with analog
channels.
A detailed description concerning the usage can be found in chapter 5.5 ‘DSP
menu’ (page 33).
16
d:series amplifiers
manual
connections, pinout and cabling
inputs and mains connection
4 - connections, pinout and cabling
4.1 - mains connection via powerCON
4.2 - inputs
The maximum current draw of the amplifier is 32A. Therefore, it is recommended to only use the original
cable shipped with the amp (country-specific power cord to powerCON 32 A with minimum cable
cross-section of 2,5mm2, H07RN or equal quality).
Depending on the ordered unit, the d:series amplifier supports one of the following mains voltages:
230VAC -5V; +20V or 115VAC -5V; +10 (50-60 Hz).
The following block diagram shows the simplified signal flow of the d:series amplifiers.
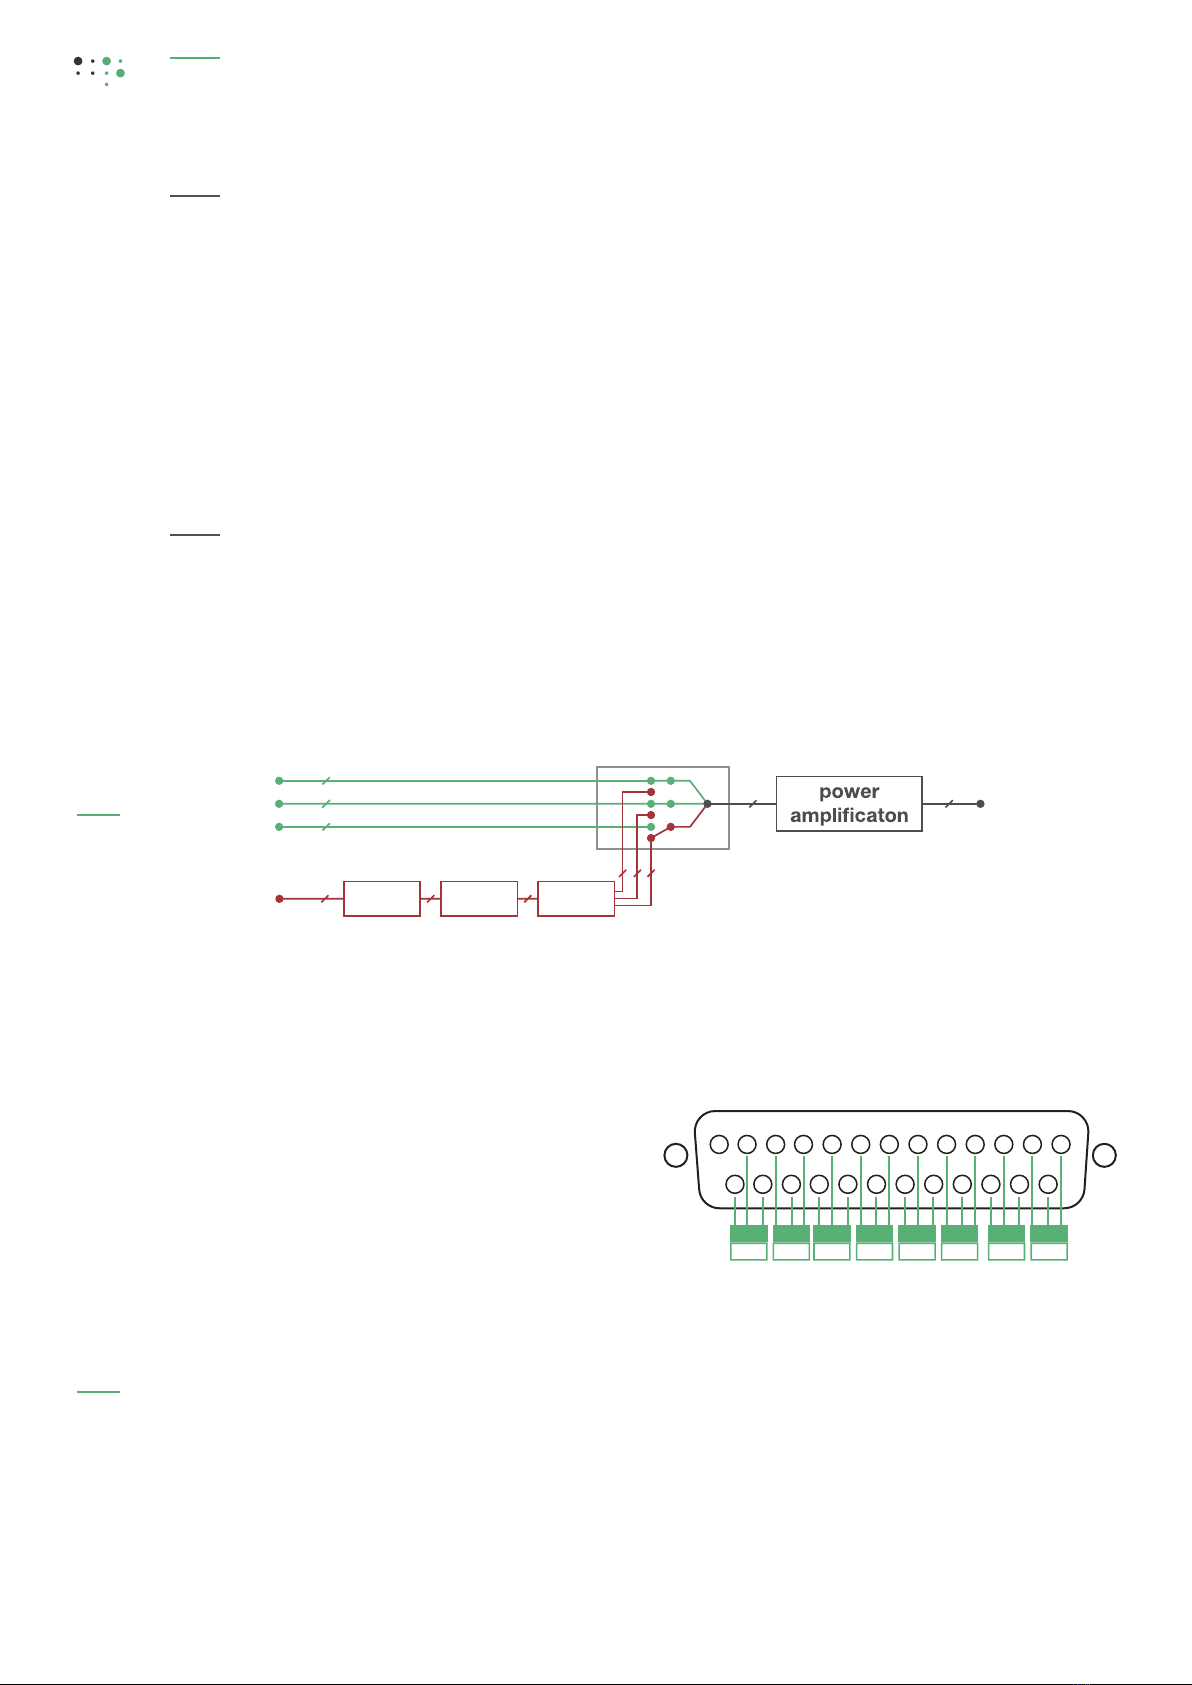
Analog Inputs (DB-25)
The DB-25 connectors located on the rear panel for analog inputs are patched in Tascam analog norm as
depicted in the following illustration.
Analog input specifications
Required level for 250W: 15 dBu
Input impedance: 95kΩ
Max. input level: 15 dBu
12345678910111213
141516171819202122232425
gc h gc h gc h gc h gc h gc h gc h gc h
ch 1 ch 2 ch 3 ch 4 ch 5 ch 6 ch 7 ch 8
g = ground c = cold h = hot
Analog In Speaker Out
Digital In Matrix
8
888
8
8
DSP DAC
16/24 16/24
Input select
(groups of 8)

17
d:series amplifiers
manual
connections, pinout and cabling
inputs and mains connection
Digital inputs
Optionally, the d:series amplifier can be equipped with one of the following input cards:
Supported sample rates: 44.1, 48, 88.2 and 96 kHz.
The d:series amplifier is automatically detected as slave and assumes the sample rate transmitted by the
master device.
NOTE: The digital input slots are factory-fitted and cannot be changed arbitrarily or on site.
AES/EBU, S/PDIF (AES3)
The optional AES/EBU input interface provides 16 channels (d:16 unit) or 24 channels (d:24 unit) and
enables digital input signals in AES3 format via AES/EBU (or S/PDIF). The digital input interface includes
high end DACs on each of the channels.
All inputs are independent and do not have to be synchronized concerning the word clock because of the
built-in ASRCs (Asynchronous Sample Rate Converters) on each of the input channels.
NOTE: With the AES/EBU (S/PDIF) card there is no possibility for daisy chaining!
The pinout of the DB-25 sockets are patched in Tascam analog norm as depicted below:
pin assignment:
stereo ch 1-8 = mono ch 1-16
stereo ch 9-12 = mono ch 17-24
(the lower stereo channels 1-4 are in use)
AES/EBU, S/PDIF (AES3) MADI (AES10) Dante
AES/EBU inputs
stereo ch 9-12 stereo ch 1-8
12345678910111213
141516171819202122232425
gc h gc h gc h gc h gc h gc h gc h gc h
ch 1 ch 2 ch 3 ch 4 ch 5 ch 6 ch 7 ch 8
g = ground c = cold h = hot
18
d:series amplifiers
manual
connections, pinout and cabling
inputs and mains connection
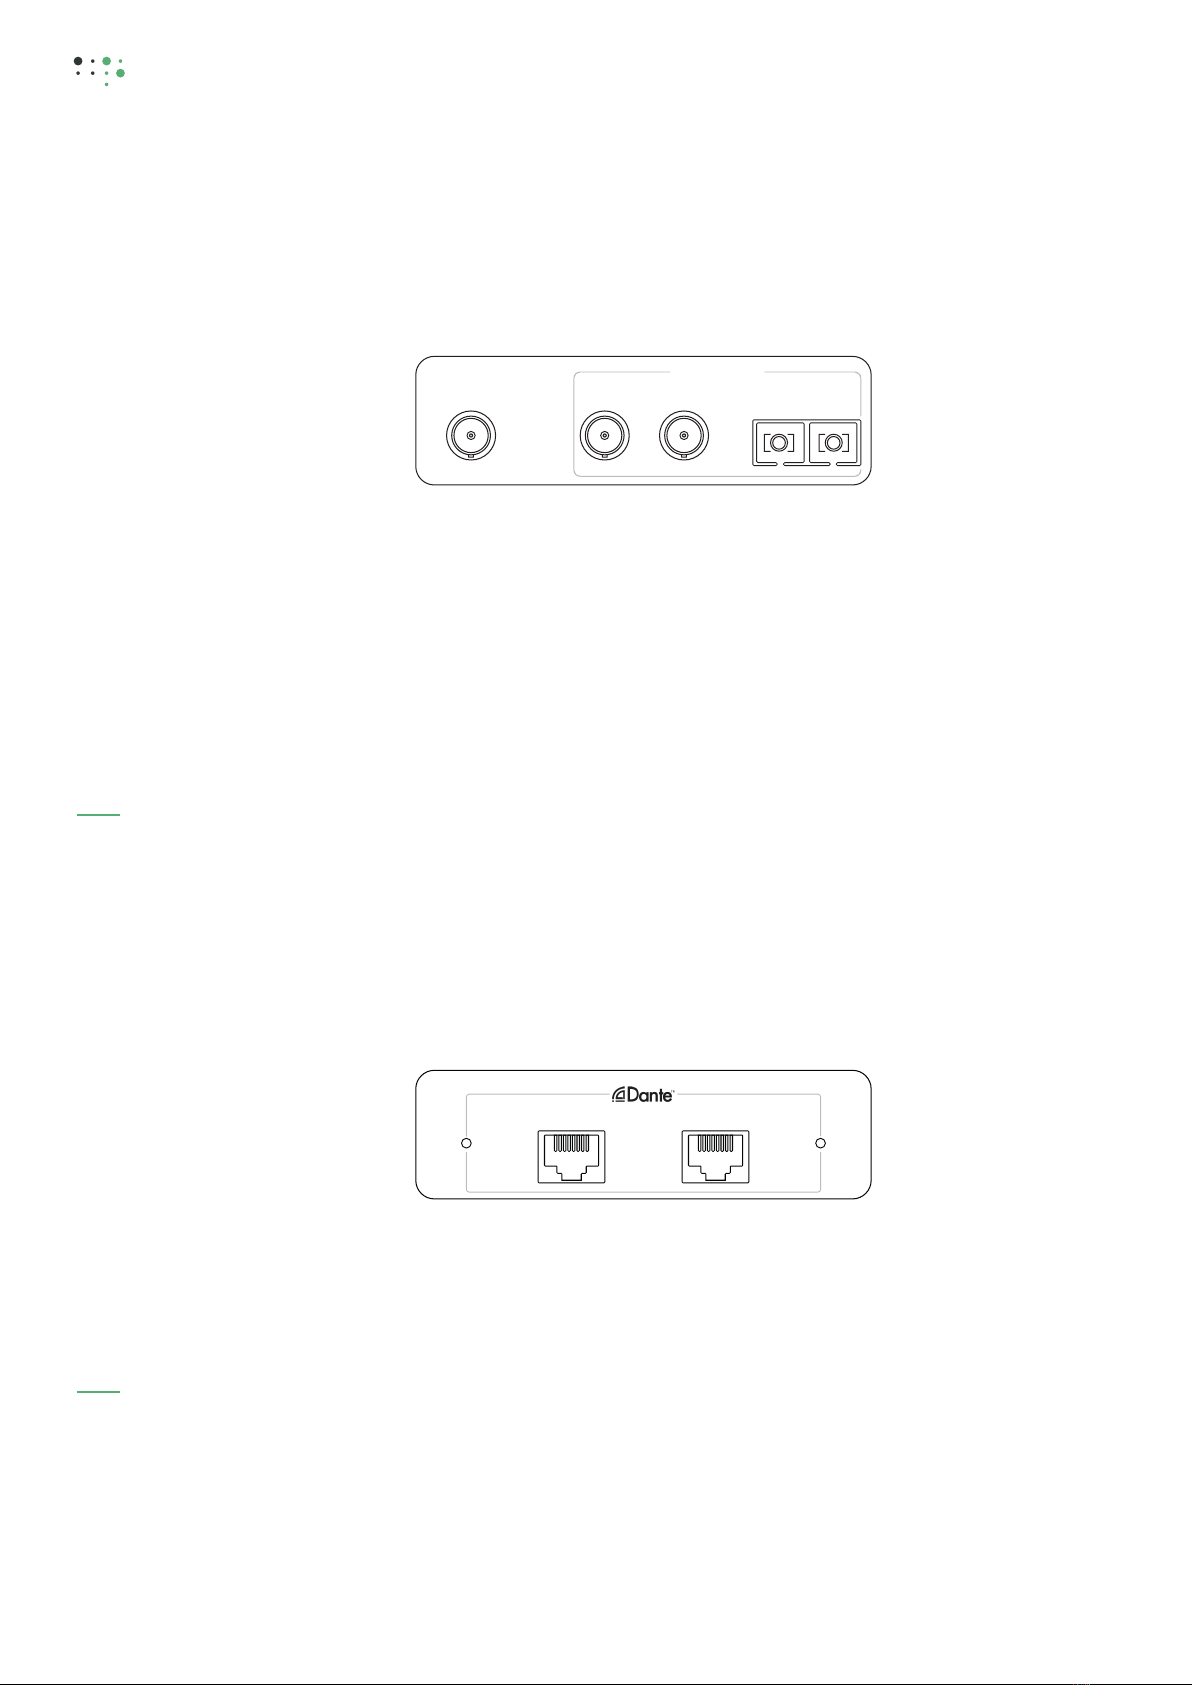
Dante
Dante is a multi-channel digital media networking technology created by Audinate with near-zero latency
and synchronization. By the use of the optional Dante input card the d:series amplifier provides a primary
and secondary port for redundant wiring by a RJ45 connection over gigabit transmission via CAT5e or
higher network cable.
Note: When using the Dante input card the sample rate is set in the Dante Controller software.
MADI (AES10)
The MADI input card is providing two individual MADI inputs and outputs (BNC/coaxial and optical – one
of each type). If needed, both MADI input streams can be used simultaneously and routed or mixed and
merged per channel.
The MADI input option providing one BNC wordclock output, ensuring seamless syncing even in larger
line-ups with other products and brands.
Note: When using the MADI input card, the clock source has to be set in the routing menu via
the touch display or in the web application. The default sync setting of the amplifier is ‘slave’.
Dante | Daisy chaining
For daisy chaining the secondary port can be used. To daisy chain more than two devices we recommend
to connected via Ethernet switches in star network topology. If you are using the secondary port for
redundancy, the relevant devices have to be connected to a second switch.
To be able to set up the Dante network and the routing of the channels it is necessary to install the Dante
Controller which is a software application provided by the company ‘Audinate’. It can be downloaded at
Audinate’s website.
All Dante routing can be configured via 6.5"touch display as described in chapter 5.3 ‘routing screen’
(page 28) or via the remote application (described in chapter 6 ‘remote control, page 38)
MADI | Daisy chaining
The MADI input signals on the BNC and optical connectors are directly patched to the corresponding
MADI output connectors – enabling daisy chaining for several d:series amplifiers without latency.
For wiring of multiple amplifiers within a rack, suitable coaxial cables (RG59, 75 ohm) or optical wires are
recommended.
primary secondary
MADI section
outclock out in out in

19
d:series amplifiers
manual
connections, pinout and cabling
outputs and bridging
4.3 - outputs (euroblock)
speaker outputs
4.4 - bridging
The d:series amplifier is supplied with 2-pin Euroblock connectors for each amplified output channel.
Compatible plug connectors are part of the delivery. To guarantee the operating safety and the proper
function, sonible recommends to use only prebuilt or professionally built speaker cables with minimum
cable cross-sections of 1.5mm2.
The amplifier offers to bridge channels in pairs of two. The main benefit of bridging is a doubling of output
voltage. Therefor you have to route one input signal to two amplifier channels, whereas one amplifier
channel is fed by the original signal and the other channel with the phase reversed counterpart. When
using digital inputs, the following steps have to be performed:
Step 1:
When using bridged mode, the same input source
has to be routed to both output channels in the
routing menu (e.g. input channel 1 to output
channels 1+2). The second input channel has to
be phase inverted in the routing sub menu of the
amplifier as shown in the graphic.
Further information about routing can be found in
chapter 5.3 ‘routing screen’ (page 28).
Step 2:
The 2-pin output speaker cable has to be connected with one pin to the plus
pole of the first channel (1+) and with the second pin the plus pole of the
second channel (2+) as shown in the graphic on the left.
If analog inputs are used for bridging amplifier channels you have to ensure
that the input signals comply similar to the description mentioned above. That
means that one amplifier channel has to be fed with the original signal, the
other with the inversed counterpart. The phase inversion of the input has to be
performed beyond the amplifier.
NOTE: Please be VERY careful when bridging channels! Incorrect
wiring can damage the corresponding amplifier channels as well as the
connected speaker. The bridged loudspeaker may not be connected to
the ground under no circumstances.
Output specifications:
Connectors: 16x/24x Euroblock
Output impedance: < 100 mΩ
Min. load impedance: ≥ 4 Ω (single channel)
≥ 8 Ω (bridged)
Hi-Z/ch., unloaded: approx. 32VRMS
DC output offset: < 10 mV
routing
setup
phase
inversion
-+-+-+-+
Ch. 1 Ch. 2
+
+
+
+-
-
-
-

20
d:series amplifiers
manual
connections, pinout and cabling
network
4.5 - network
The d:series amplifier offers remote control via an Ethernet connection. To establish a connection, the
remote device (e.g. Laptop) has to be wired to the ‘network’-port at the rear of the d:series amplifier.
Remote control for multiple devices:
To access a remote control for multiple amplifiers
in a network a star topology via Ethernet switch is
needed.
The instructions to configure the network
connection via the touch screen can be found in
chapter 5.4 ‘network screen’ (page 32).
A detailed description concerning the estab-
lishment of a connection between the amplifier
and the remote device can be found in chapter 6.1
‘establishing a connection’ (page 38).
Remote control via wireless connection:
The d:series amplifier can also be remote controlled via a wireless connection by using a wireless access
point. To guarantee an impeccable functionality we recommend to use a wired connection. The web
interface is optimized for remote control via laptop or desktop computer.
Integration in various systems
Based on the HTTP API, the d:series amplifier can be integrated in systems like Crestron, KNX, RTI, C4 or
similar systems. A documentation including the specification sheet regarding the HTTP API can be found
and downloaded at our website: www.sonible.com.
Ethernet
Ethernet switsch
This manual suits for next models
2
Table of contents
Other sonible Amplifier manuals


