SONIQ S43V15A User manual
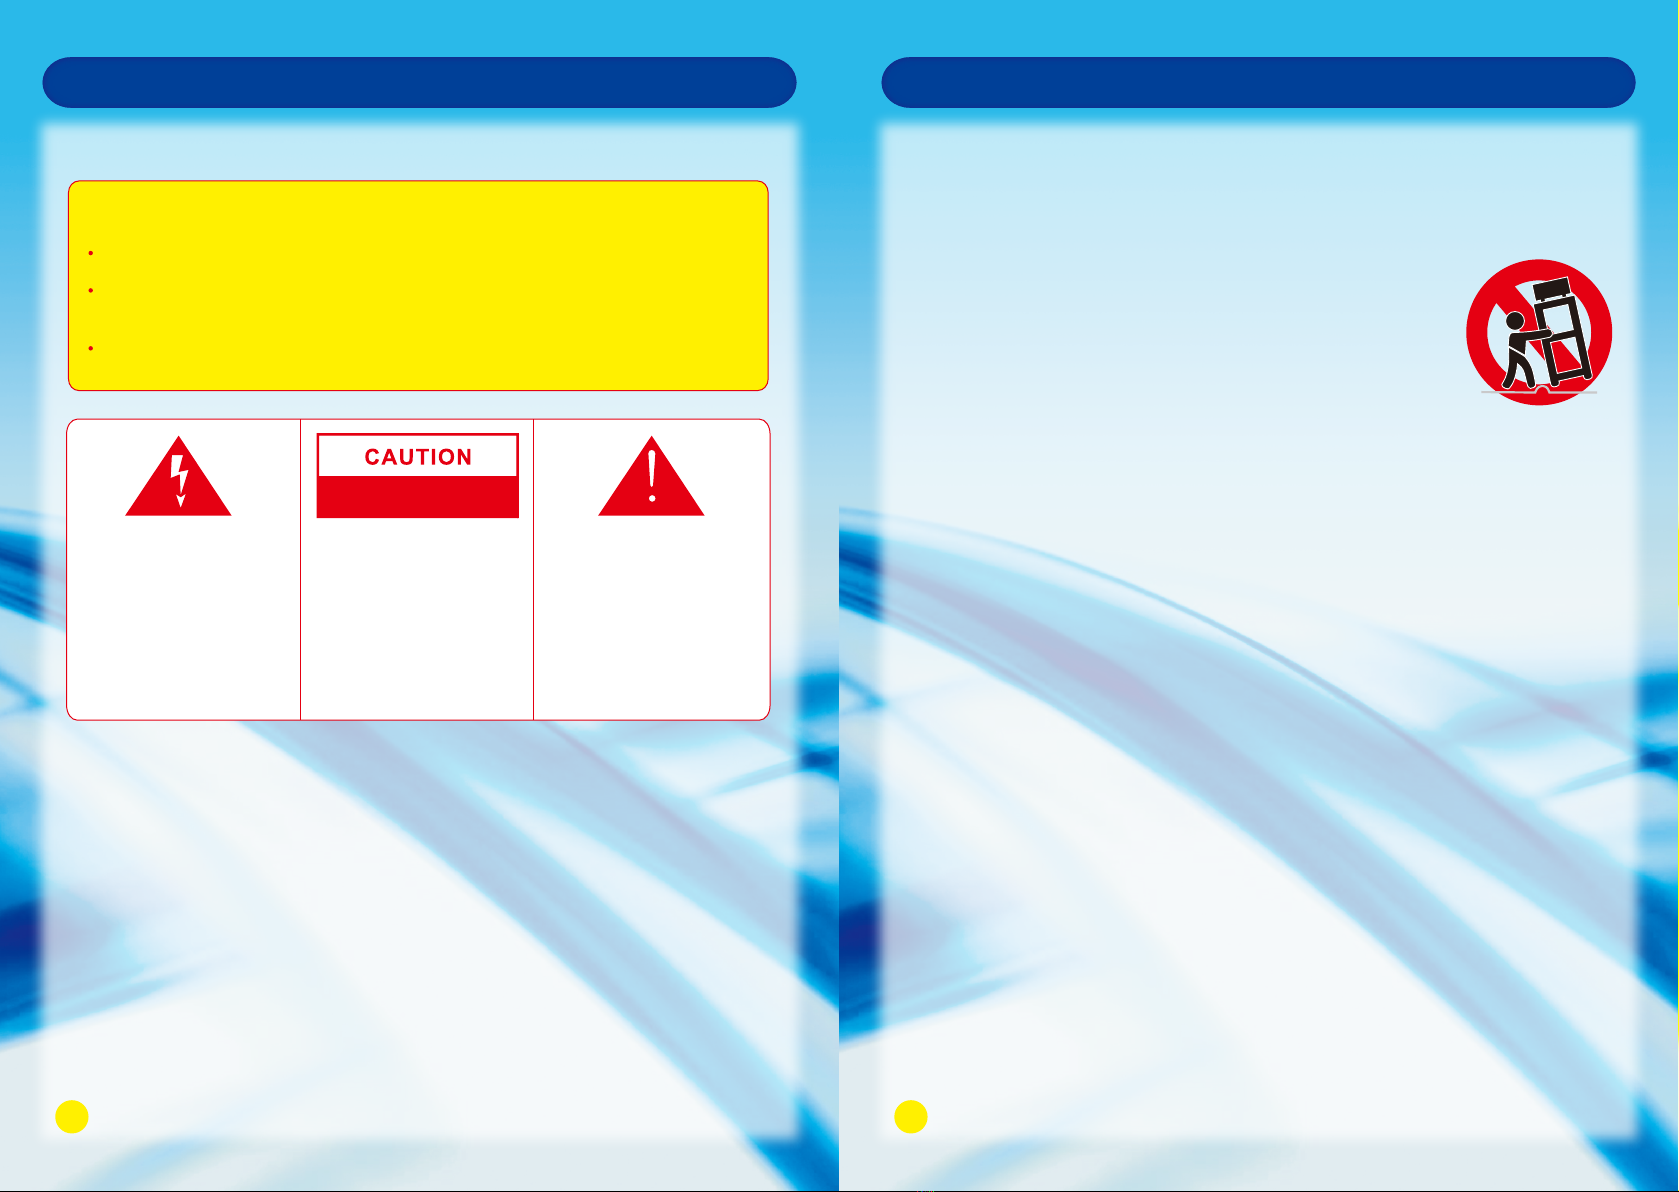
Important Safety InstructionsThe appliance should not be exposed to water and no object filled with liquid such as a vase should be placed on the unit.The lightning flash with arrowhead symbol in a triangle indicates the presence of uninsulated dangerous voltage within the product enclosure that may be of sufficient magnitude to constitute a risk of electric shock.The exclamation mark within the triangle alerts users to the presence of important operating and maintenance (servicing) instructions for the appliance.WARNING: To reduce the risk of electric shock, do not remove cover (or back).No user serviceable parts inside. Refer servicing toqualified service personnel.
RISK OF ELECTRIC SHOCKDO NOT OPEN
WARNINGTO PREVENT FIRE OR SHOCK HAZARD. DO NOT USE AN EXTENSION CORD.TO PREVENT FIRE OR SHOCK HAZARD, DO NOT EXPOSE THIS APPLIANCETO RAIN OR MOISTURE.TO PREVENT ELECTRIC SHOCK, MATCH WIDE BLADE PLUG TO WIDE SLOT FULLY INSERTED.Important InformationIf a television is not positioned in a sufficiently stable location, it can be potentially hazardous if it falls. Many injuries, particularly to children, can be avoided by taking simple precautions such as: · Using cabinets or stands recommended by the manufacturer of the television. · Only using furniture that can safely support the television. · Ensuring the television is not overhanging the edge of the supporting furniture. · No placing the television on tall furniture (for example, cupboards or bookcases) without anchoring both the furniture and the television to a suitable support. · Not standing the televisions on cloth or other materials places between the television and supporting furniture. · Educating children about the dangers of climbing on furniture to reach the television or its controls. · Figures and illustrations in this user manual are provided for reference only and may differ from actual product appearance. Product design & specification may be changed without notice.1. Read Instructions - All the safety and operating instructions should be read before operating.2. Retain Instructions - The safety and operating instructions should be retained for future reference.3. Warnings - All warnings on the appliance and in the operating instructions should be adhered to.4. Follow Instructions - All operating instructions should be followed.5. Earthing Connection - The TV shall be connected to a MAINS socket outlet with a protective earthing connection.6. Water and Moisture - The appliance should not be used near water.7. Cart and Stands - The appliance should only be used with a cart or stand that is recommended by the manufacturer. 8. Wall or Ceiling Mounting - The appliance should be mounted to a wall or ceiling only as recommended by the manufacturer.9. Ventilation - The appliance should be well situated so that its location or position does not interfere with its proper ventilation.10. Heat - This appliance should be placed away from heat sources such as radiators, heat registers and stoves.11. Power Sources - The appliance should only be connected to a power supply as described in the operating instructions as marked on the appliance.12. Power Cord Protection - Power supply cord should be routed so that it is not likely to be walked on, pinched by item placed upon it against the cord and its end.13. Cleaning - The appliance should be cleaned only as recommended by the manufacturer.14. Power Lines - An outdoor antenna should be located away from power lines.15. Outdoor Antenna Grounding - If an outside antenna is connected to the receiver, the antenna system must be grounded so as to provide against voltages and built-up static charges.16. Non-use Periods - The power cord of the appliance should be unplugged from the outlet when left unused for a long period of time.17. Conditions Requiring Service - The appliance should be serviced by qualified service personnel when: · The power-supply cord or the plug has been damaged. · Objects have fallen on or liquid has been spilled into the appliance. · The appliance has been exposed to rain. · The appliance does not appear to operate normally or exhibits a marked change in performance.18. This appliance should not be exposed to water and no objects filled with liquids such as a vase should be placed on the unit. Safety InstructionSafety Instruction12

34Safety InstructionWARNINGHigh voltages are used in the operation ofthis product. Do not remove the back coverof the cabinet. Refer servicing to qualifiedservice personnel.WARNINGTo prevent fire or electrical shock hazard,do not expose the main unit to rain ormoisture.WARNINGDo not drop or push objects into the television cabinet slots or openings. Neverspill any kind of liquid on the television receiver.CAUTIONIf the television is to be built into acompartment or similarly enclosed space theminimum distance must be maintained.Heat build up can reduce the service lifeof your television, and can also bedangerous.CAUTIONNever stand or lean on product or its standor push suddenly. Always pay special attentionwhen children are near product to avoid harm.Minimun Distances10cm20cm10cm5cmCAUTIONDo not place the main unit on an unstablecart stand, shelf or table.CAUTIONWhen the product is not used for an extended period of time, it is advisable todisconnect the AC power cord from the AC outlet.CAUTIONAvoid exposing the main unit to direct sunlight and other sources of heat. Do not position television receiver directly on other products which give off heat.E.g. video cassette players, audio amplifiers. Do not block the ventilationholes in the back cover.Ventilation is essential to prevent electrical failure.Do not squash powersupply cord under the main unit.CAUTIONThe panel used in this product is made ofglass.It can break when the product is droppedor applied with force. Safety Instruction
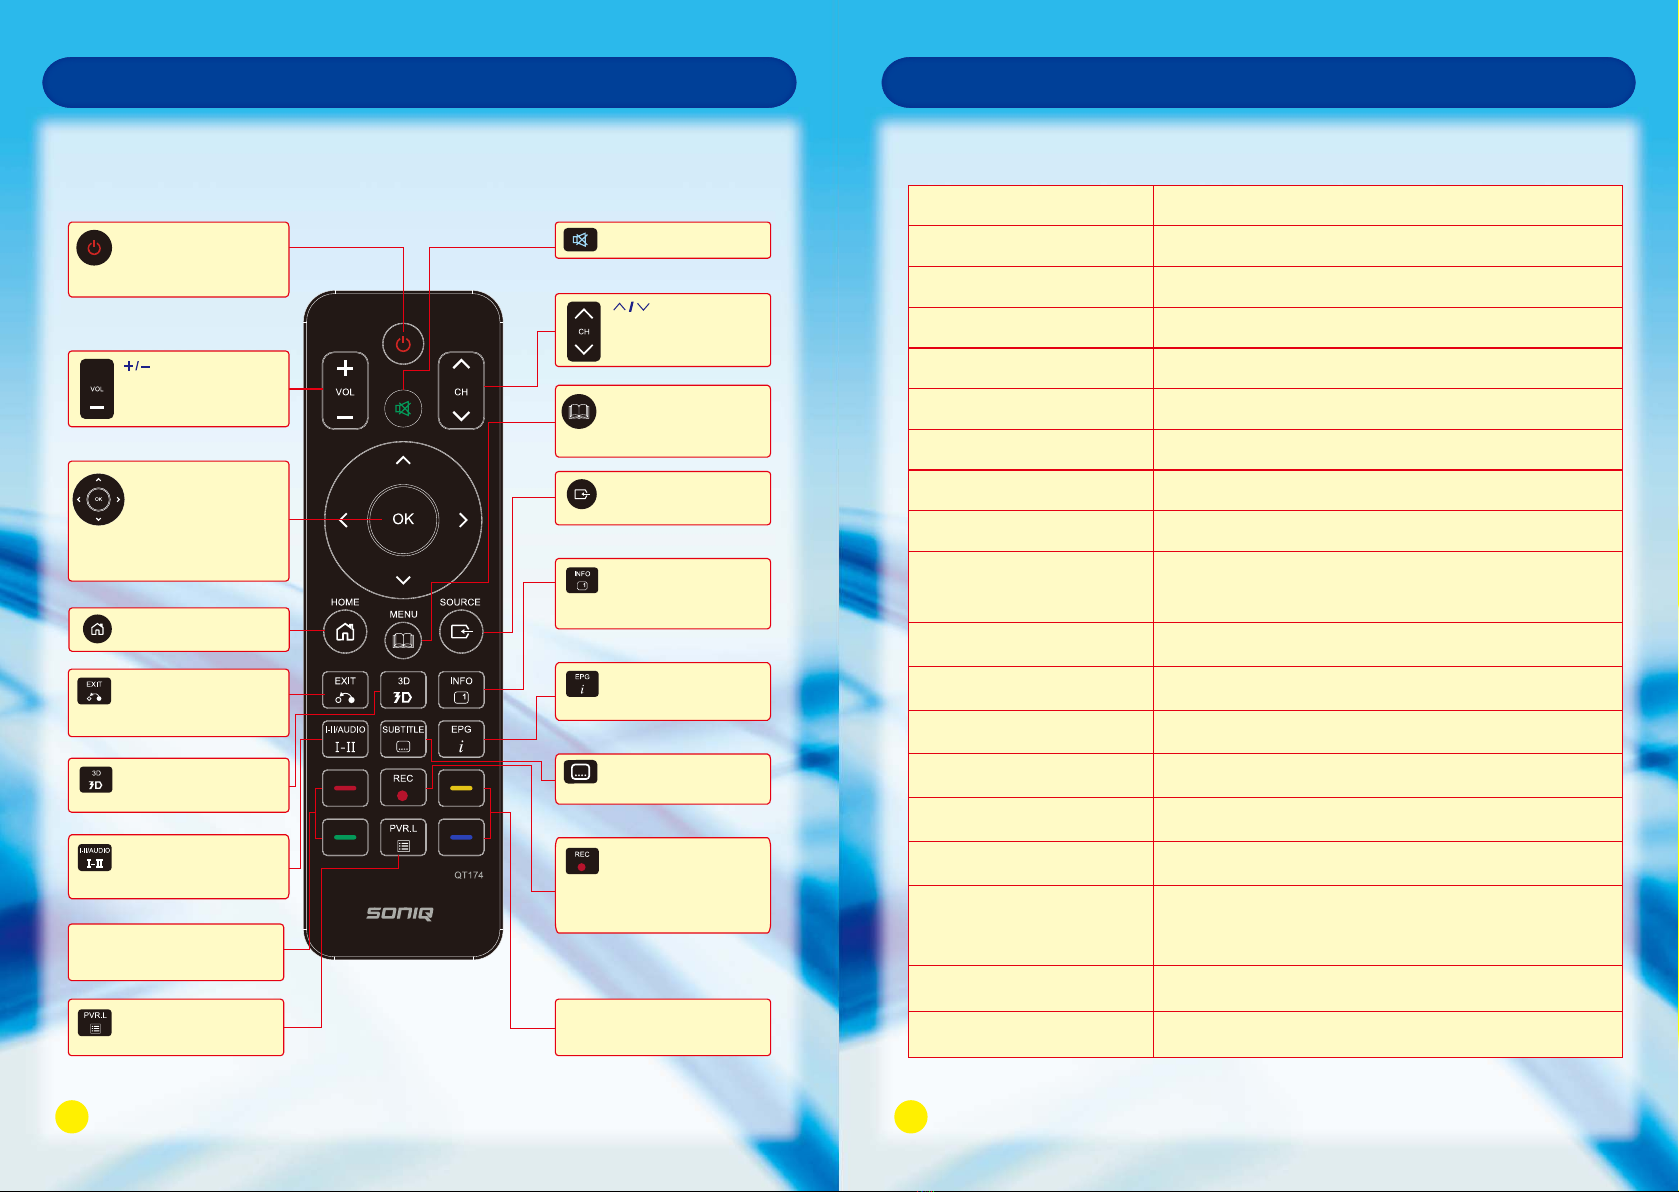
5Remote ControlRemote Control Overview6Remote Control Key FunctionsRemote Control Power ButtonTurns the TV On/Off or tothe standby mode.AUDIO ButtonPress to select sound output mode.MENU ButtonPress to enter the mainmenu.EXIT ButtonReturn back to the previousmenu under Smart function.Exit all OSD menu.3D ButtonPress to open 3D settingmenu.NAVIGATION/OK ButtonScrolls through menus oroptions.OK : Selects menus or options and confirmsyour input.SOURCE ButtonPress to display all possible input sources.INFO ButtonDisplays the information ofthe current program. COLOUR FUNCTION ButtonTo obtain the special functions from certain menus. COLOUR FUNCTION ButtonTo obtain the special functions from certain menus. HOME ButtonTo access the HOME page.REC ButtonUse to record a program in DTV mode.Press and hold this button for three seconds to display PVR Setting list.ButtonTo adjust the volume.+ButtonScrolls through the savedprogram.MUTE ButtonTurn on or off the sound.Displays your preferred subtitle in DTV mode. SUBTITLE ButtonEPG ButtonOpen or close EPG menu in DTV mode.Power ButtonIndicator LightMute ButtonAudio ButtonSubtitle ButtonMenu ButtonSource ButtonNavigation ButtonOK ButtonExit ButtonTurn the unit On/Off or to the Standby Mode.Code sending indicator light.Turn on or off the sound.3D ButtonInfo ButtonEPG Button+/- Button</>ButtonHome ButtonREC ButtonColor Function ButtonSelect sound output mode.Display your preferred subtitle in DTV mode.Enter into the main menu.Display all possible input sources.Scroll through menus or options.Select menus or options and confirms the input.Return back to the previous menu underSmart function. Exit all OSD menu.Open 3D setting menu.Display the information of the current program.Open or close EPG menu in DTV mode.To adjust the volume.Scroll through the saved program.To access the HOME page.To record a program in DTV mode.Press and hold this button for three secondsto display PVR Setting list.To obtain the special functions from certain menus.Press to display the PVR list.PVR.L ButtonPVR.L Press to display the PVR list.
7
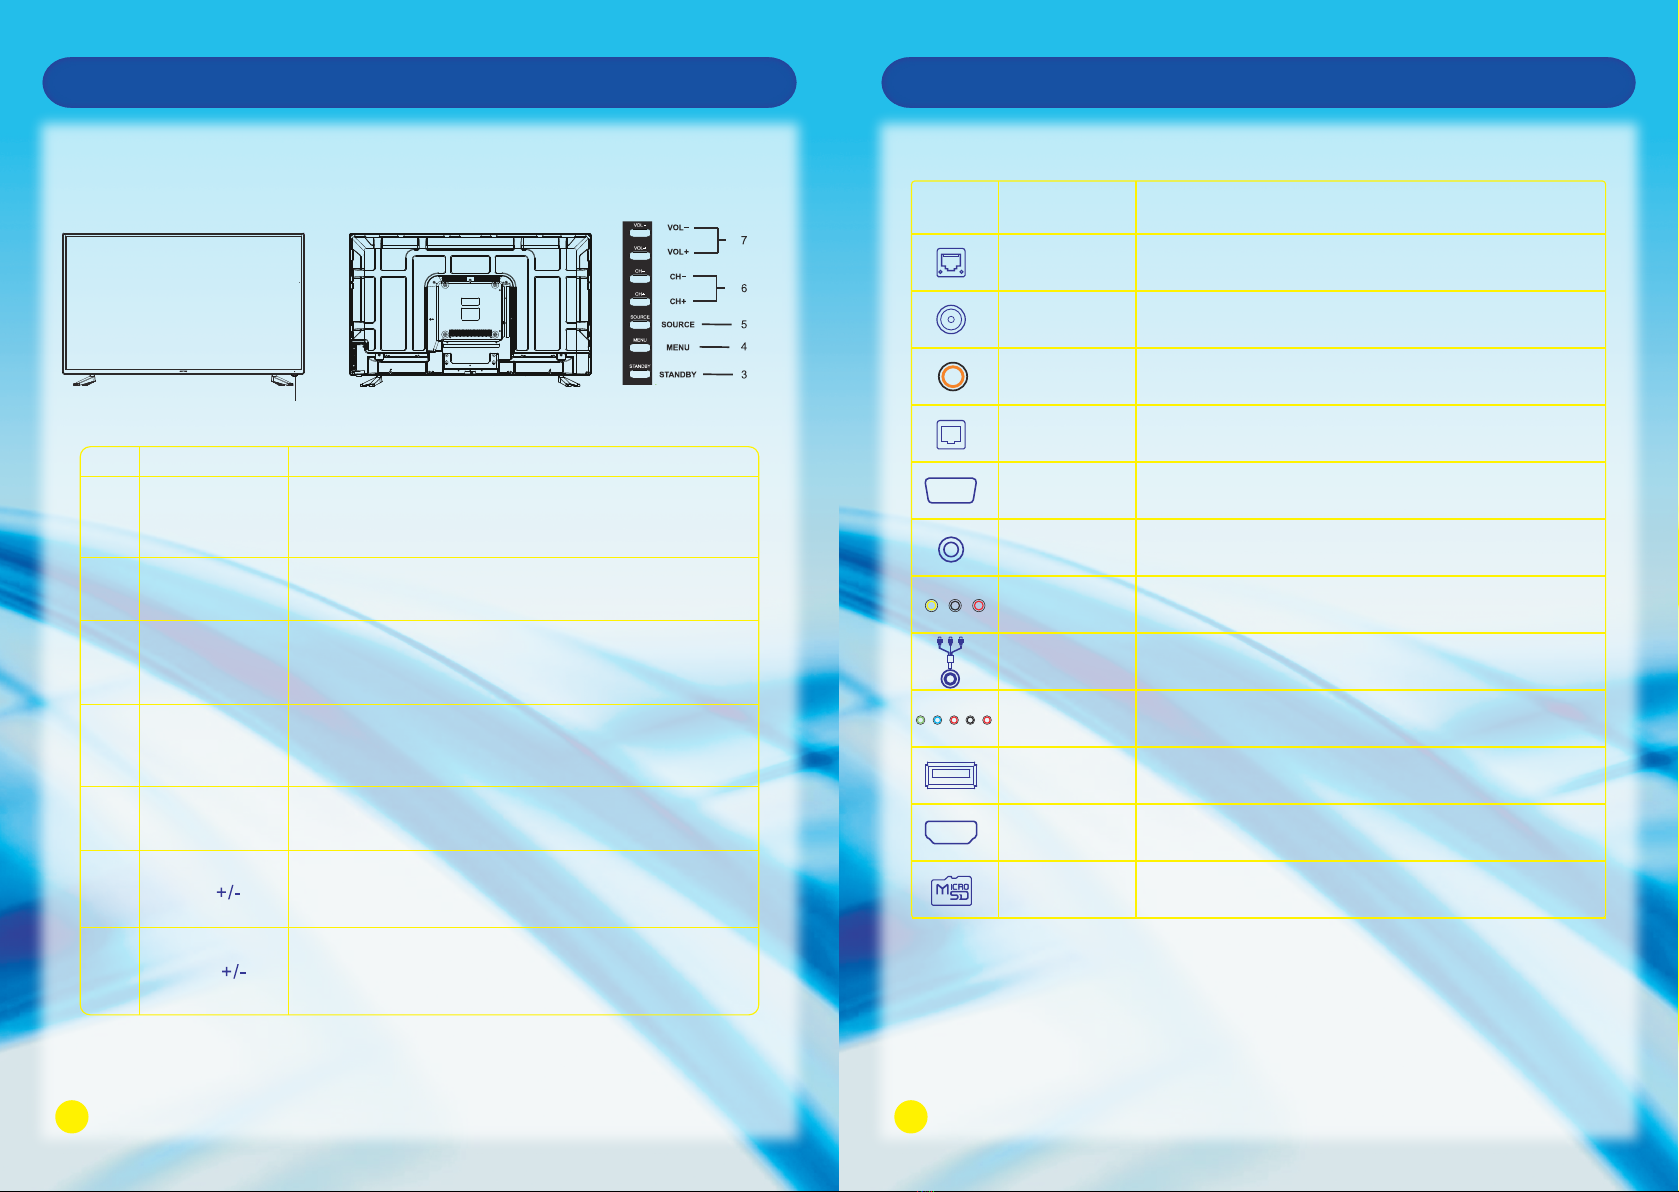
Front Panel
No.
1
2
3
4
5
6
7
Name
Remote Control
Sensor Window
Power Indicator
Description
Receives the signal from the Remote Control. Do not
put any objects in front of the window in order not to
hinder the reception of signal.
Flashes red when the unit is powered on:
Lights up red when the unit is in standby mode.
Press to display all possible input signal sources.
Press to cycle through various sources.
SOURCE
Press this button to display the OSD menu.
When the OSD menu is on, press this button to exit the
menu.
MENU
Press this button to turn the unit on when it is in standby
mode.
Press this button once more to put it to standby mode.
STANDBY
Press VOL + to increase volume, or VOL - to decrease.
At the OSD menu, press these buttons to move the
selection focus left and right to change settings.
VOL
Press these buttons to sequentially select channels.
When the OSD menu is on, press these buttons to
move the selection focus up or down to change settings.
CH
Main Unit Control
8
Connection and Setup
Terminals on TV
Digital Audio Out
(OPTICAL)Connect to Digital Audio Amplifier OPTICAL Input.
Icon
HDMI
ETHERNET Connect the RJ45 Interface Ethernet.
Name Description
Connect to HDMI signal.
AV OUT Connect to PVR or RECOREDR.
VGA Audio In Connect the DVI or VGA Audio Signal.
VGA Connect the PC VGA Signal.
ANT IN Connect to External Antenna.
USB Connect for media files playback and program recording.
(USB3.0 is not compatible with USB 1.1)
Note: Above is the universal version of all SONIQ Smart TV. Some terminals may not be
contained for some products, for that please obey the entity display.
Digital Audio Out
(COAXIAL) Connect to Digital Audio Amplifier COAXIAL Input.
COMPONENT IN Connect the Component Video and Audio Signal.
AV IN Connect Composite Video and Audio Signal.
Micro SD SD card reader slot.
Front View Back View
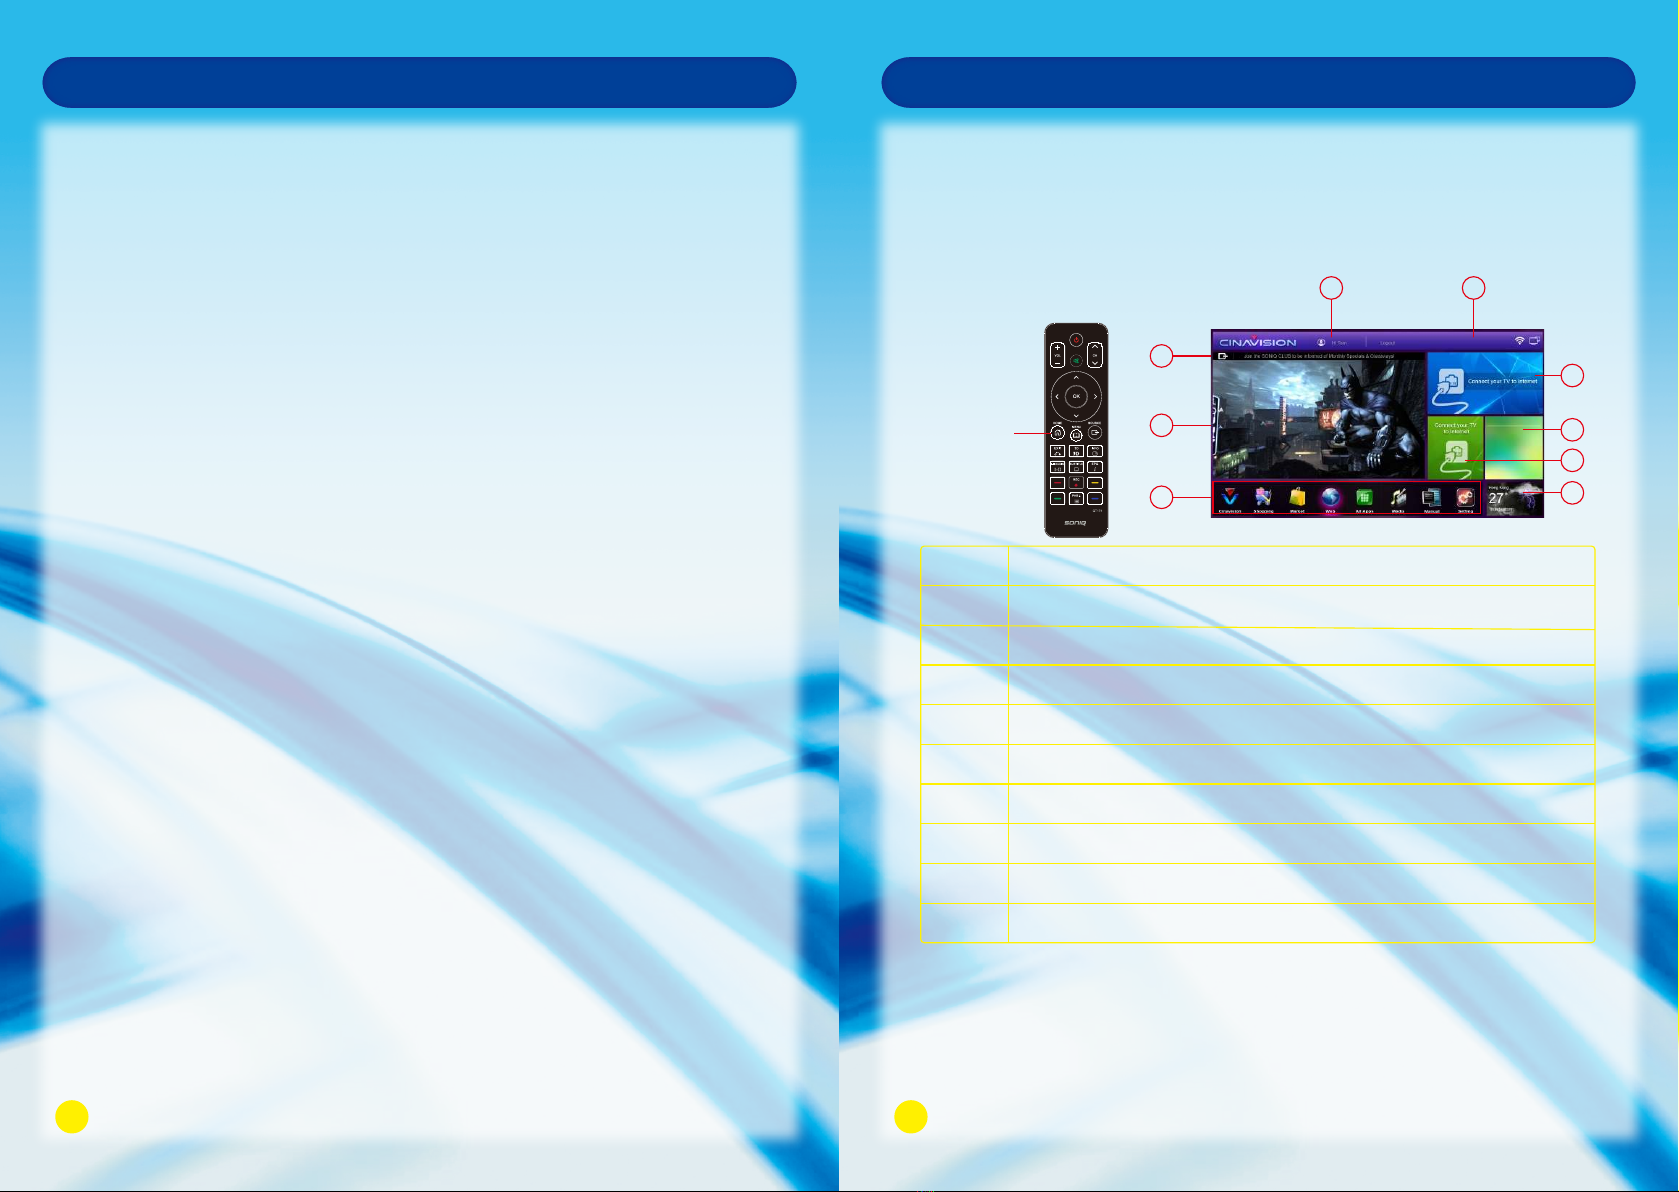
Connection and SetupPrecautions when using the USB device1. Please do not turn off the TV or unplug the USB device when the USB is connected. When such device is suddenly separated or unplugged, the stored files or the USB storage device may be damaged.2. Please use only USB storage devices that are formatted as a FAT32 file system, otherwise it may not be recognized.3. Every USB port only supply 500mA electric current, if the user’s device requirement is over the specification, users need to choose to connect to the external power supply, otherwise the device may not be recognized.4. If the USB HDD does not have an external power supply, the USB device may not be detected. So be sure to connect the external power supply.5. The recommended capacity is 2TB or less for a USB external hard disk and 32GB or less for USB flash memory.6. The recognition speed of a USB storage device may depend on each device.7. Please connect a USB storage device with the cable offered by the device maker.8. Be sure to back up important files since data stored in a USB memory device may be damaged. We will not be responsible for any data loss.9. If your USB memory device has multiple partitions, or if you use a USB multi-card reader, you can use up to 4 partitions or USB memory devices.10. If the USB memory device does not work properly, disconnect and reconnect it. How fast a USB memory device is detected differs from device to device.11. If the USB is connected in Standby Mode, specific hard disk will automatically be loaded when the TV is turned on.12. Any device with more than the recommended capacity may not work properly.No. 123456789Member registration and log inCurrent time and network statusSwitchover input sourcesCurrent playing video or programmeApplication program sectionInformation release 1Information release 2FavouritesWeather DescriptionHOME ButtonOperation for adding application: Select your favourite application from the ALL APPS interface.Press and Hold OK Button on the needed short cut icon for a second to add it to the column. Operation for deleting application: Press and Hold OK Button on the icon required to be deletedfor a second, the selected one can be deleted.Accessing HOME menuTurning on the TV will automatically enter HOME menu, or you can either pressHOME Button to access the HOME menu.Every time when you enter or return to the HOME page, you will see a “run” keyat the bottom right corner of the current functional area which will disappear after flashing for 5 seconds.Smart TV FunctionFavourites section operation25/10/2012 9:55 Thu168972435910

Smart TV FunctionHot Key operation at HOME pageSmart TV FunctionNetwork ConnectionConnect the TV to a local area network (LAN) via the LAN port as shown in the followingillustration and set up the network settings.If wired and wireless networks are both available, wired is the preferred method.After making a physical connection, a small number of home networks may require theTV network settings to be adjusted.For most home networks, the TV will connect automatically without any adjustments.For detailed information, contact your internet provider or refer to router manual.Remark: Network speed requirement is very important to this TV. Please keep network open, if there are any problems with your network connection please contactyour internet provider or refer to router manual.CAUTIONDo not connect a modular phone cable to the LAN port.Since there are various connection methods, please follow the specifications of yourtelecommunication carrier or internet service provider.Connect to wired network111225/10/2012 9:55 Thu
Smart TV FunctionThe methods of setting up network settings:HOME - > Settings - > Network and location settings - > Ethernet settings1. Automatically connect the Ethernet: Ethernet has been confirmed, mark on Obtain IP address automatically, the TV will automaticallyacquire an IP address to connect to the network.2. IP Manual Settings: Set the IP address manually, input IP address, Subnet mask,Default Gateway. Primary DNS and Secondary DNS, then press Save to connect the network.Connect to wireless networkThe methods of setting up wireless connection:HOME - > Settings - > Network and location settings - > Wi-Fi direct1. Select Wi-Fi, then the system will automatically scan all the AP and wirelessrouters within the scope and then display the device list.2. Select an AP and wireless router and input the password for saving, then the network can be available.3. This TV includes wireless mode and has wi-fi function.Setting up the AP (Access Point) or the wireless router is required before connecting the TV tothe network.The network configuration and connection methodmay vary depending on the equipment in use andthe network environment. Refer to the setup instructions supplied with your access point or wireless router for detailed connection steps and network settings.Smart TV FunctionTips for Network SettingsUse a standard LAN cable with a connector.Many network connection problems during set up can often be fixed by re-setting therouter or modem. After connection to the home network, quickly power offand / or disconnect the power cable of the home network router or cable modem. Thenpower on and / or connect the power cable again.Depending on the internet service provider (ISP), the number of devices that can receive internet service may be limited by the applicable terms of service. For details,contact your ISP.We are not responsible for any malfunction of the TV and / or the internet connectionfeature due to communication errors / malfunctions associated with your broadband internet connection, or other connected equipment.We are not responsible for problems within your internet connection.Some content available through the network connection may not be compatible withthe TV. You may experience undesired results if the network connection speed does not meetthe requirements of the content being accessed.Some internet connection operations may not be possible due to certain restrictions set by the internet service provider (ISP) supplying your broadband internet connection.A 10 Base-T or 100 Base-TX LAN port is required when using a wired connection to this TV. If your internet service does not allow for such a connection, you will not be able to connect the TV.ADSL modem is required to use DSL service and a cable modem is required to use cable modem service. Depending on the access method of and subscriber agreement with your ISP, you may not be able to use the internet connection feature contained in the TV or you may be limited to the number of devices you can connect at the same time.(If your ISP limits sub-scription to one device, this TV may not be allowed to connectwhen a PC is already connected.)The wireless network operates at 2.4GHz radio frequencies that are also used by otherhousehold devices such as cordless telephone, Bluetooth devices, microwave oven,and can be affected by interference from them.Turn off all unused network equipment in your local home network. Some devices maygenerate network traffic.In some instances, placing the wireless router or access point higher up away from thefloor may improve the reception.The reception quality over wireless depends on many factors such as type of the access point, distance between the TV and access point, and the location of the TV.To connect wireless AP, and AP that supports the wireless connection is necessary,and the wireless connection.1314

Smart TV FunctionWi-Fi DirectHOME - > Settings - > Network and location settings - > Wi-Fi directThe connected device must acquire the Wi-Fi Direct certificate. Wi-Fi Direct can at any time realize interconnection without the help of Wi-Fi router and AP.1. Make sure the Wi-Fi Direct is enabled both on TV and the connected device.2. Enable the Wi-Fi Direct at the connected device.3. The devices which are available for TV connection display in the window list.4. Select the device you are willing to connect to the TV then choose YES if connecting request appears.5. If the connected device accepts the request, then the connecting setup has been done.Function of the AP needs to be activated. Please enquire to the AP supplier for thepossibility of AP wireless connections.Please verify the security settings of AP SSID for wireless AP connection, and enquire to the AP supplier for the AP SSID security settings.The TV can become slower or malfunction with wrong settings of network equipments (wired / wireless router, hub, etc).Please install correctly by referring to the manual of the equipment, and set the network.When AP is set it include 802. 11n, and if Encryption is designated as WEP or WPA(TKIP / AES) and WPA2 hardware encryption schemes, the connection may not bepossible. There may be different connection methods according to the AP manufactures.Smart TV FunctionWi-Fi HotspotALL AppsHOME - > Settings - > Network and location settings - > Wi-Fi hotspotFirst, assure TV is connected to wired network. Then to get mobile phone or notebook connected to TV. Specific operations are as follows: 1. Make sure the Wi-Fi hotspot on TV is enabled. 2. Select settings to input the SSID and password. Choose Save to complete the settings. 3. Use mobile phone and notebook to search TV Wi-Fi hotspot, and then input the password. Connection has been completed.Press the NAVIGATION Buttons to scroll to the ALL Apps and press OK, from the displayed window you can operate any of the downloaded apps.Application ManagementPlease insert the SD card before applying this function.Apps Installation:1.Install the apps that you want from the on-line shop.1.1 The procedure for registration on cinavision are as follows: 1.1.1 Click on the login at the top of the HOME page. 1.1.2 Select register and obey the clause. 1.1.3 Input the user name, e-mail and password, then confirm the password. 1.1.4 Registration completed after being confirmed.Note: Should you change the password, the modified password should contain at least 8 characters.1.2 Click on the Login at the top of the HOME page, input e-mail and password to log in to visit the on-line shop. On-line apps can be downloaded through HOME - > Market - > Apps 1.2.1 Choose the application that you need from the list. 1.2.2 Check the related information about the application, select install. 1.2.3 The installed application will display at interface of ALL Apps, click one of them for running. 1.2.4 If there is not enough space on the TV you can download the application nto the SD card for running. 1516Sign InEmailAddressPasswordNot A Member?SignInCancel Forgotyourpassword? RegisterAccess as guestRemembermeRegistering is free, quick and easy. Once registered, you'll have access to the world of Cinavision.If you're a guest and would like to browse through Cinavision, click below.

21Smart TV FunctionWi-Fi DirectHOME - > Settings - > Network and location settings - > Wi-Fi directThe connected device must acquire the Wi-Fi Direct certificate. Wi-Fi Direct can at any time realize interconnection without the help of Wi-Fi router and AP.1. Make sure the Wi-Fi Direct is enabled both on TV and the connected device.2. Enable the Wi-Fi Direct at the connected device.3. The devices which are available for TV connection display in the window list.4. Select the device you are willing to connect to the TV then choose YES if connecting request appears.5. If the connected device accepts the request, then the connecting setup has been done.Function of the AP needs to be activated. Please enquire to the AP supplier for thepossibility of AP wireless connections.Please verify the security settings of AP SSID for wireless AP connection, and enquire to the AP supplier for the AP SSID security settings.The TV can become slower or malfunction with wrong settings of network equipments (wired / wireless router, hub, etc).Please install correctly by referring to the manual of the equipment, and set the network.When AP is set it include 802. 11n, and if Encryption is designated as WEP or WPA(TKIP / AES) and WPA2 hardware encryption schemes, the connection may not bepossible. There may be different connection methods according to the AP manufactures.22Smart TV FunctionWi-Fi HotspotALL AppsHOME - > Settings - > Network and location settings - > Wi-Fi hotspotFirst, assure TV is connected to wired network. Then to get mobile phone or notebook connected to TV. Specific operations are as follows: 1. Make sure the Wi-Fi hotspot on TV is enabled. 2. Select settings to input the SSID and password. Choose Save to complete the settings. 3. Use mobile phone and notebook to search TV Wi-Fi hotspot, and then input the password. Connection has been completed.Press the NAVIGATION Buttons to scroll to the ALL Apps and press OK, from the displayed window you can operate any of the downloaded apps.Application ManagementPlease insert the SD card before applying this function.Apps Installation:1.Install the apps that you want from the on-line shop.1.1 The procedure for registration on cinavision are as follows: 1.1.1 Click on the login at the top of the HOME page. 1.1.2 Select register and obey the clause. 1.1.3 Input the user name, e-mail and password, then confirm the password. 1.1.4 Registration completed after being confirmed.Note: Should you change the password, the modified password should contain at least 8 characters.1.2 Click on the Login at the top of the HOME page, input e-mail and password to log in to visit the on-line shop. On-line apps can be downloaded through HOME - > Market - > Apps 1.2.1 Choose the application that you need from the list. 1.2.2 Check the related information about the application, select install. 1.2.3 The installed application will display at interface of ALL Apps, click one of them for running. 1.2.4 If there is not enough space on the TV you can download the application nto the SD card for running. Smart TV FunctionApplication Uninstall / MoveEnvironment Selection1. Find the application that you want to uninstall or move through the method ofHOME - > Settings - > Application management - >All applicationsSystem provided application can not be uninstalled.2. Open the application, then select Uninstall / Move.To use this TV for in-store demonstration,select (Demo).Initial setup window will appear when you first start to use , choose the setting mode you want. You can either choose to select HOME USE or DEMO.HOME USE: To use this TV at home without demonstrating any advertisements.Smart TV FunctionMENUButtonTo enter File Explorer interface by HOME - > All Apps - > File Explorer1. Click on the Menu Icon at the top right of the screen or MENU Button on the Remote Control to display theedit menu; then continue with the related operation. File ExplorerOK Button2. Select a file, then press and hold “OK” Button for 2 seconds to have related operation on the selected file. Menu IconHOME Button25/10/2012 9:55 ThuNote: When DEMO Mode is executed, please first press EXIT Button to exit then follow the above operation by going to Settings then enter Environment selection for closing.2. Install the apps that are according with your own requirement, you need to open the “Browser” icon in the homepage and then the procedures are as follows: 2.1 Click the icon on the top right corner of the displayed page. 2.2 Press / to select the “Setting”, and press OK button to confirm. 2.3 Press / to select “Advanced” in the displayed window, and press OK button to confirm. 2.4 Press / to select “Set User Agent” in the displayed window, and then select “Desktop useragent”, press OK to confirm. (The default item in this option is “ipad useragent” which can make the displaying picture show in the appropriate resolution, so after the new setting, you can restore this option to the default to get the good vision.)After completing the above operation, you can download and install the needed applications via browser.Set User AgentDesktop useragentipad useragentandroid 4.0.2 useragentle9 useragent
Cancel
Note: since the operation system of our smart TV adopts the Android 4.2, the applications that the user want to install should be supported by the TV operation system.DEMO: To use this TV for in-stone demonstration with digital adverts. (Please do not select this mode when using at home.)Users can switch between these two modes by following the below method. Press HOMEButton to enter the HOME menu, click on Settings will pop up to System settings, go toEnvironment selection from the displayed window, you can cycle through the two differentmode by pressing Up and Down Button, then press OK Button to confirm.
Home
http://www.cinavision.com/tv/navigation/?client=android-google&source=android-home+
+
TMTMWORLDWORLD
Home
http://www.cinavision.com/tv/navigation/?client=android-google&source=android-home+
+
TMTMRefreshForwardNew tabNew incognito tabFind on pageSave for offline readingPage infoDownloading listSettings
WORLD
WORLD
1718

Smart TV FunctionBrowserAdd the BookmarkClick on the (Star Icon) at the top right of the page to display a page, from which you can add bookmarks, view visited history.Media:This function can allow you to view the shared media from the memory storage.Note: Before operating Media function, plug in USB device.HOME - > MediaPress Navigation Button to view the shared media in the category.To open Browser click on HOME - > BrowserWebsite can be entered by( keyboard on the TV screen / external keyboard), you can view the website on the TV.LabelAddressAccountAdd toCancelOKGooglehttp://www.google.co.in/LocalBookmarksBookmark this pageSmart TV FunctionPress OK Button to play or Exit to exit13579246810No. 12345678910Skip to the previous picture.Click it to play or pause playback.Skip to the next picture.Zoom in the picture.Zoom out the picture.Right rotation.Left rotation.Display the information of the picture.Set the picture as a wallpaper.Set the animation effect and interval time of playing the picture.DescriptionOK Button1920NavigationButton
Smart TV FunctionMusic PlaybackEnter this function by HOME - > Media, then select your favourite song for playing.Press OK to play the music and Exit to exit playback.OK Button268379145No. Description123456Stop video playback.Play the previous video.Fast rewind playback.Playback or pause.Fast forward playback.Play the next one.789Press to switch among single playback/random playback/cycle playback.Display all the songs added to the play list.Display the information of the current playing song.Smart TV FunctionVideo PlaybackEnter this function by HOME - > Media, then select your favourite video for playing.Press OK to play the video or Exit to exit.135791124681012No. 123456789101112Stop video playback.Skip to the previous video.Fast rewind playback.Playback or pause.Fast forward playback.Skip to the next video.Time setting : Display the time progress of the current video playback, or setthe video cut-in time.Display all the videos.Display the information of the current video playback.Playback setting including subtitle, breakpoint and audio track setting.A-B cycle playback.Zoom in or zoom out of the video picture.DescriptionOK Button2122
Smart TV FunctionSystem UpdateIn order to enhance the network quality of the TV, regularly update the software from official website.Auto network updating1. Click on Download to download the software, itmay take some time for file downloading. Pleasefollow the instructions as the TV indicates.2. After you have finished software downloading,click on update now, a reminder will pop up and if you are to save the downloadedAPK applications or user info, please select NO.3. It may need some time for program installation,please follow the instructions indicated on the TV.4. When the update is completed, the TV willautomatically restart in 5 seconds.Turning on the TV will automatically detect the software package, you can click on Download to download the new software, or click the EXIT Button on the Remote Control to exit the network update.EXIT ButtonManual Network updateLocal UpdateOSD Menu Operation (Before operating OSD menu, Please switch to full screen Auto Tuning1. Auto Tuning will be highlighted upon displaying this menu. Press OK Button to enter.2. Press / to select country, press OK Button to enter the next step.3. Use / button to select your location, then press OK button to enter the next step.4. Press Up and Down to select tuning type. Press OK to start auto search. playback by pressing HOME Button on the Remote Control).OSD menu can only be operated by using remote control.Press MENU Button to enter the main menu, use Left and Right Button to select CHANNEL. 1. Users need to download the related new software from our official website.2. Copy the software update to the USB device,and named after update signed. zip
3. HOME - > Settings - > System update or restore Factory Settings - > System Update - >
Local Update to enter the interface of local update, click on Update immediatelyto start local update.HOME - > Settings - > System update or restore Factory Settings - > System update - > Network Update to enter the interface of network update, then follow the steps ofauto network updating as above.OK Button AustraliaReturnReturnConfirmConfirm
2324OSD Menu OperationDTV+Radio+ATVDTV+RadioATVHOME ButtonMENUButtonOK ButtonEPGProgram EditATV Manual TuningDTV Manual TuningAuto Tuning
OSD Menu OperationATV Manual TuningProgram EditPress Up and Down to select Channel Edit, then press OK Button to enter sub-menu.1. Press Green Button to rename the current channel. (only available in ATV)2. Press Yellow Button to change the program order.Selected channel can be moved by using Up and Down, then press OK for confirm.3. Press Blue Button to skip the selected channel.4. Press Red Button to delete the selected channel.Program Edit901DeleteRenameMoveSkipC-00ATVSelectConfirmReturnExitOK
Press Up and Down Button to highlight ATV Manual Tuning, then press OK to entersub-menu.1. Analog Scan : Press “OK” and then adjust Analog Scan by pressing Left and Right Button.2. Sound System : Press Left and Right Button to change (left/right/up/down) it into BG, DK or I mode.3. Search : Press Left and Right Button to set the Frequency and stop it by pressing OK, Left and Right Button.4. Frequency : Display the adjusted frequency channel.5. Fine Tune : Press Left or Right Button to make minor modulation and stop it by pressing OK, Left and Right Button.Picture MenuPress MENU Button to bring up the main menu, then press Left and Right to select thePICTURE MENU.1. Picture Mode:Press Left and Right to adjust the mode colour by Standard. Dynamic, User, Mild. Contrast, Brightness, Sharpness, Saturation can be adjusted only under User mode, press MENU to return to the main menu. 2. Noise Reduction:Press OK Button to adjust among Strong, Weak, Middle and Off.3. Color Temp:Press Left and Right Button to select Cool, Standard, Warm and User. You can adjust R Gain, G Gain, and B Gain in User mode.5. Aspect Mode:Press Up and Down to choose Aspect Mode, press OK to confirm. Press Left and Right to select Full, 4:3 or Auto. 4. Energy Saving:Press Left and Right Button to select Standard or High.8. Color Space (available under PC):Press Left and Right Button to select RGB Limited or RGB Full.7. Screen Mode (available under VGA or HDMI)Press Up and Down to choose Screen Mode, press OK to confirm. Press Left and Right to select PC/Video.6. PC Settings (available under VGA or HDMI)Press Up and Down to select PC Settings, press OK to enter the sub-menu, you can also choose auto adjust to adjust the picture to full screen, or you can select clock,phase, horizontal position, vertical position for adjusting.2526OSD Menu OperationPress Up and Down to select EPG, or press EPG Button on the remote control. Channel list, program information and progress list can be carried out. The picture shows as below.EPG 1210111221222324Confirm
MENUButtonRed ButtonGreen ButtonBlue ButtonYellow ButtonOK ButtonMENUButtonNavigation ButtonPicture Mode StandardNoise Reduction MiddleColor Temp UserEnergy Saving Standard Aspect Mode Full

Sound MenuPress MENU Button to display the main menu.Press Left and Right to enter the SOUND page, it will highlight the first option, then press OK Button to enter the sub-menu.1. Sound Mode:Press OK and then press Left and Right to adjust Sound Mode. You can change the value of Treble and Bass under user mode.2. Balance:Press Up and Down to select Balance, then press OK Button to enter sub-menu,press Left and Right adjust.3. Auto Volume (AVC):Press Up and Down to select Auto Volume, then press OK and Left and Right to select On or Off.4. SPDIF Output:Press Up and Down to select SPDIF Mode, then press OK and Left and Right Button to select PCM, Off or Bitstream.5. Power On Music:Press Left and Right Button to set On or Off.Option MenuPress MENU Button to display the main menu.Press Left and Right to enter OPTION page, it will highlight the first option.1. OSD Time Out:Press OK and then press Left and Right Button to set the OSD Time Out.6. Restore Default:Operate this item to resume all the initial settings.Time MenuPress MENU Button to display the main menu.Use Left and Right to enter TIME page, it will highlight the first option.1. Current Time:Can not be selected, but it can automatically obtain the network time.2. Off Time:Press Up and Down to select Off Time, then press OK Button to enter the sub-menu,press OK and adjust it into On or Off.3. On Time:Press Up and Down to select On Time, then press OK Button to enter the sub-menu,press OK to proceed with the On and Off time settings.4. Sleep Timer:Press Up and Down Button to select Sleep Timer, then press OK to confirm, pressLeft and Right to adjust.5. Time Zone:You can choose different location by operating this item.2. PVR Settings: Press OK button to display the related functions included in this item.3. MFC: Press Up and Down Button to select MFC, then press OK Button to enter thesub-menu, then press Left and Right Button to select the mode among High, Off, Low or Middle.2728OSD Menu OperationOSD Menu Operation4. Audio: It is the same with Audio Button on the remote control. When press this button or select this item, you can select sound output mode. It is the same with Subtitle Button on the remote control. When press this button or select this item, there displays your preferred subtitle in DTV mode.5. Subtitle:PVR SettingsMFC AudioSubtitleRestore DefaultOSD Time Out OffOK ButtonMENUButtonNavigation ButtonOK ButtonMENUButtonNavigation ButtonOK ButtonMENUButton
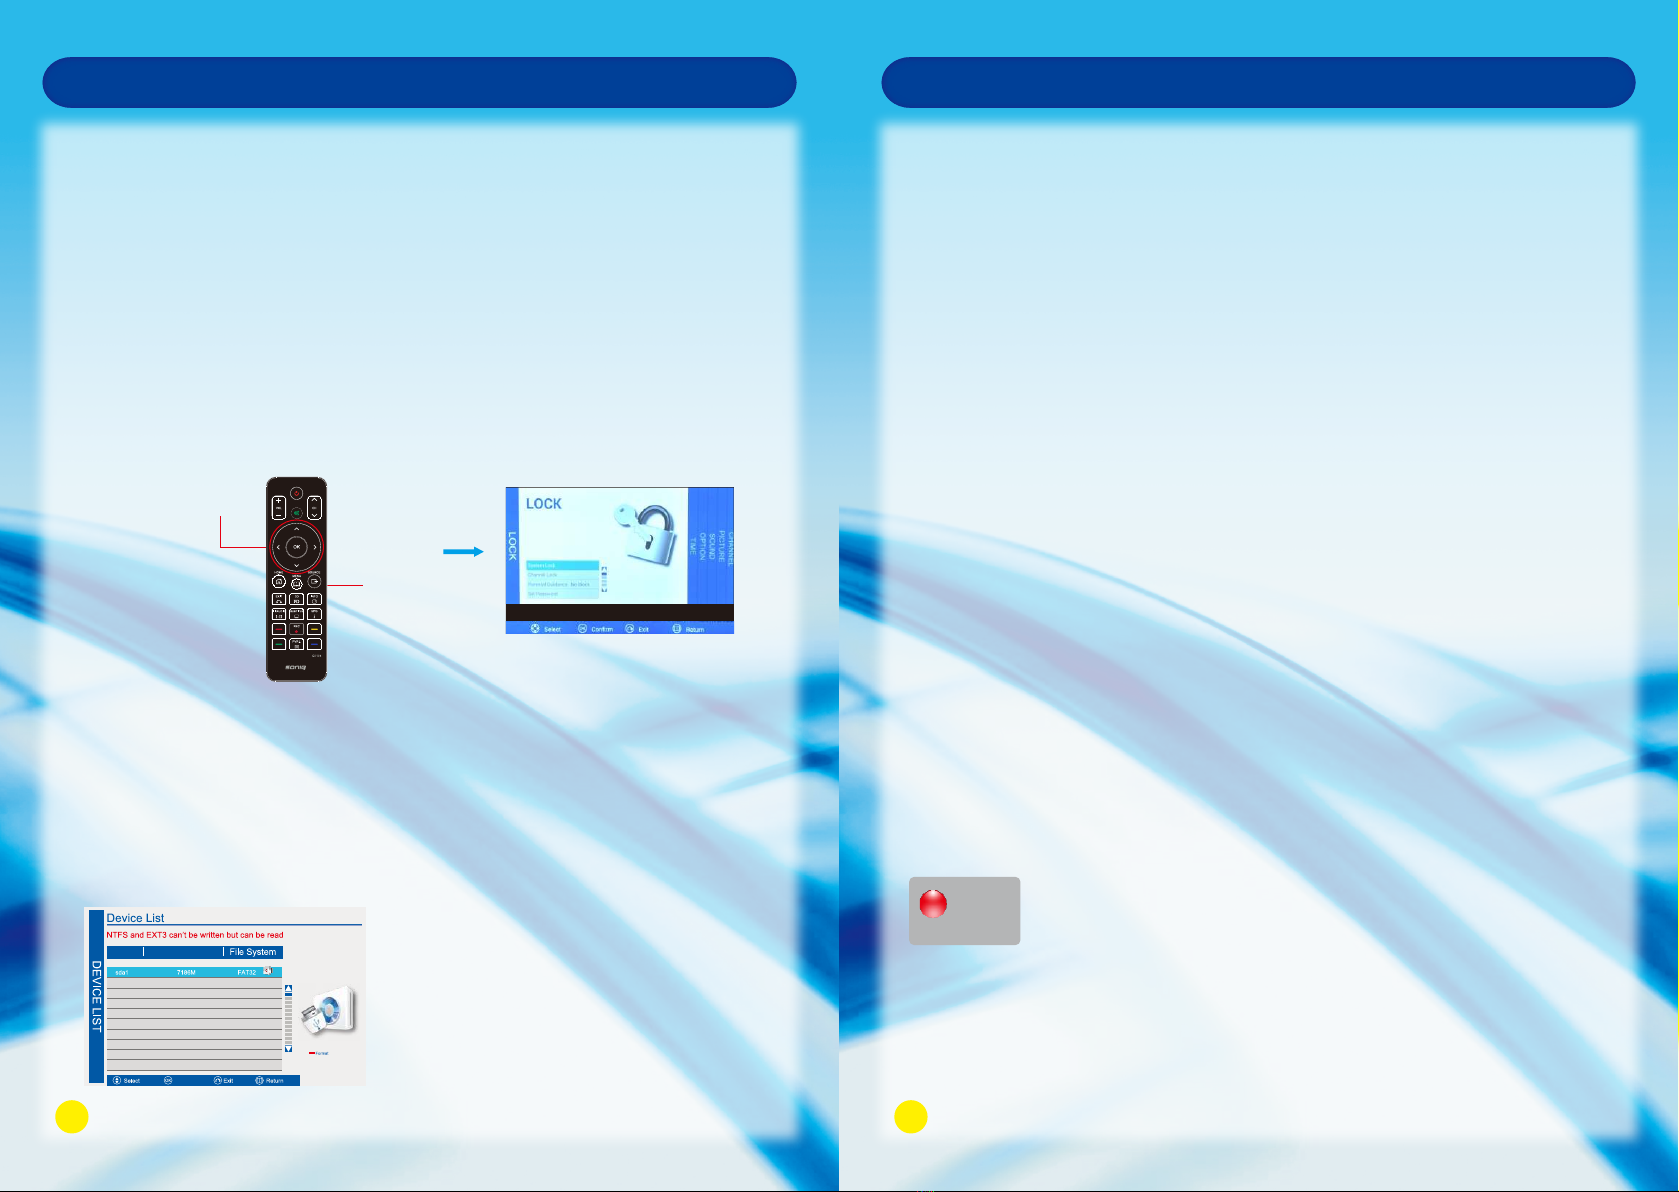
Press MENU Button to bring up the OSD menu.Use Left and Right to turn to LOCK page (this function is only available under TV mode),it will highlight the first option, then you are required to input the password (default as0000).1. System Lock:Press OK to select On or Off.2. Channel Lock:Press Up and Down to select Channel Lock, then press OK to enter the sub-menu, press Up and Down to select the program that you want to lock, then press OK to confirm.3. Parental Guidance:Parent can set age limit level by this function.Lock Menu4. Set Password:Press Up and Down to select Set Password, press OK Button to enter the sub-menuto set the new password.PVR FunctionPVR Settings(This feature is only available under DTV mode.)Please plug in the USB device before executing recording function and as well do the following settings to save the file recording.1. MENU->OPTION MENU->PVR SETTINGS->DEVICE LIST2. Select a USB storage device formatted as FAT, press OK to confirm.3. If a USB storage device formatted as a different format, press the red button on the remote to format as FAT, recording can be carried out by this time. EXFAT is not supported by the system, format of NTFS is just available for reading, and can not be applied for recording.Device Available SpaceConfirmOSD Menu OperationPrecautions when using the USB device1. Please do not turn off the TV or unplug the USB device when the connected USB storage device is working. When such device is suddenly separated or unplugged, the stored files or the USB storage device may be damaged.2. Please use only USB storage devices that are formatted as a FAT32 file system , otherwise it may not be recognized.3. Every USB only supplies 500mA electric current, if the user’s device requirement is over the specification, users need to choose to connect to the external power supply, otherwise the device may not be recognized.4. If the USB HDD does not have an external power supply, the USB device may not be detected. So be sure to connect the external power supply.5. The recommended capacity is 2TB or less for a USB external hard disk and 32GB or less for USB flash memory.6. The recognition speed of a USB storage device may depend on each device.7. Please connect a USB storage device with the cable offered by the device maker.8. Be sure to back up important files since data stored in a USB memory device may be damaged We will not be responsible for any data loss.9. If your USB memory device has multiple partitions, or if you use a USB multi-card reader, you can use up to 4 partitions or USB memory devices.10. If the USB memory device does not work properly, disconnect and reconnect it. How fast a USB memory device is detected differs from device to device.11. If the USB is connected in Standby Mode, specific hard disk will automatically be loaded when the TV is turned on.12. Any device with more than the recommended capacity may not work properly.In-Time RecordYou can record the program you are watching. Press REC on the remote to start the recording. Recording icon and recording time will be displayed at the right bottom of the Screen.Recording00:00:192930OSD Menu OperationOK ButtonMENUButton
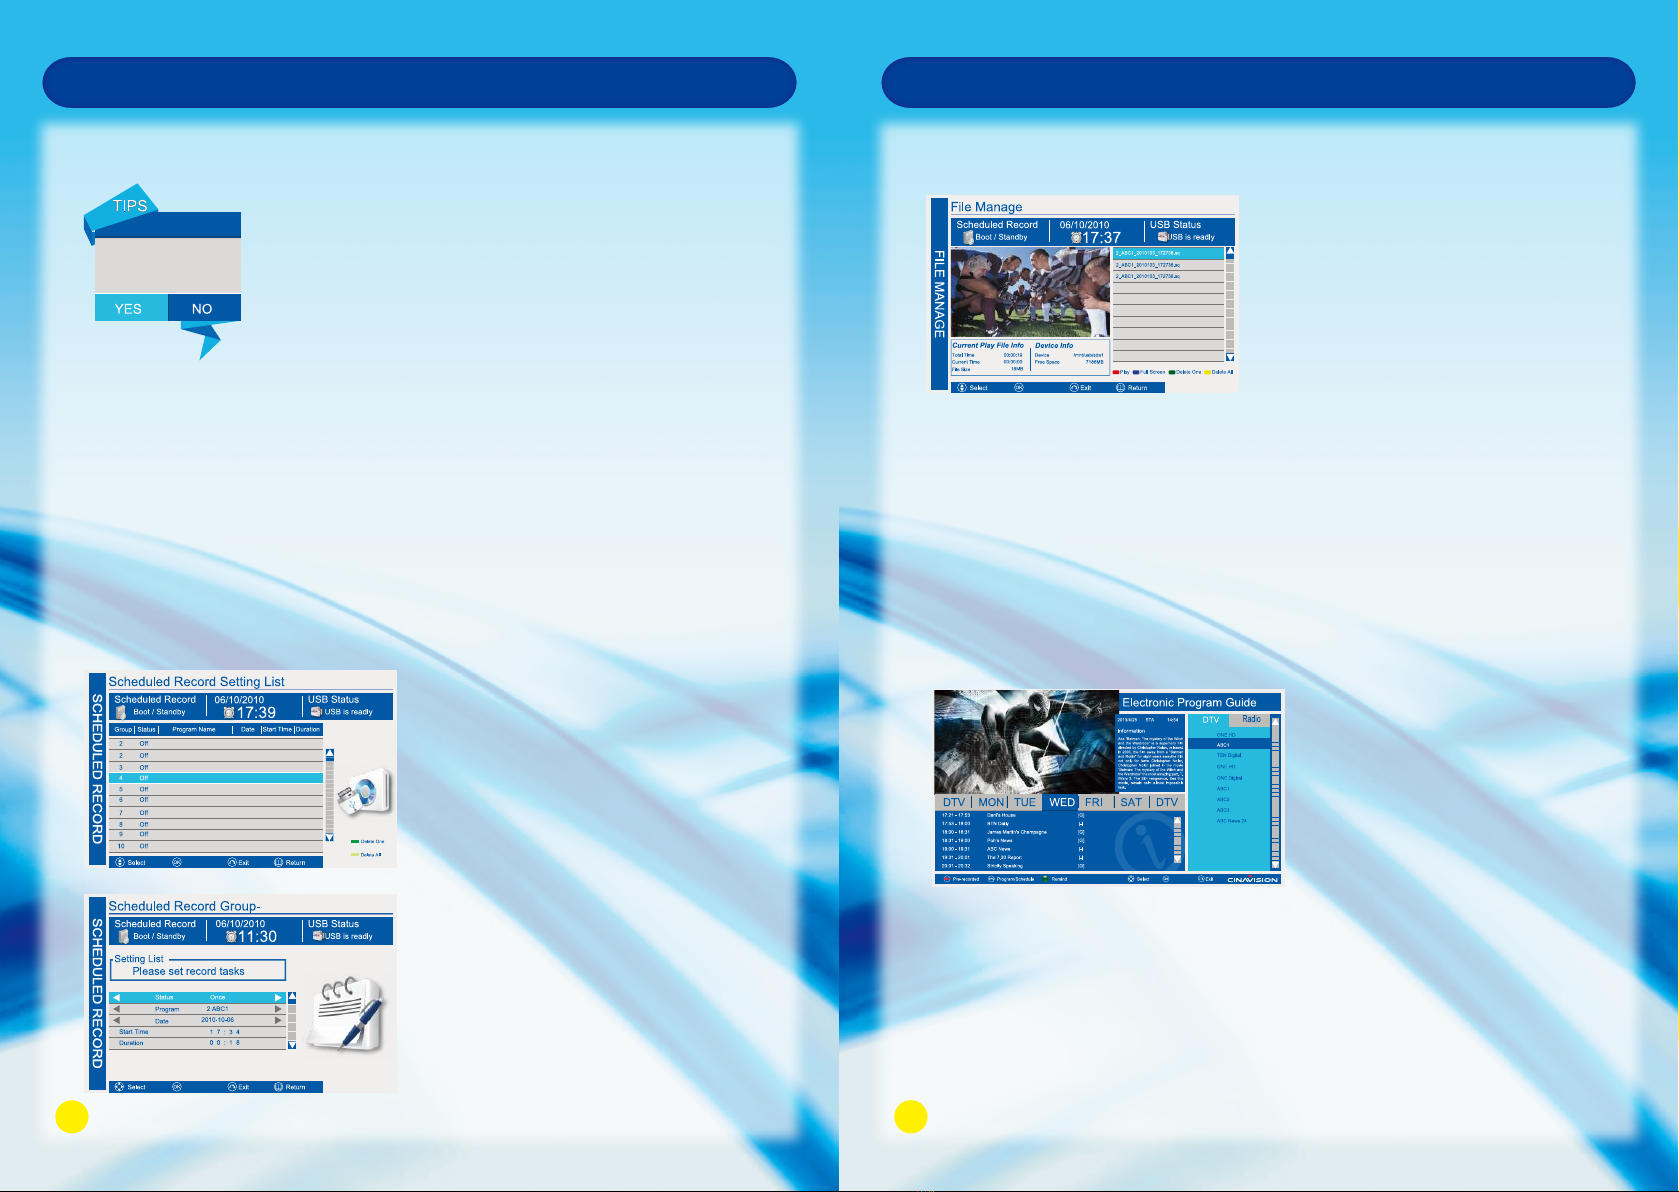
OSD Menu OperationStop Record1. Press STOP button to stop the recording.2. Press Navigation buttons to scroll to Yes,and press OK button.Pre-record1. Press EPG on the remote to open the program guide, select the program that you want to record, then long press REC for three seconds to add the program to Pre-record list.2. Press the Green Button on the Remote Control to delete the selected recording group, yellow button to delete all the recording group.3. You can also enter PVR settings by the method of :MENU->OPTION MENU->PVR SETTING- >SCHEDULED RECORD SETTING LIST. Select a blank recording group, then press OK to enter the setting list to set the recording task.Are you sure to stop therecording?2ConfirmConfirmOSD Menu OperationPlay the recorded program1. MENU->OPTION MENU->PVR SETTINGS->FILE MANAGER 2. Select the recorded program that you want to play, press OK button or red button to play the program at the left window. Press Glue Button to play in full screen, press it again to exit the full screen playback. Press Green Button to delete the selected recorded program. Press Yellow Button to delete all the recorded programs.3. The current program and device information will be displayed underneath the played program.EPGPress EPG to show the EPG list.Channel list ,program information and progress list can be carried out by operating this function.The EPG displays the program details for next 7 days, you can choose the program that you want to have pre-record, press REC to have program pre-record.
r
R
Confirm1210111221222324Confirm
3132

Troubleshooting TroubleshootingBefore calling a service center, attempt the following steps to diagnose the problem.TV unit.ProblemSuggested ActionThere is no power.There is no picture or sound.There are spots on the screen.Degraded colors or tints.Improper Screen position or size.The image appears distorted.The image appears too bright,and there is a loss of definitionin the brightest areas of the image.The image apperas too washedout, or the darkest areas of theimage appear too bright.There is no picture or sound, just noise.No sound.Picture is not clear.Remote Control does not function properly.
Ensure the power plug is securely inserted into the unit and wall outlet.Try a different input source to check whether the source is at fault.Check for mis-connection of cables or for wrong input source.Your unit is being affected by interference from automobiles, trains,high-voltage transmission lines, neon signs or another sources of interference.Try redirecting or relocating your antenna to reduce the affects of theinterference.Check whether all the picture adjustments have been properly performed.Try selecting a different aspect ratio by pressing the <ASPECT> Buttonon the remote control.Ensure the display aspect ratio is corredctly set to suit the program source.Reduce the contrast settings.The AV video signal has not been terminated properly somewhere in the external AV equipment.Reduce the brightness level till the black areas of the picture appear as black.Make sure the antenna cable is properly connected.Change channels to confirm if the symptom is still present.Check whether you have selected the Mute function.Make sure the volume is not set to minimum.Check the AV cables for disconnection.Make sure the antenna cable is properly connected.Change channels to confirm if the symptom is still present.If PC (VGA) is selected as the input signal source, use the Auto Sync Function in the Set Up Menu (In VGA Mode) to let the display adjust pictureautomatically.Check for incorrect battery orientation.Check for dead batteries.Check your distance and angle from display.Check whether remote control is pointing at sensor window;Check for any obstacle between the Remote Control and Remote Control sensor.Check that the Remote Control sensor window is not under strong fluorescentlighting.Check for any devices (PC or personal digital assistant, PDA) nearby thattransmit infrared signal which may cause interference to signal transmission between the Remote Control and the unit.Turn off the infrared function of these devices.
TroubleshootingThe picture is notsharp.The picture is doubledor tripled.The picture is spottedThere are stripes on the screen or colors fade.The reception may be weak.Change channels to confirm if the symptom is still present.Make sure the outside antenna is not disconnected.Make sure the antenna is facing the right direction.Make sure the antenna is facing the right direction.Picture ghosting is caused by reflections from buildings, large metal structures and mountains. Carefully realign your antenna to minimize the ghost images. Ultimately ahigher quality antenna professionally installed may be necessary to reduce the ghosting.There may be interference from automobiles, trains, high voltage lines, neon lights, etc.There may be interference between the antenna cable and power cable, try positioningthem further apart.Is the television receiving interference form other devices? Transmission antennas of radio broadcasting stations and transmission antennas of amateur radios and cellularphones may also cause interference.Use the television as far away as possible from devices that may cause possible interference.AntennaProblemSuggested Action3334
Table of contents
Other SONIQ LED TV manuals

SONIQ
SONIQ E40S12A-AU User manual

SONIQ
SONIQ E32W13B-AU User manual

SONIQ
SONIQ E32W13A-AU User manual

SONIQ
SONIQ W Series User manual

SONIQ
SONIQ S55UV16B-AU User manual

SONIQ
SONIQ E48W13A-AU User manual

SONIQ
SONIQ S49VT15A User manual

SONIQ
SONIQ E43V15C-AU User manual

SONIQ
SONIQ S65UX16A-AU User manual

SONIQ
SONIQ S55UV16A-AU User manual


