SONIQ W Series User manual
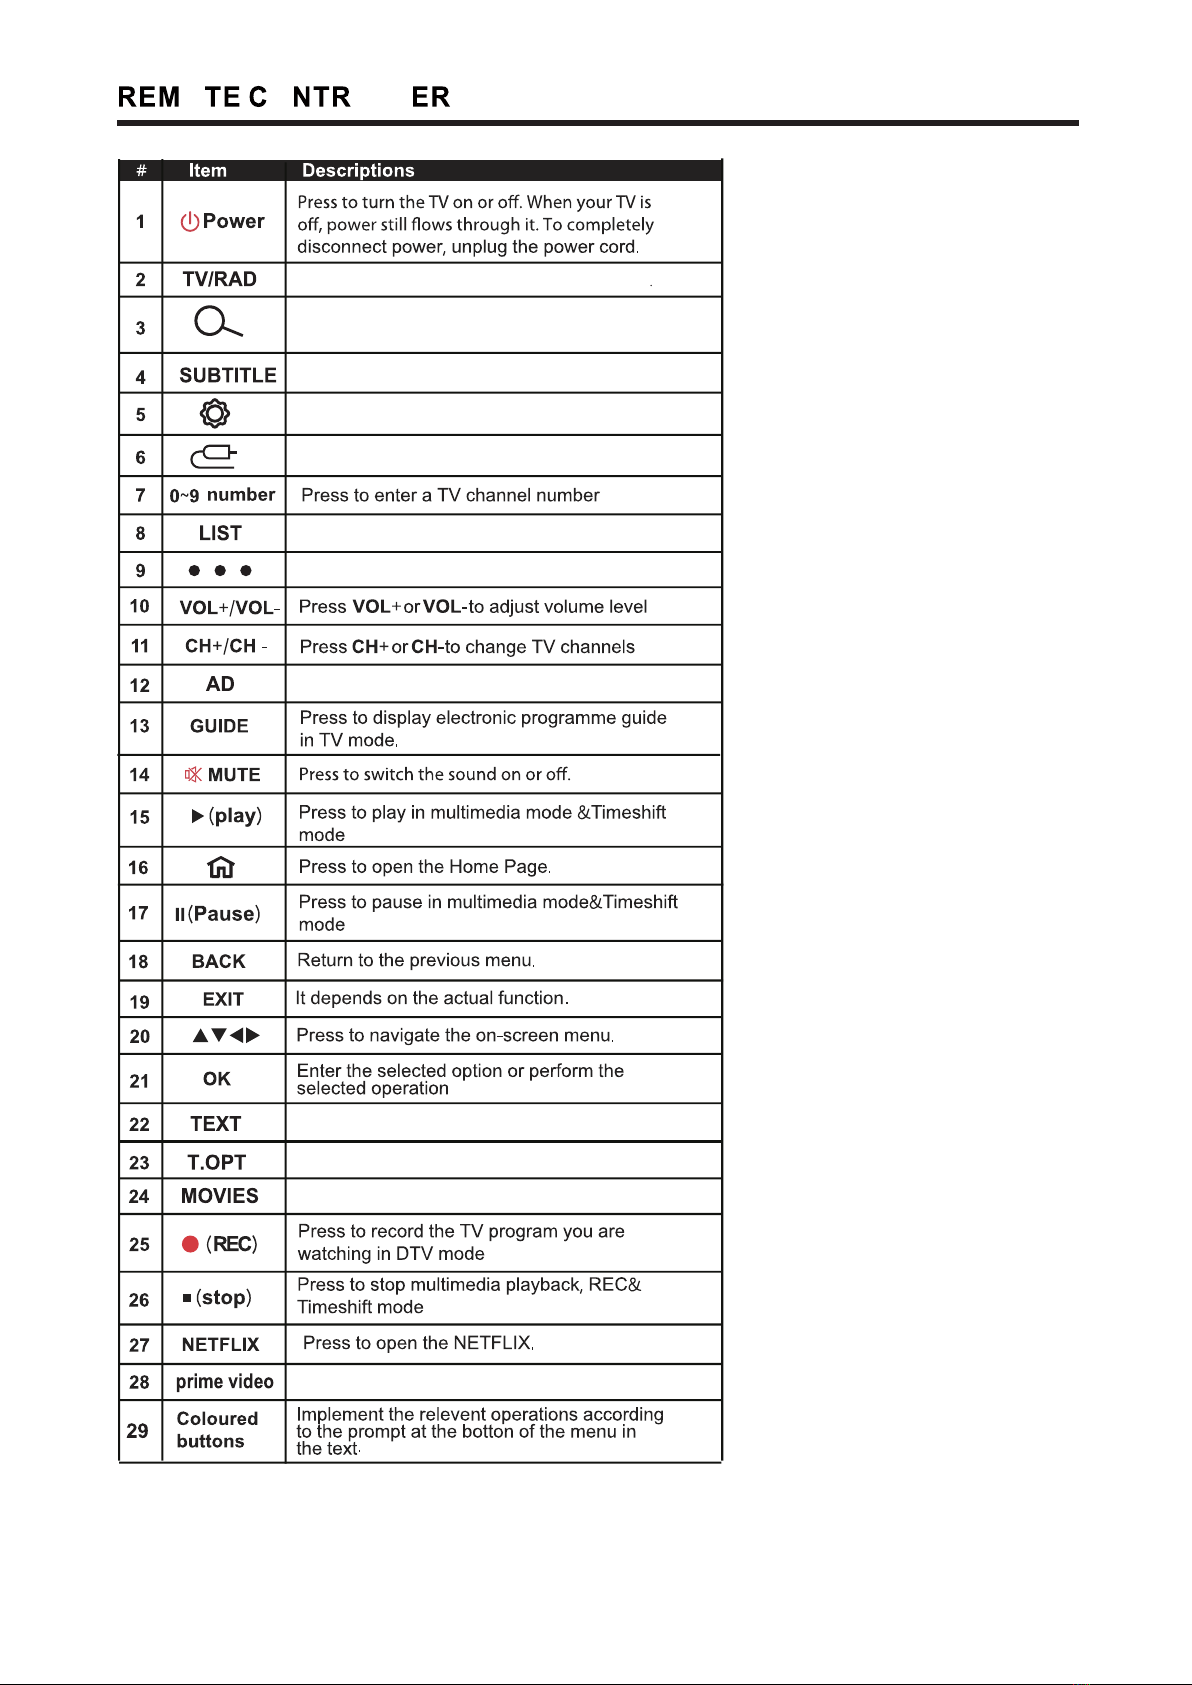
65’’ UltraHD SMART LED TV


-1-
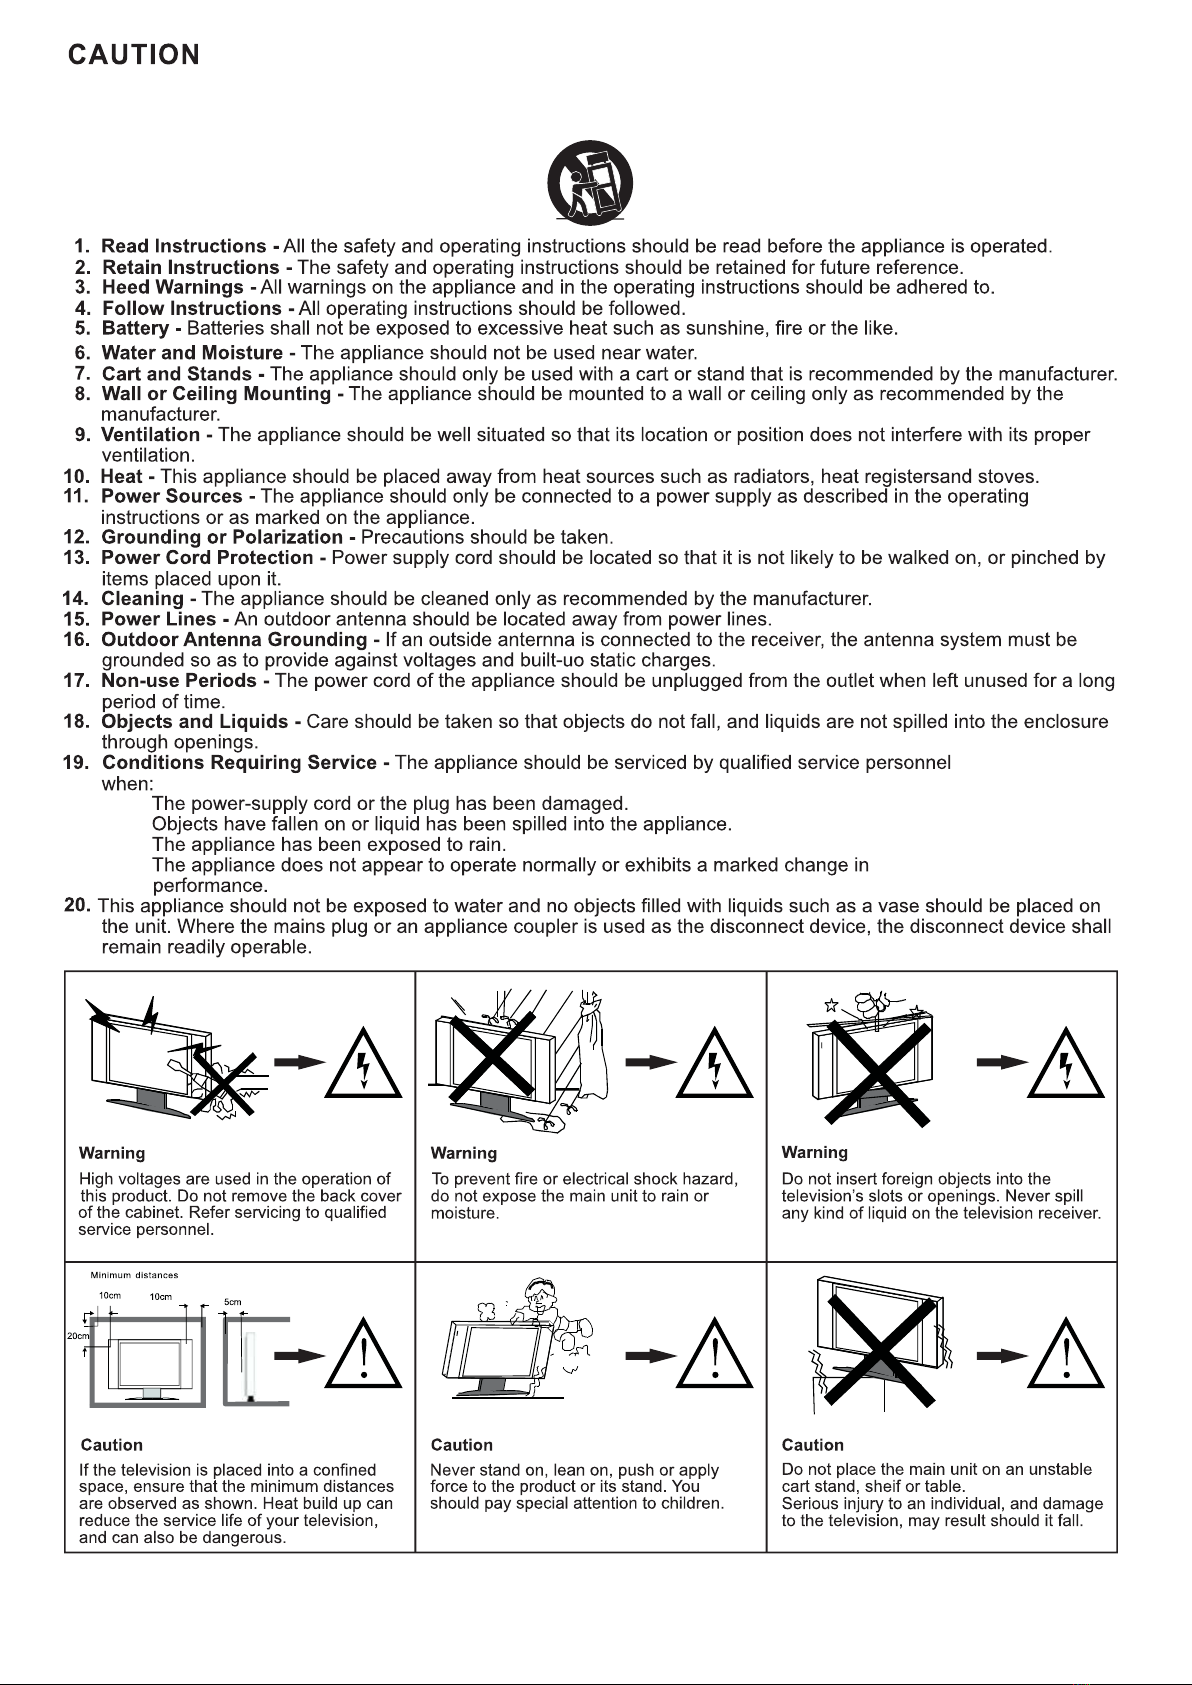
CAUTION ............................... ........................ ........... ............ ........ 2
........................................................................................ 5
CONTROL BUTTON ....................................................................................... 6
TERMINAL .................................................................................................... 7
......... .......................................................................8
SIMPLE TROUBLESHOOTING ......................................................................... 19
............ . .. .
STAND ASSEMBLY
.......... . .... .................................................................................. 4
ACCESSORY
REMOTE CONTROLLER
...... .... ... ... .......................................................................11MENU OPERATION
...... .... ... . .... ... ... .......................................................................10
INITIAL SETUP
...... .... .... ... ... .......................................................................18
SPECIFICATIONS
-2-
-3-
-4 -
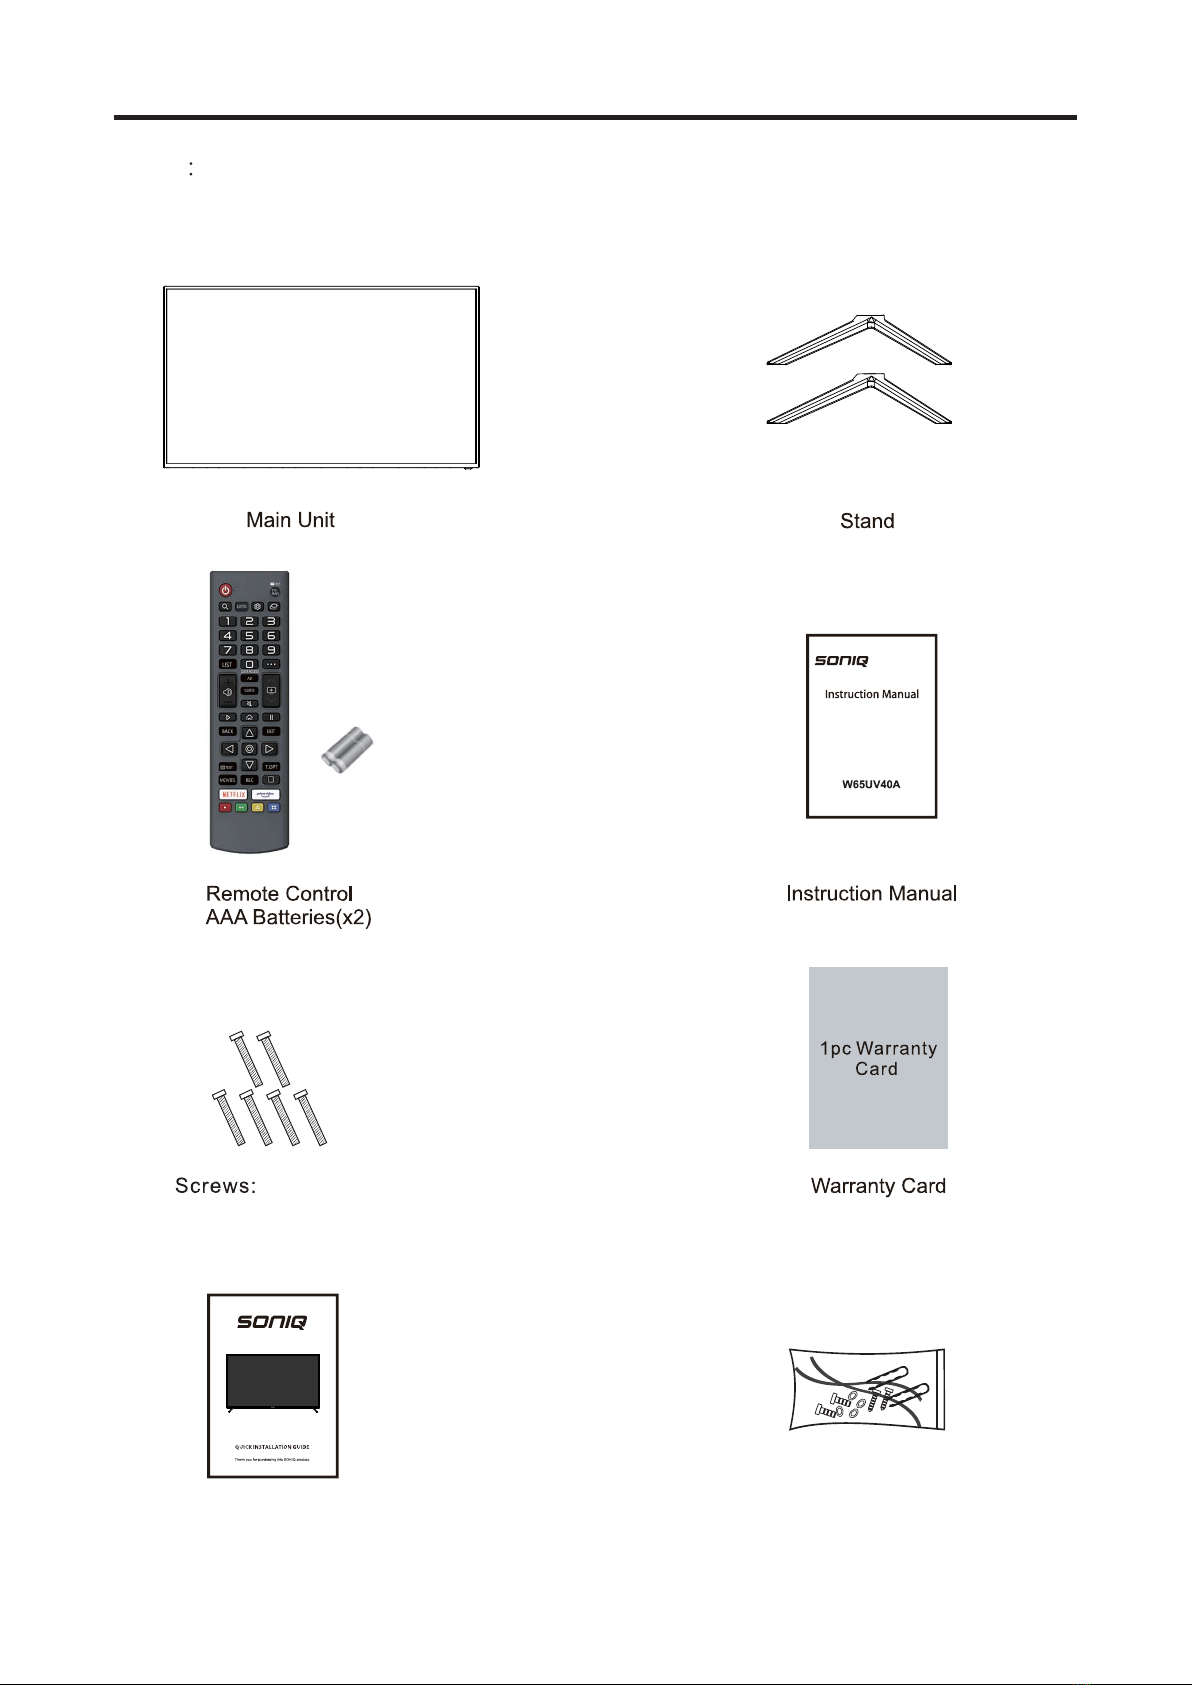
ACCESSORY
There are these accessories in the carton, the style will be different according to the
product model.
Note
Quick installation manual
BM4*20 (X6)
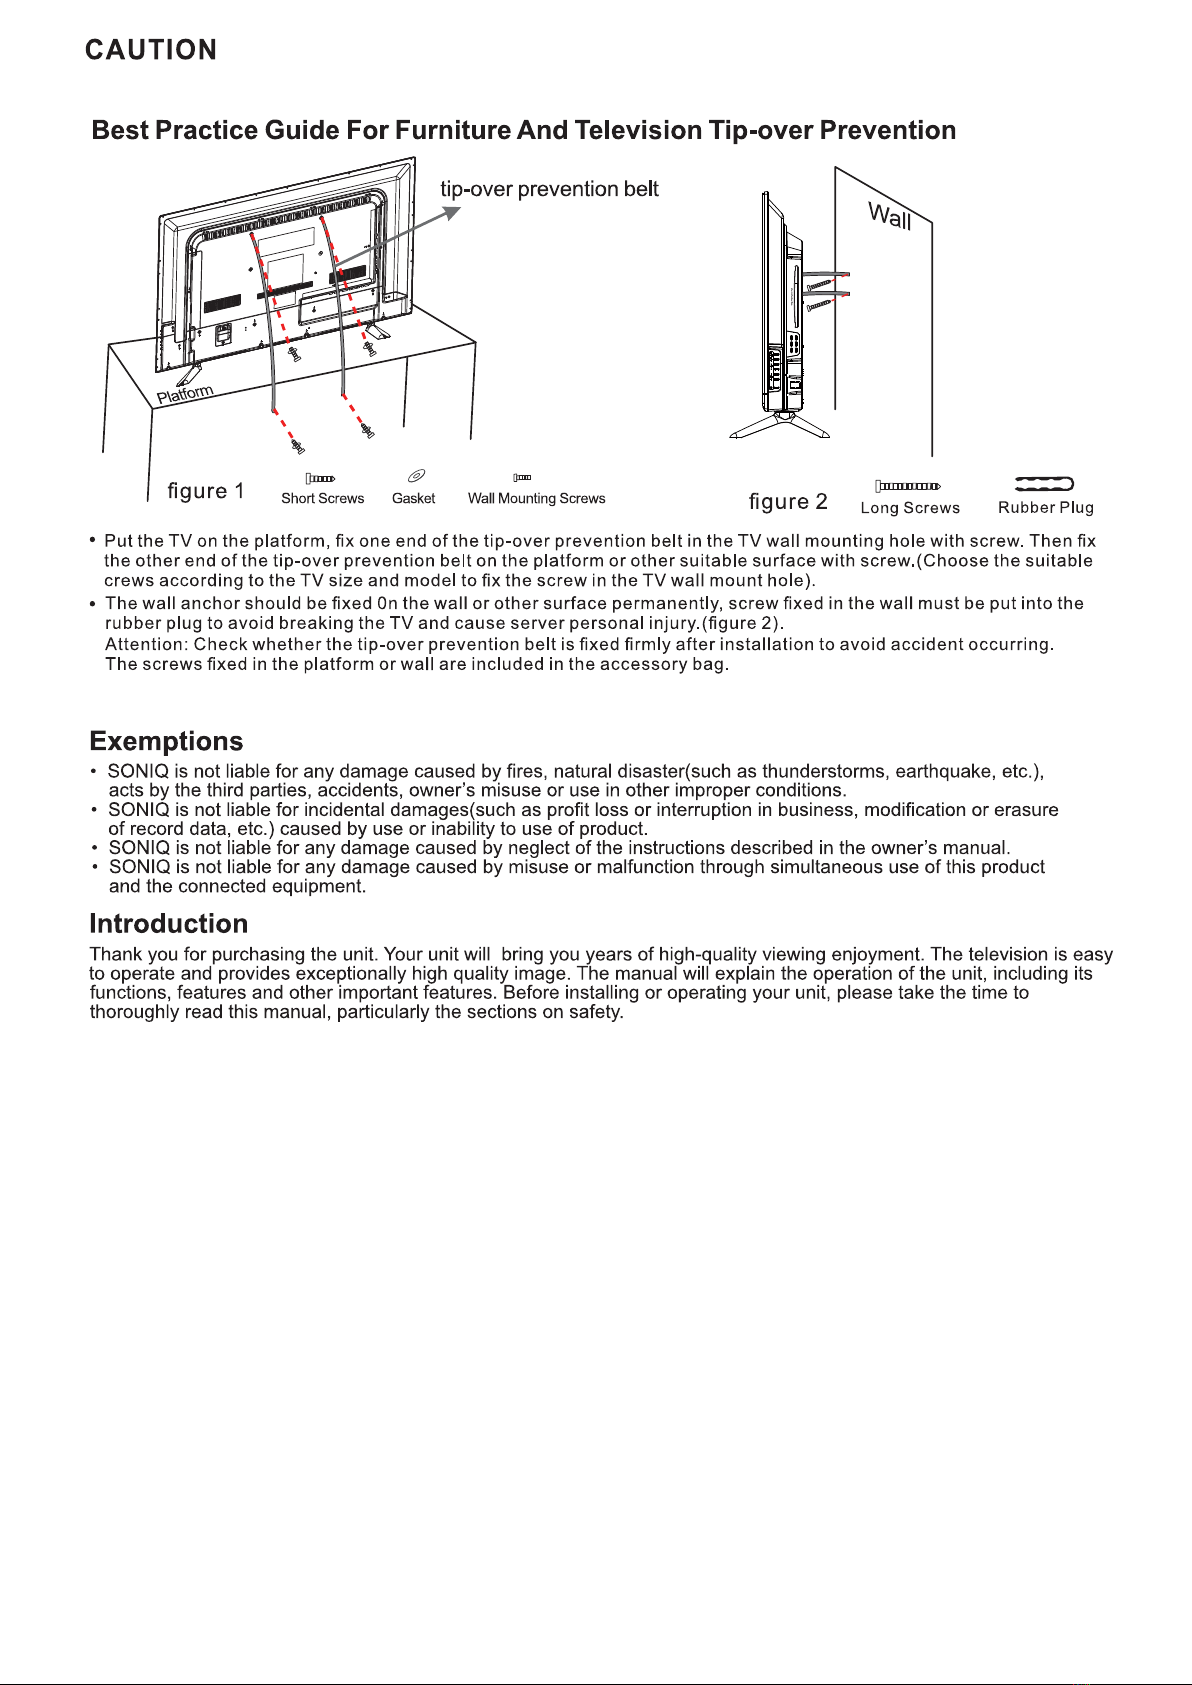
Tipping prevention materials
QT WEE
-5-
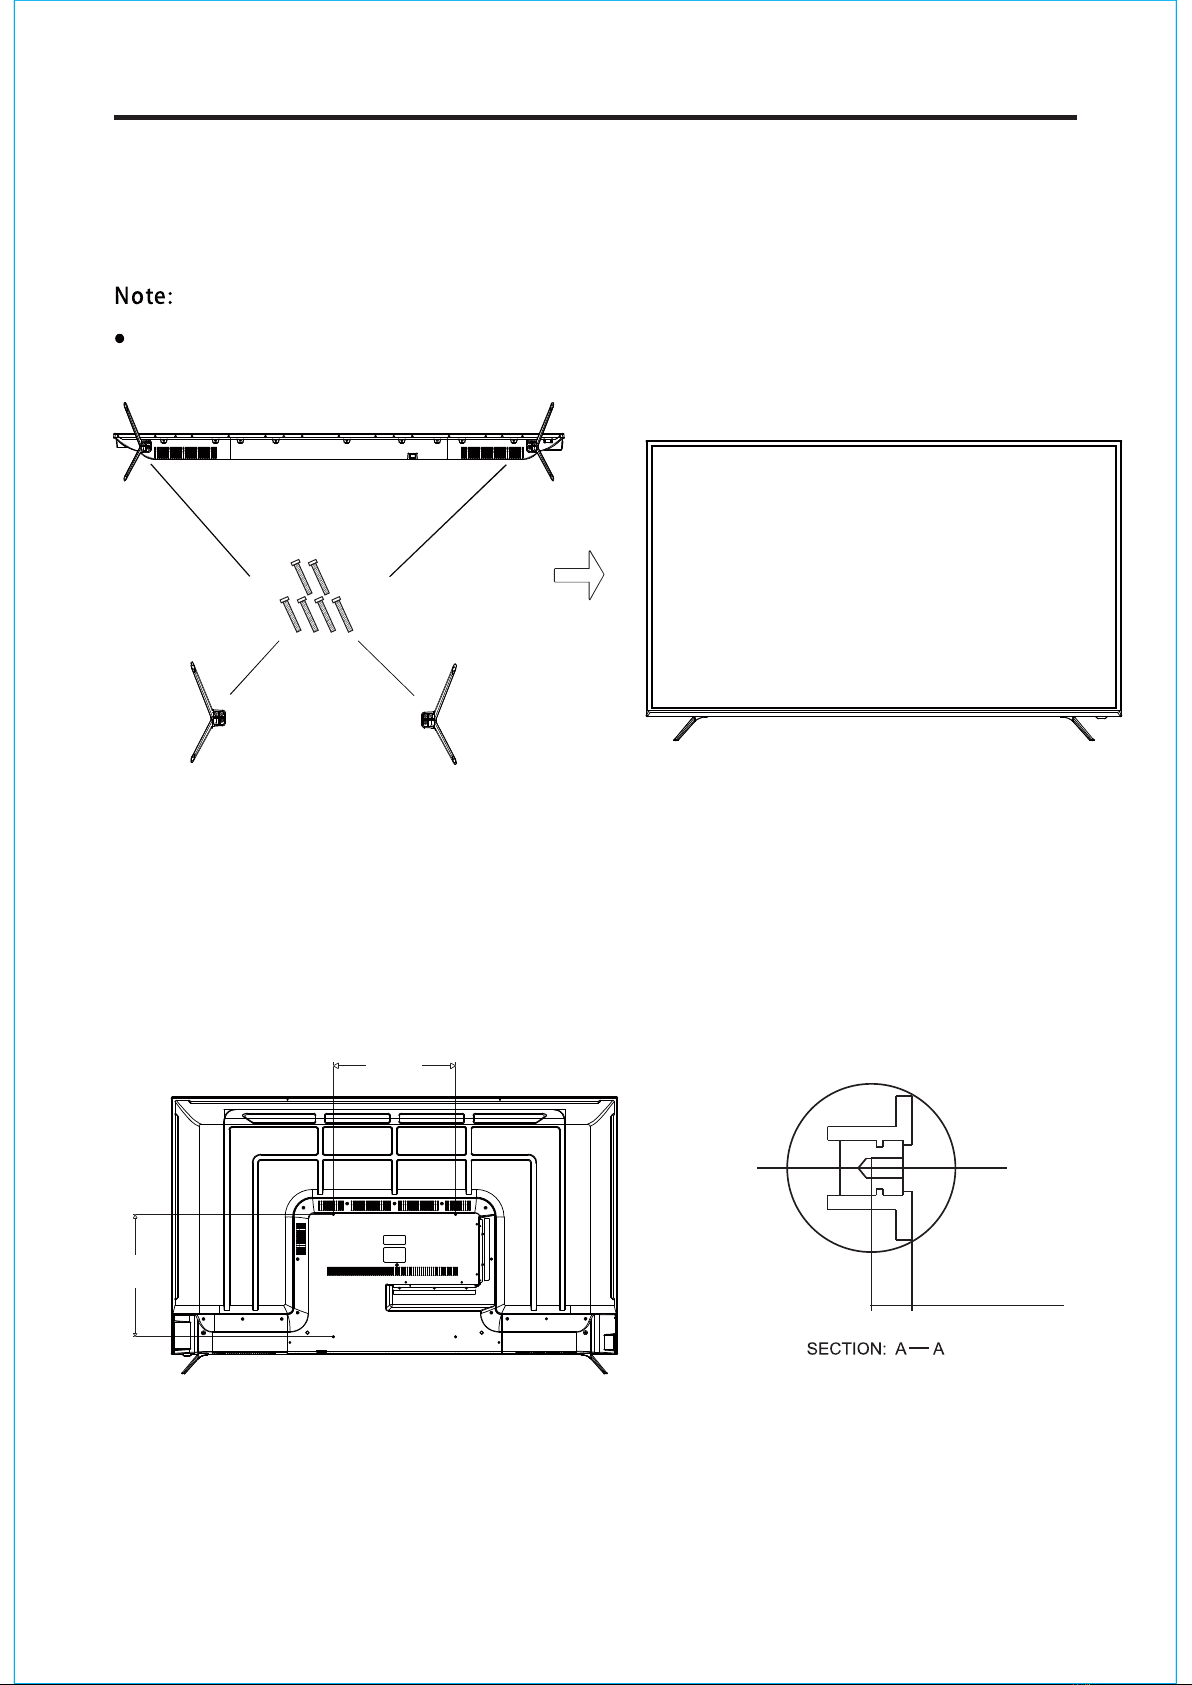
1. Please disconnect all the cable connections before installation.
2. Lay the TV face down on a flat surface, on a blanket or towel to avoid damaging the screen.
3. Please keep the TV in a horizontal position and fix the standing base with screws.
stand of TV unit, in order to avoid damaging the TV unit.
Only use matching screws provided by manufacturer in the accessory bag to install the
Wall Mounting Instruction:
This TV is equipped with mounting holes of 400 x 400mm.If the thickness of the wall mount is 2mm,
4PCS of type M6x10mm screws are required (the length of the screws fixed in the interior of the TV
should not be longer than 12mm) Recommend to use SONIQ wall mount and install by professional
people (do not operate while the TV is on).
MA X 10 mm
400mm
400mm
STAND ASSEMBLY

QT WEE
-6-
CONTROL BUTTON
The following is only functional schematic, And the actual position and arrangement of differect
models may be different. Some models has 5 buttons, some models has 7 buttons.
Middle key
STANDBY
STANDBY
In the standby state, press the STANDBY button to turn on the TV; in the startup state, short press
the STANDBY button to turn off.
To adjust the volume, press the VOL +-key, and to change the channel, press the CH +- key.
To open the setup menu, please press the MENU button, SOURCE to switch the signal source.
1: Remote control sensor.
2: Indicator LED: RED STANDBY.
3: Key board

-7-
TERMINAL
The LED TV has many multimedia functions. It can be connected to many types of equipment.
The following paragraph shows how to connect to other Audio and Video devices.
Optical input
USB
USB
SONIQ does not supply
these cables.
All the terminals are (from left to right):
USB1, HDMI2, HDMI1, EARPHONE.
USBAll the terminals are (from left to right):
RJ45, OPTICAL output, VIDEO, USB2, HDMI3, ANT IN.
Red (audio R)
White(audio L)
Red(Pr or Cr)
R
W
R
Blue(Pb or Cb)
Green(Y)
B
G
Yellow (video)
Y
VIDEO EQUIPMENT
Y
YW R
W R
HD MI
Router network interface
HD MI
-8-
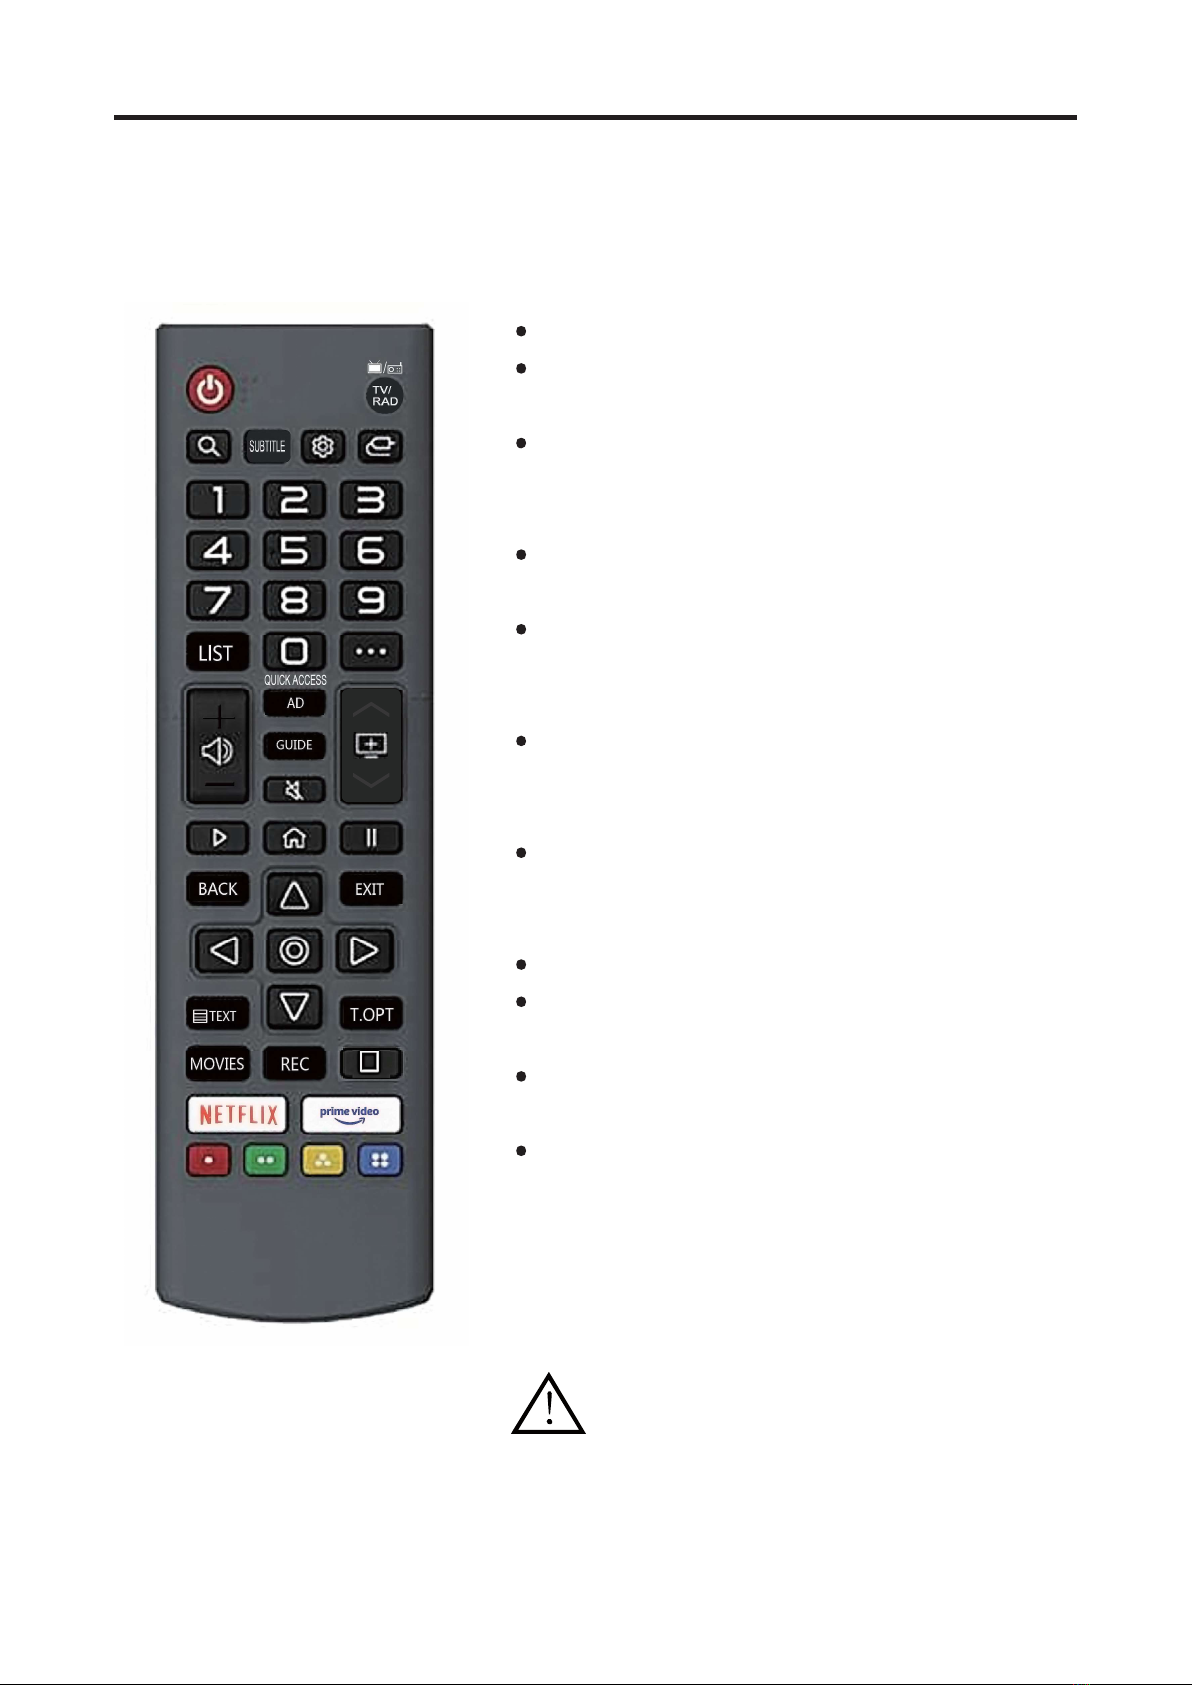
REMOTE CONTROLLER
Open the battery cover and insert 2 "AAA" batteries.
Point the remote control at the remote sensor located
on the unit.
When there is a strong ambient light source,
the performance of the infrared remote sensor may be
degraded, causing unreliable operation.
The recommended effective distance for remote is
about 16 feet (5 meters).
When the batteries become weak and the operating
distance of the remote control is greatly reduced, you
will need to replace the batteries.
If the remote control is not going to be used for a long
period of time, remove the batteries to avoid damage
caused by battery leakage or corrosion.
Do not mix old and new batteries or ALKALINE or
standard (CARBON-ZINC) or rechargeable
(NICKEL-CADMIUM) batteries.
Always remove batteries as soon as they become weak.
Weak batteries can leak and severely damage the
remote control.
Do not dispose of batteries in fire, they may explode
or leak.
Batteries should not be exposed to excessive heat such
as sunshine, fire or the like.
CAUTION :
Danger of explosion may occur if
battery is incorrectly replaced.
The remote controller cannot be used unless it is within the receivable range. Before you
use the remote control, please make sure there's no obstacle between the remote control
and the receiver.
QT WEE
-9 -
O O OLL
Open or close subtitle.
Enter the settings menu.
Quickly switch channels.
Press to display the TV status information.
Quickly switch between TV and broadcast
Press to display the Channel List.
Moreactions shortcuts.
Add favorite show.
Press to select the teletext mode.
Show program information.
MOVIES shortcut keys.
prime video shortcuts.
Note: The description of above function is for reference only.
Specification are subject to change without notice.

10
The first time you turn on your TV, the
setup wizard will quide you through
setting up basic settings Please
according to the Text Tip to First Time
Setup.
Press the arrow keys to select the
desired wireless network, enter the
password and click to confirm, and then
click "Connect", or select Via LG Mobile.
Press the arrow keys to select the system
language, country and time zone, and click
Next.
Display the current signal access status,
please connect to the required signal
source, and click Next.
Press the arrow keys Check Settings,
and set your address Select an item to
modify and change it The way to
watch TV, click Next when finished.
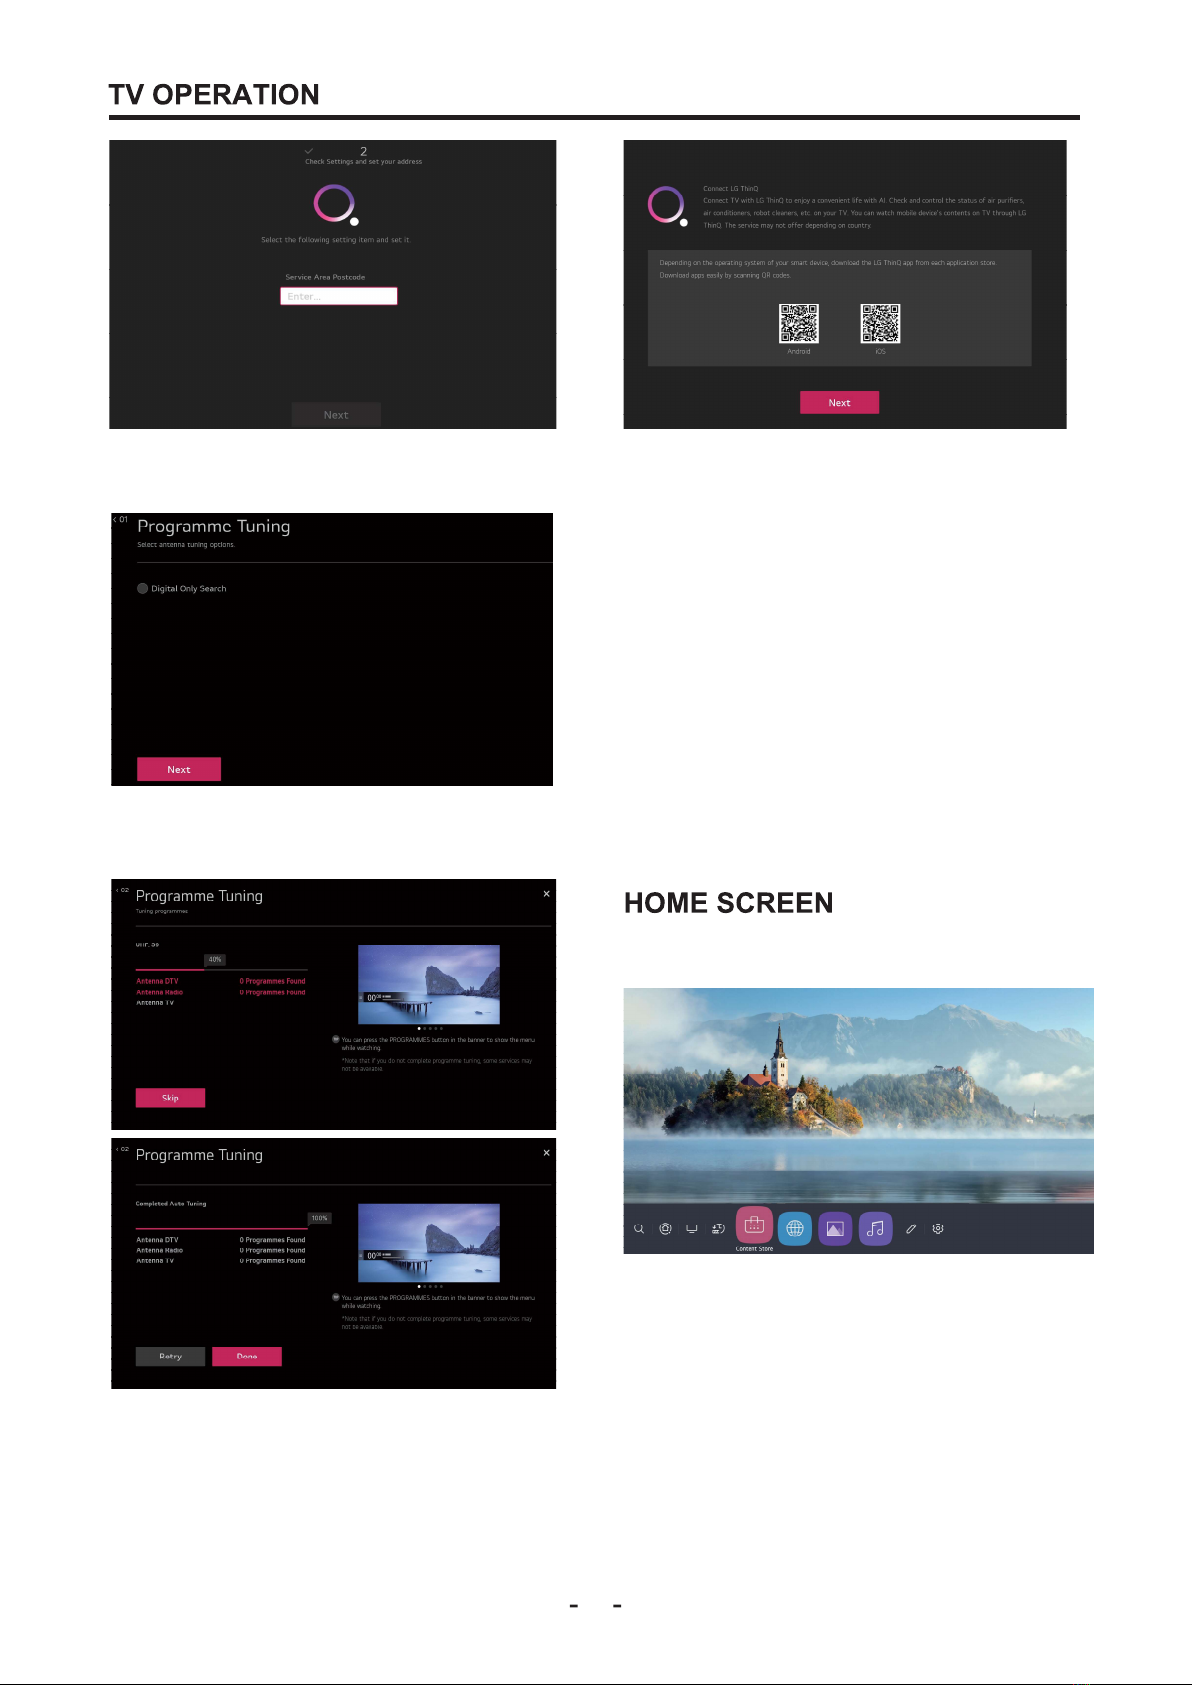
11
Enter the postal code of the service
area and click Next.
Connect LG ThinQ
Connect TV with LG ThinQ to enjay a
convenient life with Al. Check and
control the status of air purifiers, air
conditioners, robot cleaners, etc. on your
TV. You can watch mobile device's
contents on TV through LG ThinQ. The
service may not offer depending on
country.
Depending on the operating system of
your smart device, download the LG
ThinQ app from each application
store.Download apps easily by scanning
QR codes
Programme Tuning Select antenna
After completing the wizard Settings, you
can watch TV and go to the home screen.
tuning options, select next.
At this time, the TV is in the state of
searching channels, wait for the
search to be completed, and proceed
to the next step. Then you can choose
to search again, or complete.
Press HOME button on the remote
control to enter the Main Launcher.Press
the arrow buttons to select the icon and
press "OK" button to enter the
sub-menu.In smart TV mode, you can
install / uninstall the application, browse
the web, Media and other operations.
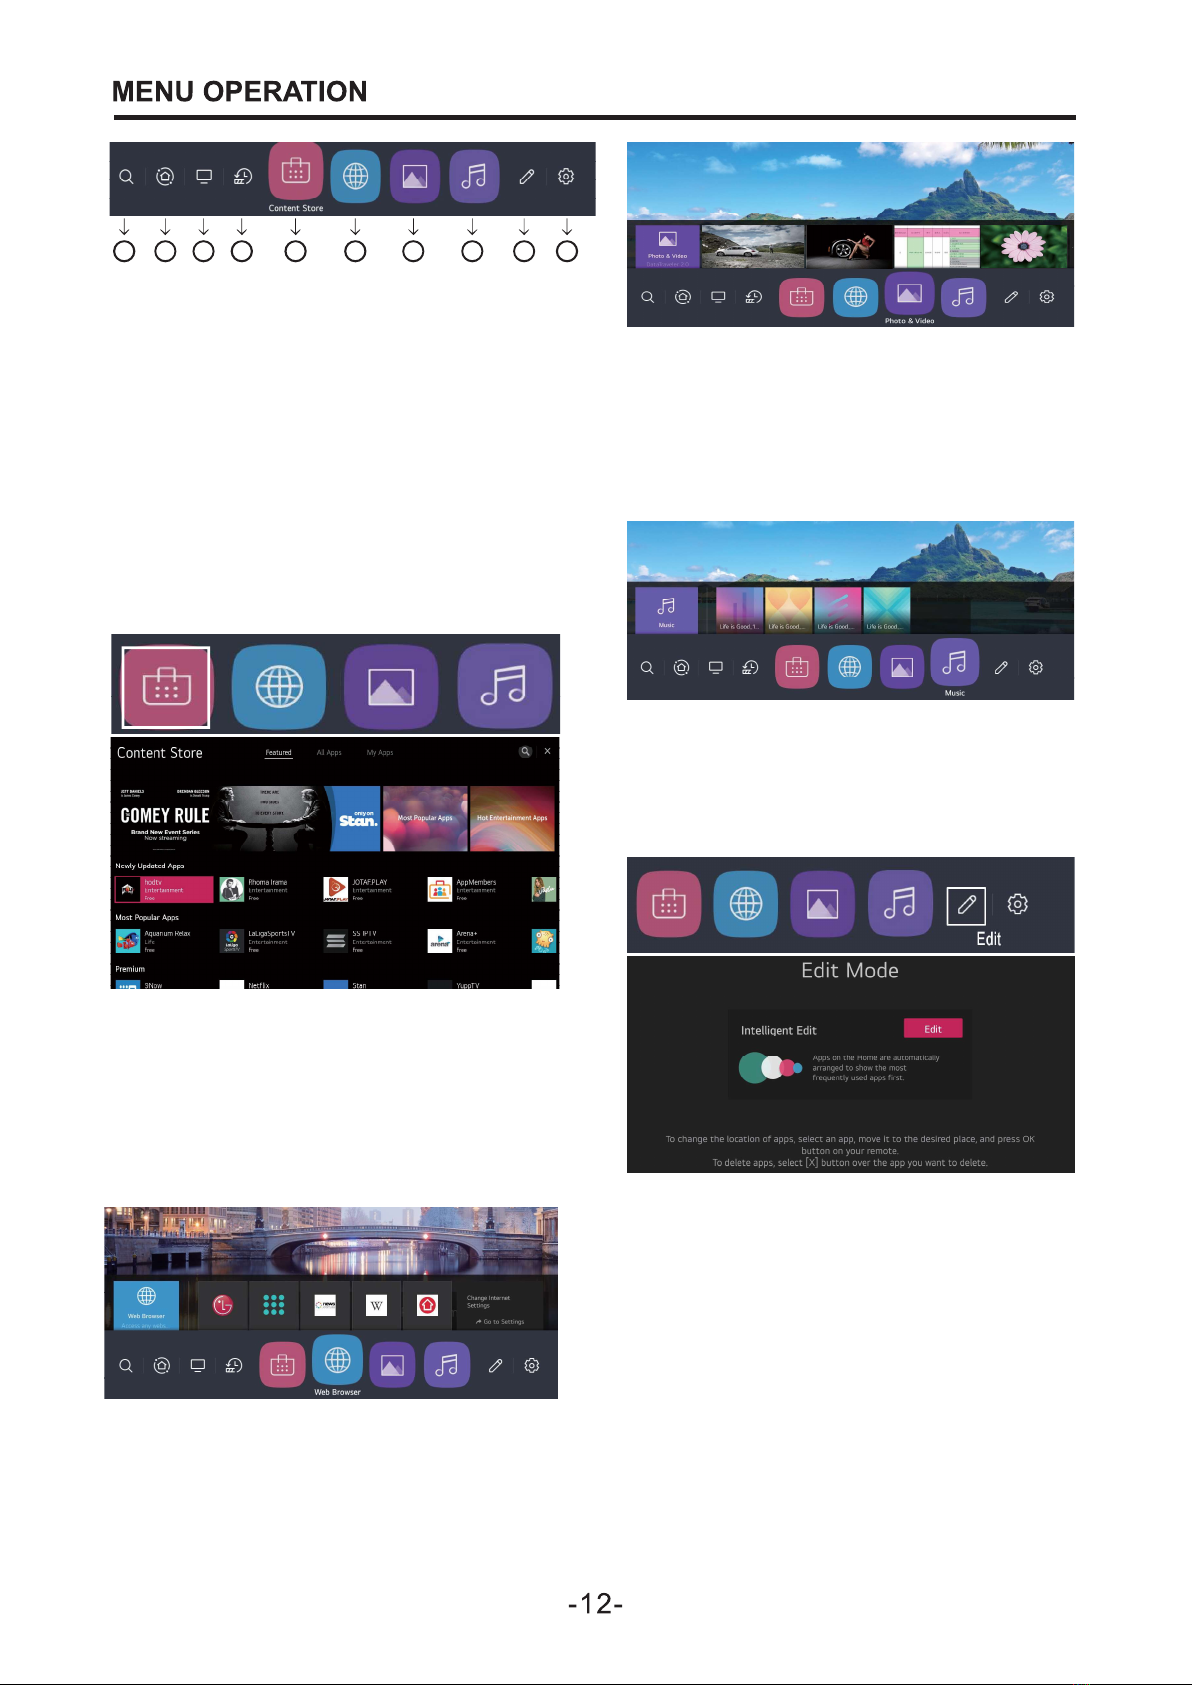
On the main interface, press the arrow
1.Search for TV apps or files.
2.Open Home Dashboard.
3.Enter TV mode to watch TV programs.
4.Open the most recently used app.
5.APP Mall
6.Browse the web after opening.
7.Open multimedia pictures and videos.
8.Turn on multimedia audio.
9.Edit the application.
10.Enter the TV setting interface.
keys to select Web Browser, and press
the OK key to select the
corresponding requirement, Enjoy the
joy of the Internet.
In the main interface, press the arrow
keys to select Music, press the OK key
to enter the Music interface, and then
press the OK key to play.
Video interface, and then press the OK
button to watch in full screen.
In the main interface, press the arrow
keys to select Photo & Video, press
the OK button to enter the Photo &
1 2 3 4 5 6 7 8 9 10
On the main interface, press the arrow
keys to select Edit and press the OK key
to enter the Edit Mode interface.
Then press the Edit button to edit the
application. Apps on the Home are
automatically arranged to show the mast
frequently used apps first.
To change the location of apps, select
an app, move it to the desired place, and
press OK button on your remote.To
delete apps, select [x] button over the
app you want to delete.
On the main interface, press the arrow
keys to select Content Store, press the
OK key to enter the APP management
interface, in which you can view the
installed applications, or install and
uninstall the corresponding applications.
13
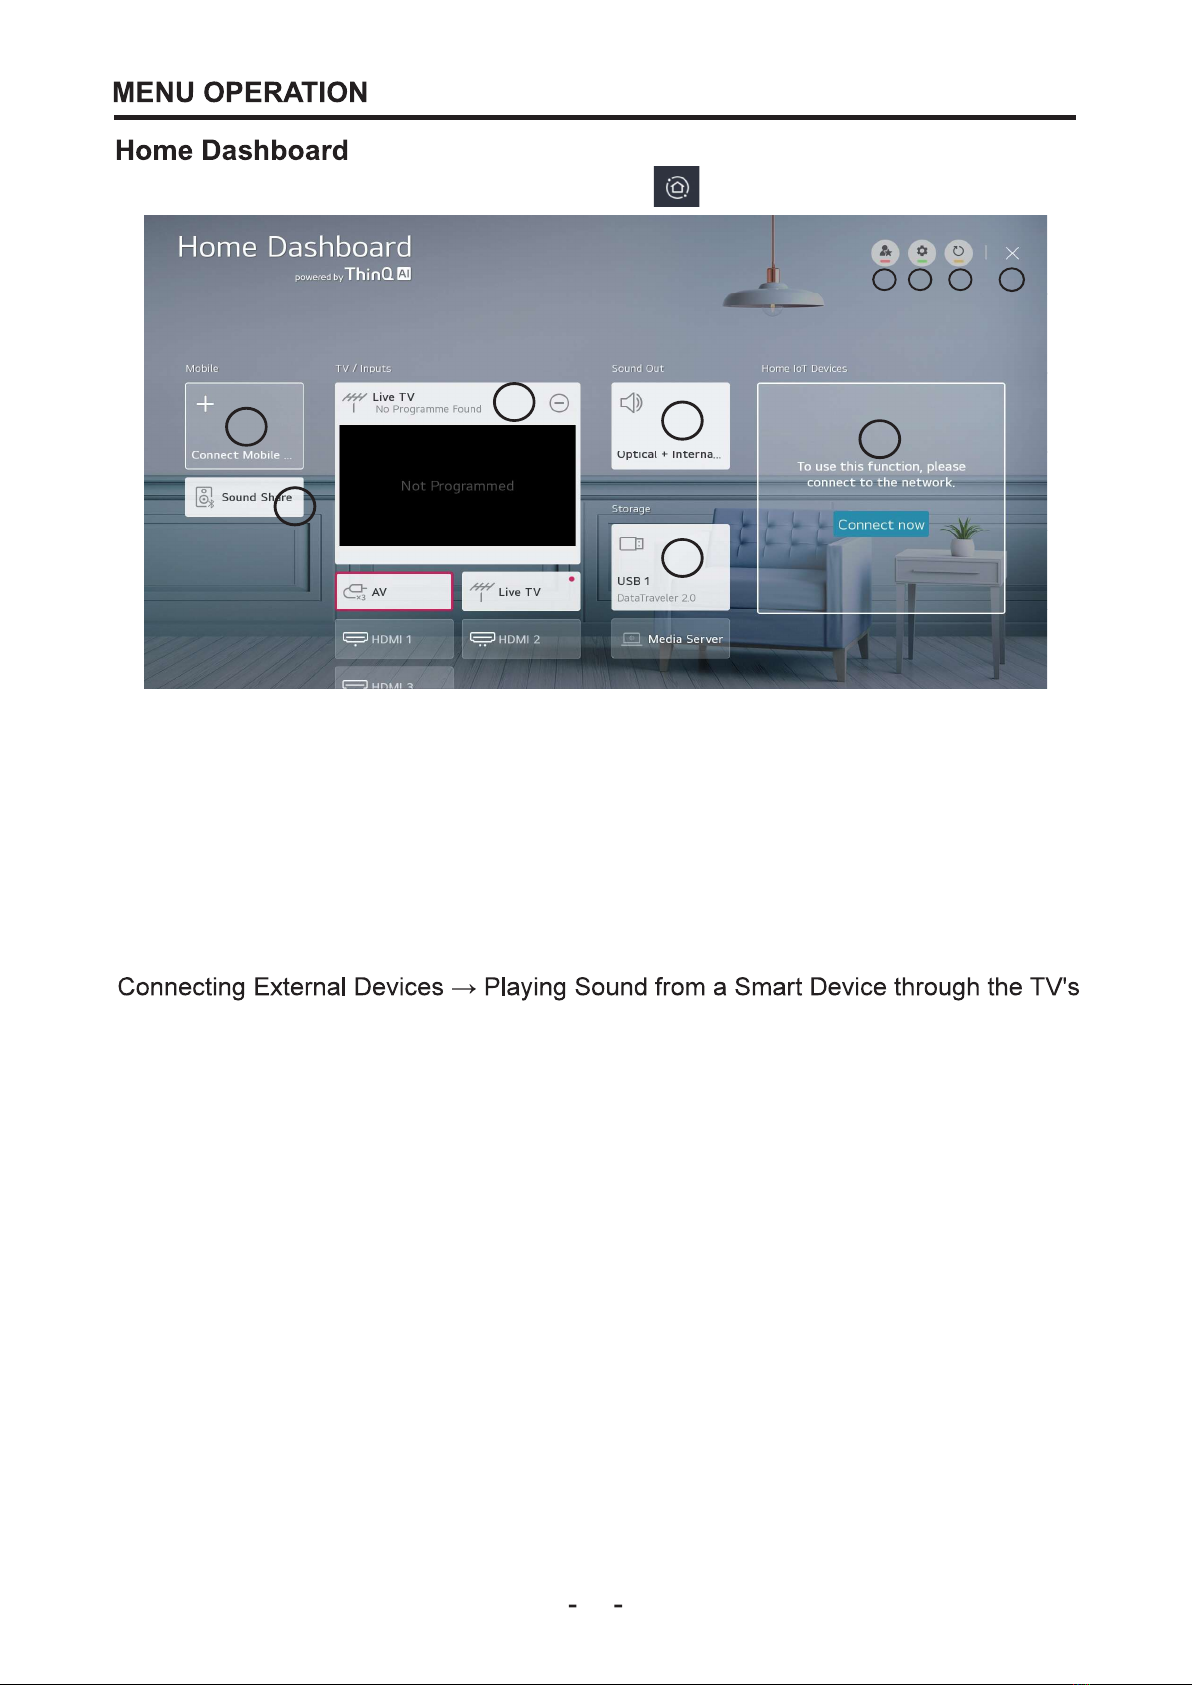
On the main page, go to Home Dashboard from
Home Dashboard Press the arrow buttons to select the icon, and press the "OK" key
to enter the submenu. In smart TV mode, check the status of external devices,
to enter the submenu. In smart TV mode, check the status of external devices,
multimedia, signal source, and link.
10. Close Home Dashboard.
1
2
5
6
7 8 9
10
4
3
1. You can check and select the smart device connected with the LG ThinQ
app.Please refer to Connecting External Devices Connecting Smart Devices in User
Guide for more information on the action.
2. You can play sound from a smart device connected via Bluetooth.Please refer to
Speakers in User Guide for more information on the action.
3. You can check and select the external device connected through the external input
port or network.
4. The currently selected output speaker is displayed, and you can navigate to the
output speaker settings screen.
5. You can view and select the connected storage device.
6. You can check and control the device connected via the Home loT.Please refer to
Connecting External Devices Connecting Home loT. Devices in User Guide for more
information on the action.
7. You can easily control your device by presetting the desired operations.
8. Sign In: You can log in/out to and from the LG ThinQ account you created on
mobile.
Edit: You can edit the name of the device connected to Inputs or Home loT Devices
or configure the related settings.
9.It rofreshes the device lict
-14 -
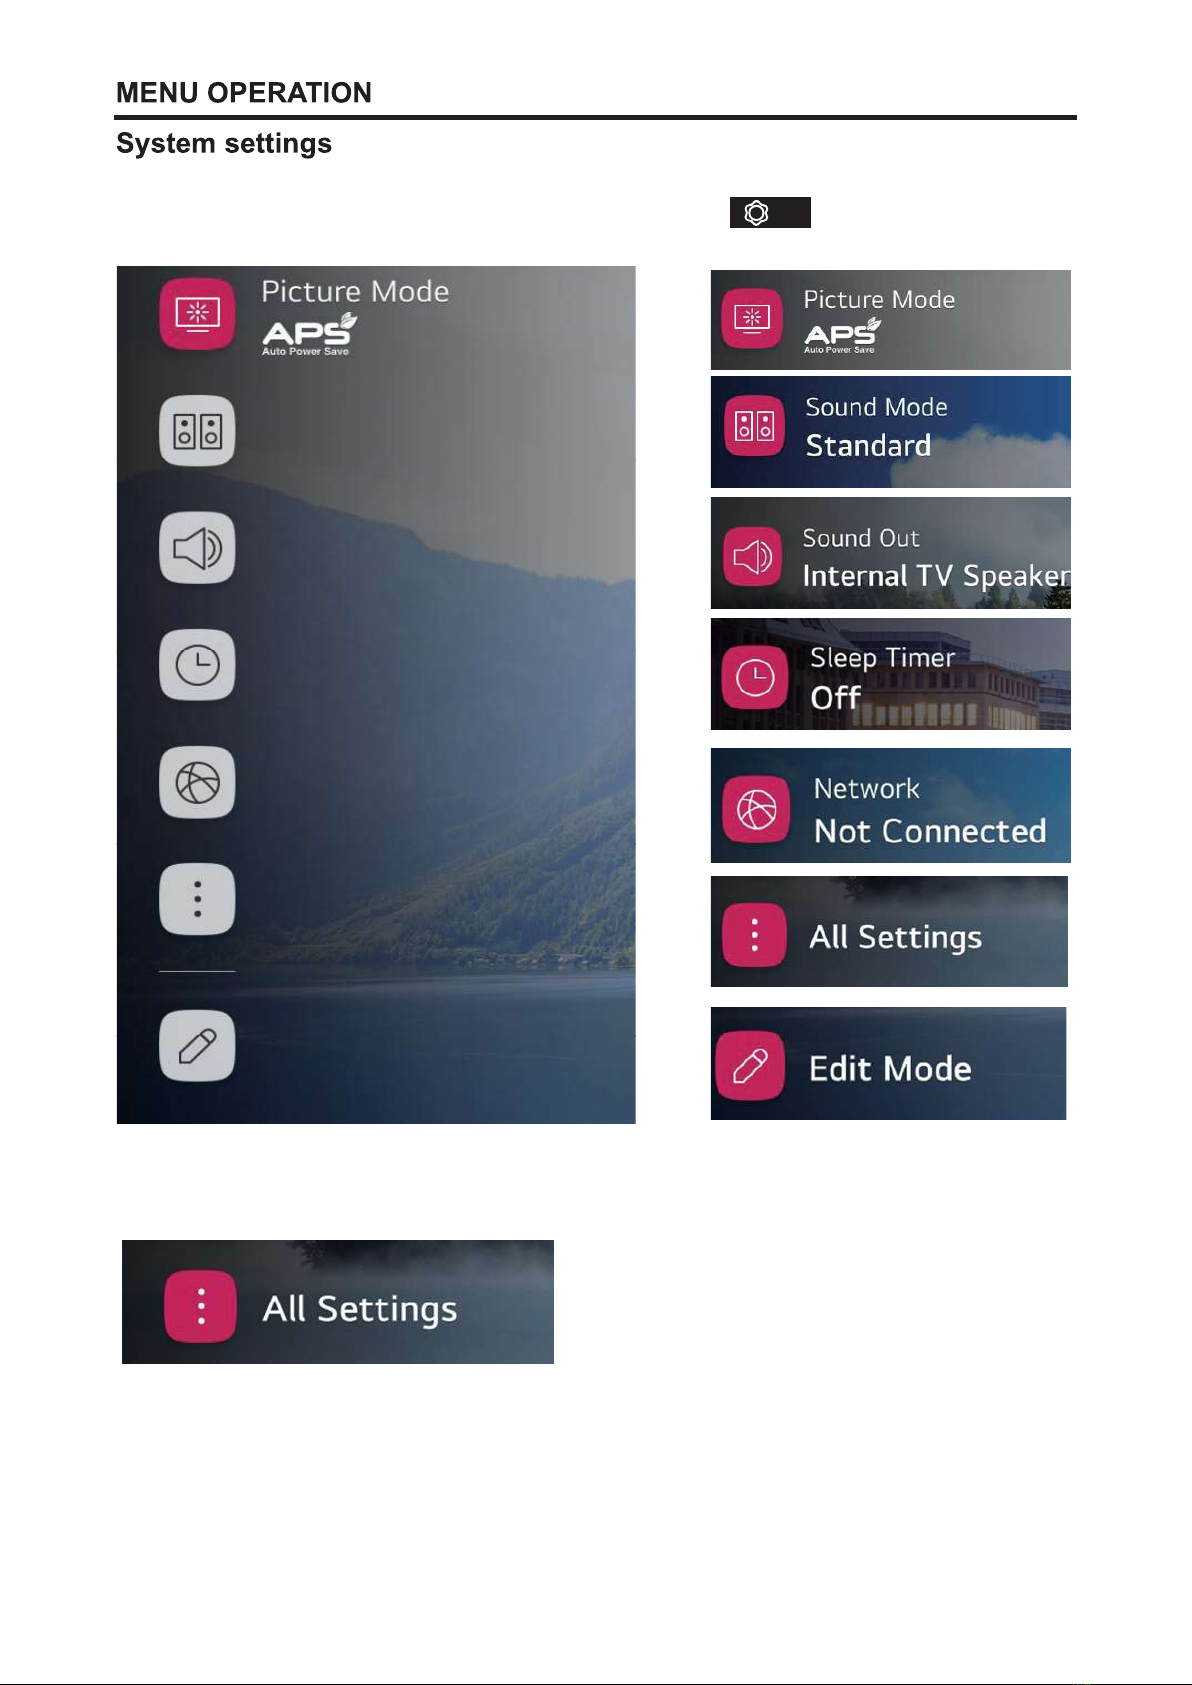
Enter the basic setting interface through remote control shortcut keys, or from
The main menu enters the basic setting interface.
Press the up and down keys to select the corresponding setting item, press the right
key to enter the submenu and press the enter key.
Press the arrow keys, select the All Settings icon and press OK to enter the All
Settings interface.

-15-
Picture
You can choose the picture mode that
best suits your personal preferences.
Press the setting key to enter the OSD
menu, then enter the detailed settings,
press the arrow keys to select "Picture"
in the main menu, and select the item to
be changed. Use the button to select
the desired setting.
Programmes
Press the setup key to enter the OSD
menu, then enter the detailed settings,
press the arrow keys to select
"Programmes" in the menu, and then
select Program Tuning to search.
Connection
Press the setting key to enter
the OSD menu, and then enter
the detailed settings, press the
arrow keys to select
"Connection" for network
connection and settings.
Sound
You can choose the sound mode that
best suits your personal preferences.
Press the setting key to enter the OSD
menu, then enter the detailed settings,
press the arrow keys to select "Sound" in
the main menu, and select the item to be
changed. Use the buttons to select the
desired setting.
-16-
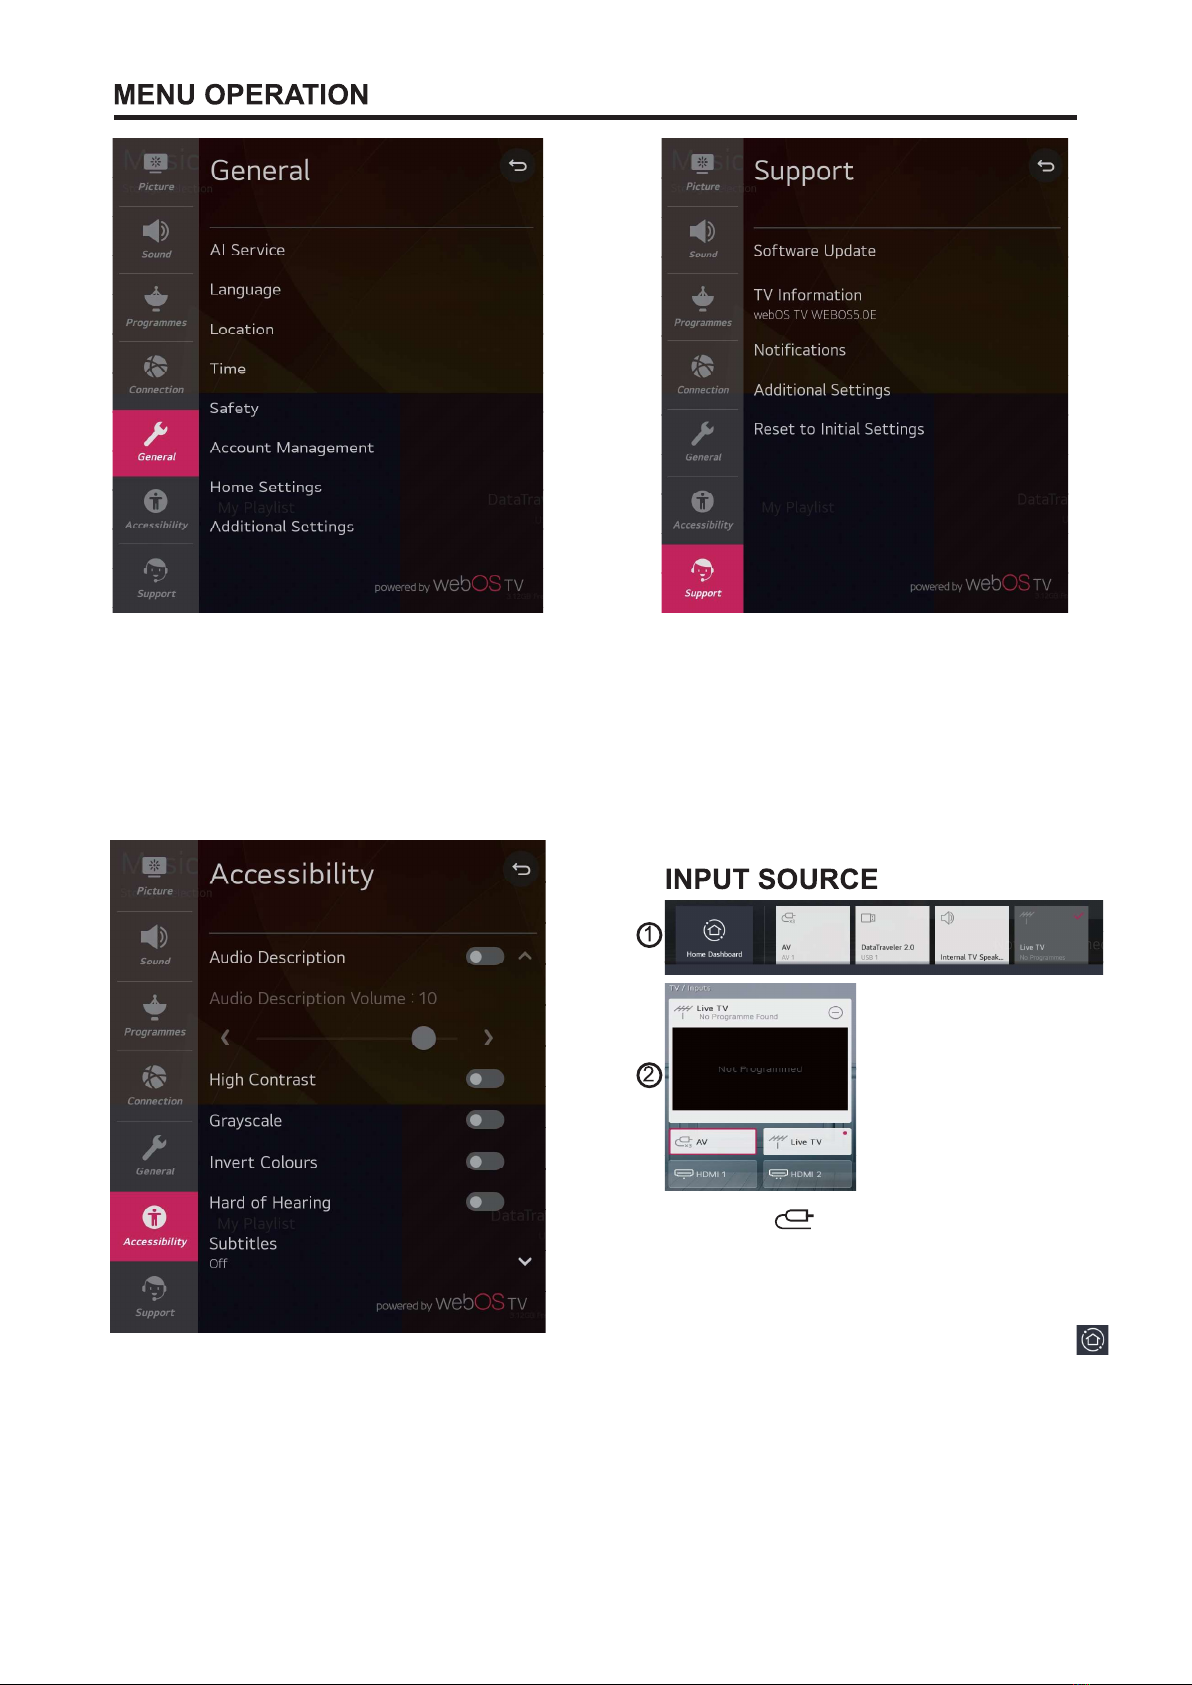
General
Press the setup key to enter the OSD
menu, then enter the detailed settings,
press the arrow keys to select "General"
for language settings, time settings,
account settings, security settings, etc.
General
Press the setting key to enter the
OSD menu, then enter the detailed
settings, press the arrow keys to
select "Support" to set, software
update, view software information,
restore factory settings, etc.
Accessibility
Press the setting key to enter the OSD
menu, then enter the detailed settings,
press the arrow keys to select
"Accessibilityon" to set.
Press the shortcut key on the
remote control to enter the Figure 1
interface, and then press the arrow keys
to select the desired channel.
Or press the arrow keys to select the *
icon on the homepage, and then click to
confirm, jump to the TV / Inputs
interface as shown in Figure 2, and then
select the desired channel.

-17-
1. Press the setting button on the
remote control to enter the OSD
setting interface, or select the icon
on the main page to enter the OSD
setting interface
2. Press the arrow key to select all
Settings and press ok to enter.
3. Press the arrow keys to
select"Programmes", and then press
Enter to enter "Programe Tuning".
4.Select antenna tuning options, directly
click Next, and the TV will enter the
automatic scanning state.
5. Wait for the scan to complete,you can
scan again after completion, or save.
You can also choose to press the arrow
keys to select Program Manager.
-1 -
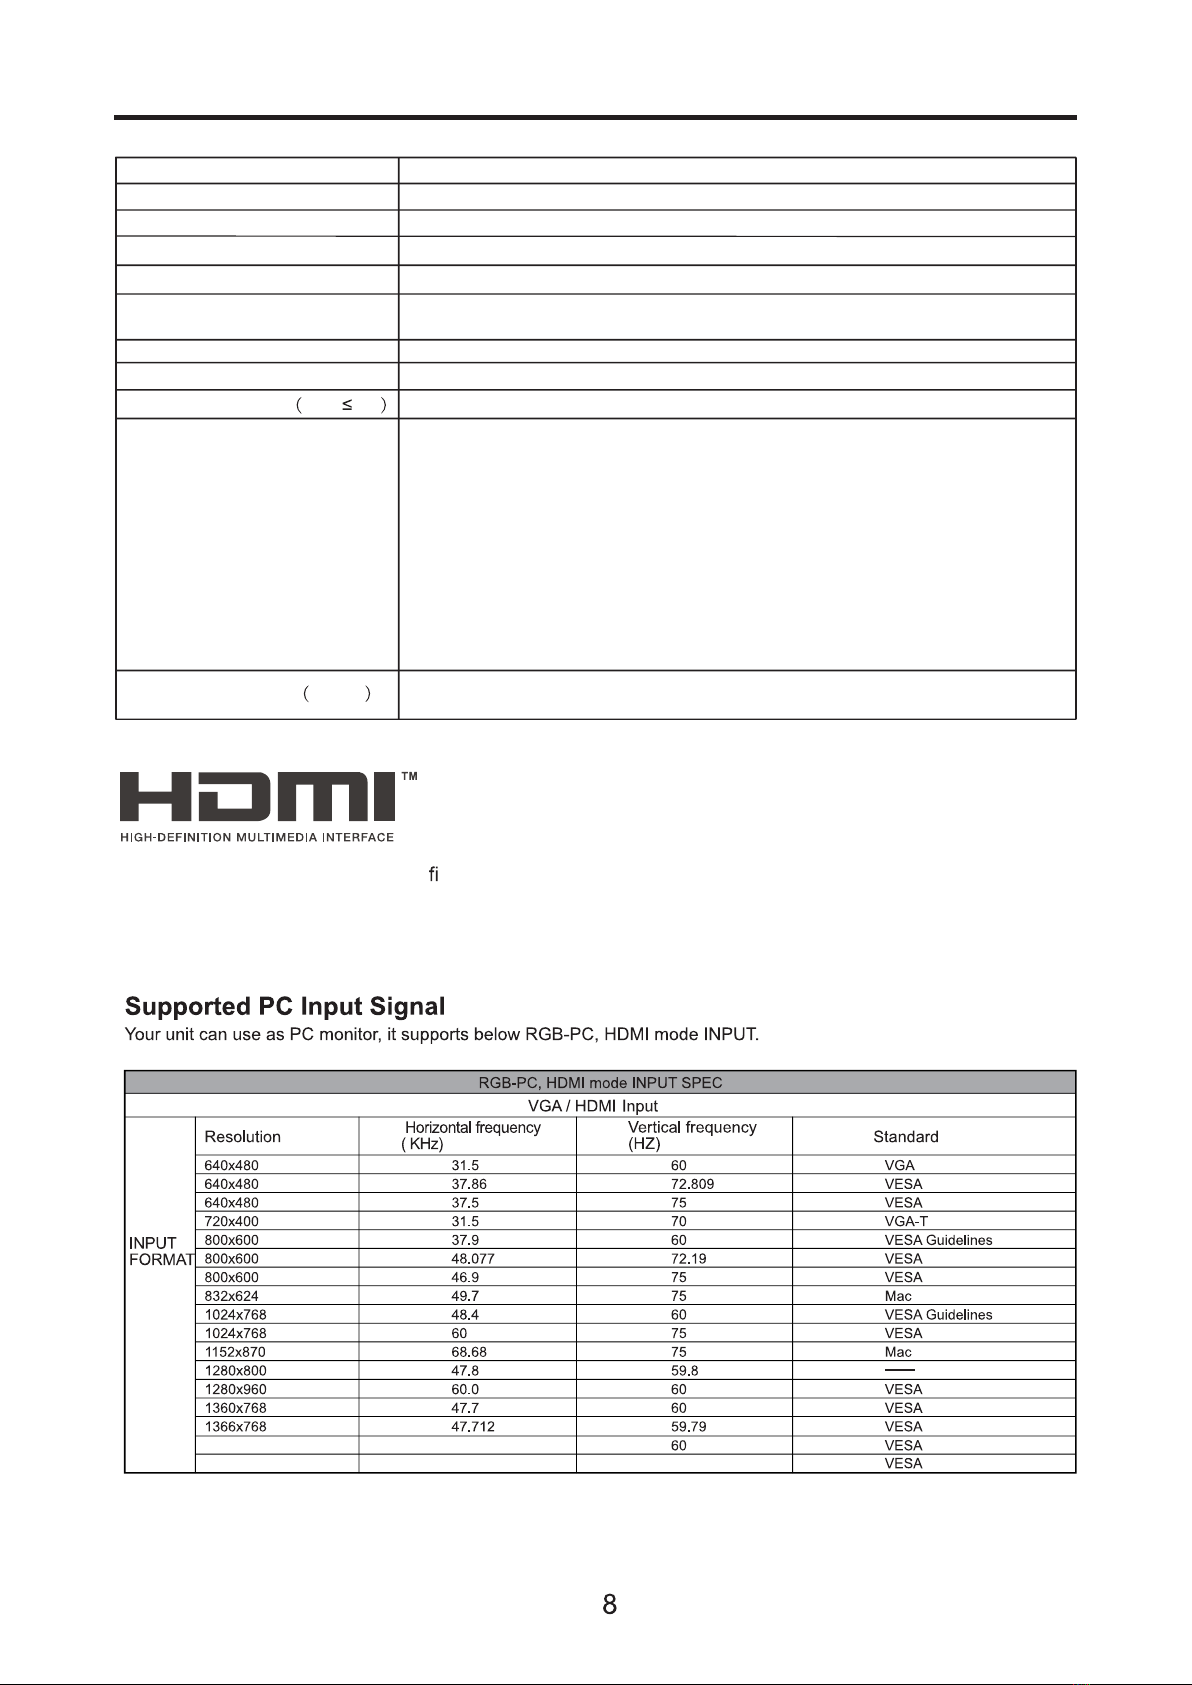
SPECIFICATIONS
Viewing Picture Size (Diagonal)
Resolution
Aspect Ratio
TV System
Receiving Channel
Power consumption
Signal input/output
Video Signal System
Input Power
Voltage
Audio Output Power THD 7%
3840x2160
16 : 9
PAL-B/G, SECAM-B/G, DVB-T, DVB-C
PAL / NTSC
100-240V~, 50/60Hz
65inch
2 x10W
180W
High-Definition Multimedia Interface(HDMI) x3
Audio Input x 1
LAN Input x 1
USB x 2
OPTICAL OUTPUT x 1
HEADPHONE OUTPUT x 1
RF x 1
CompositeVideoinput>=350
YCb(Pb)Cr(Pr)>=400
Horizontal definition TVline
DVB-T:1000, DVB-C:1000, ATV:99
The terms HDMI, HDMI High-De nition Multimedia Interface, and the HDMI Logo
are trademarks or registered trademarks of HDMI Licensing Administrator, Inc.
49.6
60
50
1920x1080
3840x2160
This manual suits for next models
1
Table of contents
Other SONIQ LED TV manuals

SONIQ
SONIQ S55UV16B-AU User manual

SONIQ
SONIQ E43V15C-AU User manual

SONIQ
SONIQ E40S12A-AU User manual

SONIQ
SONIQ S49VT15A User manual

SONIQ
SONIQ E32W13A-AU User manual

SONIQ
SONIQ S43V15A User manual

SONIQ
SONIQ S55UV16A-AU User manual

SONIQ
SONIQ S65UX16A-AU User manual

SONIQ
SONIQ E32W13B-AU User manual

SONIQ
SONIQ E48W13A-AU User manual


