Sonodyne SC 2311 User manual
Stereo-mixer-preamplifier owners manual

INTRODUCTION
Congratulations on your purchase of this unique preamplifier.
Our years of experience in installed sound has resulted in a feature-loaded device that will meet most
installed sound needs. The SC 2311 performs admirably as a line mixer with intuitive priority allocations
and overrides, and as a preamplifier, providing low noise, low distortion signals to your power/ booster
amplifiers. With 3 mic, 2 line ins, and a priority alarm in, it will make your installation a breeze to set-up
and operate. So go ahead and produce your signature sound with the SC 2311.
CONNECTIONS
All the XLR inputs and output sockets on the SC 2311 have the following pin configurations: 1 - GND, 2 -
HOT (+), 3 - COLD (-). All the TRS sockets on the back panel have the following pin configurations: TIP - HOT
(+), RING - COLD (-), SLEEVE - GND.
To connect any MIC with an XLR socket, simply use a 2-core MIC cable of the desired length having a male
XLR socket on one end which plugs into the MIC socket, and a male XLR socket on the other end which
connects to the preamplifier, following the pin connections stated above. There is no provision of
PHANTOM POWER.
- page 1 -
Introduction · Connections
SC 2311

- page 2 -
Operations
1. Keep POWER switch in OFF position
2. Make all input and output connections
3. Keep MIC 1 - MIC 3 controls at their minimum position, MIC/ LINE mixing control at its centre position,
BALANCE, BASS and TREBLE at their centre position, and VOLUME at its minimum position.
4. Keep line input selector in the position for which the input (AUX1 / AUX2) has been connected, and
MODE switch in the STEREO position. If you have a mono line input, keep mode switch in MONO
position.
5. Connect the mains cord to a 230V utility outlet.
6. Switch on power. The power indicator LED on the front panel will glow.
7. If you wish to check the mic first, advance the level control of the MIC that you have selected to about
2 O’Clock position, gradually turn up the volume while speaking into the mic. Adjust MIC level control
and/or volume control as desired.
8. To check line level, turn on source and adjust the volume control.
9. To mix Line and Mic, just carry out steps (7) and (8) together. To make the MIC input more prominent
than the LINE input, turn the MIC/ LINE mixing control counterclockwise, & vice versa.
10. SC2311 has priority ALARM input for fire alarm protection where if it senses signal it automatically
mutes all other inputs . Connect fire alarm or supervisory system output to the ALARM input . If MIC1
PRIORITY switch is pressed MIC1 will get priority over all the inputs ( except ALARM ) but, when the
ALARM signal is sensed ALARM gets priority. When ALARM or MIC 1signal is removed, the selected
line input is connected after a delay of 5 - 10 seconds.
We recommend that you test and adjust the level of the alarm source before setting it permanently,
so that the desired alarm level comes through the PA.
11. If you wish to use the PC soundcard output as the source, please use the AUX2 input. It has integral
protection for high voltage spikes or leakages that might occur when a PC soundcard is connected.
The PC earthing may not always be proper and we strongly suggest that you use AUX2 only, for
ensured system protection
SC 2311

FIG. 2 : REAR PANEL LAYOUT
- page 3 -
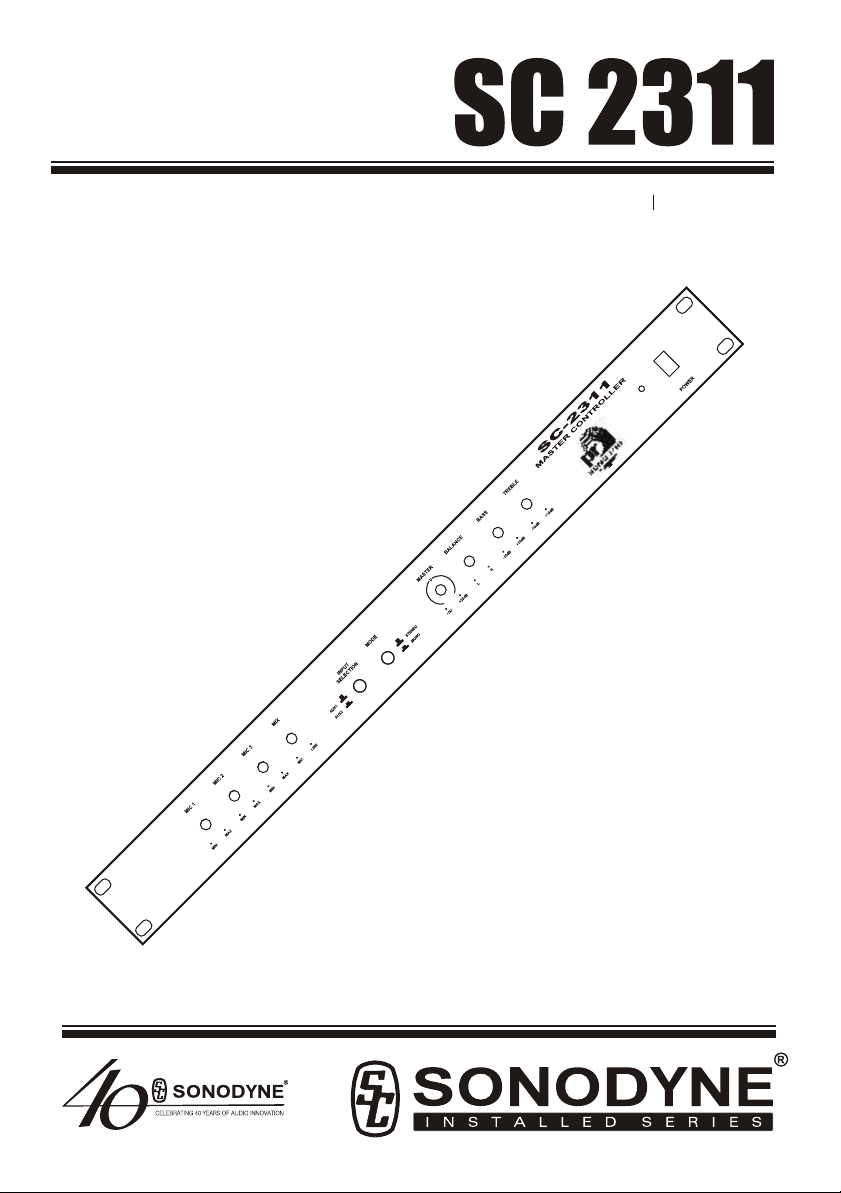
Fig 1: Front Panel · Fig 2: Rear Panel
FIG. 1 : FRONT PANEL LAYOUT
SC 2311

SYMPTOM: Power LED doesn’t glow/ no output
REMEDIES: Check that mains cord is plugged in. Check fuse on back panel. (For replacing fuse,
unscrew the fuse holder and replace fuse with exact equivalent)
SYMPTOM: Microphone inputs not working
REMEDIES: Check position of LINE/ MIC mixing level control. Move it to MIC position (extreme anti-
clockwise) if you do not want to mix with LINE input , check if the MIC1 priority switch is
depressed , if yes then only MIC1 will work when you try to use more than one microphone.
SYMPTOM: Hum present in system
REMEDIES: (A) Check that the earth terminal of the utility AC socket is connected to the earth bus
(B) Check that the earth is not shared with any other ‘noisy’ equipments like light dimmers,
arc lamps etc
- page 4 -
Troubleshooting
SC 2311

- page 5 -
Architects & Engineering Specifications
The stereo preamplifier shall provide low-noise, low distortion preamplification, switching and signal
processing for permanent installation or sound reinforcement applications. The preamplifier shall have 3
MIC inputs and 3 stereo line level inputs (1 balanced, 2 unbalanced). Out of the 3 stereo line level inputs,
one pair shall be a balanced input via TRS socket (AUX 1) and the remaining two pairs shall be unbalanced
inputs via RCA socket (AUX2, ALARM) . Out of these inputs, one pair shall be a priority input (ALARM) which
shall override all inputs. MIC1 is 2nd priority input which gets priority on rest of the inputs (except ALARM)
provided that the MIC1 PRIORITY switch is depressed (accessible from the rear panel).The line level inputs
shall be switch-selectable (AUX1/AUX2) provided on the front panel. The MIC inputs shall have individual
level controls. There shall be a mixing control to control the relative signal strength between MIC and LINE
inputs. The preamplifier shall feature a Baxandall type bass - treble control and a master volume control
together with a balance control for left and right channels. There shall be a mode switch on the front panel
to switch between mono and stereo mode. All MIC inputs shall be female XLR type and all balanced inputs
shall be TRS type. All unbalanced inputs shall be RCA type. Pin connections of XLR and TRS type shall
conform to international standards.
The preamplifier shall have 2 stereo outputs out of which one is a balanced output via TRS socket (L&R)
and a unbalanced output via RCA socket (PREOUT).
The preamplifier shall be a Class I equipment with a 3-pin molded plug to suit 230V AC outlets. Switching
off power shall be controlled by a front panel mounted rocker switch with an LED power-on indicator.
Protection shall be provided by a rear panel mounted glass cartridge fuse and fuse holder.
The preamplifier shall be the SONODYNE model SC 2311.
SC 2311

- page 6 -
SC 2311
Specifications
DESCRIPTION Professional stereo mixer preamplifier
INPUTS 3 Mic inputs (fully balanced) via XLR socket
1 balanced stereo line level input via TRS (AUX 1)
2 unbalanced stereo line level inputs via RCA socket as follows :
AUX 2 (L&R), ALARM (L&R)
OUTPUTS 1 unbalanced line level stereo RCA output
1 balanced line level stereo TRS outputs
CONTROLS AND SWITCHES Master volume control, Balance, Bass, Treble, Mic/ Line MIX Control, individual Mic
level controls, selector switches for AUX1 & AUX2, STEREO/MONO mode selection
switch, one power switch & one rear panel accessible priority control switch which
provides priority to MIC 1 over all channels except ALARM
FREQUENCY RESPONSE 10 Hz ~ 20 kHz, ±3 dB
INPUT SENSITIVITY Aux 1 - 140 mV
(For 1V output) Aux 2 - 130 mV
Alarm - 180 mV
Mic - 2 mV
INPUT IMPEDANCES Aux 1 - 44k Ohm (balanced)
Aux 2 - 47k Ohm
Alarm - 10k Ohm
Mic - 1k Ohm (balanced)
CROSS TALK (1 kHz) Better than 65 dB
CHANNEL SEPARATION (1 kHz) 55 dB
S/N RE(MIC/LINE) 5 V OUTPUT Better than 85 dB
TOTAL HARMONIC DISTORTION 0.02% @ 1 kHz
BASS ± 10 dB at 100 Hz
TREBLE ± 10 dB at 10 kHz
POWER REQUIREMENT 230 V AC @ 50 Hz
POWER CONSUMPTION 15 V A max
DIMENSIONS (W x H x D) mm 483 x 44 x 168
NET WEIGHT 2.3 Kg Due to continuous improvements, specifications may change

A product of Mukherjee Innovation Centre
Manufactured by Sonodyne Electronics Co Pvt Ltd, 98 NB Block E New Alipore, Kolkata 700053, INDIA
Please visit us at www.sonodyne.com
Table of contents
Other Sonodyne Amplifier manuals


