Sonova Phonak 043-3070 User manual

Connecting hearing technology to computers
Connecting Hearing Assistive Technology or Tablets
Your student will need the appropriate audio cord that came in the box with their microphone or streaming device.
Simply plug 3.5mm end of the cord into the headphone port on the computer/device and the other end into the microphone.
Phonak sells audio cables for their Roger microphones and streaming devices.
If a parent would like to hear what the child is hearing, an audio splitter is necessary.
Phonak Recording Cable (one audio output and one audio input)
Part Number: 043-3070
Phonak Audio Splitter (two audio outputs)
Part Number: 038-3107
Phonak
Connectivity Options

Phonak Connectivity Options 2
Audio splitters come in different shapes and sizes. However, they have the same purpose, to split the signal so more than
one person can hear. Below are audio splitters. They would plug into the headphone jack of the computer, then you would
plug the HAT technology into one audio port and the parents headphones into the other audio port.
Here is a high-level overview of how to connect DM/FM/Streaming devices through a splitter to a student’s
computer or tablet.
(This is created by See Hear Communication Matters.)
If a parent would like to use Bluetooth headphones to listen to what the child is
hearing.
In addition to using an audio splitter, the parent would need to get a Bluetooth
transmitter with a 3.5mm audio adapter like this one Aluratek device. Setup: Plug the
audio splitter into the headphone jack of the computer, then plug the HAT technology
into one audio port and the Bluetooth transmitter into the other audio port. Follow the
instructions of the Bluetooth transmitter and pair the parent’s headphones. Play audio
on computer. It should be heard through Roger and the parent’s Bluetooth headphones.
If a pop-up screen occurs on your computer when you plug in the Roger Mic, be sure to
select “Headphones” from the list of playback device options
.

Phonak Connectivity Options 3
If the child uses a Touchscreen Mic
The Touchscreen uses the 3.5mm audio cable.
Once you have plugged one end of the audio cord into the computer, plug the other end into the bottom of the Touchscreen.
-Do NOT change any of the selections when the audio settings screen pops up
-It should remain on 'Input' (see image below)
-If changed to the other Output settings, the child will not be able to hear the audio from the computer
-The Touchscreen will automatically mute its external microphones (you will see the flashing RED light) so the only
audio the child will hear will be from the computer. If you want to speak to child through mic, you must press the
Mute button to unmute the microphone.
If the child uses a Multimedia Hub
The Multimedia Hub uses the 3.5mm audio cable.
-Plug one end of the audio cord into the computer
-Plug the other end into the bottom of the Multimedia Hub
-Hold the Multimedia Hub up to one receiver and press the “Connect” button on the front of the device. Button has a
chain-link symbol on it
-Child should hear an audible tone when receiver is connected
-Repeat this step with the other receiver (if applicable)

Phonak Connectivity Options 4
If the child uses a Roger Select, Pen, EasyPen, or Clip-on Mic:
The Roger Select, Pen, Easy Pen or Clip-on uses a microUSB-to-3.5 cord audio cable included in the original packaging
Once you have plugged one end of the audio cable into the computer, plug the micro-USB end into the bottom of the
microphone.
-When plugged in, the microphone will automatically mute (violet light) so that the only sound the child will hear
through the microphone will be from the computer. Press on/off button to unmute mic if you would like child to
hear you through microphone.
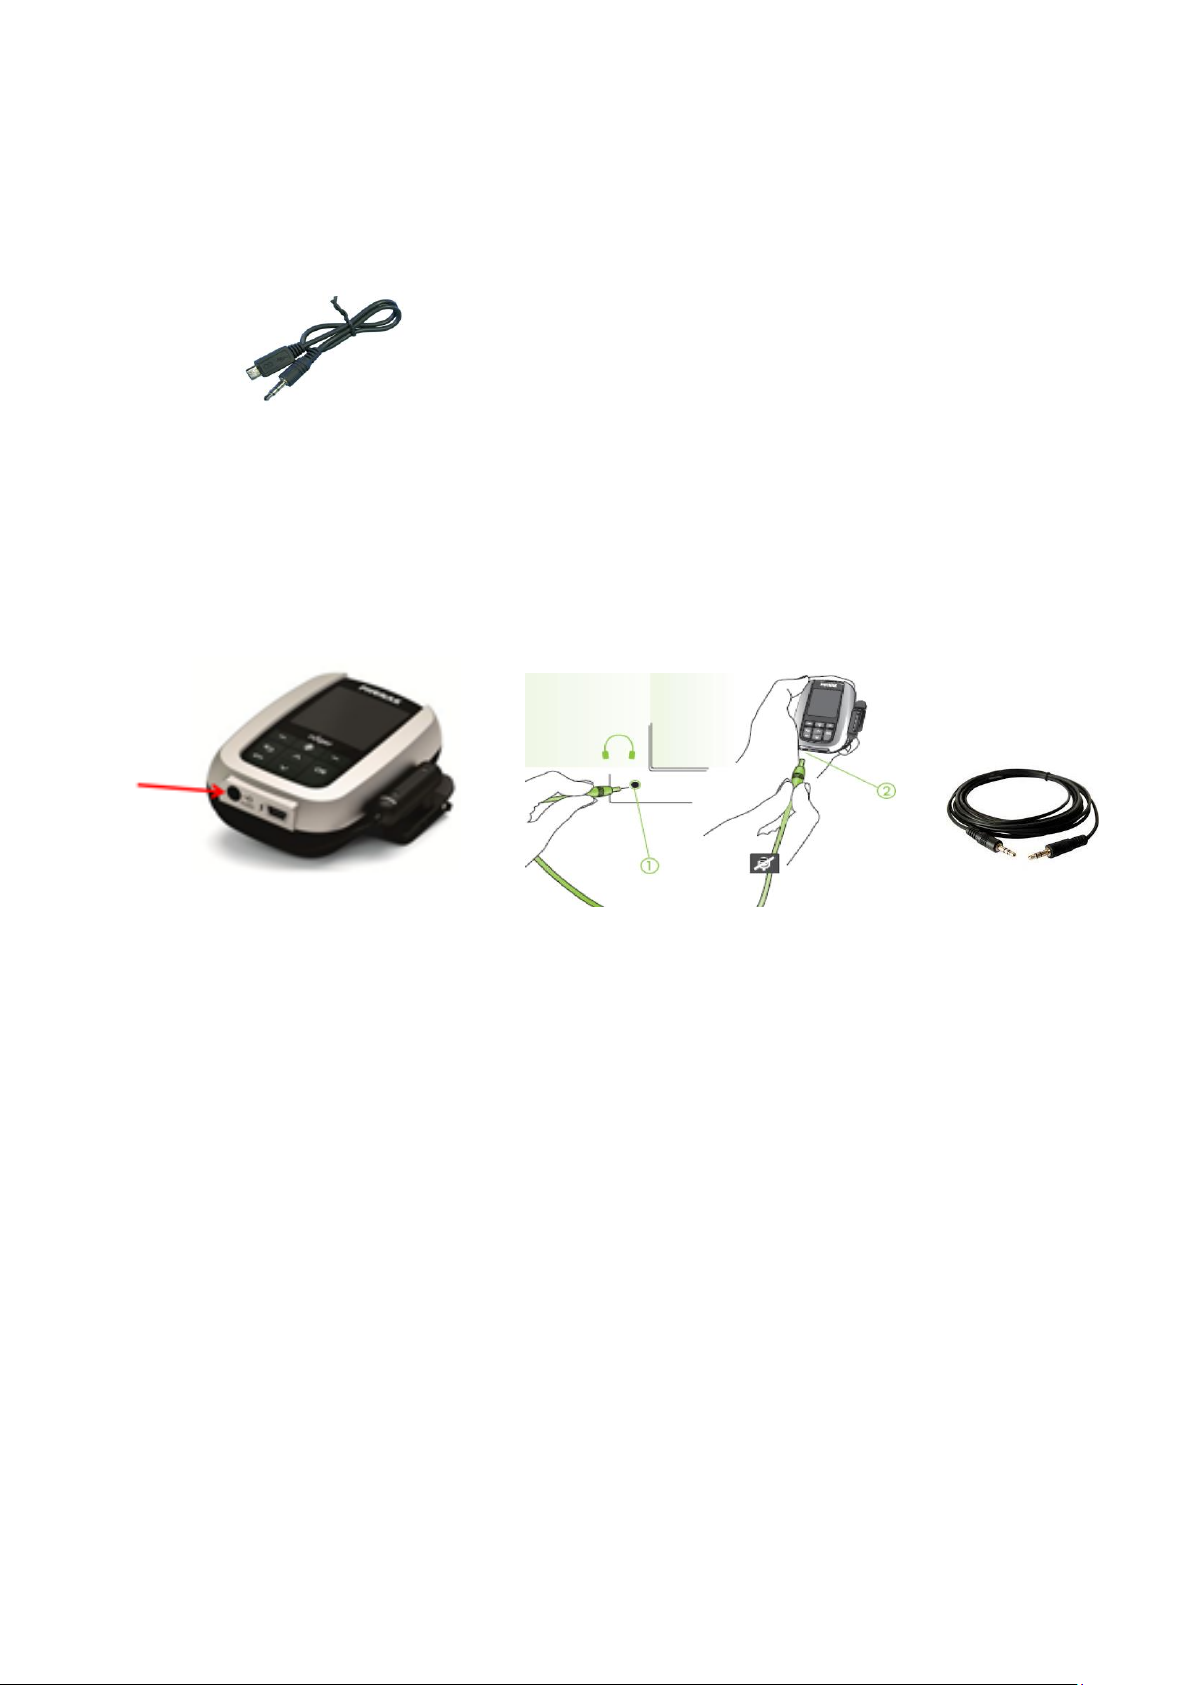
If the student uses an Inspiro microphone:
The Inspiro uses a 3.5mm to 3.5mm audio cable.
Once you have plugged one end of the audio cord into the headphone jack of the computer, plug the other end into the
audio jack at the bottom of the Inspiro microphone.
-The external mic on the Inspiro will automatically mute so when plugged in, the only audio going through the Inspiro
will be from the computer. To unmute microphone, press the mute button on the front of the Inspiro mic.
If the student does not have a Roger system - ComPilot II streamer:
If you do not have a Roger system available at home, you can use the Phonak ComPilot II streamer to access audio directly
to the hearing aids, either using the Bluetooth on your computer/tablet or hardwired with an audio cord (if your device is
not Bluetooth enabled). Because accessing Bluetooth on a computer/tablet can sometimes be an issue, hardwiring the
ComPilot II is a more universal way to access audio.
With Bluetooth:
-Turn computer/tablet Bluetooth ON
-Turn ComPilot II ON by sliding the ON/OFF switch on the side of the device.
-Press and hold the ComPilot II CONNECT button and VOLUME UP button at the same time for 2 seconds until
the indicator light at the top of the device starts to rapidly flash BLUE
-Select ComPilot II from the list of Bluetooth devices on your computer/tablet
-Pairing is successful when the indicator light stops flashing blue and the device shows ComPilot II is connected
-Student must wear Compilot II around their neck for audio signal to stream to compatible Phonak hearing aids
(Phonak Venture & Belong technology)

Phonak Connectivity Options 5
Hard-Wired (Without Bluetooth):
The ComPilot uses a 3.5mm to 3.5mm audio cord. ⇨
-Turn ComPilot II ON
-Plug audio cable into audio jack at the bottom of the ComPilot II device
-Plug the other end into the computer headphone/audio jack
-Ensure you select ‘Headphones’ instead of ‘Speakers’ on your
computer when prompted
Phonak Marvel Hearing Aids with Bluetooth
Steps to increase laptop volume beyond maximum (if necessary):
1. Select the Loudness Equalizer Option in Windows
First, check out the Loudness Equalizer option in Windows. Selecting that setting will raise the volume a little above its
default maximum for PCs with Realtek audio drivers.
However, not all sound cards support equalization. This is how you can select the Loudness Equalizer option in Windows 10.
•Press Cortana’s taskbar button, and enter the keyword ‘audio’ in the app’s search box.
•Select Manage audio devices to open the window directly below.
•Select Speakers and press the Properties button to open the General tab shown in the snapshot below.
•Select the Enhancement tab on the Speakers Properties window.
•Select the Loudness Equalizer check box on the Enhancement tab.
•Press the Apply > OK buttons to close the window.
This manual suits for next models
1
Table of contents