manuals.online logo
Brands
  1. Home
  2. •
  3. Brands
  4. •
  5. Sony
  6. •
  7. Car Receiver
  8. •
  9. Sony CDX-GT410U - Fm/am Compact Disk Player User manual

Sony CDX-GT410U - Fm/am Compact Disk Player User manual

Before using the card remote commander for the
first time, remove the insulation film.
OFF button
To power off; stop the source.
EQ3 (equalizer) button
To select an equalizer type (XPLOD,
VOCAL, EDGE, CRUISE, SPACE,
GRAVITY, CUSTOM or OFF).
To adjust the equalizer curve, see
“Customizing the equalizer curve” on the
reverse side of this sheet.
Volume control dial/select button
To adjust volume (rotate); select setup items
(press and rotate).
SOURCE button
To power on; change the source (Radio/CD/
MD*1/USB/AUX).
Disc slot
Insert the disc (label side up), and playback
starts automatically. You can play CD-DA
(also containing CD TEXT), CD-R/CD-RW
(MP3/WMA/AAC files also containing
Multi Session) and ATRAC CD (ATRAC3
and ATRAC3plus format).
Display window
USB terminal
To connect to the USB device.
(eject) button
To eject the disc.
PTY (Program Type) button
To select PTY in RDS. After pressing
, press  –/+ to search for a
station.
(front panel release) button
SEEK –/+ buttons
CD/MD*1/USB*2:
To skip tracks (press); skip tracks
continuously (press, then press again within
about 1 second and hold); reverse/fast-
forward a track (press and hold).
Radio:
To tune in stations automatically (press);
find a station manually (press and hold).
Receptor for the card remote
commander
MODE button
To select the radio band (FM/MW/LW);
select the unit*3; select the play mode*4.
DSPL (display)/DIM (dimmer) button
To change display items (press); change the
display brightness (press and hold).
RESET button (located behind the front
panel)
Detach the front panel and press the RESET
button with a pointed object, such as a ball-
point pen.
Display items for CD / Repeat and shuffle play / Playback USB devices /
Display items for USB / Listening to music on a Mass Storage Class type audio
device / Listening to music on “Walkman” (ATRAC Audio Device) / Adjusting the
sound characteristics / Customizing the equalizer curve / Adjusting setup items
CDX-GT410U
©
2006 Sony Corporation
AUX
OFF
DSPL
MODE
PUSH SELECT
SEEK SEEK
PAUSE
DIM REP SHUF
EQ3
SOURCE
123456
GP/ALBM
AF
/
TA
PTY
1 2
q
j
q
h
4 5 863
CDX-GT410U
q
a
q
d
q
;
9 q
s
q
f
q
g
7
q
k
Notes
•Before operating the unit for the first time, or
after replacing the car battery or changing the
connections, you must reset the unit.
•Pressing the RESET button will erase the clock
setting and some stored contents.
Number buttons
CD/MD*1/USB*2:
/: GP*5/ALBM*6–/+
To skip groups/albums (press); skip
groups/albums continuously (press and
hold)*7.
: REP
: SHUF
: PAUSE*8
To pause playback. To cancel, press
again.
Radio:
To receive stored stations (press); store
stations (press and hold).
AF/TA button
AF (Alternative Frequencies)/TA (Traffic
Announcement), TP (Traffic Programme):
Each time you press , the item
changes as follows:
AF-ON TA-ON AF, TA-ON 
AF, TA-OFF
AUX input jack
To connect a portable audio device.
The following buttons on the card remote
commander have also different buttons/functions
from the unit.
()/() buttons
To control CD/radio/MD/USB, the same as
 –/+ on the unit.
VOL (volume) +/– button
To adjust volume.
ATT (attenuate) button
To attenuate the sound. To cancel, press
again.
SEL (select) button
The same as the select button on the unit.
Location of controls and basic operations Detaching the front panel
You can detach the front panel of this unit to
prevent theft.
1Press .
The unit is turned off.
2Press , then pull it off towards you.
Attaching the front panel
Engage part of the front panel with part of
the unit, as illustrated, and push the left side into
position until it clicks.
B
A
OFF
DSPL SCRL
SEL
SOURCE
MODE
132
465
ATT
VOL
+
–
+
–
4ws
qd
1
wf
ql
qf
wa
w;
wg
wd
Main unit
Card remote commander
RM-X151
(+)/(–) buttons
To control CD, the same as / (GP/
ALBM –/+) on the unit.
SCRL (scroll) button
To scroll the display item.
Number buttons
To receive stored stations (press); store
stations (press and hold).
*1 When an MD changer is connected.
*2 When a USB device is connected.
*3 When a CD/MD changer is connected.
*4 When an ATRAC Audio Device is connected.
*5 When an ATRAC CD is played.
*6 When an MP3/WMA/AAC is played.
*7 If the changer/USB device is connected, the
operation is different.
*8 When playing back on this unit.
Notes
•When ejecting/inserting a disc, keep any USB
devices disconnected to avoid damage to the disc.
•If the unit is turned off and the display disappears,
it cannot be operated with the card remote
commander unless  on the unit is
pressed, or a disc is inserted to activate the unit
first.
Warning if your car’s ignition has no
ACC position
Be sure to set the Auto Off function. The unit
will shut off completely and automatically in
the set time after the unit is turned off, which
prevents battery drain. If you do not set the
Auto Off function, press and hold 
until the display disappears each time you
turn the ignition off.
SET UP
Setting the clock
The clock uses a 24-hour digital indication.
1Press and hold the select button.
The setup display appears.
2Press the select button repeatedly
until “CLOCK-ADJ” appears.
3Press  +.
The hour indication flashes.
4Rotate the volume control dial to set
the hour and minute.
To move the digital indication, press 
–/+.
5Press the select button.
The setup is complete and the clock starts.
Tip
You can set the clock automatically with the RDS
feature. For details, see “Adjusting setup items” on the
reverse side of the sheet, and set to “CT-ON” (Clock
Time).
RADIO
Storing stations automatically
— BTM
The unit selects strong signal stations and stores
them. You can store up to 6 stations per band
(FM1, FM2, FM3, MW, or LW).
Caution
When tuning in stations while driving, use Best
Tuning Memory (BTM) to prevent an accident.
1Press  repeatedly until
“TUNER” appears.
To change the band, press 
repeatedly. You can select from FM1, FM2,
FM3, MW or LW.
2Press and hold the select button.
The setup display appears.
3Press the select button repeatedly
until “BTM” appears.
4Press  +.
The unit stores stations in order of frequency
on the number buttons.
A beep sounds when the setting is stored.
SET UP RADIO CD USB
Location of controls and basic operations /
Detaching the front panel / Setting the clock /
Storing stations automatically
ILM (Illumination)
To change the illumination color: “ILM-1” ()
or “ILM-2.”
A.SCRL (Auto Scroll)
To scroll long displayed item automatically
when the album/track is changed.
– “A.SCRL-ON” (): to scroll.
– “A.SCRL-OFF”: to not scroll.
LOCAL (Local Seek Mode)
– “LOCAL-ON”: to only tune into stations with
stronger signals.
– “LOCAL-OFF” (): to tune normal reception.
MONO*2(Monaural Mode)
To improve poor FM reception, select monaural
reception mode.
– “MONO-ON”: to hear stereo broadcast in
monaural.
– “MONO-OFF” (): to hear stereo broadcast
in stereo.
REG*2(Regional)
To set “REG-ON” () or “REG-OFF.”
LPF*3(Low Pass Filter)
To select the subwoofer cut-off frequency: “LPF
OFF” (), “LPF125Hz” or “LPF 78Hz.”
BTM
To store radio stations automatically.
*1 When the unit is turned off.
*2 When FM is received.
*3 When the audio output is set to “SUB.”
CD
Display items for CD
AAC/WMA/ATRAC/MP3 indication
Source
Track number/Elapsed playing time, Disc/
artist name, Album/group number*, Album/
group name, Track name, Text information,
Clock
*Album/group number is displayed only when the
album/group is changed.
To change display items , press ;
scroll display items , press  on the
card remote commander or set “A.SCRL-ON.”
CD
Repeat and shuffle play
1During playback, press  (REP)
or  (SHUF) repeatedly until the
desired setting appears.
Select To play
TRACK track repeatedly.
ALBUM*1album repeatedly.
GROUP*2group repeatedly.
SHUF ALBUM*1album in random order.
SHUF GROUP*2group in random order.
SHUF DISC disc in random order.
*1 When an MP3/WMA/AAC is played.
*2 When an ATRAC CD is played.
To return to normal play mode, select “ OFF”
or “SHUF OFF.”
Adjusting the sound
characteristics — BAL/FAD/SUB
You can adjust the balance, fader, and subwoofer
volume.
1Press the select button repeatedly
until “BAL,”“FAD” or “SUB” appears.
The item changes as follows:
LOW*1MID*1HI*1
BAL (left-right) FAD (front-rear) 
SUB (subwoofer volume)*2AUX*3
*1 When EQ3 is activated.
*2 When the audio output is set to “SUB.”
“ATT” is displayed at the lowest setting, and
can be adjusted up to 20 steps.
*3 When AUX source is activated.
2Rotate the volume control dial to
adjust the selected item.
After 3 seconds, the setting is complete and
the display returns to normal play/reception
mode.
SET UP RADIO CD USB
Customizing the equalizer
curve — EQ3
“CUSTOM” of EQ3 allows you to make your
own equalizer settings.
1Select a source, then press 
repeatedly to select “CUSTOM.”
2Press the select button repeatedly
until “LOW,” “MID” or “HI” appears.
3Rotate the volume control dial to
adjust the selected item.
The volume level is adjustable in 1 dB steps,
from –10 dB to +10 dB.
Repeat steps 2 and 3 to adjust the equalizer
curve.
To restore the factory-set equalizer curve,
press and hold the select button before the
setting is complete.
After 3 seconds, the setting is complete and
the display returns to normal play/reception
mode.
SET UP RADIO CD USB
Adjusting setup items — SET
1Press and hold the select button.
The setup display appears.
2Press the select button repeatedly
until the desired item appears.
3Rotate the volume control dial to
select the setting (example “ON” or
“OFF”).
4Press and hold the select button.
The setup is complete and the display returns
to normal play/reception mode.
Note
Displayed items will differ, depending on the source
and setting.
The following items can be set:
“” indicates the default settings.
CLOCK-ADJ (Clock Adjust)
To set the clock.
CT (Clock Time)
To set “CT-ON” or “CT-OFF” ().
BEEP
To set “BEEP-ON” () or “BEEP-OFF.”
AUX-A*1(AUX Audio)
To turn the AUX source display “AUX-A-ON”
() or “AUX-A-OFF.”
A.OFF (Auto Off)
To shut off automatically after a desired time
when the unit is turned off,
– “A.OFF-NO” (), “A.OFF-30S (Seconds),”
“A.OFF-30M (Minutes)” or “A.OFF-60M
(Minutes).”
SUB/REAR*1
To switch the audio output.
– “SUB-OUT” (): to output to a subwoofer.
– “REAR-OUT”: to output to a power
amplifier.
DEMO*1(Demonstration)
To set “DEMO-ON” () or “DEMO-OFF.”
DIM (Dimmer)
To change the brightness of the display.
– “DIM-ON”: to dim the display.
– “DIM-OFF” (): to deactivate the dimmer.
USB
Playback USB devices
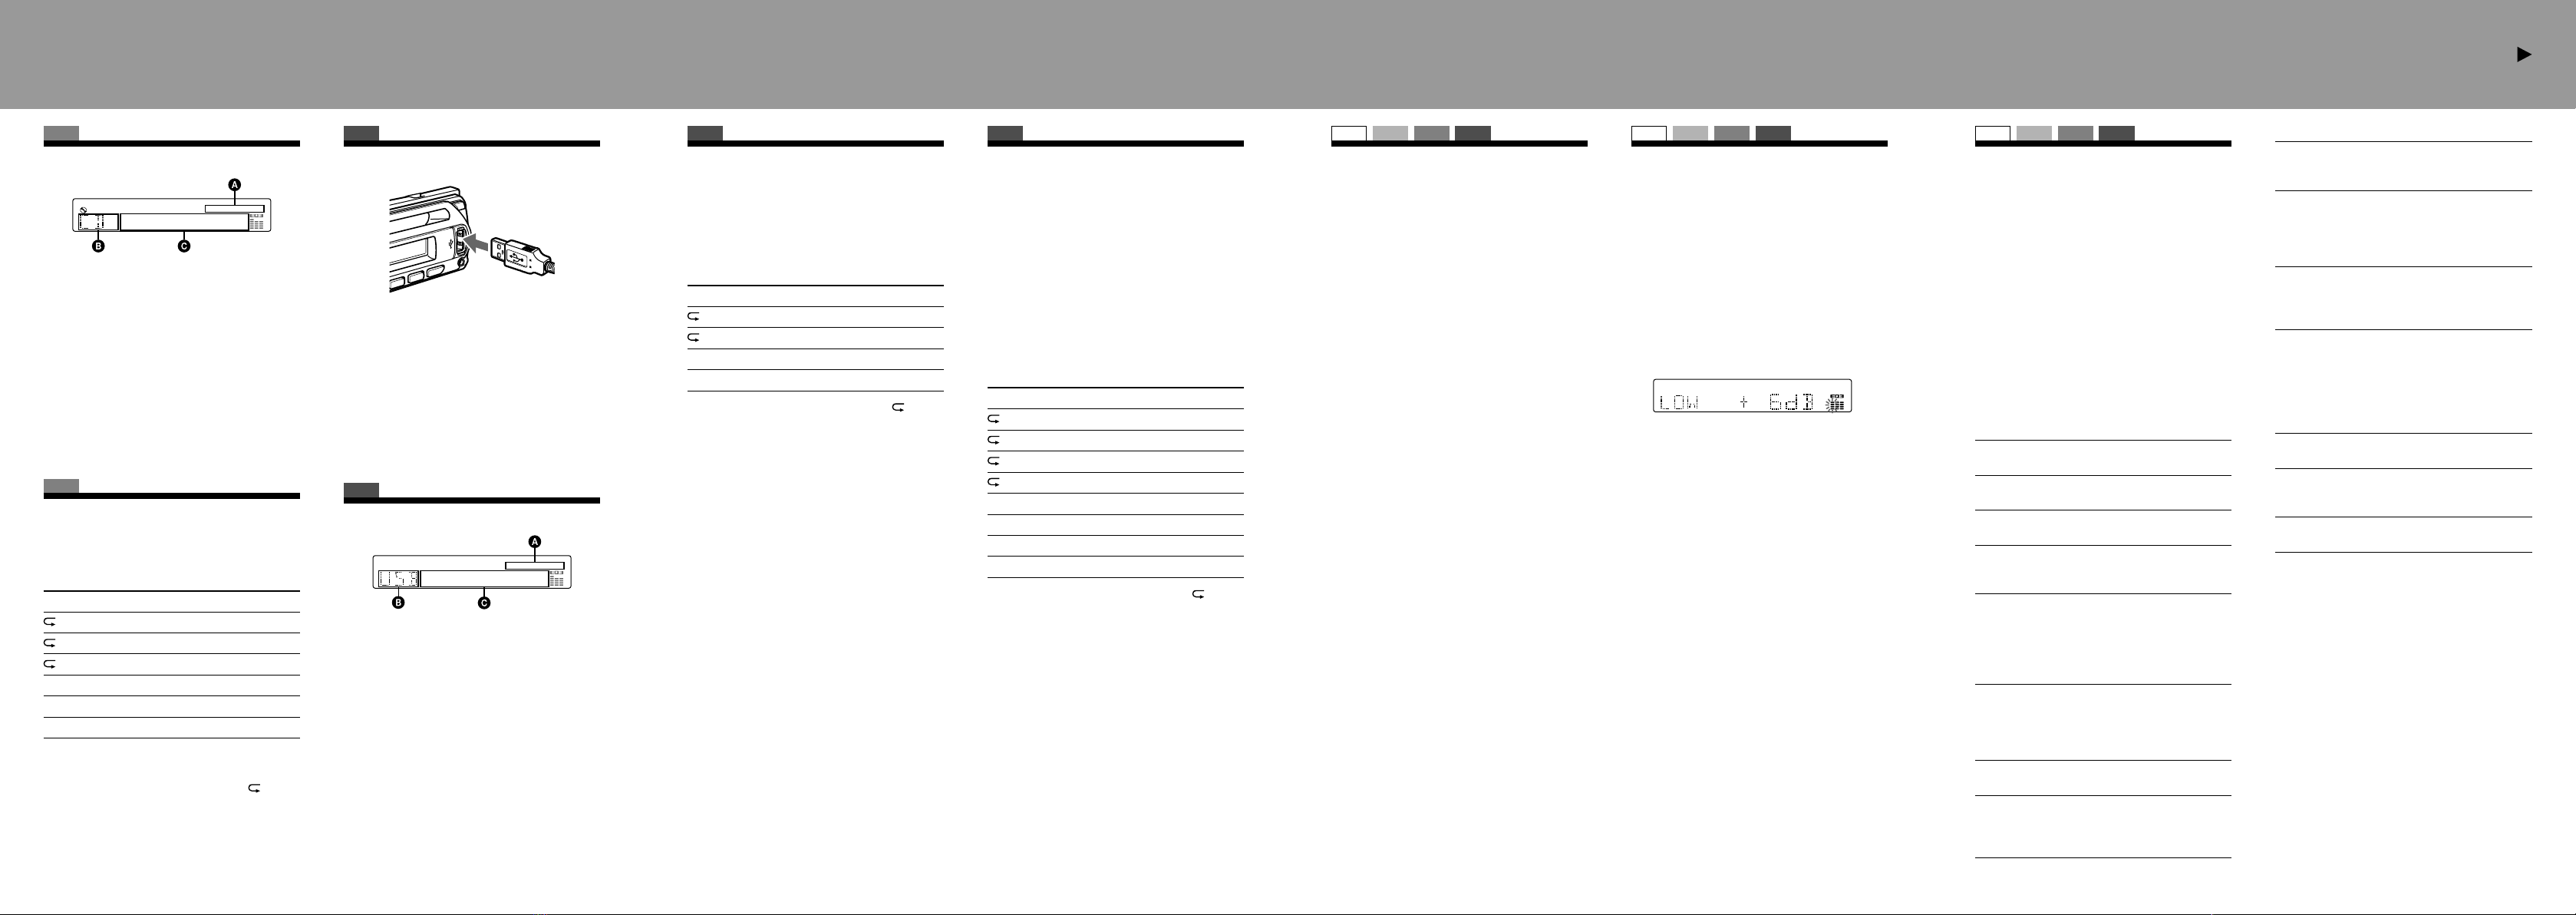
1Connect the USB device to the USB
terminal.
Playback starts.
Press  to stop playback.
Note
Before removing a USB device, be sure to stop
playback first. If you remove your USB device during
playback, data in the USB device may be damaged.
USB
Display items for USB
AAC/WMA/ATRAC/MP3 indication
“Walkman” (ATRAC Audio Device):
ALB, ART, PLY
Mass Storage Class: USB
Track/Album/Artist/Playlist number, Track/
Album/Artist/Playlist name, Elapsed playing
time, Clock
Note
The display differs depending on the Mass Storage
Class type USB device, and “Walkman” (ATRAC
Audio Device).
USB
Listening to music on a Mass
Storage Class type audio device
Repeat and shuffle play
1During playback, press  (REP) or 
(SHUF) repeatedly until the desired setting
appears.
Select To play
TRACK track repeatedly.
ALBUM album repeatedly.
SHUF ALBUM album in random order.
SHUF DEVICE device in random order.
To return to normal play mode, select “ OFF”
or “SHUF OFF.”
USB
Listening to music on “Walkman”
(ATRAC Audio Device)
1During playback, press 
repeatedly until the desired setting
appears.
The item changs as follows:
ALB (Album) ART (Artist) 
PLY (Playlist)
Repeat and shuffle play
1During playback, press  (REP) or 
(SHUF) repeatedly until the desired setting
appears.
Select To play
TRACK track repeatedly.
ALBUM album repeatedly.
ARTIST artist repeatedly.
PLAYLIST playlist repeatedly.
SHUF ALBUM album in random order.
SHUF ARTIST artist in random order.
SHUF PLAYLIST playlist in random order.
SHUF DEVICE device in random order.
To return to normal play mode, select “ OFF”
or “SHUF OFF.”

Other manuals for CDX-GT410U - Fm/am Compact Disk Player

5

This manual suits for next models

1

Other Sony Car Receiver manuals

Sony MEX 1GP - Giga Panel Radio Instruction sheet

Sony

Sony MEX 1GP - Giga Panel Radio Instruction sheet

Sony CDX-GT26 User manual

Sony

Sony CDX-GT26 User manual

Sony XR-1953 Product guide

Sony

Sony XR-1953 Product guide

Sony CDX-L550V User manual

Sony

Sony CDX-L550V User manual

Sony CDX-GT40UW User manual

Sony

Sony CDX-GT40UW User manual

Sony XR-3503MK2 User manual

Sony

Sony XR-3503MK2 User manual

Sony Model CDX-L280 User manual

Sony

Sony Model CDX-L280 User manual

Sony XR-CA350X Marketing s & diagrams Product guide

Sony

Sony XR-CA350X Marketing s & diagrams Product guide

Sony CDX-C90R User manual

Sony

Sony CDX-C90R User manual

Sony CDX-S2000C Product guide

Sony

Sony CDX-S2000C Product guide

Sony XR-1800R User manual

Sony

Sony XR-1800R User manual

Sony CDX-M1000TF User manual

Sony

Sony CDX-M1000TF User manual

Sony CDXGT430U - CD Receiver Head Unit User manual

Sony

Sony CDXGT430U - CD Receiver Head Unit User manual

Sony CDX-CA710X Addendum to User manual

Sony

Sony CDX-CA710X Addendum to User manual

Sony CDX-GT40U Product guide

Sony

Sony CDX-GT40U Product guide

Sony CDX-GT790UI User manual

Sony

Sony CDX-GT790UI User manual

Sony XA-V7W User manual

Sony

Sony XA-V7W User manual

Sony FM/AM CASSETTE XR-C5120 User manual

Sony

Sony FM/AM CASSETTE XR-C5120 User manual

Sony XR-C400 - Fm/am Cassette Car Stereo Product guide

Sony

Sony XR-C400 - Fm/am Cassette Car Stereo Product guide

Sony CDX-GT81UW - Usb Receiver Product guide

Sony

Sony CDX-GT81UW - Usb Receiver Product guide

Sony RXD-700 User manual

Sony

Sony RXD-700 User manual

Sony CDX-4000X - Fm/am Compact Disc Player User manual

Sony

Sony CDX-4000X - Fm/am Compact Disc Player User manual

Sony XR-L240 User manual

Sony

Sony XR-L240 User manual

Sony CDX-GT57UPW User manual

Sony

Sony CDX-GT57UPW User manual

Popular Car Receiver manuals by other brands

Pioneer SX-P520 Service manual

Pioneer

Pioneer SX-P520 Service manual

Philips CED230/51 user manual

Philips

Philips CED230/51 user manual

JVC KW-XG504 instructions

JVC

JVC KW-XG504 instructions

Boss Audio Systems 614C user manual

Boss Audio Systems

Boss Audio Systems 614C user manual

Phonocar VM 070 instruction manual

Phonocar

Phonocar VM 070 instruction manual

Hyundai H-CDM8056 instruction manual

Hyundai

Hyundai H-CDM8056 instruction manual

JVC KD-ADV6160 Service manual

JVC

JVC KD-ADV6160 Service manual

Motorola VWAT Service manual

Motorola

Motorola VWAT Service manual

JVC KD-APD58 - Radio / CD instructions

JVC

JVC KD-APD58 - Radio / CD instructions

Clarion PN-2714B-B Service manual

Clarion

Clarion PN-2714B-B Service manual

JVC KD-SX991R instructions

JVC

JVC KD-SX991R instructions

Varta V-AVD55 instruction manual

Varta

Varta V-AVD55 instruction manual

JVC KD-ADV6270 Installation & connection manual

JVC

JVC KD-ADV6270 Installation & connection manual

Vitek VT-3632 Manual instruction

Vitek

Vitek VT-3632 Manual instruction

Audiovox AV-301N owner's manual

Audiovox

Audiovox AV-301N owner's manual

JVC KD-T922BT quick start guide

JVC

JVC KD-T922BT quick start guide

Skoda CAR RADIO BOLERO - FOR OCTAVIA manual

Skoda

Skoda CAR RADIO BOLERO - FOR OCTAVIA manual

Legacy LCD32FD instruction manual

Legacy

Legacy LCD32FD instruction manual

manuals.online logo
manuals.online logoBrands
  • About & Mission
  • Contact us
  • Privacy Policy
  • Terms and Conditions

Copyright 2025 Manuals.Online. All Rights Reserved.