LCS-URXP2 4-418-819-01 (1)
4-418-819-01(1)
Soft Carrying Case
取扱説明書 Istruzioni per l’uso
Operating Instructions Manual de instrucciones
Mode d’emploi
Bedienungsanleitung
お買い上げいただきありがとうございます。
電気製品は、安全のための注意事項を守らないと、人身事故になるこ
とがあります。
この取扱説明書には、事故を防ぐための重要な注意事項と製品の取り扱いかたを示
してあります。この取扱説明書をよくお読みのうえ、製品を安全にお使いく
ださい。お読みになったあとは、いつでも見られるところに必ず保管してください。
ご使用にあたっては、URX-P2 本体および本体と組み合わせの接続機器に付属の取
扱説明書の「安全のために」と「 警告」、「 注意」をよくお読みください。
お読みになったあとは、いつでも見られるところに必ず保管してください。
LCS-URXP2
© 2011 Sony Corporation Printed in Korea
安全のために
ソニー製品は安全に充分に配慮して設計されています。しかし、まちがった使い
かたをすると、製品の落下などにより人身事故につながることがあり、危険です。
事故を防ぐために次のことを必ずお守りください。
安全のための注意事項を守る。
破損したら使わずに、ソニーのサービス窓口に相談する。
警告表示の意味
この取扱説明書および製品では、次のような
表示をしています。表示の内容をよく理解し
てから本文をお読みください。
この表示の注意事項を守らないと、けがをし
たり周辺の物品に損害を与えたりすることが
あります。
行為を禁止する記号
行為を指示する記号
下記の注意を守らないと、けがをしたり周辺の
物品に損害を与えることがあります。
指定以外の機器を収納・使用しない
指定以外の機器を収納した場合、その機器が落下し、ケガの原因と
なることがあります。
機器の切替時以外はタブを確実にしめる
移動、運搬時にタブが開いていると、収納している製品が落下して
けがの原因となることがあります。
改造しない
改造するとキャリングケースの強度が低下し、収納している製品
が落下して、けがの原因となることがあります。
日本語
概要
ソフトキャリングケースLCS-URXP2は、ポータブルダイバーシティーチュー
ナー URX-P2(別売)を持ち運ぶための専用ソフトケースです。
本ケースにURX-P2を入れたままで、ケーブル接続、スイッチ/ボタン操作およ
び電池交換が可能です。
本ケースにURX-P2を入れたままディスプレイやランプ表示の確認が可能で
す。
マウントアダプター SMAD-V1(別売)を使用して、本ケースをカムコーダー
に取り付けることができます。
各部の名称(図)
タブ
バンジーコード
トップファスナー
ベルト
ボトムファスナー
URX-P2をケースに入れる(図)
本ケースのタブをトップファスナーからはずし、URX-P2()を上方から入れ
ます。トップファスナーとタブを貼り合わせます。
マウントアダプターに取り付ける(図)
マウントアダプター SMAD-V1(別売)()とVシュー(SMAD-V1に固定済み)
()を使用して、Vマウントに取り付けることができます。
本ケースのベルトをSMAD-V1の上下の穴に通す。
1.
本ケースのベルトとボトムファスナーを貼り合わせる。
2.
VシューをVマウントに装着する。
3.
カムコーダーに取り付ける(図、)
ご注意
ベルトとボトムファスナーを貼り合わせる際は、ベルトがゆるまないように
しっかりと引っ張りながら貼り合わせてください。
本ケースをカムコーダーに取り付ける際にベルトがカムコーダーのグリップ
ベルトを傷つける恐れがあります。取り付けの際は充分に注意してください。
ハンディタイプのカムコーダーに取り付ける(図)
本ケースのベルトをカムコーダー本体とグリップベルトの間に通す。
1.
本ケースのベルトとボトムファスナーを貼り合わせる。
2.
ショルダータイプのカムコーダーに取り付ける(図)
本ケースをカムコーダーに装着するには、マウント金具(A-8278-057-B、別売)
()とマウントアダプター SMAD-V1(別売)()を使用します。
SMAD-V1とVシューに取り付けられているネジ(3か所)をはずす。
1.
マウント金具にSMAD-V1をネジ留め(4か所、+B3×5と+B4×5:各2本)す
2.
る。
本ケースのベルトとボトムファスナーを貼り合わせる。
3.
ケーブルを接続する
本ケースのタブとトップファスナーを貼り合わせた状態で、URX-P2の端子に
ケーブルを接続してください。
ご注意
URX-P2の端子にコネクターを接続する際は、バンジーコードをはさみ込まない
ようにしてください。
主な仕様
外形寸法 66 ×116 ×43 mm(幅×高さ×奥行き)
質量 約40 g
付属品 取扱説明書(1)
仕様および外観は、改良のため予告なく変更することがありますが、ご了承くだ
さい。
お使いになる前に、必ず動作確認を行ってください。故障その他に伴う営業上
の機会損失等は保証期間中および保証期間経過後にかかわらず、補償はいたし
かねますのでご了承ください。
English
Before operating the unit, please read this manual thoroughly and retain it for
future reference.
Overview
The LCS-URXP2 Soft Carrying Case is a soft carrying case specifically designed for
the URX-P2 Portable Diversity Tuner (not supplied).
Cable connections, switch and button operations, and battery replacement
can be performed while the URX-P2 is inside the case.
You can view the URX-P2 display and indicators while it is inside the case.
The SMAD-V1 mount adapter (not supplied) can be used to mount the case to
a camcorder.
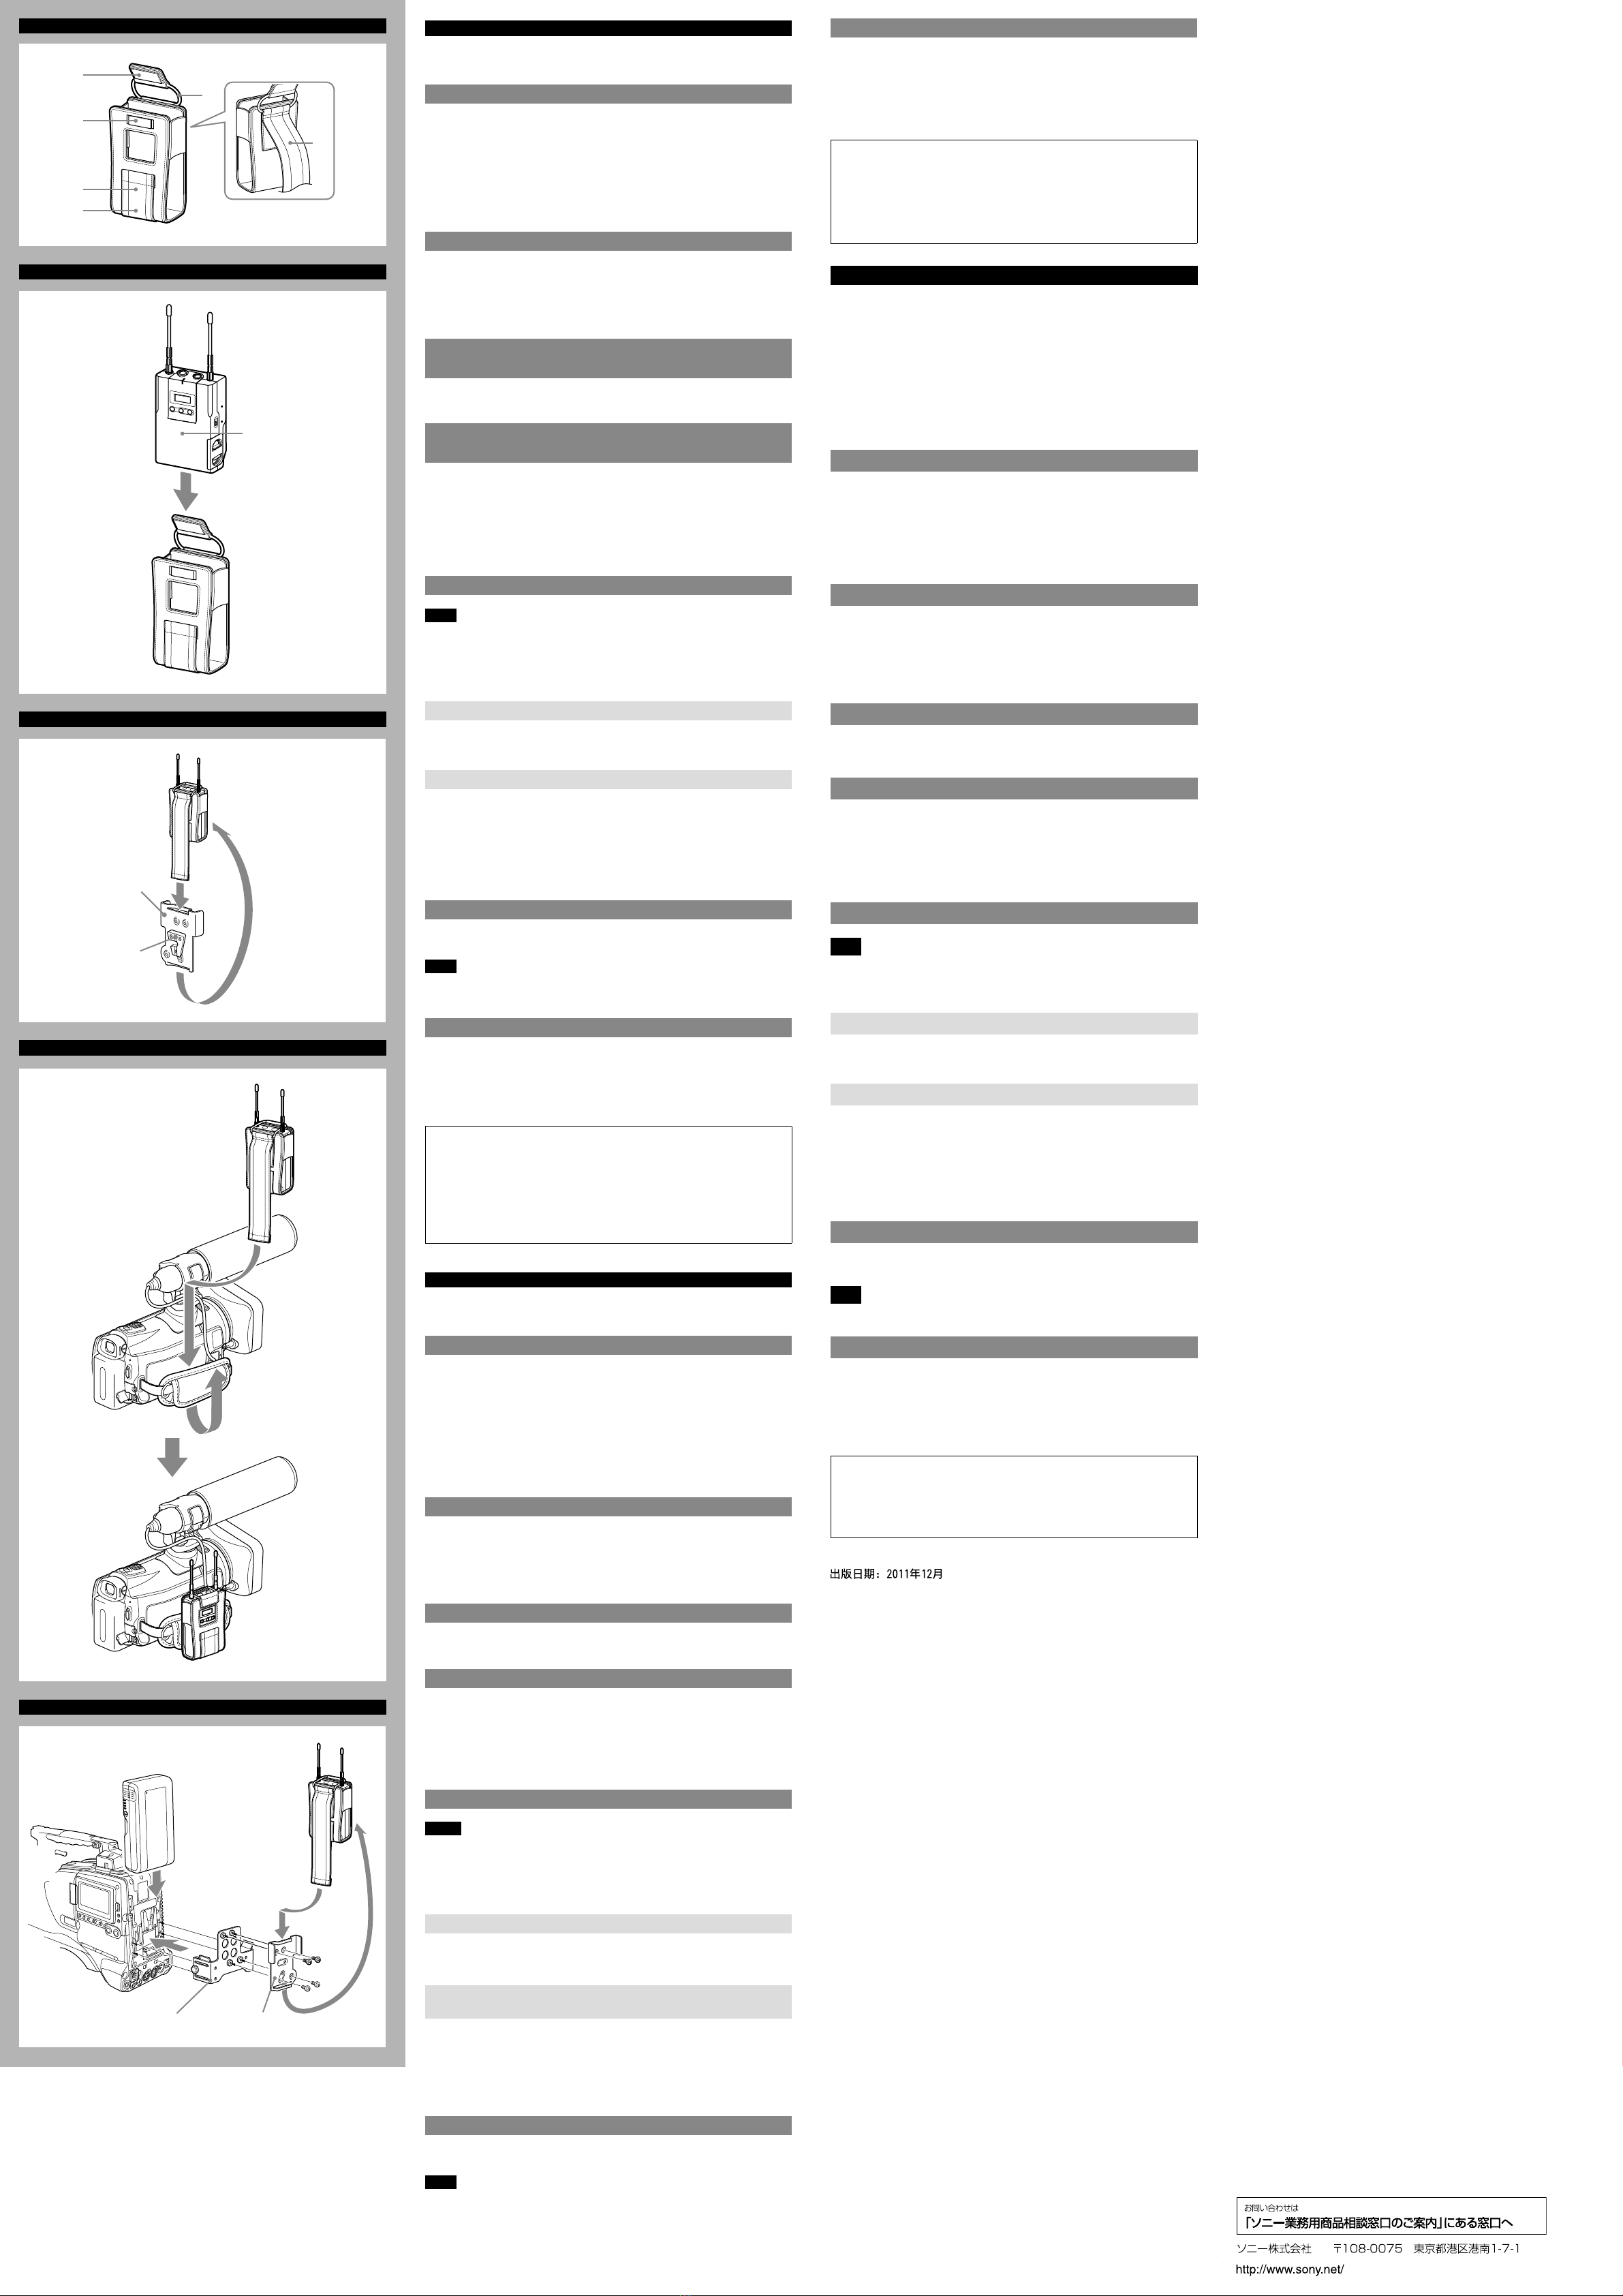
Parts Identification (Fig. )
Tab
Bungee cords
Top fastener
Belt
Bottom fastener
Inserting the URX-P2 into the Case (Fig. )
Undo the tab from the top fastener, and insert the URX-P2 () from the top of
the case. Fasten the tab to the top fastener.
Mounting to a Mount Adapter (Fig. )
You can mount the case on the V mount using the SMAD-V1 mount adapter (not
supplied) () and V shoe (attached to the SMAD-V1) ().
Pass the case’s belt through the holes at the top and bottom of the SMAD-V1.1.
Fasten the case’s belt to the bottom fastener.2.
Mount the V shoe onto the V mount.3.
Mounting to a Camcorder (Fig. , )
Notes
Be sure to pull the belt so that it is secure and not loose when fastening the
belt to the bottom fastener.
When attaching this case to a camcorder, the case’s belt may scratch the grip
belt on the camcorder. Be careful when attaching the case.
Mounting to a Handheld Camcorder (Fig. )
Pass the case’s belt through the grip belt on the camcorder.1.
Fasten the case’s belt to the bottom fastener.2.
Mounting to a Shoulder-Mount Camcorder (Fig. )
Use a mount bracket (A-8278-057-B) () and the SMAD-V1 mount adapter ()
(both not supplied) to mount the case to the camcorder.
Remove the screws on the SMAD-V1 and V shoe (3 screws).1.
Screw the SMAD-V1 onto the mount bracket (2 +B3×5 screws, 2 +B4×52.
screws).
Fasten the case’s belt to the bottom fastener.3.
Connecting Cables
Connect the cables to the connectors on the URX-P2 while it is inside the case
with the tab fastened to the top fastener.
Note
When connecting cables to the URX-P2 connectors, make sure that the bungee
cords do not get caught.
Specifications
Dimensions 66 × 116 × 43 mm (2 5/8× 4 5/8× 1 3/4in.) (W × H × D)
Mass Approx. 40 g (1.4 oz.)
Supplied accessories Operating Instructions (1)
Design and specifications are subject to change without notice.
Note
Always verify that the unit is operating properly before use. SONY WILL
NOT BE LIABLE FOR DAMAGES OF ANY KIND INCLUDING, BUT NOT LIMITED
TO, COMPENSATION OR REIMBURSEMENT ON ACCOUNT OF THE LOSS OF
PRESENT OR PROSPECTIVE PROFITS DUE TO FAILURE OF THIS UNIT, EITHER
DURING THE WARRANTY PERIOD OR AFTER EXPIRATION OF THE WARRANTY,
OR FOR ANY OTHER REASON WHATSOEVER.
Français
Avant d’utiliser l’appareil, veuillez lire attentivement ce manuel et le conserver
pour future référence.
Présentation
La mallette de transport souple LCS-URXP2 est une mallette de transport
spécialement conçue pour le tuner portable à diversité URX-P2 (non fourni).
La connexion des câbles, le fonctionnement des interrupteurs et des touches
et le remplacement de la batterie peuvent être effectués avec l’URX-P2 dans
la mallette.
Vous pouvez voir l’afficheur et les indicateurs alors qu’il est dans la mallette.
L’adaptateur de montage SMAD-V1 (non fournie) peut être utilisée pour
monter la mallette sur le caméscope.
Identification des pièces (Fig. )
Languette
Cordes élastiques
Attache supérieure
Bandoulière
Attache inférieure
Insertion de l’URX-P2 dans la mallette (Fig. )
Enlevez la languette de l’attache supérieure, puis insérez l’URX-P2 () par le
haut de la mallette. Attachez la languette à l’attache supérieure.
Montage sur un adaptateur de montage (Fig. )
Vous pouvez monter la mallette sur le montage en V à l’aide de l’adaptateur de
montage SMAD-V1 (non fourni) () et la courroie en V (fixée au SMAD-V1) ().
Passez la bandoulière de la mallette dans les fentes en haut et en bas du1.
SMAD-V1.
Attachez la bandoulière de la mallette à l’attache inférieure.2.
Montez la courroie en V sur le montage en V.3.
Montage sur un caméscope (Fig. , )
Remarques
Assurez-vous de tirer la bandoulière pour vérifier qu’elle est bien serrée en
l’attachant à l’attache inférieure.
En attachant cette mallette au caméscope, la bandoulière de la mallette peut
érafler la poignée du caméscope. Faites attention en attachant la mallette.
Montage sur un caméscope portatif (Fig. )
Passez la bandoulière de la mallette dans la poignée du caméscope.1.
Fixez la bandoulière de la mallette à l’attache inférieure.2.
Montage sur un caméscope à bandoulière (Fig. )
Utilisez un support de montage (A-8278-057-B) () et l’adaptateur de montage
SMAD-V1 () (tous deux non fournis) pour monter la mallette sur le caméscope.
Retirez les vis du SMAD-V1 et de la courroie en V (3 vis).1.
Vissez le SMAD-V1 sur le support de montage (2 +B3×5 vis, 2 +B4×5 vis).2.
Attachez la bandoulière de la mallette à l’attache inférieure.3.
Raccordement des câbles
Raccordez les câbles aux connecteurs de l’URX-P2 lorsqu’il est dans la mallette
avec la languette attachée à l’attache supérieure.
Remarque
Lors du raccordement des câbles aux connecteurs URX-P2, faites attention à ne
pas coincer les cordes élastiques.
Spécifications
Dimensions 66 × 116 × 43 mm (2 5/8× 4 5/8× 1 3/4po.) (L × H × P)
Poids Environ 40 g (1,4 on.)
Accessoires fournis Mode d’emploi (1)
La conception et les spécifications sont modifiables sans préavis.
Remarque
Vérifiez toujours que l’appareil fonctionne correctement avant l’utilisation.
Sony n’assumera pas de responsabilité pour les dommages de quelque
sorte qu’ils soient, incluant mais ne se limitant pas à la compensation ou
au remboursement, à cause de la perte de profits actuels ou futurs suite à
la défaillance de cet appareil, que ce soit pendant la période de garantie
ou après son expiration, ou pour toute autre raison quelle qu’elle soit.
Deutsch
Bitte lesen Sie dieses Handbuch vor der Benutzung des Geräts sorgfältig durch
und bewahren Sie es zum späteren Nachschlagen auf.
Kurzbeschreibung
Die Tragetasche LCS-URXP2 ist speziell für den mobilen Diversity Tuner URX-P2
(nicht im Lieferumfang enthalten) vorgesehen.
Das Anschließen von Kabeln, Bedienvorgänge mittels der Schalter und Tasten
sowie das Ersetzen des Akkus können erfolgen, während der URX-P2 sich in
der Tasche befindet.
Auch der Bildschirm und die Anzeigen des URX-P2 sind sichtbar, wenn sich
dieser in der Tasche befindet.
Mit dem Adapter SMAD-V1 (nicht im Lieferumfang enthalten) kann die Tasche
an einem Camcorder befestigt werden.
Beschreibung der Teile (Abb. )
Lasche
Gummibänder
Oberer Verschluss
Gurt
Unterer Verschluss
Einsetzen des URX-P2 in die Tasche (Abb. )
Lösen Sie die Lasche vom oberen Verschluss, und legen Sie den URX-P2 () von
oben in die Tasche ein. Befestigen Sie die Lasche am oberen Verschluss.
Montage an einem Montageadapter (Abb. )
Sie können die Tasche mit dem Adapter SMAD-V1 (nicht im Lieferumfang
enthalten) () und dem V-Schuh (am SMAD-V1 angebracht) () an der
V-Montagehalterung befestigen.
Führen Sie den Gurt der Tasche durch die Öffnungen an der Ober- und1.
Unterseite des SMAD-V1.
Befestigen Sie den Gurt der Tasche am unteren Verschluss.2.
Bringen Sie den V-Schuh an der V-Montagehalterung.3.
Anbringen an einem Camcorder: (Abb. , )
Hinweise
Achten Sie darauf, dass der Gurt beim Schließen des unteren Verschlusses fest
anliegt und nicht lose ist.
Wenn Sie die Tasche an einem Camcorder befestigen, kann der Gurt der
Tasche an der Handschlaufe des Camcorders scheuern. Gehen Sie daher beim
Anbringen der Tasche sorgfältig vor.
Anbringen an einem Handheld-Camcorder (Abb. )
Führen Sie den Gurt der Tasche durch die Handschlaufe des Camcorders.1.
Befestigen Sie den Gurt der Tasche am unteren Verschluss.2.
Anbringen an einem Schulter-Camcorder (Abb. )
Verwenden Sie eine Halterung (A-8278-057-B) () und den Adapter SMAD-V1
() (beide nicht im Lieferumfang enthalten), um die Tasche am Camcorder zu
befestigen.
Entfernen Sie die Schrauben am SMAD-V1 und am V-Schuh (3 Schrauben).1.
Schrauben Sie den SMAD-V1 an der Halterung fest (2 Schrauben +B3×5,2.
2 Schrauben +B4×5).
Befestigen Sie den Gurt der Tasche am unteren Verschluss.3.
Anschließen der Kabel
Schließen Sie die Kabel an die Anschlüsse am URX-P2 an, wenn sich dieser in der
Tasche befindet und die Lasche am oberen Verschluss befestigt ist.
Hinweis
Achten Sie beim Anschließen der Kabel an die URX-P2-Anschlüsse darauf, dass
diese sich nicht mit den Gummischnüren verwickeln.
Technische Daten
Abmessungen 66 × 116 × 43 mm (B × H × T)
Masse ca. 40 g
Mitgeliefertes Zubehör Bedienungsanleitung (1)
Änderungen, die dem technischen Fortschritt dienen, bleiben vorbehalten.
Hinweis
Bestätigen Sie vor dem Gebrauch immer, dass das Gerät richtig arbeitet. SONY
KANN KEINE HAFTUNG FÜR SCHÄDEN JEDER ART, EINSCHLIESSLICH ABER
NICHT BEGRENZT AUF KOMPENSATION ODER ERSTATTUNG, AUFGRUND
VON VERLUST VON AKTUELLEN ODER ERWARTETEN PROFITEN DURCH
FEHLFUNKTION DIESES GERÄTS ODER AUS JEGLICHEM ANDEREN GRUND,
ENTWEDER WÄHREND DER GARANTIEFRIST ODER NACH ABLAUF DER
GARANTIEFRIST, ÜBERNEHMEN.
A
B
D
E
C