ILCA-77M2/77M2M/77M2Q_L2
– 2 –
SPECIFICATIONS
– ENGLISH – – JAPANESE –
概略仕様
本体
[形式]
カメラタイプ フラッシュ内蔵レンズ交換式
デジタルカメラ
使用レンズ ソニー Aマウントレンズ
[撮像部]
撮像素子 23.5mm×15.6 mm(APS-Cサイズ)、
CMOSイメージセンサー
総画素数 約24 700 000画素
カメラ有効画素数 約24 300 000画素
[手ブレ補正]
静止画撮影時 形式:イメージセンサーシフト方式
動画撮影時 形式:電子式
[アンチダスト]
システム 帯電防止コートとイメージセンサー
シフト駆動の併用
[オートフォーカス]
形式 TTL位相差検出方式(中央F2.8セン
サーあり)、79点(15点クロスタイプ)
検出輝度範囲 EV −2 〜EV 18(ISO 100相当)
AF補助光 約1 m 〜5 m
[ファインダー]
形式 電子式ビューファインダー
(有機EL)
画面サイズ 1.3cm(0.5型)
総ドット数 2 359 296ドット
視野率 100%
倍率 約1.09倍(35mm判換算:約0.71倍、
50 mmレンズ、無限遠、
視度−1 m−1時)
アイポイント 最終光学面から約27 mm、接眼枠か
ら約22 mm(視度−1 m−1時)(CIPA規
格準拠)
視度調整 −4.0 m−1〜+3.0 m−1
[液晶モニター]
形式 7.5 cm(3.0型)TFT駆動
ドット数 1 228 800(640×4(RGBW)×480)
ドット
[露出制御]
測光素子 ExmorCMOSセンサー
測光方式 1200分割ライブビュー分析測光
測光範囲 EV −2 〜+17、分割、中央重点、
スポット測光とも(ISO100相当、
F1.4レンズ使用)
ISO感度(推奨露光指数)
静止画撮影時:オート、
ISO50 〜25600(1/3EVステップ)
動画撮影時:オート、ISO100 〜
12800相当(1/3EVステップ)
露出補正 ±5.0EV(1/3、1/2EVステップ切り換
え可能)
[シャッター]
形式 電子制御式縦走りフォーカルプレー
ンシャッター
シャッタースピード範囲
静止画撮影時:1/8000 〜30秒、
バルブ
動画撮影時:1/8000 〜1/4秒(1/3段
ステップ)、AUTO時は1/60秒まで
(オートスローシャッター 1/30秒ま
で)
フラッシュ同調速度 1/250秒
[内蔵フラッシュ]
ガイドナンバー 12(ISO100・m)
充電時間 約3秒
照射角 16 mmレンズをカバー(レンズ表示
の焦点距離)
調光補正 ±3.0EV(1/3、1/2EVステップ切り換
え)
フラッシュ光の届く範囲
絞り値 F2.8 F4 F5.6
ISO感度
ISO 100 1 m 〜4.3 m 1 m 〜3 m 1 m 〜2.1 m
ISO 200 1 m 〜6.1 m 1 m 〜4.2 m 1 m 〜3 m
ISO 400 1.4 m 〜8.6 m 1 m 〜6 m 1 m 〜4.3 m
ISO 800 2 m 〜12 m 1.4 m 〜8.5 m 1 m 〜6.1 m
[連続撮影]
連続撮影速度 連続撮影優先AE:毎秒最高約12枚/
:毎秒最高約8枚/
:毎秒最高約3枚
* 弊社測定条件による。撮影条件に
よっては連続撮影の速度が遅くな
ります。
最大連続撮影枚数 連続撮影優先AE時
エクストラファイン:53枚/ファイ
ン:60枚/スタンダード:64枚/RAW
+JPEG:25枚/RAW:26枚
連続撮影時
エクストラファイン:56枚/ファイ
ン:75枚/スタンダード:93枚/RAW
+JPEG:26枚/RAW:28枚
[拡大再生]
拡大倍率範囲 画像サイズ:L:約1.0 〜18.8倍/
M:約1.0 〜13.3倍/S:約1.0 〜9.4倍
[記録方式]
静止画記録方式 JPEG(DCF Ver.2.0、Exif Ver.2.3、
MPF Baseline)準拠、RAW(ソニー
ARW 2.3フォーマット)
動画記録方式(AVCHD方式)
AVCHD規格 Ver2.0準拠
映像:MPEG-4 AVC/H.264
音声:Dolby Digital 2ch
ドルビーデジタルステレオクリエー
ター搭載
•ドルビーラボラトリーズからの実
施権に基づき製造されています。
動画記録方式(MP4方式)
映像:MPEG-4 AVC/H.264
音声:MPEG-4 AAC-LC 2ch
[記録メディア]
メモリースティック PRO デュオ、
SDカード
[入出力端子]
マルチ/マイクロUSB端子
USB通信、Hi-Speed USB(USB2.0)
* この端子はマイクロUSB規格に対
応した機器をつなぐことができま
す。
HDMI端子 HDMIタイプD マイクロ端子
マイク端子 φ3.5 mmステレオミニジャック
REMOTE端子
[電源]
バッテリー リチャージャブルバッテリーパック
NP-FM500H
消費電力(撮影時) DT 16-50mm F2.8 SSM* 使用時ファイ
ンダー使用時:約3.5 W
モニター使用時:約3.0 W
* ILCA-77M2Qに付属
[その他]
マイクロホン ステレオ
スピーカー モノラル
Exif Print 対応
DPOF 対応
PRINT Image Matching III
対応
外形寸法 142.6 mm×104.2 mm×80.9 mm
(幅×高さ×奥行き、突起部を除く)
本体質量 約726 g(バッテリー、メモリース
ティック PRO デュオを含む)
約647 g(本体のみ)
動作温度 0℃〜 40℃
[ワイヤレスLAN]
対応規格 IEEE 802.11 b/g/n
使用周波数帯 2.4 GHz帯
セキュリティー WEP/WPA-PSK/WPA2-PSK
接続方式 WPS (Wi-Fi protected Setup)/
マニュアル
アクセス方式 インフラストラクチャーモード
NFC NFCフォーラム Type 3 Tag準拠
画像の互換性について
•本機は、(社)電子情報技術産業協会(JEITA)にて制定さ
れた統一規格Design rule for Camera File system(DCF)
に対応しています。
•本機で撮影した画像の他機での再生、他機で撮影/修正
した画像の本機での再生は保証いたしません。
バッテリーチャージャー BC-VM10A
定格入力 AC100 V – 240 V、50 Hz/60 Hz、9 W
定格出力 DC 8.4 V、0.75 A
動作温度 0℃〜 40℃
保存温度 −20℃〜+60℃
最大外形寸法 約70 mm×25 mm×95 mm
(幅×高さ×奥行き)
リチャージャブルバッテリーパック
NP-FM500H
使用電池 リチウムイオン蓄電池
最大電圧 DC 8.4 V
公称電圧 DC 7.2V
容量 公称容量 11.8 Wh(1 650 mAh)
定格(最小)容量 11.5 Wh(1 600
mAh)
最大外形寸法 約38.2 mm×20.5 mm×55.6 mm
(幅×高さ×奥行き)
本機や付属品の仕様および外観は、改良のため予告なく
変更することがありますが、ご了承ください。
Camera
[System]
Camera Type: Built-In-Flash
Interchangeable Lens Digital Camera
Lens: Sony A-mount lens
[Image sensor]
Image format: 23.5 mm×15.6 mm
(APS-C format) CMOS image sensor
Total pixel number of image sensor:
Approx. 24 700 000 pixels
Effective pixel number of camera:
Approx. 24 300 000 pixels
[SteadyShot]
For still images:
System: Image sensor-shift mechanism
For movies:
System: Electronic
[Anti-Dust]
System: Charge protection coating on image sensor
and image sensor shift mechanism
[Auto focus system]
System: TTL phase-detection system
(with center F2.8 sensor),
79 points (15 points cross type)
Sensitivity Range: –2 EV to 18 EV
(at ISO 100 equivalent)
AF illuminator: Approx. 1 m to 5 m
(3.3 ft. to 16.4 ft.)
[Electronic viewfinder]
Type: Electronic viewfinder (Organic
Electro-Luminescence)
Screen size: 1.3 cm (0.5 type)
Total number of dots: 2 359 296 dots
Frame coverage: 100%
Magnification:
Approx. 1.09 ×
Approx. 0.71 × (35mm-format equivalent) with
50 mm lens at infinity, –1 m–1
Eye Point: Approximately 27 mm
from the eyepiece, 22 mm from the eyepiece
frame at –1 m–1 (CIPA standard compliant)
Diopter Adjustment: –4.0 m–1 to +3.0 m–1
[LCD monitor]
LCD panel: 7.5 cm (3.0 type) TFT drive
Total number of dots: 1 228 800
(640 × 4 (RGBW) × 480) dots
[Exposure control]
Metering Cell: “Exmor” CMOS sensor
Metering method: 1 200-zone
evaluative metering
Metering Range: –2 EV to +17 EV on Multi segment,
Center weighted, Spot modes (at ISO 100 equiva
lent with F1.4 lens)
ISO sensitivity (Recommended exposure index):
Still images: AUTO, ISO 50 to 25 600 (1/3 EV
step)
Movies: AUTO, ISO 100 to 12 800 (1/3 EV step)
Exposure compensation: ±5.0 EV
(switchable between 1/3 EV and 1/2 EV steps)
[Shutter]
Type: Electronically-controlled,
vertical-traverse, focal-plane type
Speed range:
Still images: 1/8 000 second to 30 seconds, bulb
Movies: 1/8 000 second to 1/4 second (1/3 step),
up to 1/60 second in AUTO mode
(up to 1/30 second in Auto slow shutter mode)
Flash sync speed: 1/250 second
[Built-In-Flash]
Flash G.No.: GN 12 (in meters at ISO 100)
Recycling time: Approx. 3 seconds
Flash coverage: Covering 16 mm lens (focal length
that the lens indicates)
Flash compensation: ±3.0 EV
(switchable between 1/3 EV and 1/2 EV steps)
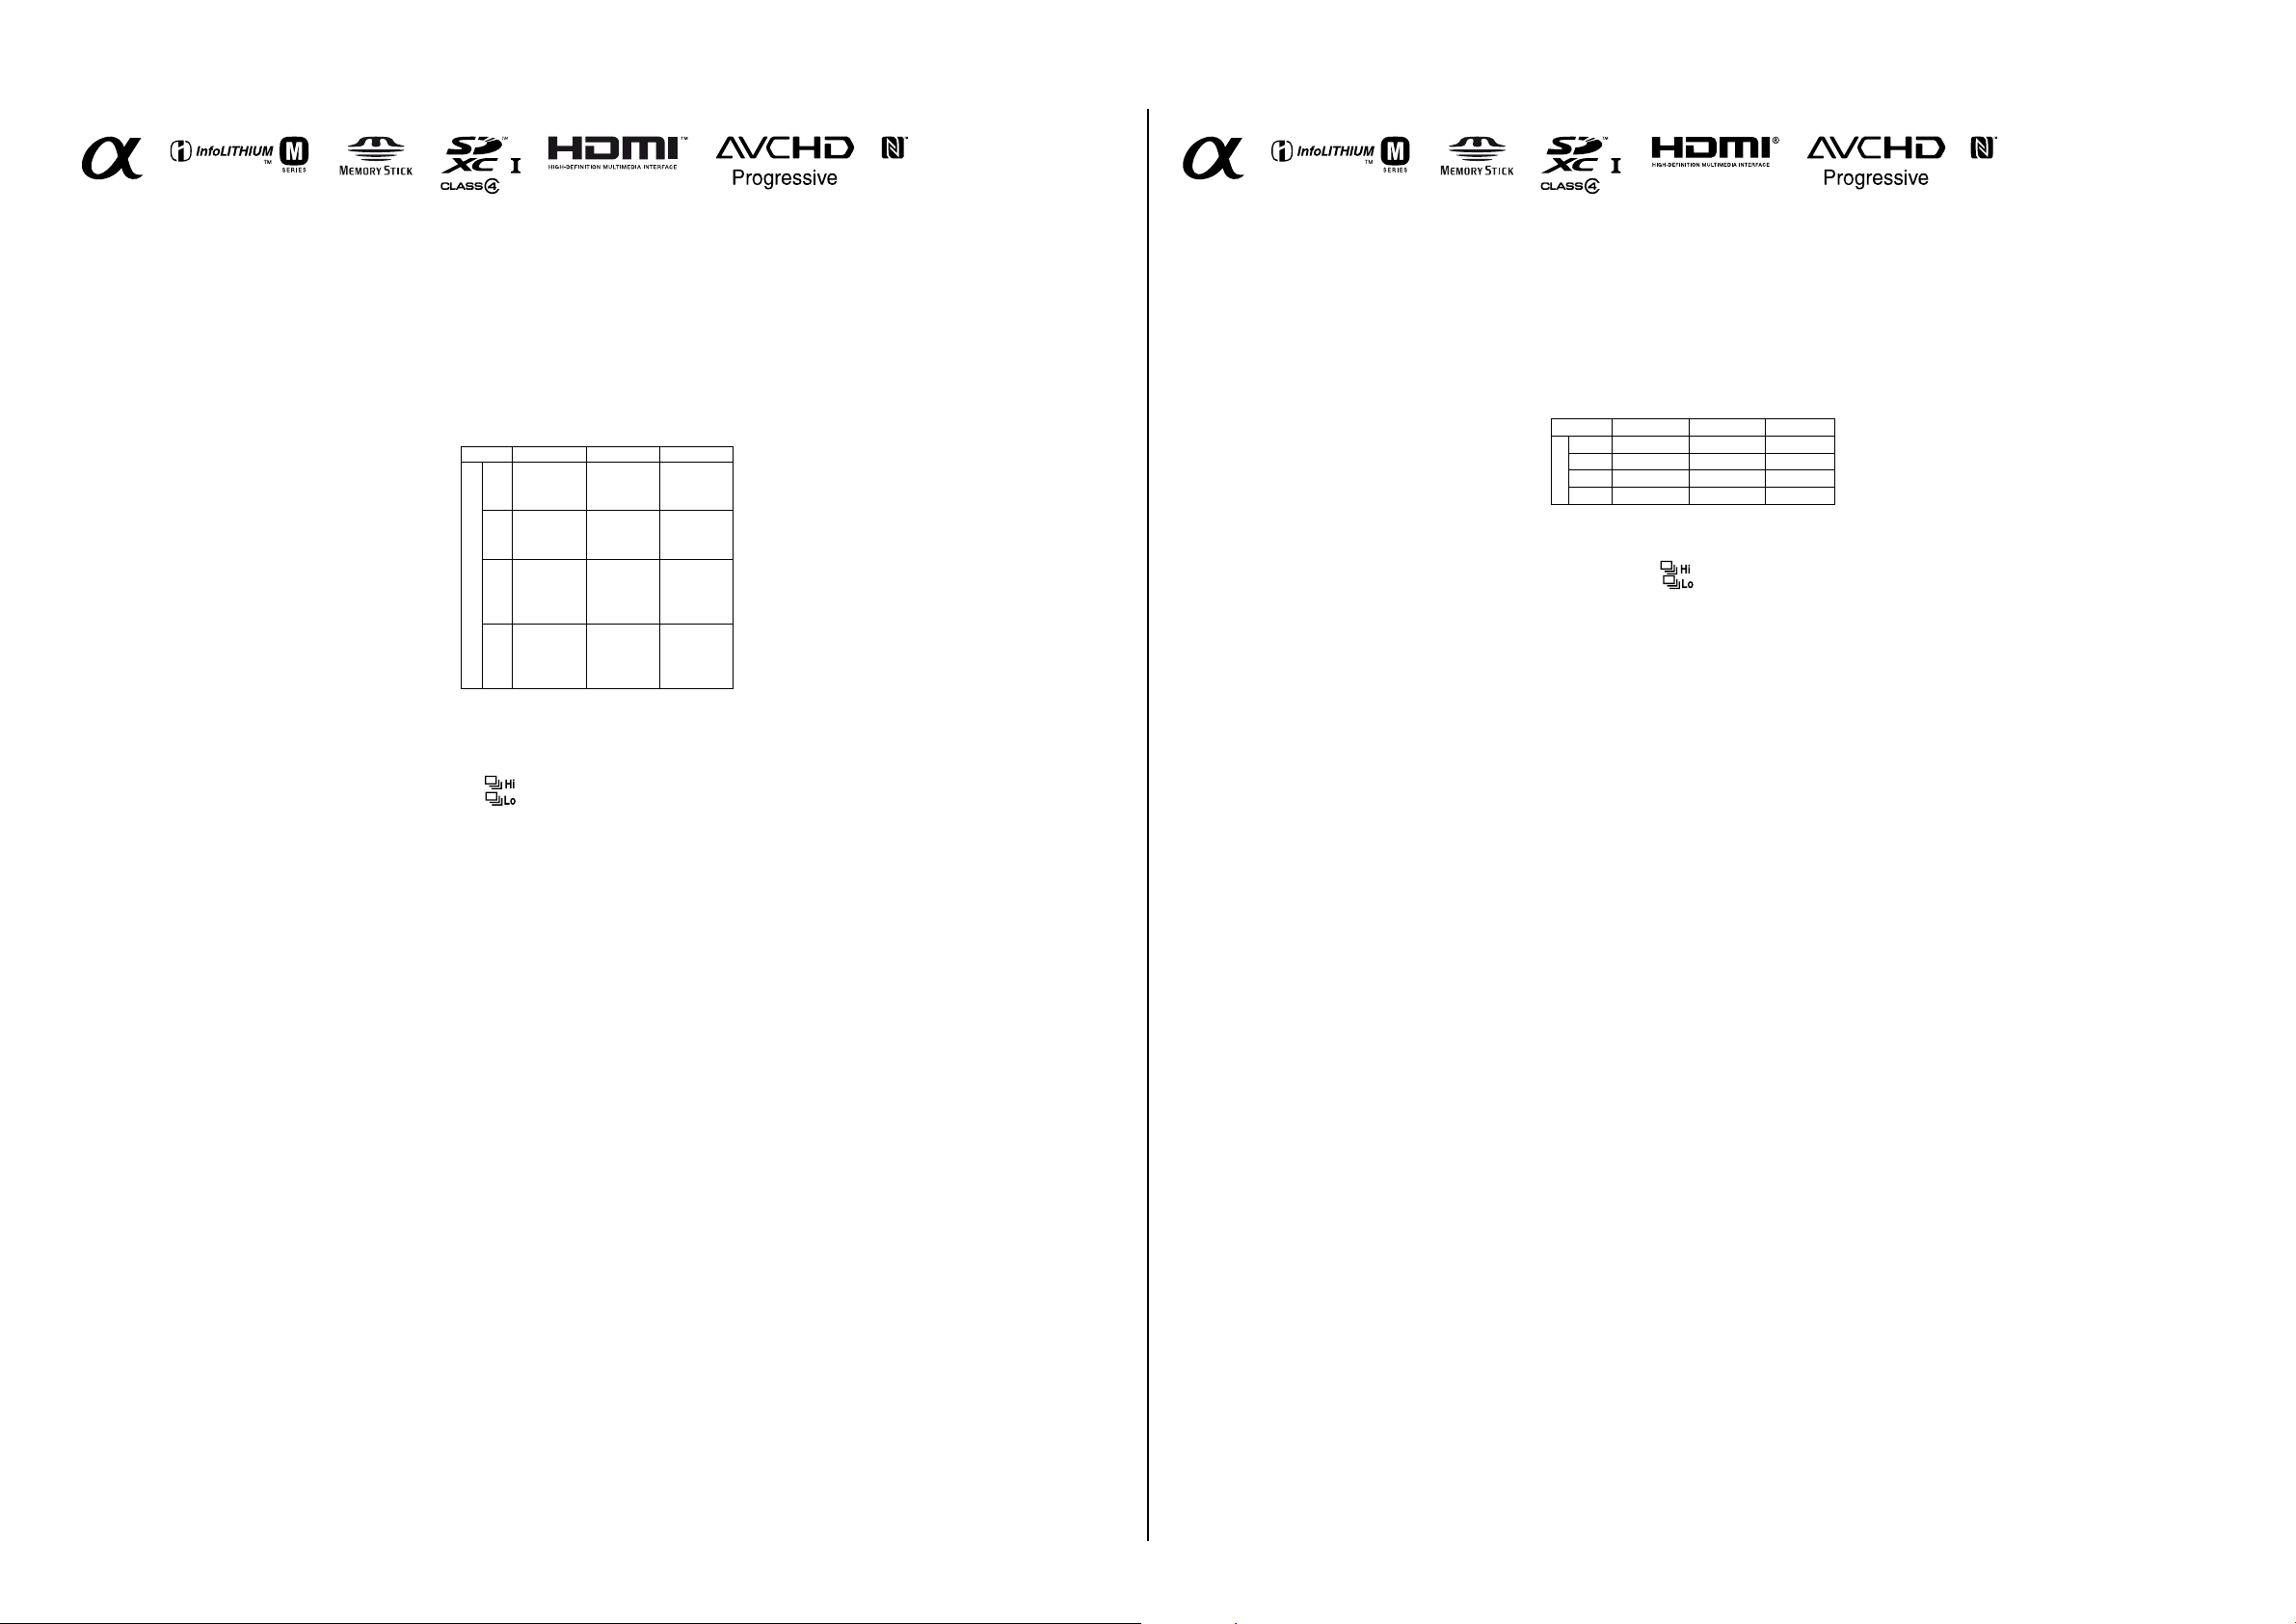
Flash range:
Aperture F2.8 F4.0 F5.6
ISO setting
100 1 m – 4.3 m
(3.3 ft. –
14.1 ft.)
1 m – 3 m
(3.3 ft. –
9.8 ft.)
1 m – 2.1 m
(3.3 ft. –
7.0 ft.)
200 1 m – 6.1 m
(3.3 ft. –
19.9 ft.)
1 m – 4.2 m
(3.3 ft. –
13.9 ft.)
1 m – 3 m
(3.3 ft. –
9.9 ft.)
400 1.4 m –
8.6 m
(4.7 ft. –
28.1 ft.)
1 m – 6 m
(3.3 ft. –
19.7 ft.)
1 m – 4.3 m
(3.3 ft. –
14.1 ft.)
800 2 m – 12 m
(6.6 ft. –
39.8 ft.)
1.4 m –
8.5 m
(4.6 ft. –
27.8 ft.)
1 m – 6.1 m
(3.3 ft. –
19.9 ft.)
[Continuous shooting]
Continuous shooting speed:
Continuous Advance Priority AE:
Maximum 12 images per second/
: Maximum 8 images per second/
: Maximum 3 images per second
• Based on our measurement conditions. The
speed of continuous shooting can be slower,
depending on the shooting conditions.
The maximum number of continuous shots:
In Continuous Advance Priority AE mode
Extra fine: 53 images/
Fine: 60 images/
Standard: 64 images/
RAW & JPEG: 25 images/
RAW: 26 images/
In Continuous shooting
Extra fine: 56 images/
Fine: 75 images/
Standard: 93 images/
RAW & JPEG: 26 images/
RAW: 28 images
[Image zooming playback]
Scaling range:
Image size:
L: Approx. ×1.0 – ×18.8/
M: Approx. ×1.0 – ×13.3/
S: Approx. ×1.0 – ×9.4
[Recording format]
File format: JPEG (DCF Ver. 2.0, Exif Ver. 2.3, MPF
Baseline) compliant, RAW (Sony ARW 2.3
format)
Movie (AVCHD format): AVCHD format Ver. 2.0
compatible
Video: MPEG-4 AVC/H.264
Audio: Dolby Digital 2ch,
equipped with Dolby Digital Stereo Creator
• Manufactured under license from
Dolby Laboratories.
Movie (MP4 format):
Video: MPEG-4 AVC/H.264
Audio: MPEG-4 AAC-LC 2ch
[Recording media]
Memory Stick PRO Duo media, SD card
[Input/output terminals]
Multi/Micro USB Terminal*:
USB communication, Hi-Speed USB (USB 2.0)
* Supports Micro USB compatible devices.
HDMI: HDMI type D micro jack
Mic Terminal: φ3.5 mm Stereo mini jack
REMOTE Terminal
[Power, general]
Battery pack: Rechargeable battery pack NP-FM500H
[Power consumption]
When using a DT 16-50 mm F2.8 SSM*
When using the viewfinder:
Approx. 3.5 W
When using the screen:
Approx. 3.0 W
* Supplied with ILCA-77M2Q.
[Others]
Microphone: Stereo
Speaker: Monaural
Exif Print: Compatible
DPOF: Compatible
PRINT Image Matching III: Compatible
Dimensions:
142.6 mm × 104.2 mm × 80.9 mm (5 3/4 inches ×
4 1/8 inches × 3 1/4 inches)
(W/H/D, excluding protrusions)
Mass:
Approx. 726 g (1 lb 9.6 oz) (with battery and
Memory Stick PRO Duo media)
Approx. 647 g (1 lb 6.8 oz) (body only)
Operating temperature: 0°C to 40°C
(32°F to 104°F)
[Wireless LAN]
Supported format: IEEE 802.11 b/g/n
Frequency band: 2.4 GHz bandwidth
Security: WEP/WPA-PSK/WPA2-PSK
Connection method: WPS (Wi-Fi Protected Setup)/
Manual
Access method: Infrastructure mode
NFC: NFC Forum Type 3 Tag compliant
Battery charger/Battery
BC-VM10A Battery charger
Input rating: 100 V - 240 V AC, 50/60 Hz, 9 W
Output rating: 8.4 V DC, 0.75 A
Operating temperature range:
0°C to 40°C (32°F to 104°F)
Storage temperature range:
–20°C to +60°C (–4°F to +140°F)
Maximum dimensions:
Approx. 70 mm × 25 mm × 95 mm (2 7/8 inches
× 1 inch × 3 3/4 inches) (W/H/D)
Rechargeable battery pack
NP-FM500H
Battery type: Lithium-ion battery
Maximum voltage: DC 8.4 V
Nominal voltage: DC 7.2 V
Maximum charge voltage: DC 8.4 V
Maximum charge current: 2.0 A
Capacity:
Typical: 11.8 Wh (1 650 mAh)
Minimum: 11.5 Wh (1 600 mAh)
Maximum dimensions:
Approx. 38.2 mm × 20.5 mm ×
55.6 mm (1 9/16 inches ×
13/16 inches × 2 1/4 inches) (W/H/D)
Design and specifications are subject to change
without notice.


