Troubleshooting
What should I do if my computer
does not start?
The power indicator on your computer is off when the computer
is not securely attached to a source of power. Make sure the
computer is plugged into the AC adapter and the adapter is
plugged into an outlet. If you are using battery power, make
sure the battery pack is installed properly and charged. You
may check the power source by disconnecting the AC adapter
and removing the battery pack. Wait three to five minutes
before reattaching the AC adapter and reinstalling the battery
pack.
Additional suggestions include:
■If your computer is plugged into a power strip or an
uninterruptible power supply (UPS), make sure the power
strip or UPS is turned on and working.
■If your computer is connected to an external display, such
as a multimedia monitor, make sure the display is plugged
into a power source and turned on. The brightness and
contrast controls may need to be adjusted. See the manual
that came with your display for more information.
■If your computer is booting from a floppy disk, eject the disk
from the floppy disk drive (if applicable).
■If you notice condensation on your computer, do not use the
computer for at least one hour. Condensation may cause
the computer to malfunction.
How do I keep my computer
updated?
Download and install the latest updates regularly using the
preinstalled software applications, such as Windows Update
and VAIO Update 3 so that the computer can run more
efficiently.
To download and install the updates, your computer must be
connected to the Internet.
Dépannage
Que dois-je faire si mon ordinateur
ne démarre pas?
Le témoin sur l'ordinateur est éteint quand l'ordinateur est mal
raccordé à une alimentation électrique.Assurez-vous que
l'ordinateur est branché dans l'adaptateur secteur et que celui-ci
est bien branché dans une prise secteur.Si votre ordinateur est
alimenté par batterie, vérifiez si la batterie est correctement
installée et chargée.Vous pouvez vérifier l'alimentation électrique
en débranchant l'adaptateur secteur et en retirant la batterie.
Attendez de trois à cinq minutes avant de rebrancher
l'adaptateur c.a. et de réinstaller la batterie.
Autres suggestions :
■Si votre ordinateur est branché à une barre d'alimentation ou
à une alimentation électrique sans coupure, assurez-vous
que la barre ou l'alimentation est sous tension.
■Si votre ordinateur est branché à un écran externe, comme
un écran multimédia, assurez-vous que cet écran est
branché à une alimentation électrique et allumé. Il faudra
peut-être ajuster les commandes de luminosité et de
contraste. Pour de plus amples renseignements, veuillez
consulter le manuel de l'écran.
■Si l'ordinateur démarre avec une disquette insérée, éjectez
la disquette de son lecteur (le cas échéant).
■Si vous constatez de la condensation sur votre ordinateur,
ne l'utilisez pas pendant au moins une heure.La
condensation peut causer un dysfonctionnement de
l'ordinateur.
Comment garder mon ordinateur à
jour?
Téléchargez et installez les dernières mises à jour
régulièrement à l'aide des applications préinstallées, comme
Windows Update et VAIO Update 3 afin d'améliorer l'efficacité
de votre ordinateur.
Pour télécharger et installer les mises à jour, vous devez
disposer d'une connexion Internet.
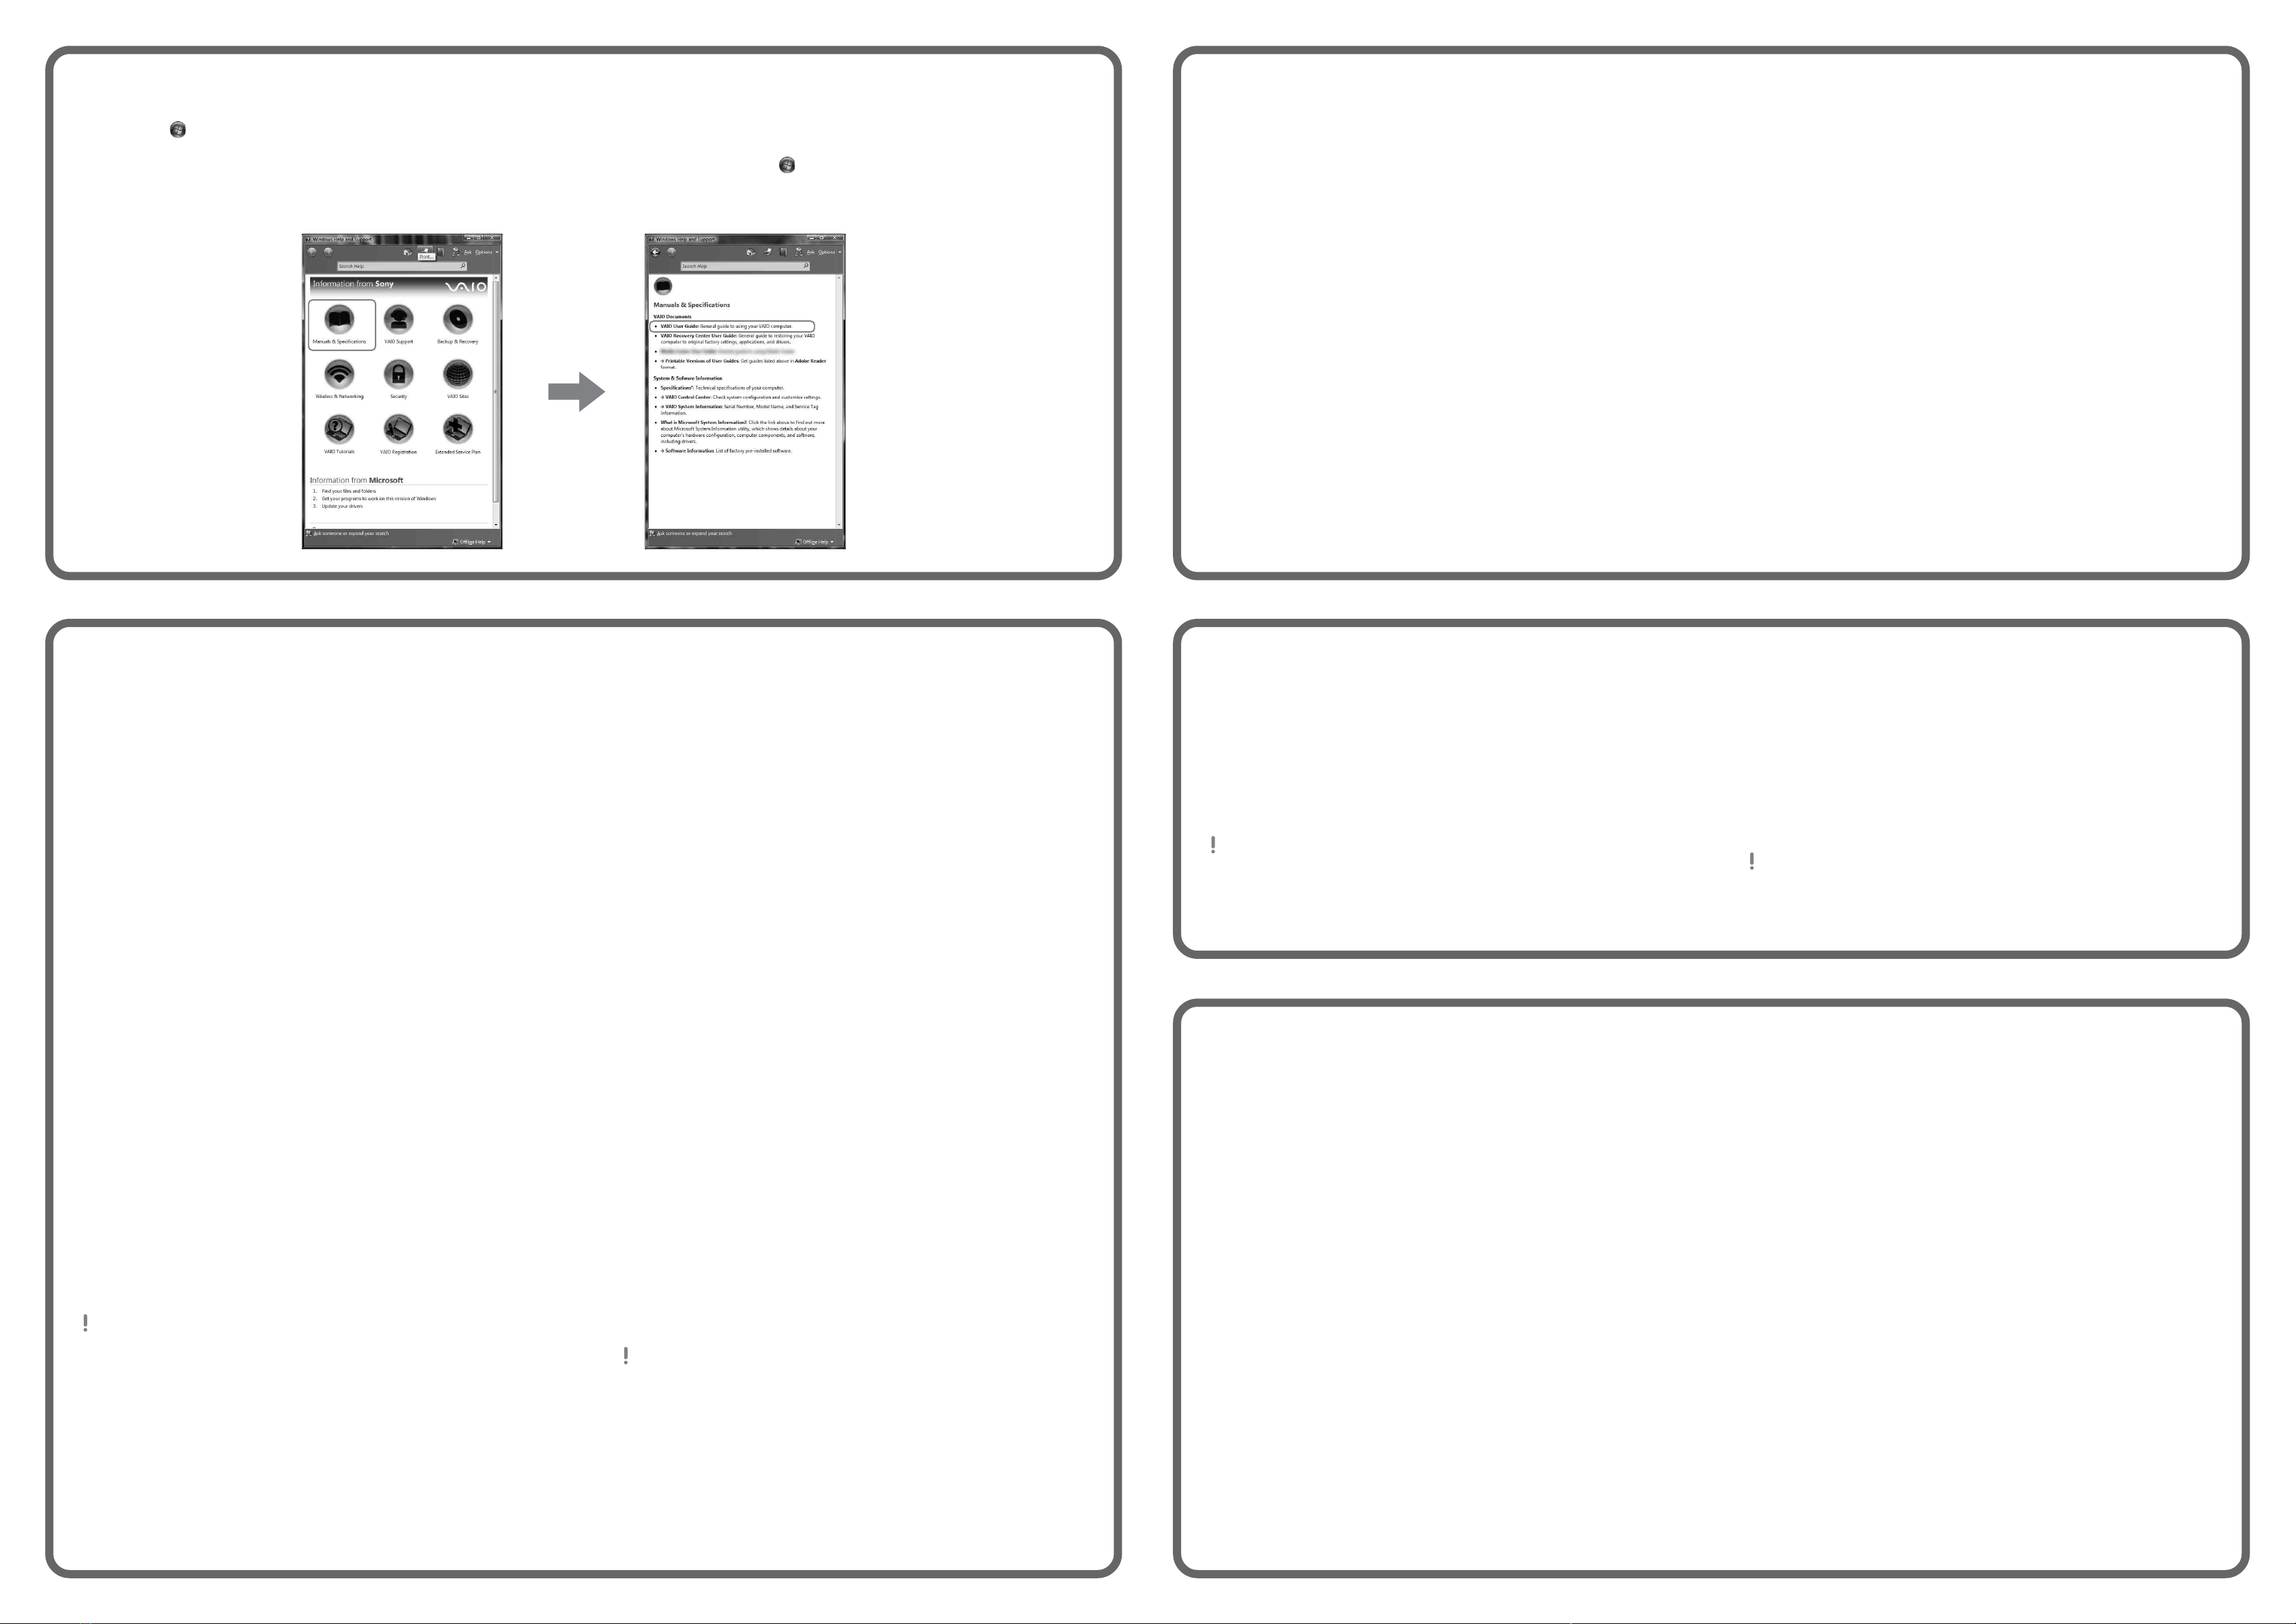
Pour repérer le Guide de
l'utilisateur
1Cliquez sur Démarrer > Aide et support.
2Cliquez sur Manuels & fiches techniques.
3Cliquez sur Guide d'utilisation VAIO.
To locate the User Guide
1Click Start > Help and Support.
2Click Manuals & Specifications.
3Click VAIO User Guide.
To start SmartWi™
Connection Utility
(available on models with the
wireless WAN function only)
At initial startup, the SmartWi™ Connection Utility main screen
appears from the taskbar. Click the main screen or double-click
the tool icon to start the SmartWi Connection Utility.
1Turn on your computer.
2Locate the WIRELESS switch on your computer and slide
the switch to the ON position.
3Click Start > All Programs > SmartWi Connection Utility.
4Click Activate with Sprint.
5Go through the activation wizard to activate your WWAN
device.
The SmartWi Connection Utility Help provides detailed
information on how to use the SmartWi Connection Utility.
1Click Start > All Programs > SmartWi Connection Utility.
2Click SmartWi Connection Utility Help.
Pour lancer l'application
SmartWiMC Connection Utility
(pour les modèles dotés de la fonctionnalité
sans fil WAN uniquement)
Au démarrage, l'écran principal de la SmartWiMC Connection Utility s'affiche à
partir de la barre des tâches. Cliquez sur l'écran principal ou double-cliquez
sur l'icône de l'outil pour lancer l'application SmartWi Connection Utility.
1Allumez votre ordinateur.
2Repérez le commutateur WIRELESS sur votre ordinateur et faites-le glisser
à la position ON.
3Cliquez sur Démarrer > Tous les programmes > SmartWi Connection
Utility.
4Cliquez sur Activate with Sprint.
5Effectuez les étapes de l'assistant afin d'activer votre périphérique WWAN.
Le guide SmartWi Connection Utility Help contient des instructions détaillées
sur la manière d'utiliser l'application SmartWi Connection Utility.
1Cliquez sur Démarrer > Tous les programmes > SmartWi Connection
Utility.
2Cliquez sur SmartWi Connection Utility Help.
HDD recovery
Your computer is equipped with the VAIO®Recovery Center, a
utility program that recovers your computer’s operating system
and preinstalled software to their original factory-installed
settings.
System and/or application recovery media are not delivered
with your computer.
For on-screen information about hard
disk recovery:
1Click Start > Help and Support.
2Click Manuals & Specifications.
3Click VAIO Recovery Center User Guide.
To access
the VAIO Recovery Center utility
from the Windows Vista®operating
system:
1Click Start > Help and Support.
2Click Backup & Recovery.
3Click VAIO Recovery Center.
Récupération du disque dur
Votre ordinateur est équipé de l'utilitaire VAIOMD Recovery Center,
un programme qui récupère le système d'exploitation de votre
ordinateur et les logiciels préinstallés en fonction des réglages
effectués en usine.
Les supports de récupération du système d'exploitation ou des
applications ne sont pas fournis avec votre ordinateur.
Pour afficher plus de renseignements
à l'écran sur la récupération des fichiers
du disque dur :
1Cliquez sur Démarrer > Aide et support.
2Cliquez sur Manuels & fiches techniques.
3Sélectionnez le VAIO Recovery Center Guide d'utilisation.
Pour accéder à l'utilitaire VAIO Recovery
Center dans le système d'exploitation
Windows VistaMD :
1Cliquez sur Démarrer > Aide et support.
2Cliquez sur Sauvegarde & réinstallation.
3Cliquez sur VAIO Recovery Center.
To register your
computer
You can register your computer online at the following URLs:
http://www.sony.com/vaioregistration/ for customers in USA
http://www.sonystyle.ca/registration/ for customers in Canada
http://vaio.sony-latin.com/ for customers in Latin American
countries or areas
Sony product registration is voluntary. Failure to register will
not diminish your limited warranty rights.
Pour enregistrer votre
ordinateur
Vous pouvez enregistrer votre ordinateur en ligne en visitant les adresses
suivantes :
http://www.sony.com/vaioregistration/ pour les clients des États-Unis
http://www.sonystyle.ca/registration/ pour les clients du Canada
http://vaio.sony-latin.com/ pour les clients des pays et des régions de
l'Amérique latine
L'enregistrement des produits de Sony n'est pas obligatoire. Votre garantie
limitée ne sera pas affectée si vous n'enregistrez pas votre produit.


