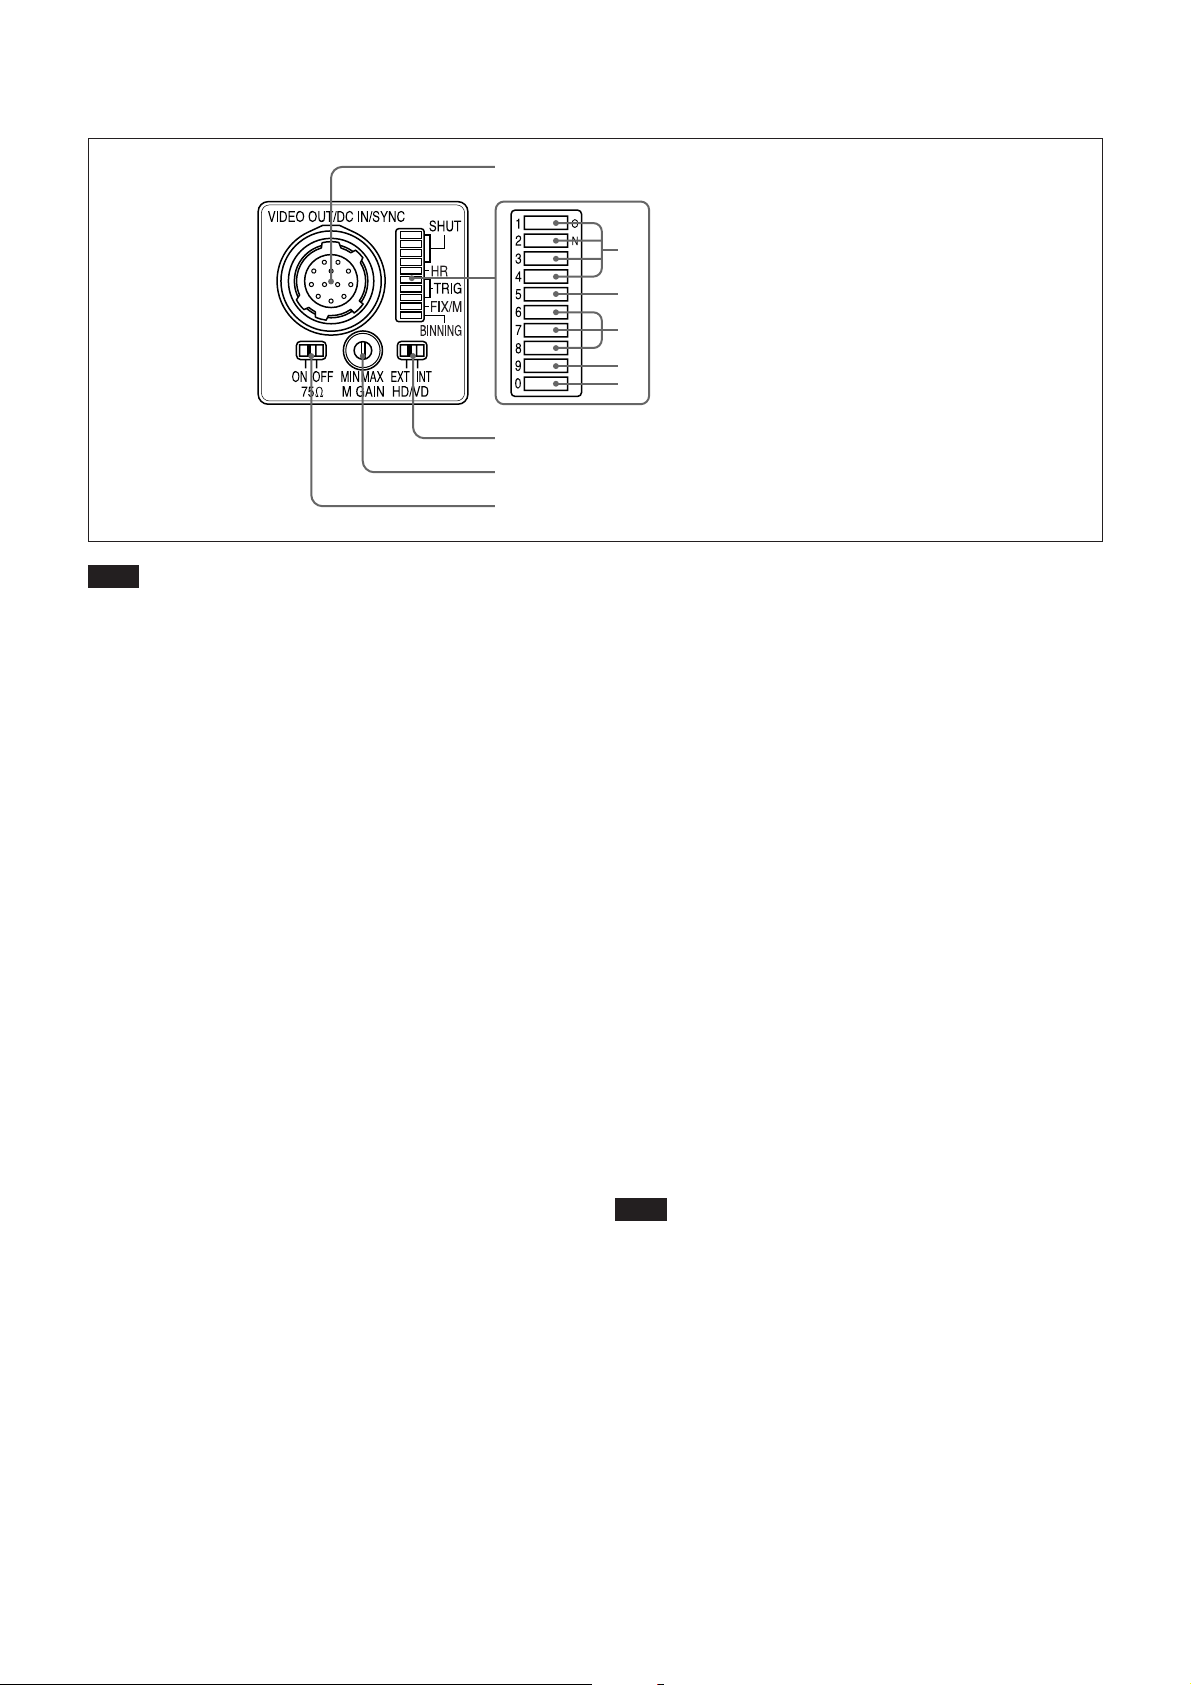
Sony XCHR58 User manual

2004 Sony Corporation
CCD Black-and-White
Video Camera Module
XC-HR58
A-BUS-100-11 (1)
Technical Manual

2
XC-HR58
Table of Contents
Overview
Features ..................................................................... 3
System Components................................................. 4
Connection Diagram ................................................. 4
Location and Function of Parts and Controls ........ 5
Front/Top/Bottom........................................................ 5
Rear Panel ................................................................. 6
Mode Settings
Input/Output Specifications ..................................... 8
External HD/VD Input Phase Specifications .............. 8
HD/VD Output Specifications ..................................... 9
WEN Output Specifications........................................ 9
VD Input Specifications .............................................. 9
HD Input Specifications.............................................. 9
Trigger Pulse Specifications ....................................... 9
Video Output Modes ............................................... 10
Binning OFF ............................................................. 10
Binning ON ............................................................... 10
About the Electronic Shutter.................................. 11
DIP Switches on the Rear Panel .............................. 11
Normal Shutter ......................................................... 11
External Trigger Shutter............................................ 12
Restart/Reset ........................................................... 13
To Set Restart/Reset Mode ...................................... 13
To Use High-rate Scan Mode (A) ............................. 14
ExternalTrigger Shutter.......................................... 16
To Set the External Trigger Shutter .......................... 17
To Use High-rate Scan Mode (B) ............................. 18
Timing Chart............................................................. 20
Specifications
Main Specifications................................................. 28
Spectral Sensitivity Characteristics
(TypicalValues) ..................................................... 28
CCD Output WaveformTiming Chart ..................... 29
Dimensions .............................................................. 31
Appendix
Available Accessory Lenses .................................. 32

3
Overview
XC-HR58
Overview
The XC-HR58 is a black-and-white video camera
module using a CCD (Charge Coupled Device) image
sensor.
Features
High image quality
The 490,000-pixel SVGA-compatible CCD image
sensor delivers detailed images with the equivalent of
SVGA resolution (767 ×580 pixels). The CCD has
square pixels, eliminating the need for aspect ratio
conversion.
Various mode settings
Rear panel switches allow the following mode settings.
•Gain: Fixed/Manual
•Read mode: Normal (50.0 fps)/Binning (99.8 fps)
•High-rate scan
•Synchronized input/output
•75Ωtermination
•Shutter modes: Normal/Trigger shutter
•Shutter speed
External synchronization
The camera module automatically detects HD
(horizontal drive) and VD (vertical drive) signals input
for external synchronization.
Sync signal output
You can output HD and VD signals from a 12-pin
connector by changing the setting of a rear panel
switch.
Electronic shutter
You can choose from FL (flickerless) mode and a wide
range of image speeds (1/125 to 1/30,000 s) for the
best match to shooting conditions.
External trigger shutter function (1/4 to
1/100,000 s)
You can obtain a freeze picture by inputting an
external trigger. This function is useful for shooting a
fast-moving object at a precise moment.
High-rate scan
By limiting the number of effective image output lines,
you can obtain image output at high frame rates,
suitable for high-speed image processing.
Binning function
Video signals combining vertically adjacent pixels can
be obtained at 99.8 fps.
Mounting holes
Mounting screw holes are provided on the reference
plane on the lower surface of the body, allowing
mounting for minimum deviation in the optical axis.
Compliant with new EIAJ 12-pin connector
pin assignments
The new pin arrangement adds pin assignments for
trigger pulses and WEN signals.

4
Overview
XC-HR58
System Components
The XC-HR58 Video Camera Module system
comprises the following components.
Connection Diagram
Video camera module
XC-HR58
Camera cables
CCXC-12P02N(2 m)
CCXC-12P05N(5 m)
CCXC-12P10N(10 m)
CCXC-12P25N(25 m)
Camera adaptor
DC-700/700CE
Tripod adaptor
VCT-333I
(Insulated type)
C-mount lenses
VCL-50Y-M
VCL-25Y-M
VCL-16Y-M
VCL-12YM
VCL-08YM
Close-up ring kit
LO-77ERK
C-mount lens
VCL-08YM
VCL-12YM
VCL-16Y-M
VCL-25Y-M
VCL-50Y-M
Close-up ring kit
LO-77ERK
XC-HR58
Tripod adaptor
VCT-333I
Camera cables
CCXC-12P02N
CCXC-12P05N
CCXC-12P10N
CCXC-12P25N
Camera adaptor
DC-700/700CE
(Conforms to new EIAJ 12-pin
assignments)
AC
VIDEO OUT
HD/VD
WEN
TRIG

5
Overview
XC-HR58
Location and Function of Parts and Controls
Front/Top/Bottom
1Lens mount (C-mount)
Attach any C-mount lens, such as the VCL-12YM
standard lens, or other optical equipment.
Note
The lens must not project more than 7 mm (9/32 inch)
from the lens mount.
2Reference holes (at the top)
These precision screw holes are for locking the camera
module. Locking the camera module using these holes
secures the optical axis alignment.
3Reference holes/Tripod screw holes (at the
bottom)
These precision screw holes are for locking the camera
module. Locking the camera module using these holes
secures the optical axis alignment.
You can install the camera on a tripod. To install on a
tripod, you will need to install the VCT-333I tripod
adaptor using the reference holes on the bottom of the
camera.
4Reference holes (at the bottom)
These precision screw holes are for locking the camera
module. Locking the camera module using these holes
secures the optical axis alignment.
1Lens mount (C-mount)
2Reference holes (at the top)
3Reference holes/Tripod screw holes (at the bottom)
4Reference holes (at the bottom)

6
Overview
XC-HR58
Rear Panel
Note
Be sure to turn the power off before making switch
settings.
1VIDEO OUT/DC IN/SYNC (video output/DC
power/sync input signal) connector (12-pin
connector)
Connect a CCXC-12P05N camera cable to this
connector to obtain power from the +12V DC power
supply and also to enable video signal output from the
camera module. When a sync signal generator is
connected to this connector, the camera module is
synchronized with the external sync signals (HD/VD
signals).
For more information, see “VIDEO OUT/DC IN/SYNC
connector pin assignments” (page 7).
2Shutter speed/Mode setting DIP switch
1Shutter speed (bits 1-4)
Set an appropriate shutter speed (factory setting:
OFF).
2High-rate scan mode switch (bit 5)
The factory setting of this switch is high-rate
scan OFF. If you turn this switch ON to use
high-rate scan mode, you also need to make the
external VD pulse rate and width settings.
For more information, see “To Use High-rate Scan
Mode (A) (page 14)” or “To Use High-rate Scan
Mode (B)” (page 18).
3Restart reset/External trigger shutter mode
switch (bits 6 to 8)
By inputting an external restart/reset signal, you
can capture the information of single screens at
arbitrary timing. By inputting an external trigger
signal, you can capture imaging information on
fast-moving objects at a precise moment in
time. The factory settings for these switches are
for normal operation (restart/reset and external
trigger shutter OFF).
For more information, see “Restart/Reset” (page 13)
and “External Trigger Shutter” (page 16).
4Gain switch (bit 9)
This switch selects FIX (fixed) or MANUAL
(manual adjustment) (factory setting: FIX (left
side)).
5Binning mode switch (bit 0)
Switches the video signal output mode between
binning OFF and binning ON (factory setting:
OFF).
For more information, see “Video Output Modes”
(page 10).
3HD/VD signal input/output switch
Set the switch to INT to output HD/VD signals from
the camera module.
Set the switch to EXT to input HD/VD signals from an
external unit (factory setting: EXT).
Note
Even when the switch is set to EXT, the camera
module operates in internal synchronization mode
when no external HD signal is input. In this case,
however, the camera module will not output internal
sync signals.
4M GAIN (Manual Gain) control knob
If you have selected MANUAL (manual adjustment)
with DIP switch 4, this knob adjusts the gain.
575Ωtermination switch
Turn this to OFF when not terminating the external
sync signal (factory setting: ON).
1VIDEO OUT/DC IN/SYNC connector
2Shutter speed / mode setting DIP switches
3HD/VD signal input/output switch
4M GAIN control knob
575Ωtermination switch
1
2
3
4
5

7
Overview
XC-HR58
VIDEO OUT/DC IN/SYNC connector pin assignments
Pin No. Camera sync output External mode (HD/VD) Restart/Reset External trigger shutter
1Ground Ground Ground Ground
2+12V DC +12V DC +12V DC +12V DC
3Video output (Ground) Video output (Ground) Video output (Ground) Video output (Ground)
4Video output (Signal) Video output (Signal) Video output (Signal) Video output (Signal)
5HD output (Ground) HD input (Ground) HD input (Ground) HD input (Ground)
6HD output (Signal) HD input (Signal) HD input (Signal) HD input (Signal)
7VD output (Signal) VD input (Signal) Reset (Signal) VD input (Signal)
8— — — —
9— — — —
10 — — — WEN output (Signal)
11 — — — Trigger pulse input (Signal)
12 VD output (Ground) VD input (Ground) Reset (Ground) VD input (Ground)*
Rear panel
Factory mode settings of rear panel
Number Switch name Factory mode setting
1Shutter speed and mode setting DIP switches All bits are OFF (left).
275Ωtermination switch ON
3M GAIN control knob — *
4HD/VD signal input/output switch EXT
* This unit is shipped from the factory with the gain switch (DIP switch 9)
being set to “FIX,” so the M GAIN control knob is not operative unless
the switch setting is changed. When the gain switch (DIP switch 9) is set
to MANUAL, you can rotate this knob to adjust gain over the range 0 to
18 dB.
1
23 4
* Common ground for pins 7, 10, and 11

8
Mode Settings
XC-HR58
External VD
External HD
100 100
1005
Unit: Clock
1 Clk = 33.90 ns
Make sure that the external HD and VD phases against
the standard center phase are as shown in the figure.
External VD falling edge: Input within 100 Clk
before or after the standard center phase.
External VD rising edge: Input within 5 Clk before
or 100 Clk after the standard center phase.
(The rising edge is used only in high-rate scan
mode.)
Note that input outside the specified ranges can lead to
internal reset instability and high-rate interval
instability.
However, when you input an external HD/VD phase
signal in all modes, the video out signals are output
about 1 H later than the external VD.
Mode Settings
During normal operation: HD phase 32.0 µs, VD
phase 20.0 ms/10.02 ms (binning ON/OFF)
continuous.
Phase timing is as shown above (falling edge only
applied).
During restart/reset or external trigger shutter
mode operation: HD phase 32.0 µs continuous.
VD (reset) any timing where HD phase is within
range shown above.
Input/Output Specifications
External HD/VD Input Phase Specifications
Standard center phase
Falling edge
Rising edge

9
Mode Settings
XC-HR58
HD/VD Output Specifications
The amplitude level is the typical value when
terminated with 10 kΩ. External HD and VD can be
output when you set the HD/VD signal input/output
switch to INT.
WEN Output Specifications
The amplitude level is the typical value when
terminated with 10 kΩ.
The pulse width is undefined during high-rate scan
mode, but WEN rising edge is always synchronized
with internal VD at the start of image output.
VD Input Specifications
•Input impedance: 75Ωor 10 kΩor more.
•Input amplitude 2.0 to 5.0 Vp-p (for both 75Ω
termination ON and OFF).
•The voltage and pulse width used are as measured at
pin 7 of the 12-pin multi-connector on the rear panel.
0 V
4.5 V
HD
VD 4.5 V
0 V
4.5 V
0 V
HD Input Specifications
•Input impedance: 75Ωor 10 kΩor more.
•Input amplitude 2.0 to 5.0 Vp-p (for both 75Ω
termination ON and OFF)
•The voltage and pulse width used are as measured at
pin 6 of the 12-pin multi-connector on the rear panel.
Trigger Pulse Specifications
•Input impedance: 10 kΩor more.
•The voltage and pulse width used are measured at pin
11 of the 12-pin multi-connector on the rear panel.
2.0 µs – 5.0 µs
2.0 – 5.0 Vp-p
0 – 0.6 V
2 – 5.0 V
2 µs – 1/4 s
625 H (Binning OFF)
313 H (Binning ON)
*These VD width values are only effective when high-rate
scan is OFF.
7 H – 33 H*
2.0 – 5.0 Vp-p

10
Mode Settings
XC-HR58
1/99.8 s (313 H)
1/50 s (625 H)
OFF
0
ON
0
Video Output Modes
This unit has two video signal output modes. Select the
mode with the binning mode switch (DIP switch 0) on
the rear panel.
Binning OFF
Signals for each independent pixel are output from the
VIDEO OUT connector every 1/50.0 s (line sequential
output).
External synchronization is possible by external HD/
VD.
Binning ON
Mixed signals for vertically adjacent pixels are output
from the VIDEO OUT connector every 1/99.8 s.
External synchronization is possible by external HD/
VD.
Frame image Frame image Frame image
Binning image Binning image Binning image Binning image Binning image
Rear panel DIP switches
Binning mode

11
Mode Settings
XC-HR58
About the Electronic Shutter
There are two shutter types: normal shutter and
external trigger shutter. Select them with the DIP
switches on the rear panel.
DIP Switches on the Rear Panel
*The electronic shutter cannot be used in restart/reset mode. High-rate
scan can be used in restart/reset mode and in external trigger shutter
mode 1.
Normal Shutter
This mode provides continuous video output with the
electronic shutter selected by switches to capture a
high-speed moving object clearly.
8 8
*“Other modes” refers to restart/reset mode and external trigger shutter
mode.
Rear panel DIP switches
Switches 1 to 4: Shutter speed switches*
Switch 5: High-rate scan mode
switch*
Switches 6 to 8: Trigger shutter mode
switches
Switch 9: Gain switch (FIX/
MANUAL)
Switch 0: Binning mode switch
(OFF/ON)
Normal
Shutter Other
modes*

12
Mode Settings
XC-HR58
Normal shutter speed settings
(Unit: second)
ExternalTrigger Shutter
By inputting an external trigger pulse, the camera is
able to capture fast-moving objects clearly.
For more information, see “External Trigger Shutter” (page
16).
1/125
1
2
3
4
1
2
3
4
1
2
3
4
1
2
3
4
1
2
3
4
1
2
3
4
1
2
3
4
1
2
3
4
1
2
3
4
1
2
3
4
1/250 1/500 1/1000
1/2000 1/4000 1/10000 1/15000
1/30000 1/100

13
Mode Settings
XC-HR58
Restart/Reset
To Set Restart/Reset Mode
The information on one screen can be extracted at
any time by externally inputting restart/reset signals
(HD/VD). To enter this mode, set the trigger shutter
switches (6 to 8) on the rear panel of the camera as
shown in the figure below.
To use restart/reset mode and high-rate scan mode
simultaneously, set the high-rate scan mode switch
(5) to ON (right side).
Long exposure
The Restart/Reset function extends the CCD
accumulation time, resulting in highly sensitive
image capture. This function is effective when you
cannot gain satisfactory sensitivity under normal
operating conditions, or when you want to observe
the trail of a moving object. Extend the VD interval
(T) between external VD pulses.
OFF
5
ON
5
R/R
6
7
8
Rear panel DIP switches
High-rate scan
EXT-HD
EXT-VD
T
Example of input timing chart
Charge
accumulation
on CCD
VIDEO OUT

14
Mode Settings
XC-HR58
To Use High-rate Scan Mode (A)
As shown in the table below, you can increase the
frame rate by setting the high-rate scan mode switch
and the external VD width and frequency. The image
obtained is centered as shown below.
Note
In Restart/Reset mode, video out signals are output
about 1 H later than the external VD.
580 lines
X lines
1 H
BLKG interval
Tb [line] Effective image interval X [line]
External VD interval Tv [line]
External VD
VBLKG
Video out
External VD width
Tw [line]

15
Mode Settings
XC-HR58
Binning OFF mode
Binning ON mode
•The shaded parts of the tables are items that you set or input yourself.
•The number of effective lines with high-rate scan set to ON is determined
by the formula shown below.
X = Tv – Tb
where Tw: External VD width [line]
Tb: BLKG interval [line]...45 [line] (constant)
Tv: VD interval [line]
Note that there is no difference in the formula of effective lines between
Binning ON and Binning OFF.
VD interval
Tv [line]
313 (10.02 ms)
157 (5.02 ms)
97 (3.10 ms)
External VD width
Tw [line]
High-rate scan OFF
18
23
Effective lines
X [line]
268 (8.58 ms)
112 (3.58 ms)
52 (1.66 ms)
BLKG interval
Tb [line]
45 (1.44 ms)
45 (1.44 ms)
45 (1.44 ms)
Frame rate
[frame/s]
99.8
200
300
Effective lines
X [line]
580 (18.56 ms)
258 (8.26 ms)
162 (5.18 ms)
90 (2.88 ms)
BLKG interval
Tb [line]
45 (1.44 ms)
45 (1.44 ms)
45 (1.44 ms)
45 (1.44 ms)
VD interval
Tv [line]
625 (20.00 ms)
303 (9.70 ms)
207 (6.62 ms)
135 (4.32 ms)
Frame rate
[frame/s]
50
100
150
200
External VD width
Tw [line]
High-rate scan OFF
17
21
24

16
Mode Settings
XC-HR58
ExternalTrigger Shutter
Inputting an external trigger pulse enables the camera
to capture fast-moving objects clearly with precise
timing.
Set DIP switches 6, 7, and 8 on the rear panel to Mode
1 or Mode 2.
OFF
5
ON
5
6
7
8
6
7
8
When you set the trigger pulse width to 1/3 of a second
or more, the output signal changes to the normal
VIDEO signal.
Mode 1 Mode 2 High-rate scanning
Note
High-rate scan mode cannot be used while in external
trigger shutter mode 2.
There are two modes for the timing in which video
signals are obtained.
• Mode 1 (Non-reset mode)
In this mode, a video signal synchronized with a VD
signal is output after a trigger pulse is input.
– The video signal is synchronized with the external
VD signal when an external HD*/VD signal is
input.
– The video signal is synchronized with an internal
VD signal when no external HD*/VD signal is
input.
*External or internal synchronization is selected
automatically depending on the presence or absence
of external HD input.
• Mode 2 (Reset mode)
In this mode, an internal VD is reset, then a video
signal is output a certain period of time after trigger
pulse input.
(High-rate mode is
compatible with Mode 1
only.)
Rear panel DIP switches

17
Mode Settings
XC-HR58
1
2
3
4
Mode 1 (Non-reset mode)
1
2
3
4
Mode 2 (Reset mode)
Using trigger pulse width
Set all DIP switches (1 to 4 on the rear panel) to OFF.
You can obtain an arbitrary shutter speed by setting the
trigger pulse width to the range of 2
µ
sec to
250 msec.
Exposure time = Trigger pulse width + 5
µ
sec
Note
An incorrect video signal will be output if you input a
new trigger pulse before the video signal output for the
previous trigger pulse is output completely.
To Set the ExternalTrigger Shutter
There are two ways to set the shutter speed.
Using the DIP switches on the rear panel
For shutter speeds, see the following table.
Mode 1 (Non-reset mode)/Mode 2 (Reset mode)
1/125
1
2
3
4
1
2
3
4
1
2
3
4
1
2
3
4
1
2
3
4
1
2
3
4
1
2
3
4
1
2
3
4
1
2
3
4
1
2
3
4
1/250 1/500 1/1000
1/2000 1/4000 1/10000 1/25000
1/50000 1/100000
1
2
3
4
1/100
(Unit: second)

18
Mode Settings
XC-HR58
To Use High-rate Scan Mode (B)
In external trigger shutter mode 1, you can increase the
frame rate by setting the shutter speed to the trigger
pulse width, and setting the high-rate scan mode
switch on the rear panel, the trigger interval, the
external VD phase and the external VD width.
The image is centered as shown below.
Notes
•In external trigger shutter mode, video out signals are
output about 1 H later than the external VD.
•In high-rate scan mode, image output and the WEN
rising edge are always synchronized, but the WEN
width becomes undefined. High-rate scan mode
cannot be used in external trigger shutter mode 2.
1 H
BLKG interval Tb [line] Effective image interval X [line]
Trigger interval T [line]
X lines
580 lines
External VD
Video out
WEN
Trigger
External VD
width Tw [line]
The image output is terminated by inputting of the
trigger falling edge.
Note that input of a trigger pulse is needed in the
effective image interval to control the ending of image
output, and this affects the image synchronization with
the timing of the trigger rising edge.

19
Mode Settings
XC-HR58
Binning OFF mode
Binning ON mode
•The shaded parts of the tables are items that you set or input yourself.
•The table is an example in external trigger shutter mode 1 where the
trigger pulse width is 100 µs, and the time from the trigger rising edge to
external VD falling edge is about 1 H (32.0 µs). In this case, about 2 lines
at the end of the effective image segment are affected by trigger input.
•The number of effective lines with high-rate scan set to ON is determined
by the formula shown below.
X = T – Tb – 2
where Tw: External VD width [line]
Tb: BLKG interval [line]...45 [line] (constant)
T: Trigger interval [line]
2: Ineffective interval [H] caused by trigger input
Note that there is no difference in the formula of effective lines between
Binning ON and Binning OFF.
Effective lines
X [line]
578 (18.50 ms)
256 (8.19 ms)
160 (5.12 ms)
88 (2.82 ms)
Trigger interval
T [line]
625 (20.00 ms)
303 (9.70 ms)
207 (6.62 ms)
135 (4.32 ms)
External VD width
Tw [line]
High-rate scan OFF
14
18
21
BLKG interval
Tb [line]
45 (1.44 ms)
45 (1.44 ms)
45 (1.44 ms)
45 (1.44 ms)
Frame rate
[frame/s]
50
100
150
200
Trigger interval
T [line]
313 (10.02 ms)
148 (4.74 ms)
100 (3.20 ms)
External VD width
Tw [line]
High-rate scan OFF
16
20
Effective lines
X [line]
266 (8.51 ms)
101 (3.23 ms)
53 (1.70 ms)
BLKG interval
Tb [line]
45 (1.44 ms)
45 (1.44 ms)
45 (1.44 ms)
Frame rate
[frame/s]
99.8
200
300

20
Mode Settings
XC-HR58
3
3
2
2
1
1
*1 This is an external input signal. Make sure to input
both HD and VD signals.
*2 Exposure time (Te)
Te = Trigger pulse width + 5
µ
sec
(The effective trigger pulse width for the external
trigger shutter operation is between 2
µ
s and 1/4 s.)
*3 Normal operation is resumed when the trigger
pulse width is 1/3 s or more. The trigger falling
edge restores external trigger shutter operation. At
this time, the 50 ms after the falling edge of the
trigger pulse is an external trigger input inhibition
area. There is no guarantee of operation for any
trigger input in this period.
*4 If there is a falling edge on the external VD within
a period of +10
µ
s from the falling trigger edge (1
and 2in the figure), it is not defined whether the
image is output for the external VD falling edge or
the image is output for the next external VD falling
edge. (1in the figure shows that the image is
output for the next external VD. 2shows the
image for the external VD.) In this case, see WEN
since output of the image and WEN make up a
pair. In any other case, the image is output for the
external VD falling edge after the trigger falling
edge (3in the figure).
Note
An image is not output correctly when the next trigger is
input before the image for the previous trigger has been
output.
External trigger shutter operation Normal operation*3
Mode transition state
External input
inhibition area
(50 ms)
External trigger
shutter operation
Exposure time (Te)*2Exposure
time (Te)*2
Exposure time (Te)
*
2
Trigger pulse width*3
T: T=under 10
µ
s*4T: T=under 10
µ
s*410
µ
s or more
625 H (Binning OFF)
313 H (Binning ON)
32
µ
s
10
µ
s
Trigger*1
External HD*1
External VD*1
(Continuous
VD)
EXT-VD
Video out
WEN
TRG
EXT-VD
EXT-VD
Timing Chart
When set to Mode 1 (Non-reset mode)
Setting the shutter speed using trigger pulse width
◆ HD/VD input
• Continuous VD input
Other manuals for XCHR58
1
Table of contents
Other Sony Security Camera manuals

Sony
Sony Ipela SNC-WR600 User manual

Sony
Sony IPELA SNC-RZ30N User manual

Sony
Sony SSC-C350 User manual

Sony
Sony Ipela SNC-CH180 User manual

Sony
Sony IPELA SNC-DH220 User manual

Sony
Sony IPELA SNC-CS20 User manual

Sony
Sony IPELA SNC-DH120 User manual

Sony
Sony IPELA SNC-CH110 User manual

Sony
Sony SNC-RH124 User manual

Sony
Sony ExwaveHAD DXC-990P User manual

Sony
Sony Ipela SNC-ZM551 User manual

Sony
Sony DXC-930 User manual

Sony
Sony SNC-RS84N User manual

Sony
Sony SRG120DH User manual

Sony
Sony DFW-V500 User manual

Sony
Sony IPELA SNC-Z20N User manual

Sony
Sony Ipela SNC-ER580 User manual

Sony
Sony IPELA SNC-DM110 User manual

Sony
Sony SSC-CD75 User manual

Sony
Sony Ipela SNC-EP520 User manual