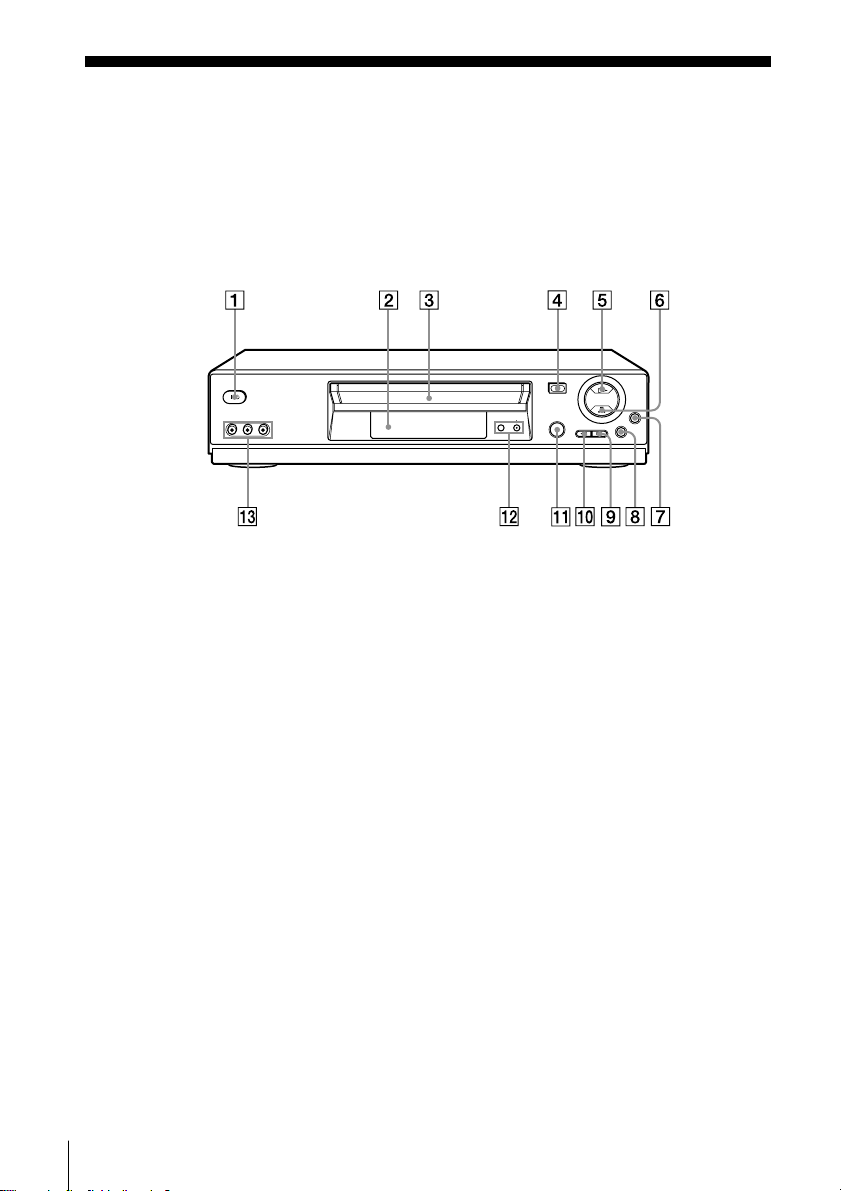
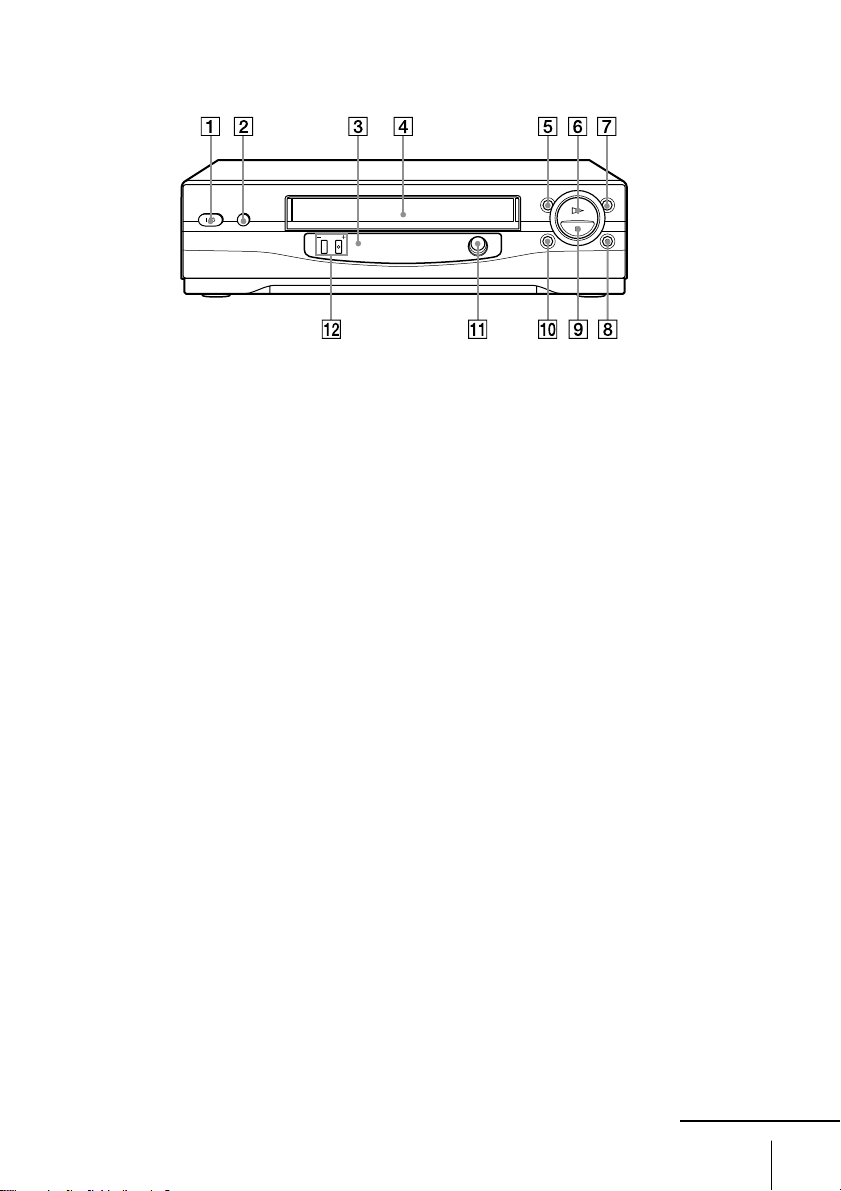
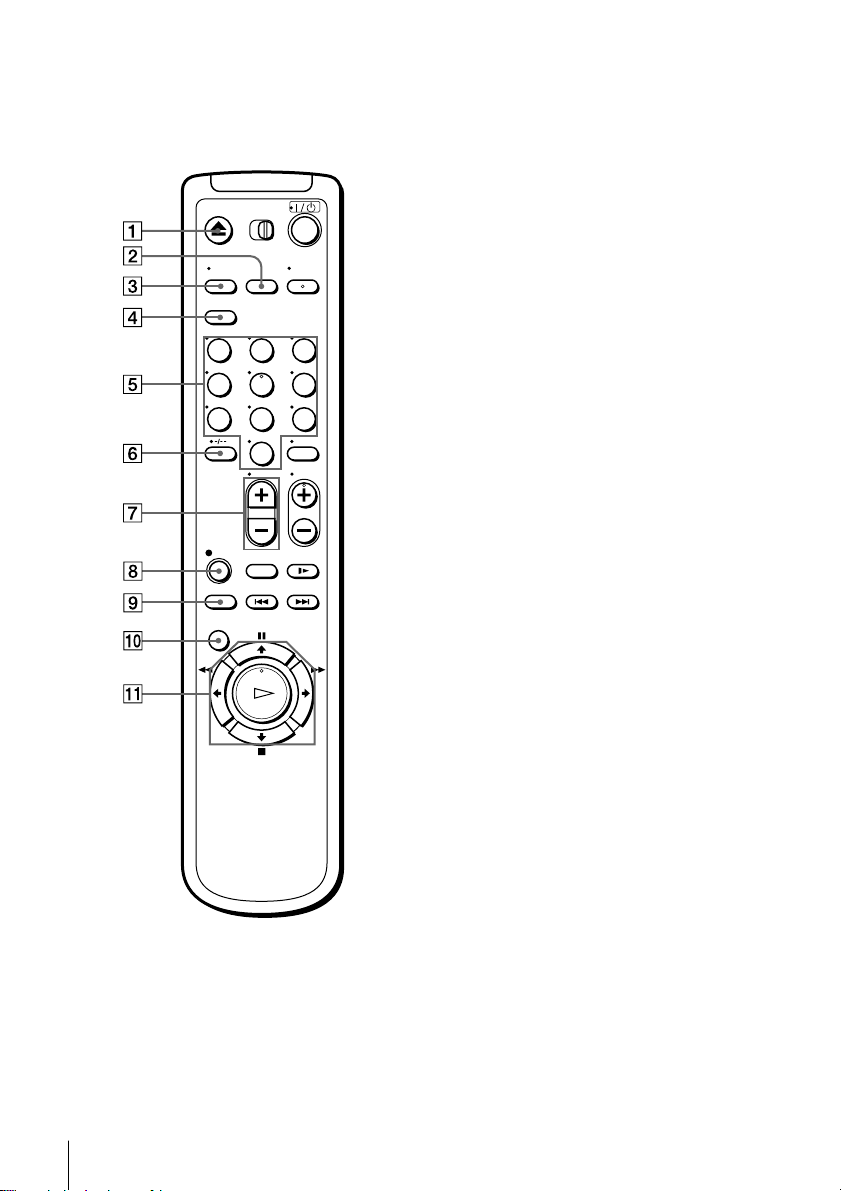
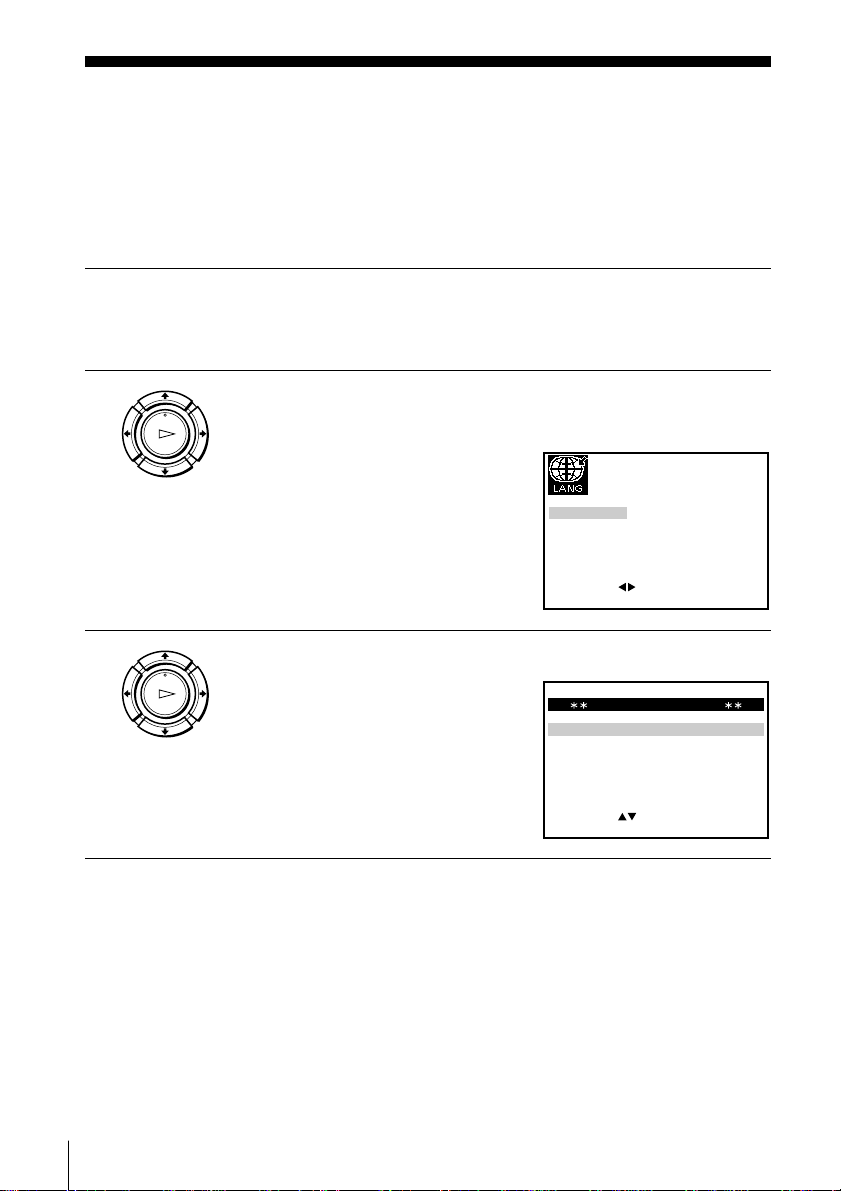
Sony SLV-ED828SG User manual

Operating Instructions
Video Cassette
Recorder
3-073-156-P1 (1) GB
© 2002 Sony Corporation
SLV-ED828SG
SLV-ED323SG
PAL NTSC

2
Index to parts and controls
Refer to the pages indicated in parentheses ( ) for details.
Front panel
For SLV-ED828SG
1?/1 ON/STANDBY switch
2Remote sensor
3Tape compartment
4AEJECT button (28)
5HPLAY button* (28)
6xSTOP button* (9) (28) (Back
cover)
7zREC (record) button (17) (29)
(Back cover)
8XPAUSE button (24) (28) (Back
cover)
9MFF (fast-forward) button (28)
q; mREW (rewind) button (28)
qa EASY TIMER (19)
qs PROGRAM/TRACKING +/–
buttons* (20)
qd LINE-2 IN VIDEO/AUDIO L/R
(left/right) jacks (30)
* The HPLAY, xSTOP and PROGRAM/
TRACKING + buttons have a tactile dot.

3
For SLV-ED323SG
1?/1 ON/STANDBY switch
2AEJECT button (28)
3Remote sensor
4Tape compartment
5mREW (rewind) button (28)
6HPLAY button (28)
7MFF (fast-forward) button (28)
8zREC (record) button (17) (29)
(Back cover)
9xSTOP button (9) (28) (Back
cover)
q; XPAUSE button (24) (28) (Back
cover)
qa EASY TIMER (19)
qs PROGRAM/TRACKING +/–
buttons* (20)
* The PROGRAM/TRACKING + button
has a tactile dot.
continued

4
Remote commander
123
456
789
0
1ZEJECT button (28)
2INPUT SELECT button (17) (25)
(Back cover)
3TV/VIDEO button (for TV)
4CLEAR button (14)
5Programme number buttons*
6-/-- (ten’s digit) button
7VOL (volume) +/– buttons
8zREC (record) button (17) (29)
9REC SPEED (recording speed)
button
q; MENU button (12)
qa XPAUSE/Mbutton (12) (28)
xSTOP/mbutton (12) (28)
mREW (rewind)/<button (12)
(28)
MFF (fast-forward)/,button
(12) (28)
HPLAY/OK button* (12) (28)
* The HPLAY, AUDIO MONITOR,
number 5 and PROG + buttons have a
tactile dot.
Index to parts and controls (continued)

5
qs ?/1 (on/standby) switch (26)
qd •TV/VIDEO remote control switch
qf AUDIO MONITOR button*1*2
qg DISPLAY button (18)
qh PROG (programme) +/– buttons*1
qj ySLOW button (28)
qk ×2 button (28)
ql ./> INDEX SEARCH
buttons
*1The HPLAY, AUDIO MONITOR,
number 5 and PROG + buttons have a
tactile dot.
*2SLV-ED828SG only
123
456
789
0

6
Connecting the VCR
Mains lead
AERIAL IN to mains
Aerial cable (supplied)
: Signal flow
1Disconnect the aerial cable from your
TV and connect it to on the rear
panel of theVCR.
2Connect of the VCR and the aerial
input of your TV using the supplied
aerial cable.
3Connect the mains lead to the mains.
Note
• When you connect the VCR and your TV only with an aerial cable, you have to
tune your TV to the VCR (see page 8).

7
Additional connections
To a TV that has audio/
video input jacks
This additional connection
improves picture and sound
quality. Connect the TV as
shown on the left.
For SLV-ED828SG
LINE OUT LINE IN
Audio/video cable (not supplied)
For SLV-ED323SG
LINE OUT LINE IN
Audio/video cable (not supplied)

8
EXIT MENU:OK:SET
SELECT
SYSTEM
SYSTEM
SYSTEM
:
SYSTEM SELECT
–B/G
D/K–I
–
Setting up the VCR with the Auto
Set Up function
Before using the VCR for the first time, set up the VCR using the Auto Set Up
function. With this function, you can set the language for the on-screen display and
TV channels automatically.
1Turn on your TV and set it to the video channel.
Tune the TV to channel 32 (the initial RF channel for this VCR).
Refer to your TV manual for TV tuning instructions.
2Connect the mains lead to the mains.
The VCR automatically turns on.
The LANGUAGE SET menu
appears on the TV screen.
Press </,to select the desired
language, ENGLISH orARABIC,
then press OK.
The message for the Auto Set Up
function appears.
3Press OK.
The SYSTEM SELECT menu
appears.
EXIT MENU:OK:SET
SELECT
ENGLISH ARABIC
:
OK
PLAY
OK
PLAY

9
4Press M/mto select the appropriate
TV system, then press OK.
The VCR starts searching for all of
the receivable channels and presets
them (in the appropriate order for
your local area).
If you want to disable unwanted
programme positions, see
“Disabling unwanted programme
positions” on page 14.
After the search is complete, the clock setting menu appears. See
“Setting the clock” on page 10.
To cancel the Auto Set Up function
Press MENU.
Notes
• Whenever you operate the Auto Set Up function, some of the settings (timer, etc.)
will be reset. If this happens, you have to set them again.
• Auto preset starts automatically only when you plug in the mains lead for the first
time after you purchase theVCR.
• After using theAuto Set Up function, the LANGUAGE SET menu does not
appear automatically when you connect the mains lead again. If you want to use
theAuto Set Up function again, press MENU, then press M/m/</,to highlight
INSTALLATION and press OK. Press M/mto highlight AUTO SET UP, then
repeat all procedures from step 3.
• Auto preset can be performed by pressing xSTOP on theVCR continuously for
5 seconds or more with no tape inserted.
OK
PLAY
MENU:
PLEASE WAIT
AUTO SET UP
40%
EXIT

10
MENU
SET MENU:
:
OK:END
SELECT
12 0 1 JAN/0:20
TUE
02/
:EXIT
OK
PLAY
SET MENU:
:
OK:END
SELECT
18 0 1 JAN/0:20
TUE
02/
:EXIT
SET MENU:
:
OK:END
SELECT
18 3 1 JAN/0:20
TUE
02/
:EXIT
OK
PLAY
OK
PLAY
Setting the clock
You must set the time and date on the VCR to use the timer features properly.
Before you start…
• Turn on the VCR and the TV.
• Set the TV to the video channel.
• Refer to “Index to parts and controls” for button locations.
1Press MENU, then press M/m/</
,to highlight CLOCK SET and
press OK.
2Press M/mto set the hour.
3Press ,to select the minutes and
set the minutes by pressing M/m.

11
OK
PLAY
SET MENU:
:
OK:END
SELECT
18 3 82 SEP/0:20
SAT
02/
:EXIT
MENU
4Set the day, month, and year in
sequence by pressing ,to select
the item to be set, and press M/mto
select the digits, then press ,.
The day of the week is set
automatically.
5Press MENU to exit the menu.

12
OK
PLAY
MENU:OK:END
SELECT
PR : 5
SYSTEM : B/G/D/K
MFT : –
NAME : ––––
:SET :
EXIT
MANUAL TUNING
CH : 033
Presetting channels
If some channels could not be preset using the Auto Set Up function, you can preset
them manually.
Before you start…
• Turn on the VCR and the TV.
• Set the TV to the video channel.
• Refer to “Index to parts and controls” for button locations.
1Press MENU, then press M/m/</
,to highlight INSTALLATION
and press OK.
2Press M/mto highlight MANUAL
SET UP, then press ,.
3Press M/mto highlight the row
which you want to preset, then
press ,.
To display other pages for
programme positions 6 to 80, press
M/mrepeatedly.
4Press </,repeatedly until the
channel you want is displayed.
Select the appropriate TV system, if
necessary.
MENU
OK
PLAY
SET MENU:
:
OK:END
SELECT
AUTO SET UP
MANUAL SET UP
TV SYSTEM 32:G:
VCR OUTPUT CH
:EXIT
OK
PLAY
EXIT MENU:CLEAR:DELETE SWAPPING OK
TV STATION TABLE
:
5
4
3
2
1
0
0
0
0
3
3
2
2
2
0
9
7
I
C
L
A
J
D
M
A
K
E
N
B
–
–
–
–
B/G/D/K
B/G/D/K
B/G/D/K
B/G/D/K
PR CH NAME SYSTEM
OK
PLAY
MENU:OK:END
SELECT
PR : 5
SYSTEM : B/G/D/K
MFT : –
NAME : ––––
:SET :
EXIT
MANUAL TUNING
CH : –––

13
5Press M/mto highlight NAME,
then press ,.
6Enter the station name.
1Press M/mto select a character.
Each time you press M, the
character changes as shown
below.
A tB t…tZ t0 t1
t…t9 tA
2Press ,to set the next character.
The next space flashes.
To correct a character, press </,until the character you want
to correct flashes, then reset it.
You can set up to 4 characters for the station name.
7Press OK to confirm the station name.
8Press MENU to exit the menu.
Note
• If the TV sound is distored or noisy, select the appropriate TV system (“G”, “K”
or “I”) for your area.
OK
PLAY
MENU:OK:END
SELECT
PR : 5
SYSTEM : B/G/D/K
MFT : –
NAME : ––––
:SET :
EXIT
MANUAL TUNING
CH : 033
OK
PLAY
OK
PLAY
MENU
MENU:OK:END
SELECT
PR : 5
SYSTEM : B/G/D/K
MFT : –
NAME : O–––
:SET :
EXIT
MANUAL TUNING
CH : 033
continued

14
OK
PLAY
EXIT MENU:CLEAR:DELETE SWAPPING OK
TV STATION TABLE
:
5
4
3
2
1
0
0
0
0
3
3
2
2
2
0
9
7
I
C
L
A
J
D
M
A
K
E
N
B
–
–
–
–
B/G/D/K
B/G/D/K
B/G/D/K
B/G/D/K
PR CH NAME SYSTEM
OK
PLAY
EXIT MENU:CLEAR:DELETE SWAPPING OK
TV STATION TABLE
:
5
4
3
2
1
0
0
0
0
3
3
2
2
2
0
9
7
I
C
L
A
J
D
M
A
K
E
N
B
–
–
–
–
B/G/D/K
B/G/D/K
B/G/D/K
B/G/D/K
PR CH NAME SYSTEM
CH
MENU:CLEAR:DELETE SWAPPING OK
TV STATION TABLE
:
5
4
3
2
1
0
0
0
3
3
2
2
0
7
I
C
A
J
D
A
K
E
B
–
–
–
B/G/D/K
B/G/D/K
B/G/D/K
PR NAME SYSTEM
EXIT
CLEAR
Disabling unwanted programme positions
After presetting channels, you can disable unused programme positions. The
disabled positions will be skipped later when you press the PROG +/– buttons.
1Press MENU, then press M/m/</
,to highlight INSTALLATION,
and press OK.
2Press M/mto highlight MANUAL
SET UP, then press ,.
3Press M/mto highlight the row
which you want to disable.
To display other pages for
programme positions 6 to 80, press
M/mrepeatedly.
4Press CLEAR.
The selected row will be cleared as
shown on the left.
MENU
OK
PLAY
SET MENU:
:
OK:END
SELECT
AUTO SET UP
MANUAL SET UP
TV SYSTEM 32:G:
VCR OUTPUT CH
:EXIT
Presetting channels (continued)

15
MENU
continued
MENU
OK
PLAY
SET MENU:
:
OK:END
SELECT
AUTO SET UP
MANUAL SET UP
TV SYSTEM 32:G:
VCR OUTPUT CH
:EXIT
OK
PLAY
EXIT MENU:CLEAR:DELETE SWAPPING OK
TV STATION TABLE
:
5
4
3
2
1
0
0
0
0
3
3
2
2
2
0
9
7
I
C
L
A
J
D
M
A
K
E
N
B
–
–
–
–
B/G/D/K
B/G/D/K
B/G/D/K
B/G/D/K
PR CH NAME SYSTEM
OK
PLAY
MENU:OK:END
SELECT
PR : 5
SYSTEM : B/G/D/K
MFT : –
NAME : ––––
:SET :
EXIT
MANUAL TUNING
CH : 033
5Repeat steps 3 and 4 for any other programme positions you want
to disable.
6Press MENU to exit the menu.
Changing the station names
You can change or enter the station names (up to 4 characters).
Before you start…
• Turn on the VCR and the TV.
• Set the TV to the video channel.
• Refer to “Index to parts and controls” for button locations.
1Press MENU, then press M/m/</
,to highlight INSTALLATION
and press OK.
2Press M/mto highlight MANUAL
SET UP, then press ,.
3Press M/mto highlight the row
which you want to change or enter
the station name, then press ,.
To display other pages for
programme positions 6 to 80, press
M/mrepeatedly.

16
MENU:OK:END
SELECT
PR : 5
SYSTEM : B/G/D/K
MFT : –
NAME : O–––
:SET :
EXIT
MANUAL TUNING
CH : 033
OK
PLAY
OK
PLAY
MENU
4Press M/mto highlight NAME,
then press ,.
5Enter the station name.
1Press M/mto select a character.
Each time you press M, the
character changes as shown
below.
A tB t…tZ t0 t1
t…t9 tA
2Press ,to set the next character.
The next space flashes.
To correct a character, press </,until the character you want
to correct flashes, then reset it.
You can set up to 4 characters for the station name.
6Press OK to confirm the new name.
7Press MENU to exit the menu.
OK
PLAY
MENU:OK:END
SELECT
PR : 5
SYSTEM : B/G/D/K
MFT : –
NAME : ––––
:SET :
EXIT
MANUAL TUNING
CH : 033
Presetting channels (continued)

17
REC
Recording indicator
• PROG
Recording TV programmes
Before you start...
• Refer to “Index to parts and controls” for button locations.
1Turn on your TV and set it to the video channel.
2Insert a tape with its safety tab in place.
3• To record a normal channel, press PROG +/– until the
programme position number you want appears in the display
window.
• To record from other equipment connected to one or more of the
LINE inputs, press INPUT SELECT to display the connected line
in the display window.
4Press zREC to start recording.
The recording indicator lights up red in the display
window.
INPUT
SELECT
continued

18
To stop recording
Press xSTOP.
To check the remaining time
Press DISPLAY. Each time you press DISPLAY, the display changes as
shown below.
Sound system, TV system, colour system, programme position, tape speed
and time counter tRemaining time tCurrent date and time, and time
counter
In order to get an accurate remaining time indication, be sure TAPE
SELECT in the USER SET menu is set according to the tape type you use.
To watch anotherTV programme while recording
1If the TV is connected to the VCR using an audio/video cable, set the
TV to TV input. If the TV is connected to the VCR using only the
aerial cable, skip this step.
2Select another programme position on the TV.
To save a recording
To prevent accidental erasure, break off the
safety tab as illustrated. To record on the same
tape again, cover the tab hole with adhesive
tape. Safety tab
RecordingTV programmes (continued)

19
Recording TV programmes using the
Easy Timer
The Easy Timer function allows you to
make timer recordings of programmes
without turning on your TV. Set the
recording timer to record up to eight
programmes, including settings made with
other timer methods, that will be broadcast
within the next month. The recording start
time and recording stop time can be set at
one minute intervals.
?/1 ON/STANDBY EASYTIMER xSTOP
PROGRAM +/–XPAUSE
Before you start...
• Insert a tape with its safety tab in place. Make sure the tape is longer than the total
recording time.
• Refer to “Index to parts and controls” for button locations.
1Press EASY TIMER.
“DATE” and “TODAY” appear alternately in the display window.
If the date and time are not set, “DAY” will appear. See step 2 in
the following section, “To set the clock” to set the date and time.
2Turn EASY TIMER to set the recording date.
EASY TIMER
n
EASY TIMER
continued

20
RecordingTV programmes using the EasyTimer (continued)
3Press EASY TIMER.
START indicator and the current time appear in the display
window.
4Turn EASYTIMER to set the recording start time.
You can set the recording start time in 15 minute intervals or adjust
the time in one minute intervals by pressing the PROGRAM +/–
buttons.
5Press EASY TIMER.
STOP indicator and the recording stop time appear in the display
window.
6Turn EASYTIMER to set the recording stop time.
You can set the recording stop time in 15 minute intervals or adjust
the time in one minute intervals by pressing the PROGRAM +/–
buttons.
EASY TIMER
EASY TIMER
PROGRAM
EASY TIMER
EASY TIMER
PROGRAM
This manual suits for next models
1
Table of contents
Other Sony VCR System manuals

Sony
Sony SLV-KA197TK User manual

Sony
Sony SLV-585HF User manual

Sony
Sony SLV-SE440K User manual

Sony
Sony SLV-760HF User manual

Sony
Sony SL-20 User manual

Sony
Sony SLV-960HF MX User manual

Sony
Sony Video Walkman GV-D200 User manual

Sony
Sony SLV-X9G User manual

Sony
Sony SLV-798HF User manual

Sony
Sony EV-S7000 User manual

Sony
Sony SLV-M11HF - Video Cassette Recorder User manual

Sony
Sony SLV-KH7PL User manual

Sony
Sony DSR-1600.GB User manual

Sony
Sony 50P User manual

Sony
Sony SRW-5000 User manual

Sony
Sony SLV-ED10ME User manual

Sony
Sony SLV-380 User manual

Sony
Sony HDV HVR-1500 User manual

Sony
Sony SLV-N55 - Video Cassette Recorder User manual

Sony
Sony SRW-5000 User manual