Sound Choice PCK4000 User manual

FOR YOUR RECORDS
Model #:
Serial #:
Date of Purchase:
Place of Purchase:
Rev. 08/22/12 © 2012 Sound ®
Choice
OWNER’S MANUAL
Please review this manual before playing the machine.
This manual refers to models: PCK4000 US, and PCK4000 AU
DVD / CD+G / MP3G / Xvid / CD / USB / SD Card
DVD-R / DVD-R/RW / CD-DA / CD-R / CD-RW /
MP3 / MP3G / VCD / SVCD / JPEG / Kodak Picture CD
This manual is also available as a .PDF file at www.soundchoice.com.

TO OBTAIN SERVICE ON WARRANTY UNITS
Call Sound Choice customer service below for the nearest authorized warranty
service center. If there is no service center near you, then the unit must be sent prepaid
by insured parcel post or UPS to the Sound Choice service center address nearest
you. To establish eligibility for free repair or replacement, YOU MUST INCLUDE
A NOTE EXPLAINING HOW THE UNIT IS DEFECTIVE, a copy of the original
receipt (including the date), your full name, complete mailing address and telephone
number including area code.
Limited Warranty
North America
Sound Choice
Attn: Service Dept.
14100 South Lakes Drive
Charlotte, NC 28273
USA
Customer Service: 888-389-9648
Australia
Sound Choice Distr. (Aust) Pty. Ltd.
Attn: Service Dept.
P. O. Box 50
KLEMZIG, SA 5087
AUSTRALIA
Customer Service: +61 (8) 8261-0566
IF THIS UNIT IS OUTSIDE OF THE WARRANTY PERIOD, please call the appropriate
number below for repair.
Note: The unit must be shipped in the original carton and placed inside another
carton with added padding for extra protection during shipment. All original
accessories including but not limited to cables, remote control, batteries,
owner’s manual, microphone and cable must be included or the warranty will
be voided. If the unit is missing parts when received you may be charged by
Sound Choice for all missing parts.
33
AVAILABLE AT:
WWW.SOUNDCHOICE.COM
KARAOKE PRODUCTS
RIS K OF ELEC TRIC SH OCK DO
NOT O PEN
WARNING - To reduce the risk of electric shock,
do not expose this apparatus to rain or moisture.
WWW.SOUNDCHOICE.COM.AU

Table of Contents
General Information
Safety Information
Disc Care
Introduction
Features
Video Standards (NTSC/PAL)
Formats
Connections
Video Connections
Audio Connections
Microphone Connection
Getting Started
Front Panel Operation
Remote Control Setup
Basic Play
Playing a Disc
Menu
Fast-Forward / Fast-Reverse
Slow Motion
Chapter / Track Selection
Timed Playback
Subtitle Selection
Repeat
Programmable Playback
MP3 Disc Playback
Quick Reference
Remote Control
Trouble-Shooting Guide
Specifications
Index
Warranty
Limited Warranty
2 - 3
2
4
4
5
6
7
8
9
10
11 - 12
13
13
13
13
14
14
14
15
16
17 - 19
27
28
29
32-33
*Important: The information contained herein is subject to change without notice.
Limited Warranty
Sound Choice DVD Player
(This limited warranty is valid only for model numbers PCK-4000 US, PCK-4000 AU.)
Who is covered?
This warranty only covers the original consumer purchaser. You must have proof of purchase
such as the original receipt with the date of the purchase and the original packaging.
What is covered?
Sound Choice warrants this product to be free from defects in material and workmanship
for a period of ninety (90) days from the original date of sale to the original consumer
purchaser. This product will be replaced or repaired free of charge if it has proven to be
defective within the ninety (90) day period when said product is returned at the customer’s
expense within the warranty period. THIS WARRANTY DOES NOT COVER EXPENSES
INCURRED IN THE REMOVAL AND REINSTALLATION OF THIS PRODUCT.
Limitation of liability.
All implied warranties are limited to the duration of the warranty. This is the complete warranty
and no other expressed warranty is valid. Some states/countries/provinces do not allow
limitations on how long an implied warranty lasts or exclusions or limitations of incidental
or consequential damages, so the above limitations or exclusions may not apply. This warranty
gives you (the owner) specific legal rights, and you may also have other rights which may vary
by state, country or province.
Before exchanging this product.
Please read this owner’s manual carefully. Adjustments that may need to be made to enable
the player to function properly may be listed in this manual.
What is excluded?
This warranty does not apply to any product damaged by accident, misuse, abuse, improper
line voltage, fire, water damage (including any type of liquid), lightning or other uncontrollable
forces of nature, or any parts or service furnished by anyone else other than Sound Choice
This warranty does not cover damaged cartons, carrying cases, broken or damaged cabinets, or any
other items used in connection with the product or consequential damages due to defect in that
product. This warranty does not cover products that have damaged, altered or removed serial
numbers. This warranty does not cover products sold AS-IS or Re-Manufactured units sold out of
the Sound Choice distribution channel.
Where is exchange available?
This product may only be exchanged at an authorized Sound Choice service facility.
If this product was purchased in a country that does not have an authorized service facility,
then the owner must contact Sound Choice for detailed exchange instructions.
32
Features Setup 20-26
Playback Control 5

Please read and observe all warnings and instructions given in this owner ’s manual and those marked on the player. Retain this
manual for future reference. This player has been designed and manufactured to assure personal safety. Improper use can result in
electric shock or fire hazard. The safeguards incorporated in this player will protect you if you observe the following procedures for
installation, usage and servicing. This player is fully transistorized and does not contain any parts that can be repaired by the user.
Do not remove the cabinet cover, or you may be exposed to dangerous voltage. Refer servicing to qualified service personnel only.
WARNING - To reduce the risk of electric shock, do not expose this apparatus to rain or moisture.
1. Read these instructions.
2. Keep these instructions.
3. Heed all warnings.
4. Follow all instructions.
5. Do not use this apparatus near water.
6. Clean only with a dry cloth.
7. Do not block any of the ventilation openings. Install in accordance with the manufacturers instructions.
8. Do not install near any heat sources such as radiators, heat registers, stoves, or other apparatus (including amplifiers) that produce
heat.
9. Do not defeat the safety purpose of the polarized or grounding - type plug. A polarized plug has two blades with one wider than the
other. A grounding type plug has two blades and a third grounding prong. The wide blade or the third prong are provided for your
safety. When the provided plug does not fit into your outlet, consult an electrician for replacement of the obsolete outlet.
10. Protect the power cord from being walked on or pinched particularly at plugs, convenience receptacles, and the point where they
exit from the apparatus.
11. Only use attachments/accessories specified by the manufacturer.
12. Use only with a cart, stand, tripod, bracket, or table specified by the manufacturer, or sold with the apparatus. When a cart is used,
use caution when moving the cart/apparatus combination to avoid injury from tip-over.
13. Unplug this apparatus during lightning storms or when unused for long periods of time.
14. Refer all servicing to qualified personnel. Servicing is required when the apparatus has been damaged in any way, such as a power-
supply cord or plug is damaged, liquid has been spilled or objects have fallen into the apparatus, the apparatus has been exposed to
rain or moisture, does not operate normally, or has been dropped.
Important Safety Instructions Notes
CAUTION:
231

Damage requiring service
a. When the power-supply cord or plug is damaged.
b. If the player has been exposed to liquids, or other objects have fallen into the player.
c. If the player has been exposed to rain or water.
d. If the player has been dropped or damaged in any way.
e. When the player is smoking or has an unpleasant smell.
Replacement parts
When replacement parts are required, be sure the service technician has used replacement parts specified by the
manufacturer. Unauthorized substitutions may result in a voided warranty, fire, electric shock, or other hazards.
Safety check
Upon completion of any service or repairs to this player, ask the service technician to perform safety checks to determine that
the player is in proper operating condition.
Important Safety Instructions
3
Notes on handling
1. When shipping the player, the original shipping carton and packing materials should always be used. For maximum
protection, repackage the unit as it was originally packed at the factory.
2. Do not use volatile liquids, such as insect spray, near the player for a long time. They will leave marks on the finish and
may damage the player.
3. The top and rear panels of the player may become warm after a long period of use. This is not a malfunction.
4. When the DVD video player is not in use, be sure to remove the disc and turn off the power.
5. If you do not use the DVD video player for a long period of time, the unit may not function properly in the future.
Occasionally turn on and use the DVD player.
Notes on location placement
When you place this player near a TV, radio, or VCR, the playback picture may become poor and the sound may become
distorted if the other units are not properly shielded. In this case, place the player away from the TV, radio, or VCR.
Notes on cleaning
Use a soft, dry cloth for cleaning. For stubborn dirt, soak the cloth in a weak detergent solution, wring well and wipe. Use a
dry cloth to wipe dry. Do not use any type of solvent, such as thinner and benzene, as they may damage the surface and
electronics of the player.
Lens warning
Cleaning and adjustment of the lens or other components should only be done by a qualified technician.
To obtain a clear picture
The player is a high technology, precision driven device. If the optical lens and drive parts are dirty or worn down, the
picture quality may become poor. To obtain a clear picture, we recommend regular inspection and maintenance
(cleaning or parts replacement) every 1,000 hours of use.
If the player doesn’t operate normally by following the operating instructions, adjust only those controls that are covered
by the operating instructions. Improper adjustment of other controls may result in damage and will often require extensive
work by a qualified technician to restore the player to its normal condition. Unplug this player from the electrical outlet
and refer servicing to qualified service personnel under the following conditions:
Notes
30
Object and liquid entry
Never attempt to insert objects of any kind into the openings of the player, or you may be exposed to dangerous voltage.
Do not store player near liquids of any kind in order to prevent a fire or electrical shock.
Disc tray
Keep your fingers well clear of the disc tray as it is opening and closing. Neglecting to do so may cause serious personal injury.
Handling discs
Do not touch the playback side of the disc. Do not attach paper or tape to discs.
Cleaning discs
Wipe the disc from the center outward with a soft cloth. Do not wipe in a circular motion. Fingerprints and dust on the disc cause
picture and sound deterioration. If you cannot wipe off the dust with a soft cloth, wipe the disc lightly with a slightly moistened soft
cloth and finish with a dry cloth. Do not use any type of solvent such as thinner, benzene, commercially available cleaners or anti-
static spray. It may damage the disc.
Storing discs
Do not store discs in places subject to moisture and dust such as a bathroom or near a humidifier. Do not store discs in a
place subject to sunlight or near heat sources.
Discs
Do not use cracked, deformed or repaired discs. These discs are easily broken and may cause personal injury and damage to the
player.
Laser
Do not remove the cabinet cover. Direct exposure to the laser may cause damage to eyesight.
Introduction
Welcome
Thank you for purchasing this Sound Choice® DVD / CD+G / MP3G player. This manual will describe the functions and features of the
player and the remote control. The player itself has many built-in features that will make your DVD viewing and Karaoke experience
more enjoyable. The player is limited by the functions included on the DVD disc. Some DVD discs have more features than others.
Please refer to the disc’s Main Menu for a complete listing of features. To access the Main Menu of the disc, press MENU on the
remote control.
Features:
Full Karaoke Features
- 2 Microphone Inputs
- Individual Microphone Volume Controls
- Digital Echo
- 6 Levels (+/-) Digital Key Control
- Direct Track Access
Multi Language On-Screen Display
Multi Language Subtitles
Time/Chapter/Title Search
5.1 Dolby Digital Surround Sound
Programmable Playback
Random Playback
Playback Control (PBC)
Multi-Angle Viewing (if available on the DVD disc)
Zoom
A-B Repeat
Pause/Play/Fast Forward/Fast Reverse On DVD Discs
Slow Motion
Parental Controls
Unavailable Features
Some features described in this manual may not be available on certain DVDs. When a function is unavailable and has been attempted
to be accessed by the user, a or will appear in the top left corner of the screen.
Manufactured under license from Dolby Laboratories. Dolby
and the double-D symbol are trademarks of Dolby Laboratories.
Confidential Unpublished Works.
1992-1997 Dolby Laboratories. All rights reserved. “DTS” and
“DTS Digital Out” are trademarks of Digital Theater Systems,
Inc.
C
This product incorporates copyright protection technology that is
protected by method claims of certain U.S. Patents and other
intellectual property rights owned by Macro Vision Corporation and
other rights owners. Use of this copyright protection technology
must be authorized by Macro Vision Corporation, and is intended for
authorization by Macro Vision Corporation. Reverse engineering or
disassembly is prohibited.
NTSC / PAL Video Standards
There are different video standards used throughout the world. This player is compatible with NTSC or PAL and may be switched at any time
by using the P/N button on the remote control. This player will only play discs that were recorded using the NTSC or PAL video standards.
The format should be stated on the disc. The video standard used in the United States is NTSC. Throughout the world the most widely used
format is PAL.
4
Interlaced Video Output
Televisions have used interlaced video output since their inception in the 1940’s. Interlaced Video Output takes the odd number of lines in a
picture and combines them into a frame. Then the even numbered lines are combined into a second frame. The process begins by displaying
the first frame line by line from left to right in 1/30 of a second. This leaves gaps in the picture caused by the missing even numbered lines.
After the first frame has been displayed completely, the second frame begins. The second frame is displayed exactly as the first filling the gaps
in the picture in 1/30 of a second. When both frames are completed, this creates a picture on the screen. The interlaced process leaves marginal
room for distorted objects and artifacts left on the screen between frames.
Progressive Scan
Progressive Scan Output allows the picture on the screen to be displayed in greater detail and less distorted than normal interlaced video.
Progressive Scan takes the even and odd numbered lines and combines them into one frame rather than two. Progressive Scan then displays
the even and odd lines from left to right in succession (leaving no gaps in the picture) until the bottom of the frame is reached after 1/60 of a
second. This is the highest quality video output available, and it produces a crisp and clearer picture for viewing. (This feature is only
compatible with HDTV and DTV.)
Index 29
A - B 17
Angle 18
Arrow Buttons 12, 18
Close 9, 11, 17
Progressive Scan 4, 24
Connection 6
Program (PROG) 15, 17
Remote Control
Batteries 10
Operation 10
Repeat 14, 17
Resume 18
Reverse (REV) 13, 18
RGB Connection 6
S-Video Connection 6
SCART 7
Setup 18
Slow Motion 13, 18
Speaker Setup 21
Stop 9, 18
Subtitle 14, 17, 25
10(+) 9, 18
Timed Playback 14
Title Access (Direct) 9
Track Access (Direct) 9
TV Display 20
Video Connections 6
Volume 12, 19
Warranty 32, 33
Zoom 17
Digital Coaxial Audio Output 7, 22
Digital Echo 9
Digital Key Control 9, 19
Disc Tray 9
Enter 12, 18
5.1 Audio Output 7, 21
Fast-Forward (FR) 13, 18
Goto 14, 18
Karaoke Setup 8, 24
L / R
9, 15, 19
Menu 13, 15, 17
Microphone Connection 8
Microphone Volume 8
MP3 16
Mute 12, 18
Next 9, 13, 17
NTSC 4, 25
Number Buttons 18
Open 9, 11, 17
PAL 4, 25
Parental Control 26
Pause 9, 12, 19
Play 9, 11, 17
Playback Control (PBC) 5, 15, 25
N/P 19
Power 9
Previous (PREV) 9, 13, 18
Interlaced Video Output 4, 24
Reverb 23
Equalizer 22
Dolby Pro Logic 23
Audio 15
HDMI . . . . . . . . . . . . . . . . . . . . . . . . . . . . . 6

Specifications
Disc type:
Video format:
Audio format:
Signal output:
Karaoke:
Input jack:
Output jack:
(Audio & Video)
Power voltage:
Power consumption:
Frequency response:
Signal/noise ratio:
Dimensions:
Accessories:
MPEG2 for DVD; MPEG1 for CD+G / VCD
MPEG1, MPEG2, PCM, DOLBY DIGITAL; Analog Stereo
Video System: NTSC or PAL
Video: 1.0 Vp-p (75 )
S-Video: Y:1Vp-p (75 ) C:0.3Vp-p (75 )
Audio: 2.0V + 0.0V/-1.0V (5.1 Audio: 0.5V +/- 0.2V)
Digital Echo, 16 Levels (+/-) Step Digital Key Control
2 Microphone jacks
RCA, S-video, Optical and Coaxial Digital Output, Composite,
SCART , VGA and HDMI
AC 110V~240V (Automatically adjusts to local current)
25W
Fs 192KHz: 4Hz-44KHz: +/-1dB
Audio: 90dB
Video: 56dB
17” (W) x 3-3/4” (H) x 12” (D) (432mm x 95mm x 305mm)
RCA Audio/Video Cables, Remote Control (with batteries),
Quickstart Guide & Warranty Card. The most current Owner`s
Manual can be downloaded at www.soundchoice.com.
Note: Designs and specifications are subject to change without notice.
Weight: 7 lbs. (3.17 kg.)
28 Acceptable Formats
Invalid Formats
This DVD Player will not accept the following formats:
DVD-ROM Compact Disc Interactive (CD-I)
DVD-RAM CD-ROM
DIGITAL AUDIO
GRAPHICS
5
Playable Discs
This DVD player will play the following formats: Digital Video Discs (DVD), Compact Disc+Graphics (CD+G),
Compact Disc (CD), Digital Video Disc Recordable (DVD-R), Digital Video Disc Re-Writable
(DVD-RW), Super Video Compact Disc (SVCD), Video Compact Disc (VCD), Compact Disc
Recordable (CD-R), Compact Disc Re-Writable (CD-RW), MPEG 3 (MP3), Compact Disc Digital Audio
(CD-DA), MP3G (Mp3 with Graphics) JPEG, WMA and Kodak Picture CD.
Kodak, Digital Science and Photo CD are trademarks of Eastman Kodak Company.
Playback Control (PBC)
The playback control function allows the user to have direct access to different tracks, titles and chapters in acceptable
audio and video formats. The player’s default setting is “PBC ON”.
Playback Control - ON (Factory Default Setting):
This allows the user to have direct track access during playback with the following formats:
Compact Video Disc (VCD) Compact Disc Recordable
(CD-R)
Compact Disc+Graphics (CD+G)
Compact Disc Re-Writable (CD-RW)
Compact
Digital Video Discs
Disc (CD)
(DVD)
MPEG 3 (MP3)
Digital Video Discs (DVD), Compact Disc+Graphics (CD+G),
Compact Disc (CD), Super Video Compact Disc (SVCD),
Video Compact Disc (VCD), Compact Disc Recordable (CD-R),
Compact Disc Re-Writable (CD-RW), MPEG 3 (MP3), Compact
Disc Digital Audio (CD-DA), JPEG, and Kodak Picture CD.
MP3
/ MPEG1 for MP3G

Instructions for connecting the video output
Video Output (Standard / Interlaced)
Video Connections
Caution Note:
Please refer to the instructions for your TV set. Turn off the DVD player, TV set and/or amplifier and disconnect the
power before you connect the audio/video cables. If there is only one audio input terminal (monaural sound) on your TV
set, you can connect the DVD video player with a Y-shape cable (commercially available) before connecting to the TV
set.
*Please connect the DVD video player to the TV set directly. If you connect the DVD video player to the VCR, the picture
will become distorted because all DVD discs are copy-protected.
Video cable Connect to the VIDEO (Yellow) input of
the TV set.
S-VIDEO Output
S-VIDEO cable
Connect to the S-VIDEO input of the TV set in which
there is an S-VIDEO JACK. The S-Video input is
higher resolution picture than the video input.
Progressive Scan - Color Different (Y, Pb/Cb, Pr/Cr) / (R, G, B) Output
(Y, Pb/Cb, Pr/Cr) cable
Color different video terminals provide (Y, Pb/Cb, Pr/Cr)
or (R, G, B) in order to match with the (Y, Pb/Cb, Pr/Cr)
or (R, G, B) of the TV set. By using (Y, Pb/Cb, Pr/Cr) or
(R, G, B) the video output is clearer than the S-video
output. (Y, Pb/Cb, Pr/Cr) or (R, G, B) can be switched
in the options of the general setup menu.
Allows connection to flat screen televisions and
projectors. Can be switched in the options of the
general setup menu.
Note: The color different output terminals (Y, Pb/Cb, Pr/Cr)
are the same as (R, G, B)
6
Trouble-Shooting Guide
Check the following guide for the possible cause of a problem before contacting service.
Symptom
No power.
The player doesn’t
work after turning
on the power.
No picture.
No Sound.
The picture is not good.
The DVD video player
does not start playback.
The remote control does
not work properly.
Possible Cause
The power plug is disconnected.
No disc.
The TV is not set to receive DVD signal output.
The video cable is not connected securely.
The connected TV set is not turned on.
The equipment connected with the audio cable is
not set to receive DVD signal output.
The audio receiver is turned off.
The setting of the output sound format is incorrect.
The disc is dirty.
No disc is inserted.
The disc is placed upside down.
The disc is not placed within the guide.
The disc is dirty or scratched.
There is a menu pictured on the TV screen.
The parental lock function is set.
The remote control is not pointed at the remote
sensor on the DVD video player.
The remote control is too far from the DVD video player.
There is an obstacle between the remote sensor on
the player and the remote control.
Correction
Connect the power plug securely into the electrical
outlet.
Load the disc, USB or SD Card and check the
indicator on the display.
Select the appropriate video input mode on the TV so
the picture from the DVD video player appears on the
TV screen.
Connect the video cable securely into appropriate jacks.
Turn on the TV power.
Select the proper audio input mode of the TV set.
Turn on the audio receiver`s power.
Eject the disc and clean it.
Insert the disc with the label facing upward.
Place the disc correctly inside the guide on the disc tray.
Carefully clean the disc.
Press SETUP button to close the item picture.
Cancel the parental lock function or change the
parental level.
Point the remote control at the remote sensor on the
DVD video player. Do not point the remote at the TV.
Operate the remote control within about 20 feet (7m).
Remove all of the obstacles.
Replace both of the batteries with new ones.
The batteries in the remote control are exhausted.
27
Insert a disc.
Change the audio output on the DVD Player.
No sound output in
Karaoke mode. Stereo output is not connected properly (see pg.7).
Speaker setup is not set properly for Karaoke.
Connect the stereo output of the unit
to your TV or amplifier.
Speaker setup should be set on stereo.
The microphone does
not work.
Power button on the microphone is switched “off”.
Switch the microphone “on” and check that the
microphone volume is at least more than 50%.
Check to see that the cable is not damaged.
Also check that the volume hasn’t been turned
down on the remote control.
.
HDMI, VGA Output or SCART Connection
Connect the SCART output from the PCK 4000 to
the SCART input on your TV, Digital Recorder,
VCR or Receiver.
The word MUTE is on your monitor screen Turn MUTE off on your remote
, or USB Device or SD CARD
Still getting no sound?
Check the volume control on the remote.
Allows connection to flat
screen televisions and projectors
with HDMI connections..

Audio Connections
Instructions for connecting the audio output
Stereo output mode (Standard) - This output must be used for the Karaoke feature.
Digital Optical or Coaxial output mode
Connect to the optical or coaxial input of your TV set or
an amplifier on which the optical or coaxial input terminals
are equipped. In this case, you can use the decoder built
into the TV set or amplifier.
Coaxial cable
Connect to the (5.1) channel audio inputs of the
amplifier.
Surround Sound (5.1) output mode
(5.1) Channel Audio cable
Optical cable
Stereo cable (Left)
Stereo cable (Right)
Connect to the Stereo (Red & White) inputs of your TV or Stereo.
7
(Note: At any time you may exit the menu by pressing the SETUP button.)
PREFERENCE PAGE CONTINUED
PARENTAL KID SAFE
G
PG
PG-13
PGR
R
(Note: Password mode must be
turned "on" for the Parental
Menu to work. To change the
parental function, the user must
turn "off" the password protection
and adjust the parental level
setting. Once this is completed,
turn the password protection
mode “on”.)
Features Setup
NC-17
ADULT
DEFAULT RESET
WARNING!!! (By selecting RESET, this will reset the player's
memory to the factory settings. Any personalized
features or changes that have been made will be
lost.)
MAIN PAGE
(This button will take you back to the
main page of the MENU.)
PASSWORD SETUP
PASSWORD MODE ON
OFF
PASSWORD CHANGE
(The default code is: 0000)
26
Microphone Connection
1. The microphone must be switched “Off” before connecting.
2. The microphone volume must be turned to (0) on the player.
3. Connect the microphone plug into the jack.
4. Turn the microphone “On” using the on/off switch on the body of
the microphone.
Microphone Connection
Microphone Volume Control
1. The microphone should be in the “On” position
before adjusting the Microphone Volume Control.
2. Adjust the Microphone Volume to a desired level.
Note: Before disconnecting the microphone cable from the player, the microphone
volume control must be turned completely to ( 0 ).
* Feedback Alert: Feedback is a loud squealing noise that comes from the output
speakers. Feedback may damage speakers. To avoid feedback
noise do not place your hands near the top of the microphone
and do not point the microphone directly at the output
speakers. If feedback occurs, lower the volume control.
8
(Note: At any time you may exit the menu by pressing the SETUP button.)
PREFERENCE PAGE
Note: In order to access the Preference Page, the player must come to a complete stop.
To completely stop the player, the user must press the STOP button twice.
TV TYPE PAL (Europe and Australia)
AUTO
NTSC (North America)
PBC
(Playback Control Feature)
ON
OFF
Features Setup
SUBTITLE
DISC MENU
25
ENGLISH
FRENCH
GERMAN
PORTUGUESE
SPANISH
CHINESE
JAPANESE
AUDIO
MIC
1 2
0 10 0 10
MIC VOL
1 2
OFF
ENGLISH
FRENCH
GERMAN
PORTUGUESE
SPANISH
CHINESE
JAPANESE
ENGLISH
FRENCH
GERMAN
PORTUGUESE
SPANISH
CHINESE
JAPANESE
ENGLISH
FRENCH
GERMAN
PORTUGUESE
SPANISH
CHINESE
JAPANESE
LATIN
LATIN

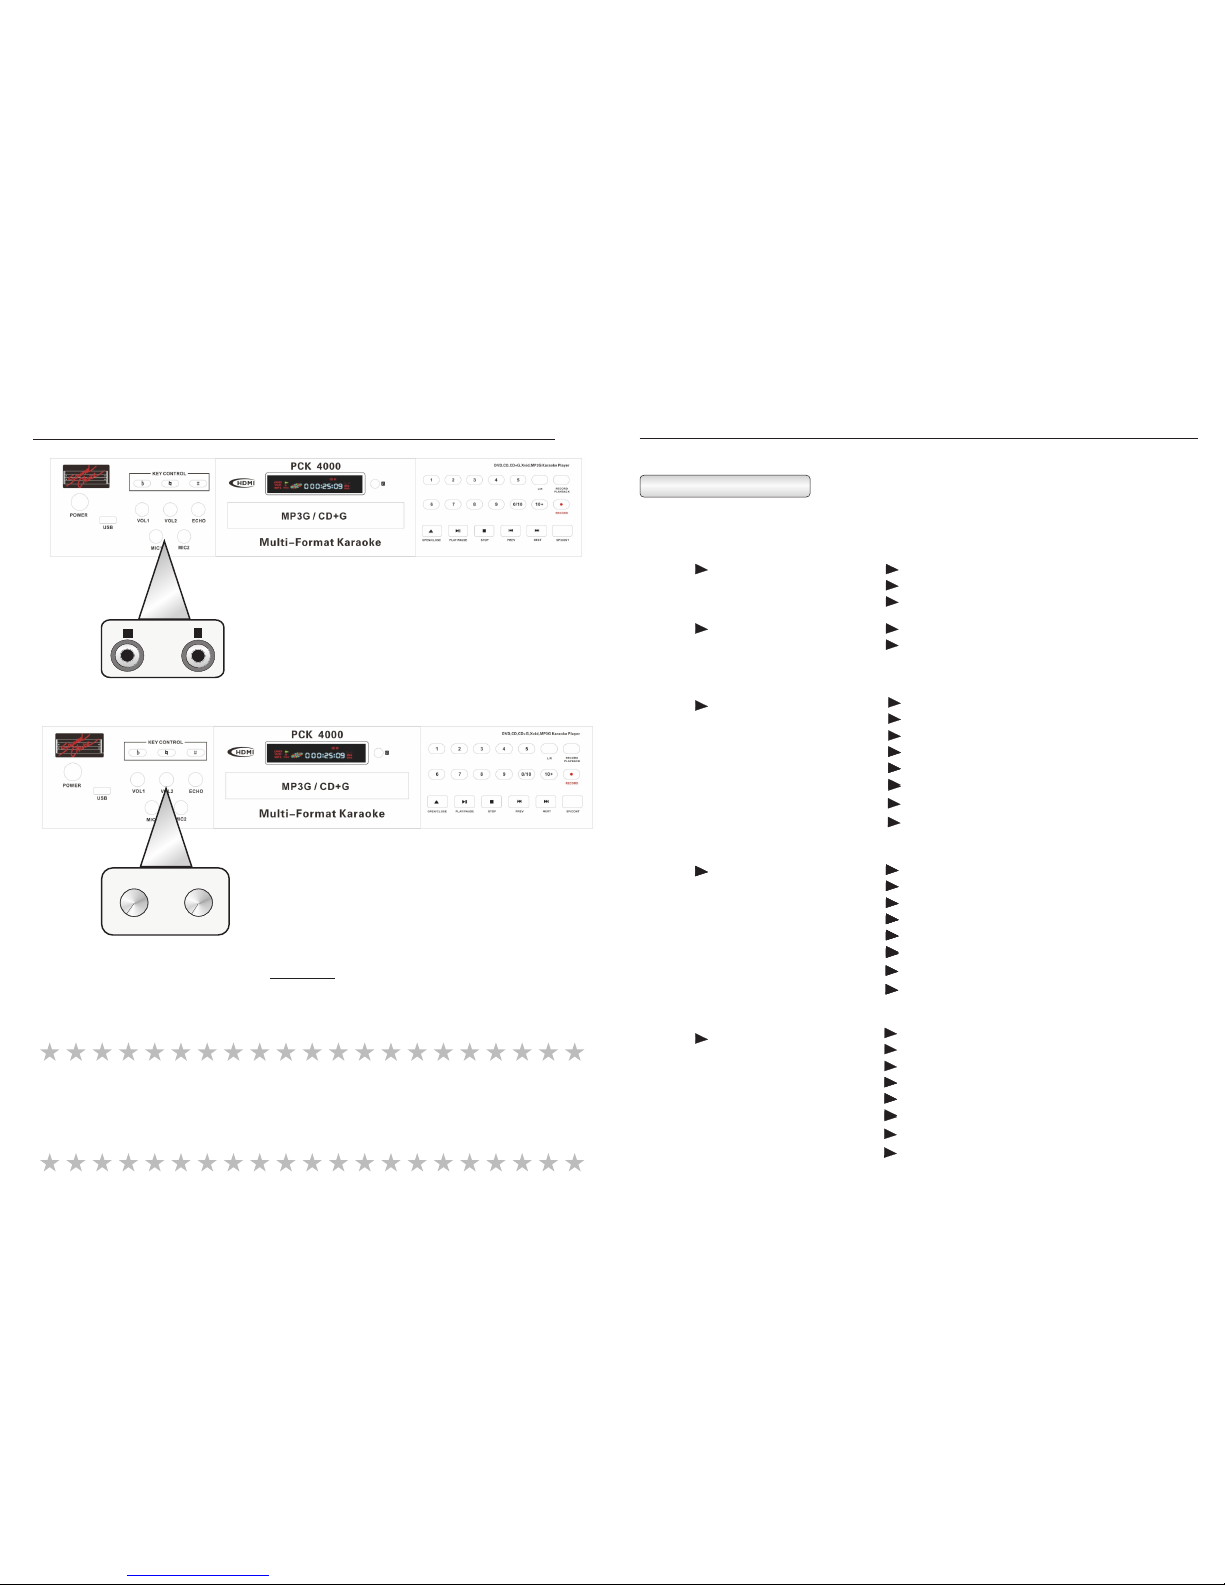
Front Panel Operation
1. Power
Press to turn the power ON or OFF.
2. Direct Track/Title Access
For Turbo Load place your disc in the tray, then without closing the tray, press your desired track # on the front panel. The tray will
close, and the player will directly play the selected track.] For tracks above 10, press the 10+ button, followed by the desired
number: e.g. for 12 press 10+ then 2. If your disc has greater than 20 tracks, then press 10+ twice followed by the desired single digit.
E.g. for 26, press 10+, 10+, 6, and for 36 press 10+ 3 times followed by 6 etc.
3. Disc Tray
Insert discs here
4. 10+
This allows the user to have direct track or title access above 10. Press once and the (1 ) will appear; then press the desired single
digit number to access the track. For example, to access track/title 14, press the (10+) button once and then press 4. To access
track/title 22, press (10+) twice and (2 ) will appear on the screen. Then press 2.
5. Open/Close
This button opens and closes the disc tray.
6. Digital Echo Control
This function allows the user to add echo effects to the microphone input when singing. Adjust the control from left to right to add or
remove echo.
7. Digital Key Control
These buttons allow the user to adjust the pitch (sharp-#, or flat-b) of the audio track during playback. There are a total of 6 steps
up (sharp) and 6 steps down (flat). Press the reset- button to return to “zero” adjustment. When any track finishes, the key
change will automatically revert to the natural setting. NOTE: The first time you press any of the key change buttons, the player
displays the current setting. It then takes another button input to actually change the key.
8. L /R
This will switch the audio output of the player from right channel, left channel, mono and stereo.
9. Play
Press this button to play the disc.
10. Pause
Press this button to pause the disc.
11. Stop
Press this button once to stop the disc. The player will hold the place on the disc where it was stopped. Press play to continue.
Press twice to completely stop the disc.
12. Previous (PREV)
Press this button to skip to the previous track/title. (This function may not work with certain discs, depending on their structure.)
13. Next
Press this button to skip to the next track/title. (This function may not work with certain discs, depending on their structure.)
14. Single Play / Continuous Play (momentarily displays on your TV or monitor when pressed)
Pressing this button before you insert a disc will cause the disc to load and pause at the first track, or if you select a track number on
any disc other than a DVD the player will close the drawer and cue the selected track. If the setting is Continuous Play and you start a
track playing, then select Single Play, the player will go into Pause at the end of the track from any format. DVDs will go directly to
track one and pause if Single Play is selected prior to loading the disc, then you may select your desired track, and the player will load
that track and pause again at the start. You can select or de-select the single play mode at any time during play from discs, USB or SD
Cards.
9
1
2
34
5
6
8
AUDIO SETUP PAGE CONTINUED
(Note: At any time you may exit the menu by pressing the SETUP button.)
Features Setup
To Return, Press Setup
VIDEO SETUP PAGE
COMPONENT S-VIDEO
YUV (Most televisions use YUV)
RGB (Progressive Scan)
VGA (Progressive Scan)
TV MODE INTERLACED
P-SCAN (Progressive Scan)
QUALITY
POWER RESUME
DEFAULT
(Press the ENTER button for access
to the editing options.)
SHARPNESS HIGH
MEDIUM
LOW
BRIGHTNESS 0
Note:
1) Press the RIGHT ARROW
button to change the brightness setting.
2) Use the UP & DOWN ARROW
buttons to adjust the brightness level.
3) Press the LEFT ARROW button to
return to the Quality Menu.
CONTRAST
ON (DEFAULT)
OFF
RESTORE
0
Note:
1) Press the RIGHT ARROW
button to change the brightness setting.
2) Use the UP & DOWN ARROW
buttons to adjust the brightness level.
3) Press the LEFT ARROW button to
return to the Quality Menu.
24
7
12 13
9 10 11
14 15
In this position, if there is a power failure then it comes back,
the player will restart automatically.
If the power fails, the player will shut down and has to
be restarted manually.
Resets factory settings.

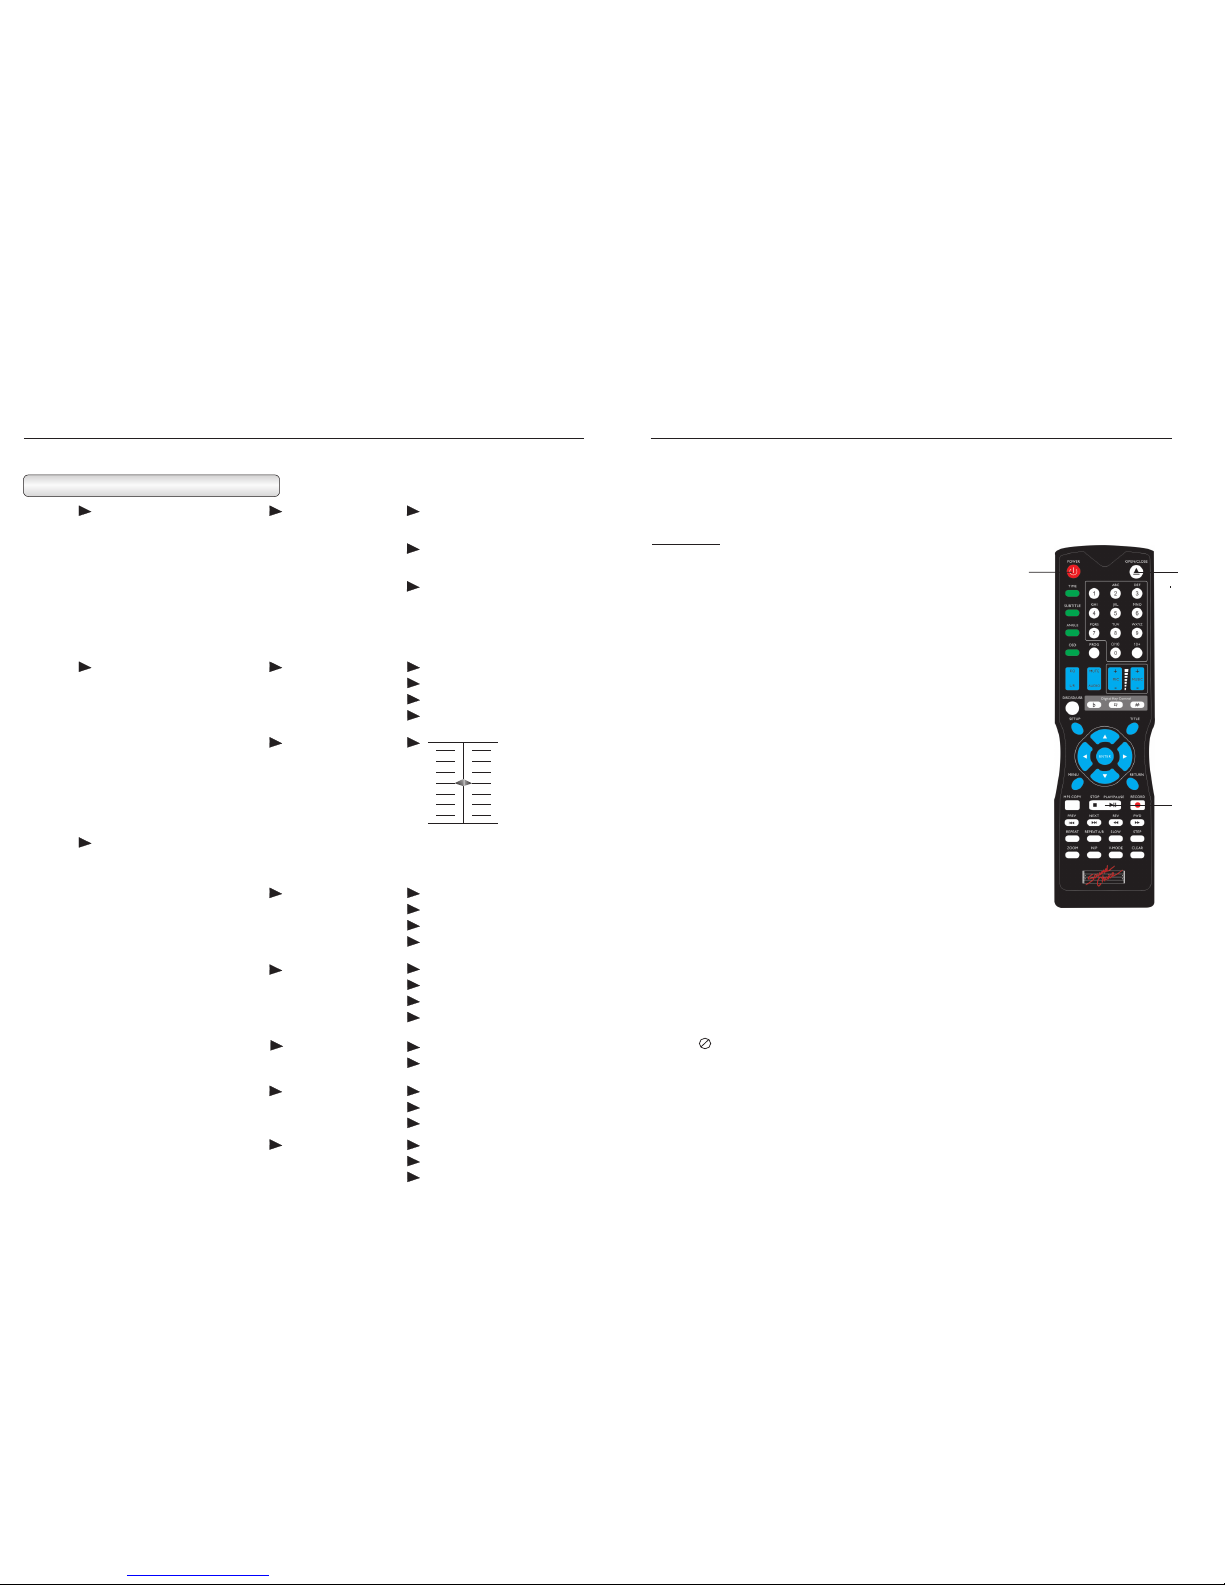
Preparation of the remote control
Place the batteries into the remote control.
The remote control will then be ready to operate the
DVD player.
1. Open the cover.
2. Insert the batteries (2 - No. AAA).
Make sure to match the +/- on the batteries to
the marks inside the battery compartment.
3. Close the cover.
Notes on the batteries
Improper use of the batteries may cause battery
leakage and corrosion. To operate the remote
control correctly, follow the instructions below.
1. Do not insert batteries into the remote control
in the wrong direction.
2. Do not charge, heat, open, or short-circuit the
batteries. Do not throw batteries into a fire.
3. Do not leave dead or exhausted batteries in the
remote control.
4. Do not use different types of batteries together
or mix old and new batteries.
5. If you do not use the remote control for a long
period of time, remove the batteries to avoid
possible damage from battery corrosion.
6. If the remote control does not function correctly
or the operating range becomes reduced, replace
all batteries with new ones.
7. If battery leakage occurs, carefully wipe the battery
liquid from the battery compartment; then insert new
batteries. WARNING: Avoid any contact with your skin.
Batteries contain caustic material which can cause burns.
If contact occurs, wash immediately under running water.
Remote Control Setup
30 30
Operation of the remote control
Instructions for using the remote control.
Distance: within 20ft. (6m) from the front of the remote
control sensor on the player.
o
Angle: within 30 in each direction of the front of the
remote sensor on the player.
Do not expose the remote sensor of the DVD video
player to a strong light source such as direct sunlight
or other illumination. If you do so, you may not be able
to operate the DVD karaoke player via the remote control.
Notes:
1. Direct the remote control at the remote sensor on
the player.
2. Do not drop or give the remote control a shock.
3. Do not spill water or any liquid on the remote
control.
4. Do not open the remote control, except to install the
batteries in the battery compartment.
10
Remote Sensor
AUDIO SETUP PAGE CONTINUED
(Note: At any time you may exit the menu by pressing the SETUP button.)
Features Setup
3D PROCESSING PRO LOGIC II ON
OFF
AUTO
MODE MUSIC
MOVIE
PRO LOGIC
AUTO
PANORAMA ON
OFF
DIMENSION SIZE -3
SIZE -2
SIZE -1
SIZE 0
SIZE 1
SIZE 2
SIZE 3
CENTER
WIDTH
LEVEL 0
LEVEL 1
LEVEL 2
LEVEL 3
LEVEL 4
LEVEL 5
LEVEL 6
LEVEL 7
(Set this mode to the
type of audio/video
signal that you are
applying the PRO
Logic on.)
(This feature makes the
overall sound larger.)
(This feature adds depth
to the overall sound.)
(This feature adds depth
to the front and center
speakers.)
REVERB MODE
(5.1 AUDIO ONLY)
OFF
CONCERT
LIVING ROOM
HALL
BATHROOM
CAVE
ARENA
CHURCH
23
Progressive Scan
After connecting all of the component systems, turning on the relevant equipment and equipping the remote
control with the batteries, the user is now ready to use the DVD video player.
Preparation
a. Turn on the TV set.
b. If the amplifier is connected, you should turn on the amplifier and
select the corresponding mode of the amplifier according to your
DVD video player.
c. Turn on the player.
1. Press the POWER button of the DVD video player to
turn on the player.
Switch the input mode of the TV to either VIDEO IN or AVI 1, 2 or
3 (depending on the Model of the TV).
2. Press the OPEN/CLOSE button on the player or remote
control to eject the disc tray.
a. After the disc tray is ejected, insert a disc with label side upward into
the disc tray.
3. Alternatively Press PLAY
The player recognizes the format of the disc automatically, and the
result will appear on the display screen of the player. Then the player
will automatically play the program. At any time you can change the
selected track by inputting a new track number.
Basic Play
b. Press the OPEN/CLOSE button on the player or the remote control to close
the tray or for Turbo Load - press desired track number, or 1 to start playing a movie.
11
AUDIO SETUP PAGE CONTINUED
SPDIF SETUP
(DIGITAL OUTPUT
SETUP)
SPDIF OUTPUT
(DIGITAL OUTPUT)
SPDIF/OFF (Turns "off" the
digital outputs of
player.)
SPDIF/RAW (Activates the
optical outputs of
the player.)
SPDIF/PCM (Activates the
coaxial outputs of
the player.)
(Note: At any time you may exit the menu by pressing the SETUP button.)
Features Setup
DOLBY DIGITAL
SETUP
DUAL MONO
(For use with the
Karaoke CD+G
format.)
STEREO
L-MONO
R-MONO
MIX MONO
DYNAMIC
(Audio compression
ratio setting.)
FULL
OFF
6/8
4/8
2/8
CENTER DELAY +
- 4 MS
- 2 MS
0 MS
+
- 12 MS
- 6 MS
0 MS
REAR DELAY
LARGE
SMALL
CENTER
FRONT
LARGE
LARGE
SMALL
SMALL
OFF
OFF
REAR
22
Notes:
1. During playback, if the picture is not in full-screen, or the edge is
covered, or there is no picture, you must change the video output
setting to the local corresponding TV signal format: PAL or NTSC.
2. When a appears on the TV screen, it indicates that the operation
is invalid or can`t be accepted by the player. This is controlled largely
by the programming on the DVD disc; therefore, it will vary from DVD
to DVD.
CHANNEL DELAY
(This feature allows the user to alter the delay to different speakers, according to the distance from the
speakers the user is.)
1 2
3

4. Pause
During the play, press PAUSE and the playback will pause. Press the
button again to return to normal playback.
5. Volume adjustment
During playback, press VOL(+) and VOL(-) to adjust the output volume
of the DVD video player.
During playback, press MIC VOL(+) and MIC VOL(-)
to adjust the output volume of the DVD video player.
End of Play
1. Press OPEN/CLOSE button to open the disc tray. After the tray is ejected,
remove the disc.
2. Press OPEN/CLOSE to close the disc tray.
3. Press POWER to turn off the DVD video player. Then turn off the relevant
equipment, Amp, TV etc..
Basic Play
POWER OPEN/CLOSE
12
AUDIO SETUP PAGE
AUDIO OUT DOWNMIX LT/RT (LEFT/RIGHT
MONO)
STEREO (NORMAL)
V. SURR (VIRTUAL
SURROUND)
(Note: At any time you may exit the menu by pressing the SETUP button.)
Features Setup
GENERAL SETUP PAGE CONTINUED
LAST MEMORY OFF (Permanent factory setting)
5.1 CH
21
7. Press buttons to select
Move these arrow buttons to the desired menu or picture.
8. Press ENTER to confirm the desired menu
The next set of submenus will appear. The player will automatically play the
selected program. As for the operation of the next submenu, use the
buttons to select the desired program; then press ENTER to confirm.
/ / /
/ / /
76
4
6. Microphone Volume adjustment
This function has been disabled at the factory. Because this is a karaoke
player when a previously played disc is re-inserted with this function
turned on the player would immediately load and play from the last point
which the disc had reached instead of going to the selected track.

1. Fast-forward playback
This function does not work with CD+G discs. For VCD
discs the PBC must be turned “off” to activate this function.
During playback, press the "FF" button to achieve fast-
forward playback. There are four levels of speed. Each
time it is pressed, the speed will increase a level. After
reaching the fastest speed, pressing the "FF" button will
return playback to the normal speed.
*There will be no audio output during the fast-forward
playback.
2. Fast-reverse playback
This function does not work with CD+G discs. For VCD
discs the PBC must be turned “off” to activate this function.
During the playback, press the "FR" button to achieve
the fast-reverse playback. There are four levels of speed.
Each time it is pressed, the speed will increase a level.
After reaching the fastest speed, pressing the "FR" button
will return playback to the normal speed.
*There will be no audio output during the fast-reverse
playback.
3. Slow motion
During playback, press SLOW to get multi-speed playback.
There are two modes of slow motion. They are slow forward
and slow reverse. There are four speed levels associated with
both. Each time it’s pressed, the speed will change a level.
After each level is accessed, the player will return to the
normal playback speed.
*There will be no audio output during the slow-motion
playback.
Basic Play
4. Skip to the next chapter/track
During playback, press the NEXT button.
5. Skip to the previous chapter/track
During playback, press the PREV button.
13
This section will instruct you on how to navigate the setup features of the DVD player. There are many features that
are built into this player that can be accessed by the user. Please review this section of the manual before attempting
to adjust any of the features.
NOTE: While navigating through the menu, you must use the LEFT ARROW button to return to the previous
page or selection.
1) To access the player's internal menu, you must press the SETUP button on the remote control.
SETUP MENU -- MAIN PAGE
(Note: At any time you may exit the menu by pressing the SETUP button.)
GENERAL
LANGUAGE SETUP
AUDIO SETUP
SCREEN SETUP
SPEAKER SETUP
MODE SETUP
GENERAL SETUP PAGE
RESOLUTION
TV SYSTEM
VIDEO
RATING
4801 / 5761
NTSC
480P / 576P
1080I
PC - VGA
PAL 60
720P
1080P
S - VIDEO
PAL
INTERLACE - YUV
AUTO
TV - RGB
PAN SCAN YPBPR
Features Setup
TV TYPE
PASSWORD
4 : 3 PAN SCAN
4 : 3 LETTERBOX
16 : 9
- - - -
SCREEN SAVER ON
OFF
(Note: This should be left "on" to
protect the television screen. This
is very important especially when
connected to a HDTV or a Plasma
television set. If the screen saver is
turned "off", it could damage the screen
and it will become unreadable.)
20
6
6. Select the program through the menu
If the disc contains a menu option in the menu “on” mode, press MENU to
activate the menu of the disc. Select a certain program to play. The detailed
operations are as follows:
Press MENU and the menu screen will appear. The available programs vary
according to the different discs.
1 KID SAFE 2 G 3 PG 4 Pg13
5 PG - R 6 R NC - 17 8 ADULT
1
2
3
4
5
7. Skip to the timed playback
8. Switch the subtitle language
For a DVD disc, press the SUBTITLE button to
select the subtitle language, such as Chinese,
English, etc. Each time it’s pressed, the subtitle
language will switch (if available on the disc).
9. Repeat playback
During playback, press REPEAT continuously;
this will select the different programs.
Basic Play
A. DVD discs
Press REPEAT once to replay “chapter”.
Press it twice to replay “title”.
Press it three times to play “all”.
Press it the fourth time to cancel repetition playback.
B. Other discs
Press REPEAT once to replay the single “chapter”.
Press it twice to replay all of the tracks on the disc.
Press it the third time to cancel the repetition playback.
14
24. AUDIO (DVD Karaoke Only)
Most Karaoke discs are designed to play the demonstration vocal on the right channel only, so that you will not hear the lead
vocal in stereo. Press this button to turn “On/Off” the demonstration (lead) vocal track during playback. The default setting is
“off”; you will need to turn this function “on” for each track selection except for playback in Repeat modes.
25. PAUSE
While the player is in the playback mode (including slow, fast forward, fast reverse, etc.), press this button and the playback
will pause. The picture will be still. Press it again to return to normal playback.
26. VOL +
This increases the volume level of the audio output.
27. VOL -
This decreases the volume level of the audio output.
28. R/L
This is used to select the right and left tracks of VCD discs, and CD+G discs which have a multiplex demonstration
vocal track.
29. DISPLAY
This will display the different times that are remaining on a disc during playback.
Remote Control Quick Reference Guide
19
8
9
This function is not available on this model.

10. Programming playback
While the menu is off and in the stop mode:
press "PROG". The on-screen display will appear:
Simply enter the desired track number(s) and up to
sixteen (16) pre-selected songs will play in the
selected order.
Pressing the Single Play button during any song in the
program will cause the player to PAUSE at the beginning
. of the next programmed song.
Press the CLEAR button to cancel the entered number.
Press ENTER button.
The unit will play back the programs according to the
programmed order.
11. Menu
For a DVD disc, when the drawer closes, the disc will find
the first chapter, then press MENU to turn on the menu.
For VCD or SVCD discs, during the stop mode,
press the MENU button. Then the following on-
screen display will appear and await the user`s
selection.
1. BROWSE 2.
SINGLE TRACK
3. ALL DISC 4. EXIT
According to the entered number, the player
will play each main picture and sounds in a
small window one by one.
(Press the STOP button to exit.)
12. Playback Control Function (PBC)
While playing a CD+G / DVD / VCD / CD-DA / CD-R / CD / MP3 disc,
if the PBC function is on (factory default), you can press any
number button to select the corresponding track directly. If the
track number is more than 10, you must press (10+) first; then
press the second number button. For example, if you want to
select 21, press (10+) twice and then press 1.
Basic Play
15
10. ANGLE
This is for DVD discs only with multi-angle feature. Press this button to view the picture from the different angles. Each time
it is pressed, the picture will switch to another angle.
11. RESUME
During playback, press STOP once. Then press this button to resume playback from the stopped point. (You can press PLAY
to resume for some discs.)
12. FORWARD (FF)
Press this button to fast-forward. Each time it is pressed, the speed will change a level. Continually pressing this will return
the audio/video to the normal playback. This function does not work with CD+G discs.
13. REVERSE (FR)
Press this button to reverse the playback. Each time it is pressed, the speed will change a level. Continually pressing this will
return the audio/video to the normal playback.
14. SLOW
Press this button to play in slow speed without sound. It can play slowly forward or backward. Each time it is pressed, the slow
motion speed will change. Continually pressing this will return the audio/video to the normal playback.
15. POWER
Press this button to turn the player on or off.
16. PREV
For a DVD disc, press this button to skip to the previous chapter; for a CD or other discs, press this button to skip to the
previous track.
17. ENTER
(Arrow Buttons)
Press this button to make the selection valid.
18.
When in the DVD menu or system menu, press this button to move the selection marker to select the desired program.
19. Number buttons
[0],[1],[2],....[9], etc., are used for entering the numbers. For example, enter the number of the Karaoke track, the numbers of
a DVD chapter and the number of the time, etc.
20. 10+
When the number of the track or chapter is more than 10, press the (10+) button first and then enter the second number. Each
time the user presses the (10+) button, the number will increase by 10.
Remote Control Quick Reference Guide
/ / /
18
21. SETUP
Press this button and the SETUP screen will appear and wait for your setting. The user can change the settings according to
their needs.
22. STOP
For a DVD, press this button once and the playback will stop. Press this again to stop the playback entirely. For a non-DVD
disc, press it once to stop the playback.
23. GOTO
Press this button to enter the designated time, track or chapter to view.
10
11
13. Audio
When playing Karaoke DVDs, press the AUDIO button to hear the
Lead Demonstration Vocal through the right channel of the audio output.
Press again to turn “off” the Lead Demonstration Vocal.
14. R/L (Right/Left) - Karaoke DVD playback only. Audio function (above) must be in 2/2 mode.
Mono Left - Music only.
Mono Right (Practice) - Vocals in stereo, music on left channel.
Mix Mono - Stereo playback of Demo Vocals and music.
Stereo - Vocals on right channel, music on left (equal volume level).
13
14

MP3 Discs
The MP3 disc is a large capacity disc containing CD audio programs. This player can support the MP3
disc format. The detailed operation is as follows:
Press OPEN/CLOSE button to eject the disc tray. Place an MP3 disc into the tray and press the
OPEN/CLOSE button to close the disc tray. The following on-screen display will appear:
Press buttons to select the desired track; then press the PLAY button to play the selected
track.
If the MP3 disc contains multiple file directories, press the STOP button first, and then press the PROGRAM
button to activate the MP3 file MENU display on the TV screen. Then press buttons to
select the desired file directory and press the PLAY button to list the tracks in the selected
directory. At this moment, press buttons to select the desired program; then press the
PLAY button to play the selected song.
Playing MP3 Discs
/ / /
/ / /
/ / /
SMART NAVI
ROOT ROOT 0
01 MP3 1
02 MP3 2
03 MP3 3
04 MP3 4
05 MP3 5
PLAY MODE: FOLDER
16
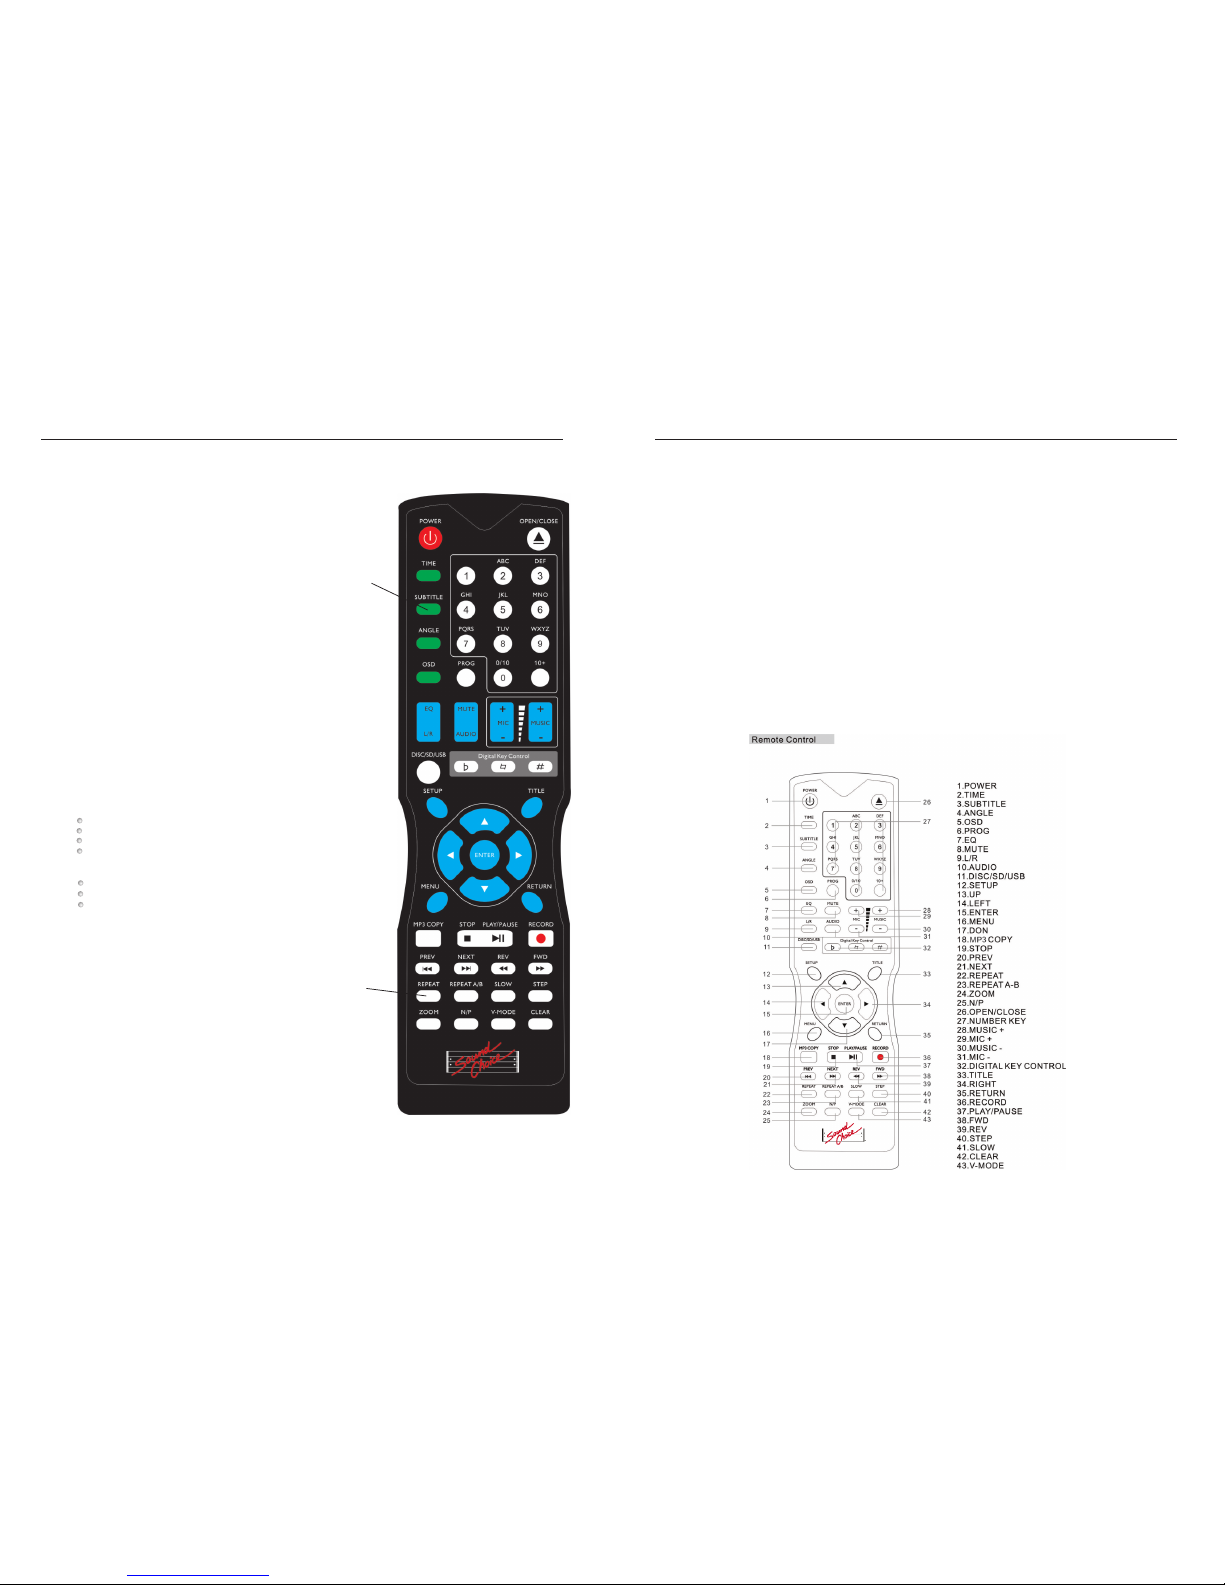
The functions of keys on the remote control
This section lists the functions or operations of keys on the remote control. It is intended for the user`s
speedy search. You can refer to the previous pages for the detailed operation of most keys.
1. Repeat A-B
During playback, press this button at the point (A) where the repetition will start. Press this button again
at point (B) where the repetition will end. Then the unit will play the programs between A and B. Press
this button the third time to finish the repetition.
2. PLAY
During the mode of stop, pause, slow motion, fast forward, or fast reverse, etc., press this button to return
to the normal playback.
3. SUBTITLE
4. PROGRAM
Press this button to change the playback order. It varies according to the different discs.
5. OPEN/CLOSE
Press this button once to eject the disc tray; press it again to close the disc tray. Use this button to load a
disc or remove a disc.
6. REPEAT
For a DVD disc, press this button to repeat the current chapter. Press it again to repeat the programs of
the current title. Press it the third time to cancel repetition. For a CD, press this button to repeat the
current track. Press it again to repeat the entire disc. Press it the third time to cancel the repetition.
7. ZOOM
During playback, press this button to zoom in on the picture. Press it once and the picture zooms 1.5x.
Press it twice and the picture will zoom 2x. Press it the third time and the picture will zoom 4x. Press it
the fourth time to return back to the normal playback.
8. MENU
For a DVD disc, press this button to activate the options contained in the disc (if available). When the
menu is off, in the stop mode, press this button to browse the contents of the disc.
9. NEXT
For a DVD disc, press this button to skip to the next chapter. For a CD or other discs, press this button to
skip to the next track.
Remote Control Quick Reference Guide
Press this button to access the different subtitles that are available on the disc. This player has the capability
of displaying many different subtitle languages, but they must be available on the disc.
17
This manual suits for next models
1
Table of contents


