Sound Projects SP20-Linex User manual

S O U N D P R O J E C T S
O
OP
PE
ER
RA
AT
TI
IO
ON
N
M
MA
AN
NU
UA
AL
L
S
SP
P2
20
0-
-L
LI
IN
NE
EX
X™
™
SOUND PROJECTS
Karperweg 16
1317 SN Almere
The Netherlands
Phone +31 (0)36 53 94 570
Fax +31 (0)36 53 00 578

V1.22 Owners Manual SP20-Linex™
- 2 -
All the important notes regarding
proper operation of the product and
potential danger or damage to either
the user or the equipment, are
highlighted in yellow!
All the important notes regarding
the immediate safety or injury of
persons and/or damage to the
product are highlighted in red!
Like any high performance tool your Sound Projects system needs regular maintenance.
Check all bolts and nuts of touring systems at least once a year! Clean foam-grille and
cabinet openings with vacuum cleaner and compressed air to remove excessive dust.

V1.22 Owners Manual SP20-Linex™
- 3 -
Contents
1QUICK REFERENCE SET-UP GUIDE ................................................................... 4
2LINE-ARRAY BASICS ......................................................................................... 8
3BASIC CONFIGURATION PRINCIPLES ............................................................... 9
4USING SOUND PROJECTS ARRAY CALCULATOR (SPARC™) ........................... 11
4.1 GENERAL OVERVIEW..................................................................................................... 11
5ELECTRONIC SYSTEM SET-UP ......................................................................... 14
5.1 GENERAL OVERVIEW..................................................................................................... 14
5.2 WIRING AND CONNECTION .......................................................................................... 16
5.3 SIGNAL PROCESSING .................................................................................................... 16
5.4 POWER AMPLIFIER REQUIREMENTS ................................................................................. 18
6STACKING AND FLYING WITH EASY-RIG™ .................................................... 21
6.1 SAFETY GUIDELINES ..................................................................................................... 21
6.2 RIGGING COMPONENTS ............................................................................................... 22
6.3 PREPARING A SET-UP .................................................................................................... 25
6.4 GENERAL SET-UP OF A FLOWN ARRAY ............................................................................ 26
6.5 SETTING UP A SYSTEM WITH LIMITED FLOOR-SPACE.......................................................... 30
6.6 DISCONNECTING ......................................................................................................... 30
6.7 GROUND STACKING..................................................................................................... 30
6.8 HOW TO DETERMINE THE MAXIMUM NUMBER OF CABINETS IN AN ARRAY.......................... 31
7ADDITIONAL SAFETY GUIDELINES ................................................................. 33
8MAINTENANCE .............................................................................................. 33
9COMPONENTS AND SYSTEM SPECIFICATIONS............................................... 34
10 DECLARATION OF CONFORMITY ............................................................... 36
List of Figures
FIGURE 4.1 PROJECT INFO PAGE SCREENSHOT ................................................................................. 12
FIGURE 4.2 MAIN INTERFACE PAGE SCREENSHOT ............................................................................. 12
FIGURE 5.3 TYPICAL LINEX™BLOCK DIAGRAM ............................................................................... 14
FIGURE 5.4 LINEX™CONNECTION EXAMPLE ................................................................................... 15
FIGURE 6.1 EASY-RIG™FLY-FRAME WITH 3SP20-LINEX CABINETS AND RIGGING ACCESSORIES ........... 21
FIGURE 6.2 SP20-LINEX ENCLOSURE WITH INTEGRATED FLYING HARDWARE .................................... 22
FIGURE 6.3 S
ASY-RIG™
FLY-FRAME WITH SINGLE-HOIST-ADAPTER AND WITH TILT-BAR...................... 22
FIGURE 6.4 QUICK RELEASE PINS ................................................................................................... 23
FIGURE 6.5 TRANSPORT FLIGHT CASES ........................................................................................... 23
List of Tables
TABLE 5.1 RECOMMENDED CABLE SIZE ........................................................................................... 16
TABLE 5.2 CONNECTOR WIRING.................................................................................................... 16
TABLE 5.3 RECOMMENDED CONTROLLER SETTINGS FOR LINEX ........................................................ 17
TABLE 5.4 RECOMMENDED AMPLIFIER POWER ................................................................................ 18
TABLE 5.5 MAX.RMS POWER HANDLING ...................................................................................... 19
TABLE 5.6 MAX.SPL@1M............................................................................................................. 19
TABLE 5.7 LIMITER SETTINGS EXAMPLE TABLE................................................................................... 20
V1.22 Owners Manual SP20-Linex™
- 4 -
1Quick reference set-up guide
For a more detailed description of the set-up procedure please refer to chapter 6.
Preparations:
Refer to the SPArC™ program (chapter 4) to have the proper setup parameters for your Linex rig.
Carry a printout of the technical parameters for easy reference. A laptop computer with the
project info is recommended to modify unexpected changes at the venue.
Step 0: Connect the single hoist adapter to the fly-frame (optional)
Connect the single hoist adapter to the fly-frame.
Step 1: Connect motor hoist to fly-frame
Connect the motor hoist(s) to the lifting point (and tilting point if applicable).

V1.22 Owners Manual SP20-Linex™
- 5 -
Step 2: Lift the first cluster of cabinets
Lift the fly-frame at the lifting-point together with the first cabinets out of the flight-case
Step 3: Set the angles of the cabinets
IMPORTANT: ALWAYS make sure the
quick release pins are well in place and
locked!
Set the angles at the back of the cabinets and connect the audio-line

V1.22 Owners Manual SP20-Linex™
- 6 -
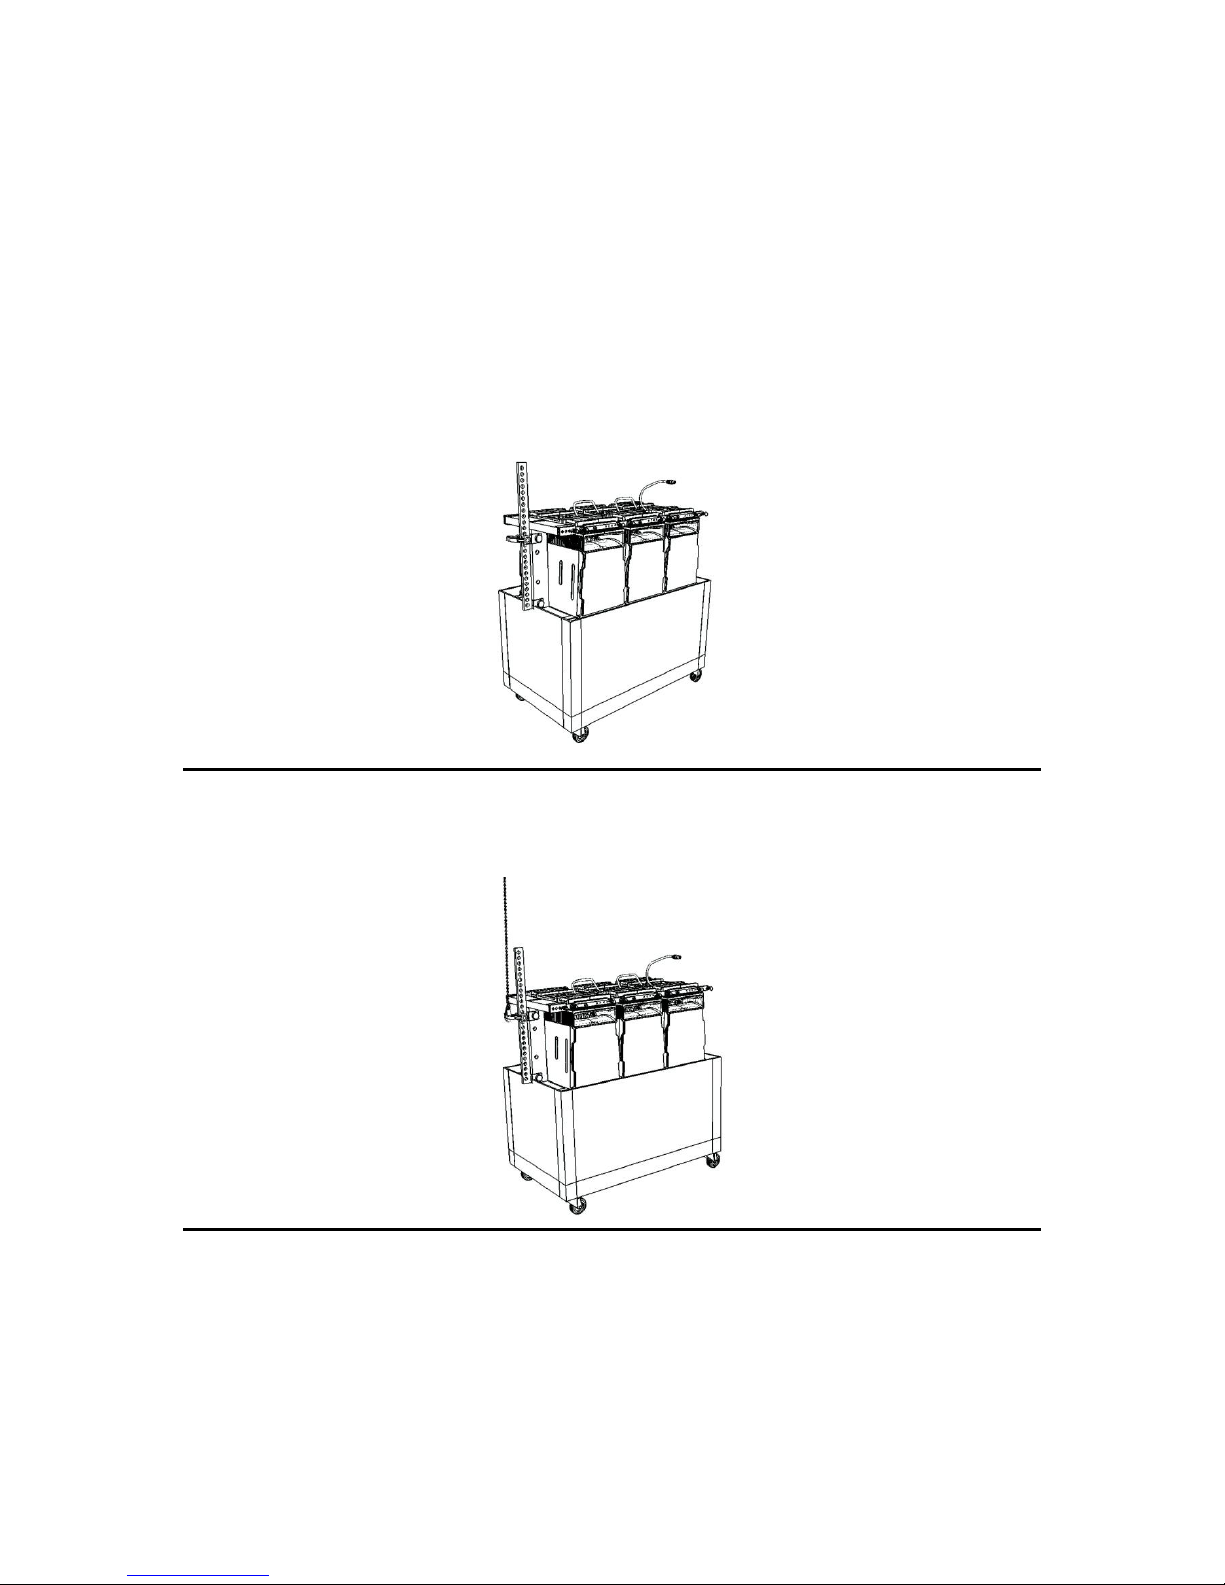
Step 4: Connect the next cluster of cabinets
Connect the backside of the enclosures with the 3 cabinets in the flight-case.
Place the angle setting pin at the 0-
degree angle to fix the slide-bar during
lifting!
Fix the back connector of the lower cabinet in the array at 0 degrees.
IMPORTANT: Do not stand in front of
the array when hoisting! When cabinets
are freed from the ground they may
cause the array to swing forward.
Lift the array out of the flightcase

Step 5: Connecting enclosure fronts
Connect the fronts of the cabinet.
Step 6: Set the angles at the back of the cabinets
Set the angles at the back of the cabinets, connect the audio-lines and lift the array
Continue from step 4 until the complete array is finished

V1.22 Owners Manual SP20-Linex™
- 8 -
2Line-array basics
What is a line-array?
A line-array is a sound system made up out of a group of identical, omni-directional radiating
elements oriented in a tightly spaced, straight line. If this line is long enough compared to the
wavelength the elements behave acoustically as if it were a single source. The basics of this
principle are employed in today‘s vertical line-array systems.
Because of the physical dimensions of conventional HF compression-drivers it is impossible to
meet the criteria of tight spacing of the sources for the frequency bandwidth it operates. To solve
this most line-array systems use waveguides to convert the circular wave front emerging from a
HF drivers exit to a rectangular plane enabling multiple sources to be tightly spaced.
Furthermore the wave front emerging from the waveguide should have tight vertical dispersion
in order to avoid unwanted interference. The way this is achieved largely determines the vertical
performance of the line-array system at the HF bandwidth.
Line-arrays behaviour differs in some respects remarkably from conventional systems. The
greatest benefit of a line-array is that, when properly designed, the acoustical power of many
cabinets can be combined without the unwanted interference that conventional systems show.
Furthermore its vertical directivity can be adapted to closely fit the venue.
Vertical directivity of a line-array versus a conventional system
While conventional system will almost inevitably cause harmful interference when using more
than one system, a well-designed line-array has the advantage of better acoustic energy
distribution towards the projected area. Although it‘s a misconception that with a line-array no
interference will occur. Due to it‘s tight spacing of the omni-directional MF and LF sources most
of the cancellations do occur outside the projected area. In fact it is the ‘desired‘ interference
that creates the ‘bullet-shape‘ often seen in simulation software.
The vertical directivity of the LF can be partially be altered by the angle of the total array. The
MF beam (lobe) is partially manipulated by curving the shape of the array. Due to the HF
waveguide‘s tight vertical dispersion, necessary for proper functioning of the array, curving the
array is also bound to outer limits so it doesn‘t create harmful areas i.e. hotspots and poor HF
coverage. For Linex this outer limit is set to 6 degrees; the maximum angle between two
elements.
Vertical directivity of low frequencies
versus array size
The previously described ‘bullet-shape‘, as a
rule of thumb, applies for wavelengths
equal to or smaller than the vertical array
sizes. For a wavelength equal to the array
length the vertical dispersion will
approximately be 90-degrees. For the
frequencies below this frequency, hence
longer wavelengths, it will gradually turn
into an omni-directional source. Therefore,
vertical directivity control and maximum
SPL of the low and low-mid frequencies
greatly benefit from a larger (longer) array
size.
Fig.1 Typical characteristic of a 2 meter
array at 170 Hz.

V1.22 Owners Manual SP20-Linex™
- 9 -
3Basic configuration principles
With respect to the horizontal coverage a line-array should not differ from a conventional
constant directivity (CD)-system. When more horizontal coverage is needed than the horizontal
dispersion of one line-array some basic rules apply explained later in this chapter. The main
variable to which a line-array can- and has to be adapted is the vertical coverage.
Establishing proper vertical coverage
The first step in the configuration process is to get the venue parameters and listeners positions
right. It may seem logical but a good preparation is the main time-saver in setting up any audio-
system. Once these parameters, such as distances to first and last listener positions and flying
height, are known prediction software such as SPArC™ can easily be employed to configure the
best array shape and size.
When a line array is flown it is most logical to configure from top to bottom (far coverage to
near coverage). Therefore it might not always be possible to point the bottom array element to
the nearest listener position to be fed by the line-array (e.g. due to limited number of array
elements). Additional front fill is then necessary. Another situation where front fill is preferred is
when the array is flying relatively high to the first listeners position. In order to avoid 'elevator-
music' coming from above, front fills placed at stage height will place the sound image
downward for the front of the audience.
When a line array is ground stacked it is more logic to configure the array from bottom to top.
Additional front fill can still be used, however often not necessary.
The requested SPL and venue shape (e.g. arena type or flat field) largely determine the angle
settings within the array. If the variation in audience distance is large (e.g. flat floor) minimal “j-
shaping” of the array may be needed to achieve a more even loudness throughout the field and
to compensate for the losses due to air attenuation. This however increases the number of array
elements needed for a certain vertical coverage angle. If the variation in distance from array to
the audience is small (e.g. the distance between the shortest and the longest distance to the
audience is not more than doubled), a constant angle setting between the elements is
recommended. This will often be the case in small theatres, amphi-theatres or sports arenas.
Constant angle settings between the elements are also recommended whenever the array is very
short (1.2m and below), since a lot of the lower frequency band will have a wide vertical
dispersion in such an array.
The angle increments between array elements shall always be as smooth as possible to not
disrupt the coherent wave front emitted by the array. It is advised to use only constant or
increasing angles from top to bottom when flown or stacked. Furthermore it is advised to use
only the zero angle setting when (very) long throw (40 meters or more) situations apply and/or
large arrays are used (12 elements or more).
Be generous when deciding a certain vertical coverage angle, otherwise (large)
amounts of listeners might be partially in the –6dB coverage area. This means they will
hear less low-mid frequencies! This effect is most pronounced at large distances. In
general one to three cabinets extra coverage for the furthest audience will be sufficient.

V1.22 Owners Manual SP20-Linex™
- 10 -
Horizontal coverage affairs…………
In some cases it might be necessary to use more than one array per side in order to achieve
more horizontal coverage or to be used as in-fills. An important rule applies when this situation
occurs. Instead of placing an array directly besides the first one, the proper approach would be
to fly a second array, focused on another portion of the audience. This second array should best
be spaced 6-7 meters (approximately 20 ft) away from the first array.
Given this separation, interference only occurs in the low frequency range. Hence there are no
audible intelligibility losses. The first major cancellation is shifted lower in frequency band. and
tends to be masked or filled in by room reverberation (example, 28 Hz for 2 arrays of the same
size, spaced 6 metres). Additionally, focussing the arrays at different panning angles will reduce
comb filtering interaction since the overlap region is reduced. Last but not least, the ear cannot
resolve tightly spaced comb filtering notches at higher frequencies throughout the overlap
region.

V1.22 Owners Manual SP20-Linex™
- 11 -
4Using Sound Projects Array Calculator (SPArC™)
To determine the optimum angle settings of the array elements, array position, expected SPL
levels and other array configuration parameters SOUND PROJECTS has developed SPArC™; a
pragmatic array calculation tool.
Based on the venue parameters SPArC™ instantly calculates the most favourable line-array
configuration and processor pre-set. The most important configuration rules are listed in the next
paragraphs. It is strongly recommended to read them carefully before use.
4.1 General overview
SPArC™ is a Microsoft Excel based program, therefore Microsoft Excel needs to be installed on
the workstation on which SPArC™ is used. SPArC™ uses several Visual Basic based program
structures, therefore the macro use in excel must be enabled. Furthermore, be careful no to alter
any cells that are not intended to be altered by the user; otherwise the program might not
function correctly.
The use of SPArC™ is concentrated into two work-maps, the
project info
page and the
main
interface
page, they can be selected at the bottom of the excel sheet. The venue specific
parameters can be entered at the
project info
page, whereas array parameters are automatically
calculated or can be optimized at the
main interface
page.
MS Excel’s automatic calculation setting and the macro use must be enabled!
You can find these settings in menus: extra>options>calculation and
extra>macros>security.

V1.22 Owners Manual SP20-Linex™
- 12 -
Project info page
figure 4.1 Project info page screenshot
When starting a new project, the first page to look at is the
project info
page, here the venue
specific parameters can be entered. SPArC™ uses these in several calculations.
Main interface page
figure 4.2 Main interface page screenshot
The second page in SPArC™ is the main interface. Here a coverage side view is given together
with an SPL prediction for the audience (right scale-axis). Furthermore, the manual adjustment
setting gives full control to optimize vertical array coverage. In addition several automatic
configuration algorithms can be used.
Auto and manual configuration
When the
auto
configuration is turned “on” the graph at the “Main interface” page corresponds
with calculated angle settings. SPArC™ uses the data on the “Project info” page to calculate a
near to optimum array shape. It is recommended by SP to use an array shape as close as
possible to these settings. The settings calculated by SPArC™ are displayed in the pink areas.
If
manual
configuration is turned “on” the graph at the “Main interface” page corresponds with
the manual angle settings (beside the pink areas). The auto settings can be copied to the manual
settings, after which the auto settings can be “fine tuned” if preferred by the user.

V1.22 Owners Manual SP20-Linex™
- 13 -
Important note on proper vertical coverage
Be cautious not to configure the vertical coverage to tight, unless this is absolutely necessary
(this might be the case, due to e.g. a highly reflective back wall in a closed area). This is
especially important in long throw situations. The above rule should prevent (large) amounts of
listeners from being in the area around the -6dB vertical coverage angles. At “main interface”
page of SPArC™ this area can be recognized as the area between the pointers of the first two
(top) cabinets and last two (bottom) cabinets in the graph of the “Main interface” page. The –
6dB angles are represented by top cabinet and bottom cabinet pointers in SPArC™ (“Main
interface”).
The –6dB top coverage area is largest for long to very long throw situations. This area can be
reduced by setting a few top cabinets to a zero degree angle setting and/or addition of cabinets
to the top end of the array. For more related notes on array shape configuration see the array
configuration section of this manual.
The automatic calculation for the angle settings does not take fully into account the above
arguments because such coverage issues are too venue specific to decide upon via simple
algorithms. A sound technician should, therefore review the automatic array settings.
Ground stacking
If wanted (generally only in case of a theatre like venue) the SP line arrays can be ground
stacked. In principal the same rules apply as for flown arrays. Ground stacking in SPArC™ is not
yet a standard option but can be simulated manually. The lowest cabinet will be attached to the
fly-frame and should be positioned at the required height. The ‘lower cabinet angle‘ should be
set to –3 (angle between cabinet and fly-frame is 0 degrees).
Due to omni-directional character of the lower octaves note that when ground-stacking
spill of these lower frequencies occurs at the sides and, if applicable, on stage of the
ground stack!
Printing a page
Any page of SPArC™ can be printed via the excel menu: file>print.

V1.22 Owners Manual SP20-Linex™
- 14 -
5Electronic system set-up
5.1 General overview
The Linex™ system is designed as a three-way/four channel system. The audio signal is
processed to a HF, MF and LF output signal. From these audio signals the Linex™ cabinet is
amplified by means of four AMP channels: HF channel, MF channel, LF1 channel and LF2
channel. If desired a fourth SUB signal leaving the processor can be used for separate sub-low
cabinets.
Cabinets are interconnected in parallel. Hence, two amplifiers are needed to drive one, two,
three or even four Linex™ cabinets, depending on the used amplifier current supply capabilities.
From the amp-rack one cable of minimal but sufficient length shall be connected to a Linex™
cabinet. Short, integrated linking cables then connect additional cabinets in parallel to the first.
A typical block diagram for a Linex™
system set-up and a more figurative
connection example is given in figure 5.1
and figure5.2, consisting of one 2in-4out
controller, one SP2600 for the HF and MF
sections and one SP4600 amplifier for the
LF sections powering three Linex™
cabinets.
figure 5.1 Typical Linex™ block diagram

V1.22 Owners Manual SP20-Linex™
- 15 -
figure 5.2 Linex™ connection example

V1.22 Owners Manual SP20-Linex™
- 16 -
5.2 Wiring and connection
Speaker cable requirements
When planning speaker cable requirements, the following core diameters of 2.5 mm21or 4 mm2
are recommended depending on cable length and nominal input impedance (see table 2.1).
Max cable length
Nominal input impedance Z
Recommended Core diameter
15 m
4 Ω
2,5 mm2
30 m
4 Ω
4 mm2
15 m
2 Ω
4 mm2
table 5.1 Recommended cable size
Speaker cable connector type
All Linex™ cabinets are equipped with Neutrik NL 8 Speakon receptacles.
Speaker cable extension
NL-8 Speakon couplers can be used to extend cables by joining two together.
Connector wiring
Connections are also labelled on the panel at the cabinet rear.
Each Neutrik NL-8 connector shall be wired as follows:
Frequency Band
NL8 Connector
Impedance
LF 1
Conductor pair 1+/-
8 Ω
LF 2
Conductor pair 2+/-
8 Ω
MF
Conductor pair 3+/-
8 Ω
HF
Conductor pair 4+/-
16 Ω
table 5.2 Connector wiring
5.3 Signal processing
In general all array elements (each Linex™ cabinet) of a single array has to be fed with
the same program material, the same amplifier gain, controller, limiter and EQ settings
to ensure coherent behaviour of the line array!
General guidelines
SOUND PROJECTS has configured several controller presets to cover any venue situation.
These settings will deliver the most accurate frequency response at the audience areas.
It is advised to use no or only minor EQ adjustments afterwards. One must be very precautious
because, due to venue acoustics, the frequency response may differ remarkably between places.
Therefore what seems a proper adjustment at one place may have a destructive effect at
another.
Selecting controller settings
*
SOUND PROJECTS Linex™ is standard supplied with 2.5mm2core diameter / Neutrik NL-8 Speakon cables

V1.22 Owners Manual SP20-Linex™
- 17 -
SOUND PROJECTS has prepared a tenfold controller settings, which are available as presets for
several recommended controllers available in the market today. The correct controller preset
number can be selected with table 3.3. In addition SPArC™ can be consulted for the proper
preset number. These controller settings will result in the most coherent frequency response
throughout the audience area.
Average angle
Nr Cabinets
4
2
1
0
24
1
1
2
CSP2
23
1
1
2
CSP
22
1
1
2
CSP
21
1
1
2
CSP
20
1
1
2
CSP
19
1
1
2
CSP
18
1
2
2
CSP
17
1
2
2
CSP
16
1
2
2
CSP
15
1
2
4
CSP
14
1
2
4
CSP
13
1
2
4
CSP
12
1
2
4
CSP
11
2
4
5
CSP
10
2
4
5
CSP
9
2
4
5
0 (distance>120m)
8
3
4
5
0 (distance>70m)
7
3
6
5
0 (distance>70m)
6
5
6
5
0 (distance>40m)
5
5
7
7
0 (distance>40m)
4
6
7
9
0 (distance>20m)
3
7
8
9
0
2
0
0
0
0
1
0
0
0
0
table 5.3 Recommended controller settings for LINEX
It is strongly recommended to use these recommended settings otherwise proper use is
not guaranteed!
SPArC™ controller setting recommendation
The controller setting recommended by SPArC™ can be found on the technical overview within
SPArC™.
Crossover parameters
Please contact SOUND PROJECTS.
Warning! Always use the supplied crossover settings, different settings always give less
than optimum performance and can cause damage to your system!
2Contact SOUND PROJECTS for advice.

V1.22 Owners Manual SP20-Linex™
- 18 -
5.4 Power amplifier requirements
When selecting a power amplifier, don‘t go for “just enough power”! Ample although not
excessive headroom is preferable. The recommended amplifier power presented for a given
Linex system is a good indicator of the size of the amplifier, which will safely drive the
loudspeaker system to full output under most conditions. A smaller amplifier may seem to
provide an extra safety-measure against loudspeaker failure. However an underpowered
loudspeaker will most probably fail sooner than the same loudspeaker powered properly with
the same voltage.
Recommended amplifier power
Sound Projects recommends a
minimum
amplifier peak voltage capacity of double the RMS
voltage at full power in order to avoid clipping the signal. For this reason maximum
Recommended Power Levels per Transducer (RPL/T) may exceed the AES power rating of
individual drivers.
Important note on amplifier power
The listed amplifier power does not always correspond to the best amplifier sizes for
optimum loudspeaker reliability and/or performance. They correspond with what
generally will be a safe amplifier size given the connection diagram in paragraph 2.1.
However in some applications they can be over or underpowered. Proper amplifier
selection requires a considered analysis for the particular application.
Recommended amplifier power table for SP20-Linex
1 Cabinet
2 Cabinets
3 Cabinets
4 Cabinets 3
p4/HF
300 W
16 Ω
600 W
8 Ω
900 W
5,3 Ω
1200 W
4 Ω
p3/MF
600 W
8 Ω
1200 W
4 Ω
1800 W
2,7 Ω
2400 W
2 Ω
p2/LF1
1200 W
8 Ω
2400 W
4 Ω
3600 W
2,7 Ω
4800 W
2 Ω
p1/LF2
1200 W
8 Ω
2400 W
4 Ω
3600 W
2,7 Ω
4800 W
2 Ω
table 5.4 Recommended Amplifier power
Two-Ohm loads and amplifier performance
Most professional amplifiers are capable of running two-ohm loads for extended periods of time
and thus only two amplifiers can power up to four LINEX cabinets. Powering low- and mid
bands @ 2 ohm load is common practice and permissible as long as the available power and
other specs are in excess of the system requirements. However, capable is not necessarily the
same as recommendable. Hence the first obvious question is therefore: will a particular
amplifier handle 2-ohm operation with acceptable distortion specifications?
The next question is: how much are you willing to sacrifice of the superb transient-response of
your LINEX system? The unintended but unavoidable consequence of lowering the loudspeaker
impedance is a decrease in damping factor. The damping factor describes the control a power
amplifier exerts over the loudspeaker motion.
3
Not recommended, only with 2 Ohm enabled amplifiers.

V1.22 Owners Manual SP20-Linex™
- 19 -
Power handling
Although many ways of power handling are used (Program-, Peak-, Peak-program, RMS, AES
and IEC 268-5 Power), only the latter two are real standards and therefore comparable. The
other ways of specifying are more fanciful and therefore not serious. Sound Projects transducer
power ratings are calculated based on minimum impedance (Z-min) and the RMS voltage of the
relevant band-passed4noise input signal. This is in harmony with the most frequently used
Audio Engineering Society (AES) power test specification that requires the transducer to operate
at its rated power level for 2 hours with no degradation in performance.
Important note on power handling
The Max RMS power handling values ratings are power values, which the drivers can
sustain for long periods of time without any damage. The listed power handling ratings
are intended as a point of comparison for the sound technician. In practice, the amount
of excitation of the drivers strongly depends on the type of signal, which is applied to
the drivers (e.g. speech, classic, rock, house). To safeguard against driver damage it is
recommended/common practice to always use a limiter on all channels. Limiter
settings have to be determined (each time), according to the specific use of the PA-
system.
Power handling table
1 Cabinet
p4/HF
(50 Vrms long-term)
150 W
16 Ω
p3/MF
(50 Vrms long-term)
300 W
8 Ω
p2/LF1
(50 Vrms long-term)
300 W
8 Ω
p1/LF2
(50 Vrms long-term)
300 W
8 Ω
table 5.5 Max. RMS Power handling
Limiter settings
It is important to realize a limiter only helps partially to prevent speaker and amplifier
damage. In any case it is always best to check and keep track of the peak SPL at one
meter of a cabinet. It must not exceed the specified MAX SPL@1m per cabinet (table
2.6).
Max. SPL@1m
1 Cabinet5
HF (2kHz)
142 dB
MF (500 Hz)
141 dB
LF (150 Hz)
131 dB
table 5.6 Max. SPL@1m
4
In simple terminology; the above test method confirms that it does not make sense to test a 15 inch “woofer” with a
test signal of 10.000 Hz, or a compression HF driver with a 50 Hz signal. This form of testing and specification is
today regarded as closest to the real thing because music is quite different from a single sine wave.
5These SPL values are for a single cabinet. A line-array of more cabinets will show higher SPL values at one meter.
Especially low frequencies will be severally louder.

V1.22 Owners Manual SP20-Linex™
- 20 -
Threshold value and amplifier gain factor
When you use the amplifiers supplied by Sound Projects they have a gain of 32 dBu.
The gain factor of an amplifier is extremely important for the threshold value of the
limiter! In table 2.6, the limiter parameters are listed in case of amplifiers with a gain of
32 dBu. Furthermore the listed settings are only valid when the recommended amplifier
power (or higher) is used.
Attack and release
The attack and release settings of the limiter strongly depend on the type of sound material,
which is used. If not set correctly they degrade sound quality and proper limiter operation. The
effect of the limiter on music quality can be checked by a sound technician; by turning the
amplifiers low and turning the input signal up into limiting (some limiters have a special limiting
mode). As an example timescales are listed. They are however merely an example and might in
practice differ remarkable depending on the type of limiter and the program material!
Limiter settings example table
HF
MF
LF
Threshold
0dBu/31 VRMS
+3dBu/44 VRMS
+3dBu/44 VRMS
Ratio
INF : 1
10 : 1
10 : 1
Attack
Fast / 5 ms
Med / 25 ms
Slow / 50 ms
Release
Fast / 50 ms
Slow / 200 ms
Slow / 200 ms
table 5.7 Limiter settings example table
Table of contents
Other Sound Projects Stereo System manuals


