Sound Sation YOUMIX Series User manual

YOUMIX
PROFESSIONAL AUDIO Mixer Series
With MP3 and BT AUDIO STREAMING
Please read this manual carefully and properly take care of it
USER MANUAL
Leggete questo manuale e conservatelo per future consultazioni
MANUALE UTENTE

Dear customer,
First of all thanks far purchasing a SOUNDSATION® product. Our mission is to satisfy
all possible needs of musical instrument and professional audio users oering a wide
range of products using the latest technologies.
We hope you will be satised with this item and, if you want to collaborate, we are
looking for a feedback from you about the operation of the product and possible
improvements to introduce in the next future. Go to our website www.soundsation-
music.com and send an e-mail with your opinion, this will help us to build instruments
ever closer to customer’s real requirements.
One last thing: read this manual before using the instrument, an incorrect operation
can cause damages to you and to the unit. Take care!
The SOUNDSATION Team
Gentile Cliente,
Grazie per aver scelto un prodotto SOUNDSATION®. La nostra missione è quella di
orire ai nostri utenti una vasta gamma di strumenti musicali ed apparecchiature audio
e lighting con tecnologie di ultima generazione.
Speriamo di aver soddisfatto le vostre aspettative e, se voleste collaborare, saremmo
lieti di ricevere un vostro feedback sulla qualità del prodotto al ne di migliorare co-
stantemente la nostra produzione. Visitate il nostro sito www.soundsationmusic.com ed
inviateci una mail con la vostra opinione, questo ci aiuterà a sviluppare nuovi prodotti
quanto più vicini alle vostre esigenze.
Un’ultima cosa, leggete il presente manuale al ne di evitare danni alla persona ed al
prodotto, derivanti da un utilizzo non corretto.
Il Team SOUNDSATION

3
ENGLISH
TABLE OF CONTENTS
1. UNPACKING ................................................................................................................................6
2. OVERVIEW ...................................................................................................................................6
2.1. YOUMIX 202 MEDIA Main Features................................................................................................................7
2.2. YOUMiX 402 MEDIA Main Features................................................................................................................7
3. MAINS CONNECTION.................................................................................................................8
4. AUDIO CONNECTIONS...............................................................................................................8
4.1. RCA Connections ...................................................................................................................................................8
4.2. TS JACK Connections............................................................................................................................................9
4.3. XLR Connections ..................................................................................................................................................10
5. REAR PANEL ............................................................................................................................. 11
6. MONO MIC/LINE INPUTS AND CONTROLS.......................................................................... 12
7. STEREO INPUTS AND CONTROLS.......................................................................................... 13
8. COMMON INPUTS/OUTPUTS ................................................................................................ 14
8.1. TAPE IN/OUT Input/Output .............................................................................................................................14
8.2. AUX SEND/AUX RET Input/Output ...............................................................................................................14
8.3. CONTROL ROOM Output .................................................................................................................................15
8.4. MAIN OUT LEFT/RIGHT Outputs....................................................................................................................15
8.5. Stereo headphones output ..............................................................................................................................15
9. MAIN SECTION CONTROLS .................................................................................................... 16
10. DIGITAL MULTI EFFECT PROCESSOR ..................................................................................... 16
10.1. Eects Selection ...................................................................................................................................................17
11. MP3 PLAYER............................................................................................................................. 18
11.1. Commands and Functions Table....................................................................................................................19
11.2. Track Playback.......................................................................................................................................................20
11.3. Equalization Presets............................................................................................................................................20
11.4. Recording ...............................................................................................................................................................20
12. “BT AUDIO STREAMING” CONNECTION .............................................................................. 21
13. MIOMIX 202 MEDIA SPECIFICATIONS ................................................................................. 22
14. MIOMIX 402 MEDIA SPECIFICATION ................................................................................... 24
15. WARRANTY AND SERVICE ..................................................................................................... 26
16. WARNING................................................................................................................................. 26
4
ENGLISH
YOUMIX SERIES User manual
IMPORTANT SAFETY SYMBOLS
The symbol is used to indicate that some hazardous live terminals are
involved within this apparatus, even under the normal operating con-
ditions, which may be sucient to constitute the risk of electric shock
or death.
The symbol is used in the service documentation to indicate that spe-
cic component shall be replaced only by the component specied in
that documentation for safety reasons.
Protective grounding terminal
Alternating current/voltage
Hazardous live terminal
Denotes the apparatus is turned on
Denotes the apparatus is turned o
WARNING: Describes precautions that should be observed to prevent the danger
of injury or death to the operator.
CAUTION: Describes precautions that should be observed to prevent danger of
the apparatus.
IMPORTANT SAFETY INSTRUCTIONS
fRead these instructions
fKeep these instructions
fHeed all warning
fFollow all instructions
1)^Water and Moisture
The apparatus should be protected from moisture and rain and can not be used near
water; for example near a bathtub, a kitchen sink, a swimming pool, etc.
2)^Heat
The apparatus should be located away from heat sources such as radiators, stoves or
other appliances that produce heat.

5
ENGLISH
YOUMIX SERIES User manual
3)^Ventilation
Do not block areas of ventilation opening. Failure to do could result in re. Always
install according to the manufacturer's instructions.
4)^Object and Liquid Entry
Objects do not fall into and liquids are not spilled into the inside of the apparatus for
safety.
5)^Power Cord and Plug
Protect the power cord from being walked on or pinched particularly at plugs, conve-
nience receptacles, and the point where they exit from the apparatus. Do not defeat
the safety purpose of the polarized or grounding-type plug. A polarized plug has two
poles; a grounding-type plug has two poles and a third grounding terminal. The third
prong is provided for your safety. If the provided plug does not t into your outlet,
refer to an electrician for replacement.
6)^Power Supply
The apparatus should be connected to the power supply only of the type as marked on
the apparatus or described in the manual. Failure to do could result in damage to the
product and possibly the user. Unplug this apparatus during lightning storms or when
unused for long periods of time.
7)^Electrical Connection
Improper electrical wiring may invalidate the product warranty.
8)^NOISE And INTERFERENCES
Do not use the device in the nearby of a TV, radio, stereo equipment, mobile phone, or
other electric devices. Otherwise, the device, TV, or radio may generate noise.
9)^Cleaning
Clean only with a dry cloth. Do not use any solvents such as benzol or alcohol.
10)^Servicing
Do not implement any servicing other than those means described in the manual. Refer
all servicing to qualied service personnel only. Only use accessories/attachments or
parts recommended by the manufacturer.

6
ENGLISH
YOUMIX SERIES User manual
1. UNPACKING
Thank you for purchasing the YOUMIX mixer. You have acquired a mixing console
whose small size belies its versatility and audio performance. Each unit has been well
tested and shipped in perfect operating conditions. Carefully unpack the carton and
check the contents to ensure that all parts are present and in good conditions:
f1 x YOUMIX mixer
f1 x Power Cable
fThis User manual
If anything damaged during transport, notify the shipper immediately and keep pack-
ing material for inspection. Again, please save its carton and all packing materials. If the
unit must be returned to the manufacturer, it is important that the unit is returned in
the original manufacturer’s packing. Please do not take any action without rst contact-
ing us.
2. OVERVIEW
YOUMIX series combines maximum portability with preamp quality, lters and controls
accuracy. The use of high quality SMD components allow us to concentrate functions
that normally require much more space, such as the 60mm volume sliders, the SOLO
function, a single display for both digital multi-eect and USB player, the BT connec-
tion.
This series includes two models with 2 and 4 mic/line channels (plus 2 Line stereo
inputs): YouMix-202 Media and YouMIx-402 Media. They are ideal for live music, home
recording, podcasting, and all those applications where you need to integrate all main
functions of a professional mixing console into a single tool.
The mic preamps oer high headroom and low noise, to guarantee a clean and natural
sound with all source types: condenser microphones (with +48V Phantom Power), dy-
namic mics, line signals and high impedance instruments. The digital multi-eect oers
256 presets that cover all the most used eects (Room, Hall, Vocal, and Plate reverbs;
Delay; Echo; Chorus; Flanger, and Combo). The USB player accepts les in MP3 format
(up to 48kHz – 32-bit @ 320kbps); the BT receiver assures professional audio streaming.
Both use one of the two stereo Line inputs and oer the advantage of in-line channel
controls (Gain, 2-band EQ, FX Send, Pan and Solo).
YouMix essentially represents the compact solution with superior performance to all
those mixing requirements where the quality of the result cannot be secondary.
7
ENGLISH
YOUMIX SERIES User manual
2.1. YOUMIX 202 MEDIA Main Features
f6-Channel Professional Mixing Console
f2 Mic preamps with high-headroom & low-noise
f2 Stereo channels and 1 separate stereo tape In/Out channel
fBT Stereo audio wireless connection with in-line channel controls
fUSB Player with in-line channel controls
f24-bit Digital Multi Eect with 256 Presets
fBalanced ¼” (6.3mm) jacks on all Mic/Stereo LIne channels
fStereo Balanced Output with XLR; Stereo Control Room Outputs with ¼” Jack
f3-band EQ on all mono channels; 2-band EQ on stereo channels
f60mm Volume slider on each channel and Main Output
fAux/E Send controls on all channels
fAux/E Return with 60mm slider for optimal level adjustment
fControl Room/Headphones output with dedicated volume control
fBuilt-in +48V phantom power for condenser microphones
2.2. YOUMiX 402 MEDIA Main Features
f8-Channel Professional Mixing Console
f4 Mic preamps with high-headroom & low-noise
f2 Stereo channels and 1 separate stereo tape In/Out channel
fBT Stereo audio wireless connection with in-line channel controls
fUSB Player with in-line channel controls
f24-bit Digital Multi Eect with 256 Presets
fBalanced ¼” (6.3mm) jacks on all Mic/Stereo LIne channels
fStereo Balanced Output with XLR; Stereo Control Room Outputs with ¼” Jack
f3-band EQ on all mono channels; 2-band EQ on stereo channels
f60mm Volume slider on each channel and Main Output
fAux/E Send controls on all channels
fAux/E Return with 60mm slider for optimal level adjustment
fControl Room/Headphones output with dedicated volume control
fBuilt-in +48V phantom power for condenser microphones

8
ENGLISH
YOUMIX SERIES User manual
3. MAINS CONNECTION
Connect the device to mains with the supplied power cable. The wire correspondence is
as follow:
Cable Pin International
Brown Live L
Blue Neutral N
Yellow/Green Earth
Earth wire must always be connected! Pay attention to safety! Before taking
into operation for the rst time, the installation has to be approved by an
expert.
4. AUDIO CONNECTIONS
You will need several audio cables for the various connections of the mixer. See the fol-
lowing pictures that show the internal wiring of these cables. Be sure to use only high
quality cables.
4.1. RCA Connections
Use RCA cables to connect unbalanced stereo sources with RCA output connectors to
RCA TAPE IN stereo inputs of the mixer (CD Player, MP3 Player, Etc.), or to connect the
mixer RCA TAPE OUT stereo outputs to RCA stereo inputs of an external device (Audio
Recorder, etc.).
Center
Signal
Body
Ground / Shield
OUT IN
L L
R R
TAPE
MP3 Player
CD Player
EXTERNAL RECORDER
( CD-R, DAT, ETC.)
9
ENGLISH
YOUMIX SERIES User manual
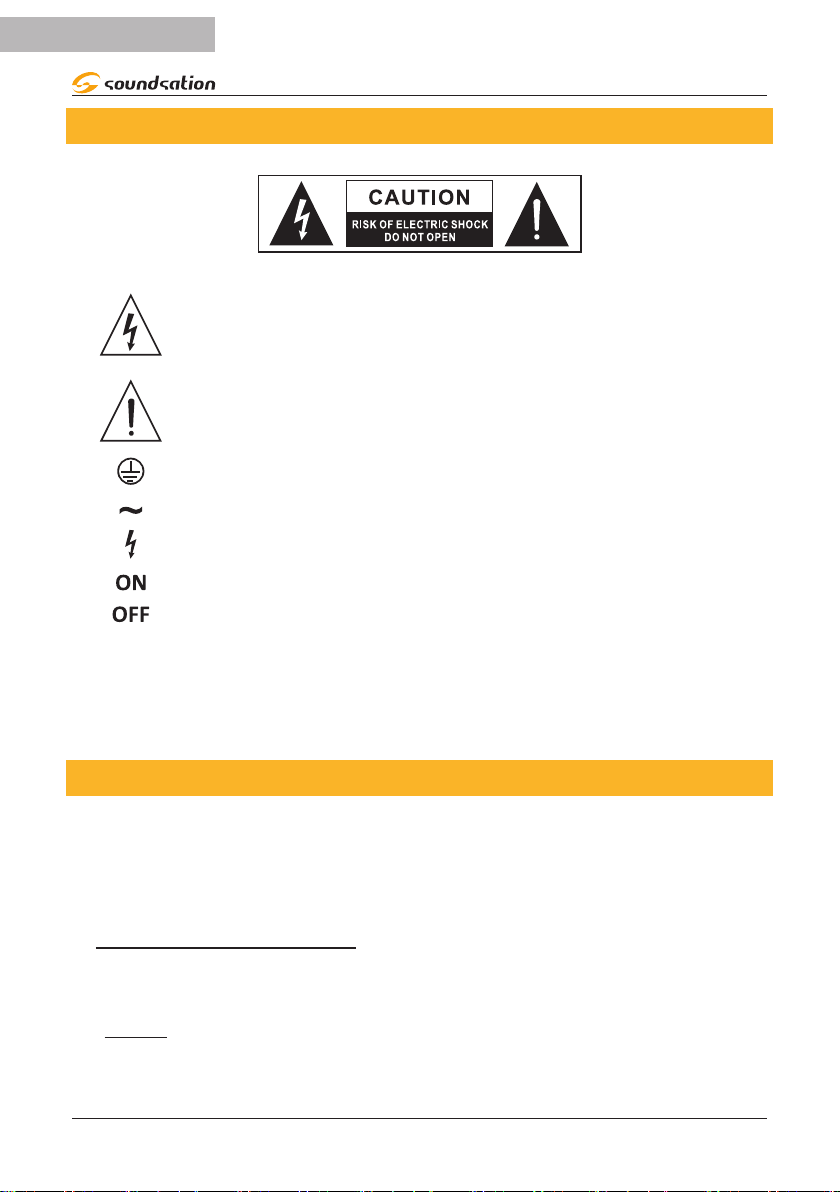
4.2. TS JACK Connections
Use mono 1/4” (6.3mm) TS jack to connect unbalanced stereo sources of external
devices, such as musical instruments, etc.
Unbalanced use of 1/4” jack TS connector
Strain relief
clamp
Sleeve
Tip
Sleeve
Ground shield
Tip
Signal
RIGHT RIGHT
LEFT (MONO) LEFT (MONO)
-/- (BT) -/- (usb)
Electronic Keyboard
Drum Machine
YOUMIX 202 MEDIA CH3/4 CH5/6
YOUMIX 402 MEDIA CH5/6 CH7/8
1/4“ (6.3mm) mono jack connectors can be used in all YOUMIX mixers for LINE IN
inputs.
MIC -
LINE IN
YOUMIX 202 MEDIA CH1-CH2
YOUMIX 402 MEDIA CH1-CH2-CH3-CH4
1/4“ (6.3mm) mono jack connectors can be used in all YOUMIX mixers for Headphones
output.
PHONES
10
ENGLISH
YOUMIX SERIES User manual
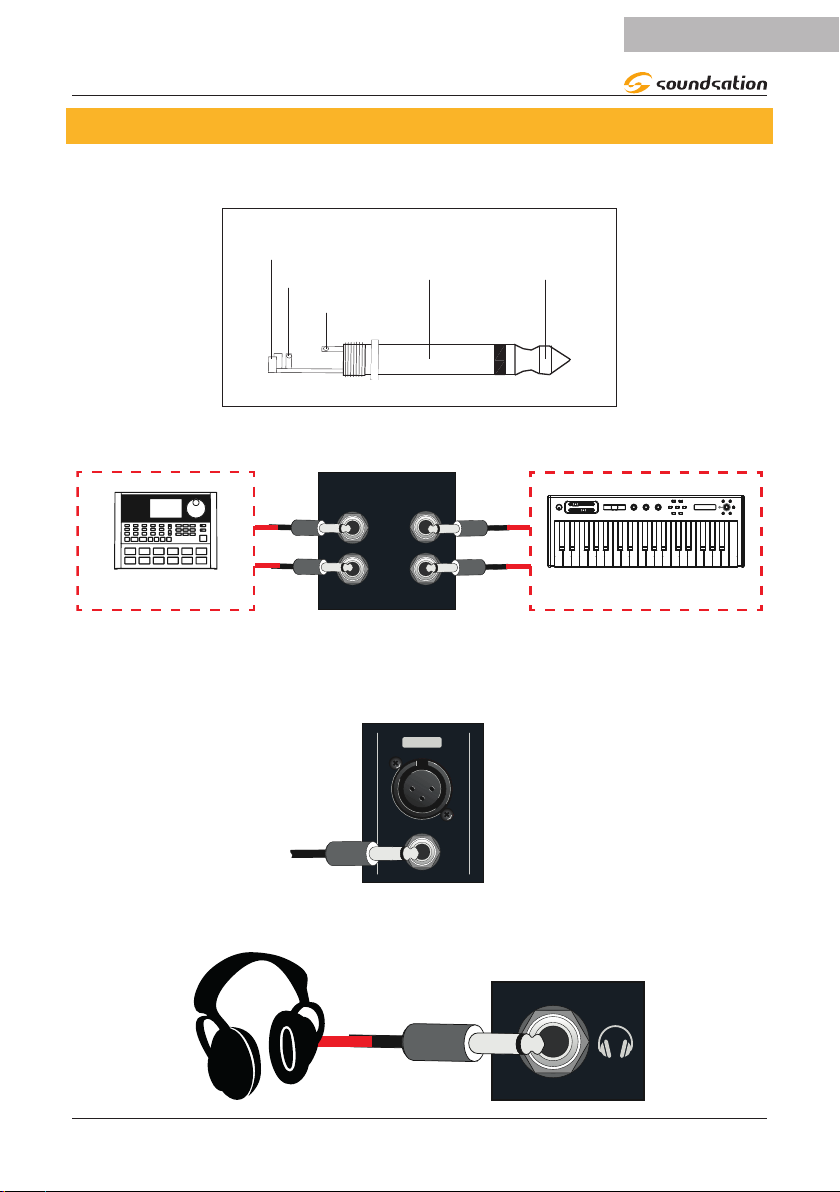
YOUMIX mixers have other 1/4“ (6.3mm) mono jack connectors, such as L/R CONTROL
ROOM outputs to connect speakers, ampliers, etc.
Control
Room
L
R
Active
Speakers
Passive
Speakers
Amplifier
AUX SEND output jack plug is used to send unbalanced line level signals, consisting of
part of all input channels (whose level is adjusted by AUX knobs on each channel), to
the input of an external eects device or compressor. Consequently, AUX RET input jack
connector is used to route the output of that external eect processor to mixer’s AUX
Return stage.
AUX
SEND
AUX RET.
External Effect, Compressor, Etc.
Output
Input
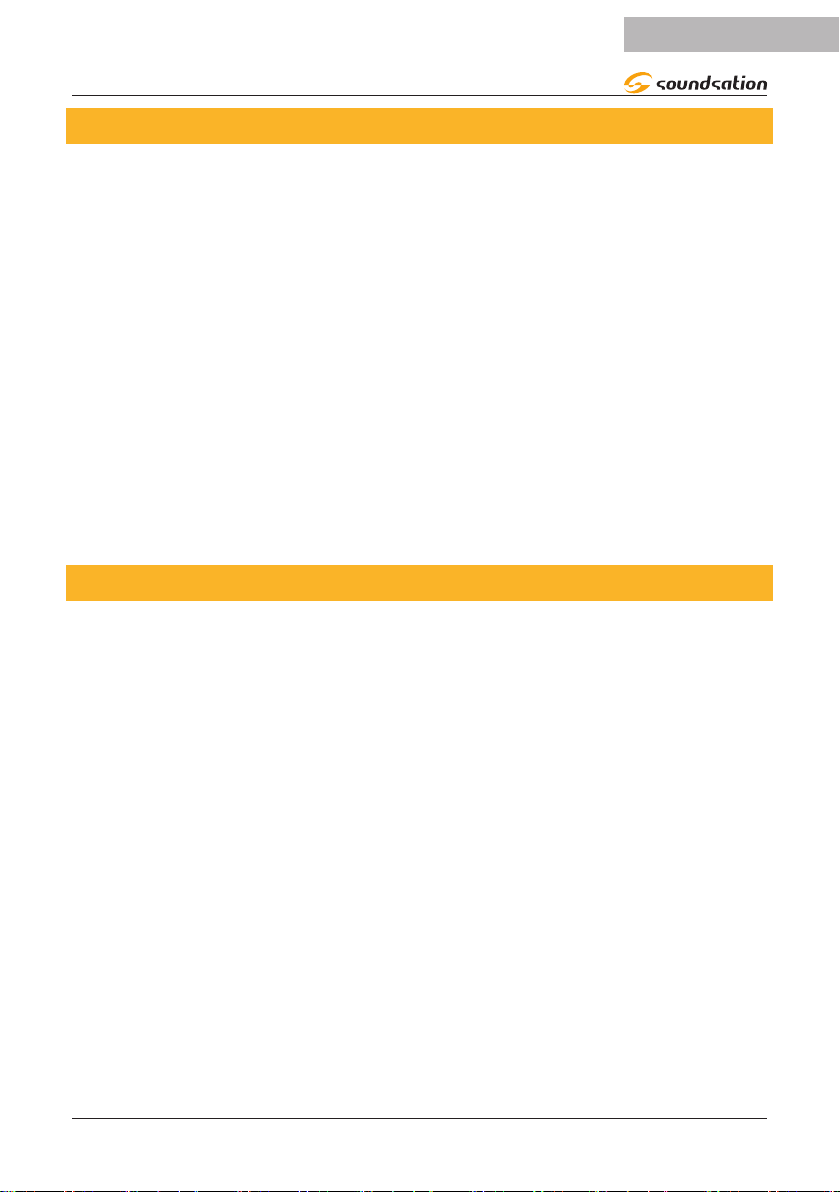
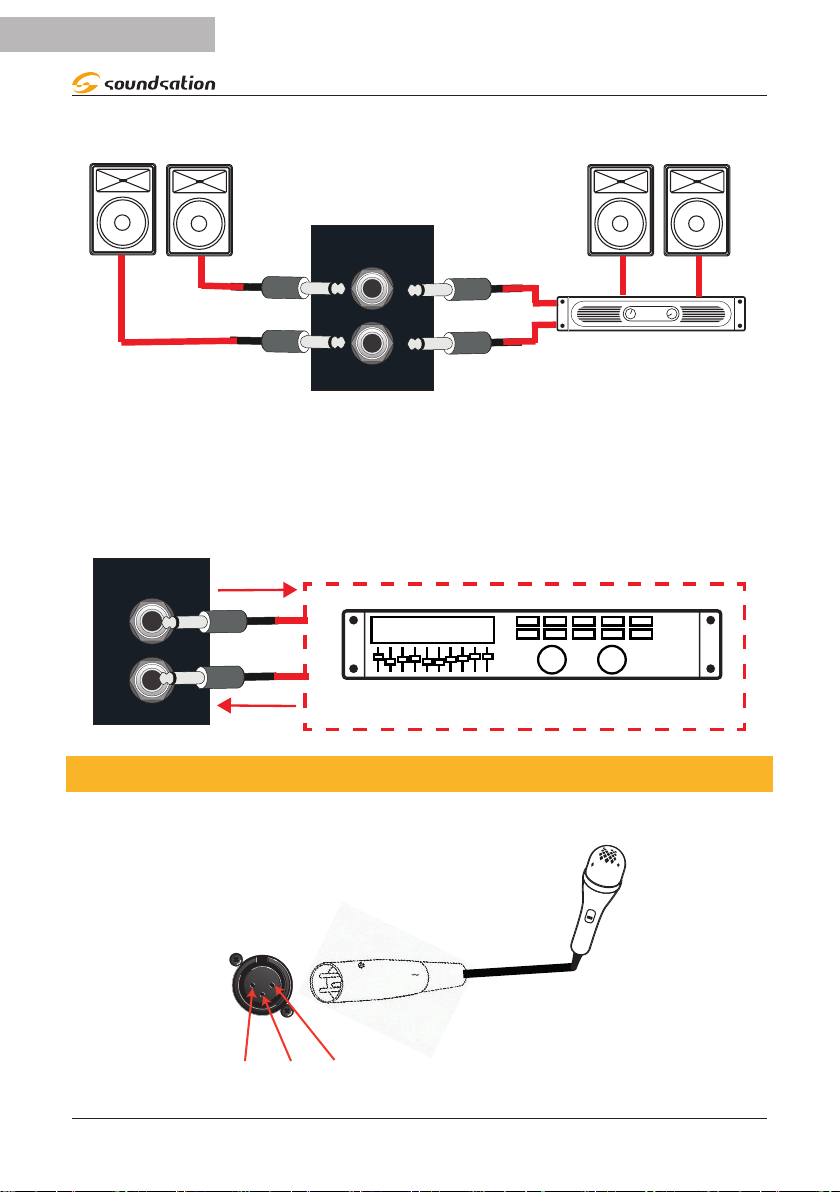
4.3. XLR Connections
MIC Inputs accept balanced XLR connectors. Pin-out is as follows:
12
3
1.Ground/Shield
3.Cold (-)2.Hot(+)

11
ENGLISH
YOUMIX SERIES User manual
MAIN OUT LEFT / MAIN OUT RIGHT outputs have female XLR plugs. They are used to
connect to active speakers, ampliers, or PA systems as shown below.
MAIN OUT
LEFT
RIGHT
Passive
Speakers
Amplifier
Active
Speakers
5. REAR PANEL
OFF
POWER
PHANTOM
GND
AC IN
100-240V~
50/60Hz
ON
1 2 3
1)^IEC Socket
Plug power cord into an AC socket properly congured for your particular model
2)^POWER Switch
Press power switch to ON position to turn the system on, and to OFF position to turn it
o. When the MIxer is turned on, the green [POWER] LED on the front panel lights up.
3)^PHANTOM SWITCH
Youmix mixers can power condenser microphones that require a phantom voltage up
to + 48VDC. Pressing the [PHANTOM] switch to ON position, all mono channels with
XLR connector will be powered. When active, the red LED [PHANTOM] on front panel
is on. If you are not using microphones that require this phantom power, leave the
[PHANTOM] switch in OFF position (red LED is o).

12
ENGLISH
YOUMIX SERIES User manual
6. MONO MIC/LINE INPUTS AND CONTROLS
EQ
HI
12KHZ
-15 +15
0
TRIM
MID
2.5KHZ
-15 +15
0
LOW
80HZ
-15 +15
0
MIC
LINE IN
PEAK
CH 1
R
0
L
FX
PAN
solo
+10
0
-10
-20
-30
-40
-60
dB
+5
-5
-50
+15
0
1
2
3
4
5
6
7
8
910
11
(1)
This is a female XLR connector that accepts a
balanced microphone input from any type of
microphone, and other balanced audiol sources.
(2)
These 1/4” jacks share circuitry (but not phantom
power) with the mic preamps, and can be driven
by balanced or unbalanced sources
(3)
TRIM knobs adjust the input sensitivity of the Mic
preamp (0dB ÷ -60dB) and Line preamp (+15dB
÷ -45dB) inputs.
(4) These controls adjust the amount of high fre-
quencies for each channel (12kHz, +/-15dB).
(5) These controls adjust the amount of medium
frequencies for each channel (2.5kHz, +/- 15dB).
(6) These controls adjust the amount of low frequen-
cies for each channel (80Hz, +/-15dB).
(7)
These controls adjust the amount of eect for
each channel. to be sent to AUX output or the
internal eect processor.
(8)
These controls set the amount of channel signal
sent to the Right and Left output channels,
allowing the signal source to be shifted evenly
throughout the stereo image.
(9)
If the “SOLO” button is pressed, the audio signal
of the channel can only be heard in the head-
phones or on the “CONTROL ROOM” outputs.
This allows the user to listen to the audio signal
of a channel without sending it to MAIN outputs.
(10) These sliders adjust the volume level for each
channel.
(11)
When the peak LED ashes, indicates that the
input signal is too high. Please adjust TRIM knob
and/or channel volume slider to in order to let
that LED light only occasionally.
Channels with MONO MIC/LINE inputs on YOMIX 202 MEDIA are CH1 and CH2. Chan-
nels with MONO MIC/LINE inputs on YOMIX 402 MEDIA channels are CH1, CH2, CH3
and CH4.

13
ENGLISH
YOUMIX SERIES User manual
7. STEREO INPUTS AND CONTROLS
TRIM
HI
10KHZ
-15 +15
0
LOW
120HZ
-15 +15
0
PEAK
RIGHT
LEFT (MONO)
-/- (BT)
+15
0
R
0
L
FX
PAN
solo
+10
0
-10
-20
-30
-40
-60
dB
+5
-5
-50
1
2
4
3
5
6
78
9
(1)
Stereo channels have two line-level inputs. In
case of mono sources, use LEFT (MONO) input
only. It will be routed equally on both left and
right channel of MAIN bus.
(2)
TRIM knobs adjust input sensitivity. In case of
Mic signales from 0dB ÷ -60dB); in case of Line
signals from +15dB ÷ -45dB..
(3) These controls adjust the amount of high fre-
quencies for each channel (10kHz, +/-15dB).
(4) These controls adjust the amount of low frequen-
cies for each channel (120Hz, +/-15dB).
(5)
These controls adjust the amount of eect for
each channel. to be sent to AUX output or the
internal eect processor..
(6)
These knobs set the amount of channel sig-
nal sent to the Right and Left output channels,
allowing the signal source to be shifted evenly
throughout the stereo image.
(7)
If the “SOLO” button is pressed, the audio signal
of the channel can only be heard in the head-
phones or on the “CONTROL ROOM” outputs.
This allows the user to listen to the audio signal
of a channel without sending it to MAIN outputs.
(8) These controls adjust the volume level for each
channel.
(9)
When the peak LED ashes, indicates that the
input signal is too high. Please adjust TRIM knob
and/or channel volume slider to in order to let
that LED light only occasionally.
All YOUMIX mixers have 2 Stereo inputs. On YOUMIX 202 MEDIA, these stereo channels
are CH3/4 and CH5/6. CH3/4 also control BT Audio Streaming level. CH5/6 also control
USB audio level.
On YOUMIX 402 MEDIA, these stereo channels are CH5/6 and CH7/8. CH5/6 also con-
trol BT Audio Streaming level. CH7/8 also control USB audio level.

14
ENGLISH
YOUMIX SERIES User manual
8. COMMON INPUTS/OUTPUTS
As explained in “4. AUDIO CONNECTIONS” on page 8, YOUMIX mixers, in addition
to the MONO MIC/LINE and STEREO input channels, feature other common inputs and
outputs. Below is a brief explanation for each of them.
8.1. TAPE IN/OUT Input/Output
OUT IN
L L
R R
TAPE
TAPE IN
Use these unbalanced RCA connectors (L/R) to connect the output of a player, such as
an analog tape deck, MP3 player, CD/DVD player or a Personal Computer
TAPE OUT
Use these unbalanced RCA connectors to send out the MAIN MIX signal to a recorder,
such as an analog tape deck, hard disk recorder, automatic CD burner or an A/D con-
verter connected to a Personal Computer.
8.2. AUX SEND/AUX RET Input/Output
AUX
SEND
AUX RET.
AUX SEND
Use this 1/4“ (6.3mm) jack to send unbalanced line level signals consisting of a mix of
all input channels (whose levels are adjusted but AUX knobs), to the input of an exter-
nal eects device or compressor.
AUX RET
This 1/4 “jack connector is used to receive the return signal from an external device to
which the mxer has been connected from the AUX SEND connector.
15
ENGLISH
YOUMIX SERIES User manual
8.3. CONTROL ROOM Output
Control
Room
L
R
These JACK connectors provide an unbalanced line level signal. Here they can be con-
nected to active loudspeakers, PA systems, etc.
8.4. MAIN OUT LEFT/RIGHT Outputs
MAIN OUT
LEFT
RIGHT
These are balanced line-level outputs. The XLR outputs are labeled MAIN OUT L “and”
MAIN OUT R “, which refer to main left and right outputs. These outputs can be con-
nected to the corresponding inputs (L / R) of an amplier, a PA system, speakers, etc.
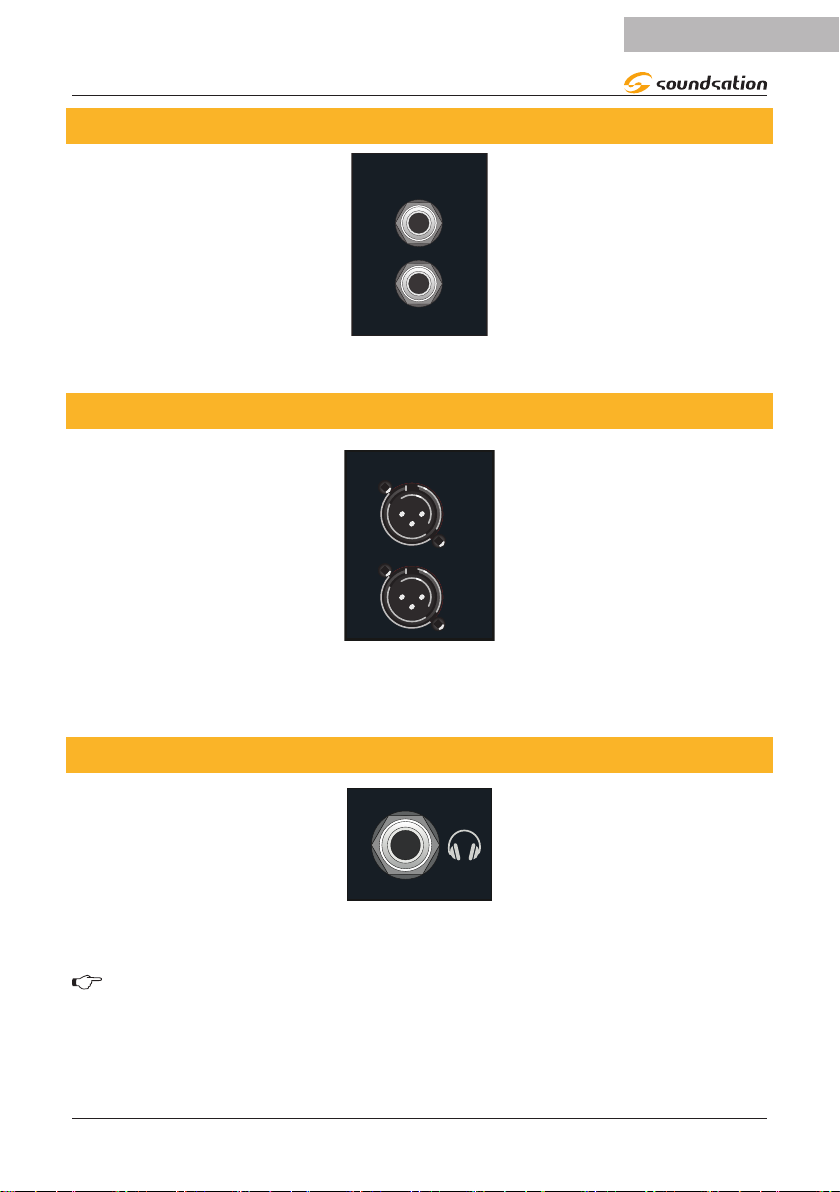
8.5. Stereo headphones output
PHONES
A standard pair of stereo headphones can be connected to the PHONES jack
WARNING: Do not listen with the headphones at high volume for long peri-
ods of time. Doing so may cause hearing loss.

16
ENGLISH
YOUMIX SERIES User manual
9. MAIN SECTION CONTROLS
-12
POWER Phantom
CLIP
+12
+6
-6
-18
0
-24
L R
PHONES/
C. ROOM
MainFX Ret
+15
0
+10
0
-10
-20
-30
-40
-60
dB
+5
-5
-50
+10
0
-10
-20
-30
-40
-60
dB
+5
-5
-50
4
21
5
67
3
(1) This slider allows you to adjust the
level of currently selected eect.
(2)
This slider allows you to adjust the
level of eect audio signal to be
sent to “MAIN OUT LEFT / RIGHT”.
(3)
This knob allows you to adjust the
level of the audio signal to be sent
to “CONTROL ROOM L / R” out-
puts and headphones output.
(4) LED VU Meter indicates the inten-
sity of audio output signal.
(5)
CLIP LEDs (RED) light up when
audio signal level is too high.
Some ashes of these LEDs may
be normal, but if they stay on for
a long time, you need to lower the
level of the audio signal output..
(6)
Yellow LED [PHANTOM] lights up
when PHANTOM POWER is activat-
ed using the special switch on the
rear panel.
(7)
Green LED [POWER] lights up when
the mixer is turned on by using the
ON/OFF switch on rear panel.
10. DIGITAL MULTI EFFECT PROCESSOR
YOUMIX mixers are equipped with a 24-bit / 48kHz digital multi-eect with 256 preset
eects, grouped into 16 families. The following is a list of the eect families with rela-
tive range of values for each of them.
EFFECT PRESET
VOK HALL 1 + 16
HALL 17 + 32
ROOM 33 + 48
PLATE 49 + 64
EARLY RE 65 + 80

17
ENGLISH
YOUMIX SERIES User manual
S ROOM. 81 + 96
SPRING 97 + 112
PHASER 113 + 128
TAP DEL 129 +144
DELAY 145 +160
DIM PONG 161 + 176
FLANGER 177 + 192
CHORUS 193 + 208
DEL+REV 209 + 224
FLAN+REV 225 + 240
CHOR+REV 241 + 256
10.1. Effects Selection
To select one of the 256 preset eects, rst enter the eects menu by pressing the [FX]
button as shown in the gure below.
USB FX
Parameter
MENU/ENTER
ROOM
48
Press this Button
By turning the [PARAMETER] knob to the right or left, you can choose the desired ef-
fect. The display will show the type and number of the eect selected with an arrow to
the right of the number.
Parameter

18
ENGLISH
YOUMIX SERIES User manual
To conrm and activate the new eect, press the knob. If conrmation is not made
within 10 seconds, the display will return to showing the type and number of the cur-
rent eect.
11. MP3 PLAYER
YOUMIX mixers are equipped with an MP3 player. By inserting a USB ash drive into
the USB port, the player will play all tracks in MP3 format.
To enter the MP3 player menu, press the [USB] button as shown in the gure below.
USB FX
Parameter
MENU/ENTER
Press this Button
Ready
By turning the [PARAMETER] knob to the right or left you can choose the desired op-
tion. The symbol for the selected option will ash. By Press the [PARAMETER] knob to
conrm the selected option.
Parameter
The following table shows how to use all functions shown on the display.

19
ENGLISH
YOUMIX SERIES User manual
11.1. Commands and Functions Table
If this symbol appears on the display, it means that playback is pau-
sed. When symbol is selected using the [PARAMETER] knob, this
will start to ash.
If you press the [PARAMETER] knob when the symbol is ashing,
the MP3 tracks in the inserted USB ash drive will be played back
and the display will show the ashing symbol. Pressing the knob
again will pause playback and the display will show the ashing
symbol.
When the symbol is selected by turning and pressing the [PA-
RAMETER] knob, the menu shows 11 equalization presets. You can
select one of them by turning and pressing the [PARAMETER] knob.
Once in this menu, if no selection is made within 10 seconds, the
display will return to displaying the main menu.
When the symbol is selected by turning and pressing the [PARA-
METER] knob, the track before the current one will be selected.
When the symbol is selected by turning and pressing the [PARA-
METER] knob, the song following the current one will be selected.
When the symbol is selected by turning and pressing the [PARA-
METER] knob, it will begin to ash. This option allows you to play
the current song in loop.
If you press the [PARAMETER] knob when the symbol is ashing,
the display will show the symbol and the current track will be
played back cyclically.
When the symbol is selected by turning and pressing the [PARA-
METER] knob, it will begin to ash. This option gives the possibility
to activate the direct recording on the inserted USB ash drive.
If you press the [PARAMETER] knob when the symbol is ashing,
the display will show the symbol and, after 7 seconds the recor-
ding will start automatically.

20
ENGLISH
YOUMIX SERIES User manual
11.2. Track Playback
After inserting a USB ash drive in the appropriate socket, if you select the symbol by
turning and pressing the [PARAMETER] knob, the mixer will start playing the MP3 tracks
contained in the USB drive. The display will show a ashing symbol, track number
and elapsed playing time.
02:19
002
During the playback of a song, channel 5/6 slider on YOUMIX 202 MEDIA, and channel
7/8 slider on YOUMIX 402 MEDIA can be used to adjust volume, as explained in para-
graph “7. STEREO INPUTS AND CONTROLS” on page 13.
11.3. Equalization Presets
As already written in paragraph “11.1. Commands and Functions Table” on page 19,
by using the option, you can access a menu of 11 selectable equalization presets.
The presets are the following:
1 Normal
2 Rock
3Pop
4 Classic
5 Jazz
6 Blues
7 Hall
8 Bass
9Soft
10 Country
11 Opera
11.4. Recording
YOUMIX can record all audio signals coming from each single channel in WAV format
(32kHz / 32bit). As already explained in paragraph ““11.1. Commands and Functions
Table” on page 19, by using the option you access recording function. When
making the rst recording, the mixer creates a folder in the USB Flash Drive. The name
of the folder is “record”. All recordings will be saved in WAV format (32kHz / 32bit) in
This manual suits for next models
2
Table of contents
Languages:
Other Sound Sation Music Mixer manuals


