Sound Sation PMX-4BT User manual
00
0
0
10
10
15
-15
+
15
-15
+
MIC
FX
LINE
Ch 1
HI VOLUME
LO
USB
SD
00
0
0
10
10
15
-15
+
15
-15
+
MIC
FX
LINE
Ch 3
HI VOLUME
LO
00
0
0
10
10
15
-15
+
15
-15
+
MIC
FX
LINE
Ch 2
HI VOLUME
LO
00
0
0
10
10
15
-15
+
15
-15
+
MIC
LINE
L
R
FX
Ch 4
Ch 5/6
HI level lINE IN
MONITOR OUT
(STEREO)
TIME
FX EQ
REPEAT
HI
MID
VOLUME
LO
LO
010
0
15
-15
+
0
15
-15
+
0
15
-15
+
010
010
010
010
CD/TAPE
IN MASTER
L
R
REC
OUT
CD/TAPE
IN
PMX-4bt
USB/SD/BT Multi Player
MODE
PMX-4BT
6-Channel Powered Mixer with
effect, MP3 Player and BT
Please read this manual carefully and properly take care of it
USER MANUAL
Leggete questo manuale e conservatelo per future consultazioni
MANUALE UTENTE

2
ENGLISH
PMX-4BT User manual
Dear customer,
First of all thanks far purchasing a SOUNDSATION® product. Our mission is to satisfy
all possible needs of musical instrument and professional audio users oering a wide
range of products using the latest technologies.
We hope you will be satised with this item and, if you want to collaborate, we are
looking for a feedback from you about the operation of the product and possible
improvements to introduce in the next future. Go to our website www.soundsation-
music.com and send an e-mail with your opinion, this will help us to build instruments
ever closer to customer’s real requirements.
One last thing: read this manual before using the instrument, an incorrect operation
can cause damages to you and to the unit. Take care!
The SOUNDSATION Team
Gentile Cliente,
Grazie per aver scelto un prodotto SOUNDSATION®. La nostra missione è quella di
orire ai nostri utenti una vasta gamma di strumenti musicali ed apparecchiature audio
e lighting con tecnologie di ultima generazione.
Speriamo di aver soddisfatto le vostre aspettative e, se voleste collaborare, saremmo
lieti di ricevere un vostro feedback sulla qualità del prodotto al ne di migliorare co-
stantemente la nostra produzione. Visitate il nostro sito www.soundsationmusic.com ed
inviateci una mail con la vostra opinione, questo ci aiuterà a sviluppare nuovi prodotti
quanto più vicini alle vostre esigenze.
Un’ultima cosa, leggete il presente manuale al ne di evitare danni alla persona ed al
prodotto, derivanti da un utilizzo non corretto.
Il Team SOUNDSATION

3
ENGLISH
PMX-4BT User manual
TABLE OF CONTENTS
1. BEFORE YOU START...................................................................................................5
1.1. Unboxing...................................................................................................................................................................6
1.2. Getting started........................................................................................................................................................6
1.3. Accessories...............................................................................................................................................................6
2. INTRODUCTION.........................................................................................................6
3. OVERVIEW..................................................................................................................7
3.1. Channel Strip ...........................................................................................................................................................8
3.2. FX Section .................................................................................................................................................................8
3.3. EQ Section ................................................................................................................................................................9
3.4. Line In, Monitor Out & RCA...............................................................................................................................9
3.5. Master Section ........................................................................................................................................................9
3.6. Digital Media Player............................................................................................................................................10
3.7. BT Connection.......................................................................................................................................................11
3.8. Remote Control ....................................................................................................................................................11
3.9. Mains and Fuse.....................................................................................................................................................12
3.10. Speaker Outputs ..................................................................................................................................................12
4. CABLES AND CONNECTORS...................................................................................12
4.1. Mains cable ............................................................................................................................................................12
4.2. Audio connections...............................................................................................................................................13
5. SPECIFICATIONS ......................................................................................................14
6. WARRANTY AND SERVICE .....................................................................................15
7. WARNING ................................................................................................................16
4
ENGLISH
PMX-4BT User manual
IMPORTANT SAFETY SYMBOLSIMPORTANT SAFETY SYMBOLS
The symbol is used to indicate that some hazardous live terminals
are involved within this apparatus, even under the normal oper-
ating conditions, which may be sucient to constitute the risk of
electric shock or death.
The symbol is used in the service documentation to indicate that
specic component shall be replaced only by the component speci-
ed in that documentation for safety reasons.
Protective grounding terminal
Alternating current/voltage
Hazardous live terminal
Denotes the apparatus is turned on
Denotes the apparatus is turned o
WARNING: Describes precautions that should be observed to prevent the dan-
ger of injury or death to the operator.
CAUTION: Describes precautions that should be observed to prevent danger
of the apparatus.
TAKING CARE OF YOUR PRODUCT
fRead these instructions
fKeep these instructions
fHeed all warning
fFollow all instructions
1) Water / Moisture
The apparatus should be protected from moisture and rain and can not be used near
water; for example near a bathtub, a kitchen sink, a swimming pool, etc.
2) Heat
The apparatus should be located away from heat sources such as radiators, stoves or
other appliances that produce heat.
5
ENGLISH
PMX-4BT User manual
3) Ventilation
Do not block areas of ventilation opening. Failure to do could result in re. Always
install according to the manufacturer’s instructions.
4) Object and Liquid Entry
Objects do not fall into and liquids are not spilled into the inside of the apparatus for
safety.
5) Power Cord and Plug
Protect the power cord from being walked on or pinched particularly at plugs, conve-
nience receptacles, and the point where they exit from the apparatus. Do not defeat
the safety purpose of the polarized or grounding-type plug. A polarized plug has two
poles; a grounding-type plug has two poles and a third grounding terminal. The third
prong is provided for your safety. If the provided plug does not t into your outlet,
refer to an electrician for replacement.
6) Fuse
To prevent the risk of re and damaging the unit, please use only of the recommend-
ed fuse type as described in the manual. Before replacing the fuse, make sure the unit
turned o and disconnected from the AC outlet.
7) Electrical Connection
Improper electrical wiring may invalidate the product warranty.
8) Cleaning
Clean only with a dry cloth. Do not use any solvents such as benzene or alcohol.
9) Servicing
Do not implement any servicing other than those means described in the manual. Refer
all servicing to qualied service personnel only. Only use accessories/attachments or
parts recommended by the manufacturer.
10) Warning
Please remember the high sound pressure do not only temporarily damage your sense
of hearing, but can also cause permanent damage. Be careful to select a suitable vol-
ume.
1. BEFORE YOU START
This user manual is made to provide both an overview of the controls, as well as in-
formation on how to use them. In order to help you understand the links between the
various controls, we have gathered in groups according to their functions.
Your PMX-4BT powered mixer was carefully packed to ensure safe transport. Despite
this, we recommend you to carefully examine the packaging and its contents for any
signs of physical damage, which can occur during transport.

6
ENGLISH
PMX-4BT User manual
1.1. Unboxing
By opening the box you will nd the following items:
• N.1 PMX-4BT Active Mixer
• N.1 Remote Control
• N.1 User’s Manual
WARNING: Packaging box is not a toy! Keep out of reach of children!!! Keep
in a safe place the original packaging material for future use.
1.2. Gettingstarted
Make sure there is enough space around the unit for proper ventilation and prevent
overheating; do not place the unit on top of hot devices such as radiators or power
ampliers. The console is connected to mains through the supplied cable. The product
meets the required safety standards. Blown fuses must be replaced with fuses of the
same type and specication.
WARNING: Make sure that all units must be properly grounded. For your
safety, you should never remove any ground connector from electrical devic-
es or power cables, or make them inoperative.
1.3. Accessories
SOUNDSATION can supply a wide range of quality accessories that you can use with
the PMX-4BT, like passive speakers, cables, microphones, stands, headphones, etc. All
products from our catalogue has been long tested with this device, so we recommend
to use genuine SOUNDSATION accessories and spare parts. Ask your SOUNDSATION
dealer for any accessories you could need to ensure best performance of the product.
2. INTRODUCTION
PMX-4BT is designed to be a powerful resource for live and educational purposes. The
friendly user interface is one of the best features of this product and allows you to con-
gure your sound device in a fast and easy way.
The 6-Channel Active Mixer lets you plug microphones, instruments or any other audio
equipment thanks to the XLR inputs on channel 1-4, the ¼” Jack inputs on channel 1-3,
the stereo RCA inputs on channel 4 and the 3mm jack input on channel 5/6 that allows
you to plug in a computer, a smartphone, a tablet, etc.
Each channel features a 2- Band EQ to better tune each channel. You can also use the
3-band EQ on the master section in order to adjust the overall sound to the character-
istics of the environment in which you’re going to use the unit.
The system is equipped with a built-in eect with level adjustment on channels 1-4, and

7
ENGLISH
PMX-4BT User manual
you can adjust master eect level, time duration and number of repeats in the FX Sec-
tion. Finally, the multimedia player with remote control reads MP3 les from the USB
connector, the SD-Card slot, and the BT connection, displaying al playback information
through the wide LCD display.
3. OVERVIEW
PMX-4bt
12 3 4 5 7
6
Serial Number
POWER
SPEAKERS
LR
4 Ohm
AC INPUT
~230V 50 hZ
FUSE T2A
250V
PMX-4bt
6-Channels 2x200W max. powered mixer
with effects, MP3 player and BT
MADE IN CHINA
Imported and distributed by:
FRENEXPORT SPA
Via Enzo Ferrari, 10
62019 Porto Recanati (Italy)
www.frenexport.com
8 9
1. Channel Strips 1-4 - Input sections with MIC balanced inputs, Line unbalanced
Inputs (Channels 1-3), Stereo Line unbalanced Input (Channel 4), 2-Band EQ, Eect
Send, Channel Volume. See paragraph “3.1. Channel Strip” on page 8.
2. FX Section - Eect Master Controls. See paragraph “3.2. FX Section” on page 8.
3. EQ Section - EQ Master Controls. See paragraph “3.3. EQ Section” on page 9.
4. Line In & Monitor Out - Stereo Line input, Monitor out and TAPE in/out. See para-
graph “3.4. Line In, Monitor Out & RCA” on page 9.
5. Master Section - See section”3.5. Master Section” on page 9.
6. Multiplayer Section - USB/SD/BT Player section. See paragraph”3.6. Digital Media
Player” on page 10.
7. Remote Control - Read paragraph “3.8. Remote Control” on page 11 for details
on each button.
8. Mains and Fuse - See paragraph “3.9. Mains and Fuse” on page 12 for details
about connection to mains and fuse replacement.
9. Speakers Outputs - Read paragraph “3.10. Speaker Outputs” on page 12 for
details.
8
ENGLISH
PMX-4BT User manual
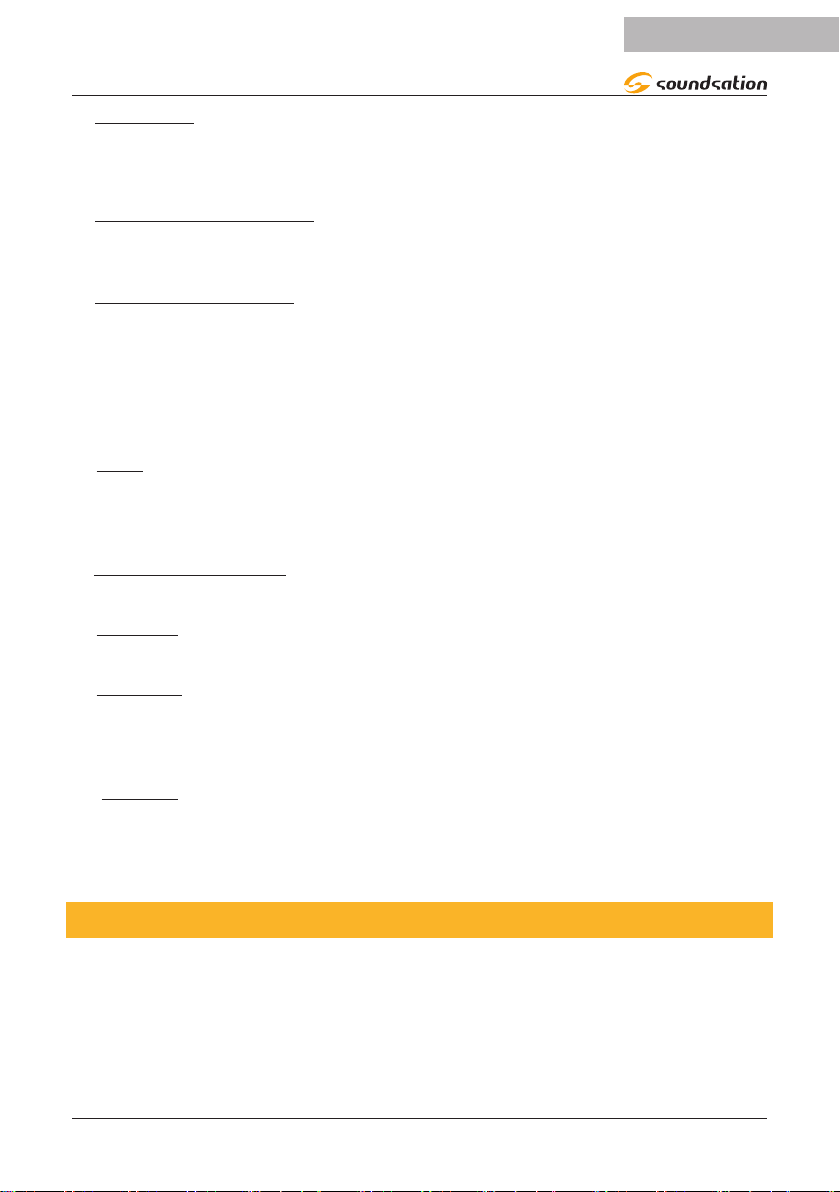
3.1. ChannelStrip
5 6
1
3
2
4
(1) - Use this XLR input to connect a Microphone.
The Input Impedance is 2kohm.
(2) - Use this 1/4” Jack input to connect a Guitar,
a Keyboard, a Drum Machine or any other Jack
based source.
(3) - This Stereo Input can be used to connect a
CD player or other RCA based line sources.
(4) - These controls allow you to adjust the Equal-
ization of each Channel:
LO adjusts Bass freq. +/-15dB with 80Hz cut point.
HI adjusts High freq. +/-15dB with 12kHz cut point.
(5) - VOLUME knob adjusts the level of each
channel.
(6) - This knob regulates the amount of the FX for
each Channel.
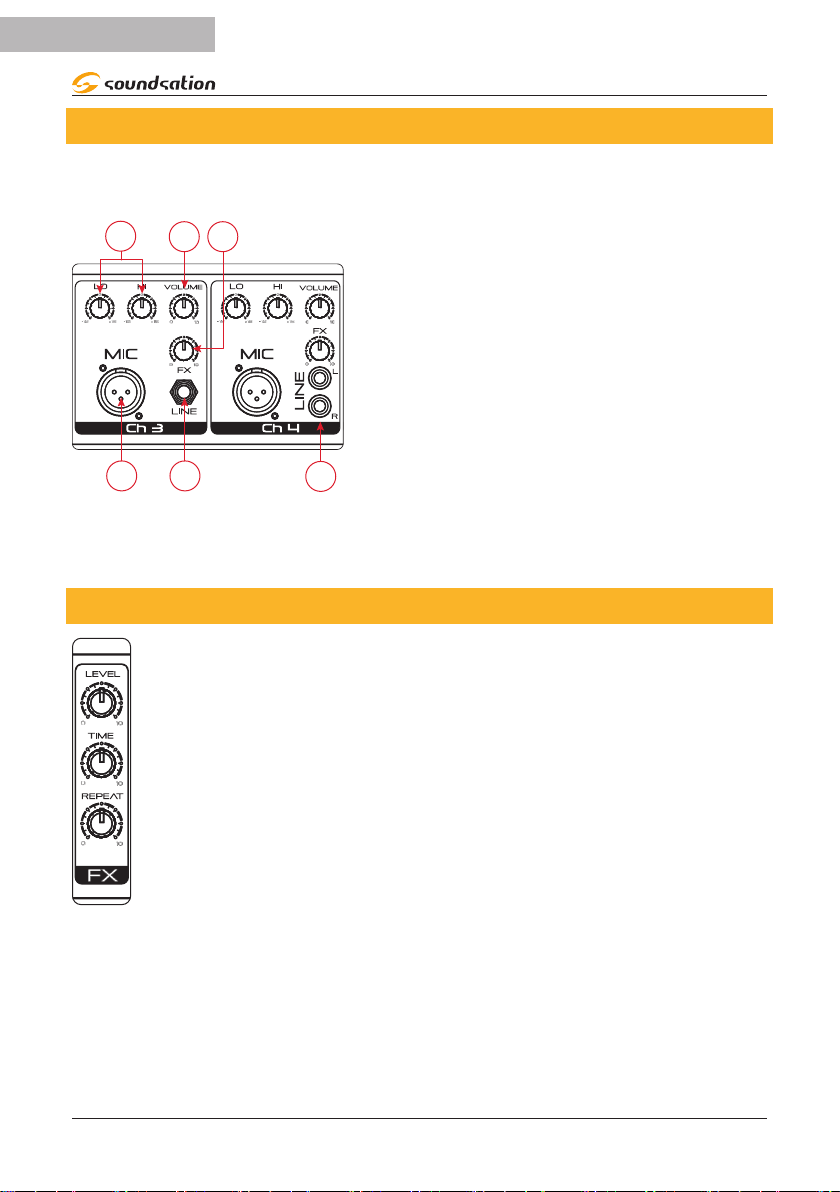
3.2. FXSection
The PMX-4BT is equipped with an Echo used to add more emphasis to voices
and instruments.
These 3 knobs allow to adjust:
LEVEL - Is the total amount of eect sent to Master Section.
TIME - Is the interval between 2 repeats.
REPEAT - Is the number of the delays.
9
ENGLISH
PMX-4BT User manual
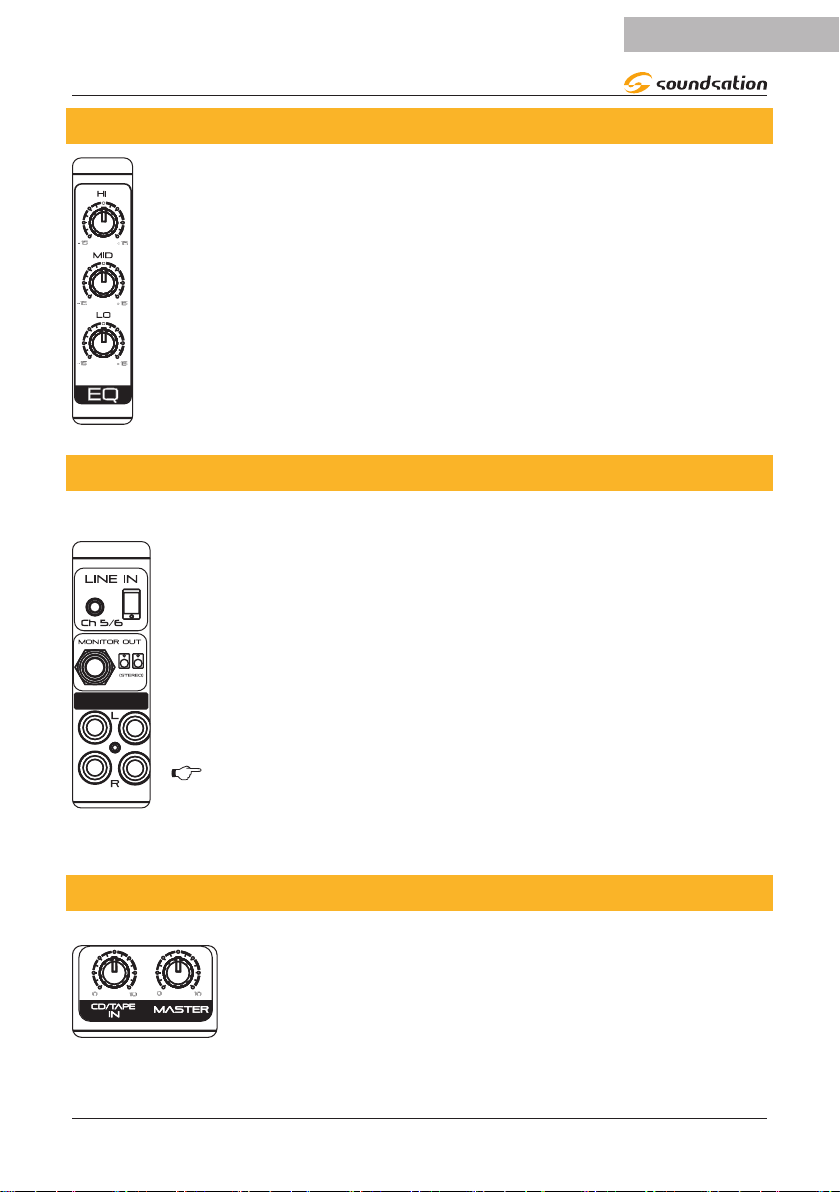
3.3. EQSection
As explained in channel strip section, each channel has got his own equaliza-
tion but, in order to improve the overall frequency response, there is also a
general 3-band EQ that helps to dene the nal mix result.
The 3 knobs adjust:
HI - adjusts High Frequencies +/-15dB with 12kHz cut point
MID - adjusts Middle frequencies +/-15dB with 3kHz cut point
LO - adjusts Bass frequencies +/-15dB with 80Hz cut point
3.4. LineIn,MonitorOut&RCA
LINE IN - This input is used to connect a stereo line source like an MP3
player, a computer or a smartphone with a 3,5mm jack.
MONITOR OUT - This stereo output is used to connect a pair of active
speakers or stage monitors. The signal is a copy of master out.
CD/TAPE IN - This RCA input accepts a stereo line source like a CD/DVD
player or a TAPE recorder. The level of this input can be adjusted with the
related control placed next to Master Knob.
REC OUT - This output provides a line-level stereo signal of the main mix
used for sending to a recorder.
WARNING: If REC OUT is connected to a recorder whose output
signal is sent to the TAPE IN, a dangerous feedback may occur
when you activate the recording function. You must unplug the
TAPE IN from the recorder before recording.
3.5. MasterSection
These 2 knobs controls respectively:
CD/TAPE IN - The amount of CD/Tape input signal to be sent to
Master Out.
MASTER - The overall Volume (what you will hear trough the
speakers).

10
ENGLISH
PMX-4BT User manual
3.6. DigitalMediaPlayer
MODE
Digital Media Player
1 32 4 65 7 98
11
10
It manages all selection and playback functions of the MP3 (up to 320kbps) and WAV
(44.1kHz - 16bit) audio les accessible via USB port or SD-Card slot, or any audio for-
mat through a Bluetooth®connection to your tablet, mobile or other device.
SD-Cards and USB devices have to be pre-formatted in MS-DOS®FAT-32 format (please
use a PC or other computer to prepare these external devices).
The controller provides 9 buttons and a wide LCD to display titles, time code and other
information of the song playing. Following a list of all buttons:
(1) Play/Pause Press this button to play the chosen song. Press it again to momen-
tarily interrupt the playing. Press a third time to continue plying the
song.
(2) Stop Press this button to end the song
(3) Volume + Use this button to increase the player volume
(4) Volume - Use this button to decrease the player volume
(5) Next Song Press this button once to go to the next song.
(6) Prev Song Press this button once to go to the previous song.
(7) Repeat Press this button once to play the current song repeatedly
(8) EQ Use this button to select dierent equalization presets (Nornal, Bass,
Pop, Rock, Jazz, Classic, Country).
(9) MODE This button let you choose between USB/SD or BT source.
(10) USB Connect here a USB drive (up to 32GByte) with your MP3 les.
(11) SD-CARD Connect here SD-Card (up to 32GByte) with your MP3 les.

11
ENGLISH
PMX-4BT User manual
3 .7. BTConnection
Set the search function on the BT device you want to play the music (see the operating
instructions of that device for details).
fPress the “MODE” button and activate BT function of the media player.
fFind on your BT device “Bluetooth” and make the connection.
ATTENTION: BT distance is approx. 10 meter without any barrier.
3.8. RemoteControl
Turns the MP3 player on/o.
Stops the song.
It mutes playback. When active, the song continues
to play.
It allows you to enter in the individual menus (blue-
tooth, USB/SD and OFF.
By repeatedly pressing, it switches from normal play
mode, current track loop (ONE), and all tracks loop
(ALL).
By repeatedly pressing, it switches among the preset
equalization curves.
They skip to the next or previous song.
Play or pause the rst song in the list or the last
played track. If pressed again, it resumes playback
from the same point.
Increase or decrease the volume (from 00 to 26).
0 - 9 They recall the song corresponding to the same posi-
tion in the list.

12
ENGLISH
PMX-4BT User manual
3.9. MainsandFuse
POWER
AC INPUT
~230V 50 hZ
FUSE T2A
250V
1 2
3
(1) Power Cord Make sure the voltage is the same as
indicated on rear panel of the unit (230
Vac/50Hz) and described in the technical
specications of this manual.
(1) Fuse When replacing the fuse, in order to avoid
the risk of re and damaging the unit,
please use only the recommended fuse type
as described on the rear panel of the unit
(T2A). Before replacing the fuse, make sure
the device is switched o and unplugged
from the outlet.
(3) Power Switch It switches the unit ON (I) and OFF (O).
3.10.SpeakerOutputs
SPEAKERS
LR
4 Ohm
These outputs are connected to passive speakers. Connect
a passive speaker to LEFT output and a second speaker to
RIGHT output. The impedance of each speaker must be
between 4-8 ohms.
WARNING: Minimum total impedance accepted by
the amp stage is 4ohms. If total load is less than
4ohms, you may damage the unit!
4. CABLES AND CONNECTORS
4.1. Mainscable
If you happen to replace the power cord plug, always use a three-pin plug with a
ground pin. The wire correspondence is as follow:
Cable Pin International
Brown Live L
Blue Neutral N
Yellow/Green Earth
13
ENGLISH
PMX-4BT User manual
WARNING: Always connect the earth! Pay attention to your safety! Before
taking into operation for the rst time, the installation has to be approved
by an expert.
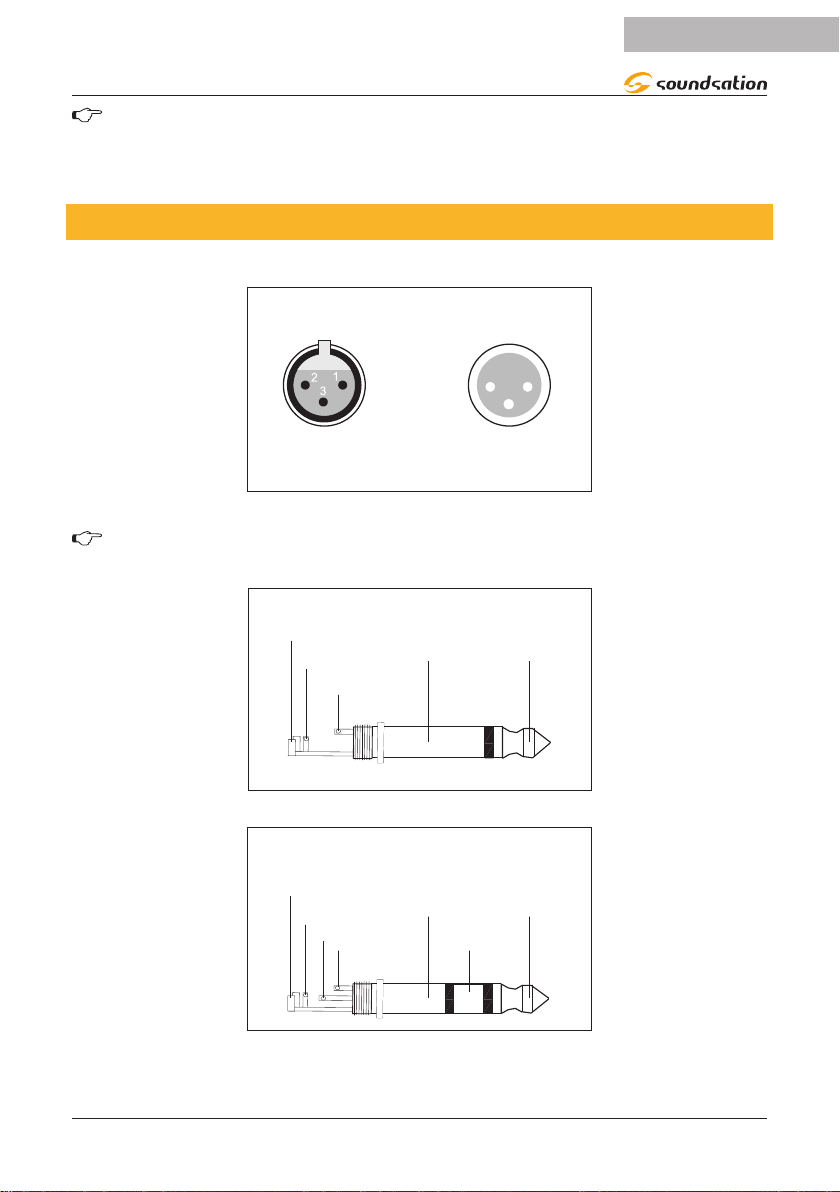
4.2. Audioconnections
Below you can see balanced XLR and balanced/unbalanced 1/4” jack connector wiring.
Balanced use of XLR connectors
1 = Ground / Shield
2 = Hot (+Ve)
3 = Cold (-Ve)
Input Output
In case of unbalanced use Pins 1 and 3 will be jumped
XLR connector
WARNING! Never use unbalanced XLR connectors XLR (pin 1 & 3 connected)
on MIC input connectors when you are using phantom power.
Unbalanced use of 1/4” jack TS connector
Strain relief
clamp
Sleeve
Tip
Sleeve
Ground shield
Tip
Signal
¼” TS Jack connector
Balanced use of 1/4” jack TRS connector
Headphones connection with 1/4” TRS connector
Strain relief
clamp
Sleeve
Tip
Sleeve
Ground shield
Ring Ring
Cold (- Ve)
Tip
Hot (+ Ve)
¼” TRS Jack connector

14
ENGLISH
PMX-4BT User manual
5. SPECIFICATIONS
System Type Active Mixer with MP3 Player
Rated Power 100+100W @ 4ohm
Peak Power 200+200W @ 4ohm
Frequency Range 20Hz - 20KHz +1/-3dB @ 1W Output to 8ohm speakers
Mixer 6-Channel Inputs (4 x Mono /Line, 1 x Stereo Line)
Input Impedance Mic – 2Kohm (balanced) / 1kohm (unbalanced)
Line – 10kohm
Tape IN – 47Kohm
Input Channel EQ HIGH: +/-15dB @ 12kHz
LOW: +/-15dB @ 80Hz
3-Band EQ Bass - Mid- Treble for Master Section
Stereo Monitor Out ¼” Jack (TRS)
Speaker Outputs 2x ¼” Jack mono
DSP 24-bit Delay/Reverb with Adjustable Level, Time and Repeat
Digital Delay Time 140 – 342ms
Digital Player
USB (MS-DOS® FAT-32 format, max 32GByte), SD-Card
(MS-DOS® FAT-32 format, max 32GByte), Bluetooth®, LCD
Display, Remote Control
AC Input 230V – 50Hz
Fuse T2A 250V
Dimensions 470 x 225 x 130 mm - 18.50 x 8.59 x 5.19 in
Net Weight 7.2 Kg - 15.87 lbs.
NOTE: Our products are subject to a process of continual further development. Therefore modications to the tech-
nical features remain subject to change without further notice.

15
ENGLISH
PMX-4BT User manual
6. WARRANTY AND SERVICE
All SOUNDSATION products feature a limited two-year warranty. This two-year warran-
ty is specic to the date of purchase as shown on your purchase receipt.
The following cases/components are not covered from the above warranty:
• Any accessories supplied with the product
• Improper use
• Fault due to wear and tear
• Any modication of the product eected by the user or a third party
SOUNDSATION shall satisfy the warranty obligations by remedying any material or
manufacturing faults free of charge at SOUNDSATION’s discretion either by repair or by
exchanging individual parts or the entire appliance. Any defective parts removed from
a product during the course of a warranty claim shall become the property of SOUND-
SATION.
While under warranty period, defective products may be returned to your local
SOUNDSATION dealer together with original proof of purchase. To avoid any damag-
es in transit, please use the original packaging if available. Alternatively you can send
the product to SOUNDSATION SERVICE CENTER – Via Enzo Ferrari , 10 – 62017 Porto
Recanati - Italy . In order to send a product to service center you need an RMA number.
Shipping charges have to be covered by the owner of the product.
For further information please visit www.soundsationmusic.com

16
ENGLISH
PMX-4BT User manual
7. WARNING
PLEASE READ CAREFULLY – EU and EEA (Norway, Iceland and Liechtenstein) only
This symbol indicates that this product is not to be disposed of with your household
waste, according to the WEEE Directive (2202/96/EC) and your national law.
This product should be handed over to a designated collection point, e.g., on an
authorized one-for-one basis when you buy a new similar product or to an authorized
collection site for recycling waste electrical and electronic equipment (WEEE).
Improper handling of this type of waste could have a possible negative impact on the
environment and human health due to potentially hazardous substances that are gen-
erally associated with EEE. At the same time, your cooperation in the correct disposal of
this product will contribute to the eective usage of natural resources.
For more information about where you can drop o your waste equipment for recy-
cling , please contact your local city oce , waste authority , approved WEEE scheme or
your household waste disposal service.

17
ITALIANO
MANUALE D’USO PMX-4BT
SOMMARIO
8. PRIMA DI INIZIARE .................................................................................................19
8.1. Disimballaggio ......................................................................................................................................................20
8.2. Operazioni iniziali ................................................................................................................................................20
8.3. Accessori .................................................................................................................................................................20
9. INTRODUZIONE.......................................................................................................20
10. PANORAMICA..........................................................................................................21
10.1. Canali di Ingresso.................................................................................................................................................22
10.2. Sezione Eetto......................................................................................................................................................22
10.3. Sezione EQ..............................................................................................................................................................23
10.4. Line In, Monitor Out & RCA.............................................................................................................................23
10.5. Sezione Master .....................................................................................................................................................23
10.6. Lettore Multimediale ..........................................................................................................................................24
10.7. Connessione BT ....................................................................................................................................................25
10.8. Telecomando .........................................................................................................................................................25
10.9. Alimentazione e Fusibile ...................................................................................................................................26
10.10. Uscite Diusori......................................................................................................................................................26
11. Cavi e connettori .....................................................................................................26
11.1. Cavo di rete............................................................................................................................................................26
11.2. Connessioni Audio ..............................................................................................................................................27
12. SPECIFICHE...............................................................................................................28
13. GARANZIA E ASSISTENZA......................................................................................29
14. AVVISO - RAEE .........................................................................................................30

18
ITALIANO
MANUALE D’USO PMX-4BT
IMPORTANTI SIMBOLI DI SICUREZZAIMPORTANTI SIMBOLI DI SICUREZZA
Il simbolo è usato per indicare che in questa apparecchiatura sono
presenti alcuni terminali sotto tensione pericolosi, anche in condi-
zioni di normale funzionamento, che possono costituire rischio di
scosse elettriche o di morte
Il simbolo viene utilizzato nella documentazione di servizio per
indicare che uno specico componente può essere sostituito esclu-
sivamente dal componente specicato nella documentazione per
motivi di sicurezza.
Terminale di Terra
Corrente/Tensione alternata
Terminale in tensione pericoloso
Indica che l’apparato è acceso
Indica che l’apparato è spento
WARNING: Precauzioni da osservare per evitare il pericolo di ferimento o di
morte per l’utilizzatore.
CAUTION: Precauzioni da osservare per evitare danni all’apparecchio.
CURA DEL PRODOTTO
fLeggete queste istruzioni
fConservate queste istruzioni
fRispettate tutte le avvertenze
fSeguite tutte le istruzioni
1) Acqua / Umidità
L’apparecchio deve essere protetto dall’umidità e dalla pioggia, non può essere usato
in prossimità di acqua; ad esempio nei pressi di una vasca da bagno, di un lavandino, di
una piscina, etc.
2) Calore
L’apparecchio deve essere posto lontano da fonti di calore come radiatori, stufe o altri
apparecchi che producono calore.

19
ITALIANO
MANUALE D’USO PMX-4BT
3) Ventilazione
Non ostruite le prese d’aria per la ventilazione: ciò potrebbe provocare incendi. Instal-
late sempre l’unità secondo le istruzioni del produttore.
4) Introduzione di oggetti e liquidi
Non introdurre oggetti o versare liquidi all’interno dell’apparato per ragioni di sicurezza
5) Cavo di alimentazione e spina
Evitate che il cavo di alimentazione venga calpestato o schiacciato, in particolare in
prossimità delle spine, delle prese e del punto in cui fuoriesce dall’apparecchio. Non
vanicate la nalità di sicurezza della spina con messa a terra. Una spina normale o
“polarizzata” ha due soli terminali; una spina con messa a terra ha un terzo polo di
terra. Questo ulteriore terminale serve per la vostra sicurezza. Se la spina fornita non si
inserisce nella presa, consultate un elettricista per l’eventuale sostituzione.
6) Fusibile
Per evitare il rischio di incendi e di danni all’unità, utilizzate solo il tipo di fusibile
descritto nel manuale. Prima di sostituire il fusibile, assicuratevi che l’apparecchio sia
spento e scollegato dalla presa di corrente.
7) Collegamento alla rete elettrica
Il collegamento elettrico improprio può invalidare la garanzia del prodotto.
8) Pulizia
Pulite solo con un panno asciutto. Non utilizzate solventi come benzolo o alcol.
9) Manutenzione
Non eettuate qualsiasi altro intervento al di fuori di quelli descritti nel manuale. Per
eventuale assistenza rivolgetevi solo a personale qualicato. Utilizzate solo accessori /
componenti suggeriti dal produttore.
10) Avviso
Vogliamo ricordare che un’alta pressione sonora non solo può danneggiare tempora-
neamente il senso dell’udito, ma può anche causare danni permanenti. Prestate atten-
zione anché il volume sia sempre adeguato.
8. PRIMA DI INIZIARE
Questo manuale d’uso è fatto per fornirvi sia una panoramica dei controlli, sia informa-
zioni dettagliate su come utilizzarli. Allo scopo di aiutarvi a capire i collegamenti fra i
vari controlli, li abbiamo riuniti in gruppi secondo le loro funzioni.
Il vostro mixer amplicato PMX-8UBT è stato imballato con cura in fabbrica per garanti-
re un trasporto sicuro. Nonostante ciò, vi raccomandiamo di esaminare con attenzione
l’imballo e il suo contenuto per qualsiasi segno di danno sico, cosa che può accadere
durante il trasporto.

20
ITALIANO
MANUALE D’USO PMX-4BT
8.1. Disimballaggio
All’interno della confezione sono presenti i seguenti articoli:
• N.1 Mixer attivo PMX-4BT
• N.1 Telecomando
• N.1 Manuale d’uso
AVVISO: l’imballo non è un giocattolo. Tenerlo fuori dalla portata dei bambi-
ni!!! Conserva tutte le componenti dell’imballaggio per un futuro utilizzo.
8.2. Operazioniiniziali
Assicuratevi che ci sia spazio suciente attorno all’unità per una corretta ventilazione
ed evitarne il surriscaldamento; non posizionate l’apparecchio sopra dispositivi caldi
come radiatori o amplicatori di potenza. La console va collegata alla rete attraverso
l’apposito cavo in dotazione. Il prodotto rispetta gli standard di sicurezza richiesti. Fusi-
bili bruciati devono essere sostituiti con fusibili dello stesso tipo e specica.
Fate attenzione a che tutte le unità siano correttamente messe a terra. Per la
vostra sicurezza, non dovete mai rimuovere nessun connettore di massa da
dispositivi elettrici o cavi d’alimentazione, o renderli non operativi.
8.3. Accessori
SOUNDSATION fornisce un’ampia gamma di accessori utili all’impiego del vostro
PMX-4BT, come ad esempio cavi, stand, microfoni, cue, ecc. Tutti gli articoli presenti a
catalogo sono stati testati rigorosamente dal nostro team con il PMX-4BT, quindi racco-
mandiamo vivamente di utilizzare prodotti ed accessori originali SOUNDSATION. Chiedi
al tuo negoziante autorizzato SOUNDSATION la lista degli accessori originali compati-
bili, in questo modo ti assicurerai una performance ottimale!
9. INTRODUZIONE
Il sistema PMX-4BT è stato progettato per essere una valida soluzione sia per l’utiliz-
zo live che per scopi didattici. L’interfaccia utente è molto semplice ed intuitiva, ciò ti
permetterà di sfruttare appieno le potenzialità di personalizzazione del prodotto senza
dover ricorrere a nozioni di prolo tecnico elevato.
Il mixer attivo a 6 canali permette di collegare microfoni o strumenti musicali necessa-
ri all’intrattenimento o alla didattica, grazie agli ingressi XLR sui canali 1-4, ai Jack da
6,3mm sui canali 1-3, all’ingresso RCA sul canale 4 ed al mini-Jack da 3mm sui CH5-6
sul quale collegare computer, smartphone, tablets, ecc. Ciascun canale ha un EQ a 2
bande per personalizzarne il suono. È possibile usare anche l’EQ graco a 3 bande sulla
sezione master per adattare il suono generale alle caratteristiche dell’ambiente in cui si
va a suonare.
Table of contents
Languages:
Other Sound Sation Music Mixer manuals


