Sound Sation hyper bass series User manual
hyper bass series
Professional active subwoofers
USER MANUAL
Please read this manual carefully and proper take care of it

Dear customer,
First of all thanks far purchasing a SOUNDSATION®product. Our mission is to
satisfy all possible needs of musical instrument, professional audio and light-
ing users offering a wide range of products using the latest technologies.
We hope you will be satised with this item and, if you want to collaborate, we
are looking for a feedback from you about the operation of the product and
possible improvements to introduce in the next future. Go to our website www.
soundsationmusic.com and send an e-mail with your opinion, this will help
us to build equipment ever closer to customer’s real requirements.
One last thing: read this manual before using the product, an incorrect opera-
tion can cause damages to you and to the unit. Take care!
The SOUNDSATION Team

3
ENGLISH
TABLE OF CONTENTS
1. GETTING STARTED .................................................................................................6
1.1. Important Safety Symbols ...................................................................................6
1.2. Important Safety Instructions ..............................................................................6
1.3. Before You Start ...................................................................................................8
2. SOUNDSATION HYPER TOP SERIES ....................................................................9
3. SETUP .....................................................................................................................10
3.1. Connections ........................................................................................................10
3.3. Rear Panel Description ......................................................................................11
4. INSTALLING WHEELS ON HYPER BASS 15A / 18A ...........................................13
5. WIRING DIAGRAM .................................................................................................14
6. SPECIFICATIONS ...................................................................................................15
7. WARRANTY AND SERVICE ..................................................................................16
8. WARNING ..............................................................................................................17
4
ENGLISH
hyper top series User manual
1. GETTING STARTED
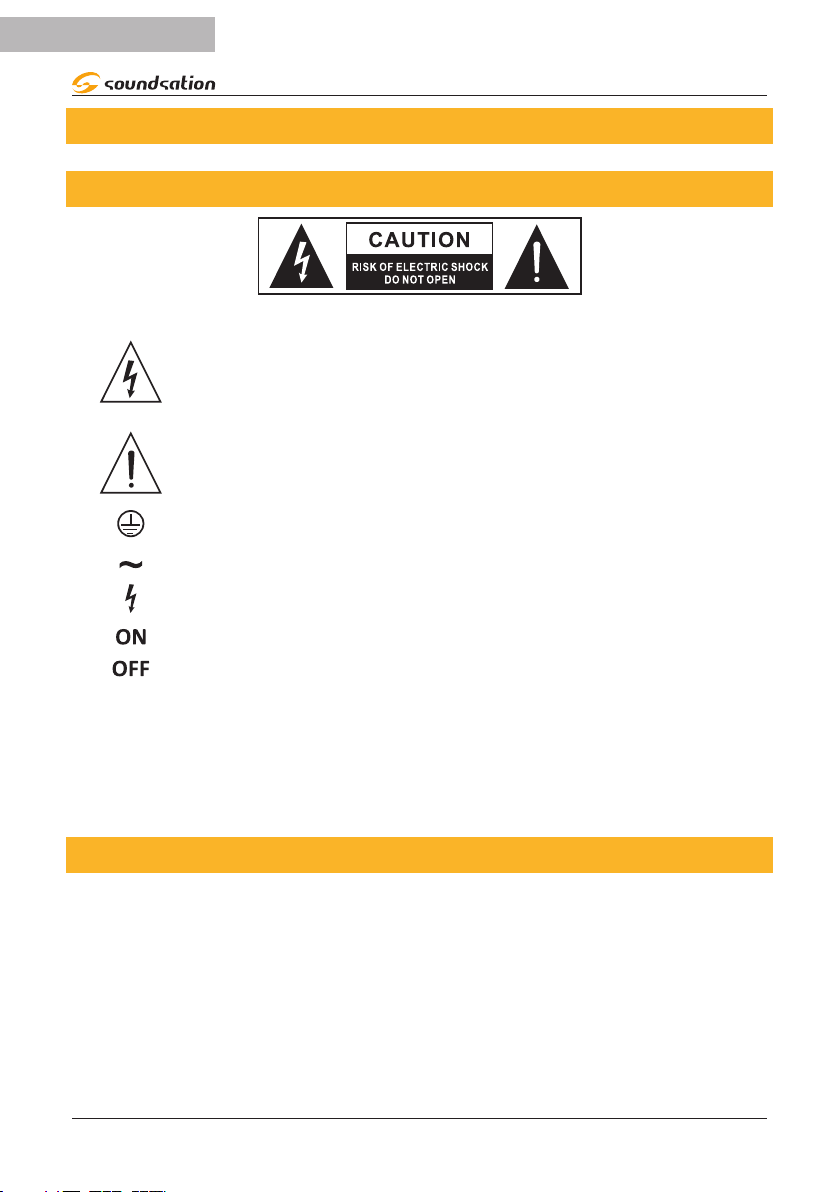
1.1. Important Safety Symbols
The symbol is used to indicate that some hazardous live termi-
nals are involved within this apparatus, even under the normal
operating conditions, which may be sufcient to constitute the
risk of electric shock or death.
The symbol is used in the service documentation to indicate
that specic component shall be replaced only by the compo-
nent specied in that documentation for safety reasons.
Protective grounding terminal
Alternating current/voltage
Hazardous live terminal
Denotes the apparatus is turned on
Denotes the apparatus is turned off
WARNING: Describes precautions that should be observed to prevent the
danger of injury or death to the operator.
CAUTION: Describes precautions that should be observed to prevent dan-
ger of the apparatus.
1.2. Important Safety Instructions
fRead these instructions
fKeep these instructions
fHeed all warning
fFollow all instructions
Water / Moisture
This product is intended to indoor use only. To prevent risk of re or shock, do
not expose it to rain or moisture. Make sure there are no ammable, explosive
or corrosive materials surrounded in 10 meters while operating.
5
ENGLISH
hyper top series User manual
Heat
The apparatus should be located away from heat sources such as radiators,
stoves or other appliances that produce heat. It may carry high heat, do not
aim at objective exceeding 2 minutes.
Ventilation
The unit must be installed in a location with adequate ventilation, at least 5m
away from adjacent surfaces. Be sure that no ventilation slots are blocked.
Object and Liquid Entry
Objects do not fall into and liquids are not spilled into the inside of the appara-
tus for safety.
Installation
Always secure speaker using a safety chain and carrying handles. Never carry
the unit by its cord.
Power Cord and Plug
Protect the power cord from being walked on or pinched particularly at plugs,
convenience receptacles, and the point where they exit from the apparatus.
Do not defeat the safety purpose of the polarized or grounding-type plug. A
polarized plug has two poles; a grounding-type plug has two poles and a third
grounding terminal. The third prong is provided for your safety. If the provided
plug does not t into your outlet, refer to an electrician for replacement.
Power Supply
Always make sure that you are connecting to the proper voltage and the line
voltage not higher than stated on the decal or rear panel of the unit. Unplug
this apparatus during lightning storms or when unused for long periods of time.
Fuse
To prevent the risk of re and damaging the unit, please use only of the rec-
ommended fuse type as described in the manual. Before replacing the fuse,
make sure the unit turned off and disconnected from the AC outlet.
Electrical Connection
Always disconnect from the power source before servicing or replacing fuse/
lamp and be sure to replace with same fuse/lamp size and type. Cut off power
before moving, repairing and cleaning the unit. Improper electrical wiring may
invalidate the product warranty.
To avoid electric shock, all units must be connected to circuits with a suitable
ground. Do not power on and power off the apparatus in a short time.
Cleaning
Clean only with a dry cloth. Do not use any solvents such as benzol or alcohol.
6
ENGLISH
hyper top series User manual
Servicing
In case of failure or misfunction occurred, stop using the unit immediately.
Never try to repair the unit by yourself. Repairs carried out by unskilled people
can lead to damage or malfunction. Please contact the nearest authorized
technical assistance center. Buy the same spare parts/components from ma-
nufacturer directly.
Any damage that cased by violating this manual is out of insurance, our com-
pany will not take the responsibility.
Warning
In case of lighting products, avoid direct eye exposure to the light source while
it is on. In case of audio products, please remember the high sound pressure
do not only temporarily damage your sense of hearing, but can also cause
permanent damage. Be careful to select a suitable volume.
1.3. Before You Start
1.3.1 UNPACKING
Thank you for purchasing HYPER BASS Series active subwoofer. Each unit
has been well tested and shipped in perfect operating conditions. Carefully
unpack the carton and check the contents to ensure that all parts are present
and in good conditions:
• 1 Loudspeaker
• 1 Power cable
• 1 User manual
If anything damaged during transport, notify the shipper immediately and keep
packing material for inspection. Again, please save the carton and all the
packing materials. If the unit must be returned to the manufacturer, it is impor-
tant that the unit is returned in the original manufacturer’s packing. Please do
not take any action without rst contacting us.
1.3.2 Getting started
HYPER BASS Series subwoofer are part of a wider range of SOUNDSATION
Pro Audio product line. These active subwoofers are compact, light weight and
very easy to use. They are ideal for any live music or xed installation pur-
pose. Make sure there is enough space around the unit for proper ventilation
and prevent overheating; do not place the unit on top of hot devices such as
radiators or power ampliers. The speaker is connected to mains through the
supplied cable. The product meets the required safety standards. Blown fuses

7
ENGLISH
hyper top series User manual
must be replaced with fuses of the same type and specication.
Make sure that all units must be properly grounded. For your safe-
ty, you should never remove any ground connector from electrical
devices or power cables, or make them inoperative.
Our products are subject to a process of continual further development. There-
fore modications to the technical features remain subject to change without
further notice.
2. SOUNDSATION HYPER TOP SERIES
HYPER series is the result of years of experience accumulated by SOUND-
SATION in Portable Sound systems, a segment where quality, versatility and
value for money are absolutely essential.
It consists of 5 two-way polypropylene active speakers with woofers from 6”
to 15” - called HYPER TOP Series - and 3 bass-reex active subwoofers from
1x12 “to 1x18” with birch plywood enclosures - called HYPER BASS Series.
The HYPER BASS series features 3 powered models with Class-D ampliers -
from 900W to 1200W - driving 12” to 18” high-performance woofers.
All models have got a sturdy, lightweight and stylish multiplex birch plywood
enclosure with full metal grille and acoustic foam to protect the transducers
inside and give a pleasant look. Furthermore, they feature a different number
of recessed handles (from 1 on each side on 12” and 15” to two on each side
on 18” model) and a standard M20 pole mount hole, in order to allow any xed
installation or portable applications as well as easily move them everywhere.
8
ENGLISH
hyper top series User manual
3. SETUP
3.1. Connections
3.1.1 Mains Connections
Connect the device to the mains with the power-plug. The wire corresponden-
ce is as follow:
Cable Pin Intermational
Brown Live L
Blue Neutral N
Yellow/Green Earth
The earth must to be connected! Pay attention to the safety!
Before taking into operation for the rst time, the installation has to be appro-
ved by an expert.
3.1.2 Audio Connections
You will need several cables for the various connections to and from the
speaker. See the pictures below that show the internal wiring of these cables.
Be sure to use only high quality cables.
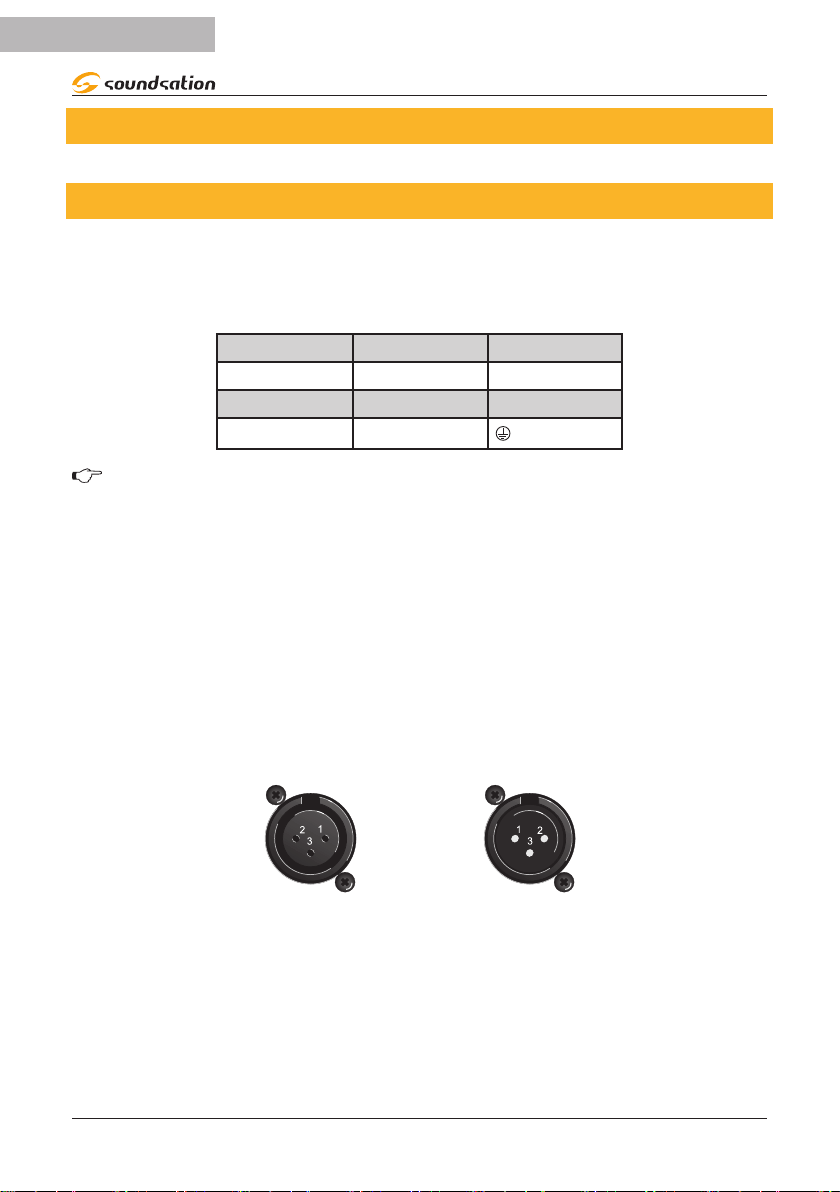
HYPER BASS speakers use balanced connections for both inputs and out-
puts; you can, of course, also connect unbalanced equipment to balanced
inputs by connecting pins 1 & 3 as shown below.
Balanced use of XLR connectors
1= Ground/Shield
2= Hot (+)
3= Cold (-)
INPUT OUTPUT
In case of unbalanced use Pins 1 and 3 will be jumped
9
ENGLISH
hyper top series User manual
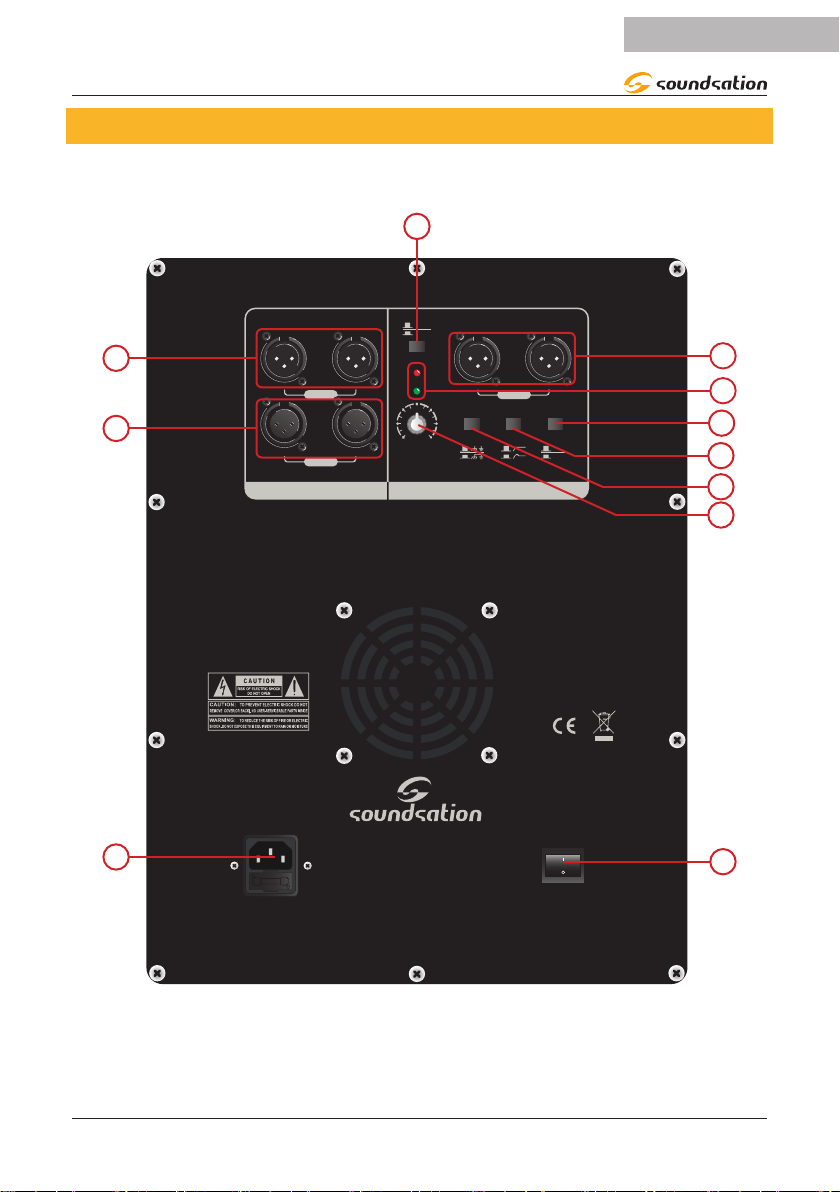
3.3. Rear Panel Description
HYPER BASS Series active subwoofers have several connectors, controls,
and indicators the use of which you should understand.
INPUT - LINK OUT CROSSOVER
IN
LINK OUT
GNDPHASE
0°
180°
LEFT RIGHT
LEFT RIGHT
signal/limit
on LEFT RIGHT
sub level
010
AC INPUT
AC 230V 50HZ
T5AL/250V
AC INPUT
Power
ON OFF
Power handling:
continuous-600w
peak-1200w
x-over
80hz
120hz
HYPER BASS 18A
SHAPE
1
2
3
4
5
6
9
8
10
11
7
1) POWER Switch
Switch up to turn the spekaer on, and switch down to turn it off. Make sure the
level control is down before you turn it on.

10
ENGLISH
hyper top series User manual
2) IEC Socket with Fuse holder
Plug the linecord into an AC socket properly congured for your particular
model. In case of fuse burn, to prevent the risk of re and damaging the unit,
please use only of the recommended fuse type as described in the manual.
Before replacing the fuse, make sure the unit turned off and disconnected
from the AC outlet.
Note: If you happen to lose the AC linecord, always use a three-pin
plug with a ground pin.
3) Stereo Balanced LINE INPUTs
This pair of female XLR-type connectors accept a balanced line-level signal.
Connect these inputs to your mixer; do not connect dynamic or condenser
microphones.
4) Link Outputs
This is a pair male XLR-type connectors that route stereo input singals without
affecting to the audio content. It is used to link the unit to another speaker or
subwoofer.
5) X-OVER
This switch toggles between 80Hz and 120Hz crossover frequency. It has to
be set depending on speakers used for reproduction of mid-high frequencies.
For speakers with 12” woofers or lower, it is normally set to 120Hz position;
while in case of 15” it is normally set to 80Hz.
6) outputs
This is a pair male XLR-type connectors containing ltered stereo singals.
Connect them to a pair of full-range active speakers of a poiwer amplier in
order to amplify the mid-high part of frequency range.
7) POWER and clip indicators
When POWER switch is turned on, and linecord is connected to an active AC
Mains supply, this POWER indicator is lit.
CLIP LED lights up only when the input signal is too high and limiter operates
in order to prevent unwanted damage to amplier or transducers.
NOTE: To better adjust levels and avoid limiter to intervene and
cut signals, once connected the desired sound source slowly turn
up MIC/LINE or LINE LEVEL controls until the desired volume is
reached (and the CLIP light comes on occasionally). Always protect
your hears if you are close when it is playing at high levels.
8) phase
11
ENGLISH
hyper top series User manual
This two-position switch turns the audio signal reproduced by the subwoofer
by 180°. Phase rotation helps the optimization of low frequency reproduction
even under the most difcult installation situations. After completing the instal-
lation, play a known track and press the button to get the best bass reproduc-
tion.
9) shape
When pressed, this switch changes the impulse response of the subwoofer,
making it punchy and thumping. It is suggested especially in DJ applications
or with dance music.
10) GND
By leaving this switch un-pressed ( ) you can reduce or eliminate the
interference which is sometimes caused by connecting signal lines between
two or more pieces of equipment. It interrupts the ground line at some point. It
is particularly effective at eliminating ground loops, but it may also increase or
decrease noise from other sources.
11) Sub Level
This knob adjusts sbuwoofer level.
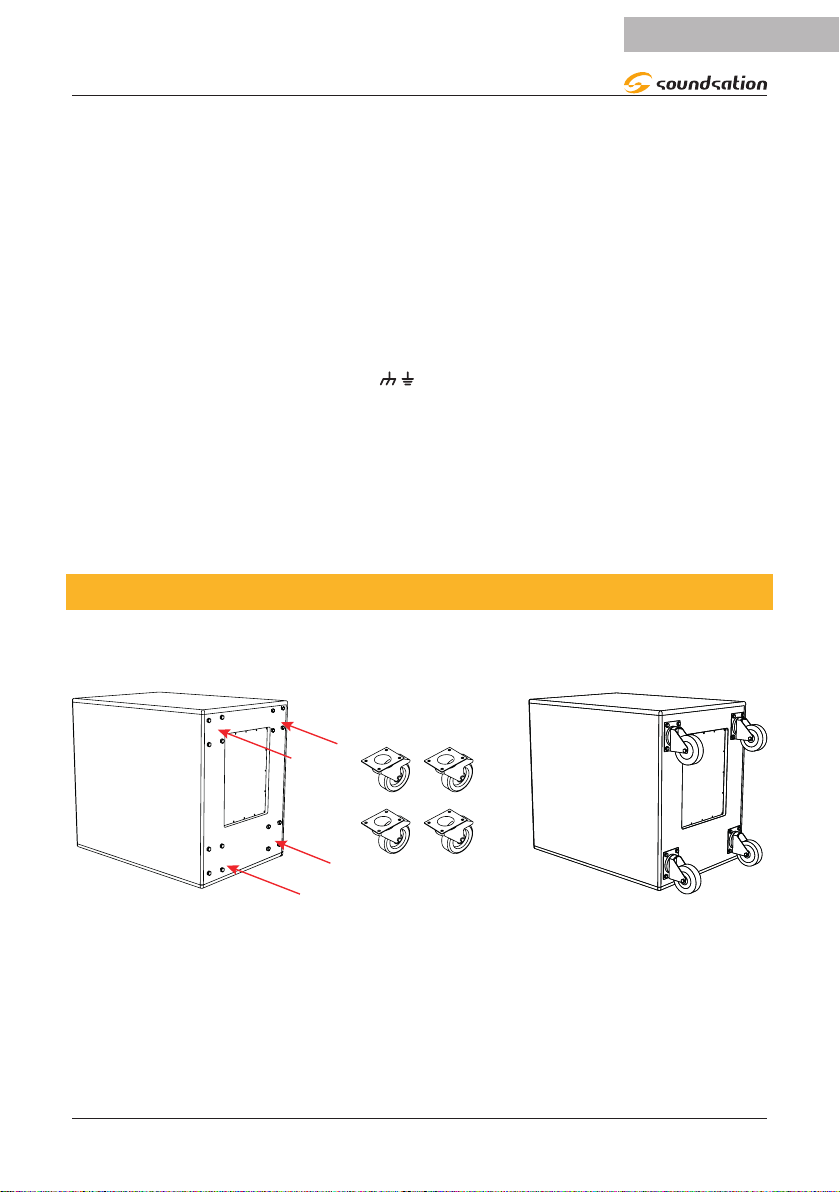
4. INSTALLING WHEELS ON HYPER BASS 15A / 18A
To facilitate the transport of 15” and 18” subwoofers, we predisposed 16 x M8
holes on the rear side for four wheels.
All holes comes with M8 drive-in nut. We suggest to use M8 x 30mm (at least)
screws, hexagonal head with washer.
For further information on how to buy these wheels, please contact your
nearest Soundsation delaer or refer to following picture to get them from your
regular dealer.

12
ENGLISH
hyper top series User manual
5. WIRING DIAGRAM
Following a typical wiring scheme with one mixer, two tops and 2 subs.
Right OutputLeft Output
MIXER
HYPER TOP
Speaker
HYPER TOP BASS
Active Subwoofer
(plays low-frequencies)
HYPER TOP
Speaker
HYPER TOP BASS
Active Subwoofer
(plays low-frequencies)
Left & Right
full-range outputs
Left full-range
input
Left hi-pass
output
Right full-range
input
Right hi-pass
output
Line balanced inputLine balanced input
SOUNDSATION
SUB ST100-M20
Speaker Pole
SOUNDSATION
SUB ST100-M20
Speaker Pole

13
ENGLISH
hyper top series User manual
6. SPECIFICATIONS
HYPER BASS12A HYPER BASS15A HYPER BASS18A
Speaker Type Bass-reex Active Sub-
woofer
Bass-reex Active Sub-
woofer
Bass-reex Active Sub-
woofer
Acoustic Data
Frequency Resp. (-10
dB)
40 Hz - 150 Hz 35 Hz - 150 Hz 30 Hz - 150 Hz
Frequency Resp. (-3 dB) 50 Hz - 120 Hz 40 Hz - 120 Hz 35 Hz - 120 Hz
MAX SPL(1W@1m) 120 dB 124 dB 126 dB
Crossover 120 Hz (24dB/Octave) 120 Hz (24dB/Octave) 120 Hz (24dB/Octave)
LF Woofer 12” (3” v.c.) Woofer 15” (4” v.c.) Woofer 18” (4” v.c.)
Amplier
Amp Class CLass D CLass D CLass D
Rated Power 450 W 600 W 600 W
Peak Power 900 W 1200 W 1200 W
Protection RMS, Overload, Thermal RMS, Overload, Thermal RMS, Overload, Thermal
Input XLR L + R Bal. Line
Inputs
XLR L + R Bal. Line
Inputs
XLR L + R Bal. Line
Inputs
Output XLR L + R Bal. Filtered
Outs, XLR L + R Bal. Link
Outs
XLR L + R Bal. Filtered
Outs, XLR L + R Bal. Link
Outs
XLR L + R Bal. Filtered
Outs, XLR L + R Bal. Link
Outs
Controls
Level Sub Level control Sub Level control Sub Level control
X-Over switch 80Hz - 120Hz 80Hz - 120Hz 80Hz - 120Hz
Other Controls Phase 0° - 180°, Shape,
Ground Lift On-Off
Phase 0° - 180°, Shape,
Ground Lift On-Off
Phase 0° - 180°, Shape,
Ground Lift On-Off
LED Power On (Green), Signal
(Green) / Limit (Red)
Power On (Green), Signal
(Green) / Limit (Red)
Power On (Green), Signal
(Green) / Limit (Red)
Mains
Power Requirement 230Vac - 50 Hz 230Vac - 50 Hz 230Vac - 50 Hz
Power Consumption 500W 750W 750W
Power Switch Yes Yes Yes
Connector VDE VDE VDE
Fuse T5AL - 250V T5AL - 250V T5AL - 250V
Mechanics
Housing Multiplex Birch plywood Multiplex Birch plywood Multiplex Birch plywood
Finish Painted Black Finish Painted Black Finish Painted Black Finish
Grille 1.5mm Metal Grille 1.5mm Metal Grille 1.5mm Metal Grille
Handles 1 recessed handles on
each side
1 recessed handles on
each side
2 recessed handles on
each side
Pole Mount M20 M20 M20
Speaker Dim. (WxHxD) 420 x 520 x 474 mm 460 x 630 x 565 mm 543 x 678 x 620 mm
Packing Dim. (WxHxD) 490 x 580 x 540 mm 530 x 690 x 640 mm 630 x 750 x 690 mm
Net Weight 17 kg 29 kg 37 kg
Gross Weight 19 kg 31 kg 40 kg

14
ENGLISH
hyper top series User manual
7. WARRANTY AND SERVICE
All SOUNDSATION products feature a limited two-year warranty. This two-
year warranty is specic to the date of purchase as shown on your purchase
receipt.
The following cases/components are not covered from the above warranty:
• Any accessories supplied with the product
• Improper use
• Fault due to wear and tear
• Any modication of the product effected by the user or a third party
SOUNDSATION shall satisfy the warranty obligations by remedying any
material or manufacturing faults free of charge at SOUNDSATION’s discretion
either by repair or by exchanging individual parts or the entire appliance. Any
defective parts removed from a product during the course of a warranty claim
shall become the property of SOUNDSATION.
While under warranty period, defective products may be returned to your local
SOUNDSATION dealer together with original proof of purchase. To avoid any
damages in transit, please use the original packaging if available. Alternatively
you can send the product to SOUNDSATION SERVICE CENTER – Via Enzo
Ferrari , 10 – 62017 Porto Recanati - Italy . In order to send a product to ser-
vice center you need an RMA number. Shipping charges have to be covered
by the owner of the product.
For further information please visit www.soundsationmusic.com
15
ENGLISH
hyper top series User manual
8. WARNING
PLEASE READ CAREFULLY – EU and EEA (Norway, Iceland and Liechten-
stein) only
This symbol indicates that this product is not to be disposed of with your
household waste, according to the WEEE Directive (2202/96/EC) and your
national law.
This product should be handed over to a designated collection point, e.g., on
an authorized one-for-one basis when you buy a new similar product or to an
authorized collection site for recycling waste electrical and electronic equip-
ment (WEEE).
Improper handling of this type of waste could have a possible negative impact
on the environment and human health due to potentially hazardous substanc-
es that are generally associated with EEE. At the same time, your cooperation
in the correct disposal of this product will contribute to the effective usage of
natural resources.
For more information about where you can drop off your waste equipment
for recycling, please contact your local city ofce, waste authority, approved
WEEE scheme or your household waste disposal service.
This product is imported in EU by
FRENEXPORT SPA – Via Enzo Ferrari, 10 - 62017 Porto Recanati - Italy
www.soundsationmusic.com
Soundsation® is a registered trademark of FRENEXPORT SPA - Italy

www.soundsationmusic.com
Ver 1.0 - Mar. 2016
Other manuals for hyper bass series
2
Table of contents
Other Sound Sation Subwoofer manuals


