Sovereign MEH1129B User manual

1
29CM 1100W ELECTRIC HOVER MOWER
Item No. 577134
Model No. MEH1129B
INSTRUCTION MANUAL
HHGL Limited, MK9 1BA; HHGL (ROI) Limited, D02 X576 Aug 20
www.gardenservicecentre.co.uk
Technical Support & Part
Mon-Fri 9am-5pm Sat-Sun 11am-4pm
0343 515 1905
Please read these instructions fully before starting assembly.

2
General safety warnings
In the box
Assembly
Operating instructions and tips
Maintenance
Plug replacement
Troubleshooting
Technical data
Recycling and disposal
Getting help
Warranty
3
11
12
14
22
24
25
26
26
26
27
CONTENTS
3
GENERAL SAFETY WARNINGS
WARNING! Read all safety warnings and instructions.
Failure to follow the warnings and instructions may result in
re and/or serious injury.
Warnings Symbols
Safety information
The following warning symbols appear throughout this
manual and indicate the appropriate safety measures you
should take when assembling and operating the mower.
Read operator’s manual before use.
Wear eye and hearing protection (PPE).
Do not expose to rain.
Keep bystanders away.
Remove plug from mains before maintenance or if
cord is damaged.
Keep exible supply cord away from cutting means.
Guaranteed sound power level data (96dB) in
accordance with Directive 2000/14/EC.

4
IMPORTANT! When using the mower, the following safety
precautions must be followed to avoid injuries and damage.
• Read all operating instructions carefully and comply with
them. It is important to understand these instructions and
to acquaint yourself with the mower, its correct usage and
all safety requirements.
• Keep this manual in a safe place so that the information is
available at all times.
• If you give the equipment to any other person, give them
these operating instructions as well.
29cm
Class II equipment.
Do not dispose of electrical equipment with household waste.
Cutting width.
This device complies with the applicable European
directives, and an evaluation method of conformity for
these directives has been done.
The product complies with the applicable UK directives
and an evaluation method of conformity for these
directives was followed.

5
General Safety
We accept no liability for damage or accidents which result from
non-compliance with these instructions.
Intended Use
This hover mower has been designed for cutting grass and soft
vegetation in private and hobby garden areas. It should only be
used for its prescribed purpose, and any other use is deemed to
be a case of misuse.
PLEASE NOTE: Our equipment has not been designed for use in
commercial, trade or industrial applications. Our warranty will
be void if the mower is used in commercial, trade or industrial
applications or for an equivalent purpose.
Power Supply
Before you connect the equipment to the mains supply, ensure
that the data on the rating plate corresponds to your mains supply.

6
Personal Safety
Note! Only supply power to the mower through a circuit
protected by an RCD with a maximum trip current of 30mA.
• Only use plugs or connectors approved for outdoor usage.
• Extension cables must comply to H07RN-F requirements
as described in DIN 57 282/VDE 0282 and must have a
minimum cross-section of 1.5mm2. The plug must have
an earth and any connection must also be earthed and
splashproof. Before use, check the cables for signs of
damage and wear. Never use the mower if the cables are
not in perfect condition (this also applies to the supply
cable on the mower). If the cable is damaged whilst the
mower is working, disconnect the mains plug from the
power supply immediately and then check the extent of
the damage.
• Never allow children or others who are not familiar with
the operating instructions to use the hover mower. Local
regulations may stipulate the minimum age of the user of
this type of appliance.
• In areas where the mains supply is weak or bearing a high
load, this mower may cause further voltage uctuations as
it starts. In extreme cases, this can cause damage to other
equipment working from the same supply. In this case,
we recommend you temporarily switch o any unneeded
equipment or connect it to a dierent circuit.
• This mower is not designed to be used by people
(including children) with limited physical, sensory or
mental capacities or those with no experience and/
or knowledge, unless they are supervised by a person
who is responsible for their safety or they have received
instructions from such a person in how to use the mower
safely. Children must always be supervised in order to
ensure that they do not play with the mower.

7
• Always check the mower for signs of damage before
each usage.
• Always disconnect the mains lead from the electrical
supply before carrying out any inspection, servicing or
maintenance work.
• Ensure that all the guards are securely tted and in good
working order.
• Before each use, inspect the mower to check the plastic
cutters, fastening bolts and the entire cutting unit for
any signs of wear or damage. To prevent imbalance or
vibration, worn or damaged cutting blades and fastening
bolts must always be fully replaced.
• Damaged parts on the mower must be replaced by
qualied personnel. Use only genuine spare parts.
• Repair work on the electrical parts of the mower may only
be carried out by a qualied electrician.
• Follow the instructions to t or remove the plastic cutters
and wear protective gloves.
• The user remains responsible for any injury to third
parties within the working area of the hover mower, whilst
the hover mower is being used.
• Only work in good daylight or appropriate and adequate
articial light.
• Never use the mower when you are tired.
• Never run the mower in enclosed or poorly ventilated
rooms or if there are ammable or explosive uids,
vapours or gases nearby.
• If the mower has struck a foreign body, switch o the
motor and disconnect the mains lead before inspection,
and before cleaning the cutting head or fan.

8
•
Check the site on which you intend to use the hover
mower and remove all objects that may be caught or
thrown up by the mower. Foreign bodies must be removed
before you start mowing. Keep an eye on the power cable
and keep it away from the cutting blade at all times.
• Ensure that you do not push the mower over areas that
might damage or snare the power cable.
• Before you lift the hover mower to transport it, switch o
the motor, disconnect the mains lead and wait until the
cutting head has come to a complete standstill. Ensure the
cutting head is facing away from you.
• Never reach towards rotating parts with your hands
or feet.
• The safety distance from the moving blade produced by
the push handle must be maintained at all times.
• If you use the mower on a small incline, mow across the
slope (not in an up and down direction). Always be sure of
your footing on slopes.
• Be particularly careful when changing direction with the
mower whilst working on a slope.
• Do not use the lawn mower on gradients of over
15 degrees.
• Ensure that you have safe footing at all times whilst
working with the mower.
• Always wear strong, anti-slip footwear and long trousers
when using the mower. Never mow in bare feet or in
open-toed sandals.
• When the mower is running, ensure that no person
or animal, particularly children and pets, are in the
immediate vicinity of the hover mower. Ensure that you
keep everybody at least 10 metres away from the mower
when it is working.
• Switch o the motor and disconnect the plug from the
power supply if the mower strikes a foreign body. Check
the mower for signs of damage and carry out all necessary
repair work, before you start the mower again.

9
• If the hover mower begins to vibrate abnormally, switch
it o immediately, disconnect the plug and check it
carefully. Ensure that all the nuts, bolts and screws are
tight and that the mower is in a safe condition for use.
• Do not leave the mower out in the rain. The lawn must
not be wet or very damp.
• Only push the mower at a normal walking pace.
• Be particularly careful when you change the direction of
the mower or pull it towards you. Avoid pulling it towards
you while the blade is moving.
• Never run or attempt to push the mower over any areas
except your lawn or other grassed areas. Carefully actuate
the starter switch in accordance with the instructions (see
‘Operating instructions’ section).
• Do not switch the mower on and o frequently over a
short period of time, and in particular, do not play with
the ON/OFF switch.
• Do not touch the cutting head until the machine has been
disconnected from the mains and the cutting blade has
reached a complete standstill.
• Never lift or carry the mower whilst the motor is running.
• Switch o the motor and disconnect the plug whenever
you leave the hover mower.
• Keep the hover mower in a dry place which is inaccessible
to children at all times.
• Before you adjust or clean the mower or check whether
the mains lead is kinked or damaged, switch o the
mower and disconnect the plug from the power supply.

10
Operating and maintenance safety
• Do not use the hover mower if the cords are damaged
or worn.
• Do not connect a damaged cord to the mains supply or
touch a damaged cord before it is disconnected from
the mains supply. A damaged cord could allow parts to
become live and cause a risk of electrocution.
• Do not attempt to touch the blades before the mower is
disconnected from the supply and the blades have come
to a complete stop.
• Keep extension cables away from the blade. The blade can
cause damage to cords and lead to contact with live parts.
CAUTION! Read all safety requirements and instructions.
Any errors made in following the safety requirements
and instructions may result in an electric shock, re and
serious injury.
Keep all safety regulations and instructions in a safe place
for future use.
Disconnect from the mains supply (i.e. remove the plug from
the mains socket) in the following situations:
• whenever leaving the mower unattended
• before cleaning a blockage
• after striking a foreign object
• whenever the mower starts vibrating abnormally.

11
Parts
IN THE BOX
1Switch box 5Lower handle 9 Cable clamp
2 Start/stop
switch lever
6Grassbox 10 Grassbox lid
3Upper handle 7Safety lock-o
button
11 Retaining pin
4Handle fastening
wing nuts
8Cable strain
relief hook
12
Bolts
1
2
3
4
5
6
7
8
9
10
12
11
12
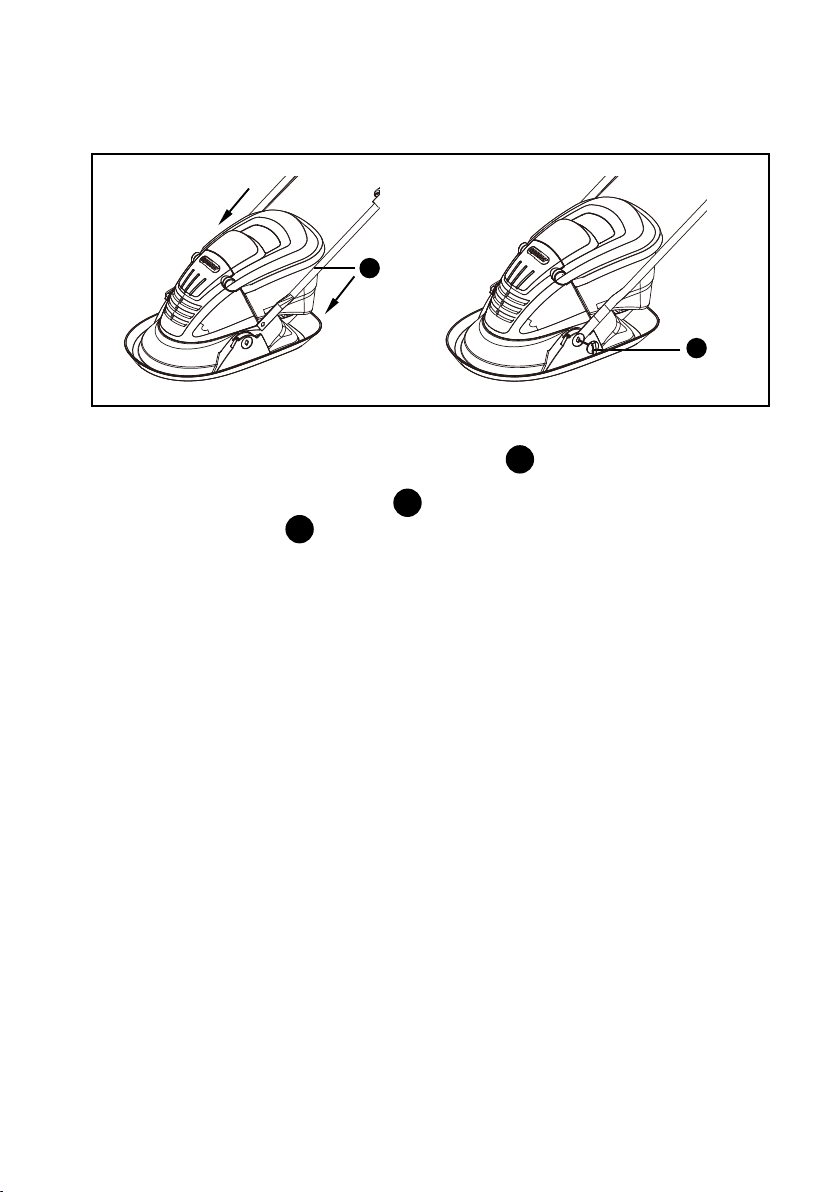
Handle Assembly
5
11
ASSEMBLY
1. Place the ends of the lower handle 5into the slots.
2. Secure the lower handle 5 to the deck by rmly pushing
a retaining pin 11 through the retaining holes on the deck
and through the bottom end of the handle.
3. Repeat on the other side.
The push handles must be fully assembled, undamaged and in
correct working order before using the hover mower.
Follow the operating instructions step-by-step and use the
pictures provided as a visual guide to assemble these parts.

13
3
4
4
9
12
4. Ensure the upper handle 3and the lower handle 5 are
aligned correctly and move freely.
5. Fix the upper handle 3section to the lower handle 5.
Use the bolts 12 and wing nuts 4provided. There are two
possible height positions. Choose the one most suitable to
the operator’s height.
6. Clip the cable to the handle bar with the cable clamp 9.
When the two wing nuts are loosened, the handle can be
folded (Fig. A) for easy storage. Ensure the power cable (Fig. A)
is not caught between the folding sections.
7. Hook the cable (or extension cable if you are using one)
through the extension cable strain relief hook 8, as
shown above, to help prevent it from coming loose or
disconnected whilst you are mowing.
8
Fig. A

14
OPERATING INSTRUCTIONS AND TIPS
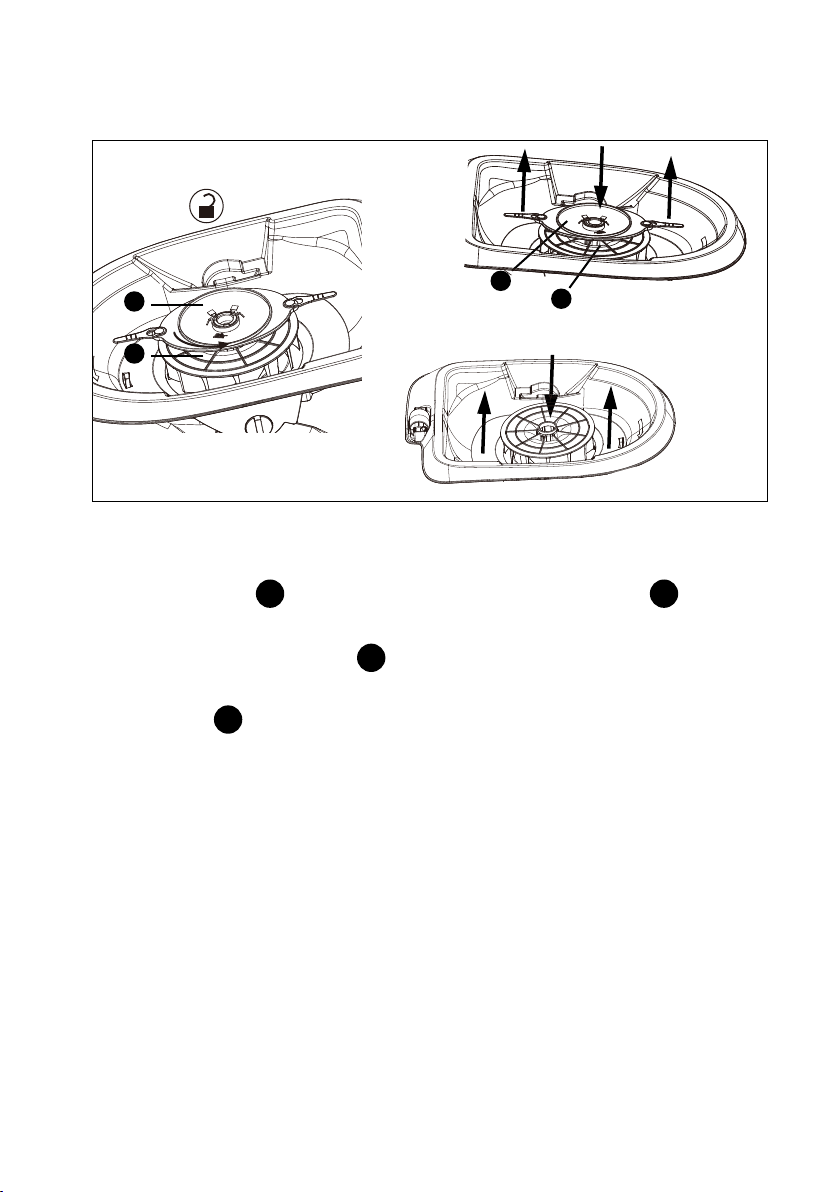
Setting the cutting heights
1. There are 2 cutting heights: Fig. A shows the lower cutting
height setting, 10mm. Fig. B shows the Higher cutting
height setting, 33mm. The blade is pre-set to the 33mm
cutting height in the factory.
2. Adjust the cutting height by turning over the cutting head
13 .
3. Disconnect from the main power supply and wait until the
fan 14 and the cutting head 13 have stopped rotating.
4. Turn your product upside down.
IMPORTANT! Ensure the power cable plug is removed
from the mains supply and wait until the cutting head has
stopped rotating, before adjusting the cutting height.
A higher cut cutting height (see Fig. B) should generally be
selected for the rst cut of the season. When cutting longer
grass, cut the grass in 2 or more stages; rst on the higher
cutting setting, then on the lower cutting setting. These
techniques will help to a avoid over-stressing your grass.
14 14
13 13
Fig. A Fig. B
15
Removing the cutting head and fan
1. Hold the fan 14 rmly and twist the cutting head 13
anticlockwise, as illustrated above.
2. Hold the cutting head 13 in the centre and remove, as
illustrated above.
3. Hold fan 14 in the centre and remove, as illustrated above.
4. Inspect for damage and clean as necessary, before
replacing the fan and cutting head.
14
14
13
13
16
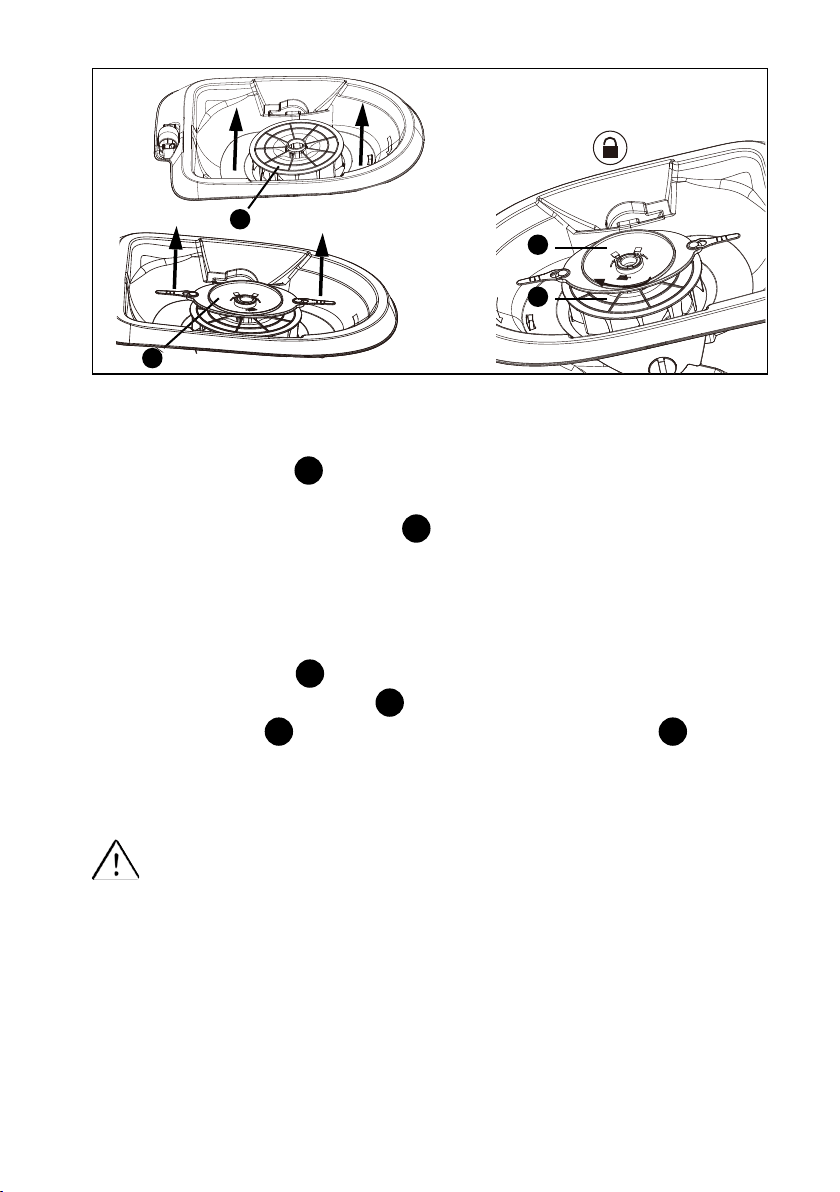
Retting the fan and setting the cutting height
1. Replace the fan 14 on the motor drive shaft, as
illustrated above.
2. Position the cutting head 13 onto the motor drive shaft,
according to the height of the cut you require. Position the
blades ush with the fan, if you want the higher
setting (33mm).
3. If you want the lower cutting height setting (10mm), turn
the cutter head 13 the other way round, with a larger
space between the fan 14 and the cutting blades.
4. Hold the fan 14 rmly and twist the cutting head 13
clockwise, as illustrated above. Ensure it is securely locked
into position.
IMPORTANT! Always ensure the fan and cutting head
are correctly located on the drive shaft and securely
locked into position. If the blade has broken, please wear
gloves or necessary protective equipment (PPE) before
inspecting the blade.
14
14
13
13

17
ON/OFF operation
1. Connect the mower to the mains supply. Ensure
the cable (or extension cable if you are using one) is
hooked through the cable strain relief hook, as
illustrated on page 14.
2. Before switching on, ensure that the mower is not in
contact with any foreign objects.
3. To switch on, press the safety lock-o button 7on the
handle, then activate the start/stop switch lever 2.
Release the lock-o button 7.
4. To switch o, release the start/stop switch lever 2.
5. Start cutting once the mower has reached full speed.
NOTE: There are two start/stop switch levers tted, either
one can be used for starting the product.
After switching o the equipment, the blade may continue
to turn for several seconds. Do not touch the moving
blade. There is a risk of serious injury.
72

18
Before you connect the equipment to the mains supply make
sure that the data on the rating plate corresponds to your
mains supply.
Operation
IMPORTANT! Always ensure the on/o switch is working
correctly. Do not use if you suspect a fault. Before you
perform any repair or maintenance work on the mower,
ensure that the plastic cutter is not rotating and that the
power supply is disconnected.
IMPORTANT! Never empty the grass box if the motor is
still running. The rotating plastic cutter can cause serious
injuries and throw objects out at high speed.
Always ensure the grass box ts securely. Always switch
o the motor before you remove it.
A safe distance between the blade deck and the user
is provided by the length of the handle. This distance
must be maintained at all times. Take special care when
mowing and changing direction on embankments and
slopes. Ensure that you have a secure surface to stand on,
wear shoes with anti-slip soles that oer good grip, and
long trousers. Always mow across the slope (not in up or
down direction).
For safety reasons, do not use the mower on gradients
exceeding 15°.
Take special care when moving backwards and pulling the
hover mower. Never pull the mower backwards when the
motor is running.

19
Emptying the grassbox
• Stop the mower, remove the plug from the mains power
supply and wait until the cutting head has come to a
complete stop.
• Lift up the grassbox lid 10 .
• Lift the grassbox 6 o the mower and empty.
• Replace the grass box 6securely and ensure the
retaining hooks are correctly located in the recesses on
the mower. Lower the lid 10 back onto the grass box 6.
Failure to t the grassbox and lid correctly will cause poor
collection of grass cilppings.
610

20
The cutting system must be kept in good condition and
inspected before and after use. Switch o the motor
before you carry out any inspections of the cutting system.
Remember that the cutting head will continue to turn for a few
seconds after the motor has been switched o. Never attempt
to stop the cutting head.
Check plastic cutters for wear and replace when necessary.
Plastic cutters should be straight, replace if bent or twisted.
Place the mains lead in loops on the ground near the wall
socket. Mow away from the socket and cable and ensure that
the mains lead is always on the section of lawn that you have
already mowed, so that you do not run over the mains lead
with the mower.
If you see the grassbox is full whilst you are mowing, you
should stop the mower and empty the grassbox.
Mowing advice
Keep the underside of the mower casing clean and remove all
grass deposits from it. Deposits make it more dicult to start
the mower and also adversely aect the mowing quality and
the grass collection.
This manual suits for next models
1
Table of contents
Other Sovereign Lawn Mower manuals

Sovereign
Sovereign SV 40 S User manual

Sovereign
Sovereign XSS40B User guide

Sovereign
Sovereign CX 7305351 User manual

Sovereign
Sovereign LM 32H User manual

Sovereign
Sovereign SLM 1500 User manual

Sovereign
Sovereign LM 32H User guide

Sovereign
Sovereign M4E1232C User guide

Sovereign
Sovereign GT5614 User manual

Sovereign
Sovereign SOVEREIGN TP 400-2218-00-SV-SMA User manual

Sovereign
Sovereign 2907857 User manual


