Sovereign SL98 User manual
In s ta lla tio n a n d Op era tin g In s tru c tion s
MODEL SL98
UNDER COUNTER LARDER FRIDGE
P lease read th ese in s tru c tion s ca re fu lly b e fo re a tt em pt in g to in s tall o r u se th is a pp lia n ce.
It is a d v isa b le to keep th ese in s tru c tion s in a sa fe pl ace fo r futu re re fe re n ce.

Introduction
Thank you for choosing this Sovereign appliance. It has been
designed to give years of trouble-free use provided it is installed
and maintained correctly.
Please read these instructions carefully before installing or using
your appliance. It is advisable to keep your purchase and installation
receipts with these instructions in a safe place for future reference.
Included is some important safety information in addition to
guidelines and recommendations that will enable you to take full
advantage of all the functions available.
This quality appliance has been tested and certified to meet all
applicable UK electrical and safety standards.
This appliance must be installed and connected in accordance
with current regulations by a qualified electrician.
After unpacking the appliance ensure that there is no visible
damage. If the appliance has been damaged during transit, do not
use it, contact your retailer immediately.
2

Guarantee
This appliance is guaranteed for one year from date of purchase.
Keep your purchase receipt with these instructions.
To fulfill the conditions of the guarantee this appliance must have
been correctly installed by a qualified person and operated in
accordance with these instructions. The appliance is intended for
domestic use only.
If the appliance fails to work properly during the first year period
contact the Sovereign Service Help line on 01527-573010.
The appliance will be repaired or replaced (at the manufacturer’s
discretion) at no cost to you. If the guarantee has elapsed, you
will be given a quotation for any repairs or parts required.
The model and serial number together with details of your sales
receipt must be quoted when contacting the Help line.
For A ssis tance or S er vice please con tact the
S o vereign S er vice Help line on 01527 -573010
3

Descrip tion of the Appliance
1.
2.
2.
3.
4.
5.
1 . Th e rmo s ta t C on tro l & In te rio r Ligh t U ni t
2 . In te rio r Gl as s S h e lve s
3 . D oo r S tor a g e – S p ec ific A rea s fo r B o ttle s & D a ir y P rod u c ts
4 . Sa la d C ris p e r B o x w ith Gl as s S h e lf
5 . T w o A d ju s ta bl e F ee t
4

CONTENTS:
Section 1. Installation
Section 2. Safety Advice
Section 3. Operating the Appliance
Section 4. Maintenance
5

Section 1. Installation
IM P ORT A NT!
This app lian ce mu st be left to stan d in an up right po siti on
for at lea st 4 hou rs be fore be ing switc he d on for the first time .
R emo ve all pa ck aging an d securing tape from the app lian ce.
W ash the interior of the app lian ce w ith luke w arm w ater con taining a
sma ll amoun t of bic arbona te sod a (5m l to 0.5 litres of water).
Po siti on the app lian ce in a dry atmo sphe re an d ou t of direct sun light.
Do no t po siti on ne xt to a coo ker or othe r sou rces of hea t, i.e. rad iator.
If po siti one d ne xt to ano the r fridge or free zer, lea ve a m inimu m gap of
2cm be tw ee n the app lian ces in orde r to avoid conden sation .
A clea ran ce of 50m m shou ld be left abo ve the app lian ce. If this canno t
be achieved you shou ld ensure a clea ran ce of 25m m is ma intaine d on
ea ch side of the app lian ce.
Fit the plastic wall spa cers to the conden ser on the rea r of the app lian ce,
this w ill en sure an air gap be tw ee n the app lian ce an d the w all.
Do no t place or store hea vy item s on the top of this app lian ce.
En sure tha t the app lian ce is po siti one d on a firm flat floo r.
This app lian ce mu st be level. Ad just the level by sc rew ing the ad justab le
fee t up or do w n (use you r fingers or a suitab le spanne r).
En sure tha t the app lian ce is up right an d bo th fee t are in firm con tact with
the floo r so tha t the cab ine t is stab le.
C onne ct the plug to an ad jacen t 13am p sock et ou tlet an d en sure tha t the
app lian ce is no t stand ing on the supp ly cab le.
Sec tion 2. Sa fe ty Ad vice
P lea se rea d this bo o klet tho rou ghly be fore installing an d sw itc hing on the
app lian ce. T he manu facturer acc ep ts no respon sibility for incorrect
installation an d usage.
If this app lian ce is to rep lace an old refrigerator w ith a lock, as a safety
mea sure brea k or remo ve the lock be fore dis po sal.
Y ou r old app lian ces con tain insulation gases an d refrigeran t tha t mu st be
dispo sed of correctl y. P lea se en sure tha t the refrigeran t circuit is no t
dama ged be fore the app lian ce is taken away for correct dispo sal in line
with curren t legisl ation . If the re is an y doub t con tact you r Lo cal Au tho rity
for instructi on s.
This app lian ce m ay conta in the refrigeran t isobuten e (R600a ). This is a
natu ral gas with a high level of en viron m enta l com pat ibility; ho wever,
caut ion is required as isobuten e is a flamm ab le gas. It is ess ent ial to en sure
tha t refrigeran t tube s are no t da m aged du ring tran spo rtat ion an d the
installation of the app lian ce. In the even t tha t the refrigeran t circuit is
6

da m aged , avoid na ked flam es or sou rces of ignition an d vent ilate the roo m
in which the app lian ce is situated .
Do no t dama ge the refrigeran t circuit.
Do no t allow children to play with the app lian ce. C hildren mu st ne ver
play in or aroun d the app lian ce.
If using an adap tor, this mu st be used in acc ordan ce w ith the
manu facturers instructi on s an d en sure tha t the electric al circuit is no t
overloade d as this cou ld cau se overhea ting.
Do no t twist or ben d the cab les, an d kee p the m away from ho t surfaces.
Do no t plug ın or unp lug this app lian ce with w et hand s.
Follow ing installation ma ke sure tha t the po w er cab le is no t trappe d
unde rnea th the app lian ce.
Sec tion 3. Operating the Appliance
3 .1 . S w itc hing on the A ppli a n c e
A llow the app lian ce to stan d for 4 hou rs after installation .
P lug in the app lian ce an d sw itch on at the ma ins supp ly.
Se t the the rmo stat con trol to the required setting as de taile d in the
Tempe rature C on trol secti on (3.2.).
Lea ve the app lian ce for app roxima tely 4 hou rs for the correct
tempe rature to be rea ched .
3 .2 . T e mp e ra ture Con trol
The tempe rature selector kno b is located at the fron t of the interior light un it
(s ee D esc ription of the App lian ce on pa ge 4).
Se tting “0”: U nit O ff
Se tting “1”: U nit On – W arme st T empe rature
Se tting “3 ” to “5”: N orma l O pe ration (ade qua te for mo st situa tion s)
Se tting “7 ”: C olde st Tempe rature
Impor ta n t!
D uring high amb ien t tempe ratures e.g. on ho t summe r da ys, it ma y be
ne cess ary to set the the rmo stat to the colde st setting (po siti on 5). This ma y
cau se the comp ress or to run con tinuou sly in orde r to ma intain a low
tempe rature in the cab ine t.
W he n the com press or is runn ing con tinuou sly the larde r fridge w ill no t be ab le
to carry ou t au toma tic de frosti ng as this can on ly take place w he n the c omp ress or
is no t in ope ration (s ee the ‘D efrosti ng’ secti on ). Shou ld a layer of
frost de velop on the rea r wall of th e cab ine t, turn the tempe rature regulator ba ck
to a w arme r setting (e.g. po siti on ‘2’ or ‘3’), as this w ill cau se the comp ress or to
7

switch off an d allow au toma tic de frosti ng to take place as no rma l.
3 .3 . Norm a l Op e ra ting S ounds
Y ou ma y hea r faint gurg ling or bubb ling sound s whe n the refrigeran t is pumpe d
to the coo ling system an d throu gh the coils or tub ing at the rea r of the
app lian ce. W he n the comp ress or is in ope ration you ma y hea r a sli ght whirring
soun d or pu lsating no ise. The the rmo stat con trols the ope ration of the
comp ress or, an d you ma y hea r a sli ght click as it cycles in an d ou t.
3 .4 . E n e rgy Sa v ing A d v ic e
Do no t install the app lian ce close to sou rces of hea t, such as a coo ker,
dishwashe r or rad iator. Lo cate the app lian ce in a coo l w ell-ven tilated roo m an d
ma ke sure tha t the air ven ts are clea r.
Try to avoid keep ing the doo r ope n for lon g time , w arm air w ill en ter the cab ine t,
an d ma y cau se a bu ild up of ice as well as affecti ng the ene rg y con sump tion .
En sure the re are no ob structi on s preven ting the doo r from closing prope rly
3 .5 . In the E v e nt of a P o w e r F a ilure
If the re is a po w er failure, kee p the doo r closed . W he n the po w er ha s bee n
restored the app lian ce will start to ope rate bu t it ma y take som e tim e to achieve
the pre-set ope rating tempe rature. C he ck the cond ition of you r stored foo d
item s an d liquids.
Sec tion 4. Main tenance
B e fore a ny m a in te n a n c e or c lea ning w ork is ca rri e d ou t, DI S CONN E CT the
a ppli a n c e from the E L E CTRICITY s uppl y.
4 .1 . In te rn a l Cl ea ning
Cl ea n the interior an d acc ess ories w ith warm w ater an d bicarbona te of sod a
(5m l to 0.5 litre of water). Ri nse an d dry tho rou ghly. Do no t use de terg en ts,
ab rasive po w de rs, highly pe rfume d clean ing produ cts, w ax po lis he s or clean ing
produ cts con taining ble ach or alcoho l.
En sure tha t the de frost w ater channe l and ou tlet are clea n an d free of deb ris
(s ee D efrosti ng)
8

4 .2 . Ex te rn a l Cl ea ning
W ash the ou ter cab ine t w ith w arm soap y w ater. Do NOT use ab rasive
produ cts. T he re ma y be sha rp ed ges on the und e rside of the produ ct, so care
shou ld be taken w he n clean ing. O nce or tw ice a yea r du st the rea r of the
app lian ce an d the comp ress or at the ba ck of the app lian ce, with a brush or
vacuu m cleane r, as an acc umu lation of du st w ill affect the pe rforman ce of th e
app lian ce an d cau se increa sed ene rg y con sump tion .
4 .3 . D e fro s ting
The interior of this app lian ce is coo led using a spe cial coo ling plate moun ted on
the rea r wall. D uring ope ration this plate w ill appea r w et bu t plea se no te tha t
this is quite no rma l. An y ice bu ild up on the w all plate w ill be de frosted w hilst
the comp ress or is no t in ope ration . A t the ba se of the w all plate the re is a sma ll
channe l an d ou tlet w he re the de frost w ater pa ss es to be evapo rated abo ve the
comp ress or un it.
It is impor ta nt th a t the c h a nn e l a nd ou tle t a re ke pt c lea n
a nd fre e of d e bri s .
If ice bu ild up on the rea r wall exceed s 3 -5mm , emp ty the con ten ts an d sw itch off
the app lian ce, lea ve the doo r ope n an d allow the ice to me lt.
Do not u s e s h a rp
ob jec ts to sc ra pe the ic e a w a y .
Cl ea n an d dry the interior, close the doo r an d
turn on the po w er to the app lian ce. W he n the po w er ha s bee n
restored the app lian ce will start to ope rate bu t it ma y take som e tim e to achieve
the pre-set ope rating tempe rature.
4 .4 . W h e n the a ppli a n c e is not in u s e
W he n th e app lian ce is no t in use for lon g pe riod s, rem ove th e content s,
disc onne ct from th e electrici ty supp ly an d clea n th e app lian ce, lea ving th e doo r
ajar unt il you w is h to use th e app lian ce again.
4.5 . Ch a ng in g th e In te rio r L igh t Bu lb
S w itch off th e po w er supp ly to th e app lian ce
R em ove th e sc rew tha t secures th e inte rior light pe rspe x cover in place.
R em ove th e cover an d un sc rew th e bu lb.
R ep lace th e bu lb w ith a suitab le rep lacem ent .
R efit th e cover an d sw itch th e app lian ce ba ck on .
9
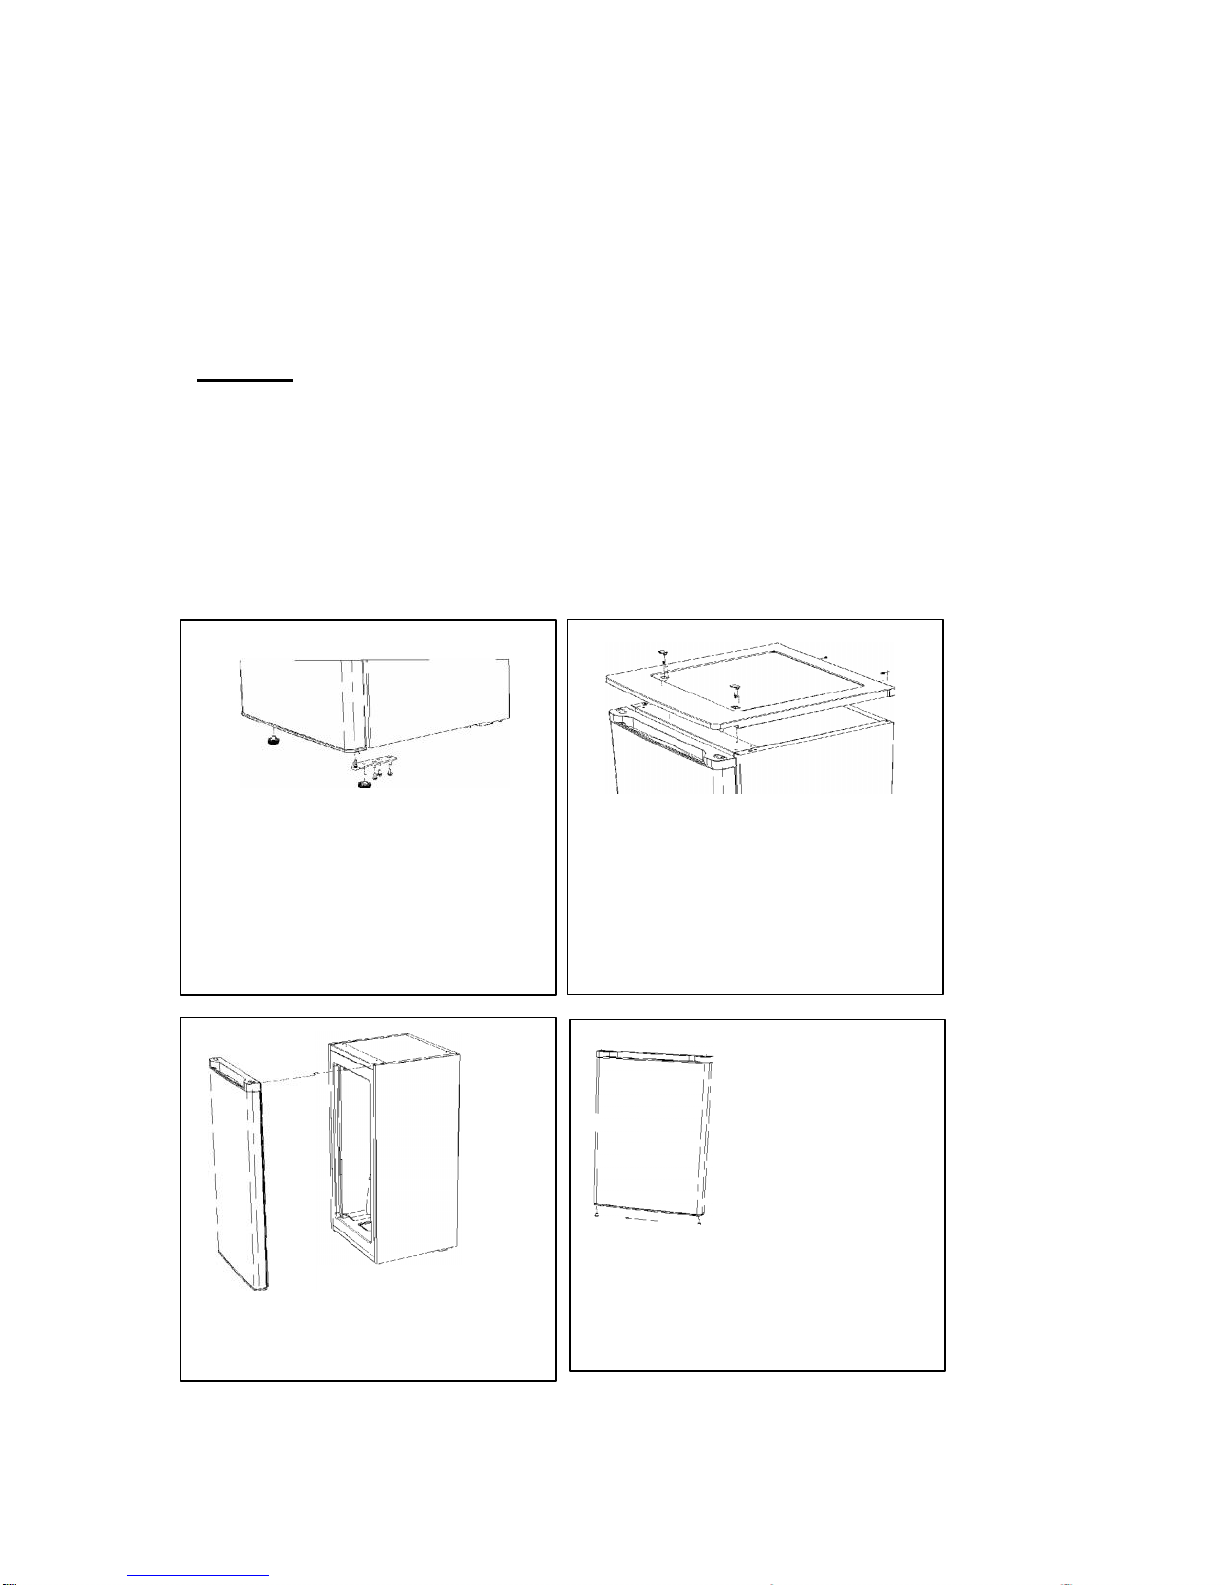
4 .6 . R e ve rs ing the Door
The doo r open ing can be reversed from “right han d hinged ” (as supp lied ) to “left
han d hinged ” if required .
Warning !
W h e n re ve rs ing the door, the a ppli a n c e mu s t not be c onn ec te d to the
m a in s . R e mo ve the plug from the m a ins b e for e h a nd.
Step 1: Tilt the appliance slightly towards the
rear and prop it securely. Unscrew the level
adjuster and the foot.
Unscrew the bottom hinge screws.
Support/hold the door so that it does not fall off.
Step 2: Remove two plastic caps in the top
cover. Unscrew the four screws that fix the top
cover. Remove the top cover.
Step 4:
Remove the plastic pluginbottomofdoorand
fit to opposite side.
Step 3: Remove the door.
10

Step 6:
Refit the hinge plate to the opposite side of the
cabinet and secure with three screws. Refit the
level adjuster and foot.
Step 5: Unscrew the bottom hinge nut and
remove hinge pin from the hinge plate. Turn the
hinge plate over and refit the hinge pin and
secure with nut.
Step 8:
Fit the door on to the bottom hinge pin. Be
careful not to let the door drop.
Step 7:
Remove the hinge pin from the top cover and refit
to the opposite side.
Step 9:
Refit the top cover so that the hinge pin is
inserted into the door. Secure the top cover with
the four screws. Insert the two plastic caps into
the top cover.
4 .7 . W h a t to do if s om e thing go e s w rong
B e for e c on tac tin g ou r se rvic e h el p lin e , c h ec k th e fo llo w in g po in ts :
The re is no po w er to the app lian ce:
C he ck the re is no t a po w er cut
C he ck the re is po w er to the electric sock et/app lian ce
C he ck the fuse in the plug (M ust be 13 amp )
C he ck tha t the the rmo stat ha s bee n set to “1” or abo ve (s ee 3.2).
The comp ress or run s con tinuou sly:
Is the doo r closed correctl y?
H ave larg e quan titi es of foo d recen tly bee n adde d to the app lian ce? – if
yes, allow the interior tempe rature to recover
H as the app lian ce doo r bee n opene d frequen tly? – if yes, allow the
interior tempe rature to recover
11

The tempe rature in the cab ine t appea rs to be too high:
C he ck that the the rmo stat ha s bee n set be tw ee n “3” an d “5”.
This produ ct is a La rde r R efrigerator an d ha s no ice -bo x. A s a result it
will ope rate at a sli ghtly highe r tempe rature tha n a refrigerator with an
ic e-bo x.
C he ck the interior cab ine t tempe rature with a the rmo me ter.
The ope rating tempe rature shou ld be w ithin a ran ge of +6 de gree s to +12
de gr ee s.
The re is excessi ve frost/ice bu ild up :
En sure tha t the doo r ha s bee n closed correctly
En sure tha t the doo r sea l is clea n an d sea ling correctly
The app lian ce is ma king a no ise:
R efer to N orma l O pe rating Sound s, secti on 3.3.
En sure tha t the app lian ce ha s bee n installed correctly (s ee secti on 1).
If after the abo ve che cks the re is still a fau lt con tact the So vereign Se rvice H elp
line on
01527 - 573010 .
In-gua ran tee customer s shou ld en sure that the abo ve che cks ha ve be en ma de
as the en gine er will ma ke a cha rg e if the fau lt is no t the result of a me chan ic al
or electric al brea kdo w n.
The mode l an d serial numbe r togethe r with de tails of you r sales receipt mu st
be quo ted whe n boo king an in -gua ran tee service call.
I nsu r ance
!
The m a nu fact ur e r's gu a ra n te e do e s not c o ve r lo s s of
!
food content
.
Any claim for loss, damage, costs or expenses of an indirect or consequential
nature including any economic loss or damage to foodstuffs or any other goods is
excluded. We recommend that you inspect your fridge regularly to check that it is
working correctly, losses can result from deterioration following breakdown or
accidental failure of the appliance, fuses, plugs or public electricity supply, these
can be covered by your standard home insurance or might require extra cover.
Check with your insurance provider.
12

Important Note:
Th is app li an c e is m a r k e d a cc o r d in g t o t h e E u r opea n d ir e c tiv e 2002 /96 / E C o n
W a s te E le c tr ic a l an d E le c tr on ic E qu ip m en t ( W E E E ). B y en s u r in g th is p r odu c t is
d is po s e d o f c o rr e c tly , y o u w il l he lp p r ev en t po ten ti a l nega tiv e c on s equen c e s fo r
th e e n v ir on m en t an d hu m a n hea lt h , w h ic h c ou ld o th e r w is e b e c au s e d b y
inapp r o p r ia te w a s te hand li n g o f t h is p r odu c t.
Th e s y m bo l o n th e p r odu c t, o r o n th e do c u m en ts a cc o m pa n y in g t h e p r odu c t, th e
C r o ss e d O u t W hee li e B in , ind ic a t e s t ha t th is app li an c e m a y no t b e tr ea te d a s
hou s eho ld w a s t e . In s tea d it s ha ll b e hande d ov e r to th e app li c ab le c o ll e c ti o n
po in t fo r th e r ec y c li n g o f e le c tr ic a l an d e le c tr on ic equ ip m en t.
D is po s a l m u s t b e c a rr ie d ou t in a cc o r dan c e w it h lo c a l e n v ir on m en ta l
r egu la ti on s fo r w a s te d is po s a l. Fo r m o r e de ta il e d in fo r m a ti o n
abou t tr ea t m en t, r ec ov e r y an d r ec y c li n g o f th is p r odu c t, p lea s e
c on ta c t y ou r lo c a l au t h o r ity , y ou r hou s eho ld w a s te d is po s a l s e r v ic e
o r th e r e ta il e r w he r e y o u pu r c ha s e d th e p r odu c t.
W e c on ti nuou s ly tr y to im p r ov e ou r p r odu c ts fo r t h e bene fi t o f ou r c u s to m e r s .
F o r th is r ea s o n w e r e s e r v e th e r igh t to m a k e c hang e s t o a n y p r odu c t a t a n y ti m e ,
w it hou t no ti c e
13
Table of contents
Other Sovereign Refrigerator manuals


