Sovereign ZD110P-20L-1200W User guide

1200W WET & DRY VACUUM CLEANER
Item No. 594453
Model No. ZD110P-20L-1200W
HHGL Limited, MK9 1BA; HHGL (ROI) Limited, D02 X576 Mar 21
ORIGINAL INSTRUCTION MANUAL
Please read these instructions fully before starting assembly.
www.coreservice.co.uk
Technical Support & Parts
01904 727509
Mon-Fri 9am-5pm Sat-Sun 11am-4pm

2
CONTENTS
Contents 2
General safety warnings 3
Warning symbols 6
In the box 7
Intended use 8
Assembly 8
Operation 12
Maintenance and storage 16
Technical data 16
Recycling and disposal 17
UK plug 17
Getting help 18
Warranty 18

3
GENERAL SAFETY INFORMATION
WARNING! Read all safety warnings,
provided with this power tool.
Failure to follow all instructions listed below
injury.
Save all warnings and instructions for future
reference.
The term 'power tool' in the warnings refers to your
mains-operated (corded) power tool or battery-
operated (cordless) power tool.
This appliance can be used by children aged 8 years
and above, and persons with reduced physical,
sensory, or mental capabilities, or lack of experience
and knowledge, if they have been given supervision
or instruction concerning the use of the appliance
in a safe way and understand the hazards involved.
Children must not play with the appliance. Cleaning
and maintenance must not be undertaken by
children without supervision.
If the supply cord is damaged, it must be replaced
by the manufacturer, its service agent or similarly
qualified persons in order to avoid a hazard.
1. IMPORTANT: Read the operating instructions
before assembling and using for the first time.
2. Check that the mains voltage is the same as the
mains voltage specified on the rating plate.

4
3. Pull out the power plug in the following
circumstances: Whenever the appliance is not in
use, before opening the appliance, and before all
cleaning and maintenance work.
4. Never clean the appliance with solvents.
5. Never pull the plug out of the socket by pulling
the cable.
6. Never leave the appliance unattended when
ready for use.
7. Keep away from children and pets.
8. Take care to ensure that the power cable does
not get damaged by being run over, crushed,
pulled or similar.
9. Do not use the appliance if the power cable is in
less than perfect condition.
10. If the power cable has to be replaced, the
replacement must comply with the design
specifications of the manufacturer.
11. Never vacuum the following: Burning matches,
smoldering ash and cigarette butts, combustible,
caustic, flammable or explosive substances,
vapour or liquids.
12. This appliance is not suitable for vacuuming dust,
which can be harmful to health.
13. Store the appliance in a dry indoor location.
14. Never use the appliance if it is damaged.

5
15. Have the appliance serviced only by an
authorised after-sales service outlet.
16. Use the appliance only to carry out work for
which it has been designed.
17. Take extra care when cleaning steps.
18. Use only genuine accessories and spare parts.
Service
Have your power tool serviced by a qualified
repair person using only identical replacement
parts. This will ensure that the safety of the power
tool is maintained.

6
WARNING SYMBOLS
Warning!
Read the instructions
Wear ear protection
Wear eye protection
Wear a dust mask
Class II tool
The product complies with the applicable European
directives, and an evaluation method of conformity
for these directives was done.
Recycle unwanted materials instead of disposing
of them as household waste. All tools, hoses
and packaging should be sorted, taken to the
local recycling centre and disposed of in an
environmentally safe way.
The product complies with the applicable UK
directives, and an evaluation method of conformity
for these directives was followed.

7
IN THE BOX
Description
1. Appliance head
2. Handle
3. Blow hose outlet
4.
5. Wheels x 4
6. Container
7. Suction hose outlet
8. Flexible hose
9. Air regulator
10.Extension tubes x 2
11.Floor tool
12.Brush nozzle
13.Crevice nozzle
14.Foam filter
15.Cloth filter
16.Paper dirt bag

8
INTENDED USE
The wet and dry vacuum cleaner is designed for wet and dry
vacuuming using the appropriate filter. Thisproduct is suitable
for private domestic use, i.e cleaning dirt, debris and liquids
from garages, workshops, courtyards, patios and gardens.
This product is not suitable for the vacuuming of combustible,
explosive or harmful substances. The product is to be used
only for its prescribed purpose. Any other use is deemed to be
will be liable for any damage or injuries of any kind caused as
a result of this.
ASSEMBLY
WARNING! To prevent serious injury from accidental
operation, turn the power switch of the vacuum off
and unplug the appliance from its electrical outlet
before performing any procedure in this section.
Before you connect the vacuum to a mains supply,
identical to the mains data.
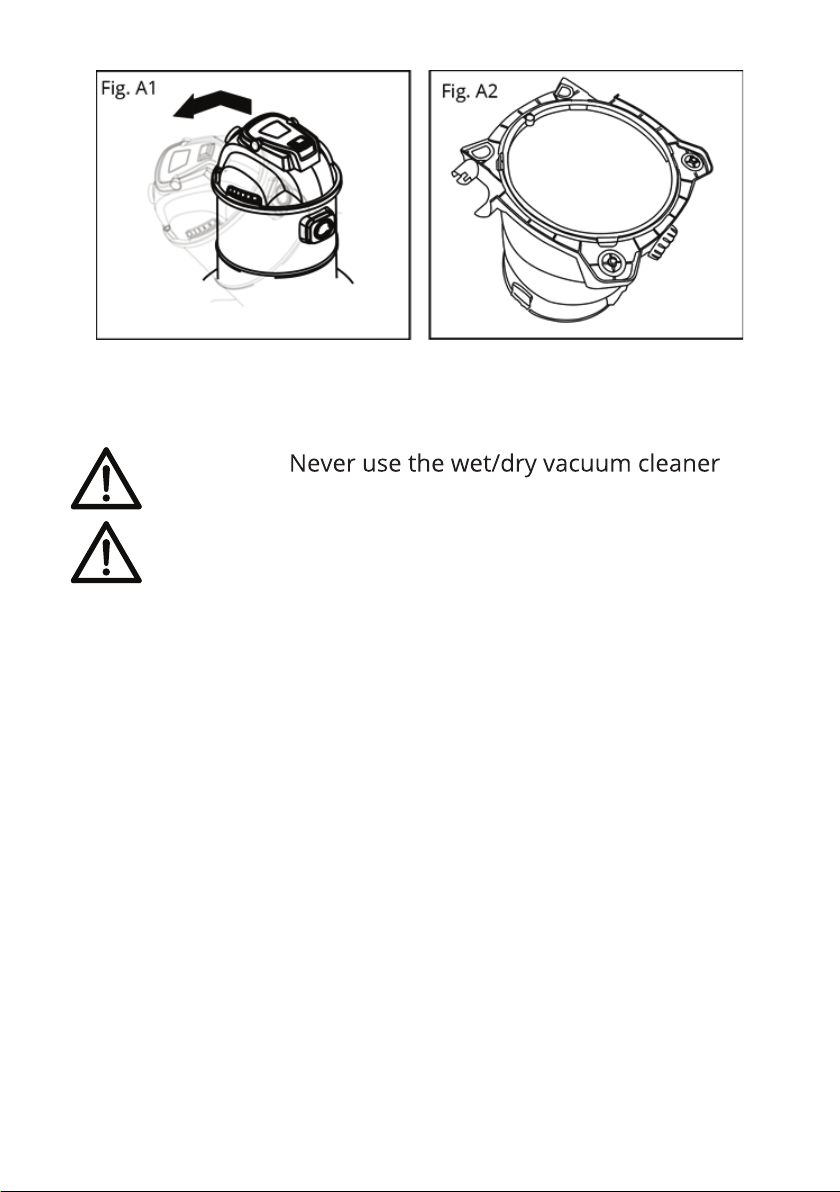
Assemble the seat (See Fig. A1, A2)
1. Remove the appliance head from the container by
unlocking the side locking latch pulling them outwards,
then upwards. Then turn the tank upside down.
2. Fit the seat by placing the seat into the container bottom.
Firmly push the container into the seat.
3. When the seat is fitted, turn the product the right way
up and re-attach the appliance head, ensuring you align
the notches on the ridge of the container lip with the
side locking latches, and secure the side locking latch in
position.
9
Assemble the filter
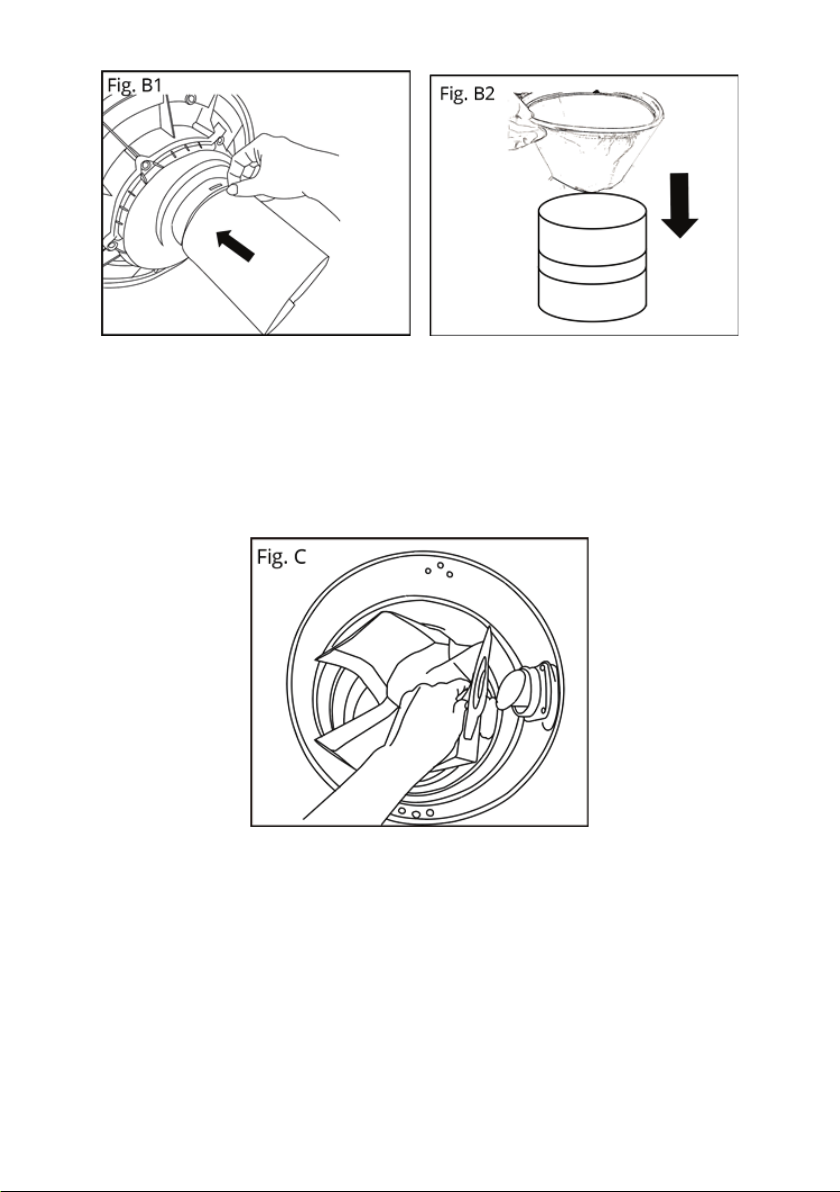
WARNING!
without a filter!
WARNING! Always ensure that the filters are properly
secured!
Assemble the foam filter (See Fig. B1)
For wet vacuuming, slip the foam plastic filter provided over
the filter basket.
Assemble the cloth filter (See Fig. B2)
For dry vacuum cleaning, always use the cloth filter provided.
Mount the cloth filter so that no air is sucked through the filter
without being filtered.
10
Assembling the paper dirt bag (See Fig. C)
For vacuuming fine, dry dirt it is recommended that you fit
the paper dirt bag. Slip the paper dirt bag over the vacuuming
hole. The dirt bag is suitable for dry vacuuming only. The dirt
bag makes it easier to dispose of the sucked-in dust.
Assemble the flexible hose
Connect the flexible hose to the flexible hose outlet,
depending on the application required:
- Vacuuming
Connect the flexible hose to the flexible suction hose outlet on
the container by inserting the hose into the outlet and aligning
the locking pin on the end of the flexible hose with the groove
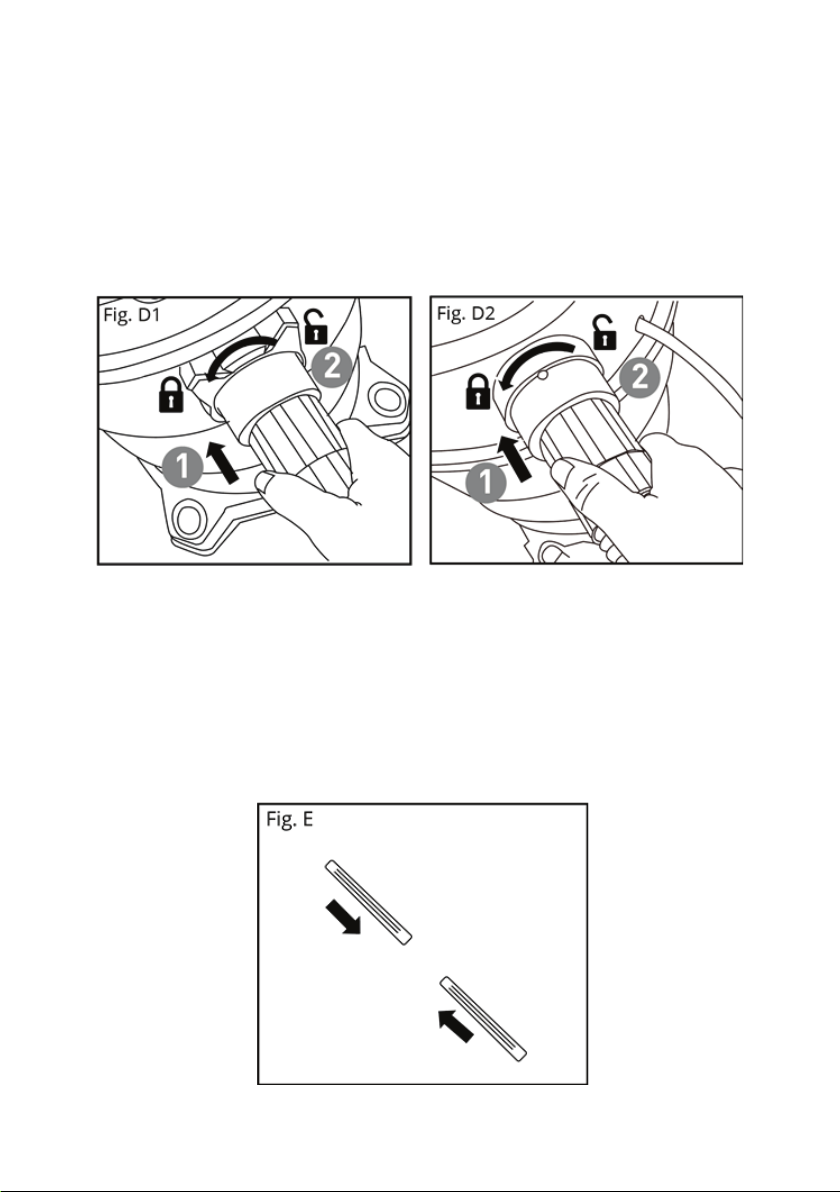
11
on the outlet. Turn the flexible hose to the right to secure the
hose into position. (See Fig. D1)
- Blowing
Connect the flexible hose to the flexible blow hose outlet
on the appliance head by inserting the hose into the outlet.
(See Fig. D2)
Fitting the extension tubes and tools
1) To fit the extension tube to the end of the flexible hose,
apply the larger opening end of the extension tube over the
end of the flexible hose.
2) Connect the 2 extension tubes one by one. (See Fig. E)
12
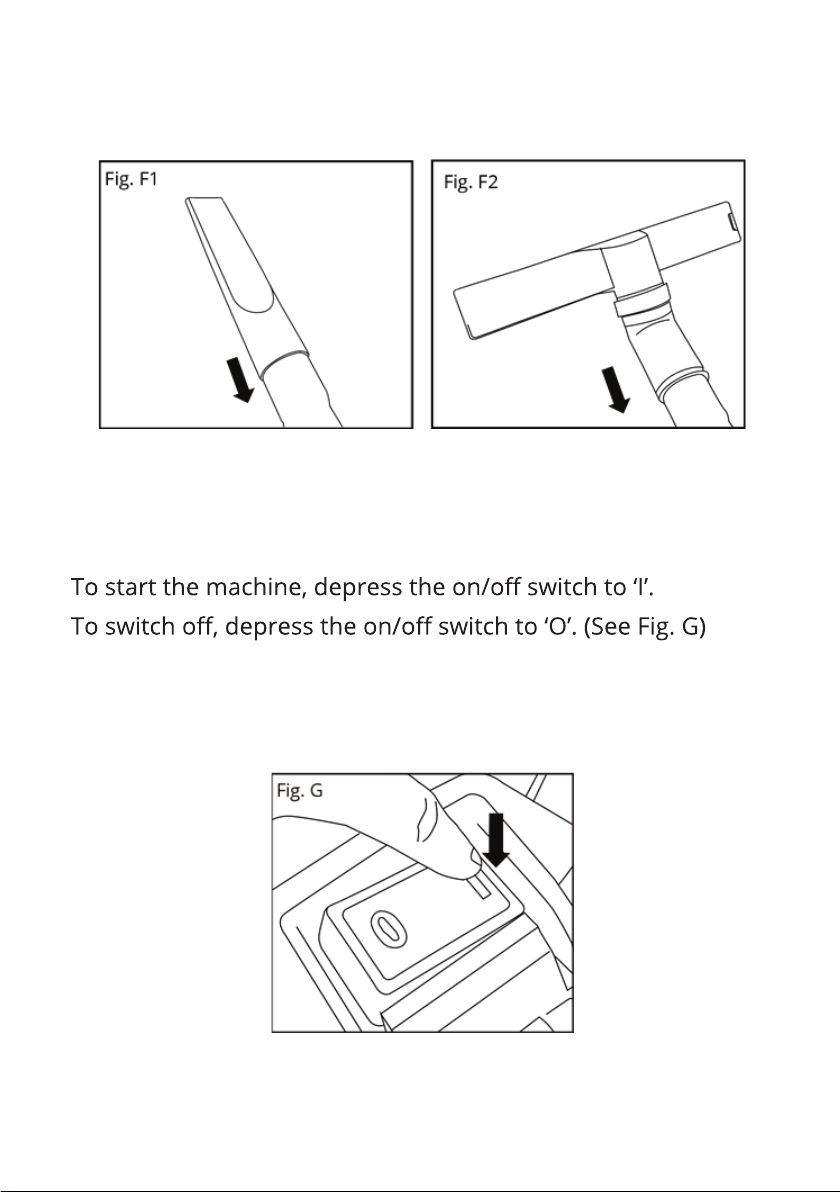
3) For vacuuming, either the floor tool or crevice nozzle can be
added to the end of the telescopic extension tube by simply
pushing them onto the extension tube. (See Fig. F1, F2)
OPERATION
Switching on and off
NOTE: When the maximum filling capacity is reached, switch
off the machine immediately. Before opening and emptying,
always pull the plug from the socket.
13
Dry vacuuming
WARNING! DO NOT use the foam filter for dry
vacuuming applications.
NOTE: It is recommended to use paper dirt bag for dry
vacuuming applications, even though the Wet & Dry Vacuum
can normally be used without the paper dirt bag.
1) Ensure the container is completely dry and free from dust
and dirt.
2) Ensure the cloth filter is fitted already. If not, install the
cloth filter first. Ensure you have already fitted the flexible
hose, extension tube, and, if required, the floor tool or crevice
nozzle for dry vacuuming applications.
IMPORTANT: ALWAYS ensure the cloth filter is securely fitted
before starting the vacuum cleaner.
3) Fit the paper dirt bag in the container if required.
NOTE: The paper dirt bag is only for dry vacuum cleaning.
4) Plug the power cord into the mains power outlet and turn
on.
switch.
WARNING! Check the cloth filter regularly for any blockages
which may reduce the suction and cause motor overheating.
Clean the cloth filter (following the cleaning instructions) and
empty the container if required.
WARNING! Check the container regularly and empty the

14
Wet vacuuming
1) Ensure the container is completely dry and free from dust
and dirt.
2) Only use the foam filter for wet vacuuming applications.
Ensure you have already fitted the flexible hose, extension
tubes, and, if required, the floor tool or crevice nozzle for wet
vacuuming applications.
IMPORTANT: Ensure the foam filter is securely fitted before
starting the Vacuum.
3) Plug the power cord into the mains power outlet and turn
on.
switch.
NOTE: When wet vacuuming, the floating safety valve closes
when the maximum tank level is reached. In doing so, the
suction noise of the vacuum will change and become louder.
When this happens, you must switch off the vacuum and
empty the container.
WARNING! The Wet & Dry Vacuum is not suitable for the
vacuuming of combustible liquids; danger of explosion
and fire! Do not vacuum flammable or explosive fluids; for
example, petrol, oil, alcohol, solvents. Do not vacuum hot or
burning dust. Do not operate the machine in rooms where the
danger of an explosion exists.
6) To empty the container, firstly ensure you are in an area
where you plan to disperse the waste water.
7) Remove the appliance head from the container and empty
the container completely.
15
Blowing function
WARNING!
Wear a dust mask and eye protection (PPE) if blowing creates
dust that might be inhaled.
Keep bystanders clear from blowing debris.
CAUTION: Any material left in the container may be blown
out, causing injury.
1) Make sure the container is empty and completely dry
before using it as a blower.
2) Fit the flexible hose to the flexible blow hose outlet.
3) Attach extension tube if required.
4) Before turning ON, ensure you are firmly holding the end of
the flexible hose, or extension tube if added.
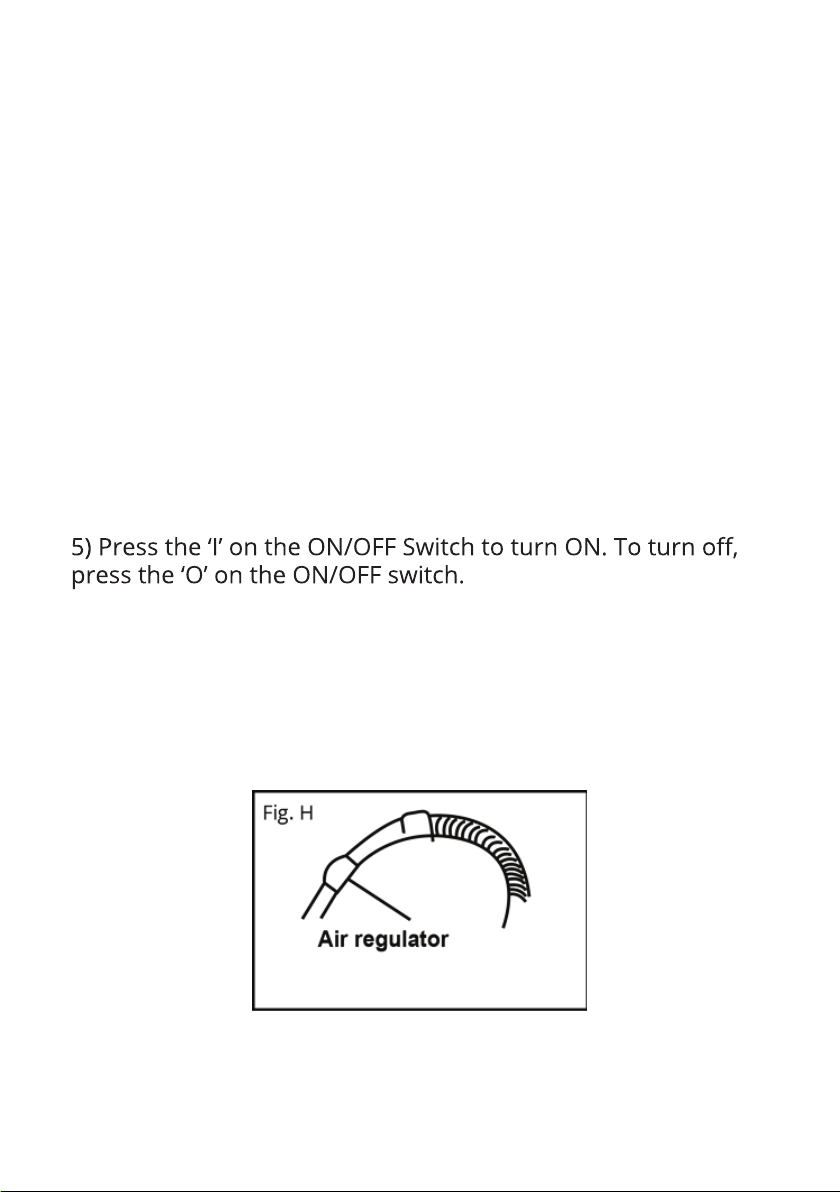
Air regulation
The air flow can be adjusted when the air regulation handle is
connected. Slide the air block as needed to adjust the air flow
(Fig. H).

16
MAINTENANCE AND STORAGE
IMPORTANT:
Make sure that the tool has been thoroughly cleaned
before storing it in a clean, dry and safe place, out of
the reach of children.
1. Switch the product 'OFF' and disconnect it from the power
supply before transporting it anywhere.
2. Always carry the product on its gripping surfaces.
3. Protect the product from any heavy impact or strong
vibrations which may occur during transportation in
vehicles.
4. Secure the product to prevent it from slipping or falling
over.
TECHNICAL DATA
Model ZD110P-20L-1200W
Max. vacuum pressure 17kPa
Max. air flow
Container volume 20L
Protection class
Weight 5.7kg

17
RECYCLING AND DISPOSAL
Waste electrical products should not be disposed with
household waste. Please recycle where facilities exist.
Check with your local authority or retailer for recycling
advice.
UK PLUG
instructions below.
IMPORTANT: The wires in the mains lead are coloured
in accordance with the following code: Blue–Neutral,
Brown–Live.
WARNING! Never connect live or neutral wires to the
As the colours of the wire in the mains lead of this product
may not correspond with the coloured markings identifying
the terminals in your plug, proceed as follows: The blue wire
must be connected to the terminal marked N or coloured
black. The brown wire must be connected to the terminal
marked L or coloured red.

18
GETTING HELP
Our dedicated UK-based customer helpline is open 7 days a
week to assist you with assembly, parts queries and technical
are here to get you back enjoying your garden in no time.
For useful assembly, starting and maintenance videos, and
ordering spares, please visit www.coreservice.co.uk.
WARRANTY
This product is covered by a 1 year warranty.
The warranty covers any manufacturing defect in materials,
Any claim under this warranty must be made by going to your
nearest Homebase store, taking your proof of purchase with
you, and claims must be made within 12 months of the date
of purchase.
possible, or a replacement or a refund. Your statutory rights
under the Consumer Rights Act 2015.
This warranty is given by HHGL Limited, MK9 1BA; HHGL (ROI)
Limited, D02 X576.
Please note: This warranty does not apply to products
misused or neglected and only covers domestic use. It does
not apply to commercial use of the product. In addition, the
warranty will be void for the following reasons: Any damage
resulting from product misuse or product neglect.
Other manuals for ZD110P-20L-1200W
1
This manual suits for next models
1
Table of contents
Other Sovereign Vacuum Cleaner manuals


