SOYO SY-K7VLM-B User manual

SY-K7VLM-B
Motherboard
Quick Start Guide
Hardware
Installation
Quick BIOS
Setup
Introduction
The SOYO CD

SOYO™
2
SY-K7VLM-B Motherboard
Socket 462 for AMD
®
Athlon/Duron
TM
processors
VIA VT8364 AGP/PCI Motherboard
200 MHz Front Side Bus supported
Micro ATX Form Factor
Copyright © 2001 bySoyo Computer Inc.
Trademarks:
Soyo is the registered trademark of Soyo Computer Inc. All trademarks are the properties of
their owners.
Product Rights:
All names of the product and corporate mentioned in this publication are used for identification
purposes only. The registered trademarks and copyrights belong to their respective companies.
Copyright Notice:
All rights reserved. This manual has been copyrighted by Soyo Computer Inc. No part of this
manual may be reproduced, transmitted, transcribed, translated into any other language, or
stored in a retrieval system, in any form or by any means, such as by electronic, mechanical,
magnetic, optical, chemical, manual or otherwise, without permission in writing from Soyo
Computer Inc.
Disclaimer:
Soyo Computer Inc. makes no representations or warranties regarding the contents of this
manual. We reserve the right to amend the manual or revise the specifications of the product
described in it from time to time without obligation to notify any person of such revision or
amend. The information contained in this manual is provided to our customers for general use.
Customers should be aware that the personal computer field is subject to many patents. All of
our customers should ensure that their use of our products does not infringe upon any patents. It
is the policy of Soyo Computer Inc. to respect the valid patent rights of third parties and not to
infringe upon or to cause others to infringe upon such rights.
Restricted Rights Legend:
Use, duplication, or disclosure by the Government is subject to restrictions set forth in
subparagraph (c)(1)(ii) of the Rights in Technical Data and Computer Software clause at
252.277-7013.
About This Guide:
This Quick Start Guide can help system manufacturers and end users in setting up and installing
the Motherboard. Information in this guide has been carefully checked for reliability; however,
to the correctness of the contents there is no guarantee given. The information in this document
is subject to amend without notice.
For further information, please visit our Web Site on the Internet. The address is
"http://www.soyo.com.tw".
K7VLM-B Serial - Version 1.0 - Edition: January 2001
*Thesespecificationsaresubjecttoamendwithoutnotice

SY-K7VLM-B
Quick Start Guide
3
Introduction
1
1
Introduction
Congratulationsonyourpurchaseofthe
SY-K7VLM-B
Motherboard.ThisQuickStartGuide
illustratesthestepsforinstallingandsettingupyournewMotherboard.
ThisguideprovidesalluserswiththebasicstepsofMotherboardsettingandoperation.For
furtherinformation,please refertothe SY-K7VLM-BMotherboardUsers’Guidethatcame
withyourMotherboard.
Unpacking
WhenunpackingtheMotherboard,checkforthefollowingitems:
u
TheSY-K7VLM-BVT8364AGP/PCIMotherboard
u
TheQuickStartGuide
u
TheInstallation CD-ROM
u
SOYOBonusPackCD-ROM
u
OneIDEDeviceATA66FlatCable
u
OneFloppyDiskDriveFlatCable
u
OneHeatSinkCompound

SY-K7VLM-B Quick Start Guide
4
Introduction
SY-K7VLM-B Motherboard Layout
USB 1
USB 2
PS/2 KB
Connector
PS/2 Mouse
Connector
PCI2
3V
Lithium
Battery
IDE 2
1
IDE 1
1
FLP
ATX Power
LINE-OUT
LINE-IN
MIC JACK
GAME
PCI3
Intel
82802AC
JP10
WOL
Header
3
1
SIRCON
1
5
1
USB3_4
1
1
5
5
CPUFAN1
1
1
CHAFAN1
PRT
COM A
VGA
DIMM 1
DIMM 2
CDIN1
141
4
PHOIN
AUXIN
14
VT82C686B
CHAFAN2
1
CPUFAN2
1
PCI1
1
3
JP5
Jumper
CMOSClear
Flash BIOS
Speaker
_
+
_
+
_
+
Reset
PWRBT
Power LED
HDD LED

SY-K7VLM-B
Quick Start Guide
5
Introduction
Key Features
Ø
SupportsSocketA(Socket462)
AMD
®
processors
Athlon(750MHz~1.2+GHz)
/Duron
(600MHz~850+MHz)
Ø
Supports100MHzFrontSideBus
Frequency
Ø
PC99,ACPI
Ø
UltraDMA33/66/100(ATA
33/66/100)
Ø
SupportsWake-On-LAN(WOL)
Ø
Power-onbymodemandalarm
Ø
Supportsonboardhardware
monitoring
Ø
Supportsmultiple-bootfunction
Ø
3x32-bitbusmasteringPCIslots
Ø
4xUSBportsonboard(USB3/4)
Ø
1xIrDAport
Ø
ATXpowerconnector
Ø
Y2KCompliant
Ø
SupportFOC(FanOffControl)
function

SY-K7VLM-B Quick Start Guide
6
Hardware
Installation
2
2
Installation
ToavoiddamagetoyourMotherboard,pleasefollowthesesimpleruleswhile
handlingthisequipment:
l
BeforehandlingtheMotherboard,groundyourselfbytouchingontoanunpainted
portionofthesystem'smetalchassis.
l
RemovetheMotherboardfromitsanti-staticpackaging.Holdthemotherboardbythe
edgesandavoidtouchingitscomponents.
l
ChecktheMotherboardfordamage.Ifanychipappearstobeloose,presscarefully
toseatitfirmlyinitssocket.
Followthedirectionsinthis sectionwhichisdesignedtoguideyouthroughaquickand
correctmethodtoinstallyournew
SY-K7VLM-B
Motherboard.Fordetailedinformation,
pleaserefertotheSY-K7VLM-BMotherboardUser'sguideandTechnicalReference online
manualonintheCD-ROMpackagethatcamewithyourMotherboard.
Gatherandprepareallnecessarycomponentstocompletetheinstallationsuccessfully:
u
AMD® Socket462 processor with built-in CPU cooling fan (boxed type)
u
SDRAM module(s)
u
Computer case with adequate power supply unit
u
Monitor
u
PS/2 Keyboard
u
Pointing Device (PS/2 Mouse)
u
Speaker(s) (optional)
u
Disk Drives: HDD, CD-ROM, Floppy drive…
u
External Peripherals: Printer, Plotter, and Modem (optional)
Note: 1.
Ifyouwanttouseanexternalspeakerconnectedto"Line-out"port,pleasemake
suretousean"amplifiedspeaker"thatcangenerateproperoutputsoundvolume.

SY-K7VLM-B
Quick Start Guide
7
Hardware
Installation
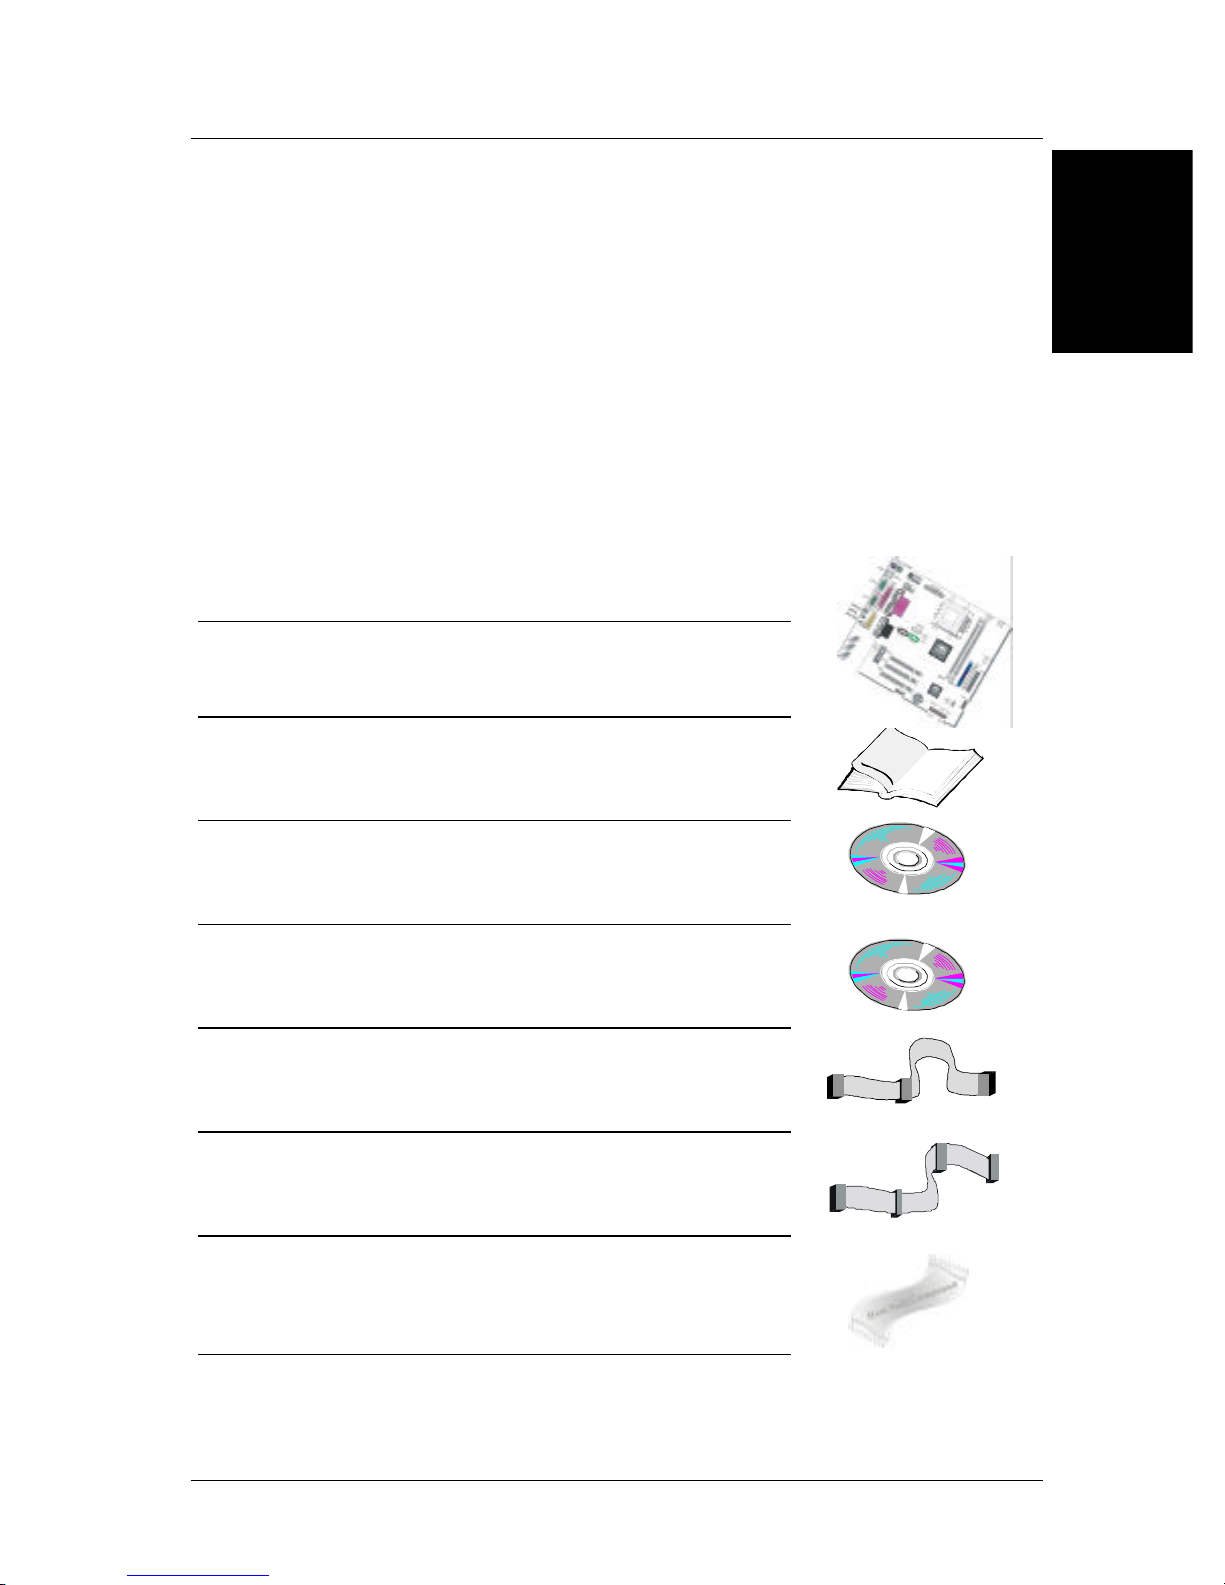
Install the Motherboard
Toperformtheinstallationofyournew
SY-K7VLM-B
Motherboard,followthestepsbelow:
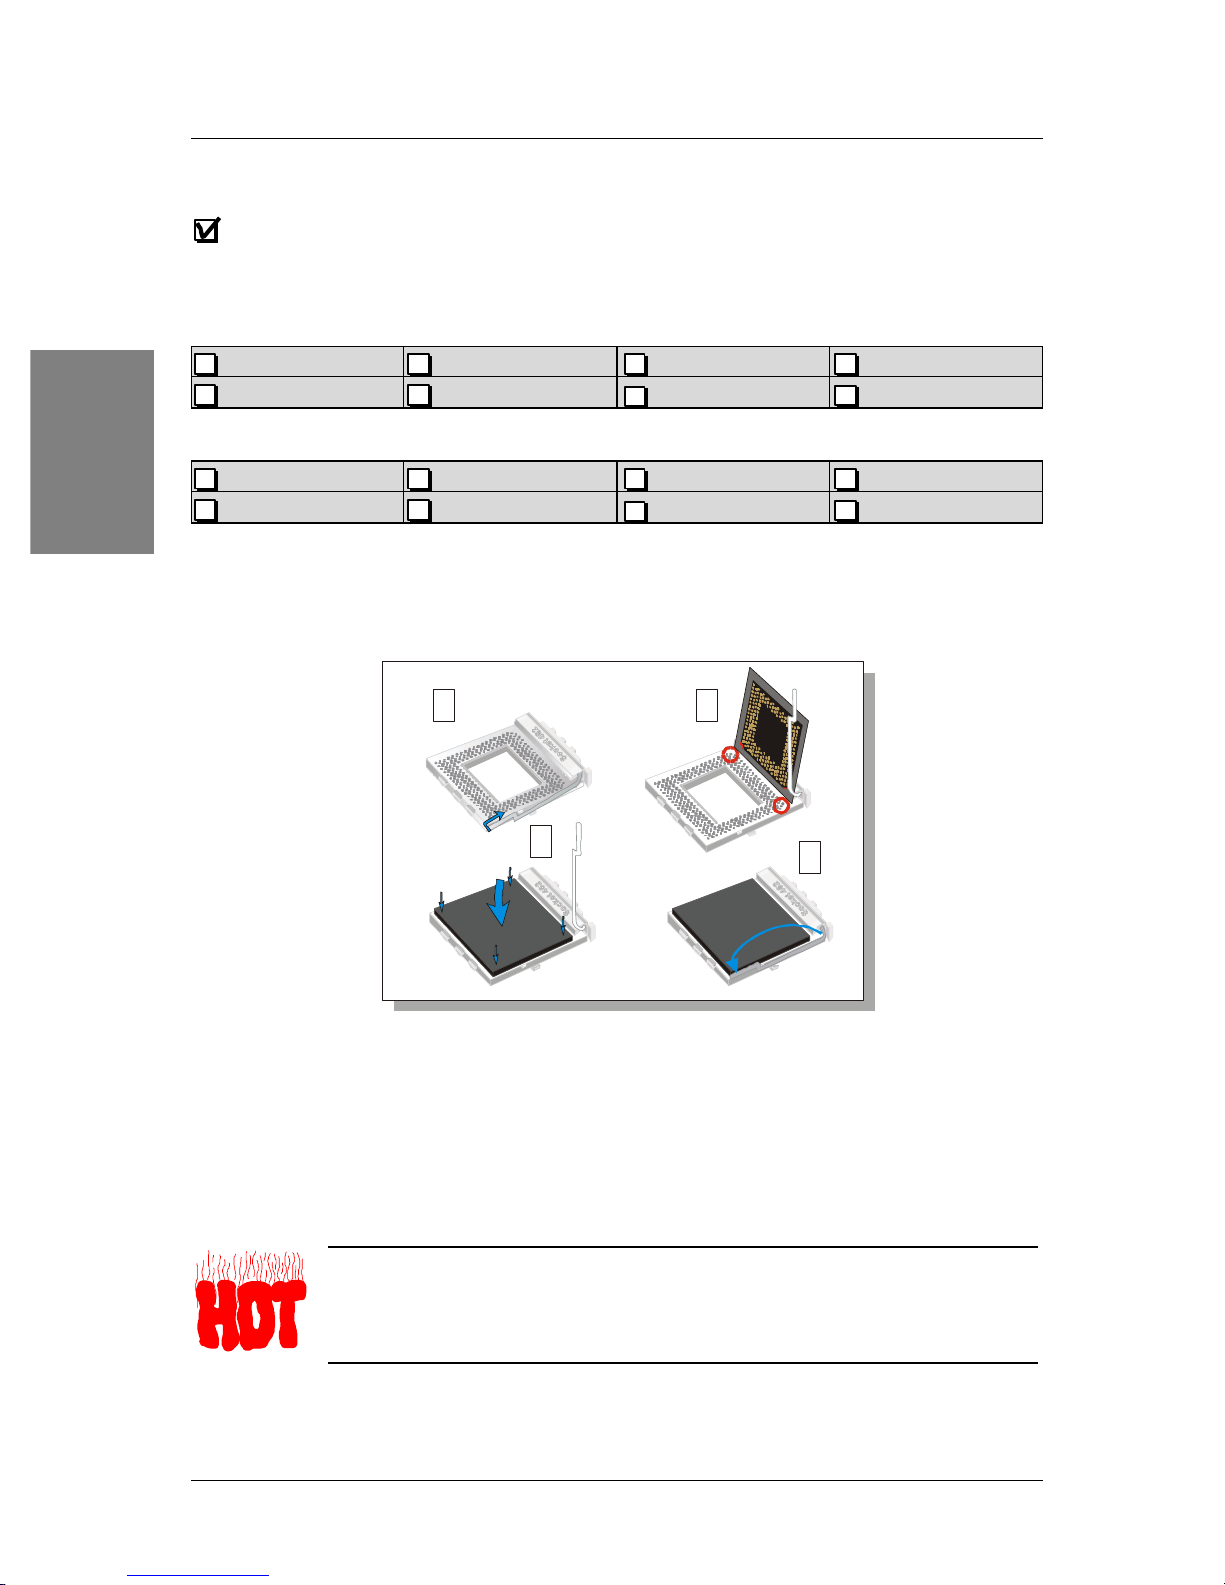
Step 1. CPU Installation
FOC ( Fan-Off Control )
The newly designed SOYO “FOC”is based on the concept of total protection for CPU,
which is very different from currently seen on the market. The H/W control function is used to
see a passive security system of monitoring and warning. “FOC”, designed by SOYO, gives
emphasis on the concept of total protection. S/W Simultaneous Signal Follow-ups techniques
and Auto Power Off System are included to prevent all possible damage caused by the MAL-
functioning of the CPU fan. With the help of “O/S On Time Monitoring And Warning”function,
provided by the H/W monitoring system, the double-protection purpose is achieved.
“FOC”includes the following functions:
(1) Simultaneous Signal Follow Ups: Before the system enters the O/S, H/W will detect the
signals of the CPU fan pins, get their revolution information and send it to the
BIOS.
(2) Auto Power Off System: If the BIOS gets the information of CPU fan revolution, it goes
on working normally. If not, it will inform the system and have the power supply
disconnected immediately. Thus, the CPU is protected from over heating.
Note:The following must be observed to secure the normal functioning of “Fan-Off Control”:
1. CPU fan with sensor pins must be used.
2. CPU fans approved by AMD are strongly recommended.
3. The “HOT KEY”function is provided for the CPU fans without sensor pins, to avoid
the power off. Users may press the “Insert”key to jump over the “Power Off”mode;
go to the BIOS and disable “FOC”. Now system can be booted normally.
4. The power connector of the CPU fan must be connected to the specified “CPU Fan
Connector”on the motherboard to secure the normal functioning of the system.
We provide the following User-Friendly protection features:
1.Fan-Off Control :The motherboard detects the status of the CPU fan and protects the
CPU by automatically disconnecting the power supply. The default value of this
function is Enable. After booting up, the user may disable it.
2.CPU Socket Sticker :Users will find a sticker on the CPU socket, which reminds
them of the correct usage of the K7 CPU.
3. Heat Dissipation Paste:Heat Dissipation Paste is included for all Socket-A
motherboards, to enhance the heat dissipation capability.
Furthermore, we strongly recommend our users to enable the function of H/W monitoring in the

SY-K7VLM-B Quick Start Guide
8
Hardware
Installation
BIOS. This function, together with the FOC, provide the total protection to the CPU and allow it
to maximize its performance.
MarkyourCPUFrequency:
Recordtheworking frequency ofyourCPUthat
shouldbeclearly marked ontheCPUcover.
FSB200MHz (Athlon/Duron)
Athlon
750MHz(100x7.5) 800MHz(100x8.0) 850MHz(100x8.5) 900MHz(100x9.0)
950MHz(100x9.5) 1000MHz (100 x 10.0) 1.1GHz(100x 11.0) 1.2GHz(100x 12.0)
Duron
600MHz(100x6.0) 650MHz(100x6.5) 700 MHz(100x7.0) 750MHz(100x7.5)
800MHz(100x8.0) 850MHz(100x8.5)
CPU Mount Procedure:
TomounttheAMD
®
&Athlon/Duron
TM
processorthatyou
havepurchasedseparately,followtheseinstructions.
1.
Liftthesockethandleuptoaverticalposition.
2.
AlignthebluntedgeoftheCPUwiththematchingpinholeedgeonthesocket.
3.
Seattheprocessorinthesocketcompletelyandwithoutforcing.
4.
ThenclosethesockethandletosecuretheCPUinplace.
RemembertoconnecttheCPUCoolingFantotheappropriatepower
connectorontheMotherboard. Thefanis akeycomponentthatstabilizesthe
system.Itpreventstheequipmentfromoverheatingandprolongsthelifeof
yourCPU.
1
1
3
4
2

SY-K7VLM-B
Quick Start Guide
9
Hardware
Installation
Speaker
_
+
_
+
_
+
Reset
PWRBT
Power LED
HDD LED
Step 2. Connections to the Motherboard
ThissectiontellshowtoconnectinternalperipheralsandthepowersupplytotheMotherboard.
TheinternalperipheralsconsistofIDEdevices(HDD,CD-ROM),FloppyDiskDrive,Chassis
Fan,FrontPanelDevices(InternalSpeaker,ResetButtonandIDELEDSwitch.),Wake-On-
LANcard,VGAcard,SoundCard,andotherdevices.
FormoredetailsonconnectinginternalandexternalperipheralstoyournewSY-K7VLM-B
Motherboard, pleaserefer to SY-K7VLM-BMotherboardUser'sGuideandTechnical
ReferenceonlinemanualontheCD-ROM.
Connectors and Plug-ins
Standard IrDA (Infrared Device Header):
SIRCON Wake-On-LAN Header: JP10
Pin1 Pin2 Pin3 Pin4 Pin5 Pin1 Pin2 Pin3
VCC NC IRRX GND IRTX 5VSB GND MP-Wakeup
USB3_4: USB3 USB3_4: USB4
Pin1 Pin2 Pin3 Pin4 Pin6 Pin7 Pin8 Pin9 Pin10
Power Data(-) Data(+) GND Power Data(-) Data(+) GND GND
CPU Cooling Fan:
CPUFAN CPU Cooling Fan:
CPUFAN2 Chassis Fan: CHAFAN1
Pin1 Pin2 Pin3 Pin1 Pin2 Pin3 Pin1 Pin2 Pin3
GND 12V SENSOR GND 12V NC GND 12V SENSOR
CDLine-in:CDIN1Pin1 Pin2 Pin3 Pin4
ConnecttheCDLine-incordfromtheCD-ROMdeviceto
thematchingheaderCDIN1 LG G R
Power LED
Pin1 Pin2 Pin3
5V NC GND
Speaker
Pin1 Pin2 Pin3 Pin4
5V NC NC Speakerout
HDD LED PWRBT RESET
Pin1 Pin2 Pin1 Pin2 Pin1 Pin2
LEDAnode LED Cathode Power On/Off GND Power Good GND
ATXPOWER On/Off :PWRBT
Connect your power switch to this header (momentary switch type).
To turn off the system, please press this switch and hold down for longer than 4
seconds.

SY-K7VLM-B Quick Start Guide
10
Hardware
Installation
ATXPower Supply: ATXPW
AttachtheATXPowercabletothisconnector.(ThismotherboardrequiresanATXpowersupply,anAT
powersupply canNOTbeused.)
WhenusingthePower-OnbyPS/2Keyboardfunction,pleasemakesuretheATXpowersupplyisableto
provideatleast720mAonthe5VStandbylead(5VSB)inordertomeetthestandardATXspecifications.
Step 3. Configure Memory
YourboardcomeswithtwoDIMMsockets,providingsupportforupto1GBofmainmemory
usingunbufferedandregisteredDIMMmodulesfrom32MBto512MB.PC100/133DIMM
moduleisrequiredonthismotherboard.
Memory Configuration Table
Number of Memory Modules DIMM 1 DIMM 2
RAM Type SDRAM/ VCM SDRAM
Memory Module Size (MB) 32/64/128/256/512 MB
CMOS Clear (JP5)
InsomecasestheCMOSmemorymaycontainwrongdata,followthestepsbelowtoclear
CMOSmemory.
1.
Clearthe CMOSmemory by momentarilyshorting pin2-3on jumperJP5. Thisjumper
canbeeasilyidentifiedbyitswhitecoloredcap.
2.
Thenputthejumperbackto1-2toallowwritingofnewdataintotheCMOSmemory.
CMOS Clearing Clear CMOS Data Retain CMOS Data
JP5Setting Shortpin 2-3for
atleast 5 secondsto
clearthe CMOS
Shortpin 1-2to
retain new settings
Note: You must unplug the ATX power cable from the ATX power connector when
performing the CMOS Clear operation.
123
123

SY-K7VLM-B
Quick Start Guide
11
Quick BIOS
Setup
3
3
Quick BIOS Setup
ThisMotherboarddoesnotrequireanyhardwarejumperstosettheCPUoperating
frequency.
Aftercompletionofhardwareinstallation,turnthepowerswitchon,thenpressthe
<DEL>
keywhile
thesystemdiagnosticischeckingtoentertheAwardBIOSSetupprogram.TheCMOSSETUP
UTILITYwillbedisplayedonscreen.ThenfollowthesestepstoconfiguretheCPUsettings.
Step 1. Select [Standard CMOS Features]
Set[Date/Time]and[Floppydrivetype],thenset[HardDisk Type]to “Auto”.
Step 2. Select [Load Optimized Defaults]
Selectthe“LoadOptimizedDefaults”menuandtype“Y”attheprompttoloadtheBIOS
optimalsetup.
Step 3. Select [SAVE & EXIT SETUP]
Press
<Enter>
tosavethenewconfigurationtotheCMOSmemory,andcontinuewiththe
bootsequence.

SY-K7VLM-B
Quick Start Guide
12
The SOYO CD
4
4
The SOYO CD
The SOYO-CD will NOT autorunifyou use itonanOperatingSystem other
thanWindows9xor NT.
YourSY-K7VLM-BMotherboardcomeswithaCD-ROMlabeled"SOYOCD."TheSOYO
CDcontains(1)theuser'smanualfileforyournewMotherboard,(2)thedriverssoftware
availableforinstallation,and(3)adatabaseinHTMLformatwithinformationonSOYO
Motherboardsandotherproducts.
Step 1. Insert the SOYO CD into the CD-ROM drive
IfyouuseWindowsNT,theSOYO-CDwillnotdetectyourmotherboardtype.Inthatcase
thefollowingdialogwillpopup,pleasechooseyourmotherboardandpressOK.Nowthe
SOYO-CDStartUpMenuwillbeshown.
(SOYO CDStart UpProgram Menu)
IfyouuseWindows95or98,theSOYOCDStart UpProgramautomaticallydetects
whichSOYOMotherboardyouownanddisplaysthecorrespondingmodelname.
7IWA-F
7IWA-F V1.0
6IWM/L
6IWM
6IWA
LI-7000
7IWB
7IWB V1.0
7IWM
7IWM/L V1
Please Select Your Board
OKCancel
X

SY-K7VLM-B
Quick Start Guide
13
The SOYO CD
Theuser'smanualfilesincludedontheSOYOCDareinPDF(PostscriptDocument)
format.InordertoreadaPDFfile,theappropriateAcrobatReadersoftwaremustbe
installedinyoursystem.
Note:
TheStartUpprogramautomaticallydetectsiftheAcrobatReaderutilityisalready
presentinyoursystem,andotherwisepromptsyouonwhetherornotyouwanttoinstallit.
YoumustinstalltheAcrobatReaderutilitytobeabletoreadtheuser'smanualfile.Follow
theinstructionsonyourscreenduringinstallation,then oncetheinstallationiscompleted,
restartyoursystemandre-runtheSOYOCD.
Step 2. Install Drivers and Utilities
Clickthe
Install Drivers
buttontodisplaythelistof driverssoftwarethatcanbeinstalled
withyourMotherboard.TheStartUpprogramdisplaysthedriversavailableforthe
particularmodelofMotherboardyouown.Werecommendthatyouonlyinstallthose
drivers.

SY-K7VLM-B
Quick Start Guide
14
The SOYO CD
(DriverInstallationMenu)
A short description of all available drivers follows:
ØVIA 4in1 driver package for Win 9x/NT
The4in1driverpackageincludesalldriversyourmotherboardneeds.Afterselectingthis
driverpackage,onedriverwillbeinstalledautomatically(theIRQ remappingutility),the
otherthreeareinstalledifselected.By defaultallthreedriversareselected.Adescriptionof
the4driversfollows:
Bus Master PCI IDE Driver
Thisdriverwillspeedupthedata-transferratetoandfromthe harddisk.
VxD Driver
Thisdrivermustbeinstalledinordertobeabletomakeuseoftheon-boardAGP
Videofunctionality.
VIAChipset Functions Registry
ThisdriverwillmakethenecessarychangestotheWindowsregistry,inorderto
makesurethatWindowshasnoproblemsrecognizing yourVIAchipset.
IRQremappingutility(Thisdriveris installed automatically)
ThisutilitywillremaptheIRQlinestomakesurethateverythingfunctionsproperly
underWindows.
ØVIA8365 Pro Savage Display Driver for Win 9x/Me
InordertobeabletomakeuseoftheintegratedVGAfunctioninyourVIAS3chipset,you
willneed toinstallthisdriverfirst. ForWin9x/Meonly.
ØVIA8365 Pro Savage Display Driver for Win 2000
InordertobeabletomakeuseoftheintegratedVGAfunctioninyourVIAS3chipset,you
willneed toinstallthisdriverfirst. ForWin2000only.
driverrevision:
VIA 4 in 1 driver package for Win 9x/NT
VIA8365 Pro Savage Display Driver for Win 9x/Me
VIA8365 Pro Savage Display Driver for Win 2000
VIA8365 Pro Savage Display Driver for Win NT4.0
VIA Ac97 Codec Driver for Win 9x/NT/2000
VIA hardware monitor(R) for (Win 95/98)
CancelOK

SY-K7VLM-B
Quick Start Guide
15
The SOYO CD
ØVIA8365 Pro Savage Display Driver for Win NT4.0
InordertobeabletomakeuseoftheintegratedVGAfunctioninyourVIAS3chipset,you
willneed toinstallthisdriverfirst. ForWinNT4.0only.
ØVIA Ac97 Codec Driver for Win 9x/NT/2000
YouhavetoinstallthedriversbeforeinstallinganyapplicationfortheAc97 codec.
ØVIA hardware monitor(R) for (Win 95/98)
YourmotherboardcomeswithahardwaremonitoringIC.Byinstallingthisutility
Temperature,FanspeedandVoltages canbemonitored.Itisalsopossibletosetalarms
whencurrentsystemvaluesexceedorfallbelowpre-setvalues.
Selectwhichdriveryouwanttoinstallandclick
OK,
orclick
Cancel
toabortthedriver
installationandreturntothemainmenu.
Note:
Onceyouhaveselectedadriver,thesystemwillautomaticallyexittheSOYOCDto
beginthedriverinstallationprogram.Whentheinstallationiscomplete,mostdrivers
requiretorestartyoursystembeforetheycanbecomeactive.
Step 3. Check the Latest Releases
Clickthe'CheckthelatestReleases'buttontogotheSOYO Websitetoautomaticallyfind
thelatestBIOS,manualanddriverreleasesforyourmotherboard.Thisbuttonwillonly
workifyourcomputerisconnectedtothe internetthroughanetworkormodem
connection.Makesuretogetyourmodemconnectionupbeforeclickingthisbutton.
(*InternetExplorerisaMicrosoftTrademark)

SY-K7VLM-B
Quick Start Guide
16
Quick Trouble shoot tips
Video (no display) related issues
I built a new computer system using a Soyo board and nothing happens when
turning it on, no video and no beeps from the PC speaker. What is happening
and how can it be fixed?
No screen and no beeps mean that your CPU and motherboard do not work at all. It
could be that the CPU is not seated correctly or that a component on the M/B is
grounded (shorted) with the case. Also make sure to check the voltage setting
switch (110V/220V) on the back of the power supply. To isolate the problem do
the following:
1. Press and hold down on the “Ins”(insert) key while turning on the computer
until you get video. If you do not get video then,
2. Double-check jumpers setting on you motherboard and remove all add-on
cards, unplug all hard-disk and floppy-disk drive cables and see if you can hear
some beeps. If you still do not get any beeps, then try putting the motherboard on
the table (to isolate it from the case) with the CPU and speaker only, and give it one
more try.
BIOS Issues
Where can I find the BIOS revision of my mainboard?
It will be displayed on the up-left corner on the screen during boot-up. It will show
as your board type followed by the revision number, such as 5EH_2CA1 (meaning
revision 2CA1 for the SY-5EH board) or 6BA+ IV_2AA2 which means SY-6BA+
IV motherboard with 2AA2 bios.
Where can I find the latest BIOS of my motherboard?
Please go to the technical support page of one of the SOYO websites (Taiwan:
www.soyo.com.tw), and look up your motherboard to find the latest BIOS
revision.
Hard disk, floppy drive, CD-ROM etc
When I boot up my new computer I got "floppy boot failure" and the LED on
the floppy stays on
Make sure the red wire of floppy ribbon cable goes to Pin1 on the floppy drive side
(don't trust the "key lock" or "notch") and use the end-connector of the cable (don't
use middle one).

SY-K7VLM-B
Quick Start Guide
17
Modem issues
I have installed my modem drivers several times and I still cannot get my
modem to work. Why?
If you are sure that the modem driver has been installed correctly, then you need to
install the south bridge driver from the SOYO CD, this is because Windows does
not properly recognize relatively new chipsets.
Audio Issues
I do not get any sound from my sound card. What could be wrong?
Please make sure the speaker is connected to the speaker out port on your sound card.
In Device Manager, I keep getting yellow exclamation signs on my sound port
even though I have installed my sound driver several times and I could not get
my sound card to work. What is wrong?
It is likely that you did not have the correct driver installed. If you are sure that the
correct sound driver has been installed, then please install the 'south bridge' driver
for the motherboard.
The sound is working in my system, but when I play CD music from the CD-
ROM, I do not get any sound. What is wrong?
This is because the 3-wire audio cable from the CD-ROM to the sound card is not
connected or it is loose.
The sound and everything else works fine except that the recorder and
microphone do not work. What is wrong?
This is because the recorder and microphone in the Windows are not enabled.
Please go to sound properties and enable them.
Lock up (freeze)
When I boot up my system, everything works fine. It sees my CPU and
memory, detects my hard drive, floppy drive and CD-ROM but locks up at
"Verify DMI pool data... ", and it won’t go any further. What should I do?
Please clear the CMOS via JP5 then choose 'load setup default' in the bios and save
the bios and exit. Next, unplug all other add-on cards except the video card and
floppy drive controller, and see if it can boot from floppy. Then put back the
peripherals one by one to identify which one causes the lockup. If you are running a
Cyrix CPU, make sure the 'linear burst function' is enabled in the bios.
I can not get my board to run properly.
Please make sure you have the latest bios and driver from the SOYO web site at:
http://www.soyo.com

SY-K7VLM-B
Quick Start Guide
18
How to contact us:
nIf you are interested in our products, please contact the SOYO sales
department in the region you live.
nIf you require Technical Assistance, please contact our Technical Support in
the region you live.
SOYO prefers Email as communication medium, remember to always add to the
email the country that you live in.
SOYO Taiwan
No. 21 Wu-Kung 5 Rd., Hsin Chuang
City, Taipei Hsien, Taiwan
Region Covered: Taiwan and Asia-
Pacific. (Including Australia).
Web Site: www.soyo.com.tw
Sales:
Tel: 886-2-22903300-318
Fax: 886-2-22983322
E-mail: [email protected]
Technical Support:
Fax: 886-2-22983322
E-mail: [email protected]
SOYO Europe BV
Signaalrood 19, 2718 SH Zoetermeer
The Netherlands
Region Covered: Europe except
Germany and United Kingdom
Web Site: www.soyo.nl, www.soyo-
europe.com
Sales:
Tel: +31-69-3637500
Fax: +31-79-3637575
Email: [email protected]
Technical Support:
Tel : +31-79-3637500
Fax: +31-79-3637575
Email: [email protected]
SOYO USA
41484 Christy Street, Fremont, CA
94538
Region Covered: US and Canada
Web Site: www.soyousa.com,
www.soyo.com
Sales:
Email : sales@soyousa.com
Technical Support:
Support Web Site:
www.soyousa.com/support.htm
SOYO (U.K.) LTD.
Unit 7, Alice Way, Hounslow Business
Park,
Hanworth Road, Hounslow, TW3 3UD
Region Covered: United Kingdom and
Republic of Ireland
Web Site: www.soyo.co.uk
Sales:
Tel : +44 (0)181 569 4111
Fax: +44 (0)181 569 4134
E-mail: [email protected]
Technical Support:
Tel : +44 (0)181 569 4111
Fax: +44 (0)181 569 4134
E-Mail: [email protected]

SY-K7VLM
Quick Start Guide
19
SOYO Deutschland GmbH
August-Wilhelm-Kuhnholz-Str. 15
D-26135 Oldenburg
Region Covered: Germany
Web Site: www.saat.de, www.soyo-
saat.com, www.soyo-saat.de
Vertrieb Mainboards, Notebooks und
SoyoCom Produkte:
E-Mail: [email protected]
Fon: +49-(0)441/20910-31/33
Fax: +49-(0)441/203422
Technischer Support:
E-Mail: [email protected]
Fon: +49-(0)441/20910-40
Fax: +49-(0)441/203422
SOYO KOREA
Region Covered: Korea
Sales:
Tel : 82-2-716-2850
Fax : 82-2-704-2619
E-mail : [email protected]
Technical Support:
tel : 82-2-717-4392
fax : 82-2-712-5853
Web site: www.soyo.co.kr
SOYO Hong Kong
Region Covered: Hong Kong
Web Site: www.soyo.com.hk
Sales:
tel: 852-27109810
fax: 852-27109078
E-mail: [email protected]
Technical Support:
tel: 852-27109810
fax: 852-27109078
E-mail: [email protected]
SOYO China (Gin Mei Jei)
Region Covered: All of China
Sales:
Tel: 86-10-62510089
fax: 86-10-62510388
E-mail: [email protected]
Technical Support:
Tel: 86-10-62510089
fax: 86-10-62510388
E-mail: [email protected]
SOYO Japan
Region Covered: Japan
Web site: www.soyo.co.jp
Sales:
Tel: 81-3-33682188
Fax: 81-3-33682199
E-mail: [email protected]
Technical Support:
Tel: 81-3-33682188
Fax: 81-3-33682199
E-mail: [email protected]

Edition: January 2001
Version 1.0
SY- K7VLM-B
SERIAL
Other manuals for SY-K7VLM-B
1
Table of contents
Other SOYO Motherboard manuals

SOYO
SOYO SY-7IWM-X User manual

SOYO
SOYO SY-6VBA133-B User manual

SOYO
SOYO SY-P4RS350 User manual

SOYO
SOYO 82430 TX P54C Use and care manual

SOYO
SOYO SY-6BA+ Use and care manual

SOYO
SOYO SY-P4I875P DRAGON 2 V1.0 User manual

SOYO
SOYO SY-7IZB+N Use and care manual

SOYO
SOYO SY-P4X400 DRAGON Lite User manual

SOYO
SOYO SY-6BA+ III Use and care manual

SOYO
SOYO SY-6VZA User manual