SP tools SP61073 User manual

USER MANUAL
IMPORTANT
ALL PERSONS WHO ARE TO USE THIS EQUIPMENT MUST THOROUGHLY READ
AND UNDERSTAND THIS INSTRUCTION MANUAL PRIOR TO OPERATION.
SP61073
1600A JUMP
STARTER LI+
COBALT HIGH
DENSITY POWER
BANK
RETAIN THESE INSTRUCTIONS
AND ATTACH RECEIPT TO
MANUAL FOR FUTURE
REFERENCE
NOTE: Proof of purchase must be retained by
the customer as it will be required in the
event of a claim under warranty.
AFTER SALES SUPPORT:
AUSTRALIA: Visit the website’s contact page to get in
touch with your local service department.
WWW.SPTOOLS.COM
INTERNATIONAL:Use the county selector to get in touch
with your service department in your country or region.

2
CONTENTS
Introduction 3
Safety Precautions & Warnings 4
Intended Use 5
Technical Features 5
Technical Specification 6
Operating Instructions 6
Troubleshooting 9
Warranty Details 10

3
INTRODUCTUCTION
This very compact Li+ Cobalt Power Bank, Jump-starter features high density cells designed
to for high current output, making it ideal for the jump-starting petrol or diesel engines up to
10 litres in capacity.
It can also be used to charge most of your portable electronic devices, which can also be a
lifesaver in an emergency situation, just when you need your mobile phone the most.
Suitable for jump starting vehicles fitted with “Lead-acid, AGM / Calcium” or “Gel” type
automotive batteries. The Li+Cobalt Power Bank provides additional battery capacity,
allowing vehicles with low battery voltage, to be started quickly and easily.
The Micro-Processor Controlled Li+Power Bank, with LED display allows users to accurately
monitor the charge status percentage as well as read any warnings displayed due to
incorrect operation.
The SP61073 Li+Cobalt Power Bank, Jump-starter, automatically provides reverse polarity
and short circuit protection, preventing serious battery damage, in the event of miss-
connection.

4
Safety Instructions for Charger & Battery
1. Do not use a damaged appliance. If the
electrical cord of the charger is damaged
have it repaired or replaced by a
qualified repair agent immediately.
2. Do not charge the Li+Cobalt Power Bank, Jump-starter inside a box or container;
place it in a well-ventilated area during charging.
3. Avoid flames and sparks - ensure the area is well ventilated.
4. Do not short the battery or bridge the terminals or clamps with any conductive
materials or use with accessories other than those supplied with this product.
5. Do not expose jump starter to water or rain, make sure you have dry hands when
operating.
6. Ensure you have read the instruction manual in full.
7. This unit is for dry use only, do not expose to rain or excessive dust.
8. Be careful not to drop or strike the Li+Power Bank.
9. Disconnect from 240volt supply before making or disconnecting connections to the
battery.
10.This unit is for jump starting 12volt vehicles only.
11.This appliance is not for use with non-rechargeable batteries.
12.Never charge a frozen battery.
13.The Li+Cobalt Power Bank is for jump starting a vehicle only, it is not intended to be
used in place of a battery or as a battery charger.
14.Store unit in a cool dry environment. Do not expose to temperatures exceeding 60˚C
or below -20˚C
△!
△
!WARNING

5
Intended Use
•Only for use in non-explosive, dry environments.
•Never use or put the unit down in any liquid, oil or water.
As Jump starter: The Li+Cobalt Power Bank is intended for use on 12V vehicles petrol and diesel up
to 10 litres.
As Power supply: The Li+Cobalt Power Bank is intended for use with 19 volt and 12 volt portable
devices.
As Recharging station: The Li+Cobalt Power Bank is intended for recharging or extending
the operating time of portable devices designed to be connect via two 5V/2.1A USB port. eg mobile phones, tablets and cameras etc.
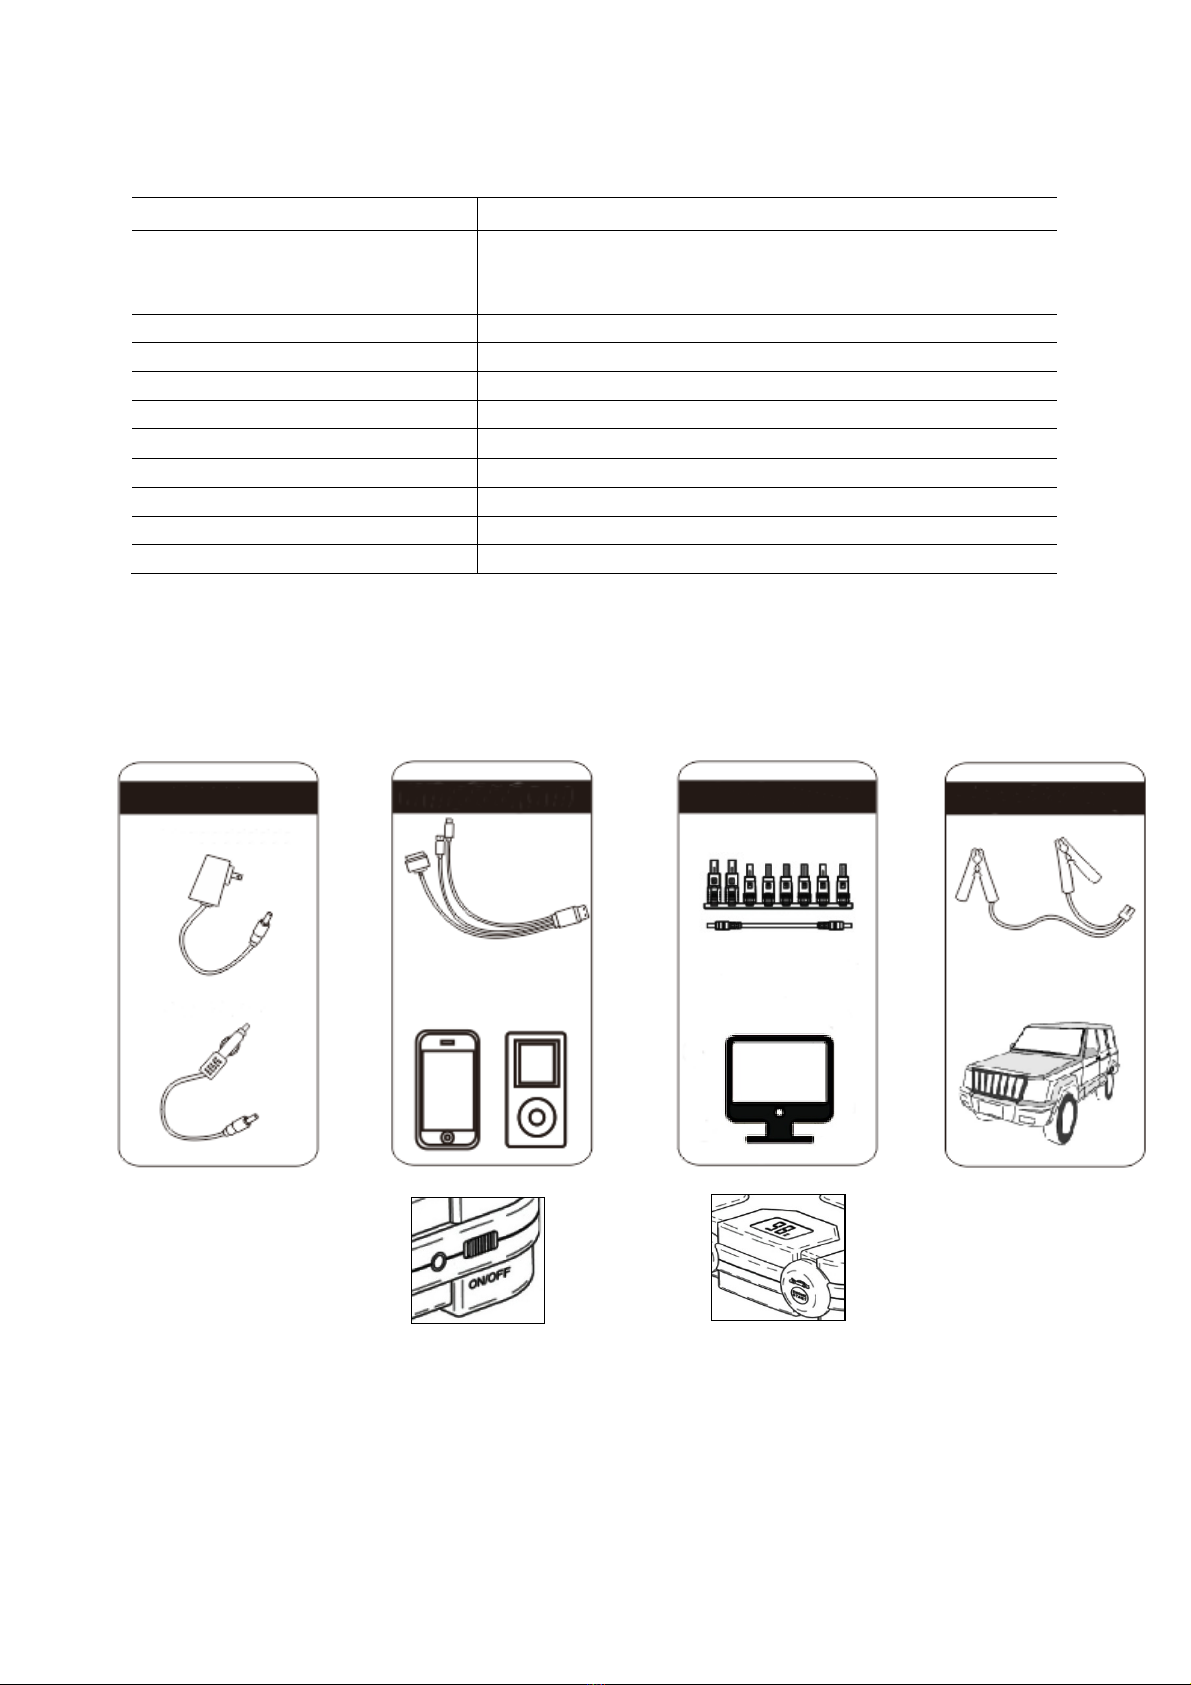
Technical Features:
•Built-in microchip monitoring system saves Li+cells from damage
Reverse polarity
protection
Short circuit, safety feature
Over discharge
protection
Reverse charge protection
Over charge protection
Over temperature protection
•LCD display shows mode, charge percentage & warnings
•LED Torch, Strobe and SOS
•Dust and water resistant
•Auto Power Off
1. LED Display
2. Flashlight
3.Battery terminal socket
4. Flashlight Power Button
5. 19V output, 3.5A
6. 5V output, 2.1A
7. 12V output, 3.5A
8. 18V input, 1.5A
9. Power ON/OFF
6
Technical Specification:
Input:
18V – 1.5A
12V via jump start output port:
12V port:
19V port:
Jumpstart (max clamp opening 45mm)
Power or charge 12V accessories
Power or charge 19V laptops
5V USB 2.1A output:
Mobile phones, Tablets, Cameras etc.
Battery Capacity:
28000mAh
Start Current:
800A
Peak Current:
1600A
Operating Temp:
-20°C ~ +60°C
Full Charge Time:
4 hours (240V wall charge) – 8 hours (12V DC
Lifetime:
>1000 cycles
Dimensions (mm):
183 x 119 x 45 (unit only) / 330 x 275 x 90 (case)
Weight:
1.08kg (unit only) / 2.92kg (when stored in case)
Operation:
How to use:
1. The power display:
Turn the switch to the “ON” position (fig. 1), the LED display (fig. 2) will show the battery
charge percentage of the Li+Power Bank, operation function and warnings (the Li+ Power
Bank requires minimum of 30% charge when jumpstarting your vehicle).
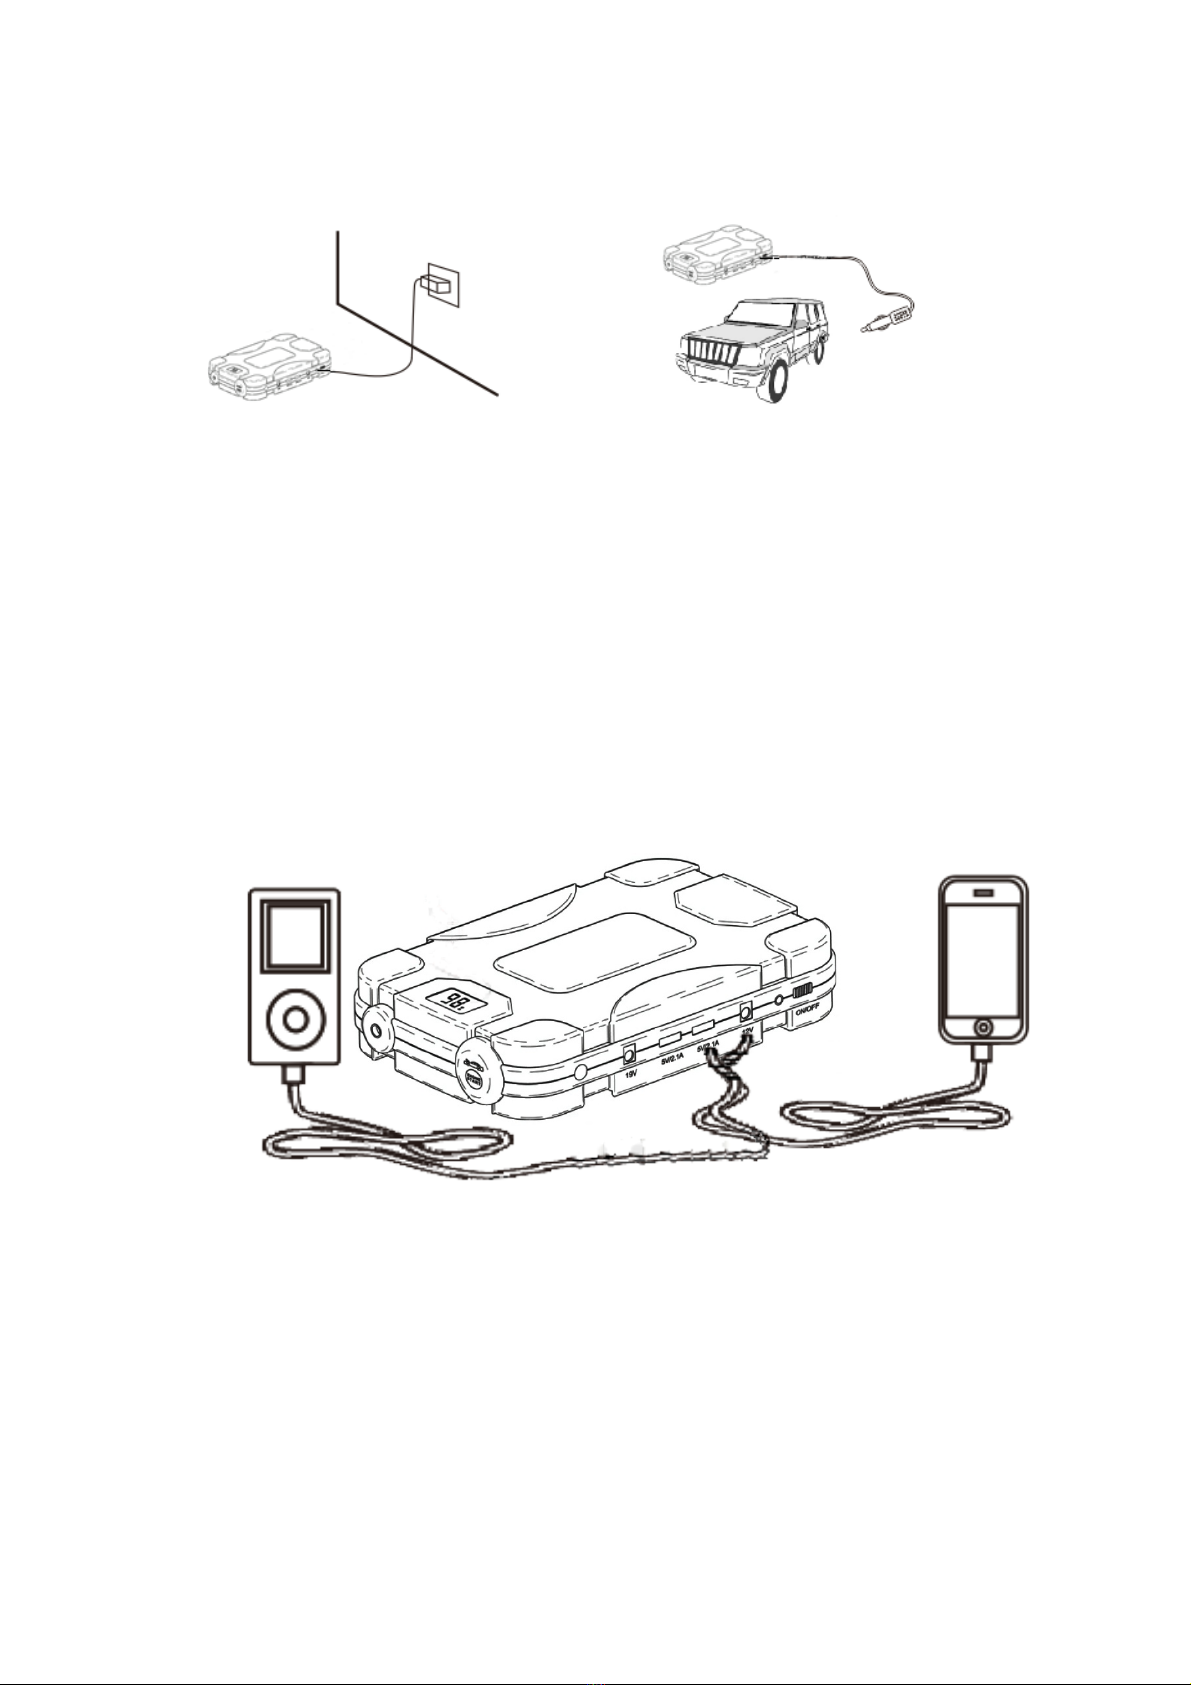
Portable Devices
USB 5V 2.1A Output
Jump Start
Cable with clamps
Laptop
Laptop adaptor
Home Adaptor
Car Adaptor
Charging Jumpstarter
(fig. 1)
(fig. 2)
7
2. Li+Power Bank Charging Instruction:
The Li+Cobalt Power can be connected to home (240v) or car charger (12v), once input
power is connected the display flashes red with the word "IN".
240v charging:
Plug the home adaptor into the 240v power point, next connect to the 18V 1.5A input port
of the Li+Cobalt Power Bank. Once charged the display will show at 100%, disconnect
and remove the home adaptor from the power point.
12v in vehicle charging:
Plug the 12v car adaptor into the 12v socket of the vehicle; next connect the other end of
the adaptor cable to the 18V 1.5A input port of Li+Cobalt Power Bank. When fully charged
the display will show 100%. Disconnect and remove the adaptor from the 12v power
socket of the vehicle.
3. USB Output Charging Cell Phone or Tablet:
Turn the power button to the “ON” position. Insert matching 4 in 1 Mobile Adaptor (or other
USB charging cable) into USB port and attach the device that needs to be charged.

8
4. Power or Charge 12V & 19V Devices / Laptop
Turn the power button to the “ON” position. Insert
the power lead (fig. 3) into the correct output
socket on your Li+Power Bank, you
can choose between 12V 3.5A or 19V
3.5A (fig.4).
Note: To avoid damaging your laptop,
confirm the correct charging/powering
voltage before connecting to the Li+
Power Bank.
For use with a laptop select the correct
power adaptor (fig. 5) to suit the power
input port on your laptop, you can now
connect the laptop to the power lead to
start charging your device.
5. LED flash light:
To activate the LED flashlight, turn the power button to
the “ON” position, next press and hold the Flashlight
Power Button for 3 seconds. To switch between modes, press the switch again to change
to Strobe, press the switch again to change to SOS, press the switch again to turn off the
flashlight.
6. 12V Jump Start:
Jump start 12V vehicle Instruction: Ensure
the Li+Cobalt Power Bank is at least 30%
charged.
1. Insert Jumper leads supplied with Li+Power
Bank into the jump starter output port (next to
the LED light). Turn the power button to the
“ON” position.
2. Connect the RED clamp to the vehicle's
battery positive (+) terminal and connect the BLACK clamp to the vehicle's battery
negative (-) terminal.
3. Turn the ignition key to the first position so that the Li+Power Bank detects a current
draw and activates properly (for push button systems, push the ignition button twice
without depressing the brake to engage the smart cable).
4. When the LED Screen displays a solid Green “8” you have a proper connection and are
ready to start the vehicle. If the LED screen shows a solid red “8” or alternating red/green
“8” refer to the trouble shooting guide on page 9.
5. If the Li+Power Bank displays a solid green “8” you have a proper connection and you
can start the engine. Note: Do not hold the key ON for more than 4 seconds at a time.
Warning: If the engine does not start initially, allow the Li+Power Bank to rest and cool for
at least 30 seconds before any other starting attempts.
(fig. 3)
(fig. 4)
(fig. 5)

9
6. Once the vehicle has started turn the power button to the “OFF” position, remove
jumper cable from Li+Power Bank and disconnect RED and BLACK clamps from the
vehicle battery terminals.
7. Note: Once the engine is running, be sure to allow enough time for the vehicles
alternator to restore charge to the vehicles battery before turning it off again.
7. Troubleshooting
FAULT
CAUSE
REMEDY
LED display shows a solid
red “8” accompanied by
long continuous beeping.
Reverse polarity
connection.
Jumper leads are
connected to the wrong
terminals on the vehicles
battery.
Remove jumper leads from
battery and connect them to
the correct terminals as per
instructions on page 8 of
this owner’s manual.
LED display shows solid red
“8” accompanied by short
continuous beeping.
Short circuit protection.
There is a short circuit
between the jumper leads.
Remove clamps from
vehicle battery, check for
short circuits. If short circuit
is caused by damage to the
jumper leads, discontinue
use until replacement leads
are available.
LED display shows solid red
“8” accompanied by short
fast continuous beeping.
Over-heat protection.
The Li+Power Bank has
become too hot.
Remove clamps from
vehicle battery, Allow the
unit to cool sufficiently
before next use.
LED display shows solid red
“8” accompanied by 2 short
fast beeps.
Over-discharging
protection.
The Li+ Power Bank is low
on charge.
Recharge the Li+ Cobalt
Power Bank.
LED display flashing
Green/Red “8”.
The Li+Power Bank is
searching for a connection.
Ensure battery terminals
are clean (free from
corrosion) and re-check
connections.
All error codes with a solid red “8” being displayed can be reset by turning the Li+ Cobalt
Power Bank off and on.

10
LIMITED WARRANTY
This Limited Warranty applies only to new products* distributed by SP Tools Pty Ltd (“SP Tools”). It is a condition of this Limited
Warranty Policy that the purchaser read the owner’s manual for the product and only use the product to the extent or for the
purposes stated therein. The purchaser must also ensure that all servicing requirements are completed as listed in the owner’s
manual (said servicing is at the owner’s expense). We recommend that all servicing is completed by an authorised service agent and
that records of said servicing are retained by the purchaser as proof in the event of a warranty claim.
Whilst the owner’s manual, packaging, and/or other documentation supplied with SP Tools’ products may provide details in respect
of a Limited Warranty, the terms set out herein supersede these matters, and this Limited Warranty applies in their place. This
warranty is no less advantageous than otherwise described in such other documentation.
SP Tools agrees, subject to the terms and conditions specified below, to repair or replace at SP Tools’ cost, the product purchased by
you when the product does not perform in accordance with its specifications during the limited warranty period, due to any fault in
manufacturing, materials and/or workmanship. SP Tools is not liable to repair or replace products that the purchaser uses in a
manner that is inconsistent with the owner’s manual or in the circumstances set out in paragraphs 1.1 – 1.7 below.
The benefits to the purchaser under this warranty are in addition to other rights and remedies under the Competition and Consumer
Act 2010 (Cth). The limited warranty period, within which a defect in the product must appear, commences from the date of
purchase and ceases on expiration of the specified term below.
THE LIMITED WARRANTY PERIOD
• SP Speciality Tools – 12 Months
THE PURCHASERS ATTENTION IS DRAWN TO THE FOLLOWING
To the extent permitted by law and subject to this Limited Warranty, and as part of the terms of the sale of the equipment or part
thereof: SP Tools shall not be liable for any form of loss, damage, cost, injury or harm of any kind (whether direct, indirect, special
or consequential) howsoever arising from the use or supply of the equipment to the purchaser.
EXCLUSIONS TO LIMITED WARRANTY POILICY
This Limited Warranty will not apply where the equipment or any part thereof:
1.1 Fails due to an accident (including liquid spillage), abuse, misuse, neglect or normal wear and tear;
1.2 Has been used in a manner other than for which it was originally designed;
1.3 Has been tampered with or is otherwise than as supplied by SP Tools;
1.4 Where any damage, malfunction or other failure of the equipment or any part thereof resulted directly or indirectly from
unauthorized persons, adjusting or failing to adjust any part requiring normal maintenance and service (examples include
adjustment of tappets, air filter maintenance, lubrication and tightening of screws nuts and bolts);
1.5 Malfunctions due to the use of defective or incompatible accessories;
1.6 Is damaged by lightning or thunderstorm activity; or
1.7 Has been transported to a country where no authorised Service Agents exist.
CLAIMING WARRANTY
This Limited Warranty may be claimed on in the following manner:
2.1 In order to make a claim under this Limited Warranty, the purchaser must deliver the equipment or any part thereof to an
SP Tools authorised repair agent and pay all costs of transportation and all costs incidental to making a claim under
this Limited Warranty. The purchaser must first contact SP Tools (contact details described above) and request the
delivery address of an SP Tools authorised repair agent.
2.2 The purchaser must deliver to the repair agent written reasons why the purchaser considers that the purchaser has a claim
under this Limited Warranty and must provide all necessary details, including:
• The place, date and from whom the unit or part was purchased.
• The unit or part involved, Model and Serial Number.
• The defect, malfunction or failure in respect of which the claim is being made.
• Proof of service of the unit or part (if applicable)
• Proof of purchase in respect of the unit or part.
2.3 If the Limited Warranty claim is valid, the repair agent will carry out repairs and return the product at no charge to the
purchaser. These repairs are limited to the Limited Warranty fault identified and as such will not include any other faults due to
misuse, abuse, failure to maintain, fair wear and tear or the replacement of serviceable items such as oil, spark plugs, air filters,
fuel etc.
Our goods come with guarantees that cannot be excluded under Consumer Law. You are entitled to a replacement or refund for a
major failure and for compensation for any other reasonably foreseeable loss or damage. You are also entitled to have the goods
repaired or replaced if the goods fail to be of acceptable quality and the failure does not amount to a major failure.
Note:Units which are failing to perform in accordance with specifications due to non-warrantable causes will be subject to freight,
repair and or quote charge
Table of contents


