APA 16442 User manual

1
Art.-Nr.: 16442
Mini-Lithium-Powerpack 8.000 mAh
mit Starthilfe
Bedienungsanleitung . . . . . . . . . . . . . . . . . . . . . . . 2
Art.-Nr.: 16442
8,000 mAh Mini Lithium Power Pack
with Jump-Start
Operating instructions . . . . . . . . . . . . . . . . . . . . . . . 5
Art.-Nr.: 16442
Mini bloc d’alimentation lithium 8000
mAh avec aide au démarrage
Manuel de l‘opérateur . . . . . . . . . . . . . . . . . . . . . . . 9
Art.-Nr.: 16442
Mini-Lithium Powerpack 8000mAh con
avviamento d‘emergenza
Istruzioni per l‘uso . . . . . . . . . . . . . . . . . . . . . . . . .16
Art.-Nr.: 16442
Mini-lithium-powerpack 8.000mAh met
starthulp
Gebruiksaanwijzing . . . . . . . . . . . . . . . . . . . . . . . 12

2
INHALT
1. BESTIMMUNGSGEMÄSSER GEBRAUCH
Das Mini-Lithium-Powerpack dient zum Auaden der Akkus von Mobiltelefonen, Smartphones,Tabletcomputern, MP3-Playern und
ähnlichen Geräten, die über ein USB-Kabel aufgeladen werden können. Zusätzlich gibt es noch die Möglichkeit zur Starthilfe für 12V
Kraftfahrzeuge mit maximal 2,0 l Benzinmotor oder 1,6 l Dieselmotor.
Dieses Gerät ist nicht dafür bestimmt, durch Kinder und Personen mit eingeschränkten geistigen Fähigkeiten oder ohne erforderliches
Fachwissen benutzt zu werden. Kinder sind von dem Gerät fernzuhalten.
Das Gerät ist nicht für den gewerblichen Einsatz bestimmt.
Zum bestimmungsgemäßem Gebrauch gehört auch die Beachtung aller Informationen in dieser Anleitung, insbesondere die Beach-
tung der Sicherheitshinweise. Jede andereVerwendung gilt als nicht bestimmungsgemäß und kann zu Sach- oder Personenschäden
führen. Die EAL GmbH übernimmt keine Haftung für Schäden, die durch nicht bestimmungsgemäßen Gebrauch entstehen.
2. LIEFERUMFANG
1 x Powerpack 1 x USB 4in1-Kabel 1 x Starthilfekabel
1 x Steckerladegerät 1 x Gebrauchsanleitung
3. SPEZIFIKATIONEN
Größe (L x B x H): 132 x 76 x 25 [mm]
Gewicht: 0,275 kg (Power Pack)
Akkukapazität: 8000 mAh, (29,6Wh)
Akkutyp: Lithium-Polymer
Ausgang: USB 5V DC, 2,1 A
EC5 Starthilfe 12V DC, 200 A (Spitze 400 A)
Eingang: 12V, 1 A (Steckerladegerät)
5V, 1 A (Micro USB B Buchse)
Temperaturbereich: -20 °C bis +60 °C
USB 4in1-Kabel für: Micro USB B, Mini USB B,
Lightning, 30-Pol Dock
Mini-Lithium-Powerpack 8.000 mAh mit Starthilfe
WARNUNG
LesenSiedieBedienungsanleitungvorInbetriebnahmesorgfältigdurchundbeachten Sie alle Sicherheitshin-
weise! Nichtbeachtung kann zu Personenschäden, Schäden am Gerät oder Ihrem Eigentum führen!
Bewahren Sie die Originalverpackung, den Kaufbeleg sowie diese Anleitung zum späteren Nachschlagen auf!
Bei der Weitergabe des Produkts geben Sie auch diese Anleitung weiter.
Prüfen Sie vor Inbetriebnahme den Inhalt derVerpackung auf Unversehrtheit und Vollständigkeit!
1. BESTIMMUNGSGEMÄSSER GEBRAUCH 2
2. LIEFERUMFANG 2
3. SPEZIFIKATIONEN 2
4. SICHERHEITSHINWEISE 3
5. SYMBOLERKLÄRUNG 3
6. BEDIENUNGSANLEITUNG 3
6.1 ÜBERSICHT 3
6.2 LADEN DES POWERPACKS 4
6.2.1 LADEN DES POWERPACKS MIT DEM STECKERLADEGERÄT 4
6.2.2 LADEN DES POWERPACKS MIT DEM USB4IN1LADEKABEL 4
6.2.3 PRÜFEN DES LADEZUSTANDS 4
6.3 STARTHILFE FÜR 12V FAHRZEUGE 4
6.4 BENUTZUNG DER LEDLEUCHTE / SIGNALLEUCHTE 5
6.5 LADENVON USBGERÄTEN 5
7.WARTUNG UND PFLEGE 5
7.1 REINIGUNG 5
7.2 AUFBEWAHRUNG 5
7.3WARTUNG 5
8. HINWEISE ZUM UMWELTSCHUTZ 5
9. KONTAKTINFORMATIONEN 5

3
5. SYMBOLERKLÄRUNG
4. SICHERHEITSHINWEISE
• DasWarndreieck kennzeichnet alle für die Sicherheit wichtigen Anweisungen. Befolgen Sie diese immer, anderenfalls könn-
ten Sie sich verletzen oder das Gerät könnte beschädigt werden.
• Kinder dürfen nicht mit dem Gerät spielen.
• Reinigung und Benutzerwartung dürfen nicht von Kindern ohne Beaufsichtigung durchgeführt werden.
• Lassen Sie dasVerpackungsmaterial nicht achtlos liegen. Dieses kann für Kinder zu einem gefährlichen Spielzeug werden!
• Benutzen Sie dieses Produkt nur für die dafür vorgeseheneVerwendung!
• Manipulieren oder zerlegen Sie das Gerät nicht!
• Verwenden Sie zu Ihrer eigenen Sicherheit ausschließlich Zubehör oder Ersatzteile, die in der Anleitung angegeben sind,
oder derenVerwendung durch den Hersteller empfohlen wird!
• Lesen Sie vor demVersuch einer Starthilfe im Handbuch Ihres Fahrzeugs nach, wie ein Starthilfevorgang durchzuführen ist.
• Tragen Sie beim Umgang mit Blei-Akkus stets eine Schutzbrille und Schutzkleidung.
• Blei-AkkusenthaltenaggressiveätzendeSäuren.VermeidenSieHaut-undAugenkontaktmitFlüssigkeitenausdemBlei-Ak-
ku! Zerlegen Sie Blei-Akkus niemals! Waschen Sie betroene Hautpartien gründlich mit Wasser und Seife ab. Ist Säure ins
Auge gelangt, spülen Sie dieses sofort für mindestens 10 Minuten unter ießendem, klarem, lauwarmemWasser aus! Su-
chen Sie danach sofort einen Arzt auf!
• Ist Säure auf Ihre Kleidung gelangt, so waschen Sie diese sofort mit vielWasser und Seife aus!
• Tragen Sie niemals Ringe, Halsketten, Uhren o.ä. beim Umgang mit Akkus oder Ladegeräten. Durch das Kurzschließen der
Akkukontakte bestehtVerbrennungs- und Explosionsgefahr!
• Das Powerpack ist nur vorgesehen für Starthilfe eines Kraftfahrzeugs mit eigenem Akku. Das Powerpack kann den Fahr-
zeug-Akku nicht ersetzten.
• Bewahren Sie das Powerpack immer mit abgezogenem Starthilfekabel auf, damit es nicht zu Kurzschlüssen zwischen den
Polzangen kommen kann.
• Versuchen Sie nicht, den Akku des Powerpacks auszubauen und zu ersetzen. Sollte die Lebensdauer des Akkus einmal be-
endet sein, entsorgen Sie das gesamte Powerpack gemäß den örtlichen Richtlinien.
• Laden Sie den Akku des Powerpacks nicht mit einem beschädigten Ladegerät auf.
• Lassen Sie das Powerpack während des Ladevorgangs nicht unbeaufsichtigt.
• Benutzen Sie nur das mitgelieferte Zubehör zum Auaden des Powerpacks.
• Versuchen Sie niemals eine Starthilfe bei eingefrorener Batterie durchzuführen, es besteht Explosionsgefahr.
• Bewahren Sie diese Anleitung auf und geben Sie sie an andere Benutzer weiter.
entspricht den
EG-Richtlinen
Schutzisoliertes Gehäuse
(Schutzklasse II) Gebrauchsanleitung lesen
gekennzeichnetes Elektro-
produkt darf nicht in den
Hausmüllgeworfenwerden
Geräte mit diesem Zeichen
dürfen nur im Haus (trockene
Umgebung) betrieben werden
6. BEDIENUNGSANLEITUNG
6.1 ÜBERSICHT
Polarität des Ladesteckers
1 LED-Leuchte
2 USB-Ausgang
3 Abdeckung für EC5 Starthilfeanschluß
4 Ladebuchse
5 USB-Eingang
6 EIN-Schalter
7 Ladezustandsanzeige
8 USB-4in1-Kabel
9 Starthilfekabel mit Startbox
10 Steckerladegerät

4
6.2.3 PRÜFEN DES LADEZUSTANDS
6.2.2 LADEN DES POWERPACKS MIT DEM USB4IN1LADEKABEL
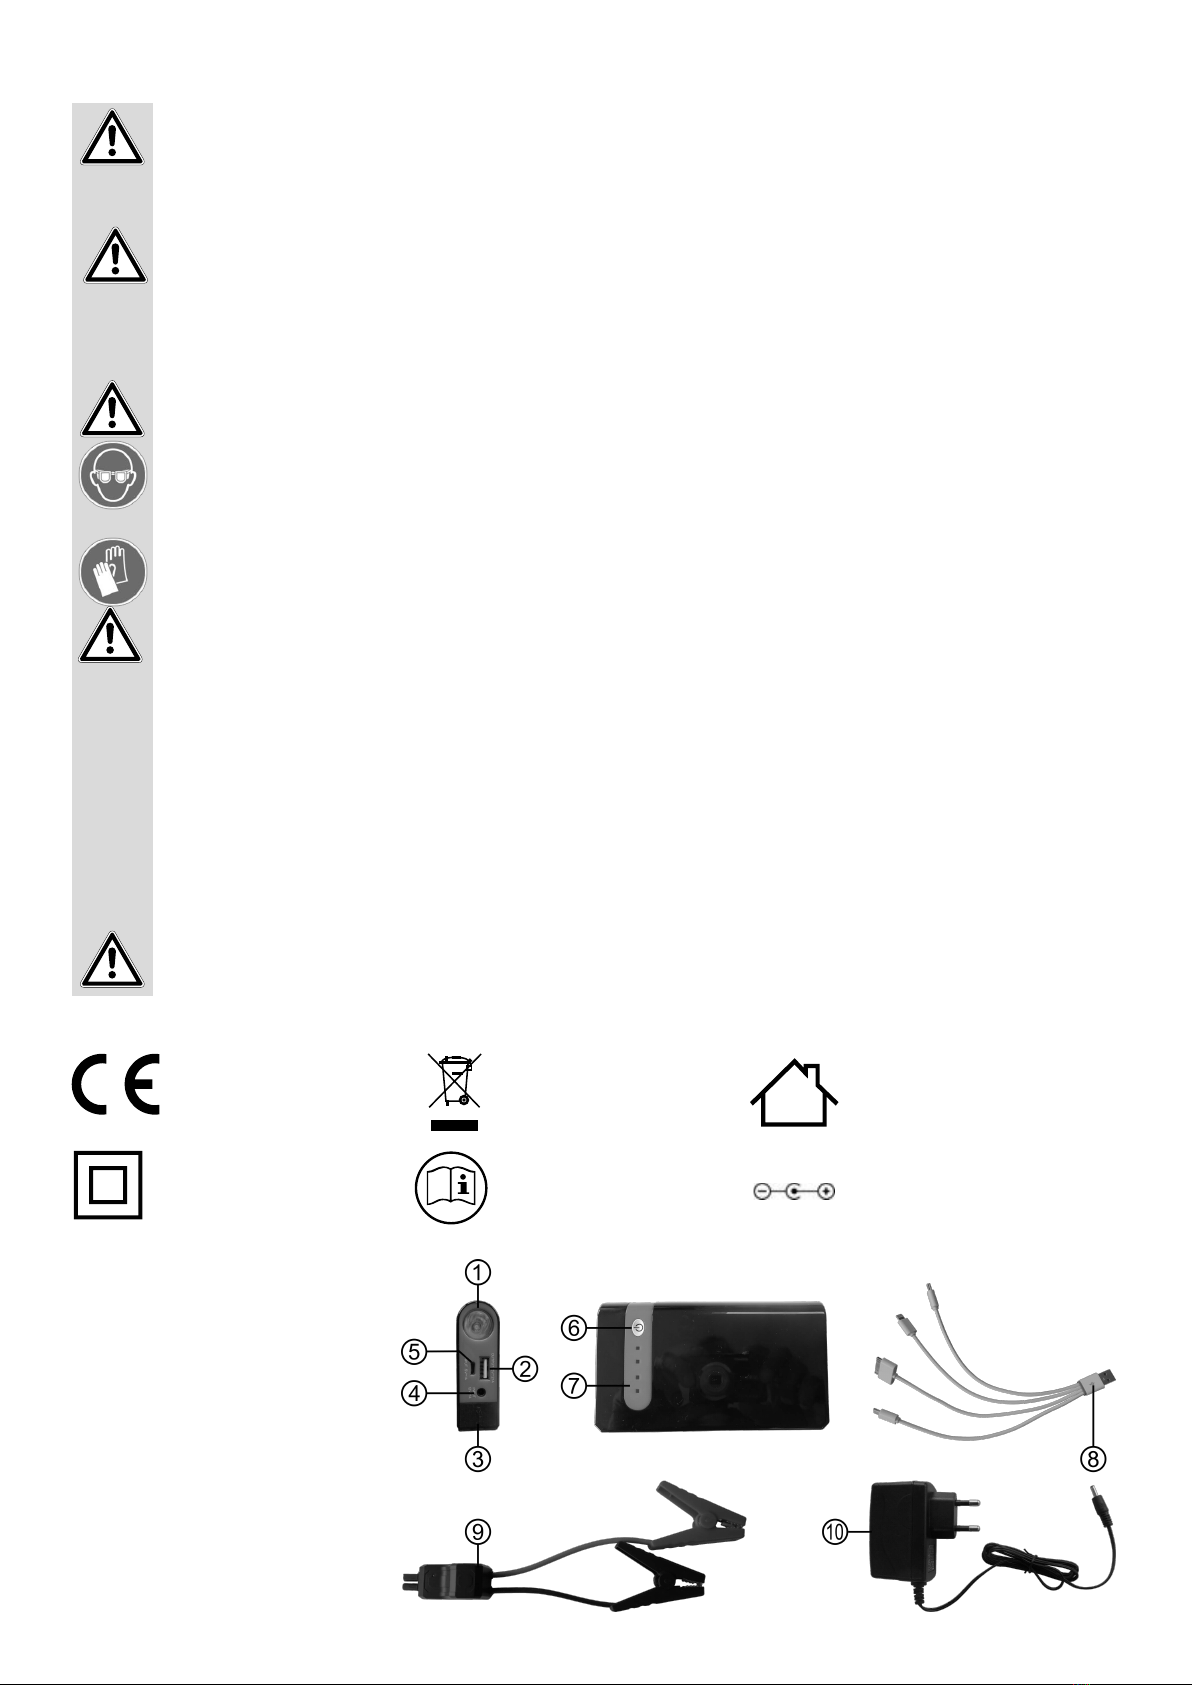
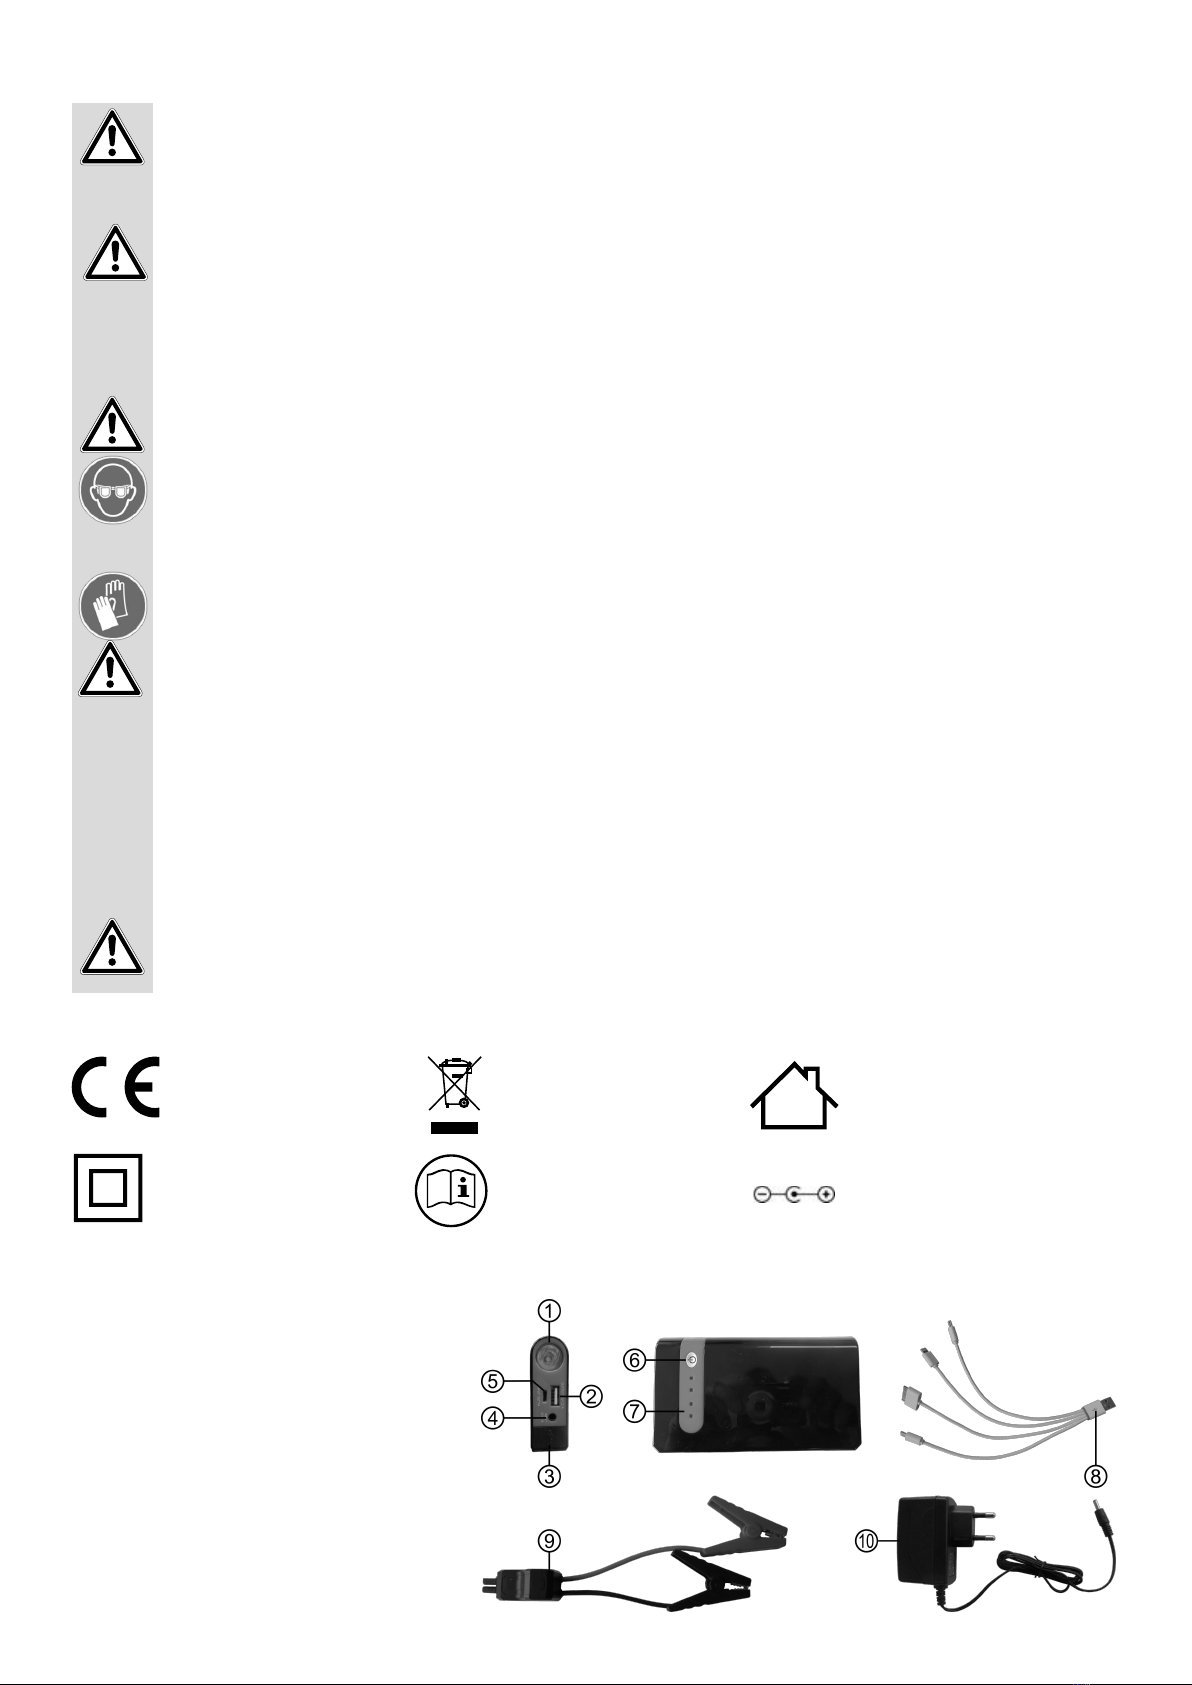
Stecken Sie den Micro-USB B-Stecker des USB-4in1-Ladekabels (Position 8 in der Übersicht) in den USB-Eingang (Position 5 in der
Übersicht) des Power Packs. Danach stecken Sie den USB-Stecker des Kabels in ein USB-Ladegerät, in den USB-Ausgang in Ihrem
Fahrzeug oder in den USB-Ausgang Ihres Computers. Stecken Sie das Ladegerät in eine Steckdose, schalten Sie bei Ihrem Fahrzeug die
Zündung ein oder schalten Sie Ihren Computer ein.
Während des Ladevorgangs blinken die Kontrolleuchten der Ladezustandsanzeige (Position 7 in der Übersicht) nacheinander auf,
die Zahl der dauernd leuchtenden Kontrolleuchten zeigt den Ladezustand des Power Packs an. Ist der Ladevorgang abgeschlossen,
leuchten alle vier Kontrolleuchten dauernd.
6.2.1 LADEN DES POWERPACKS MIT DEM STECKERLADEGERÄT
Stecken Sie den Ladestecker des Steckerladegeräts (Position 10 in der Übersicht) in die Ladebuchse (Position 4 in der Übersicht) des
Powerpacks. Danach stecken Sie das Steckerladegerät in eine 230V Netzsteckdose.
Während des Ladevorgangs blinken die Kontrolleuchten der Ladezustandsanzeige (Position 7 in der Übersicht) nacheinander auf,
die Zahl der dauernd leuchtenden Kontrolleuchten zeigt den Ladezustand des Power Packs an. Ist der Ladevorgang abgeschlossen,
leuchten alle vier Kontrolleuchten dauernd.
6.2 LADEN DES POWERPACKS
Sollte es einmal vorkommen, daß Sie das Powerpack auaden müssen, ohne es beaufsichtigen zu können,
stellen Sie es während des Ladevorgangs auf eine feuerfeste Unterlage (Stein, Fliesen oder Metallplatte).
Entfernen Sie alle brennbaren Gegenstände im Umkreis von einem Meter.
Entfernen Sie das Ladekabel aus der Ladebuchse. Drücken Sie den Schalter (Position 6 in der Übersicht) des Geräts, um den Ladezu-
stand zu prüfen. Den Ladezustand können Sie an den leuchtenden Kontrolleuchten ablesen.
Kontrolleuchten 1 1+2 1+2+3 1+2+3+4
Ladezustand 25 % 50 % 75 % 100 %
6.3 STARTHILFE FÜR 12 V FAHRZEUGE
1. Schalten Sie an Ihrem Fahrzeug die Zündung und alleVerbraucher aus.
2. Stellen Sie sicher, daß mindestens drei Kontrolleuchten (mind. 75 % Batterie-
kapazität) der Ladezustandsanzeige dauernd leuchten und daß die Batteriepole
Ihrer Fahrzeugbatterie nicht verschmutzt oder oxidiert sind. Verbinden Sie das
Powerpack und das Starthilfekabel (Position 9 in der Übersicht), indem Sie den
Stecker der Startbox des Starthilfekabels in den Starthilfeanschluß (Position 3 in
der Übersicht) des Powerpacks stecken, siehe Bild 2. Stellen Sie dabei sicher, daß
der Stecker fest und sicher eingesteckt ist. Die Kontrolleuchte der Startbox blinkt
imWechsel rot/grün.
3.Verbinden Sie zuerst die rote Polzange des Starthilfekabels mit dem Pluspol und
danach die schwarze Polzange mit dem Minuspol der Fahrzeugbatterie. Die Pol-
zangen müssen einen festen und sicheren Kontakt zu den Batteriepolen haben.
Bei verpoltangeschlossenen KabelnoderbeiKurzschlußleuchtetdie Kontrolleuch-
te der Startbox rot und es ertönt einWarnton.
4. Sind die Starthilfekabel korrekt angeschlossen, schalten Sie die Zündung Ihres
Fahrzeugs ein. Die Kontrolleuchte leuchtet jetzt dauerhaft grün.
5. Starten Sie den Motor Ihres Fahrzeugs. Lassen Sie den Anlasser nicht länger
als 3 Sekunden arbeiten. Sollte der Startversuch nicht erfolgreich gewesen sein,
warten Sie mindestens zwei Minuten, bis Sie den nächsten Versuch starten.
Unternehmen Sie nach dem dritten, fehlgeschlagenen Startversuch keinen
weiteren, sondern überprüfen Sie Ihr Fahrzeug auf Fehler.
6.Trennen Sie das Starthilfekabel vom Powerpack. Danach nehmen Sie die
Polzangen von der Fahrzeugbatterie ab.
Bild 2: Starthilfekabel anschließen
Bild 3: Kontrolleuchte Startbox

5
9. KONTAKTINFORMATIONEN
EAL GmbH
Otto-Hausmann-Ring 107
42115Wuppertal, Deutschland
+49 (0)202 42 92 83 0
+49 (0) 202 42 92 83 – 160
info@eal-vertrieb.com
www.eal-vertrieb.com
8. HINWEISE ZUM UMWELTSCHUTZ
Entsorgen Sie Elektrogeräte nicht mit dem Hausmüll! Elektro- und Elektronik-Altgeräte müssen getrennt gesammelt und
einer umweltgerechten Wiederverwertung zugeführt werden. Über Entsorgungsmöglichkeiten für Elektro- und Elektro-
nik-Altgeräte informieren Sie sich bei Ihrer Gemeinde- oder Stadtverwaltung
Die Materialien sind recycelbar. Durch Recycling, stoicheVerwertung oder andere Formen der Wiederverwendung von
Altgeräten leisten Sie einen wichtigen Beitrag zum Schutz unserer Umwelt!
7. WARTUNG UND PFLEGE
6.4 BENUTZUNG DER LEDLEUCHTE / SIGNALLEUCHTE
Um das Dauerlicht der LED-Leuchte einzuschalten, halten Sie den EIN-Schalter (Position 6 in der Übersicht) des Powerpacks für ca.
3 Sekunden gedrückt. Danach können Sie durch erneutes Drücken des Schalters die folgenden Lichtfunktionen hintereinander ein-
schalten: Blinken – SOS – AUS.
6.5 LADEN VON USBGERÄTEN
Wählen Sie den passenden Anschluß am USB-4in1-Kabel (Position 8 in der Übersicht) für Ihr USB-Gerät aus und schließen Sie es an.
Schließen Sie den USB-Stecker an den USB-Ausgang (Position 2 in der Übersicht) des Powerpacks an. Drücken Sie den Schalter (Posi-
tion 2 in der Übersicht) des Powerpacks, um den Ladevorgang zu starten.
Nachdem der Ladevorgang abschlossen ist, gehen die Kontrolleuchten für den Ladezustand (Position 7 in der Übersicht) aus. Ziehen
Sie zuerst das Ladekabel vom Powerpack ab, dann entfernen Sie das Ladekabel von Ihrem USB-Gerät.
7.1 REINIGUNG
Reinigen Sie das Mini-Lithium-Powerpack nur mit einem weichenTuch und benutzen Sie keine scharfen Reinigungs- oder Lösemittel.
Lassen Sie niemals Flüssigkeiten in das Innere des Gehäuses gelangen.
7.2 AUFBEWAHRUNG
Bei Nichtbenutzung bewahren Sie das Mini-Lithium-Powerpack an einem trockenen Ort auf. Setzen Sie das Powerpack weder Feuch-
tigkeit, Öl, Staub, Schmutz, hohen Temperaturen, starker Vibration noch mechanischer Belastung aus. Bewahren Sie das Powerpack
immer mit abgezogenem Starthilfekabel auf, damit es nicht zu Kurzschlüssen zwischen den Polzangen kommen kann.
7.3 WARTUNG
Laden Sie bei Nichtbenutzung das Powerpack alle drei Monate auf.
CONTENT
8,000 mAh Mini Lithium Power Pack with Jump-Start
1. PROPER USE OFTHE PRODUCT 6
2. SCOPE OF DELIVERY 6
3. SPECIFICATIONS 6
4. SAFETY PRECAUTIONS 6
5. EXPLANATION OF SYMBOLS 7
6. MANUAL 7
6.1 OVERVIEW 7
6.2 CHARGING THE POWER PACK 7
6.2.1 CHARGINGTHE POWER PACK WITH THE PLUG CHARGER 7
6.2.2 CHARGINGTHE POWER PACK WITH THE USB 4IN1CHARGING CABLE 7
6.2.3 CHECKINGTHE CHARGING STATUS 7
6.3 JUMPSTART FOR 12VVEHICLES 8
6.4 USE OFTHE LED LIGHT / SIGNAL LIGHT 8
6.5 CHARGING USB DEVICES 8
7. MAINTENANCE AND CARE 8
7.1 CLEANING 8
7.2 STORAGE 8
7.3 MAINTENANCE 8
8. NOTES REGARDING ENVIRONMENTAL PROTECTION 8
9. CONTACT INFORMATION 8

6
1. PROPER USE OF THE PRODUCT
The mini-lithium power pack is used to charge the batteries of mobile phones, smartphones, tablet computers, MP3 players and
similar devices that can be charged via USB cable. In addition, there is the possibility of jump-start for 12 V motor vehicles with a
maximum of 2.0 l petrol engine or 1.6 l diesel engine.
This device is not designed to be used by children or persons with limited mental abilities or without experience and/or lack of requi-
red specialist knowledge. Keep children away from the device.
The device is not designated for commercial use.
Utilisation according to the intended purpose also includes the observation of all information in these operating instructions, particu-
larly the observation of safety instructions. Any other utilisation is considered to be counter to the intended purpose and may result in
material damage or personal injuries. EAL GmbH assumes no liability for damage resulting from improper use.
2. SCOPE OF DELIVERY
1 x power pack 1 x USB 4-in-1 cable 1 x jumper cable
1 x plug-in charger 1 x Instructions for use
3. SPECIFICATIONS
Size (L xW x H) : 132 x 76 x 25 [mm]
Weight: 0.275 kg (Power Pack)
Rechargeable battery capacity: 8000 Ah, (29.6Wh)
Battery type: Lithium Polymer
Output: USB 5V DC, 2.1 A,
EC5 Jump-start 12 V DC,
200 A (Peak 400 A)
Input: 12V, 1 A (Socket)
5V, 1 A (USB-Micro-B Outputs)
Temperature range: -20 °C up to +60 °C
USB 4-in1 cable for: Micro USB B, Mini USB B,
Lightning, 30 pin Dock
WARNING
Please read the operating instructions carefully prior to use and observe all safety instructions!
Not observing such may lead to personal injury, damage to the device or to your property!
Store the original packaging, the receipt and these instructions so that they may be consulted at a later date!
When passing on the product, also include these operating instructions.
Check the contents of package for integrity and completeness prior to use!
4. SAFETY PRECAUTIONS
• The warning triangle labels all instructions important to safety. Always follow these, otherwise you could injure yourself or
damage the device.
• Children may not play with the device.
• Cleaning and user maintenance may not be carried out by children without supervision.
• Do not treat packaging material carelessly. It may become a dangerous plaything for a child!
• Only use this product for its designated purpose!
• Do not manipulate or disassemble the device!
• For your own safety, only use accessories and spare parts that are stated in these instructions or that are recommended by
the manufacturer!
• Before attempting to jump-start, refer to your vehicle‘s manual to determine how to perform the jump-start procedure.
• When using lead batteries, always wear protective goggles and clothing.
• Lead batteries contain aggressive, corrosive acids. Prevent skin and eyes from coming into contact with the lead battery u-
ids! Never disassemble lead batteries!Wash aected skin thoroughly using soap and water. If acid has entered an eye, rinse
immediately for at least 10 minutes under clean, running, lukewarm water!Then immediately consult a doctor!
• If your clothing has acid on, rinse immediately with plenty of soap and water!
• Never wear rings, necklaces, watches or similar when handling batteries or chargers.The short-circuiting of the battery con-
tacts brings a risk of burns and explosion!
• The power pack is only designed as a starting aid for a vehicle that has a battery of its own.The power pack cannot replace
the vehicle battery.
• Always store the power pack with the jump-start lead disconnected to prevent short circuits between the pole clamps.

7
5. EXPLANATION OF SYMBOLS
complies with
EC directives
Protective insulation
(safety class II) Read instructions for use
the labelled electrical pro-
duct must not be thrown
into the household refuse
Devices with this label may only
be operated inside (dry environ-
ment)
6. MANUAL
6.1 OVERVIEW
Polarity of the charging plug
1 LED lamp
2 USB output 7 Charging status display
3 Cover for EC5 jump-start connector
4 Charging socket
5 USB input
6 ON switch
7 Charge status display
8 USB 4-in-1 cable
9 Jumper cable with start box
10 Charger socket
• Do not attempt to remove and replace the battery pack of the power pack. If the battery comes to the end of its useful life,
dispose of the entire in accordance with your local guidelines.
• Never charge the power pack using a damaged charger.
• Do not leave a power pack unattended during operation.
• Only used the supplied accessories to charge the power pack.
• Never attempt to jump-start a vehicle when the battery is frozen, this brings a risk of explosion.
• Store these instructions carefully and, if necessary, pass them on to other users.
6.2.2 CHARGING THE POWER PACK WITH THE USB 4IN1 CHARGING CABLE
Plug the Micro-B USB connector (Position 8 in the overview) of the USB 4-in-1 charging cable into the USB socket (Position 5 in the
overview) of the power pack.Then plug the USB plug of the cable into a USB charger, the USB output in your vehicle or the USB output
of your computer. Plug the charger into an electrical outlet, switch on the ignition of your vehicle or switch on your computer.
During the charging process, the control lamps of the charging status display (Position 7 in the overview) ash one after the other,
the number of continuously lit control lamps indicates the charging status of the power pack. When charging is complete, all four
indicator lights are lit continuously.
6.2.1 CHARGING THE POWER PACK WITH THE PLUG CHARGER
Plug (Position 10 in the overview) into the charging socket (Position 4 in the overview) of the battery pack.Then plug the charger into
a 230V mains socket.
During the charging process, the control lamps of the charging status display (Position 7 in the overview) ash one after the other,
the number of continuously lit control lamps indicates the charging status of the power pack. When charging is complete, all four
indicator lights are lit continuously.
6.2 CHARGING THE POWER PACK
If it should happen that you have to charge the power pack without being able to supervise it, place it on
a reproof base (stone, tiles or metal plate) during the charging process. Remove all ammable objects
within one metre of the charger.
6.2.3 CHECKING THE CHARGING STATUS
Remove the charging cable from the charging socket. Press the device‘s switch (Position 6 in the overview) to check the charging
status.The charging status can be read from the illuminated control lamps.
Control lamps 1 1+2 1+2+3 1+2+3+4
Charging Status 25 % 50 % 75 % 100 %

8
8. NOTES REGARDING ENVIRONMENTAL PROTECTION
Do not dispose of electrical devices with the household waste! Electrical and electronic scrap must be collected separately
and disposed of in an environmentally responsible manner for recycling. Please contact your community or city adminis-
tration regarding disposal options for electrical and electronic scrap.
The materials are recyclable. You make an important contribution to protecting our environment by recycling, material
utilisation or other forms of reusing waste equipment!
7. MAINTENANCE AND CARE
6.3 JUMPSTART FOR 12 V VEHICLES
1. Switch o the ignition and all consumers on your vehicle.
2. Make sure that at least three control lamps (at least 75 % battery capacity) of
the charging status display light up continuously and that the battery poles of
your vehicle battery are not dirty or oxidized. Connect the power pack and the
jumper cable (Position 9 in the overview) by plugging in the jumper cable of the
start box into the jumper cable (position 3 in the overview) of the power pack,
see gure 2. Make sure that the plug is rmly and securely inserted.The control
lamp of the start box ashes alternately red/green.
3. First connect the red poleclamp of thejumper cable tothe positive pole andthen
the black pole clamp to the negative pole of the vehicle battery. The pole clamps
must have a rm and secure contact to the battery poles.
If the polarity of the cables is reversed or in case of a short circuit, the control lamp
of the start box lights up red and a warning tone sounds.
4. If the jumper cables are connected correctly, switch on the ignition of your
vehicle.The control lamp is now permanently green.
5. Now start the vehicle’s engine. Do not operate the starter for longer than 3 se-
conds. If the start attempt is not successful, wait for at least two minutes before
starting the next attempt. After the third failed attempt, do not attempt again.
Instead, check your vehicle for faults.
6. Disconnect the jump-starter from the power pack. Then remove the pole
clamps from the vehicle battery.
Figure 2: Connecting the jumper cable
Figure 3: Control lamp start box
6.4 USE OF THE LED LIGHT / SIGNAL LIGHT
To switch on the continuous light of the LED light, hold down the ON switch (Position 6 in the overview) of the power pack for approx. 3
seconds.You can then switch on the following lighting functions one after the other by pressing the switch again: Flashing– SOS – OFF.
6.5 CHARGING USB DEVICES
Select the appropriate connector on the USB 4- in-1 cable (Position 8 in the overview) for your USB device and connect it. Connect
your USB connector to the USB port (Position 2 in the overview) of the power pack. Press the switch (Position 2 in the overview) on
the power pack to start charging.
After the charging process has been completed, the control lamps for the charging status (Position 7 in the overview) switch o. First
disconnect the charging cable from the power pack, then remove the charging cable from your USB device.
7.1 CLEANING
Only clean the mini lithium power pack with a soft cloth and do not use any aggressive cleaning agents or solvents. Never allow
liquids to ingress into the housing.
7.2 STORAGE
When not in use, store the mini lithium power pack in a dry place. Do not expose the power pack to moisture, oil, dust, dirt, high
temperatures, strong vibrations, or mechanical load. Always store the power pack with the jump-start lead disconnected to prevent
short circuits between the pole clamps.
7.3 MAINTENANCE
Charge the power pack every three months when not in use.
9. CONTACT INFORMATION
EAL GmbH
Otto-Hausmann-Ring 107
42115 Wuppertal, Germany
+49 (0)202 42 92 83 0
+49 (0) 202 42 92 83 – 160
info@eal-vertrieb.com
www.eal-vertrieb.com

9
AVERTISSEMENT
Lisez attentivement la notice d‘utilisation avant la mise en service et respectez toutes les consignes de sé-
curité ! Tout non-respect de ces consignes peut entraîner des dommages corporels, endommager l‘appareil
ou vos biens ! Conservez l‘emballage d‘origine, le justicatif d‘achat et la présente notice pour vous y référer
ultérieurement ! Si vous revendez ou remettez l‘appareil à des tiers, veuillez également leur remettre cette
notice d‘utilisation. Avant la mise en service, veuillez contrôler le contenu de l‘emballage quant à l‘absence de
dommages et vérier si toutes les pièces sont présentes !
1. UTILISATION CONFORME
SOMMAIRE
Le mini bloc d’alimentation au lithium sert à recharger les batteries de téléphones portables, smartphones, tablettes, lecteurs MP3
et d’appareils similaires pouvant être rechargés à l’aide d’un câble USB. En outre, il est possible de procéder à une aide au démarrage
pour véhicules automobiles de 12V avec un moteur à essence de max. 2,0 l ou un moteur diesel de 1,6 l.
Cet appareil n‘est pas destiné à être utilisé par des enfants ou des personnes aux capacités mentales limitées ou ne disposant pas de
l‘expérience ou des connaissances nécessaires. Les enfants doivent rester à distance de cet appareil.
L‘appareil n‘est pas destiné à une utilisation commerciale.
L‘utilisation conforme aux prescriptions implique également le respect de toutes les informations contenues dans cette notice d‘utili-
sation, en particulier le respect des consignes de sécurité.Toute autre utilisation est considérée comme non conforme et peut entraî-
ner des dommages matériels ou corporels. La société EAL GmbH décline toute responsabilité en cas de dommages découlant d’une
utilisation non conforme à l’emploi prévu.
2. MATÉRIEL FOURNI
1 x Bloc d’alimentation 1 x Câble USB 4 en 1 1 x Câble d’aide au démarrage
1 x Chargeur enchable 1 x Mode d‘emploi
3. SPÉCIFICATIONS
Dimensions (L x L x H) : 132 x 76 x 25 [mm]
Poids : 0,275 kg (bloc d’alimentation)
Capacité de la batterie : 8000 mAh, (29,6Wh)
Type de batterie : lithium polymère
Sortie : USB 5V DC, 2,1 A, Aide au démarrage
EC5 12V DC, 200 A (pointe de 400 A)
Entrée : 12V, 1 A (chargeur enchable)
5V, 1 A (prise micro USB B)
Plage de température : de -20 °C à +60 °C
Câble USB 4 en 1 pour : Micro USB B, mini USB B, Lightning,
connecteur Dock 30 broches
Mini bloc d’alimentation lithium 8000 mAh avec aide au démarrage
1. UTILISATION CONFORME 9
2. MATÉRIEL FOURNI 9
3. SPÉCIFICATIONS 9
4. CONSIGNES DE SÉCURITÉ 10
5. SIGNIFICATION DES SYMBOLES 10
6. NOTICE D‘UTILISATION 10
6.1VUE D‘ENSEMBLE 10
6.2 CHARGEMENT DU BLOC D’ALIMENTATION 11
6.2.1 CHARGEMENT DU BLOC D’ALIMENTATION AVEC LE CHARGEUR ENFICHABLE 11
6.2.2 CHARGEMENT DU BLOC D’ALIMENTATION AVEC LE CÂBLE DE CHARGEMENT USB 4 EN 1 11
6.2.3VÉRIFICATION DE L’ÉTAT DE CHARGE 11
6.3 AIDE AU DÉMARRAGE POURVÉHICULES DE 12 V 11
6.4 UTILISATION DES LAMPES LED /TÉMOINS LUMINEUX 12
6.5 CHARGEMENT DES APPAREILS USB 12
7. MAINTENANCE ET NETTOYAGE 12
7.1 NETTOYAGE 12
7.2 RANGEMENT 12
7.3 MAINTENANCE 12
8. REMARQUES RELATIVES À LA PROTECTION DE L‘ENVIRONNEMENT 12
9. CONTACT 12

10
5. SIGNIFICATION DES SYMBOLES
4. CONSIGNES DE SÉCURITÉ
• Letriangle de signalisation indique touteslesinstructions relatives à la sécurité.Respectez-les à tout moment car vousrisqueriez
sinonde vousblesser oul‘appareil risqueraitd‘être endommagé.
• Lesenfants ne doiventpas jouer avecl‘appareil.
• Les tâches de nettoyage et d‘entretien à eectuer chez soi ne doivent pas être exécutées par des enfants qui ne sont pas sous
surveillance.
• Nelaissezpas traînerle matérield‘emballage. Il pourrait devenirunjouet dangereuxpour lesenfants!
• N‘utilisez cet appareilqu‘aux nspourlesquelles il a été prévu!
• Nepasmanipuler ni démonterl‘appareil!
• Pour votre propresécurité,utilisezexclusivement les accessoiresou pièces de rechangequi sont indiqué(e)sdans la notice d‘utili-
sationou dont l‘utilisation est recommandéepar le fabricant!
• Avantde tenterune aideaudémarrage,veuillezlirele manuel de votrevéhicule pour savoircommentprocéder.
• Porteztoujoursdes lunettesdeprotectionetdes vêtementsde protection lorsque vousmanipulezla batterie au plomb.
• Les batteries au plomb contiennent des acides corrosifs. Évitez tout contact de la peau et des yeux avec les liquides de la batterie
auplomb! Nedémontezjamaisde batteriesauplomb !Lavezsoigneusement leszonesde lapeauconcernéesàl‘eauetau savon.
Si de l‘acide est entré au contact d‘un œil, rincez-le immédiatement pendant au moins 10 minutes sous de l‘eau claire courante
tiède! Consultezensuiteimmédiatement un médecin !
• Si vosvêtementssont entrésen contactavecde l‘acide, lavez-les immédiatementavecbeaucoup d‘eauet dusavon !
• Ne portez jamais de bagues, de colliers, de montres, etc. lorsque vous manipulez des batteries ou des chargeurs. Un court-circuit
auniveaudes contactsde labatterieentraîneun risquedebrûlureet d‘explosion!
• Le bloc d‘alimentation est uniquement prévu comme aide au démarrage pour les véhicules automobiles équipés de leur propre
batterie.Lebloc d‘alimentationneremplacepas la batterieduvéhicule.
• Conserveztoujoursleblocd’alimentationaveclecâbled’aideaudémarragedébranchéanqu‘ilnepuissepasyavoirdecourt-cir-
cuit entreles pinces crocodiles.
• N‘essayezpasde démonteret deremplacerla batteriedu blocd’alimentation.Lorsquela batterienefonctionne plus,jetezle bloc
d’alimentationcompletconformémentaux prescriptionslocales.
• Nerechargezpas labatterie du bloc d‘alimentationà l‘aide d‘unchargeurendommagé.
• Nelaissezpas leblocd’alimentation sans surveillancelors du chargement.
• Utilisezuniquement les accessoiresfournis pour rechargerle bloc d’alimentation.
• N‘essayezjamais d‘eectuer une aide audémarrage lorsque labatterieest gelée,car cela présente un risque d‘explosion.
• Veuillez conservercettenoticed‘utilisation et remettez-laà tout utilisateurtiers.
Correspond aux directives
européennes
Boîtier avec isolation
(classe de protection II) Lire le mode d‘emploi
Un produit électrique carac-
térisé ne peut pas être jeté
aux ordures
Les appareils portant ce symbole
ne peuvent être utilisés qu‘à l‘in-
térieur (environnement sec)
6. NOTICE D‘UTILISATION
6.1 VUE D‘ENSEMBLE
Polarité de la prise de charge
1 Lampe LED
2 Sortie USB
3 Couvercle pour raccord d’aide au démarrage EC5
4 Prise de chargement
5 Entrée USB
6 Interrupteur MARCHE
7 Indicateur d‘état de charge
8 Câble USB 4 en 1
9 Câble d’aide au démarrage avec Startbox
10 Chargeur enchable

11
6.2.3 VÉRIFICATION DE L’ÉTAT DE CHARGE
6.2.2 CHARGEMENT DU BLOC D’ALIMENTATION AVEC LE CÂBLE DE CHARGEMENT USB 4 EN 1
Insérez le connecteur micro USB B du câble de chargement USB 4 en 1 (position 8 dans la vue d‘ensemble) dans l’entrée USB (position
5 dans la vue d‘ensemble) du bloc d’alimentation. Branchez ensuite la che USB du câble dans un chargeur USB, dans la sortie USB de
votre véhicule ou dans la sortie USB de votre ordinateur. Branchez le chargeur dans une prise, allumez le contact de votre véhicule ou
allumez votre ordinateur.
Lors du processus de chargement, les lampes de contrôle de l’indicateur d‘état de charge (position 7 dans la vue d’ensemble) cligno-
tent l’une après l’autre, le nombre lampes de contrôle allumées en continu indique l’état de charge du bloc d’alimentation. Une fois le
processus de chargement terminé, les quatre lampes de contrôle restent allumées.
6.2.1 CHARGEMENT DU BLOC D’ALIMENTATION AVEC LE CHARGEUR ENFICHABLE
Insérez la che de chargement du chargeur enchable (position 10 dans la vue d‘ensemble) dans la prise de chargement (position 4
dans la vue d‘ensemble) du bloc d’alimentation. Branchez ensuite le chargeur enchable dans une prise de courant 230V.
Lors du processus de chargement, les lampes de contrôle de l’indicateur d‘état de charge (position 7 dans la vue d’ensemble) cligno-
tent l’une après l’autre, le nombre lampes de contrôle allumées en continu indique l’état de charge du bloc d’alimentation. Une fois le
processus de chargement terminé, les quatre lampes de contrôle restent allumées.
6.2 CHARGEMENT DU BLOC D’ALIMENTATION
Si vous êtes amené à devoir recharger le bloc d’alimentation sans pouvoir le surveiller, placez-le sur un
support résistant au feu (pierre, carrelage ou plaque métallique) lors du processus de chargement. Retirez
tous les objets inammables dans un rayon d’un mètre.
Débranchez le câble de chargement de la prise de chargement. Appuyez sur l’interrupteur (position 6 dans la vue d’ensemble) de
l’appareil pour vérier l’état de charge.Vous pouvez consulter l’état de charge en vous référant aux lampes de contrôle.
Lampes de contrôle 1 1+2 1+2+3 1+2+3+4
État de charge 25 % 50 % 75 % 100 %
6.3 AIDE AU DÉMARRAGE POURVÉHICULES DE 12 V
1. Coupez le contact et tous les consommateurs de votre véhicule.
2. Assurez-vous qu’au moins trois lampes de contrôle (min. 75 % de la capacité de
la batterie) de l’indicateur d’état de charge s’allument en continu et que les pôles
de la batterie de votre véhicule ne soient pas encrassés ou oxydés. Connectez le
bloc d’alimentation et le câble d’aide au démarrage (position 9 dans la vue d’en-
semble) en branchant la che de la Startbox du câble d’aide au démarrage dans
le raccord d’aide au démarrage (position 3 dans la vue d’ensemble) du bloc d’ali-
mentation, voir Figure 2. Assurez-vous que la che soit fermement et solidement
insérée. La lampe de contrôle de la Startbox clignote en alternance vert/rouge.
3. Branchez d’abord la pince crocodile rouge du câble d’aide au démarrage sur le
pôle positif et ensuite la pince crocodile noire sur le pôle négatif de la batterie du
véhicule. Les pinces crocodiles doivent être fermement et solidement branchées
aux pôles de la batterie.
Si les câbles sont branchés avec une polarité inversée ou en cas de court-circuit,
la lampe de contrôle de la Startbox s’allume en rouge et un signal d’avertisse-
ment retentit.
4. Lorsque les câbles d’aide au démarrage sont branchés correctement, allumez
le contact de votre véhicule. La lampe de contrôle s’allume en vert en continu.
5. Démarrez le moteur de votre véhicule. Ne laissez pas fonctionner le démarreur
pendant plus de 3 secondes. Si la tentative de démarrage n‘a pas réussi, patien-
tez au moins deux minutes avant d‘eectuer une nouvelle tentative. Si vous avez
essayé trois fois sans y parvenir, cessez les tentatives de démarrage et contrôlez
si votre véhicule est défectueux.
6. Débranchez le câble d’aide au démarrage du bloc d’alimentation. Débranchez
ensuite les pinces crocodiles de la batterie du véhicule.
Figure 2 : Brancher le câble d’aide au démarrage
Figure 3 : Lampe de contrôle de la Startbox

12
9. CONTACT
EAL GmbH
Otto-Hausmann-Ring 107
42115 Wuppertal, Allemagne
+49 (0)202 42 92 83 0
+49 (0) 202 42 92 83 – 160
info@eal-vertrieb.com
www.eal-vertrieb.com
8. REMARQUES RELATIVES À LA PROTECTION DE L‘ENVIRONNEMENT
Ne jetez pas les appareils électriques dans les ordures ménagères ! Les appareils électriques et électroniques usagés doi-
vent être collectés séparément et être remis aux services de recyclage. Renseignez-vous quant aux possibilités d‘élimina-
tion d‘appareils électriques et électroniques usagés auprès de votre administration communale ou municipale.
Les matériaux sont recyclables. Par le recyclage, la récupération des matières ou d’autres formes de réutilisation d’appa-
reils usagés, vous contribuez activement à la protection de notre environnement !
7. MAINTENANCE ET NETTOYAGE
6.4 UTILISATION DES LAMPES LED / TÉMOINS LUMINEUX
Pour allumer la lumière continue de la lampe LED, maintenez l’interrupteur MARCHE (position 6 dans la vue d’ensemble) du bloc d’ali-
mentation enfoncé pendant environ 3 secondes. Appuyez de nouveau sur l’interrupteur pour sélectionner les fonctions d’éclairage
suivantes l‘une après l’autre : Clignotement – SOS – ARRÊT.
6.5 CHARGEMENT DES APPAREILS USB
Choisissez le raccord du câble USB 4 en 1 (position 8 dans la vue d’ensemble) adapté à votre appareil USB et connectez-le. Branchez la
che USB à la sortie USB (position 2 dans la vue d‘ensemble) du bloc d’alimentation. Appuyez sur l’interrupteur (position 2 dans la vue
d’ensemble) du bloc d’alimentation pour démarrer le processus de chargement.
Une fois le processus de chargement terminé, les lampes de contrôle pour l’état de charge (position 7 dans la vue d’ensemble) s’éteignent.
Débranchez d’abord le câble de chargement du bloc d’alimentation et débranchez ensuite le câble de chargement de votre appareil USB.
7.1 NETTOYAGE
Nettoyez le mini bloc d’alimentation au lithium exclusivement avec un chion doux et sans nettoyants agressifs ni solvants. Ne laissez
jamais de liquides entrer à l‘intérieur du boîtier.
7.2 RANGEMENT
Lorsque le mini bloc d’alimentation au lithium n‘est pas utilisé, rangez-le dans un endroit sec. Protégez le bloc d’alimentation de l‘hu-
midité, de l‘huile, de la poussière, de la boue, des températures élevées, des fortes vibrations et des surcharges mécaniques. Conservez
toujours lebloc d’alimentation avecle câble d’aide au démarragedébranché an qu‘il nepuisse pas y avoirde court-circuit entre les pinces
crocodiles.
7.3 MAINTENANCE
En cas de non utilisation, rechargez le bloc d’alimentation tous les trois mois.
INHOUD
Mini-lithium-powerpack 8.000 mAh met starthulp
1. REGLEMENTAIR GEBRUIK 13
2. LEVERINGSOMVANG 13
3. SPECIFICATIES 13
4.VEILIGHEIDSINSTRUCTIES 13
5. SYMBOOLVERKLARING 14
6. GEBRUIKSAANWIJZING 14
6.1 OVERZICHT 14
6.2 HET POWERPACK OPLADEN 14
6.2.1 HET POWERPACK LADEN MET DE STEKKERLADER 14
6.2.2 HET POWERPACK LADEN MET DE USB4IN1LAADKABEL 14
6.2.3 DE LAADSTATUS CONTROLEREN 14
6.3 STARTHULP VOOR 12VVOERTUIGEN 15
6.4 GEBRUIKVAN HET LEDLICHT/SIGNAALLICHT 15
6.5 USBAPPARATEN OPLADEN 15
7. ONDERHOUD EN VERZORGING 15
7.1 REINIGING 15
7.2 OPSLAG 15
7.3 ONDERHOUD 15
8. INFORMATIE M.B.T. HET MILIEU 15
9. CONTACT INFORMATIE 15

13
WAARSCHUWING
Lees voorafgaand aan de ingebruikname de gebruiksaanwijzing aandachtig door en neem alle veiligheids-
voorschriften in acht!
Het niet-naleven hiervan kan letsel, schade aan het product of aan uw eigendom veroorzaken!
Bewaarde oorspronkelijke verpakking, hetaankoopbewijs ende gebruiksaanwijzingom deze laterte kunnen
raadplegen! Geef bij het doorgeven van het product ook deze gebruiksaanwijzing door.
Controleer de inhoud van de verpakking voor de ingebruikname eerst op beschadigingen en volledigheid!
1. REGLEMENTAIR GEBRUIK
Het mini-lithium-powerpack wordt gebruikt om de accu‘s op te laden van mobiele telefoons, smartphones, tabletcomputers,
MP3-spelers en soortgelijke apparaten die via een USB-kabel kunnen worden opgeladen. Daarnaast kan het apparaat dienen als
starthulp voor 12V-voertuigen met een benzinemotor van max. 2,0 l of een dieselmotor van max. 1,6 l.
Dit product mag niet worden gebruikt door kinderen, mensen met een verstandelijke beperking of mensen die niet over de vereiste
ervaring/kennis beschikken. Houd kinderen uit de buurt van het apparaat.
Het apparaat is niet bedoeld voor bedrijfsmatig gebruik.
Tot het reglementair gebruik behoort ook het in acht nemen van alle informatie in deze gebruiksaanwijzing, in het bijzonder van de
veiligheidsvoorschriften. Elk ander gebruik geldt als niet-reglementair en kan materiële schade of persoonlijk letsel veroorzaken. EAL
GmbH is niet aansprakelijk voor schade als gevolg van niet-reglementair gebruik.
2. LEVERINGSOMVANG
1 x powerpack 1 x USB-4in1-kabel 1 x startkabel
1 x stekkerlader 1 x gebruiksaanwijzing
3. SPECIFICATIES
Afmetingen (L x B x H): 132 x 76 x 25 [mm]
Gewicht: 0,275 kg (powerpack)
Accucapaciteit: 8000 mAh, (29,6Wh)
Accutype: lithium-polymeer
Uitgang: USB 5V DC, 2,1 A,EC5 Starthulp 12 V DC,
200 A (piek 400 A)
Ingang: 12V, 1 A (stekkerlader)
5V, 1 A (micro-USB B-poort)
Temperatuurbereik: -20 °C tot +60 °C
USB-4in1-kabel voor: micro USB B, mini USB B, Lightning,
30-pol. dock
4. VEILIGHEIDSINSTRUCTIES
• De waarschuwingsdriehoek geldt als aanduiding van alle voor de veiligheid belangrijke aanwijzingen. Neem deze te allen
tijde in acht, anders kan lichamelijk letsel of schade aan het apparaat het gevolg zijn.
• Kinderen mogen niet met het apparaat spelen.
• Reiniging en onderhoud mogen niet zonder toezicht door kinderen worden uitgevoerd.
• Laat het verpakkingsmateriaal niet achteloos rondslingeren. Dit kan voor kinderen gevaarlijk speelgoed worden!
• Gebruik dit product uitsluitend voor het beoogde doel!
• Verander of demonteer het product niet!
• Gebruik voor uw eigen veiligheid uitsluitend toebehoren of reserveonderdelen die in de gebruiksaanwijzing staan vermeld
of waarvan het gebruik door de fabrikant wordt aanbevolen!
• Lees, voordat u de starthulp gaat gebruiken, in de handleiding van uw voertuig hoe dit in zijn werk gaat.
• Draag bij het werken met loodaccu‘s altijd een veiligheidsbril en beschermende kleding.
• Loodaccu‘s bevatten agressieve bijtende zuren.Vermijd huid- en oogcontact met vloeistoen uit een loodaccu! Demonteer
eenloodaccu nooit!Was degetroenhuidgrondigmet waterenzeep. Alsuzuur indeogen krijgt, spoelhet danonmiddellijk
uit gedurende minimaal 10 minuten onder stromend, helder, lauw water! Consulteer daarna onmiddellijk een arts!
• Als er zuur op uw kleding komt, spoelt u het uit met veel water en zeep!
• Draag nooit ringen, kettingen, horloges etc. als u met accu‘s en opladers werkt. Kortsluiting van de accupolen kan brand-
wonden of een explosie veroorzaken!
• Het powerpack is uitsluitend bedoeld als starthulp voor motorvoertuigen met een eigen accu. Het powerpack kan niet als
vervanging dienen voor de accu van het voertuig.
• Bewaar het powerpack altijd met ontkoppelde startkabels om kortsluiting tussen de pooltangen te voorkomen.
• Probeer nooit de accu van het powerpack te demonteren en te vervangen. Als de accu aan zijn eind is, moet het volledige
powerpack in overeenstemming met de lokale regelgeving worden afgevoerd.

14
5. SYMBOOLVERKLARING
Komt overeen met de
EG-richtlijnen
Behuizing met randaarde
(beveiligingsklasse II) Gebruiksaanwijzing lezen
Een dienovereenkomstig gemar-
keerd elektrisch product mag niet
als afval via het huisvuil worden
afgevoerd
Apparaten met dit teken mogen
uitsluitend binnenshuis (droge
omgeving) worden gebruikt
6. GEBRUIKSAANWIJZING
6.1 OVERZICHT
Polariteit van de oplaadstekker
1 LED-lamp
2 USB-uitgang
3 Afdekking voor EC5 starthulpaansluiting
4 Laadbus
5 USB-ingang
6 Aan-/uitschakelaar
7 Laadindicator
8 USB-4in1-kabel
9 Startkabel met startbox
10 Stekkerlader
6.2.3 DE LAADSTATUS CONTROLEREN
6.2.2 HET POWERPACK LADEN MET DE USB4IN1LAADKABEL
Steek de micro-USB-stekker van de USB-4in1-laadkabel (positie 8 in het overzicht) in de USB-ingang (positie 5 in het overzicht) van
het powerpack. Daarna steekt u de USB-stekker van de kabel in een USB-oplader, in de USB-uitgang in uw voertuig of in de USB-uit-
gang van uw computer. Steek de oplader in een stopcontact, zet het contact van uw voertuig aan of zet uw computer aan.
Tijdens het laadproces knipperen de controlelampjes van de laadindicator (positie 7 in het overzicht) na elkaar. Het aantal continu
verlichte controlelampjes geeft de laadstatus van de accu aan.Wanneer het opladen is voltooid, branden alle vier de lampjes continu.
6.2.1 HET POWERPACK LADEN MET DE STEKKERLADER
Steek de laadstekker van de stekkerlader (positie 10 in het overzicht) in de laadbus (positie 4 in het overzicht) van het powerpack.
Steek daarna de stekkerlader in een 230V-stopcontact.
Tijdens het laadproces knipperen de controlelampjes van de laadindicator (positie 7 in het overzicht) na elkaar. Het aantal continu
verlichte controlelampjes geeft de laadstatus van de accu aan.Wanneer het opladen is voltooid, branden alle vier de lampjes continu.
6.2 HET POWERPACK OPLADEN
Mochthet een keervoorkomendatu het powerpackmoet opladen zonderdat u toezichterop kunthouden,
plaatst u het tijdens het opladen op een vuurvaste ondergrond (steen, tegel of metalen plaat). Verwijder
alle brandbare objecten binnen een straal van één meter.
Verwijder de laadkabel uit de laadbus. Druk op de schakelaar (positie 6 in het overzicht) van het apparaat om de laadstatus te contro-
leren. De laadstatus kan worden afgelezen van de verlichte controlelampjes.
Controlelampjes 1 1+2 1+2+3 1+2+3+4
Laadstatus 25 % 50 % 75 % 100 %
• Laad de accu van het powerpack nooit op met een beschadigde oplader.
• Laat het powerpack bij het opladen niet zonder toezicht achter.
• Gebruik uitsluitend de bijgeleverde accessoires voor het opladen van de accu.
• Probeer nooit een jumpstart uit te voeren bij een bevroren accu, deze kan daarbij ontploen.
• Bewaar deze gebruiksaanwijzing goed en geef hem door aan andere gebruikers.

15
6.3 STARTHULP VOOR 12 VVOERTUIGEN
1. Schakel het contact en alle verbruikers op uw voertuig uit.
2. Zorg ervoor dat ten minste drie controlelampjes (min. 75% accucapaciteit)
van de laadindicator continu branden en dat de accupolen van uw voertuigaccu
niet vuil of geoxideerd zijn. Verbind het powerpack en de startkabel (positie 9 in
het overzicht) door de stekker van de startbox van de startkabel in de starthul-
paansluiting (positie 3 in het overzicht) van het powerpack te steken, zie afb. 2.
Zorg ervoor dat de stekker correct en stevig is ingestoken. Het controlelampje
van de startbox knippert afwisselend rood/groen.
3.Sluit eerst de rode pooltang van de startkabel aan op de pluspool en vervol-
gens de zwarte pooltang op de minpool van de voertuigaccu. De pooltangen
moeten stevig en betrouwbaar contact maken met de accupolen.
Als de kabels met omgekeerde polariteit zijn aangesloten of als er kortsluiting
is, brandt het controlelampje van de startbox rood en klinkt er een alarmtoon.
4. Als de startkabels correct zijn aangesloten, schakelt u het contact van uw vo-
ertuig in. Het controlelampje brandt nu continu groen.
5. Start de motor van uw voertuig. Laat de starter niet langer dan 3 seconden
werken. Mocht de motor niet starten, wacht dan minimaal twee minuten tot
u een hernieuwde startpoging doet. Ga na de derde mislukte startpoging niet
verder, maar controleer of er een defect aan uw voertuig is.
6.Trek de startkabel uit het powerpack.Verwijder vervolgens de pooltangen van
de voertuigaccu.
Afb. 2: Startkabel aansluiten
Afb. 3: Controlelampje startbox
9. CONTACT INFORMATIE
EAL GmbH
Otto-Hausmann-Ring 107
42115 Wuppertal, Duitsland
+49 (0)202 42 92 83 0
+49 (0) 202 42 92 83 – 160
info@eal-vertrieb.com
www.eal-vertrieb.com
8. INFORMATIE M.B.T. HET MILIEU
Gooi elektrische apparaten niet weg bij het huisvuil! Elektrische en elektronische apparaten moeten gescheiden worden
ingezameld en op milieuvriendelijke wijze worden gerecycled. Meer informatie over het afvoeren van elektrische en elek-
tronische apparaten kunt u opvragen bij de gemeente of het stadsbestuur.
De materialen kunnen worden gerecycled. Door recycling of andere vormen van hergebruik van oude producten levert u
een belangrijke bijdrage aan de bescherming van ons milieu!
7. ONDERHOUD EN VERZORGING
6.4 GEBRUIK VAN HET LEDLICHT/SIGNAALLICHT
Om de continue verlichting van de LED-lamp in te schakelen, houdt u de aan-/uitschakelaar (positie 6 in het overzicht) van het power-
pack ongeveer 3 seconden ingedrukt.Vervolgens kunt u de volgende verlichtingsfuncties na elkaar inschakelen door herhaald op de
schakelaar te drukken: Knipperen - SOS - UIT.
6.5 USBAPPARATEN OPLADEN
Selecteer de juiste aansluiting op de USB-4in1-kabel (positie 8 in het overzicht) voor uw USB-apparaat en sluit deze aan. Sluit de
USB-stekker aan op de USB-uitgang (positie 2 in het overzicht) van het powerpack. Druk op de schakelaar (positie 2 in het overzicht)
van het powerpack om het laadproces te starten.
Nadat het laadproces is voltooid, gaan de lampjes voor de laadstatus (positie 7 in het overzicht) uit. Koppel eerst de oplaadkabel los
van het powerpack en verwijder vervolgens de laadkabel van uw USB-apparaat.
7.1 REINIGING
Reinig het mini-lithium-powerpack met een zachte doek en gebruik geen agressieve schoonmaakmiddelen of oplosmiddelen. Laat
nooit vloeistoen in de behuizing terechtkomen.
7.2 OPSLAG
Bewaar het mini-lithium-powerpack op een droge plaats als u het niet gebruikt. Stel het powerpack niet bloot aan vocht, olie, stof,
vuil, hoge temperaturen, sterke trillingen of mechanische belastingen. Bewaar het powerpack altijd met ontkoppelde startkabels om
kortsluiting tussen de pooltangen te voorkomen.
7.3 ONDERHOUD
Laad het powerpack om de drie maanden op als het niet wordt gebruikt.

16
INDICE
1. USO CONFORME
IlMini-Lithium Powerpackserveperla ricarica delle batteriericaricabili di telefonicellulari,smartphone,computer/tablet,lettoriMP3
e dispositivi simili, che possono essere ricaricati con un cavo USB. Inoltre, può fungere da avviamento d‘emergenza per i veicoli a 12V
con motore a benzina da massimo 2,0 l o con motore a diesel da massimo 1,6 l.
Questo dispositivo non è destinato all‘uso da parte di bambini e persone con capacità mentali limitate o che non siano in possesso
delle necessarie conoscenze. Tenere il dispositivo lontano dalla portata dei bambini.
Questo dispositivo non è destinato all‘impiego industriale.
Dell’uso appropriato fa parte anche il rispetto di tutte le informazioni fornite in queste istruzioni, soprattutto delle avvertenze sulla
sicurezza. Qualsiasi impiego diverso da quello previsto è da considerarsi inappropriato e può provocare danni a persone o cose. EAL
GmbH non si assume nessuna responsabilità per eventuali danni provocati dall‘uso improprio.
2. VOLUME DI CONSEGNA
1 x Powerpack 1 x cavo USB 4in1 1 x cavo per avviamento emergenza
1 x caricatore a spina 1 x manuale d’uso
3. SPECIFICHE
Dimensioni (Lun x Lar x Alt): 132 x 76 x 25 [mm]
Peso: 0,275 kg (Power Pack)
Capacità della batteria: 8000 mAh (29,6Wh)
Tipo di batteria: ai polimeri di litio
Uscita: USB 5V DC, 2,1 A, avviamento
d‘emergenza EC5 12V DC, 200 A
(picco 400 A)
Ingresso: 12V, 1 A (caricatore a spina)
5V, 1 A (porta Micro-USB B)
Campo di temperatura: da -20 °C a +60 °C
Cavo USB 4in1 per: Micro USB B, Mini USB B,
Lightning, dock a 30 vie
Mini-Lithium Powerpack 8000mAh con avviamento d‘emergenza
AVVERTENZA
Leggere attentamente le istruzioni per l‘uso prima della messa in funzione e osservare tutte le avvertenze
di sicurezza! La mancata osservanza di queste istruzioni può provocare lesioni personali, danni al prodotto o
alla vostra proprietà! Conservare l‘imballo originale, la ricevuta di acquisto e il presente manuale per poterlo
eventualmente consultare in seguito! Quando si consegna il prodotto a terzi, consegnare anche il presente
manuale.
Prima della messa in funzione vericare l‘integrità e la completezza del contenuto della confezione!
1. USO CONFORME 16
2.VOLUME DI CONSEGNA 16
3. SPECIFICHE 16
4. AVVERTENZE DI SICUREZZA 17
5. SPIEGAZIONE DEI SIMBOLI 17
6. 5. ISTRUZIONI PER L‘USO 17
6.1 SCHEMA 17
6.2 RICARICA DEL POWERPACK 18
6.2.1 RICARICA DEL POWERPACK CON IL CARICATORE A SPINA 18
6.2.2 RICARICA DEL POWERPACK CON IL CAVO DI RICARICA USB 4IN1 18
6.2.3 CONTROLLO DEL LIVELLO DI CARICA 18
6.3 AVVIAMENTO D‘EMERGENZA PER VEICOLI A 12V 18
6.4 UTILIZZO DELLA SPIA LED / SPIA DI SEGNALAZIONE 18
6.5 RICARICA DEI DISPOSITIVI USB 19
7. MANUTENZIONE E PULIZIA 19
7.1 PULIZIA 19
7.2 CONSERVAZIONE 19
7.3 MANUTENZIONE 19
8. AVVERTENZE SULLATUTELA AMBIENTALE 19
9. CONTACTINFORMATIE 19

17
5. SPIEGAZIONE DEI SIMBOLI
4. AVVERTENZE DI SICUREZZA
• Il triangolo di segnalazione identica tutte le istruzioni importanti per la sicurezza. Rispettare sempre queste istruzioni, per
evitare il pericolo di lesioni personali o danni al dispositivo.
• I bambini non devono giocare con l‘apparecchio.
• Non adare pulizia e manutenzione ai bambini se non sorvegliati.
• Non lasciare il materiale d‘imballaggio in giro incustodito. Potrebbe infatti diventare un pericoloso giocattolo per i bambini!
• Utilizzare questo prodotto solo per lo scopo previsto!
• Non manomettere né smontare il prodotto!
• Per la propria sicurezza, utilizzare solo gli accessori e i pezzi di ricambio indicati nelle istruzioni o consigliati dal produttore!
• Prima di eettuare un avviamento d‘emergenza, consultare il manuale del proprio veicolo in merito alla procedura per l‘av-
viamento d‘emergenza.
• Mentre si utilizzano le batterie al piombo, indossare sempre occhiali di protezione e indumenti protettivi.
• Le batterie ricaricabili al piombo contengono acidi corrosivi aggressivi. Evitare il contatto della pelle e degli occhi con i liquidi
che fuoriescono dalla batteria ricaricabile al piombo! Non smontare mai le batterie ricaricabili al piombo! Lavare a fondo
con acqua e sapone le parti della pelle interessate. Se l‘acido penetra in un occhio, sciacquare l‘occhio immediatamente per
almeno 10 minuti sotto acqua corrente pulita e tiepida! Dopodiché contattare subito un medico!
• Se l‘acido viene a contatto con i propri indumenti, lavarli immediatamente e abbondantemente con acqua e sapone!
• Mentre siutilizzano batterieo caricabatterie, nonindossaremai anelli,collane,orologiosim. Ilcortocircuitodei contattidella
batteria comporta il rischio di ustioni e di esplosione!
• Il Powerpack è concepito esclusivamente per l‘avviamento d‘emergenza di un autoveicolo dotato di batteria propria. Il Pow-
erpack non può sostituire la batteria del veicolo.
• Conservare sempre il Powerpack con il cavo per l‘avviamento d‘emergenza staccato, in modo che non si crei un cortocircuito
tra i morsetti.
• Non tentare di smontare e di sostituire la batteria ricaricabile del Powerpack. Al termine della durata utile della batteria,
smaltire l‘intero Powerpack in conformità con le direttive locali.
• Non ricaricare la batteria del Powerpack tramite un caricabatteria danneggiato.
• Non lasciare incustodito il Powerpack durante il processo di ricarica.
• Per la ricarica del Powerpack, utilizzare esclusivamente gli accessori forniti in dotazione.
• Non eettuare mai l‘avviamento d‘emergenza con una batteria congelata, altrimenti si rischia di provocare esplosioni.
• Conservare accuratamente le presenti istruzioni d’uso e consegnarle anche agli altri utilizzatori.
Conforme alle
direttive CE
Alloggiamento protettivo
isolato (classe di prote-
zione II)
Leggere le istruzioni d‘uso
I dispositivi elettrici contrassegnati
con questo simbolo non vanno get-
tati nei riuti domestici
I dispositivi contrassegnati con
questo simbolo sono destinati
all‘uso domestico (in ambienti
asciutti)
6. 5. ISTRUZIONI PER L‘USO
6.1 SCHEMA
Polarità della spina di carica
1 Lampadina a LED
2 Uscita USB
3 Copertura per porta avviamento
emergenza EC5
4 Presa di ricarica
5 Ingresso USB
6 Interruttore di accensione
7 Indicatore del livello di carica
8 Cavo USB 4in1
9 Cavo avviamento emergenza con
scatola avviamento
10 Caricatore a spina

18
6.2.3 CONTROLLO DEL LIVELLO DI CARICA
6.2.2 RICARICA DEL POWERPACK CON IL CAVO DI RICARICA USB 4IN1
Inserire la spina Micro-USB B del cavo di ricarica USB 4in1 (pos. 8 dello schema) nella porta di ingresso USB (pos. 5 dello schema) del
Powerpack. Quindi inserire la spina USB del cavo in un caricabatteria USB oppure nella porta di uscita USB del veicolo o in quella del
proprio computer. Collegare il caricabatteria a una presa, avviare il veicolo o accendere il computer.
Durante la fase di ricarica, le spie di controllo dell‘indicatore del livello di carica (pos. 7 dello schema) lampeggiano una dopo l‘altra: il
numero delle spie permanentemente accese indica il livello di carica del Powerpack. Una volta terminato il processo di ricarica, tutte
e quattro le spie di controllo si accendono a luce ssa.
6.2.1 RICARICA DEL POWERPACK CON IL CARICATORE A SPINA
Inserire la spina di ricarica del caricatore a spina (pos. 10 dello schema) nella presa di ricarica del Powerpack (pos. 4 dello schema).
Quindi collegare il caricabatterie a una presa di alimentazione a 230V.
Durante la fase di ricarica, le spie di controllo dell‘indicatore del livello di carica (pos. 7 dello schema) lampeggiano una dopo l‘altra: il
numero delle spie permanentemente accese indica il livello di carica del Powerpack. Una volta terminato il processo di ricarica, tutte
e quattro le spie di controllo si accendono a luce ssa.
6.2 RICARICA DEL POWERPACK
Nel caso in cui si dovesse ricaricare il Powerpack senza poterlo sorvegliare, posizionarlo per la ricarica su
una base resistente al calore (pietra, piastrelle o piastra metallica). Allontanare tutti gli oggetti inamma-
bili nel raggio di un metro.
Scollegare il cavo di ricarica dalla presa. Premere l‘interruttore (pos. 6 dello schema) del dispositivo per controllare il livello di carica.
Il livello di carica si ricava dalle spie di controllo accese.
Spie di controllo 1 1+2 1+2+3 1+2+3+4
Livello di carica 25 % 50 % 75 % 100 %
6.3 AVVIAMENTO D‘EMERGENZA PER VEICOLI A 12V
1. Sul proprio veicolo, disinserire l‘accensione e tutte le utenze.
2. Assicurarsi che almeno tre spie di controllo (min. il 75 % della capacità della
batteria) dell‘indicatore del livello di carica siano accese permanentemente e che
i poli della batteria non siano sporchi o ossidati. Collegare il Powerpack e il cavo
per l‘avviamento d‘emergenza (pos. 9 dello schema) inserendo il connettore del-
la scatola d‘avviamento del cavo nella relativa porta (pos. 3 dello schema) del
Powerpack, vedi gura 2. Assicurarsi che il connettore sia inserito saldamente e
correttamente. La spia di controllo della scatola d’avviamento lampeggia alter-
nativamente in rosso e verde.
3.Verbinden Sie zuerst die rote Polzange des Starthilfekabels mit dem Pluspol und
danach die schwarze Polzange mit dem Minuspol der Fahrzeugbatterie. Die Pol-
zangen müssen einen festen und sicheren Kontakt zu den Batteriepolen haben.
Bei verpoltangeschlossenen KabelnoderbeiKurzschlußleuchtetdie Kontrolleuch-
te der Startbox rot und es ertönt einWarnton.
4. Se i cavi per l’avviamento d’emergenza sono collegati correttamente, avviare
il veicolo. La spia di controllo è ora accesa ssa in verde.
5. Avviare il motore del veicolo. Lasciare funzionare l‘avviatore per non più di
3 secondi. Se il tentativo di avviamento non va a buon ne, attendere almeno
due minuti prima di riprovare. Dopo il terzo tentativo fallito, non riprovare ma
controllare eventuali malfunzionamenti del veicolo.
6. Scollegare il cavo per l’avviamento d’emergenza dal Powerpack. Dopodiché,
staccare i morsetti dalla batteria del veicolo.
Figura 2: Collegamento cavo per
avviamento emergenza
Figura 3: Spia di controllo
scatola d’avviamento
6.4 UTILIZZO DELLA SPIA LED / SPIA DI SEGNALAZIONE
Um das Dauerlicht der LED-Leuchte einzuschalten, halten Sie den EIN-Schalter (Position 6 in der Übersicht) des Powerpacks für ca.
3 Sekunden gedrückt. Danach können Sie durch erneutes Drücken des Schalters die folgenden Lichtfunktionen hintereinander ein-
schalten: Blinken – SOS – AUS.

19
9. CONTACTINFORMATIE
EAL GmbH
Otto-Hausmann-Ring 107
42115 Wuppertal, Germania
+49 (0)202 42 92 83 0
+49 (0) 202 42 92 83 – 160
info@eal-vertrieb.com
www.eal-vertrieb.com
8. AVVERTENZE SULLA TUTELA AMBIENTALE
Non smaltire gli apparecchi elettrici insieme ai riuti domestici! I dispositivi elettrici ed elettronici devono essere separati
e destinati al riciclaggio. Per le possibilità di smaltimento delle apparecchiature elettriche ed elettroniche, informarsi
presso il proprio comune.
I materiali sono riciclabili. Con il riciclaggio, il recupero del materiale e altre forme di riutilizzo di prodotti usati si fornisce
un contributo importante per la protezione dell‘ambiente!
7. MANUTENZIONE E PULIZIA
6.5 RICARICA DEI DISPOSITIVI USB
Wählen Sie den passenden Anschluß am USB-4in1-Kabel (Position 8 in der Übersicht) für Ihr USB-Gerät aus und schließen Sie es an.
Schließen Sie den USB-Stecker an den USB-Ausgang (Position 2 in der Übersicht) des Powerpacks an. Drücken Sie den Schalter (Posi-
tion 2 in der Übersicht) des Powerpacks, um den Ladevorgang zu starten.
Nachdem der Ladevorgang abschlossen ist, gehen die Kontrolleuchten für den Ladezustand (Position 7 in der Übersicht) aus. Ziehen
Sie zuerst das Ladekabel vom Powerpack ab, dann entfernen Sie das Ladekabel von Ihrem USB-Gerät.
7.1 PULIZIA
Pulire il Mini-Lithium Powerpack esclusivamente con un panno morbido e non utilizzare detergenti né solventi aggressivi. Evitare
sempre che eventuali liquidi penetrino all‘interno dell‘alloggiamento.
7.2 CONSERVAZIONE
Se non viene utilizzato, conservare il Mini-Lithium Powerpack in un luogo asciutto. Non esporre il Powerpack a umidità, olio, polvere,
sporcizia, temperature elevate, forti vibrazioni o sollecitazioni meccaniche. Conservare sempre il Powerpack con il cavo per l‘avvia-
mento d‘emergenza staccato, in modo che non si crei un cortocircuito tra i morsetti.
7.3 MANUTENZIONE
Se non si utilizza il Powerpack, ricaricarlo ogni tre mesi.
Table of contents
Languages:
Other APA Remote Starter manuals
Popular Remote Starter manuals by other brands

Voxx Electronics
Voxx Electronics Pursuit PRO9556Z owner's guide

Omega
Omega Omegalink OL-RS-FO1 install guide

Audiovox
Audiovox Prestige Platinum+ APS 686 owner's manual

Halo
Halo Compact Bolt quick start guide

Gianni Industries
Gianni Industries DG-5 Operation user's manual

NOCO Genius
NOCO Genius BOOST X user guide