SPAD Derelict Instruction Manual

Derelict
file:///C|/Users/Frank/Documents/Spad%20Plans%20in%20PDF%20format/zipped/derelict/index.html[6/15/2011 2:15:55 PM]
SPAD
Simple Plastic Airplane Design
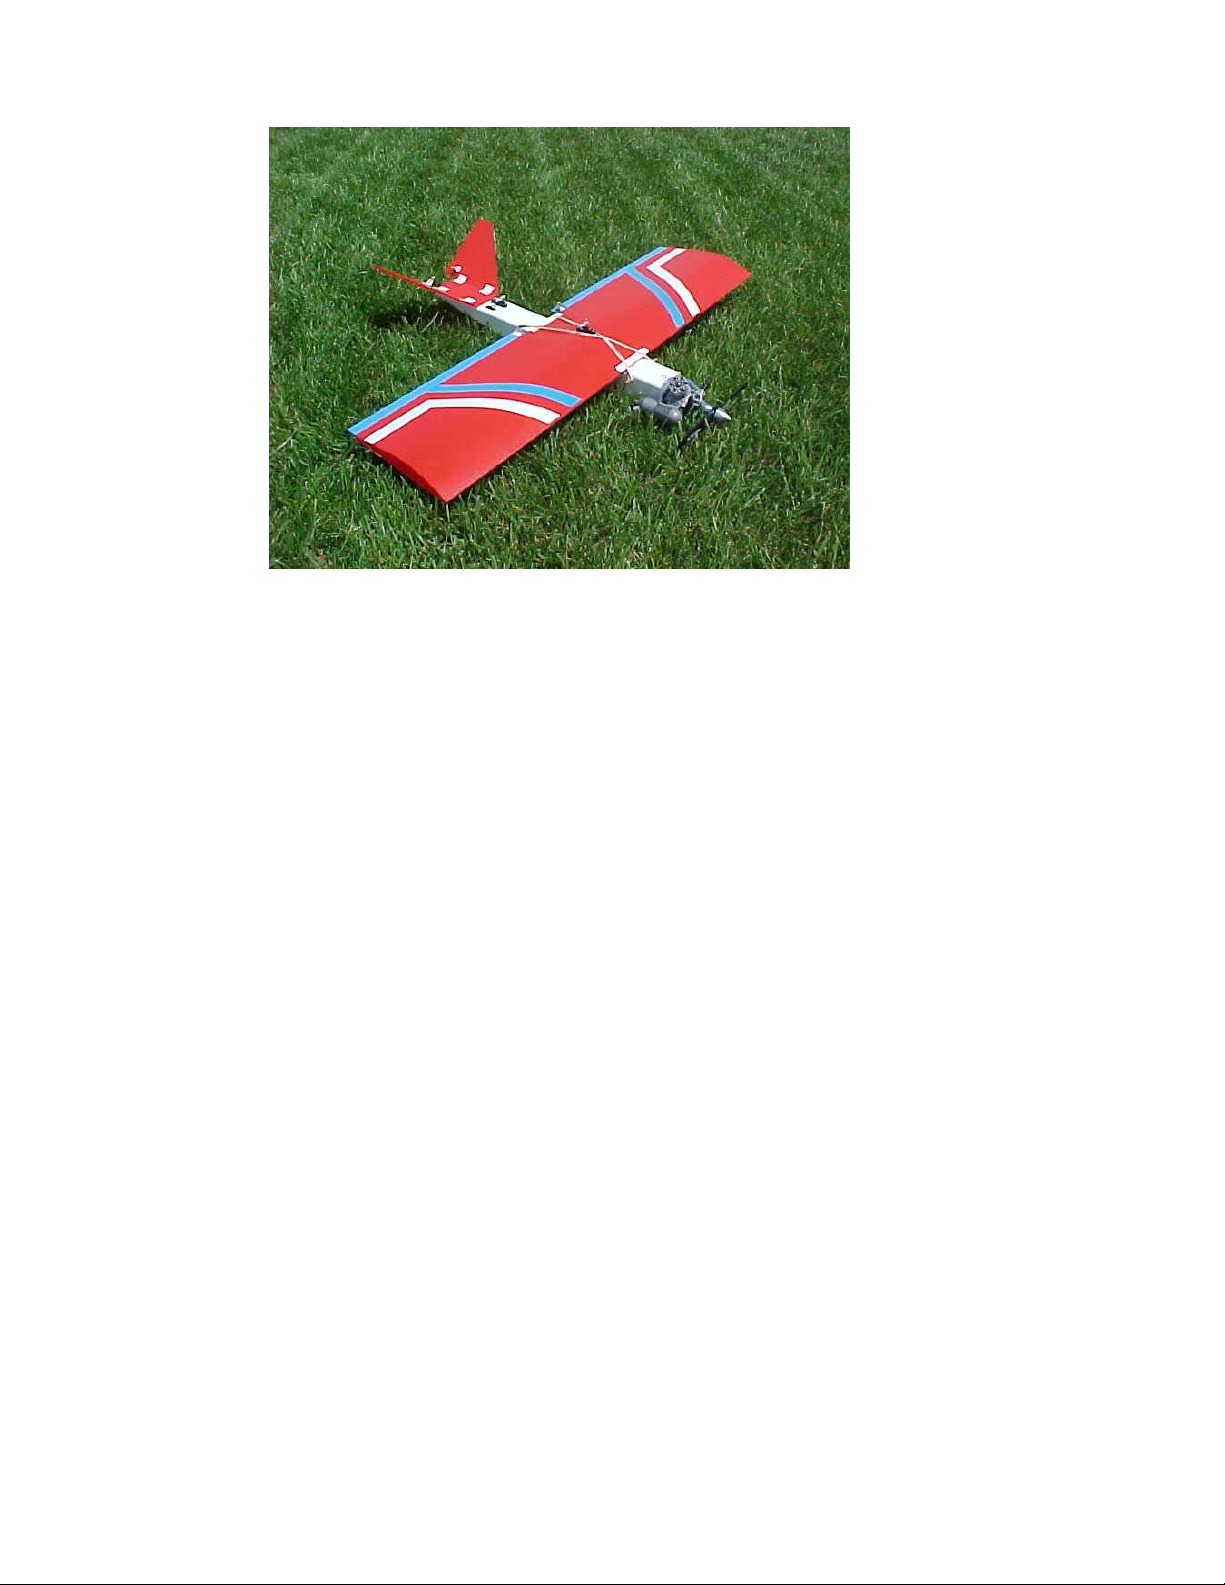
SPAD Derelict
The Derelict. This is our third design entry for an RCCA legal open "B" class plane.
The main difference in this design is the choice of materials. We use 2 mil
Coroplast® for the wing, and the fuselage is made from a light weight, smaller O.D.
gutter pipe. All up flying weight with a Magnum® .25, three Hitec® HS-81 servos
and a 270 mah battery is 2 lb 4 oz! The Derelict is our best flying open "B" class
design yet, and boy does she fly!
--------------------------------------------------------------------------------
Type: Combat
Wingspan: 36"
Length: 24"
Engine: .25 - .30
Channels: 3 - Elevator, Ailerons & Throttle
[S.P.A.D.] [SPAD Index] [Build] [Overview] [Wing] [Tail] [Fuse] [Rx Install]
Build
file:///C|/Users/Frank/Documents/Spad%20Plans%20in%20PDF%20format/zipped/derelict/build.html[6/15/2011 2:15:56 PM]
SPAD Derelict Building Instructions
The Derelict does not contain any new secrets or design breakthroughs, in
fact it's construction is extremely simple and true to all it's other SPAD family
members. The difference here is material selection! We have discovered that
our local Pay-Less Cashways carries a Canadian brand of PVC gutter pipe
that has a thinner wall & also has a smaller O.D. measurement (2 3/8"), and it
is much lighter than American made gutter pipe (about half the weight!). We
have also discovered that our local Coroplast® supplier can special order 2
MIL Coroplast®, which is half the thickness, and almost half the weight of the
4 MIL we have been using. The Derelict uses the 2 MIL Coroplast® for the
wing, and 4 MIL Coroplast® for the tail, and ailerons. The 2 MIL Coroplast®
is flexible enough to bend perfectly over the wing spar, without the need for
any upper airfoil folds! In only it's second outing, the prototype Derelict
(piloted by Kraut) won an RCCA event in Smithville, Missouri! It was up
against a Raptor, a Fun Bat, and three SPAD Defenders. The prototype was
equipped with a Magnum® .25, a 270 mah battery pack, three Hitec® HS-81
servos, and weighed in at less than 2 1/2 pounds! This plane is most
certainly geared towards experienced builders and flyers, so these
instructions will be right to the point. If you have any further questions, please
don't hesitate to post them on our SPAD message board .
Fuselage:
1) Starting with a 24" piece of Gutter pipe, measure, mark, and cut out the
radio access hole, and rear cut out as shown on the fuselage drawing. A
Dremel® with a cutting wheel works best for this. There in NO down or right
thrust on the Derelict. If you are using full size radio gear - see the note
below, if not, procede to step 2.
NOTE: If you are planning on using full size radio gear, we highly
recommend installing all of the radio gear, engine and fuel tank in the
fuselage first (before drilling the wing hold down dowel holes). Then take the
wing and tape it to the fuselage - sliding it fore and aft as necessary - until the

Build
file:///C|/Users/Frank/Documents/Spad%20Plans%20in%20PDF%20format/zipped/derelict/build.html[6/15/2011 2:15:56 PM]
correct CG position is achieved. Mark the fuselage where the leading and
trailing edges are on the fuselage. Then mark and drill for the dowel holes -
keeping them 1/2" in front of the leading edge mark and a 1/2" aft of the
trailing edge mark you made earlier. If you build the Derelict per plans, and
you use full size gear, you will have an extremely tail heavy airplane that you
may not be able to balance correctly!
2) Drill for, and install the 4 1/2" long x 3/16" dia. wing hold down dowels as
shown. Fuel proof the hold down dowels with CA.
NOTE: Install the wing hold down dowels as close to the upper fuselage
gutter pipe radius as possible to assure proper fuel tank clearance!
3) With the rear fuselage cut out scrap, fabricate 4 control horns, two wing
rubber band protectors, one V-tail support, and two small aileron servo
mounting pieces (size will be determined by the servo you use).
4) The firewall is fabricated from 1/2" plywood cut to the inside diameter of
the gutter pipe, and is mounted flush with the forward edge of the fuselage
with four #6 x 1/2" self tapping screws.
5) Drill a small hole in the rear left side lip of the fuselage for combat
streamer attachment!
Tail:
1) Cut the V-tail from 4 MIL Coroplast® as shown on the tail drawing, with
the corrugations running spanwise.
2) Hinge the elevators by cutting away the bottom side of the hinge line
corrugation.
3) Using a straight edge, and small blunt tipped item (such as a #1 phillips
screwdriver) score the inside radius of the two fold lines, and bend the V-tails
over the edge of a table.
4) Mark the PVC V-tail support bend locations. Using a propane torch (even
a cigarette lighter will work) heat up the PVC, and bend each side to a 45°
angle. Bending over a block of wood or table edge will assure a nice crisp
bend.
5) Using a propane torch "flame" the tail and V-tail support. Using medium
CA, glue the V-tail support in place as shown in the drawing.
6) The tail is attached to the fuselage using two #6 x 1/2" self tapping screws.
Make sure the pilot holes you drill in the fuselage are small enough to allow
good screw grip!
NOTE: The location of the V-tail support, and the tail mounting screws is not
critical, as long as the support is roughly centered in the "meat" of the tail,
and the mounting screws are near the outer edge of the fuselage. What is

Build
file:///C|/Users/Frank/Documents/Spad%20Plans%20in%20PDF%20format/zipped/derelict/build.html[6/15/2011 2:15:56 PM]
critical is getting the tail mounted square! Also, the outward pressure of the 4
MIL Coroplast® on the V-tail support may enlarge your V-tail angle. This is
acceptable up to 120° total angle, and will even give your elevators more
authority!
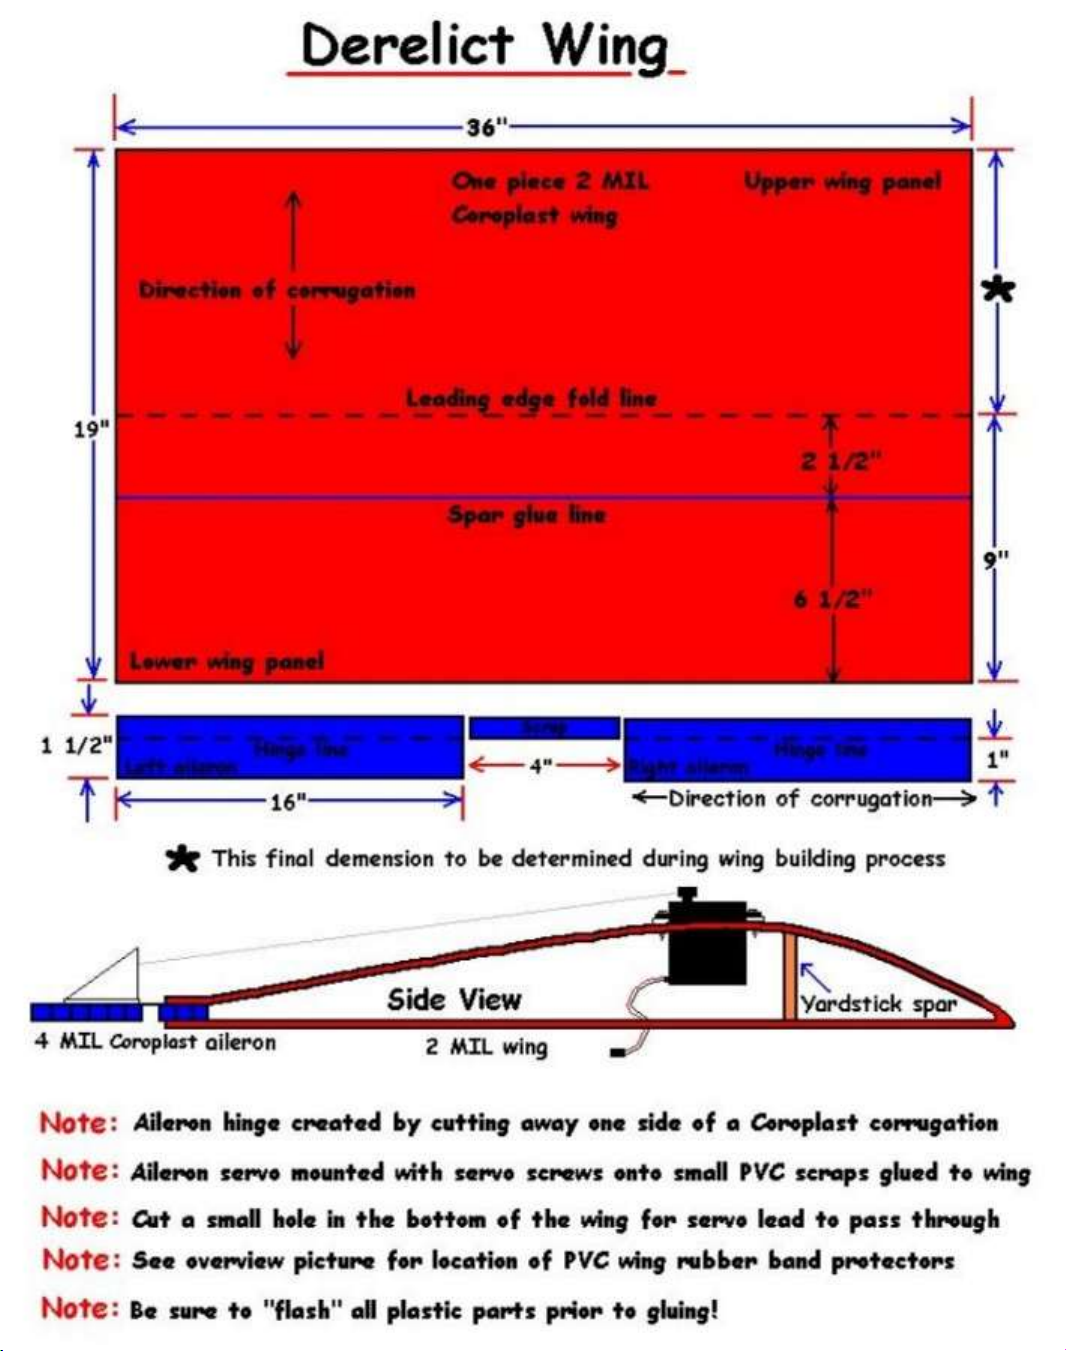
Wing:
1) The wing is fabricated from a 36" x 19" piece of 2 MIL Coroplast®, with the
corrugations running chordwise
2) The ailerons are fabricated from 4 MIL Coroplast® with the corrugations
running spanwise. Hinge as shown in the drawing. A 4" piece of 4 MIL scrap
is used as a filler between the ailerons.
3) Mark the wing leading edge fold line, and spar glue line. Using a straight
edge and small blunt tipped object, score the inner radius of the leading edge
fold line, and bend over the edge of a table.
NOTE: Flame all plastic parts with a propane torch before gluing! Medium CA
is used for all wing construction. USE SMALL 1/8" DROPS EVERY INCH OR
SO. A BEAD OF GLUE MAY NOT WORK! USING TOO MUCH GLUE IS
THE BIGGEST MISTAKE HERE!
4) Glue a standard 36" yardstick to the spar glue line (see note below before
glueing your spar down).
NOTE: While utilizing a standard width yardstick is fully acceptable, we have
discovered that if you cut it down to 7/8" wide, you will notice an increase the
overall speed of the Derelict, while retaining it's outstanding turning ability!
So if you want to gain an extra speed "edge", cut the yardstick down to 7/8"!
5) Test bend the wing top panel over the spar. Here is where things can get
tricky, and it's nice to have 5 hands or a helper! The bottom wing panel
should remain flat, and the top panel trailing edge must be marked and
trimmed flush with the bottom panel trailing edge. Once accomplished, unfold
the wing, and glue the ailerons and filler piece to the bottom wing panel.
6) Fold and glue the top panel to the spar and trailing edge. A wood 2 x 4
works great for holding the trailing edge down! Kraut has found that holding
the leading edge down with a piece of angle iron while glueing also works
great!
NOTE: By nature, the leading edge of your finished wing may be slightly
raised, and your lower wing may be slightly undercambered towards the rear.
This is acceptable, and is what gives this airplane such great performance!
7) Glue the PVC rubber band protectors to the leading and trailing edge as
shown on the overview drawing.
Engine and Fuel Tank:

Build
file:///C|/Users/Frank/Documents/Spad%20Plans%20in%20PDF%20format/zipped/derelict/build.html[6/15/2011 2:15:56 PM]
1) The fuel tank is wrapped in foam for a snug fit, and the engine and engine
mount are mounted conventionally. Make sure the throttle pushrod housing
doesn't chafe directly on the fuel tank (we've learned this one the hard way!).
We have also learned that mounting the engine at 45° (muffler down) not
only helps keep goop off your plane, but helps fuel draw during high G
maneuvers!
Radio Installation:
NOTE: Your engine and gas tank should already be mounted at this point.
USE YOUR RADIO EQUIPMENT PLACEMENT TO ACHIEVE PROPER CG.
Your Derelict MUST balance level to slightly nose heavy at the wing spar. A
tail heavy condition is not acceptable, and is VERY unsafe!
1) Glue the elevator and aileron control horns in place. Be sure to take into
account the pushrod angles on the ailerons. FLAMING OF THE HORNS
AND CONTROL SURFACES PRIOR TO GLUEING IS VERY IMPORTANT!!!
2) Cut a hole in the wing just aft of the spar for a snug aileron servo fit. Flame
and glue the two PVC aileron servo mounts to the wing. Cut a small hole in
the bottom of the wing for the servo lead. Drill for, and mount the aileron
servo using servo screws.
3) Mount the elevator servo by cutting a hole in the rear fuselage to accep
the servo, and secure using servo screws.
4) Secure the throttle servo to the inside of the fuselage using two sided
foam mounting tape. For extra security, you may wish to drill a hole on each
side of the servo in the fuselage, and secure with a zip-tie.
5) The battery and receiver are wrapped in foam for a snug fit. We have also
used two sided foam mounting tape or velcro for this. As this is a combat
plane, we recommend filling all voids inside the fuselage with foam to protect
your equipment. We also recommend drilling holes in the fuselage on each
side of the battery, and further securing
it in place with a zip-tie!
6) Switch mounting and antenna routing are a matter of personal preference.
A section of plastic tubing glued to the inside of the fuselage makes a great
antenna guide, and the switch on the prototype is mounted on top of the
fuselage near the elevator servo.
7) Set your control surface throws as follows: set ailerons & elevators - 1/2"
to 3/4" up & down (1" to 1 1/2" total).
NOTE: When rigging your ailerons, ensure that the bottom of the ailerons are
parallel to the top of the fuselage! Do not allow then to droop (like flaps)! If
your ailerons droop, they will drastically affect pitch trim!
Flying your Derelict:

Build
file:///C|/Users/Frank/Documents/Spad%20Plans%20in%20PDF%20format/zipped/derelict/build.html[6/15/2011 2:15:56 PM]
1) Follow ALL AMA safety codes!
2) Attach your wing with at least 12 #64 rubber bands
3) Make sure your prop is clocked to stop horizontal, and that your throttle is
rigged to shut the engine off for landing.
4) Have some one else hand launch your plane until you have it trimmed out
properly. IF YOU ARE NOT AN EXPERIENCED PILOT, DO NOT ATTEMPT
TO FLY YOUR DERELICT BY YOURSELF - PLEASE FIND SOMEONE
EXPERIENCED TO HELP YOU!
5) Fuel up and go kick some serious butt!
As always, send pictures if you would like to show off your plane on the
SPAD gallery! And if you have any further questions, please don't hesitate to
post them on our SPAD message board !
[S.P.A.D.] [SPAD Index] [Derelict] [Build] [Overview] [Wing] [Tail] [Fuse] [Rx Install]


Other SPAD Toy manuals


Popular Toy manuals by other brands

AEROPLANE HEAVEN
AEROPLANE HEAVEN ZLIN Z50 LS Guide

THE WORLD MODELS
THE WORLD MODELS Jeff Troy's TAMEcat Trainer 40 ARF instruction manual

Hangar 9
Hangar 9 toledo special 40 Assembly manual

Fisher-Price
Fisher-Price H6430 instruction sheet

Rail King
Rail King Scale GP-20Diesel Engine Operator's manual

Mega Bloks
Mega Bloks Barbie Build'n Play Horse Event manual


MTHTrains
MTHTrains Premier GP-40 Operator's manual

Black Horce Model
Black Horce Model L-39 Albatros BH141 instruction manual

MODSTER
MODSTER COMPASS 206212 manual

NINCOAIR
NINCOAIR EC-135 EUROCOPTER G 180 PALM G Handbook

Eduard
Eduard P-51D undercarriage manual

Composite-ARF
Composite-ARF Extra 330L instruction manual