sparkfun DEV-14475 Technical document

Noisy Cricket Stereo Amplifier - 1.5W Hookup Guide
Introduction
The Noisy Cricket Stereo Amplifier, uses the LM4853 which can be configured to output up to 1.5W of power in
mono operation (4Ω load) or 300mW per channel in stereo operation (8Ω load). The amplifier comes with a dual-
ganged pot with a built in switch to control power and adjust both left and right channel gain. In this tutorial, we’ll
show how to wire it up and crank up your tunes!
SparkFun Noisy Cricket Stereo Amplifier - 1.5W
DEV-14475
Product Showcase: Noisy Cricket & Soundie Audio Boards
Y
O
U
R
A
C
C
O
U
N
T
L
O
G
I
N
R
E
G
I
S
T
E
R

Suggested Materials
Here are some related products that will help you get started with the Noisy Cricket:
Surface Transducer - Large
COM-10975
SparkFun TRRS 3.5mm Jack Breakout
BOB-11570
Speaker - 0.5W (8 Ohm)
COM-09151
Audio Cable TRRS - 18" (pigtail)
CAB-11580
Black Knob - 15x19mm
COM-09998
Audio Plug - 3.5mm
COM-11143

Tools
You will need a soldering iron, solder, and general soldering accessories.
Suggested Reading
If you aren’t familiar with the following concepts, we recommend checking out these tutorials before continuing.
Audio Jack - 3.5mm (Panel Mount)
COM-11154
Black Chicken Head Knob - 14x20mm
COM-10000
Solder Lead Free - 100-gram Spool
TOL-09325
Weller WLC100 Soldering Station
TOL-14228
How to Solder: Through-Hole Soldering
This tutorial covers everything you need to know about
through-hole soldering.
Working with Wire
How to strip, crimp and work with wire.

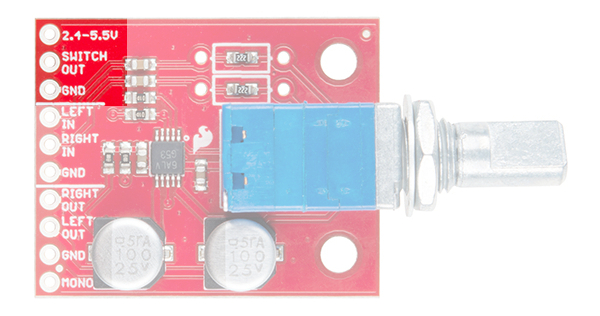
Hardware Overview and Assembly
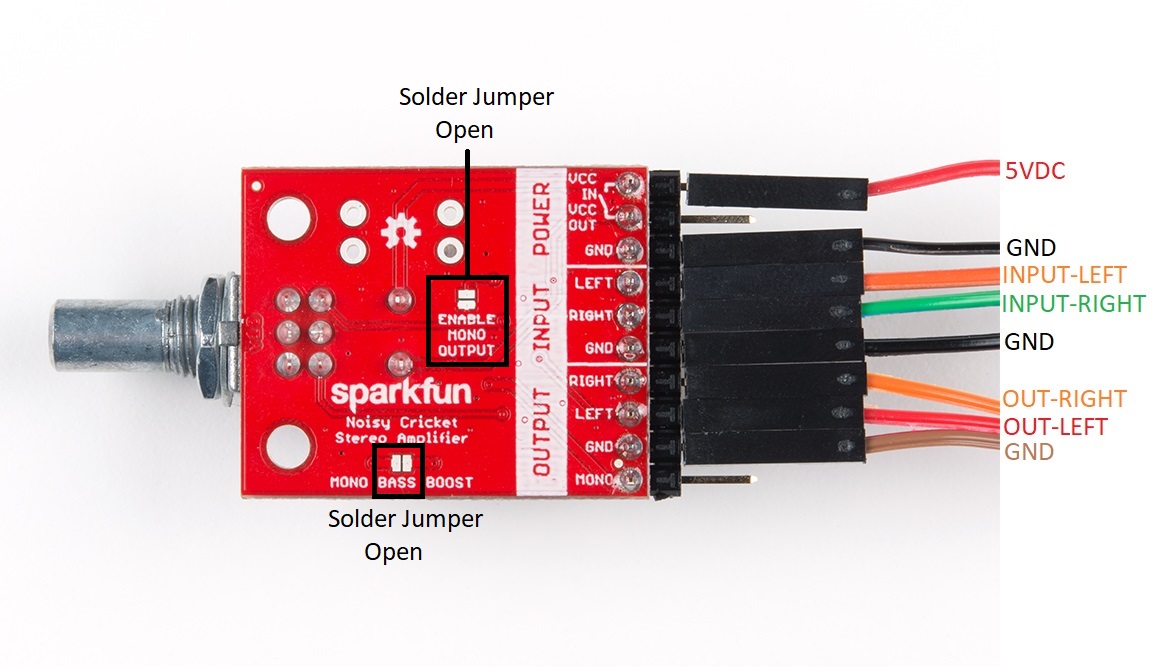
The Noisy Cricket is an easy to use board with three connection sections:
Power
Input
Output
Power
The power section has three connections: VCC, VCC OUT, and GND. VCC and VCC OUT both require a voltage
range of 2.4-5.5VDC, but only one connection is required. The pot to control the volume has a built in switch. VCC
is on the “input” side of the switch, meaning that the amplifier is off when the pot is turned all the way counter
clockwise and turns on when you hear the switch click when turned clockwise. VCC OUT is on the “output” side of
the switch, meaning that when power is applied to this pin, the amplifier is on regardless of the switch. The switch
is rated for 3A of current, which means that you can connect a 5V audio source to VCC OUT and have both board
power on at the same time without having to connect multiple switch to power up all of your electronics.
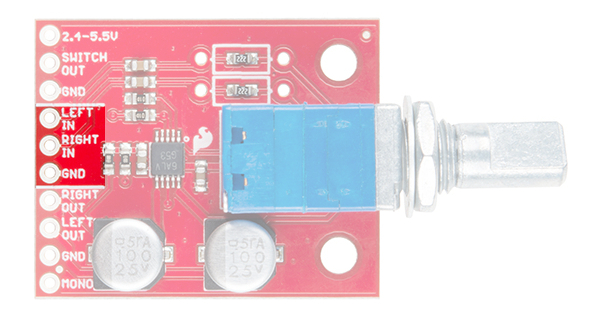
Input
The input section has three connections: Left-IN, Right-IN, and GND for your audio input. The amplifier’s gain is
controlled by external resistors as highlighed below:
Switch Basics
A tutorial on electronics' most overlooked and
underappreciated component: the switch! Here we
explain the difference between momentary and
maintained switches and what all those acronyms (NO,
NC, SPDT, SPST, ...) stand for.
Introduction to Operational Amplifiers with
LTSpice
Picking up where we left off in "Getting Started with
LTSpice," we delve a little deeper into LTSpice through
an introduction of Operational Amplifiers.

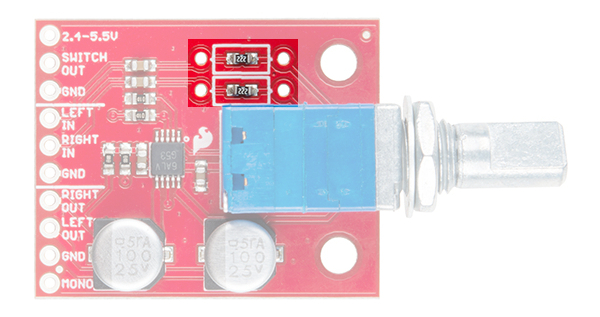
Out of the box, the resistors are configured to take a headphone output signal from your computer or phone. When
cranked to 11, the output will be distorted, but that was done deliberately to make sure you’re able to get the full
power from the amplifier. In stereo operation, both channels are effectively inverting amplifiers, which allows us to
use the following formula to calculate the gain: Av = -Rf / Ri, or Av = - Rpot / 2.2kΩ. In mono operation, one
amplifier is 180° out of phase, so the gain becomes Avd = Vout / (Vinl + Vinr) = 2 * (Rf/Ri), or Avd = Rpot / 2.2kΩ.
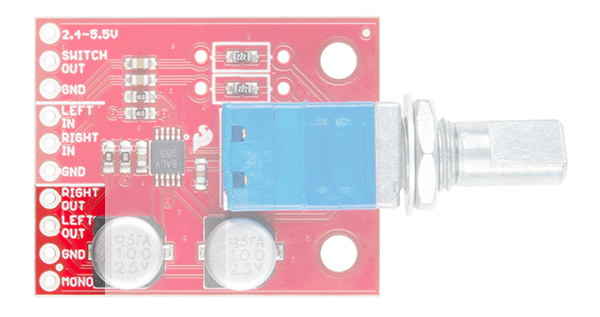
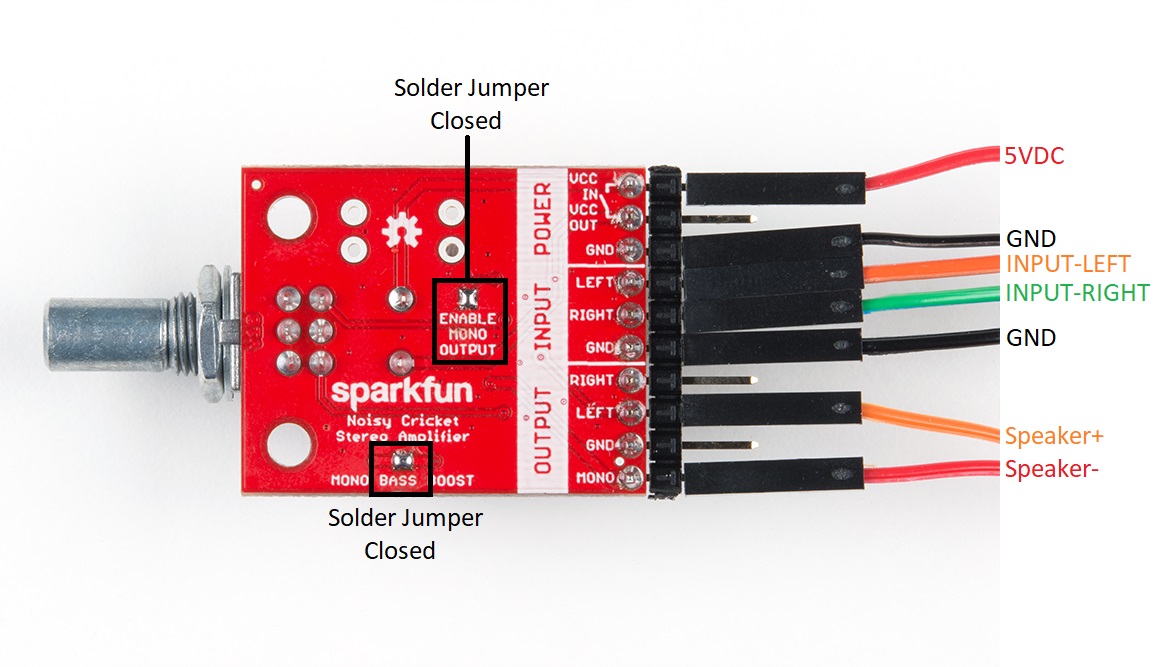
Output
The output of the Noisy Cricket can be configured as stereo or mono.
Stereo Operation
In stereo operation, the output has a maximum power output of 300mW/channel (with an 8Ω load). To connect
your stereo speakers you’ll need to connect each speaker to the left and right output pins, as well as ground as
shown below.

Stereo Amplifier Wiring
To get the full output power from the amplifier you’ll need to configure the Noisy Cricket as a mono amplifier. When
configured as a mono amplifier, the left and right input channels are combined to drive a single speaker.
To enable mono operation, use solder to short the two pads labeled “ENABLE MONO OUTPUT” on the back of
the board. It’s also recommended to close the other solder jumper labeled “MONO BASS BOOST”. Each output
has a 100μF decoupling capacitor that is used for stereo amplification. In mono mode however, the output doesn’t
need to capacitor and will filter out some of the lower bass frequencies and as a result, the audio will sound more
“tinny”. The mono bass boost jumper shorts the left output decoupling capacitor which will allow the lower
frequencies to pass.
Mono Operation
In mono operation, the output has a maximum power output of 1.5W (with a 4Ω load). To connect your speaker
you’ll need to connect one pin of the speaker to the left output pin, and the other to the mono output pin (but NOT
GROUND!) as shown below.
Mono Amplifier Wiring
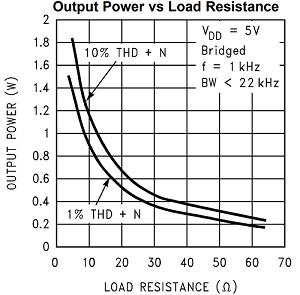
Choosing a Power Supply and Speaker(s)
As mentioned in the previous section, the Noisy Cricket has an output power of up to 300mW/channel in stereo
operation, and 1.5W in mono. The power output depends on not just the output load, but the power supply as well.
Borrowing a few graphs from the datasheet should help us understand our power supply and speaker selection.

In the first graph we see the effect that the load (speaker) has on the output power available. As we can see, there
is an inverse relationship between the load resistance and the output power. To get the most out of the Noisy
Cricket, it’s recommended to use a 4Ω speaker in mono operation and an 8Ω in stereo.
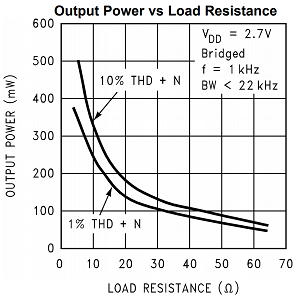
This next graph we’re still looking at the output power versus the load resistance, but instead of the power being
measured in watts, it’s in milliwatts. So what gives? The variable that was changed was the supply voltage, VDD.
In the first graph, VDD was equal to 5V, and the second VDD is set to 2.7V. With approximately half the voltage,
the output power is around four times less with the same load. While the amplifier functions down to 2.4V, it will
mean that you have less output power available if your load resistance remains constant (thanks to ohm’s law). To
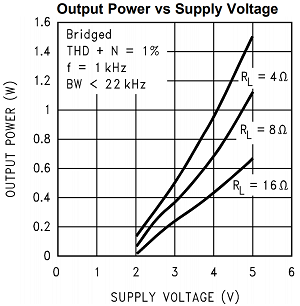
see the full effect the supply voltage has based on a few of the more common loads refer to the graph below.
With these graphs in mind and maximize the power output, we recommend a power supply voltage of 5V with a
current rating of at least 100mA. For the stereo amplifier, use 8Ω speakers. For a mono amplifier, use a 4Ω
speaker.
Resources and Going Further
Now that we know how to use the Noisy Cricket, it’s time to use it in your own project! For more information on the
Noisy Cricket, checkout the links below:

Schematic (PDF)
Eagle Files (ZIP)
LM4853 Datasheet (PDF)
GitHub Repo
SparkFun Product Showcase: Noisy Cricket & Soundie Audio Boards
Need some inspiration for your next project? Check out some of these related tutorials:
RN-52 Bluetooth Hookup Guide
A hookup guide to get you started with the RN-52
Audio Bluetooth Module Breakout Board.
Si4703 FM Radio Receiver Hookup Guide
Add some tunes to your project with the Si4703 FM
Radio Receiver Breakout.
MP3 Player Shield Hookup Guide V15
How to get your Arduino groovin' using the MP3 Player
Shield.
Wireless Audio Bluetooth Adapter w/ BC127
Build a custom wireless audio Bluetooth adapter using
BlueCreation's BC127 and add it to your old speaker
system!
Tsunami Hookup Guide
Hit the ground running with Tsunami, the Super Wav
Trigger.
Papa Soundie Audio Player Hookup Guide
Add sound effects to your project, prop or costume with
Papa Soundie Audio Player.
New!
Other sparkfun Amplifier manuals

Popular Amplifier manuals by other brands


Altec Lansing
Altec Lansing 9440A POWER AMPLIFIER Specifications

Scion-Tech
Scion-Tech PRO-1001 manual

Atlona
Atlona AT-UHD-CAT-4ED user manual

Magnat Audio
Magnat Audio MA 900 Important notes for installation & warranty card

AUSTRALIAN MONITOR
AUSTRALIAN MONITOR AMIS120P operating manual

DS18
DS18 GEN-X G1800.1D owner's manual


