Spartan Equipment SEHLS1224 User manual
Operator’s Manual
Keep this manual with the machine at all times
Hydraulic
Limb Saw
SEHLS1224
Do not attempt to operate the equipment without thoroughly
reviewing this manual for safe and proper operation.
Rev 121123
!
CAUTION
Operational Hazard
!
Personal Protection Equipment
(PPE)
is required when
operating
or maintaining this machine.
SNL00001
!
Overhead Hazard
Be
aware of falling debris under,
around
the attachment and
on
the power unit. Cut branches
CAUTION
can fall unpredictably.

2
Notes

3
Introduction…..………………………………..4
General Information.………………………… 5
Serial Number Location.……………………. 5
Safety Messages ..................................................6
Accident Prevention ..............................................7
Safety Guidelines ..................................................8
Safety Training ......................................................8
Preparation............................................................9
Transport Safety....................................................9
Operation Safety ...................................................9
Maintenance Safety ..............................................9
Hydraulic Safety..................................................10
Storage Safety ....................................................10
Safe Work ...........................................................10
Chain Saw Safety................................................10
Assembly & Inspection……………………….10
Safety Labels…………..……………………….10
Safety Label Descriptions................................... 11
If labels need to be replaced: ............................. 11
Safety Label Layout ............................................12
Specifications………….……………………….10
Specifications & Dimensions ..................................13
Components and Features..………………….14
SEHLS1224 Limb Saw Components ..................14
SEHLS1224 Limb Saw Features ........................15
Automatic Chain Oiler .............................................. 15
Pivot Stop................................................................. 15
Main Boom Mount
.................................................... 16
Initial Setup……………..……………………….17
Mount the Limb Saw ...........................................17
Check Chain Tension..........................................17
Hydraulics ...........................................................18
Test .....................................................................18
Field Operation……………………………….19
Operation Safety Checklist................................. 19
Prepare .............................................................. 19
Material .............................................................. 19
Operating ........................................................... 20
Safety .......................................................................20
Begin Work...............................................................20
Trimming Tips...........................................................20
Storage………………….……………………….21
Storage Safety Checklist .................................... 21
Placing in Storage: ............................................. 21
Service & Maintenance……………………….22
Maintenance Safety Checklist ............................ 22
General Maintenance ......................................... 22
Hydraulic Oil....................................................... 22
Lubrication:..........................................................
23
Lubricate:..................................................................23
Clean and Inspect the Chain Saw ...................... 24
Disassemble the Chain Saw ....................................24
Power head ..............................................................24
Guide Bar .................................................................25
Saw Chain................................................................25
Reassemble Chain saw............................................25
Saw Chain Tension ..................................................26
Saw Chain Sharpening.............................................26
Replacing the Drive Sprocket...................................27
Bolt Torque Table ............................................... 28
Troubleshooting……………………………….29
Accessories…………………………………….30
Optional 90” Hose Kit ......................................... 30
Optional Spring Hose Mount Kit ......................... 30
Table of Contents
4
Thank you for purchasing your new SEHLS1224 Hydraulic Limb Saw. Your limb saw has been designed and manufactured
to give you many years of dependable service by ensuring safe, effective and speedy completion of tree trimming chores.
The Spartan Equipment SEHLS1224 unique loader arm mounted design with up to 14’ reach and 22 hp hydraulic
powered chain saw motor to enable you to quickly and precisely complete tree trimming from the safety of your power
unit cab.
Only minor maintenance, such as adjusting, cleaning and lubricating, is required to keep it in top working condition.
Safe, efficient and trouble free operation of your Spartan Equipment hydraulic limb saw requires that you or any other
person, who will be assembling, operating, maintaining or working with this product, are required to read and completely
understand the information and instructions contained in this manual.
If anyone does not fully understand every part of this manual, please obtain further assistance by contacting the dealer
from which this product was purchased or by contacting Spartan Equipment with the information listed on the cover of this
manual.
Keep this manual available for reference whenever this product is being handled or used. Provide this manual to any new
owners and/or operators.
This manual covers model: SEHLS1224 Hydraulic Limb Saw.
Introduction
5
The purpose of this manual is to assist you in safely operating and maintaining your SEHLS1224 Hydraulic Limb Saw in a
safe manner. Read this manual carefully to obtain valuable information and instructions that will help you achieve safe and
dependable service. The illustrations and data used in this manual were current at the time of printing, but due to possible
engineering and or production changes, this product may vary slightly in detail. Spartan reserves the right to update and or
change components as necessary without notification.
In this manual the SEHLS1224 Hydraulic Limb Saw may be referred to as chain saw, limb saw, product, implement,
attachment or machine. Power unit is the engine driven machine that the limb saw is mounted to.
Intended Use
The Spartan Equipment SEHLS1224 limb saw is intended for attachment and use on qualified power units for the sole
purpose of trimming branches from trees.
Parts List
The parts lists for this product can be found online. Visit spartanequipment.com and click on the PARTS tab to be directed
to our on-line parts catalog.
Operator Orientation
The directions left, right, front, and rear, as mentioned throughout this manual, are determined when sitting in the power
unit driver’s seat, and facing in the direction of travel.
California Proposition 65
You may see a warning label like the following:
WARNING
Cancer and Reproductive Harm
www.P65 Warnings.ca.gov
SNL00010
This warning is required by the California Proposition 65 (Prop 65), which is meant to notify California residents of
exposures to Prop 65-listed chemicals. For more information go to ‘www.P65Warnings.ca.gov’.
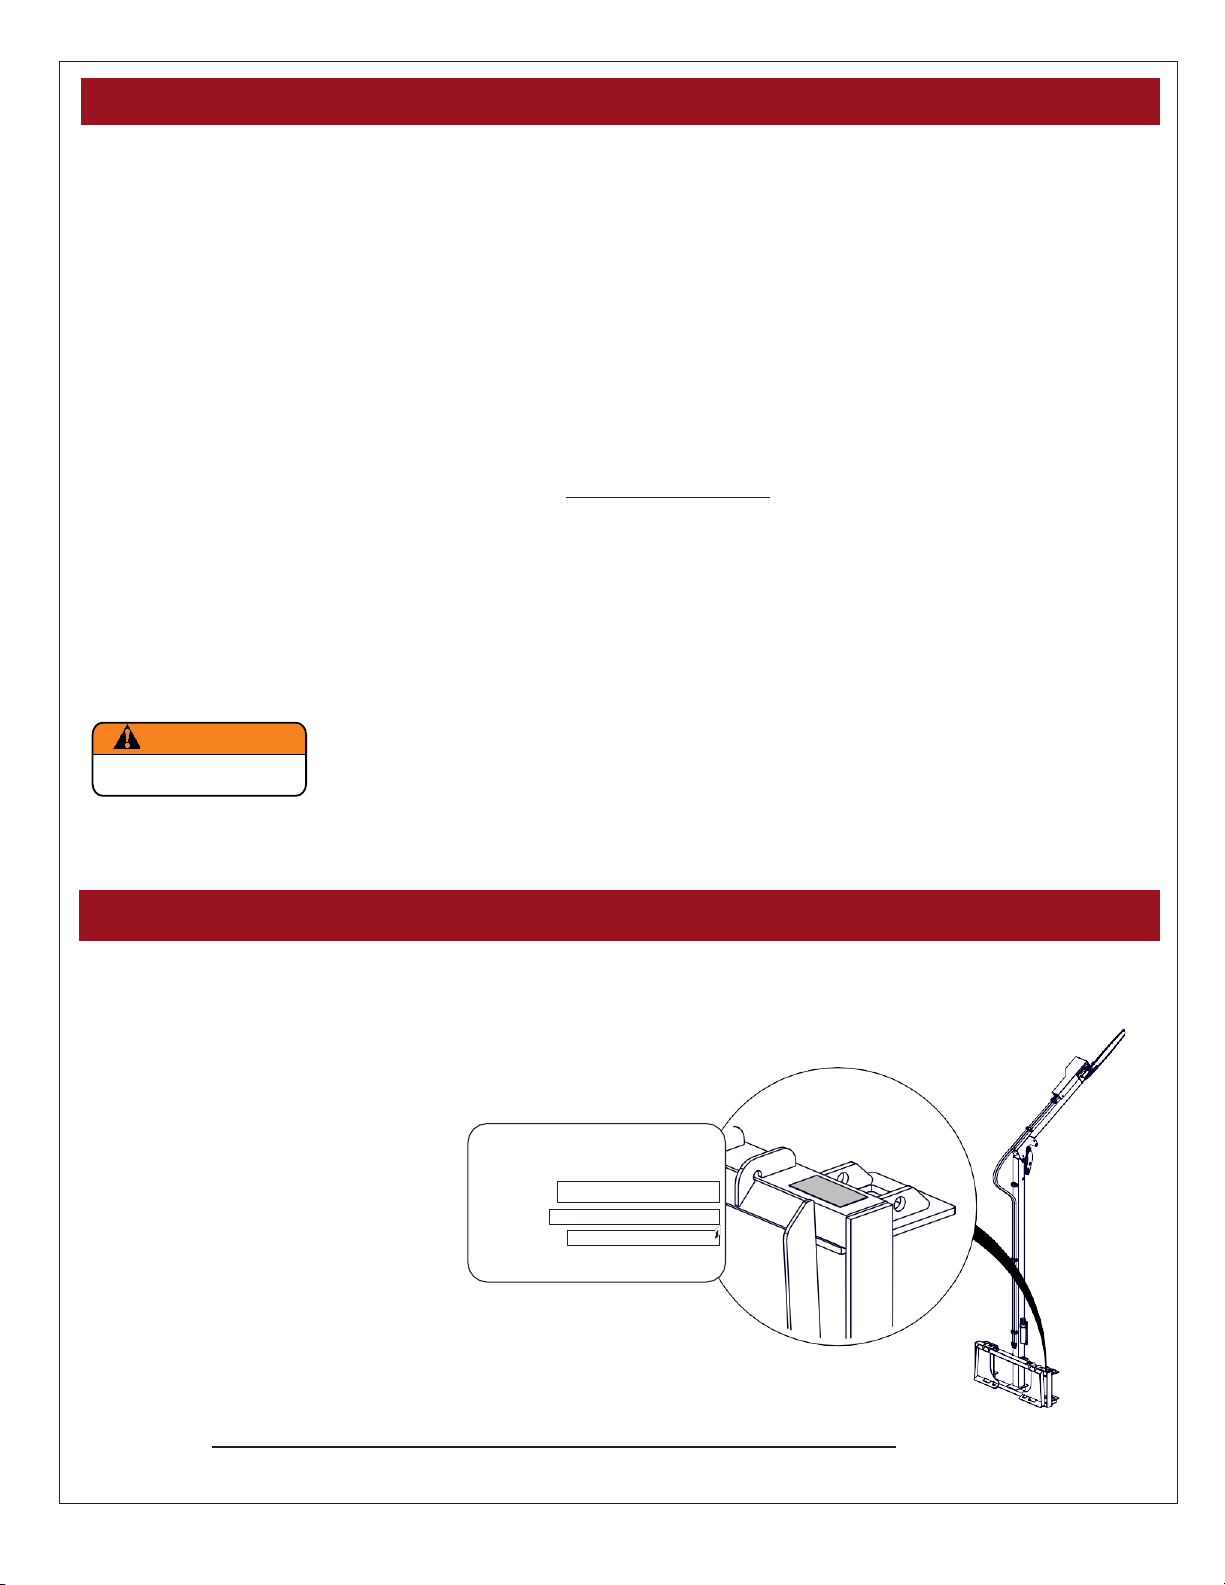
The serial number for your limb saw is located on the top right side of the limb saw frame assembly.
Please record your serial number here as a handy reference. In case of warranty issues, your dealer will ask for the
serial to verify your warranty.
Spartan Equipment
SERIAL #
MODEL #
CAPACITY
Model Number SEHLS1224
Serial Number
General Information
Serial Number Location
HLAA
ATTACHME N
SERIAL
#
MODEL
#
CAPACI
H
LA
MADE
6
The Safety Alert symbol identifies important safety messages on the implement and in the
manual. When you see this symbol, read and understand the message, be alert to the potential
hazard in the message. Follow the instructions in the safety message.
Safety Term Safety Hazard
This Safety Alert Symbol means:
ATTENTION!
BECOME ALERT!
YOUR SAFETY IS INVOLVED!
Safety Messages
Throughout this manual, the terms DANGER, WARNING, CAUTION and IMPORTANT are used to indicate the degree of
hazard to personnel if proper safety procedures and guidelines are not followed. The appropriate term for each message
has been selected using the following guide-lines:
DANGER - Indicates an imminently hazardous situation that, if not avoided, will result in death
or serious injury, and includes most extreme situations typically for implement com-
ponents which, for functional purposes, cannot be guarded.
WARNING - Indicates a potentially hazardous situation that, if not avoided, could result in death
or serious injury, and includes hazards that are exposed when guards are removed.
It may also be used to alert against unsafe practices.
CAUTION - Indicates a potentially hazardous situation that, if not avoided, may result in minor or
moderate injury. It may also be used to alert against unsafe practices.
IMPORTANT - Indicates a situation that could result in damage to the implement or other property.
In the owners manual, when a hazard is present you will see a safety message box. The box may contain:
• The safety alert symbol
• The safety term
• The safety hazard
• The safety hazard explanation
When applicable you may also see the appropriate safety label displayed with the message, as shown below.
WARNING
Pinch Point Hazard
The top rail and beam form a poten-
tial pinch point, be aware of where
hands and feet are while adjusting
the top rail.
SL00002
The safety information given in this manual does not replace any safety codes, insurance needs, government and local laws.
Safety
Safety Hazard Explanation Safety Label
Safety Alert
!
!
7
Accident
Prevention
ACCIDENTS CAN BE PREVENTED WITH
YOUR HELP!
YOU are responsible for the SAFE operation and maintenance of your implement. YOU must ensure that you and anyone
else who is going to use, maintain or work around the implement be familiar with the work and maintenance procedures
and related SAFETY information contained in this manual. This manual will take you step-by-step through your working
day and alerts you to all good safety practices that should be used.
Remember, YOU are the key to safety. Good safety practices not only protect you but also the people around you. Make
these practices an effective part of your day to day work habits. Be certain that EVERYONE using this implement is
familiar with the recommended maintenance and work procedures and follow all the safety precautions. Most accidents
can be prevented. Do not risk injury or death by ignoring good safety practices.
The best accident prevention is a careful operator.
Spartan and your dealer ask that YOU be that careful, responsible equipment operator.
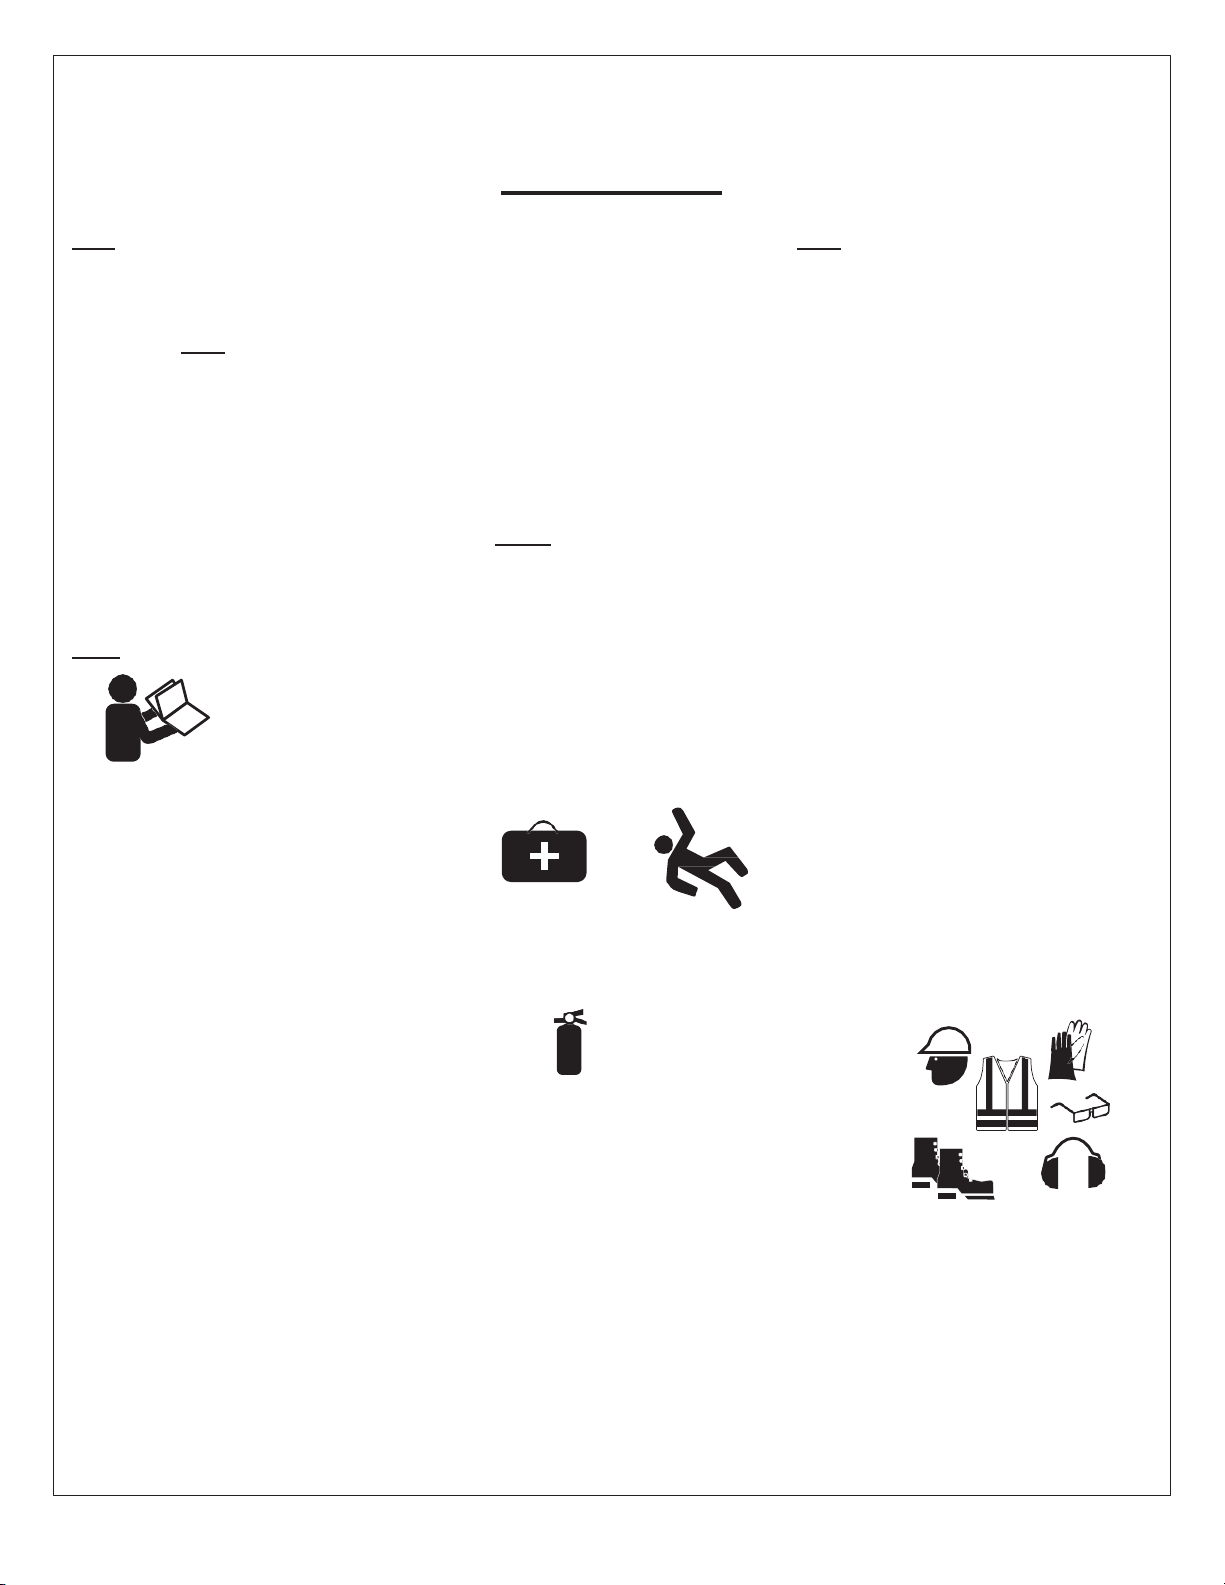
YOU ARE THE KEY TO SAFETY:
•
Familiarize yourself, and anyone else
who will operate, maintain, or work around
this product, with the safety and operation
information contained in this manual.
• Read and understand the safety labeling which
appears on the implement.
• Have a first-aid kit available for use should
the need arise and know how to use it.
• Pay attention to the job at hand. Do not let your mind
lose concentration on what you are doing. No accident
prevention program can be successful without the
wholehearted cooperation of the person who is
directly responsible for the operation of the implement.
• Have a fire extinguisher available for use should
the need arise and know how to use it.
• Reduce the risk of injury or death by following all
safety precautions and by using good safety practices.
• Accidents can to be prevented: that prevention will
come from equipment operators who accept their
complete responsibility and anticipate the results of
their actions.
• Never exceed the limits of the implement. Safety of
the operator and safe operation are the main concerns
in designing a safe product, however ignoring
implement specifications by the operator can result in
a accident which could have been prevented.
• Do not allow riders on the implement,
loaded or empty.
• Do not operate this implement under the
influence of drugs or alcohol.
• Be responsible for the SAFE operation and
MAINTENANCE of YOUR implement.
• Wear appropriate personal protective equipment
(PPE). This list includes but is not limited to:
• Hard hat
• Heavy gloves
• Hearing Protection
• Protective foot wear
• Protective eye wear
• Safety Vest

8
Safety Guidelines
Safety of the operator and bystanders is one of the chief concerns in developing and designing equipment. However,
every year many accidents occur which could have been avoided by a few seconds of thought and a more cautious
approach to handling equipment.
You, the operator, can avoid many accidents by observing the following precautions in this section. To avoid personal
injury or death, study the following precautions and insist those working with you, or for you to follow them.
In addition to the design and configuration of this implement, including safety labels and safety devices, hazard control
and accident prevention are dependent upon the awareness, concern, and proper training of personnel involved in the
operation, transport, maintenance, and storage of the implement. Refer also to safety messages and operation instruction
in each of the appropriate sections of the tractor and implement manuals. Pay close attention to the safety labeling affixed
to the implement.
1. In order to provide a better view, certain illustrations
in this manual may show an assembly with a safety
device removed. However, equipment should never be
used in this condition. Keep all safety devices in place,
if removal becomes necessary for repairs, replace the
device prior to use.
2. Replace any safety label or instruction sign that is
unreadable or is missing. Location of safety signs is
indicated in this manual.
3. Never use alcoholic beverages or drugs which can
hinder alertness or coordination while using this
implement. Consult your doctor about using this
implement while taking prescription medications.
4. Under no circumstances should young children be
allowed to work with this implement.
5. This implement is dangerous to persons unfamiliar
with its operation.
Safety Training
6. Do not allow persons to use or assemble this unit until
they have read this manual and have developed a
thorough understanding of the safety precautions and
of how it works. Review the safety instructions with all
users annually.
7. If the elderly are assisting with work, their physical
limitations need to be recognized and accommodated.
Assistants should be a responsible, properly trained
and physically able person familiar with machinery
and trained in this implement’s operations.
8. Never exceed the limits of the implement. If its ability
to do a job, or to do so safely, is in question - DON’T
TRY IT.
9. Do not modify the implement in any way. Unauthorized
modification may result in serious injury or death and
may impair the function and life of the implement.
10. Recognize the hazards associated with working
overhead. Your power unit should be equipped with a
cab or suitable overhead guard to offer protection from
the impact of falling limbs and branches.
A person who has not been trained or has not read and understood all use and safety instructions is not qualified to use
the implement. An untrained operator exposes himself and bystanders to possible serious injury or death.
• Train all new personnel with the instructions alongside
the implement. Be certain only a properly trained and
physically able person will use the machinery.
• Working with unfamiliar equipment can lead to
careless injuries. If this implement is used by any
person other than yourself, or is loaned or rented, it is
the implement owner’s responsibility to make certain
that the operator, prior to using:
• Reads and understands the operator’s manuals.
• Is instructed in safe and proper use of the implement
• If the elderly are assisting with the work, their physical
limitations need to be recognized and accommodated.
• Operators or maintenance personnel who are not fully
able to read and understand this manual should not
operate or work on the implement.
• Make certain that all operators and maintenance
personnel have complete understanding of the full and
exact contents of this manual and safety labeling.
• ALL information contained in this manual and labeling
on the implement must be conveyed CLEARLY and
FULLY, in order to be able to operate safely and
knowledgeably.
• Review the implement and instructions regularly with
existing workers.

9
Preparation
1. Inspect implement for shipping damage. If damage
does exist, do not use. Notify your dealer immediately
to have damaged parts replaced or repaired.
2. When traveling on public roads at 40 km/h (25 mph) or
less, ensure slow-moving-vehicle (SMV) emblem has
been properly installed at rear of power unit.
3. Inspect all fasteners that they are not lose or missing.
Ensure all fasteners are torqued according to the
torque chart at the back of this manual.
4. Ensure that all applicable safety decals are installed
and legible.
5. Personal protection equipment (PPE) including hard
hat, safety glasses, safety shoes, and gloves are
recommended during assembly, installation, operation,
adjustment, maintaining, repairing, removal, cleaning,
or moving the unit. Do not allow long hair, loose fitting
clothing or jewelry to be around equipment.
6. PROLONGED EXPOSURE TO LOUD NOISE MAY
CAUSE PERMANENT HEARING LOSS!
Gas or diesel powered equipment can often be noisy
enough to cause permanent, partial hearing loss. We
recommend that you wear hearing protection on a full-
time basis. Noise over 85dB on a long-term basis can
cause severe hearing loss. Noise over 90db adjacent
to the Operator over a long-term basis may cause
permanent, total hearing loss.
7. Your power unit should be equipped with a cab or
suitable overhead guard to offer protection from the
impact of falling limbs and branches.
Transport Safety
1. Fold and secure the top saw arm during travel.
1. When traveling on public roads at 40 km/h (25 mph)
or less, ensure slow-moving-vehicle (SMV) emblem
has been properly installed at rear of power unit.
2. If traveling at night, ensure provincial, state and local
lighting requirements laws have been met.
3. Do not permit riders while transporting this implement.
4. Carry the attachment low when transporting to reduce
the potential of the power unit tipping over.
5. Be aware of the limb saw boom length. Additional
swing clearance is required in front when making
turns, avoid sharp turns.
6. Slow down and use care when approaching blind
corners or other objects that obscure vision.
7. Use a “spotter” when it is hard to see in the direction
you are traveling and when preparing a cut that
obstructs your vision.
8. Always look behind you before backing up. Make
sure you are looking in the direction of travel to avoid
objects or people.
Operation Safety
1. NEVER allow helpers or bystanders under or near the
machine.
2. Make sure work is performed while on solid level
ground. Avoid operating near ditches, embankments
and holes.
3. Power unit should have a cab or overhead guard for
protection from falling objects.
4. Power unit should have ROPS installed for protection
from roll over.
5. Inspect all fastening devices, do not use if worn or
damaged.
6. Make sure that everyone is clear before moving the
implement. NEVER position yourself between the
power unit and the implement.
7. Do not place your hand or any part of your body on or
near the saw chain. Teeth are very sharp and present
a laceration hazard even when not running under
power and may cause serious injury. Keep saw chain
covered with chain saw scabbard when not in use.
8. Do not raise the implement near electrical power lines.
Contact with power lines can result in serious injury or
death.
9. Do not attempt to operate the power unit while
not seated in the operators seat with the seatbelt
fastened.
10. Do not enter area around the limb saw boom. Moving
boom assembly presents a potential collision and
crush hazard and could result in a serious injury.
11. Consult the power unit’s operator manual to determine
if a rear ballast is required.
12. Follow safe tree maintenance recommendations of
your local farm safety association.
13. Be aware if operating this equipment in areas where
stinging insects may reside. Swarming insects may
cause loss of control of the equipment.
14. Be aware of falling branches protruding into the cab
area.
Maintenance
Safety
1. Good maintenance is your responsibility, poor
maintenance is an invitation to trouble.
2. Follow good shop work practices.
3. Never work under or around the implement unless it is
blocked and chocked securely.
4. Use personal protection equipment (PPE) such as
eye, hand and hearing protectors.
5. Never adjust, service, clean or lubricate the implement
until all power is shut off when attached to the power
unit.
6. Ensure hardware is torqued according to the torque
chart at the back of this manual.

10
Hydraulic
Safety
1. Make sure that all the components in the hydraulic
system are kept in good condition and are clean.
2. Before applying pressure to the system, inspect
for leaks at all components, and that lines, hoses,
connections and couplings are not damaged and leak
free.
3. Do not attempt any makeshift repairs to the
hydraulic lines, fittings or hoses by using tapes,
clamps or cements. The hydraulic system operates
under extremely high pressure. Such repairs will
fail suddenly and create a hazardous and unsafe
condition.
4. Wear proper hand and eye protection when searching
for a high pressure hydraulic leak. Use a piece of
wood or cardboard as a backstop instead of hands to
isolate and identify a leak.
5. If injured by a concentrated high-pressure stream of
hydraulic fluid, seek medical attention immediately.
Serious infection or toxic reaction can develop from
hydraulic fluid piercing the skin surface.
6. Relieve pressure on hydraulic system before
maintaining or working on system.
7. All hydraulic work must be done by qualified personnel.
Storage
Safety
1. Store the unit in an area away from human activity.
2. Fold and secure the top saw arm.
3. Ensure the saw chain cover is on to prevent injuries
from the sharp chain.
4. Do not allow children to play on or around the stored
implement.
5. Store the unit in a dry, level area. Cover if stored
outside.
6. Guard any sharp corners.
7. Ensure components and safety features are not
damaged and in good condition before storing the
implement. Make repairs now to be ready for the
following season.
8. Secure the implement to prevent unwanted
movement.
Safe Work
Not all work spaces are the same, but the principles
presented here can be applied to any work space.
Survey the work site, make note of nearby or overhead
obstructions, embankments, holes or any surface that may
cause the power unit to overturn. Knowing your work area
will make the job easier and safer.
Use extreme care at work sites that impair or partially
block the operator’s line of sight. Know where you are
traveling and ensure there are no bystanders in the area
of travel.
Recognize the hazards associated with working overhead.
Your power unit should be equipped with a cab or suitable
overhead guard to offer protection from the impact of
falling limbs and branches.
Wear appropriate personal protection, particularly if the
work site uses chemicals or other materials that become
hazardous when airborne.
Be aware of:
Bystanders or anyone not directly involved with the
work are only allowed outside of the work area, minimized
hazards.
Workers helping the operator must wear the appropriate
PPE and must always make eye contact with the operator
before entering the work area. Unauthorized Workers or
bystanders are not allowed in the work area. Hazards are
present.
Operator, do not operate the implement outside of the
operator area.
Chain Saw Safety
1. A chain saw is inherently dangerous. Potential
hazards and injuries can be minimized by using
proper protective equipment and safe operating
procedures.
2. Good cutting action and increased chain life result
with correct chain tension and sharpness. Check saw
chain tension and sharpness every three hours of
operation.
3. Be aware that tree’s may contain nails, spikes or other
metals, inspect the tree before beginning the job.
4. Never use a saw chain that:
• Is severely damaged.
• Has excessive saw chain stretch.
• Has broken or cracked components.
• Has loose rivet joints.
Before putting the SEHLS1224 limb saw into service the first time, inspect the machine for shipping damage or
missing / loosened parts. If damaged or loosened parts exist, do not use. Notify your dealer immediately to have
affected parts replaced or repaired.
Assembly & Inspection
11
Safety labeling is an important part of the overall safe use of the implement. Safety labeling alerts and warns against
potential injury or death, and is important to follow these points to help keep your implement safe for you and others who
may be using it.
• Keep safety signs clean and legible at all times.
• Replace safety signs that are missing or have become
illegible.
• Replaced parts that displayed a safety sign should
also display the current sign.
• Safety signs are available from your authorized
Distributor or the factory order desk.
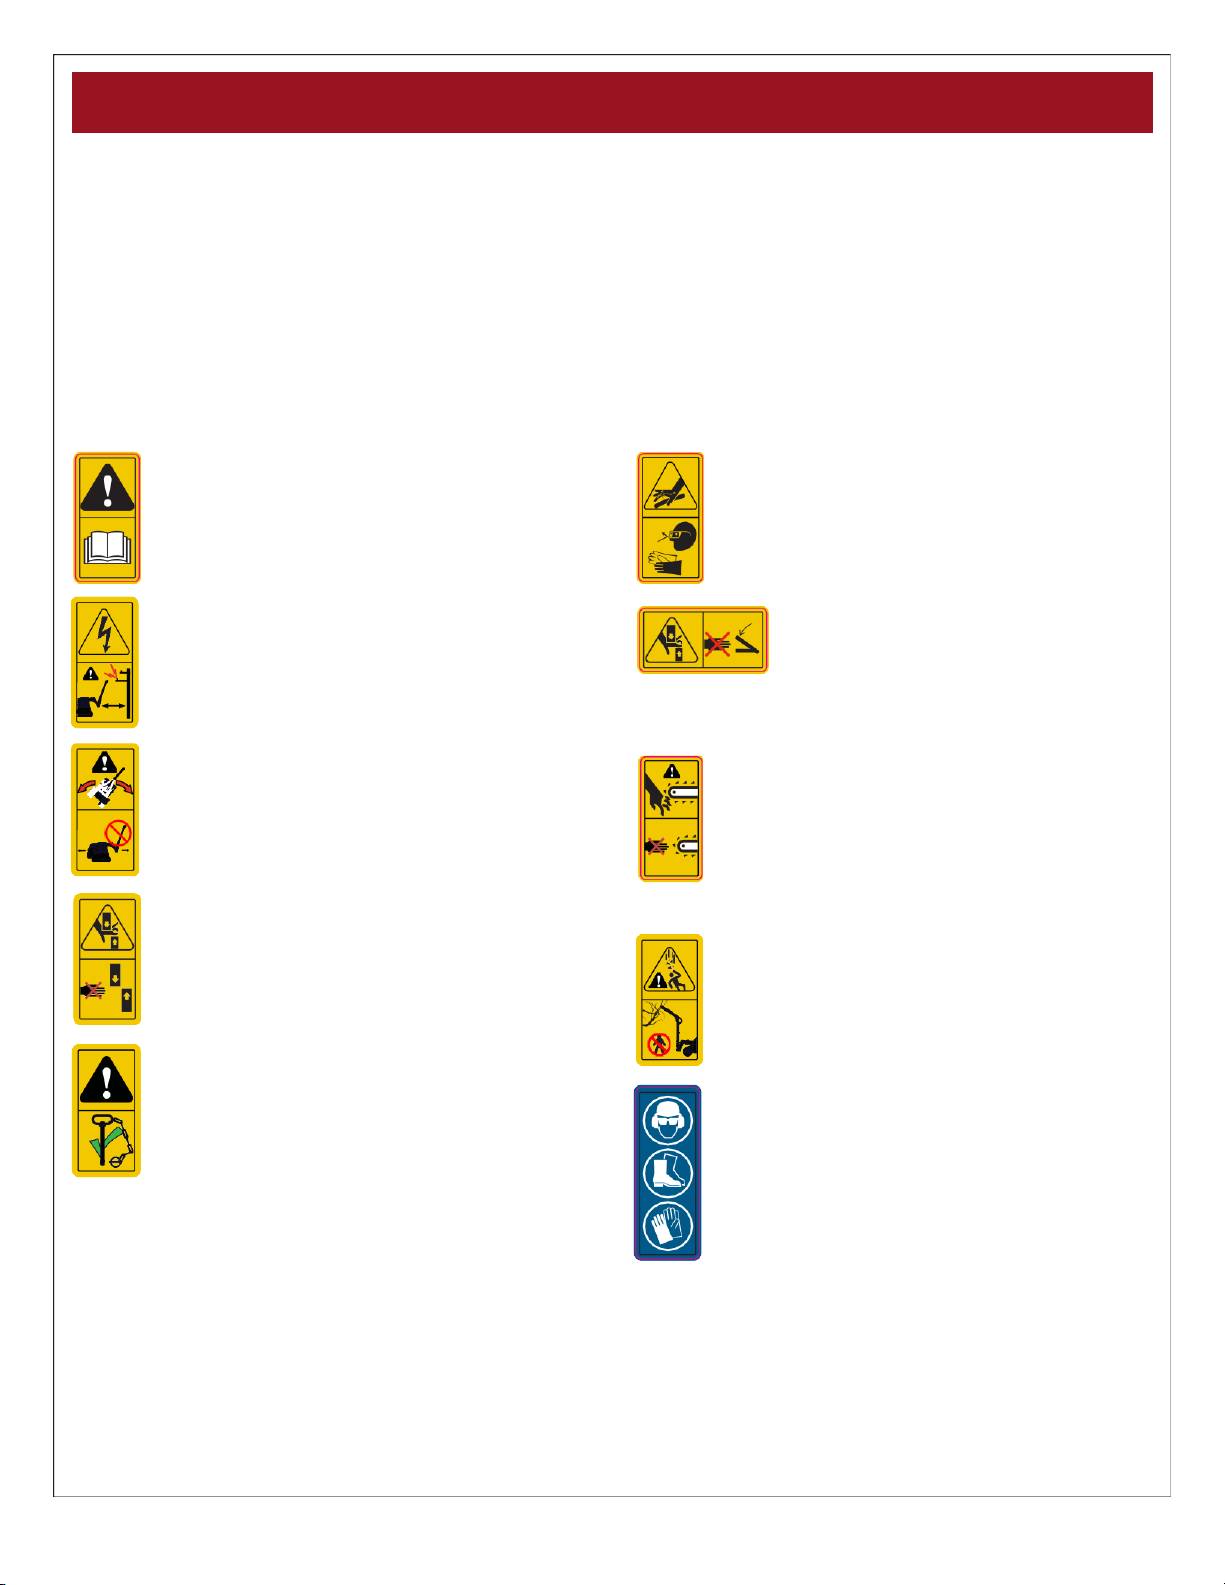
Safety Label Descriptions
Caution: read and understand ALL safety and
operating instructions in the manual, read and
understand ALL safety labels located on the
machine. The most important safety device on
this equipment is an informed SAFE operator.
SL00004
Danger: Keep boom 3 m (10 ft) or more away
from overhead electrical cables. Electrocution
from arcing is possible without direct contact.
SL00015
Caution: Hydraulic fluid is under pressure, be
aware that hydraulic leaks could develop with
out warning. Do not check for leaks with your
hand or fingers while the system is pressurized,
serious injury could result. Possible burns or
poisoning from pressurized fluid injection.
Caution: do not place your hand or any part
of your body on or near the limb saw boom
pivot points while the adjusting the boom
Possible serious personal injury or death.
3m
SL00002
Parts moving together present a pinch
(10 ft)
SL00058
SL00056
SL00057
SL00066
Warning: Do not transport with the boom raised
overhead. A raised boom is inherently unstable
and could cause a roll over. Possible serious
personal injury, crushing or death.
Caution: do not place your hand or any part
of your body on or near the front mount while
coupling to the power unit. Parts moving
together present a pinch point and may cause
serious injury Possible laceration, crushing,
amputation hazard.
Warning: Prior to use ensure the lock pin is
installed and secured with a hitch pin. Machine
damage and possible serious personal injury,
crushing or death.
SL00065
SL00067
point and may cause serious injury. Possible
laceration, crushing, amputation hazard.
Danger: do not place your hand or any part of
your body on or near the saw chain. Teeth are
very sharp present a laceration hazard even
when not running under power and may cause
serious injury. Possible laceration, amputation
hazard or death. Keep saw chain covered with
chain saw scabbard when not in use.
Warning: Be aware of falling debris under,
around the attachment and on the power unit.
Cut branches can fall unpredictably. Possible
impact or crushing could result in death or
serious injury.
Caution: Personal Protection Equipment (PPE)
is required when operating or maintaining this
machine. Failure to wear PPE will result in
personal injury.
If labels need to be replaced:
• Be sure that the installation area is clean and dry.
• Be sure temperature is above 50°F (10°C).
SNL00001
• Determine exact position before you remove the backing paper.
• Remove the smallest portion of the split backing paper.
• Align the sign over the specified area and carefully press the small portion with the exposed sticky backing in place.
• Slowly peel back the remaining paper and carefully smooth the remaining portion of the sign in place.
• Small air pockets can be pierced with a pin and smoothed out using the piece of sign backing paper.
Safety Labels
12
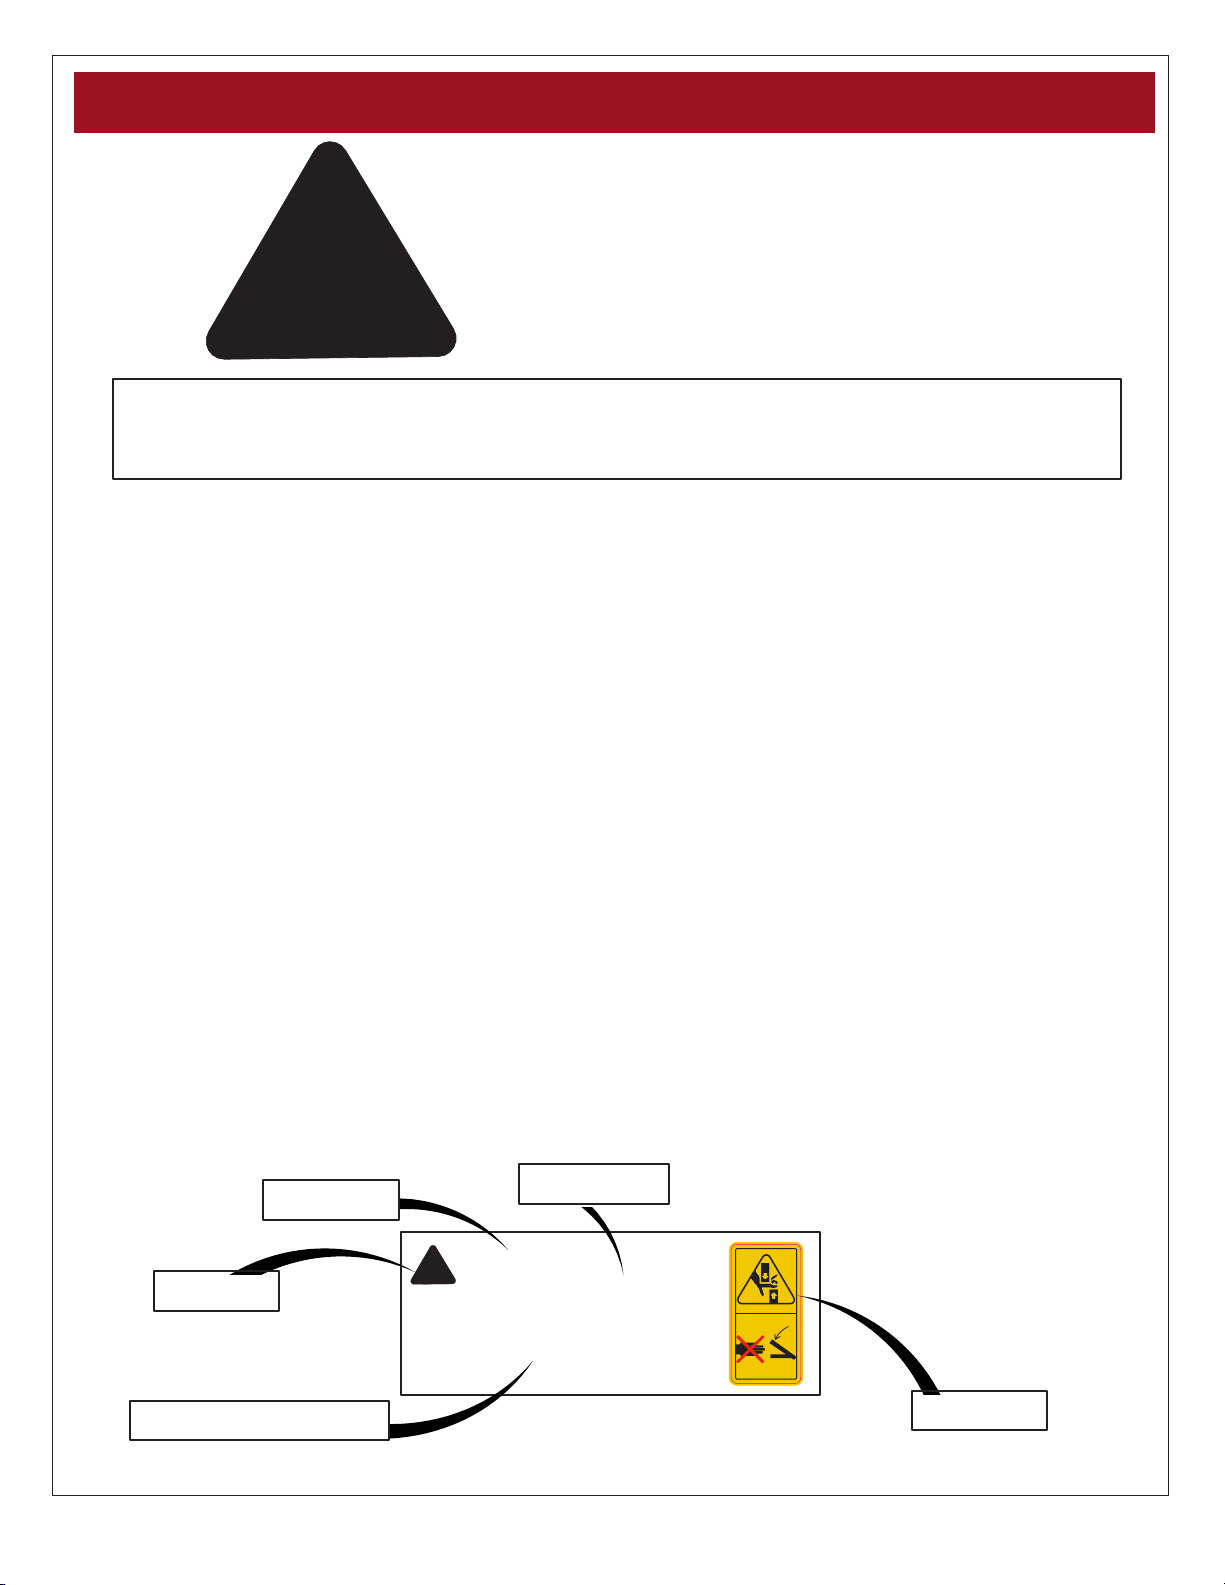
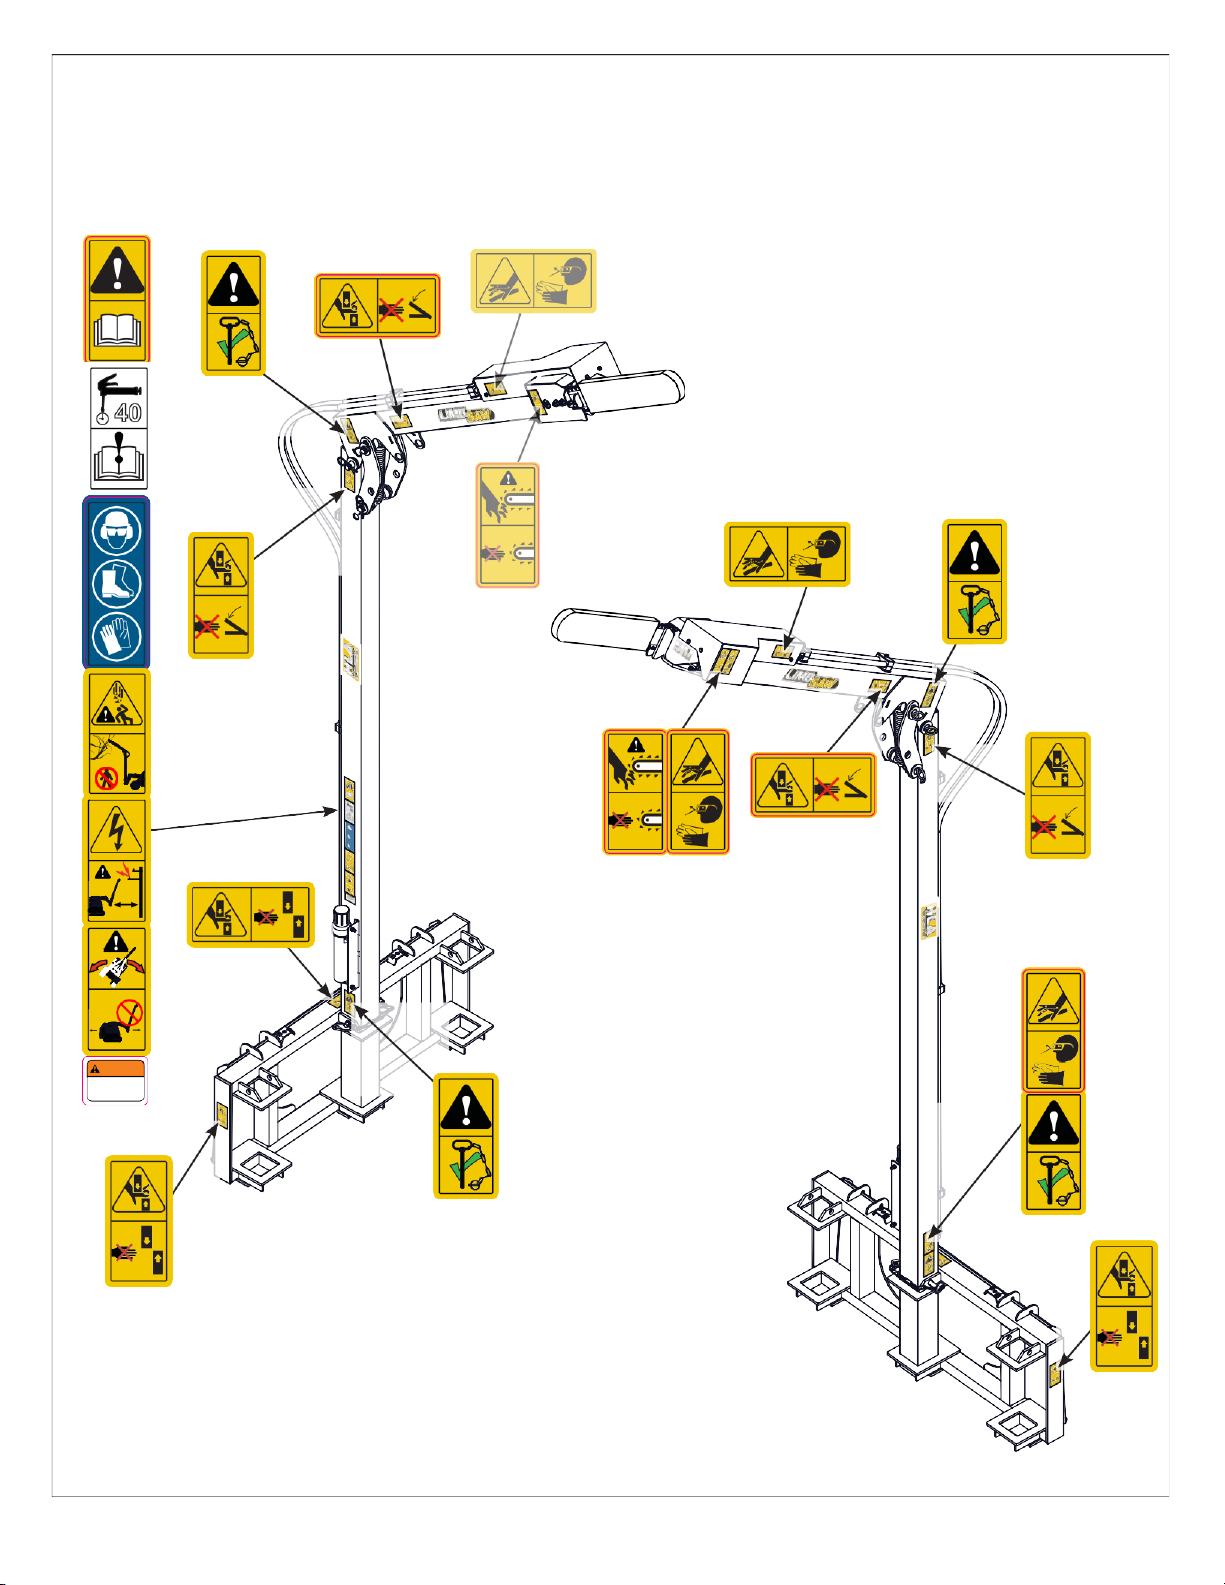
Safety Label Layout
Safety signs and locations on the equipment are shown in the illustrations below.
Good safety practice requires that you familiarize yourself with the label and the safety message it is delivering. Be aware
of the equipment or particular equipment feature that requires your SAFETY AWARENESS.
SL00015H
SL00002
SL00004
SL00066
40
ML00007
SL00065
SL00015H
SL00066
SL00002
SNL00001
SL00067
SL00002
SL00065
SL00015
SL00002
3m
(10 ft)
SL00056
SL00058H
SL00057
WARNING
Cancer and
Reproductive Harm
www.P65 Warn ings.ca.g ov
SNL00011
SL00015
SL00066
SL00066
SL00058
If safety labels have been damaged or removed, new
labels must be applied. New safety signs are available
from your dealer or contact Spartan Equipment.
SL00058

13
Storage 98° 120° Width
Specifications & Dimensions
SEHLS1224 Limb Saw BP120
Recommended Power unit size
The SEHLS1224 is designed for various
sizes of power units.
The power unit must have the rated
operating capacity (ROC) to safely lift
and
operate the attachment.
Attachment
Attachment specific per power unit at time of
ordering from the dealer.
Weight
395 lb
Saw Chain
25" STIHL-33RS Rapid Super
Guide Bar
Stihl Rolomatic ES 25"
Hydraulic Motor
Minimum Hydraulic Flow
15 GPM @ 3000 PSI
RPM:
2550 @ 15 GPM
Torque
45 ft-lb
Power
22 hp
Dimensions
A - Height
B - Depth
C - Width
Position 1: Storage
121"
20"
50.75
Position 2: 98°
138"
87"
50.75
Position 3: 120°
169"
73"
50.75
Accessories
HK90
Optional 90" Hose Kit c/w Flat Faced
Couplers
SHMK
Optional Spring Hose Mount Kit
A
C
Specifications
B
B
A
A
B

14
Motor shield
Power head
Saw boom pole
(48”) Saw chain tension
adjuster
Main boom pole
(120”)
Spring hose
mount locations
Manual tube
Automatic saw chain
oiler adjuster
Adaptor frame
assembly
The Spartan SEHLS1224 Limb Saw unique design helps to increase productivity by ensuring safe, effective and speedy
completion tree and branch trimming chores.
The owner or operator has the responsibility of being familiar with all the features of the limb saw and know how to
operate them. Each owner or operator must train all other operators before they start working with the machine.
Read this section carefully to learn how to use the limb saw safely and how to set it to provide maximum field efficiency.
By following instructions in conjunction with a good maintenance program, your SEHLS1224 will provide many years of
trouble-free service.
Do not operate this product if you are not familiar with its features.
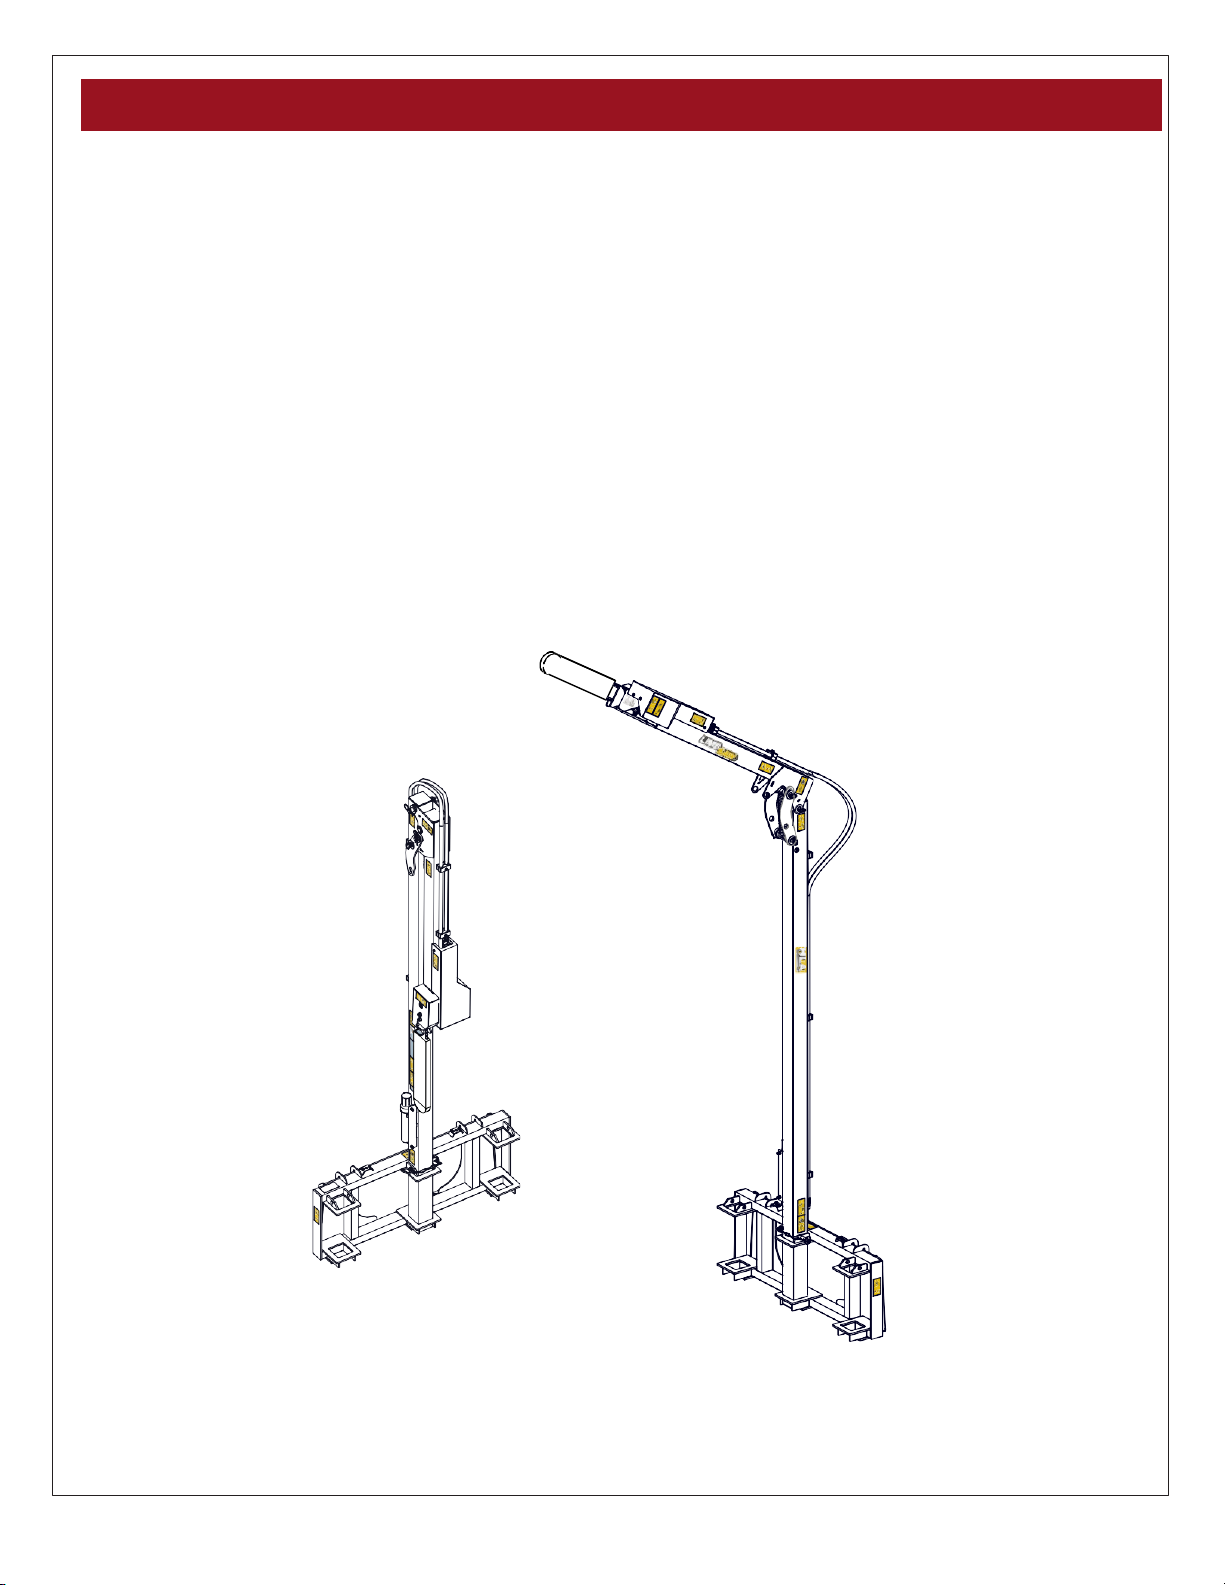
The SEHLS1224 is illustrated below, showing its basic components and features. Review the various components and
their position, the names of the components will be used to describe where they are and how they work throughout the
manual.
SEHLS1224 Limb Saw Components
Three position pivot
stop plate
Three boom mount
locations
Components and Features
Tension
spring
Chain guard
Saw chain cover
25” saw chain &
guide bar
15
SEHLS1224 Limb Saw Features
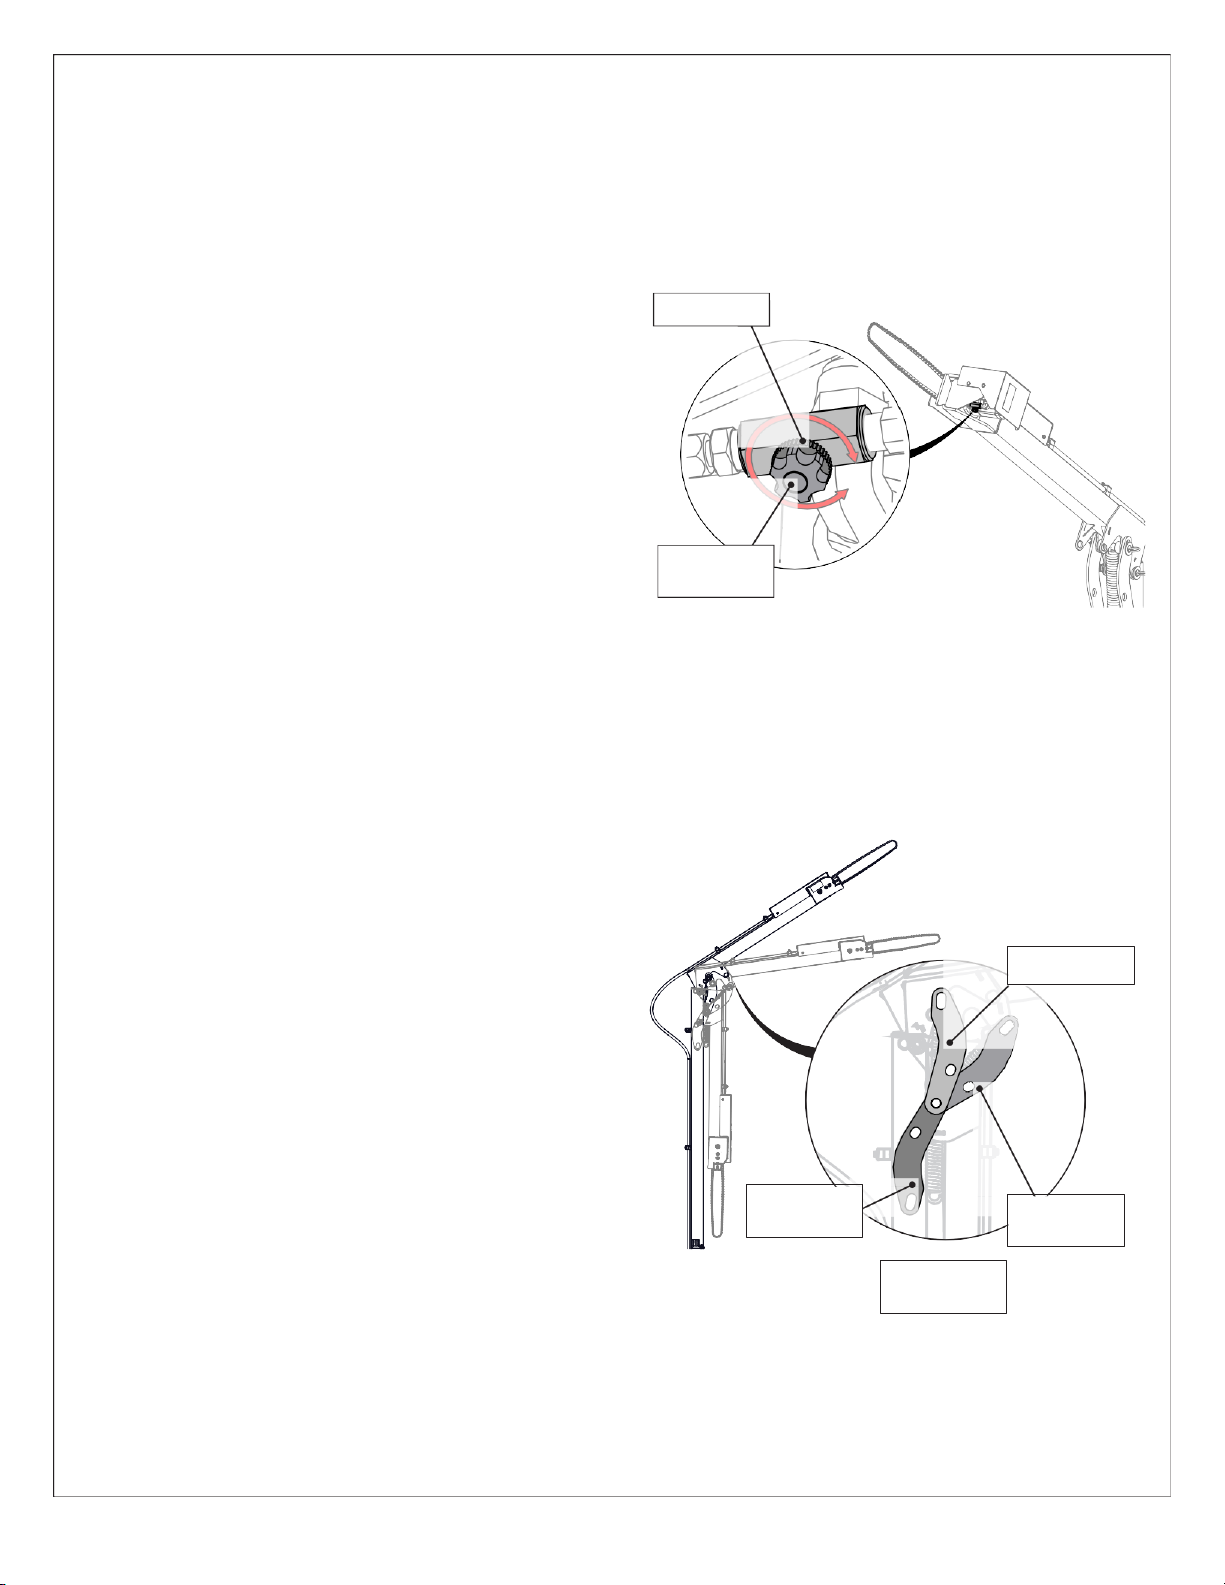
Automatic Chain Oiler
The SEHLS1224 is equipped with an automatic chain oiler
system fed from the hydraulic circuit. The system is preset
at the factory for optimum lubrication of the saw chain, but
is adjustable if required.
To change the setting:
• Hold the adjuster knob and loosen the knurled lock
nut.
• Turn the knob to the desired position: clockwise to
increase, counter clockwise to decrease.
• Use caution using no more than ½ turns to make
adjustments.
• Position piece of paper or cardboard on ground and
lower chainsaw blade over the paper.
• From the power unit seat, run your saw several
seconds. Look to see if there is any oil splatter on the
paper.
• Adjust oil flow until you have a fine spray of oil on
paper.
• When you have achieved the correct flow, hold the
knob, and tighten the knurled lock nut to lock the knob
in position.
Knurled nut
Adjuster
knob
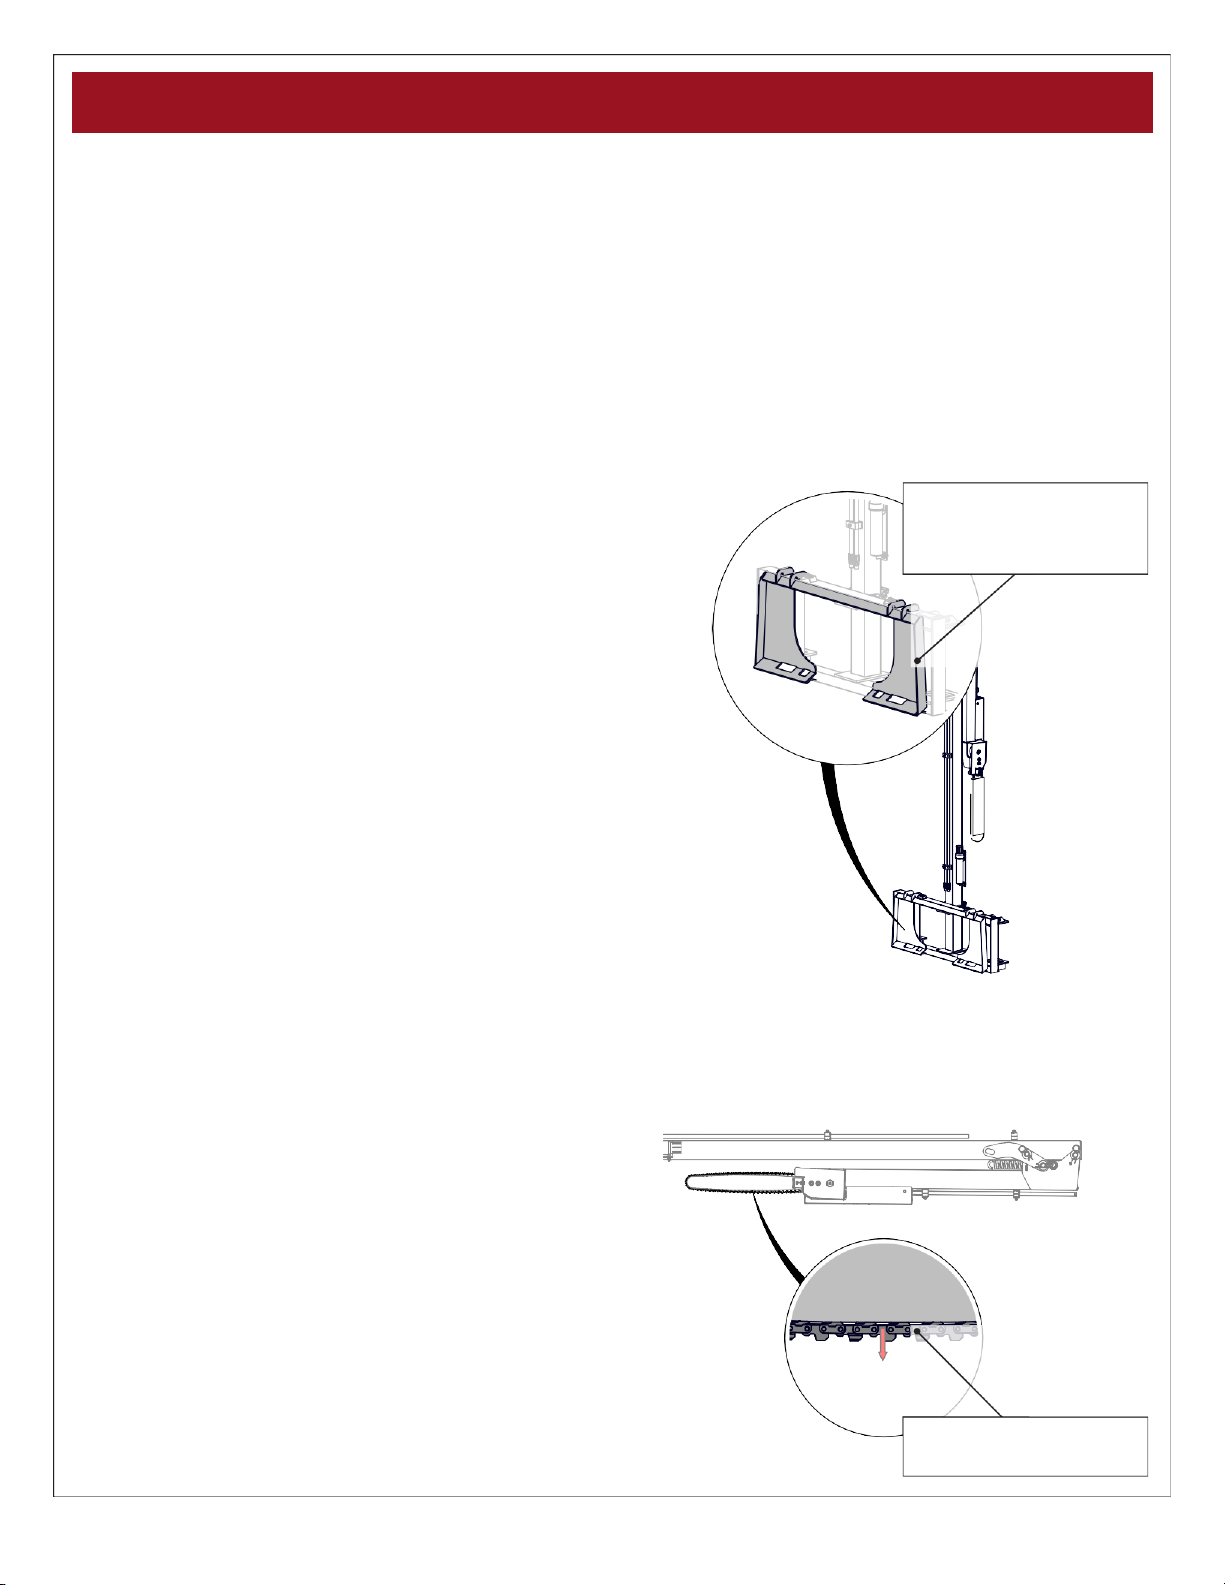
Pivot Stop
The saw boom pole is able to be locked into three
positions via the pivot stops:
• Storage position - 0°
• 98° position
• 120° position
To change position, lower the limb saw so its easily
accessible.
• With a helper support the saw boom pole.
• Remove the saw boom pole hitch pin and pin
assembly.
• Pivot the saw boom pole to the new position, and line
the spring loop up to the appropriate bracket / pin
holes.
• Rotate the two pivot stops to the appropriate bracket
holes and insert the pin assembly through the holes
and spring loop, and lock with the hitch pin.
Note: when putting the saw boom in storage position allow
the spring to hang down.
Pivot stop
positions
98° position
Storage
position
120° position

16
Main Boom Mount
The main boom pole is able to be mounted into one of
three positions on the adapter frame assembly.
To change position, have limb saw mounted on the power
unit and lock the top saw boom into the storage position.
• Roll the bucket position to full dump (so the limb saw
is horizontal) at waist height.
• Undo the lock pin from the draw pin and remove from
the main boom.
• With two people carefully slide the limb saw out of the
adapter frame.
• Carefully move it to the new position and insert into
the adapter frame.
• Insert the draw pin and secure into place with the lock
pin.
Draw pin
Limb saw in
storage position
17
To prevent potential injury during installation and to ensure safe working conditions, avoid working around the power unit
while it is running. Shut off the power unit and ensure the brakes are applied or the wheels have been secured with wheel
chocks to prevent unwanted movement during the installation process.
The following describes the typical connection procedure with supplied materials. Before proceeding, lubricate the
unit. Refer to the maintenance section in this manual. Before putting the limb saw into service the first time, inspect the
machine for shipping damage. If damage does exist, do not use. Notify your dealer immediately to have damaged parts
replaced or repaired.
This is a one-time set-up procedure, and will not have to be repeated.
The initial setup of the limb saw model involves a few basic steps.
• Prepare and attach the limb saw to the power unit, the saw boom should be in storage position.
• Install hydraulic hoses.
• Test and inspect.
Mount the Limb Saw
Ensure your attachment system is secure on the power
unit. The limb saw should be in position according to the
power unit’s mounting instructions.
• Position the hydraulic connectors away from the quick
attach points to prevent damage from pinching.
• Prepare your particular attachment system, follow the
attachment instructions for your power unit.
• Close and secure any locks or pins to lock the limb
saw to the quick attach.
• Attach the hydraulic hoses to the power unit’s auxiliary
ports.
When traveling from point to point, always travel with the
limb saw lowered and saw boom in storage position for
better stability.
Quick Attach Adaptor.
Machine specific adaptor
configured at purchase.
Check Chain Tension
Ensure your limb saw is secure on the power unit. The
limb saw should be lowered and in storage position for
easy access.
• Grasp the chain at the midpoint of the guide bar and
pull the saw chain away from the bar rails. The drive
link tangs should lift away but not clear the bar groove.
• Check that the saw chain is adequately lubricated.
Chain should be snug but move freely around the guide
bar.
If saw chain needs to be adjusted see the maintenance
section for adjustment procedure.
Tangs should lift from but
not clear guide bar.
Initial Setup
18
!
CAUTION
Operational Hazard
Do not lock the auxiliary hydraulics in the
“ON” position, dangerous and unexpected
movement will occur.
!
High Pressure Hazard
Be
aware that hydraulic leaks
could
develop with out warning.
Do not check for leaks with your
hand or fingers while the system is
WARNING
pressurized
!
CAUTION
Operational Hazard
At first use the hydraulic motor and hoses
on this product may contain air or an air
-
fluid
mixture. Failure to remove all the air from the
hydraulic
circuit can cause dangerous
uneven,
jerky movement during use.
!
WARNING
Amputation Hazard
Do not enter area of chain saw. A
running
chain saw presents a
potential
laceration
and amputation hazard
and
could result in death.
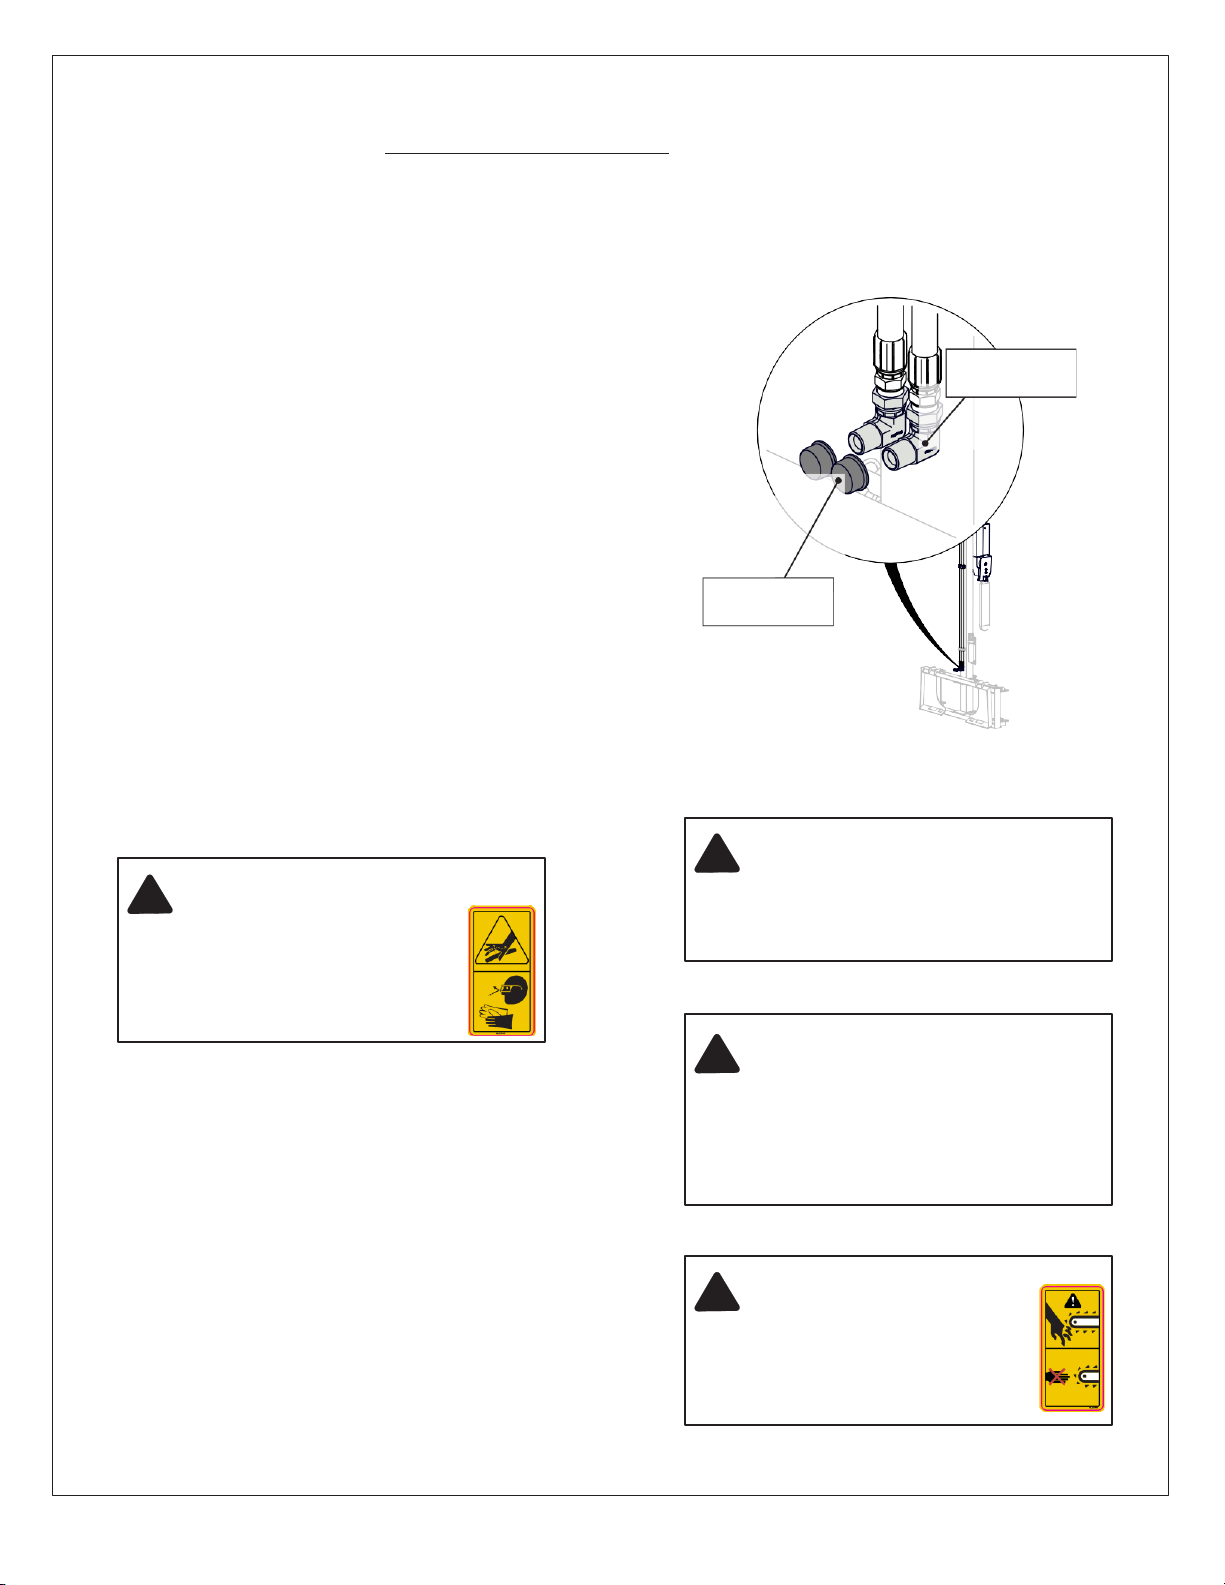
Hydraulics
Hydraulic connections from the power unit to the limb saw are made at the limb saw. Hydraulic hoses and connectors
from the limb saw to the power unit is the responsibility of the owner. HK90 Optional 90” Hose Kit c/w Flat Faced Couplers
is available from your dealer.
The following describes the typical connection procedure, however customizing the connections is possible (single
point hydraulic couplers, etc) and is up to the customer. See your power unit manual on how to operate your auxiliary
hydraulics.
Caution: only qualified personnel should make
modifications and connections to the power unit’s
hydraulic system.
• The hydraulic hoses must be:
• Good quality, 3000 psi min
• Sufficient length to reach the auxiliary ports
• 3/8 i.d. minimum.
• Limb saw end of the hose must have female 1/2”
NPT fittings.
• Power unit end, connectors to fit your auxiliary
ports.
• Remove the protective end caps on the hydraulic
connectors and hoses.
• At the power unit, route the hydraulic hoses from the
power unit’s auxiliary remote hydraulic connections to
the limb saw hydraulics connection.
• Ensure the hydraulic hose is secured and protected
from snags, crimping or pinching. Note: limb saw
comes equipped with mounting plates for the SHMK
spring hose mount kit, ask your dealer.
• Mark the connections appropriately on the hoses.
End caps
Hydraulic
connectors
Test
Once the limb saw is securely attached and hydraulics
connected, move the saw boom from storage position to a
position of your choice. Remove the saw chain cover then
start up the power unit. Ensure there are no bystanders
in the working area around the limb saw or power unit to
avoid potential injury.
Test the function of the chain saw hydraulics: check
clearances for the hydraulic hoses, lift the loader arms
up and down, curl the bucket cylinders and look for any
interference.
The hydraulic motor on this product may contain air or
an air-fluid mixture. Cycle the hydraulic chain saw motor
several times until all air has been completely removed.
Do not lock the auxiliary hydraulics in the “ON” position.

19
!
CAUTION
Prepare
Read and understand ALL safety and
operating instructions in the manual,
read and understand ALL safety
labels located on the machine.
!
WARNING
Amputation Hazard
Do not enter area of chain saw. A
running
chain saw presents a
potential
laceration
and amputation hazard
and
could result in death.
This section describes how to safely and effectively operate the limb saw in the field of operation. By following
recommended procedures, a safe working environment is provided for the operator, bystanders and the area around the
work site. Not all situations and conditions can be addressed, proceed with care & caution and use safety as your guide.
The owner or operator has the responsibility of being familiar with the operation of the limb saw and must train all other
operators before they start working with the machine.
Work in a safe manner and follow all instructions exactly, safety is everyone’s business. Untrained operators are not
qualified to use the machine.
Operation Safety Checklist
NEVER allow helpers or bystanders under or near
the machine while mounting the power unit.
Make sure that the machine is securely mounted
before using.
Be aware of overhead hazards: falling branches.
Power units should be equipped with a cab for
overhead protection.
Inspect all fastening devices, do not use if worn or
damaged.
Prepare
• Clear the area of bystanders, especially small
children.
• Training: each operator must be trained and familiar
with the set up and operation of the product and its
components.
• Review:
• Components and Features
• Operation Safety Checklist
• Power unit safe operating instructions
• It is recommended that each person wear appropriate
Personal Protective Equipment (PPE). This list
includes but is not limited to:
• Safety shoes with slip resistant soles.
• Safety glasses.
• Hearing protection.
• Heavy or leather gloves.
• Survey the work site, and make note of any
hazards such as holes, ditches nearby or overhead
obstructions. Never assume the work area is safe and
never skip the site inspection before start of operation.
Ensure your power unit has a ROPS installed.
Do not permit riders while using or transporting
machine.
Do not allow bystanders near front or sides of the
machine. Falling objects are a potential hazard.
Drive slow and carry low.
Where possible, avoid operating near ditches,
embankments and holes.
Before use, inspect the limb saw (see service &
maintenance section) and check the following:
• Inspect your power unit, it must be in good
operating condition (see power unit owner
manual).
• Check all nuts, bolts and screws and ensure they
are all properly secured.
• Check hydraulic connections, ensure they are
clean and free of dirt. Run the machine and
power unit through all hydraulic functions.
• Inspect the saw chain for correct tension and
sharpness.
Material
The Spartan Equipment limb saw is designed for the
purpose of trimming branches from trees.
Do not use the limb saw to lift, push or pull objects,
damage to the limb saw will result.
Field Operation
20
!
CAUTION
Operational Hazard
Personal Protection Equipment
(PPE)
is required when
operating
or maintaining this machine.
!
CAUTION
Overhead Hazard
Be aware of falling debris under,
around the attachment and on
the power unit. Cut branches
can fall unpredictably.
Operating
It is important to follow the safety information and operating procedures in this operator’s manual. How and when to use
the SEHLS1224 and power unit features will be dictated by a combination of variables:
• Power unit characteristics.
• Condition and type of working surface.
• Your experience using the limb saw.
Knowing the capabilities and features of your power unit and limb saw, coupled with your experience is the best way to
safely and efficiently tackle any baling operation.
Safety
Always inspect the work area before starting the job. Ensure any rocks or any other objects in the area either removed or
are noted and marked. Inspect the tree for any nails, spikes or metal objects.
• Power units must have overhead protection and a ROPS system installed.
• Review loader instructions for your power unit and ensure your quick attach system is secure.
• During transport carry the limb saw low and slow and in storage position. Be aware of overhead hazards and
obstructions.
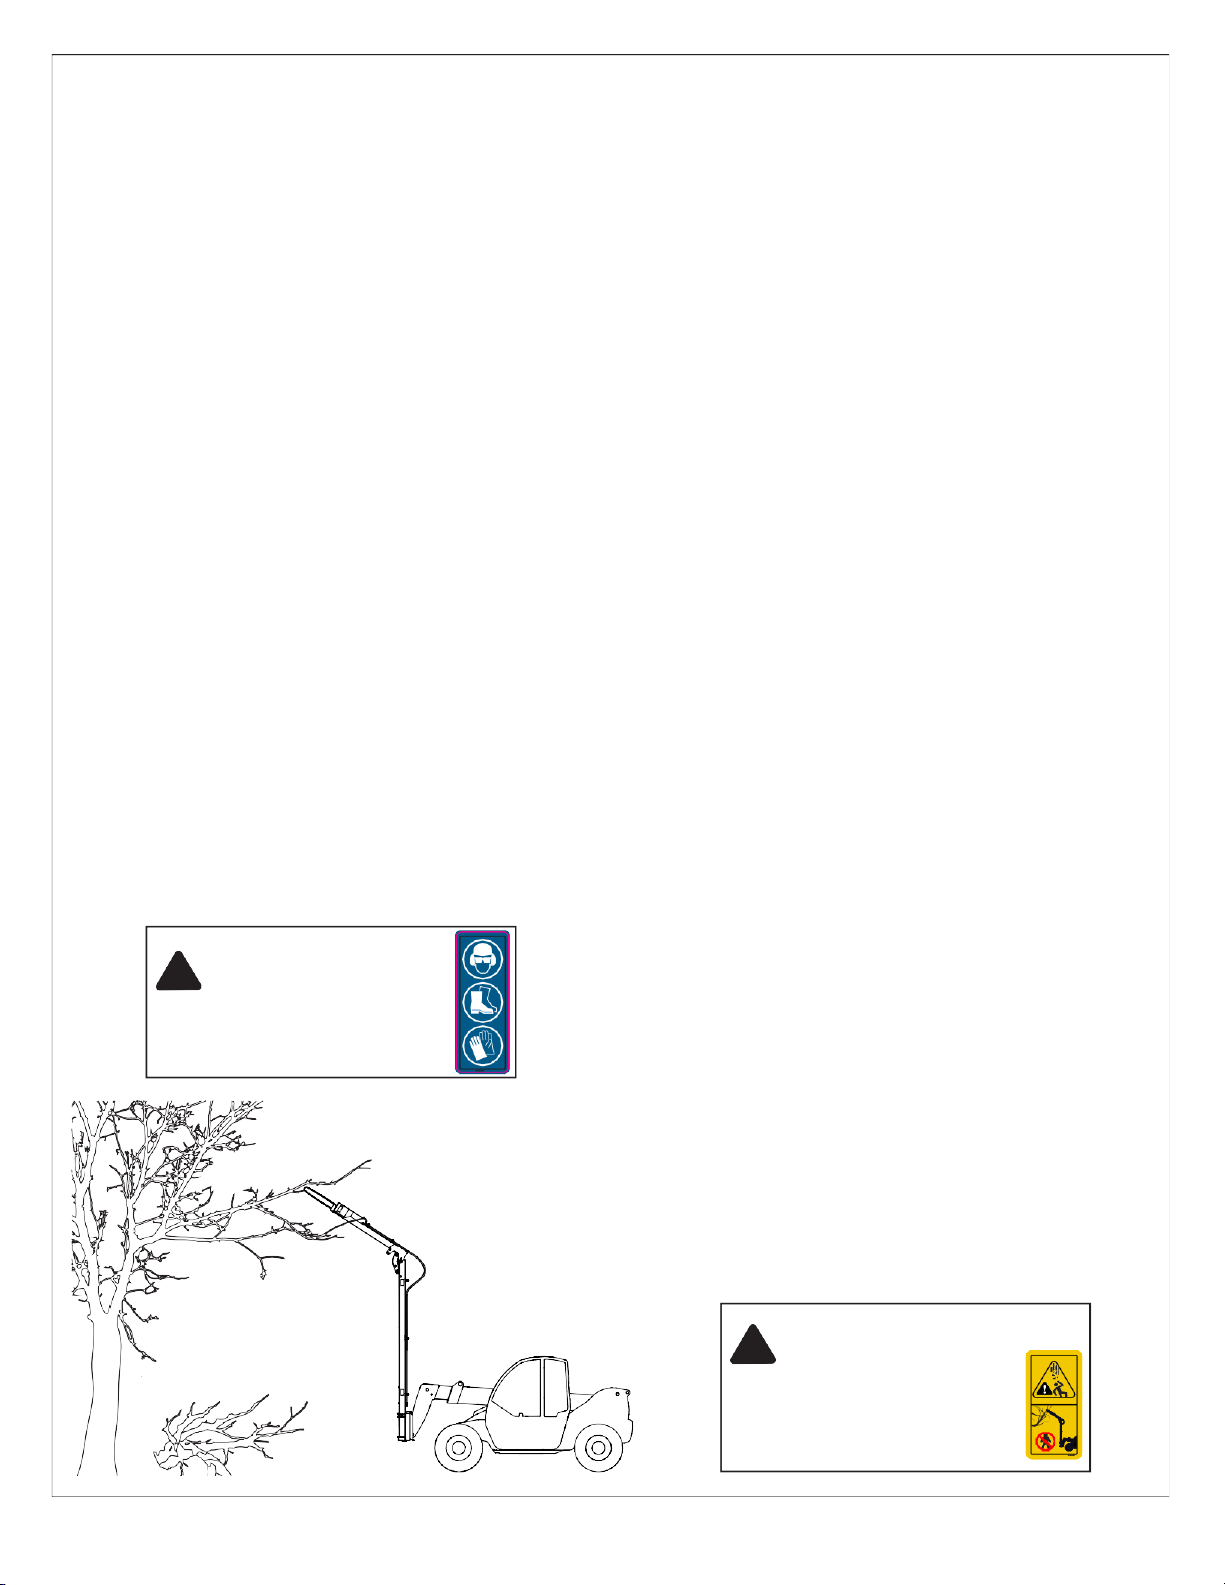
Begin
Work
As you gain experience with your saw, you will become
more skilled at determining how many cuts it will take for a
clean, final cut. When in doubt, make an extra cut.
Note: At first start of the day, allow a short run time before
beginning to trim to lubricate the saw chain.
• To begin a cut, position the limb saw over the branch
to be trimmed, around the halfway point or closer on
the guide bar from the motor.
• Activate hydraulic flow to start the chain saw running.
• Lower your loader to begin cutting, constant pressure
is supplied by the spring, keep lowering to complete
the cut.
Trimming Tips
• Always be aware of helpers. Make eye contact and
have a hand signal system in place.
• When cutting long, or large heavy limbs, make
several shorter cuts to remove weight from the limb
before making the final cut at the base. This will
minimize the chance of the bark peeling and
catching and also decrease the chance of the limb
rolling and pinching the saw.
• Always keep the chain, bar and sprocket clean.
Replace worn out parts as needed.
• Always operate with a sharp chain. Cutting with a
dull saw chain will increase the time it takes to cut
and will cause vibration and excessive wear on
your guide bar. Sharpen chain daily.
• If burn marks appear on the wood that you are
cutting, or soft wood is hard to cut, it’s time to
sharpen or replace your saw chain.
• Always keep saw chain at proper tension, check
tension every three hours of operation.
• Clear away or have a helper clear away trimmed
branches around the tree to make it easier and
safer to maneuver around the work site.
• Align the power unit to cut branches at a 90° or
greater angle so that falling branches fall off to the
side and not on the power unit.
• Be sure to clean saw chain after each use, and
sharpen if required. (see maintenance section)
Table of contents
Other Spartan Equipment Saw manuals


