Spartan Tool 740 Water Jet User manual

Record the VIN Number of your
Model 740
and give the number to the factory
when ordering parts.
Serial Number ..............................................
SPSP
SPSP
SPARTART
ARTART
ARTANAN
ANAN
AN
740 Water Jet
Owner’s Manual
Spartan Tool L.L.C.
800.435.3866
www.spartantool.com
74016000 (Rev. -) 8-18-11 © 2011 Spartan Tool LLC

Page 2
Warning
SPARTAN TOOL L.L.C.
1506 W. Division Street
Mendota, IL 61342
(800)435-3866 Fax (888)876-2371
www.spartantool.com
— Read the safety and operating instructions before using any Spartan Tool product. Drain and sewer cleaning can
be dangerous if proper procedures are not followed and appropriate safety gear is not utilized. Read the engine
owner’s manual for instruction and safety precautions on engine operation.
— Gasoline is extremely flammable and is explosive under certain conditions.
Refuel in a well ventilated area with the engine stopped. Do not smoke or allow flames or sparks in the
area where the engine is refueled or where gasoline is stored.
Do not overfill the fuel tank (there should be no fuel in the filler neck).After refueling, make sure the tank
cap is closed properly and securely.
— Before starting unit, be sure to wear personal protective equipment such as safety goggles or face shield and
protective clothing such as gloves, coveralls or raincoat, rubber boots with metatarsal guards, and hearing protection.
— Carbon monoxide exhaust and/or gasoline fumes from this equipment can create a hazardous atmosphere in
confined spaces (which may include, but are not limited to, manholes and septic tanks), closed garages or other areas
which may not be properly ventilated. In particular, excess gasoline fumes can create an explosion hazard. Such
hazardous atmospheres can cause death or severe injury. Do not operate this equipment in any confined space or
area with inadequate ventilation. Operate this equipment only when located outdoors or in an open, well ventilated
area.
— Insure the jet hose has been placed in the pipe (minimum of 6 feet suggested) before engaging the water pressure
to prevent the hose from coming out of the pipe prematurely and causing injury.
— Always shut the water pressure off before pulling the hose out of the pipe. Mark the hose a minimum of 6 feet
from the end to help insure the hose is not accidentally pulled out of the pipe while still under pressure. Shut off the
water pressure when the hose mark is encountered. WARNING: Portions of the system can still be under pressure
even if the unit is not operating.
— Never point the wash gun at anyone while operating the unit. Injury may result.
— Drains and sewer can carry bacteria and other infectious micro-organisms or materials which can cause death or
severe illness.Avoid exposing eyes, nose, mouth, ears, hands and cuts and abrasions to waste water or other potentially
infectious materials during drain and sewer cleaning operations. To further help protect against exposure to infectious
materials, wash hands, arms and other areas of the body, as needed, with hot, soapy water and, if necessary, flush
mucous membranes with water. Also, disinfect potentially contaminated equipment by washing such surfaces with a
hot soapy wash using a strong detergent.
— For any questions contact the company at the address shown below.
“California Prop. 65: This product may contain an extremely small amount of lead in the coating. Lead
is a material known to the State of California to cause cancer or reproductive toxicity.”
SS
SS
S
!SS
SS
S
!

Page 3
Table of Contents
Warning ............................................................ 2
Table of Contents ............................................. 3
OPERATING SECTION
Model 740 Water Jet Specifications.................. 4
Model 740 Water Jet Features ......................... 5
Jet Applications Areas ...................................... 6
Uncrating and Prep .......................................... 7
Towing Instructions ........................................... 8
Pump and Pressure System ............................ 9
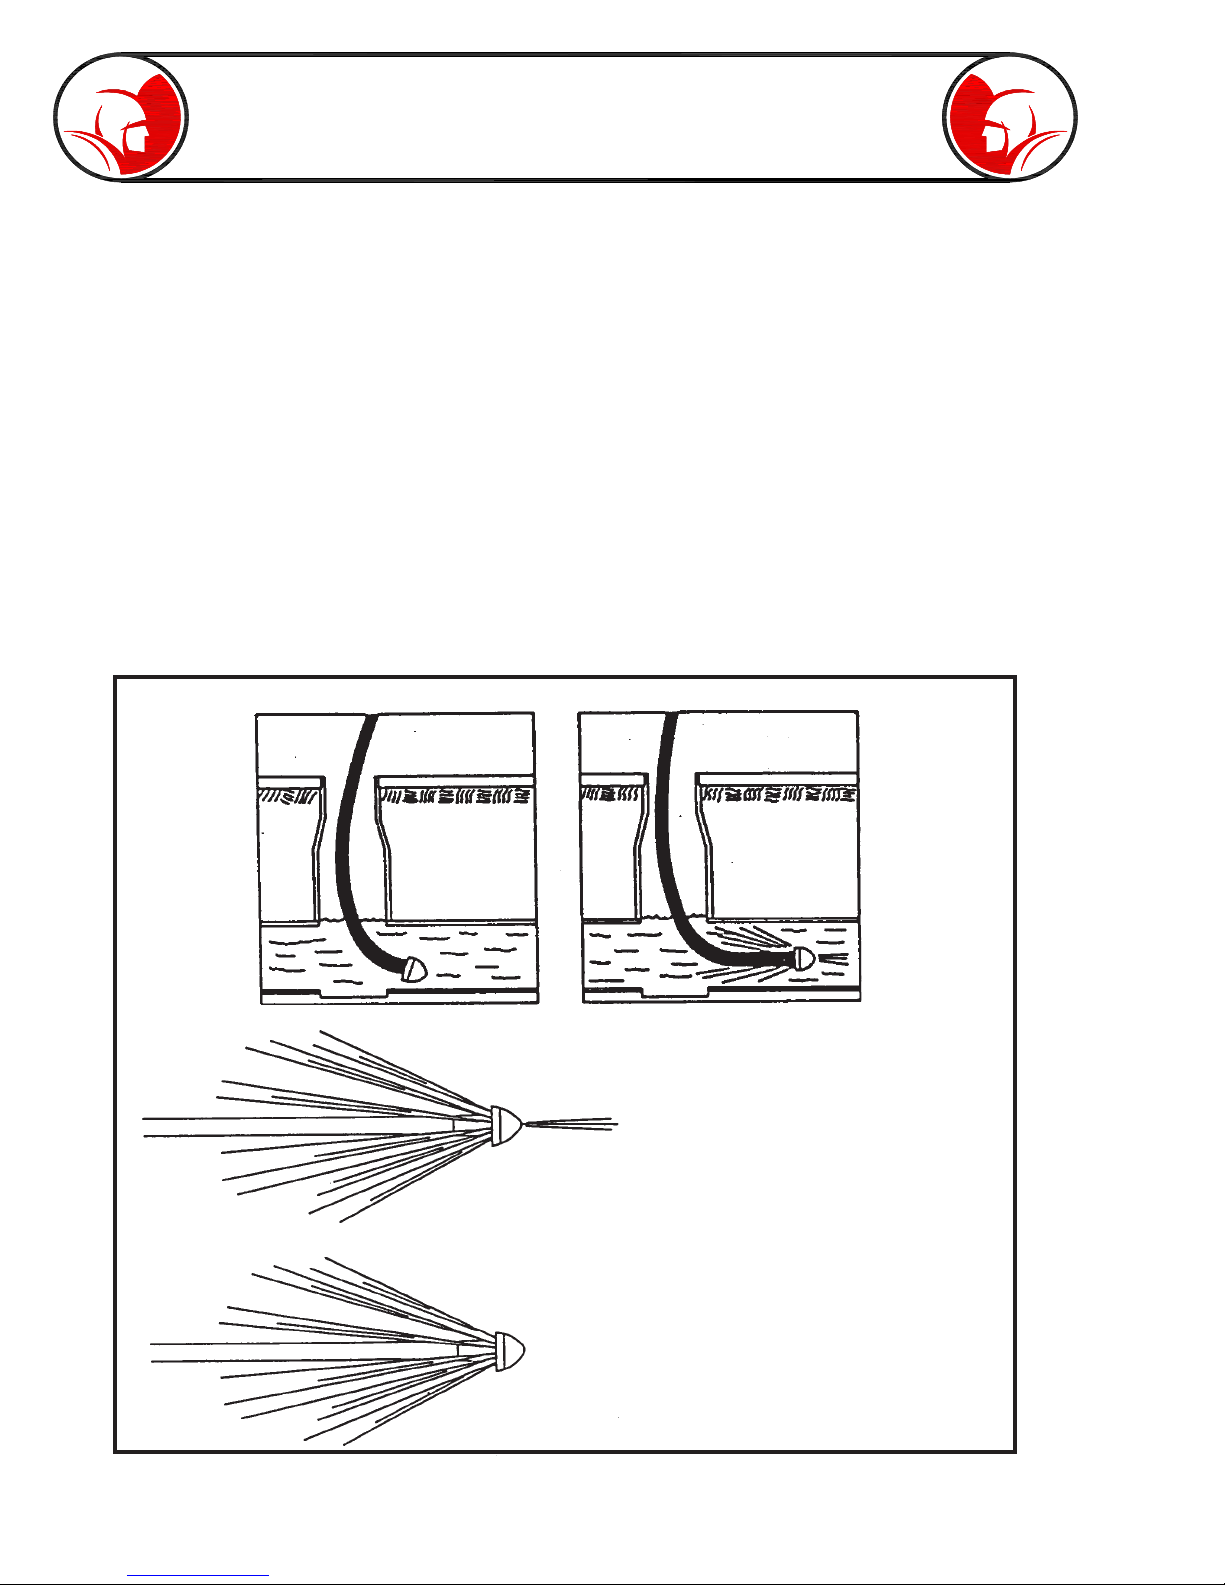
High Pressure Water Jetting .......................... 10
Water Tank Filling ........................................... 11
Operator Controls ..................................... 11-12
Low Water Switch Location..............................13
Engine Operating Procedure .......................... 13
Setting up for Operation ................................. 14
Power Rewind Operating Instructions ............ 15
Fuel and Oil Recomendations ........................ 16
Lubrication & Maintenance ........................ 17-19
Air Cleaner ................................................ 20-21
Operating Instructions ............................... 22-23
Pipe Jetting Procedure ................................... 23
When Obstruction Are Encountered .............. 24
1/4” Drain Hose .............................................. 24
Wash Down Kit - 73817300 ........................... 25
Mobile Hose Reel - 73816800 (Optional) ........ 25
Venturi Pump - 77763700 (Optional) .............. 26
Cold Weather Protection ................................ 26
740 Pump System Malfunction Chart ............. 27
Engine Troubleshooting .................................. 28
General Troubleshooting ................................ 29
PARTS & ACCESSORIES SECTION
How To Use Parts & Accessories Section ..... 30
Special Note ................................................... 30
Electrical Components ................................... 31
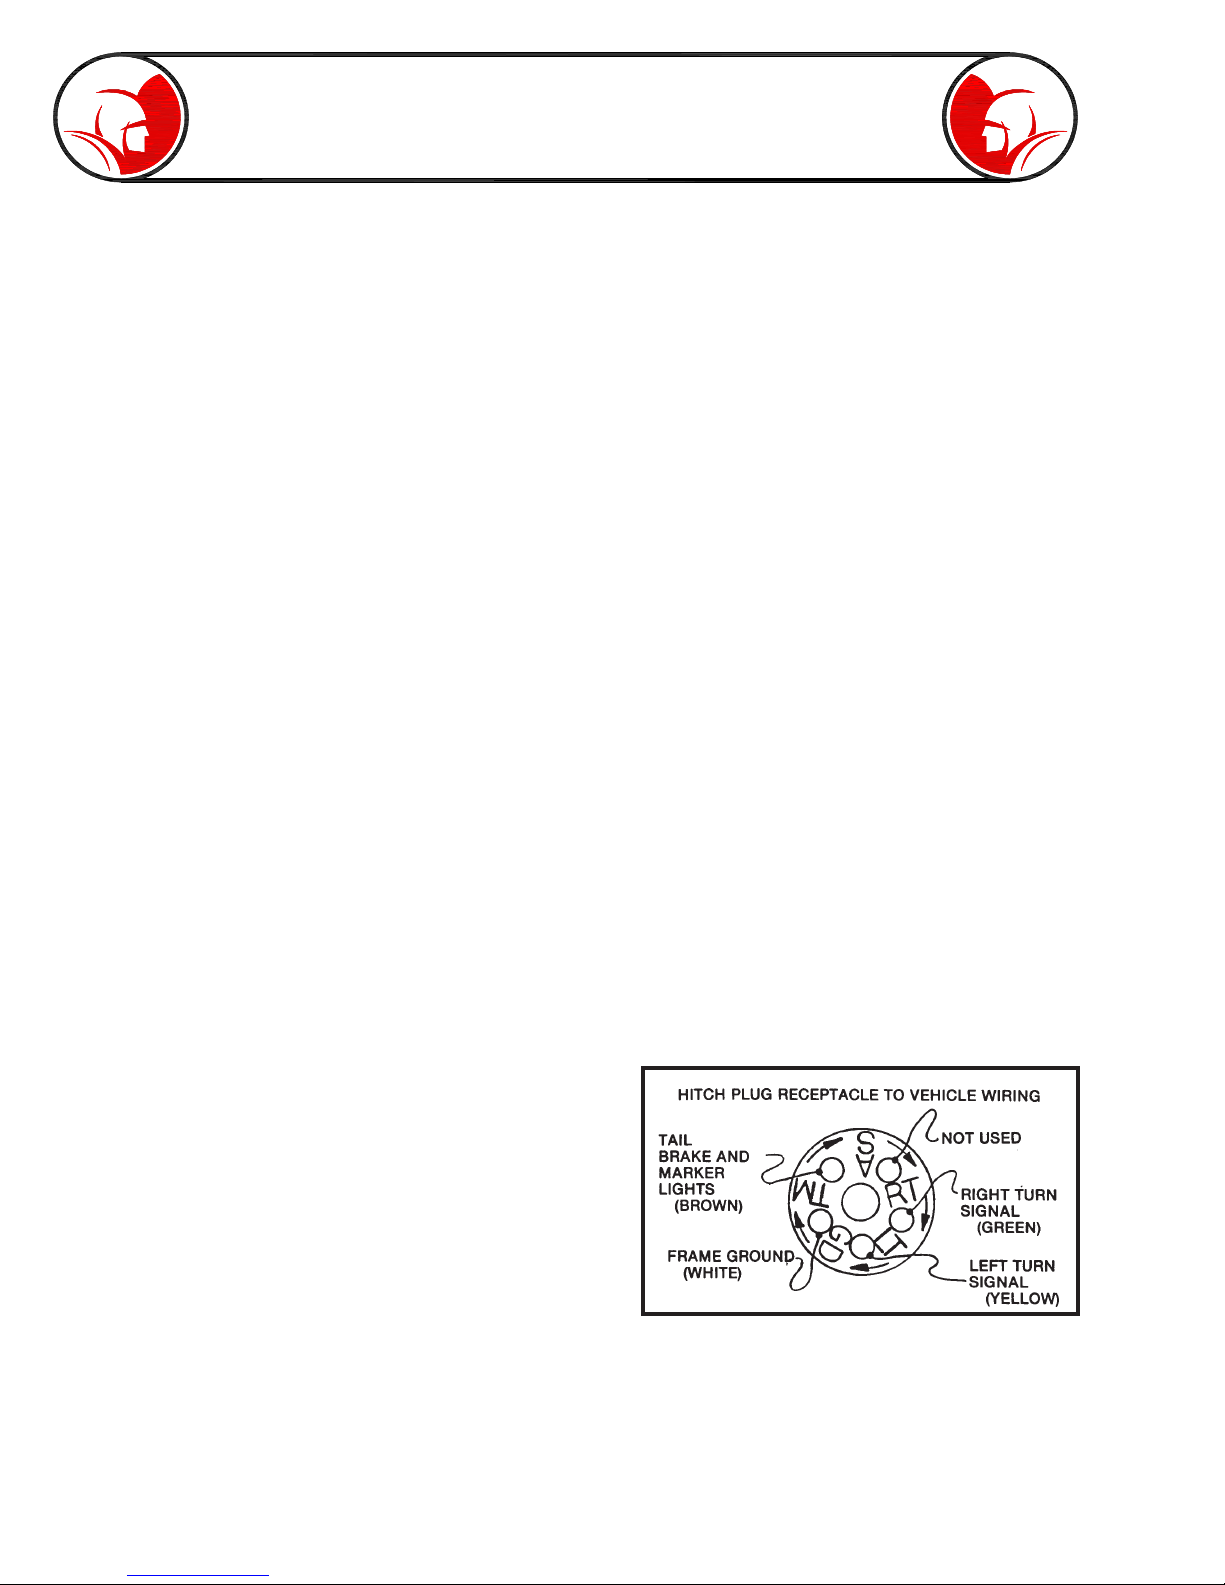
Wiring Diagrams ....................................... 31-33
Final Assembly - 74000000 ....................... 34-42
Pump Assembly - 74015000 .......................... 43
Portable Reel Assembly - 72727700 ......... 44-45
H.P. Reel Assembly - 75805500 ................ 46-47
Chain Guard Assembly - 75812300................ 48
High Pressure Pipe Assy - 73807300 ............. 48
Shaft Rewind Assembly - 75809400 .............. 49
Power Pak - 74011000 .............................. 50-51
Control Panel - 75808300 ............................... 52
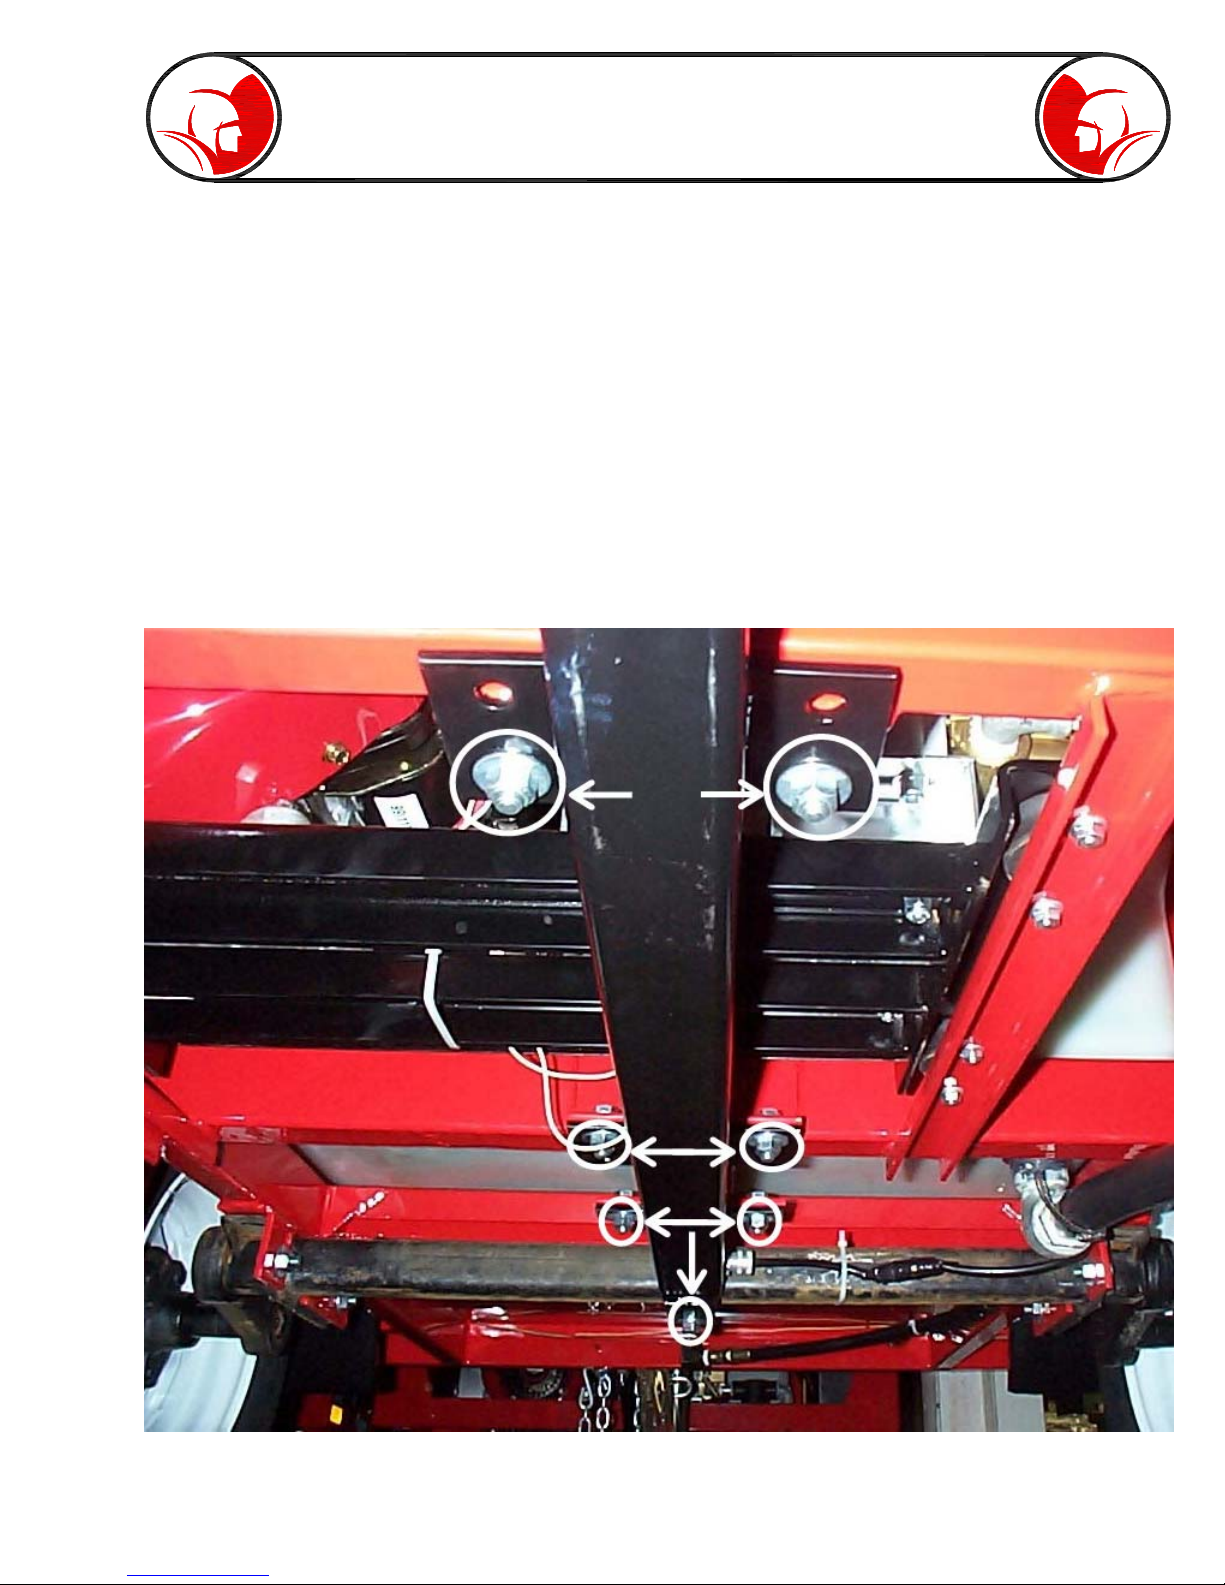
Hitch Tube Assembly - 73806800 .............. 53-54
Water Tank Assembly - 74014000 .................. 55
Axle - 73804300 .............................................. 56
Axle, Tire & Wheel - 73803700 ....................... 56
Pump Parts List-79802500 ............................ 57
Pump Exploded View-79802500 .................... 58
Pump Repair Kits ........................................... 58
Unloader - 79803700 ................................. 59-60
Frame Weldment - 74012000 ........................ 61
Hand Crank Assembly - 79827300 ................. 62
3/8” Anti-Turn Around - 75866500 ................... 62
Air Bulb & Hose Assy - 44225800................... 63
Decal Package - 74017000 ............................ 63
Wash Down Package - 73817300 .................. 64
Handgun Lance VNozzle - 77799800 ............. 64
Accessories ................................................... 65
Tire Safety Information................................66-68
Safety Information............................................69
Warranty ......................................................... 70

Page 4
Model 740 Water Jet Specifications
General
—Pipe Sizes Up to 12” in Diameter
—Max Water Delivery 12 GPM
—Max Pressure Delivery 4000 PSI
Trailer
—Gross Trailer Weight (GTW) 2651 lbs.
—Trailer Weight (Empty) 1320 lbs.
—Max Tongue Weight 120 lbs.
—Trailer Length 120”
—Trailer Width 57”
—Trailer Height 48”
—Hitch 2” Ball Type (Class II)
—Tank Capacity 150 Gal.
—Wheels 13”
—Tires ST175-80-R13, Blackwall
Engine
—Horsepower 40 HP
—Cylinders 2
—Bore & Stroke 3.54” x 3.10”
—Fuel / Tank Capacity Gasoline / 12. Gal.
—Cooling / Capacity Air Cooled
—Oil Capacity (w/filter) 2.9 qts.
—Starter Electric
—Alternator 20 Amp
—Battery 12 VDC
Pump
—Max Pressure 4000 PSI
—Max Water Output 13.0 GPM
—Max Temperature 140°F
—RPM 900
—Plungers 3

Page 5
Features
— Equipped with 3/8” x 300’ high pressure jetting hose
— Open and Closed nozzles for 3/8 inch hose
— Easily accessible pump inlet filter assembly
— Axles are torsion design with fully independent wheel suspension
— Pre-Wired lighting with standard 5-Pole plug
— Pivoting hitch jack with caster wheel provided on trailer tongue
— Low water shut off
— Unloader pressure control
—Foot pedal valve for reel rewind control
— Powered hose rewind
— Low engine oil pressure indicator
— Locking tool box
— Available Quick connect washdown gun & spray lance
— Available Manhole hose protection
— Detachable, portable reel with 1/4” x 150’ Drain Hose
Model 740 Water Jet Features

Page 6
Jet Applications Areas
There are a wide variety of uses for the Spartan Model 740 Water Jet. Here are just a few:
—Apartments/Hotels
Mains and garage drains, remove all grease and debris from main lines under the buildings.
—Factories
Food processing plants and foundries have frequent drain and sewer blockages. Set up preventive maintenance
contracts to avoid risk of total plant shutdown.
—Farms, Rural
Clean and spray barns, pens and heavy farm equipment, revitalize drain field in septic systems and field tile.
Clear blockages in liquid manure system.
—Housing Authorities
Any drains, laundry lines, garbage chutes, clean-outs and many grease-removing applications.
—Institutions
Clean-running drains and sewer lines are a “must” in hospitals, schools, prisons. Use in kitchens, remove lime
deposits on buildings and clean parking lot drains.
—Municipals
Open culverts for proper flood control, wash down manholes, clean lines in wastewater treatment plants.
—Residential
Clean drain lines, septic lines, field tiles, culverts, swimming pools, surface cleaning and sandblasting.
—Restaurants
Grease in drains is always a problem - Your Spartan Water Jet actually removes grease from the lines instead
of simply punching a hole through the blockage, risking reaccumulation downstream.

Page 7
Uncrating and Prep
If you received your machine crated, position crate so that your truck can be backed up to “front” side.
Now remove end of crate marked “front”. Remove hitch assembly from under machine. Connect and
tape wire plugs and attach hitch to frame with bowmalloy bolts provided. These bolts must be torqued to
74 ft.-lbs. (see Fig. 1). It is the uncraters responsibility to torque the hitch. Support the hitch and
remove vertical supports under frame. Hook up jet to truck and pull from crate. Remove packing materials
from jet. Door and engine keys are packed in a bag in the toolbox. Remove the contents.
If you receive your machine uncrated.
Upon receiving your machine double check the torque of all 7 hitch bolts. (See Fig. 1.)
Battery
Prior to shipping, the battery cables are disconnected from the terminals of the battery. The battery cables
will need to be reconnected to the battery before operating.
Fig. 1
SS
SS
S
!

Page 8
Before hitching and towing on public roads, check that the tow vehicle uses a 2” ball on a hitch rated class
II minimum, make sure keeper engages ball to secure hitch. Adjust if necessary.
Because of the inherent water tank sloshing when towing, pull your jet empty at all times.
The following 2 rules may limit your vehicles towing capacity and the tank fill level when towed.
Determine towing capacity as described below and follow guidelines in using the lowest value from
the 2 rules.
Trailer Hitch
— Check rating of vehicles trailer hitch -
WARNING: Class 1 hitches often uses 1 7/8 ball which is unsafe to couple with a 2" hitch.
Class 2 - 3,500 lbs. Towing capacity is required.
Vehicle GCWR (Gross Combined Weight Rating)
— Towing capacity = GCWR minus vehicle weight minus cargo weight minus passenger weight.
NOTE: GCWR is provided on your vehicle or in vehicle manual.
Vehicle Towing Capacity
— Refer to your vehicle owners manual for listed trailer towing capacity.
— Trailer towing capacity should equal GCWR (gross combined weight rating) minus vehicle weight,
cargo weight, people weight and (vehicle) fluids weight.
— Check axle load rotatings.
Towing Instructions
Wire the plug receptacle to your vehicle as shown below. Note: The wire colors used on the jet running lights are also
indicated in Fig. 2 for re-wiring to a different plug design.
—Always use safety chains.
—Always use trailer lights.
Fig. 2
The hitch jack should always be tilted up when towing to avoid damage to the caster wheel. Pin jack clamp securely.
SS
SS
S
!
SS
SS
S
!

Page 9
Pump and Pressure System
The pump and relief valve are the heart of your jet. They have been specially designed for use with water
temperatures up to 140°F for pipe jetting, but can provide useful water flow for many other cleaning jobs
using the optional wash down gun and special attachments. The positive displacement pump (each crankshaft
revolution has to move a certain amount of water) uses 3 plungers (similar to pistons in an engine) to
create water flow. Pressure is not created until the pump outlet is restricted with a valve or nozzle. The
pump, valving and hoses can support pressures to 4000 psi.
The regulator valve acts to direct the water flow to the water tank when the hose reel and gun valves are
off or if nozzles provide too much restriction for total flow.Always use clean water to keep the regulator
valve operating properly. The hose and nozzle are designed to allow full flow at 4000 psi (at 3600
engine rpm) and the wash down gun operates at 1600 PSI max pressure. If leaks develop in the system
between the relief valve and hose reel valve (or gun valve) you will hear intermittent engine surges in
bypass as the bypass pressure gradually drops and is built up again by the pump. Tighten or otherwise
repair the leaks for smooth running.Always stop engine and release pressure before any plumbing changes
or repairs.
Because of the inherent hazards with high pressure, use only Spartan high pressure hoses and components
when repairing your machine.
If the nozzles become worn or if the gun is used with the jet hose, the regulator valve allows the same total
flow but at lower pressure because the restriction is lower. To maintain desired PSI - replace nozzles.
If nozzles become plugged, the regulator valve will direct some of the flow back to the water tank while
providing pressures over 4000 psi. If these pressures are seen with normal engine speed (3600 rpm),
check and clean the nozzles. When using optional lengths of 1/4” hose the operating pressure can also be
over 4000 psi at full gpm. Reducing engines rpm will produce lower pressures to prevent regulator valve
from bypassing off and on. Continued operation at pressures over 4000 psi can cause engine overheat
and reduce engine life.
SS
SS
S
!
SS
SS
S
!
SS
SS
S
!

Page 10
High Pressure Water Jetting
High pressure water jetting is the utilization of high pressure water combined with sufficient water flow to remove
debris in drain/sewer pipes. High pressure water alone cannot do the job. You need proper flow to wash the debris
downsstream where it can be collected and removed. High pressure water jetting can also be used to remove debris
on surfaces.
A high pressure water jet consists of a pump, a motor or engine, a hose reel, a given length of hose and a
various assortment of nozzles.
A pipe is cleaned with a high pressure water jet by directing water pressure and flow through a nozzle.
Controlled water pressure and flow propels a water jet through the sewer pipe allowing it to remove and wash
away the obstruction. (See Fig. 3.)
Ideally, a sewer pipe is cleaned from the lower end of the pipe and the hose propels itself to the higher end of
the pipe. By slowly withdrawing the jet hose, the water pressure and flow cleans the line most effectively.
When it is impossible to clean from the lower end of the pipe, the pipe must be water jetted several times to
remove all the debris. A skilled operator can effectively clean a drain/sewer regardless of the obstacles in his
way.
How A Jet Works
(Penetrating Nozzle) 75800900
Nozzle to be used for initial penetration
of sewer pipe.
(Closed Nozzle) 75800800
Nozzle to be used for thorough cleaning
of sewer pipe.
Fig. 3

Page 11
Water Tank Filling
Fill the water tank from a clean water source. Always flush rust out of hydrants before connecting fill hose to top fill
valve. Your water supply hose may remain connected for further filling by controlling water flow at fill valve.
Important Note: (If the next 4 items are not followed, cavitation of the pump could occur and reduce operating
efficiency and severely damage the pump.)
— Use water temperatures under 140°F.
— Ensure that water strainer is clean (check daily or as needed).
— Make sure the strainer valve (between the tank and the pump) is fully open during operations. This valve
stops tank flow to allow strainer service.
— The pump drain valve must be closed. It must not drip when engine is off and strainer valve is open.
Operator Controls
Rewind Engage /
Disengage
Control
Pressure Gauge
Reel Supply
Valve
Rewind Push
Button Control
Circuit
Breaker
Rewind Air
Footswitch
Control (Quick
Disconnect)
Reel
Lock
Rewind Power
Switch
Hose
Holster

Page 12
Operator Controls (cont.)
Choke
Throttle
Oil Filter
Ignition Switch
Low Oil
Pressure
warning light
Water Supply
Valve
Inlet
Filter
Water
Drain
Valve

Page 13
Start Up
— Check water tank level. This water jet is equipped with a Low Water Shut-Off switch that will
prevent the engine from starting at low water levels.
— Check fuel level.
Note: Also Check engine and pump oil levels per manufacturer specifications (attached).
— Turn high pressure reel supply valve “off”.
— Turn key to start the engine. Choke as necessary.
— Allow the engine to warm up at idle for 3 to 5 minutes before putting engine under load.
Engine Shut-Down
— Turn high pressure reel supply valve “off”.
— Allow engine to idle for 1 to 2 minutes
— Turn the engine key switch OFF. (The engine key switch must be OFF when the engine is not running to
avoid battery draining.)
Engine Operating Procedure
Low Water
Switch
Low Water Switch Location

Page 14
Setting up for Operation
Fig. 4
Always locate the jet in the driest and safest place possible. Avoid high traffic areas and use flashers and safety
cones. Position the jet so that hose can be pulled directly off of the reel for use. Remember that jetting is most
effective when you jet against the water flow. See Fig. 4 for the recommended positioning of the jet for best visibility
during manhole work. Note that loose hose and damaging corners are minimized when the jet is parked as shown.
(See pages 15 and 16 for instructions on using upper and lower manhole guides.)
When operating upon unlevel ground, position trailer with the hitch (tanksump) end at the downhill side.
Warning: Trailer must be level for low water shutdown to operate correctly. When trailer is on an incline
with hitch end at the down hill side and tank is empty, enough water can be held in the lower front corner
of tank to keep float switch in the operating position.
For non-manhole use, allow extra space for handling the hose before it is wound back on the reel or run the hose
directly to the pipe inlet using extra hose guards to protect the hose from cutting when going around corners.
Warning: Do not unhitch or operate trailer jet unhitched upon unlevel ground.
When unhitching the machine from towing vehicle, always follow these steps:
— Place wheel chocks around trailer jet wheels.
— Lower hitch jack, pin clamp securely.
— Disconnect ball hitch by raising lever and jacking hitch up. Disconnect safety chains and light cord before driving
away.
SS
SS
S
!
SS
SS
S
!

Page 15
Power Rewind Operating Instructions
To Rewind Hose on Reel
— Release reel lock.
— Move rewind engagement handle to “engage” position.
— Turn power switch “on”.
— Use panel mounted push button or air foot switch to energize rewind motor.
Note: Turn power switch “OFF” when rewind is not in use to avoid accidently activating rewind.
SS
SS
S
!

Page 16
Fuel and Oil
Recomendations

Page 17
Lubrication & Maintenance
Engine

Page 18
Lubrication & Maintenance (cont.)
• Check entire unit daily for water, fuel, and oil leaks.
• Inspect machine daily for loose or lost nuts, bolts, etc.
General Maintenance
a. Clean inlet filter daily.
b. Check battery electrolyte level every week or 10 hours. Fill
with distilled water if needed.
12 volt Battery

Page 19
Lubrication & Maintenance (cont.)
Oil rewind drive
chain every 50
hours (SAE 30
or heavier).
Grease rewind
engagement
mechanism
every 25 hours.
Oil rewind
final drive
chain every
50 hours
(SAE 30 or
heavier).
High Pressure Reel Assembly
Pump
Pump Oil Fill
Change pump oil after first 50 hours of operation, then at regular intervals of 500 hours or less depending on operating
conditions. Use SAE 90 Gear Oil.

Page 20
Air Cleaner
Table of contents
Popular Water Pump manuals by other brands

TRITORC
TRITORC BEL-8 Series Operation and maintenance manual

Wayne
Wayne WAPC250 Operating instructions and parts manual

Intex
Intex Krystal Clear SF40220RC owner's manual

IWAKI WALCHEM
IWAKI WALCHEM FZ-20T instruction manual

Test Equipment Depot
Test Equipment Depot NRP6Di user guide

Pentair
Pentair HYDROMATIC HTS33M1 Installation, Operation & Parts Manual

Pentair
Pentair STA-RITE INTELLIFLO3 VSF install guide

Zoeller
Zoeller 1104-0082 Quick reference guide

KNF
KNF NF5 Operating and installation instructions

Rinnai
Rinnai GTK03U installation instructions

Sherwood
Sherwood 22000 Series Technical guide

Ingersoll-Rand
Ingersoll-Rand ARO PP10A A Series Operator's manual