Spectra Hello Kitty KT2010 User manual

SUBSCRIPTION TO CALLER ID SERVICE FROM YOUR LOCAL
TELEPHONE COMPANY IS REQUIRED FOR ALL CALLER ID FEATURES
TOOPERATECORRECTLY
USER MANUAL
CALLERIDTELEPHONE
KT2010
PLEASE READTHIS USER MANUALCOMPLETELYBEFORE USINGYOUR
TELEPHONE ANDKEEPTHISMANUALFORFUTURE REFERNCE
Printedin China
90 DAY LIMITED WARRANTY AND SERVICE
VALID IN THE U.S.A ONLY
SPECTRA MERCHANDISINGINTERNATIONAL, INC. warrants this unit to be free from
defective materials or factory workmanship for a period of 90 days from the date of
original customer purchase and provided the product is utilized within the U.S.A. This
warranty is not assignable or transferable. Our obligation under this warranty is the
repair or replacement of the defective unit or any part thereof, except batteries, when it
is returned to the SPECTRA Service Department, accompanied by proof of the date of
original consumer purchase, such as a duplicate copy of a sales receipt.
You must pay all shipping charges required to ship the product to SPECTRA for warranty
service. If the product is repaired or replaced under warranty, the return charges will be
at SPECTRA’s expense. There are no other express warranties other than those stated
herein.
This warranty is valid only in accordance with the conditions set forth below:
1. The warranty applies to the SPECTRA product only while:
a. It remains in the possession of the original purchaser and proof of purchase is
demonstrated.
b. It has not been subjected to accident, misuse, abuse, improper service, usage
outside the descriptions and warnings covered within the user manual or non-
SPECTRA approved modifications.
c. Claims are made within the warranty period.
2. This warranty does not cover damage or equipment failure caused by electrical
wiring not in compliance with electrical codes or SPECTRA user manual
specifications, or failure to provide reasonable care and necessary maintenance as
outlined in the user manual.
3. Warranty of all SPECTRA products applies to residential use only and is void when
products are used in a nonresidential environment or installed outside the United
States.
This warranty gives you specific legal rights, and you may also have other rights which
vary from state to state. TO OBTAIN SERVICE please remove all batteries (if any) and
pack the unit carefully and send it freight prepaid to SPECTRA at the address shown
below. IF THE UNIT IS RETURNED WITHINTHE WARRANTY PERIOD shown above,
please include a proof of purchase (dated cash register receipt) so that we may establish
your eligibility for warranty service and repair of the unit without cost. Also include a
note with a description explaining how the unit is defective. A customer service
representative may need to contact you regarding the status of your repair, so please
include your name, address, phone number and email address to expedite the process.
IF THE UNIT IS OUTSIDE THE WARRANTY PERIOD, please include a check for
$12.00 to cover the cost of repair, handling and return postage. All out of warranty
returns must be sent prepaid.
It is recommended that you contact SPECTRA first at 1-800-777-5331 or by email at
cases the model you have may be discontinued, and SPECTRA reserves the right to
offer alternative options for repair or replacement.
SPECTRA MERCHANDISING INTERNATIONAL, INC.
4230 North Normandy Avenue,
Chicago, IL60634, USA.
1-800-777-5331
To register your product, visit the link below to enter your information.
http://www.spectraintl.com/wform.htm

1
IMPORTANT SAFETY INSTRUCTIONS
2
D. If the product does not operate normally by following the operating instructions.A
just only those controls that are covered by the operating instructions. Improper
adjustmentof othercontrols mayresult indamage andmay requireextensive work
by a qualified technician to restore the product to normal operation.
E. If theproduct hasbeen droppedor theenclosure hasbeen damaged.
F. If the product exhibits a distinct change in performance.
13. Avoid using a telephone during an electrical storm. There may be a remote risk of
electric shock from lightning.
14. Do not use the telephone to report a gas leak in the vicinity of a leak.
15. Never installtelephone wiringduring alightning storm.
16. Never install telephone jacks in wet locations unless the jack is specifically
designed for wet locations.
17. Never touchuninsulated telephonewires orterminals unlessthe telephoneline
has been disconnected at the network interface.
18. Use cautionwhen installingormodifying telephonelines.
SAVETHESEINSTRUCTIONS
This symbol is to alert you the important operating or servicing
instructionsthatmay appearin yourowner’s manual.Always
follow basic safety precautions when using this product to reduce
the risk of injury, fire or electric shock.
When using your telephone equipment, basic safety precautions should always be
followed to reduce the risk of fire or electric shock including the following:
1. Readand understandall instructions.
2. Follow all warnings and instructions marked on the product.
3. Unplugthis productfrom thewall outletbefore cleaning.Do notuseliquidoraerosol
cleaners. Use a damp cloth for cleaning.
4. Donot usethis productnear water, for example, neara bathtub, wash bowl,kitchen
sink, or laundry tub, in a wet basement, or near a swimming pool.
5. Do not place this product on an unstable cart, stand, or table. The product may fall,
causing serious damage to the product.
6. Slots and openings in the enclosure and the back or bottom are provided for
ventilationto preventoverheating. Theseopenings mustnot beblockedor covered.
Theopenings shouldnever beblocked byplacingtheproducton abed, sofa,rug, or
othersimilar surface.This productshould neverbe placednear orover aradiator or
heatregister.This productshould notbeplacedina built-ininstallationunless proper
ventilationis provided.
7. Thisproduct shouldbe operatedonly fromthetype ofpower sourceindicated onthe
marking label. If you are not sure of the type of power supply to your home, consult
yourdealeror localpower company.
8. Do not allow anything to rest on the power cord of the externalAC adaptor. Do not
locate this product where the cord will be abused by persons walking on it.
9. Do not overload wall outlets and extension cords as this can result in the risk of fire
or electric shock.
10. Never push objects of any kind into this product through enclosure slots as they
may touch voltage points or short out parts that could result in a risk of fire or
electric shock, Never spill liquid of any kind on the product.
11. Do notdisassemble thisproduct; takeit toa qualifiedservice technicianor service
center when repair work is required. Opening or removing covers may expose you
to voltage or other risks. Incorrect reassembly can cause electric shock when the
appliance is subsequently used.
12. Unplug thisproduct fromthe walloutlet andrefer toqualified servicepersonnel
under the following conditions:
A. When the power supply cord or plug is damaged or frayed.
B. If liquid has been spilled into the product.
C. If the product has been exposed to rain or water.

CHANGES IN TELEPHONE COMPANY
EQUIPMENT OR FACILITIES
The telephone company may take changes in its communications facilities,
equipment, operations or procedures, where such action is reasonably required and
proper in its business. Should any such changes render the customer’s terminal
equipment incompatible with the telephone company facilities, the customer shall be
givenadequate noticeto makemodifications tomaintain uninterruptedservice.
GENERAL
The FCC prohibits customer-provided terminal equipment to be connected to party
lines or to be used in conjunction with a coin telephone service.
INSTALLATION
The device is equipped with a USOC RJ11C standard miniature modular jack and is
designed to plug directly into a modular jack.
***THIS TELEPHONE HAS BEEN CERTIFIEDAS HEARINGAID COMPATIBLE ***
4
FCC INFORMATION
This equipment complies with Part 68 of the FCC Rules. The label affixed to this
equipmentcontains, amongother information,theFCC RegistrationNumber andRinger
EquivalenceNumber(REN) forthis equipment. Wesuggest thatyou reviewthe
followinginformation providedby theFCC.
NOTIFICATION TO THE TELEPHONECOMPANY
Notificationtothetelephonecompanyis nolongerrequired priorconnectingtheregistered
equipment. However, uponrequestfrom thetelephone company theuser shalltell the
telephonecompany whichline theequipmentis connectedto aswellas theregistration
number and the ringer equivalence of the registered protective circuitry. In most, but
not all areas, the sum of all REN’s should be 5.0 or less.
MALFUNCTIONOF THEEQUIPMENT
If the device is not operating properly, the user should immediately disconnect it from
thetelephone lineas itmay causeharm tothe telephonenetwork. Inthe eventservice
is needed the user should contact:
ServiceDepartment
SpectraMerchandising International,Inc.,
ChicagoIndustryTechPark
4230North NormandyAvenue,
Chicago,IL60634, U.S.A.
Tel: (773)202-8408or toll-freehotline 1-800-777-5331
TELEPHONECONNECTIONREQUIREMENTS
Except for ringers provided by telephone company, all connections to the telephone
networkexcept formadethrough standardplugs telephonecompany providedjacks, or
equivalent, in such a manner as to allow for easy and immediate disconnection of the
terminalequipment. Standardjacksshouldbe soarranged that,if theconnected plug
iswithdrawn,no interferencetothe operationoftheequipmentat thecustomer’spremises
which remains connected to the telephone network shall occur by reason of such
withdrawal.
INCIDENCEOF HARM
Shouldterminal equipmentor protectivecircuitrycause harmto thetelephonenetwork,
thetelephonecompany shall,where practical,notify thecustomer thattemporary dis-
continuanceof servicemay berequired.However,where priornoticesare notpractical,
the telephone company may temporarily discontinue service if such action is deemed
reasonable in the circumstances. In the case of such temporary discontinuance, the
telephone company shall promptly notify the customer who has the right to bring a
complaint to the FCC if he feels the disconnection is not warranted.
3

BATTERIES CAUTIONARY INSTRUCTIONS
CAUTION – To Reduce the Risk of Fire or injury to Persons, Read and Follow
theseinstructions.
1. Use only the following type and size of battery: 4 ‘C’ size (UM-2) alkaline batteries.
2. Do not dispose of the battery in a fire. The cell may explode. Check with local
codes for possible special disposal instructions.
3. Do not open or mutilate the battery. Released electrolyte is corrosive and may
cause damage to the eyes and skin. It may be toxic if swallowed.
4. Exercise care in handling batteries in order not to short the battery with conductor
materialsuchasrings,bracelets, andkeys. Thebattery orconductor mayoverheat
andcauseburns.
5. Do not attempt to recharge the battery provided with or identified for use with this
product by heating them. The batteries may leak corrosive electrolyte or explode.
6. Do not attempt to rejuvenate the battery provided with or identified for use with this
product by heating them. Sudden release of the battery electrolyte may occur
causing burns or irritation to eyes or skin.
7. All batteries should be replaced at the same time. Mixing fresh and discharged
batteriescould increaseinternal cellpressure andrupture thedischarged batteries.
8. When inserting batteries into this product, the proper polarity or direction must be
observed. Reverseinsertionof batteriescan causecharging, whichmay resultin
leakageand explosion.
9. Remove the batteries from this product if it will not be used for a long period of time
(severalmonthsor more)since duringthis timethe batterycould leak,damaging in
theproduct.
10. Discard“dead” batteriesas soonas possiblesince “dead”batteries aremorelikely
to leak in a product.
11. Do notstorethisproduct, orthe batteriesprovidedwithor identifiedfor usewiththis
productin high-temperatureareas. Batteriesthat arestored ina freezeror refrigera
torfor thepurpose ofextending shelflife shouldbe protectedfrom condensation
during the storage and defrosting. Batteries should be stabilized at room
temperature prior to use after storage.
12. Donot mixold andnew batteriesordifferent typesof batteries.Do notmixalkaline,
standard (Carbon-Zinc)or rechargeable(Nickel-Cadmium)batteries.
SAVETHESEINSTRUCTIONS
5
INTRODUCTION TO CALLER ID
INSTRUCTIONS
Read this manual carefully before using this product.
Congratulations on your purchase of this product! The unit allows you to take
advantageof theCaller Identificationservice thatmay beoffered byyour local
telephone company. Not all local telephone companies provide Caller Identification
service,thereforeyou mustmake surethe serviceis available.
IMPORTANT: For your Caller ID to function, you must first contact your local
telephone company to arrange to have Caller ID service installed on your line.
There will be an extra charge added to your monthly telephone bill for this
service. Please consult with your local telephone company for the Caller ID
service charge.
1. TheCaller IDfunction canbe usedto screenunwanted calls,eliminate harassment
fromannoying calls,or toreturn missedcalls usingthedisplayed speeddial feature.
2. Whenused withCaller IDservice, theunitdisplays thename andtelephone number
ofthe personcalling, alongwith thedate andtime ofthe callbefore youpick upyour
telephone.
6

CONTROLS AND FEATURES
Features
1. Thisproduct featuresCaller ID.
2. Displays the caller’s name, telephonenumber,timeanddate ofthe last64 incoming
callsthatyouhavereceived.
3. Large three lines high resolution LCDdisplay.
4. DisplayTotal and New Calls received in standby screen.
5. Up / Down buttons allow easy scrolling forward or backward through stored call
records.
6. Erase button allows call records to be deleted individually or collectively.
7. Real Time Clock - Time and date will be automatically set by the local telephone
companywhenthephonerings.
8. Calling back a number from the Caller IDMemory.
9. NewCall LEDindicator.
10. Multi-Language Selectable -Allows you to select English, Spanish or French.
11. 10 Two-Touch SpeedDial Buttons (MEMO 1 to 0).
12. Last Number Redial – Dials the last number called.
13. HandsetVolume Control–AdjustsVolumeof handsetreceiver fromNormalto High
(N/H).
14. Requires 4 ‘C’ (UM-2) alkaline batteries(not included) anda 6VDC 300mA AC
adaptor with center positive plug (not included).
7
1.CALL BACK Button
2.REVIEW UP Button
3.REVIEW DOWN Button
4.ERASE Button
5.MemoryIndex Card
6.Display
7.FlashingRinger Indicators
8.NEWCALL Indicators
8
LOCATION OF CONTROLS

CAUTION
Disconnectthe telephonelinefromtheequipmentbeforereplacingbatteries.
BATTERY INSTALLATION
When the batteries become weak, the battery icon ( ) will appear in the display.
Replace as described below. You must replace the
batteries within two minutes, ortherwise the caller
ID and memories will be lost.
Insertfour(4) “C”size (UM-2)batteries (notincluded) in
this unit to use the Caller ID and telephone functions
as follows:
1.Open the battery door by pulling back on the latch.
2.Insertfour(4)“C”size(UM-2)alkalinebatteries
(not included).
3.Snap the battery door back into place.
ACOPERATION
To operate the unit usingAC power, connect
an external AC adaptor (not included)
to theDC jack on the bottom of the base and to a wall outlet having 120V, 60Hz AC
only. The batteries will work as battery back-up in the event of power failure and will
keep all of the functions without interruption. Make sure to only use a compatible
adaptor, 6V 300mA with positive center ( ).
This unit can be used on a desk, or other level surface
away from excessive heat or direct sunlight.
1. Set the OFF/LO/HI Ringer switch to LO or HI
tohave theringer soundwhen receivinga phonecall.
2. Set the TONE/PULSE switch to TONE or
PULSEto matchtheserviceprovidedon
your telephone line. If you are not sure of
your service, please contact your
telephonecompany.
3. DONOT CONNECTTO THE
TELEPHONELINE UNTILCALLERID
SETUPIS COMPLETED.Connect the
coiled cord to the handset and base.
Connect the long telephone cord into the jack on the bottom of the base, thread it
throughthegroove towardthe backof thebase.
9
HANDSET BOTTOMOF BASE
1.Receiver
2.Hook Switch
3.TONE/PULSESwitch
4.KeyButtons(0-9,*,#)
5.MEMO Button
6.STOREButton
7.Transmitter
8.RECEIVER(NORMAL/HIGH)VolumeSwitch
9.REDIALButton
10.FLASHButton
11.BatteryCompartment
12.DCIN Jack
13.OFF/LO/HIRinger Switch
14.HandsetJack
15.LineIn Jack
LOCATION OF CONTROLS (CONTINUED)
10
LOCATION OF CONTROLS (CONTINUED)

11
DO NOT CONNECT the line cord to the wall outlet until the caller ID setup has
been completed. Set the language, contrast, time and date as follows:
Press and hold the [ ] and [ ] buttons
simultaneously forfour secondsuntil
"ENTER LANGUAGE"appears,
followed by "ENG ESP FRA" for 20
seconds.
SELECTTHELANGUAGE
Pressthe [ ]or [ ]buttonto select
ENG (English), ESP (Spanish) or
FRA(French). Press the ERASE button
to confirm.
SELECTTHE CONTRAST:
Press the [ ] or [ ] button to select
oneofthe fivecontrast levels(default is
three). Press the ERASE button to
confirm.
To reset, press and hold the [ ] / [ ] buttons simultaneously for four seconds until
“ENTER LANGUAGE” appears.
Note: When you receive the first call, the unit will automatically set the time and
date.
SETUP PROCEDURE
PLACING A CALL
12
Lift the handset and listen for a dial
tone. Press the Key buttons (0-9) for the
desired number you wish to call.
RECEIVINGA CALL
The last 64 incoming calls are saved in the caller ID log.
Make sure that the Caller IDservice is turned on by your phone company. When you
receive a call, the display will show the name of the caller, number, time and date of
the call. The NEW icon will appear in the display and the NEW CALL indicator will
blink. To answer the call, simply remove it from the base. To end a call, simply return
the handset to the base.
NOTES:
•Hello Kitty Wings and Wand will light when an incoming call is received. This visual
ring signal will operate even if the Ringer switch is set to the OFF position.
•If a call is received from an area which does not provide caller ID service, the display
will show, “UNKNOWN” . If a call is received from outside the Caller IDarea, the
displaywill show, “UNAVAILABLE”.
•If a call is received from a caller that has blocked his/her information, the display will
show, “PRIVATE CALL” or “BLOCKEDCALL”.
•When you receive the first call, the unit will automatically set the correct time and
date.
•Calls picked up on the first ring will not be logged in the caller ID log.
•If there are new calls, the NEW icon will appear in the display and the NEW CALL
indicator will blink.
•If an incorrect, invalid or incomplete caller ID signal is received, the display will show
“LINEERROR”.
BASIC OPERATIONS
SELECTTHETIMEANDDATE:
Press the [ ] or [ ] button to select
the present hour. Press the ERASE
button to confirm. Repeat this step to
set the minutes.
Press the [ ] or [ ] button to select
the present month. Press the ERASE
button to confirm. Repeat this step to
set the day. The settings are now
complete.

14
If you are in a Pulse dialing area you
maystill takeadvantage oftouch-tone
servicesafter dialingto respond to
touch-tone prompts. To do this, press
the*/TONE buttonto temporarily
changethedialingmodefromPulseto
Tone after dialing in the Pulse mode.
This will enable Pulse users to access
touch-toneservices. Itwill revertback to
Pulseafter hangingup.
If you subscribe to Call Waiting through
your local phone company, and you
receiveanother phonecall. Simply
press the FLASH button to answer the
new call. Press the FLASH button again
to return to the original call.
STORINGAND REDIALINGNUMBERSIN THESPEED-DIALMEMORY
This telephone has ten speed-dial memories to store up to 10 of your most frequently
called numbers for easy two-touch redialing. Each of the 10 memories can store
numbers of up to 16 digits. HOWEVER, ONLYTHE LAST 14DIGITS WILLAPPEAR
INTHEDISPLAY
IMPORTANT:You must lift the handset from the cradle to store numbers in the
memory.After a few seconds off the cradle, you will hear the “offthe hook/hang up”
warningsignal fromthephone company.Therefore,if youaregoing tostore more
than one number at a time, please disconnect the straight cord from the wall jack to
avoidthe “offthe hook/hangup” warningsignal.REMEMBERTO RECONNECTTHE
STRAIGHTCORD AFTERYOUFINISH STORINGYOURNUMBERS.
TOSTORE
Liftthehandset andpress theSTORE
button.The “STORE”indicator will
appear in the display.
Use the number keys to enter the first
area code and number that you wish to
store.Remember toenter thenumber
“1” if necessary.Thenumbers will
appear in the display as you dial them.
NOTE:Ifyoumake amistake while
enteringthe number, depress theHook
switch to clear the display and then
start with step 1 again.
BASIC OPERATIONS (CONTINUED)
13
OFF/LO/HI RINGER SWITCH
Slide the OFF/LO/HI Ringer switch to
the HI or LO position to turn the ringer
on.
Slide the OFF/LO/HI Ringer switch to
the OFF position to turn the ringer off.
Slide the TONE/PULSE switch to TONE
orPULSE tomatch theservice provided
onyour telephoneline. Ifyou arenot
sureofyourservice,please contactyour
telephonecompany.
To increase/decreasethehandset’s
volume,slide theRECEIVERVolume
switchto theNORMAL (N)or HIGH(H)
position.
Pressthe REDIALbuttonto automatically
redialthe lastnumber dialed.
NOTE:Please note that only the last
number you called on this handset can
be stored in the Redial memory.
Press the FLASH button to hang up the
phonewithout havingto returnit tothe
base. If you subscribe to call waiting,
FLASH button is also used to switch
betweencalls.
BASIC OPERATIONS (CONTINUED)

15
Verify that the number on the display is
correct, then press the STORE button
again.The Memoryindicator (“MEM”)
will appear in the display.
Press the number “1” button to store the
displayednumber inmemory location1.
Repeat steps 1 through 4 to store up to
nineadditional numbersin memories“2”
through“0”
TOCHANGE ASTORED NUMBER:
To change one of the stored numbers, simply follow the procedures in steps 1
through5and entera newphone numberin thedesired memory.The new phone
numberwill bememorized andthe previousphone numberwill beerased fromthe
memory.
NOTE:Foryour convenience,you maywrite thenames ofthe peoplewhose numbers
you stored on the small index card in the center of the cradle.
MESSAGEWAITING FUNCTION
Lift the handset and listen for a dial
tone. Press the MEMO button and then press
oneof thenumber keys,“1” through“0”,
correspondingto thememory location
you want to dial. The stored number will
bedialed automatically.
TO REDIAL A STORED NUMBER
BASIC OPERATIONS (CONTINUED)
When a caller has recorded a message
on a personal message service, “ ”
will appear in the display and will go out
whenyou retrieveyour message.
This feature is only for subscribers of
a voice mail message waiting
service through the local phone
company.
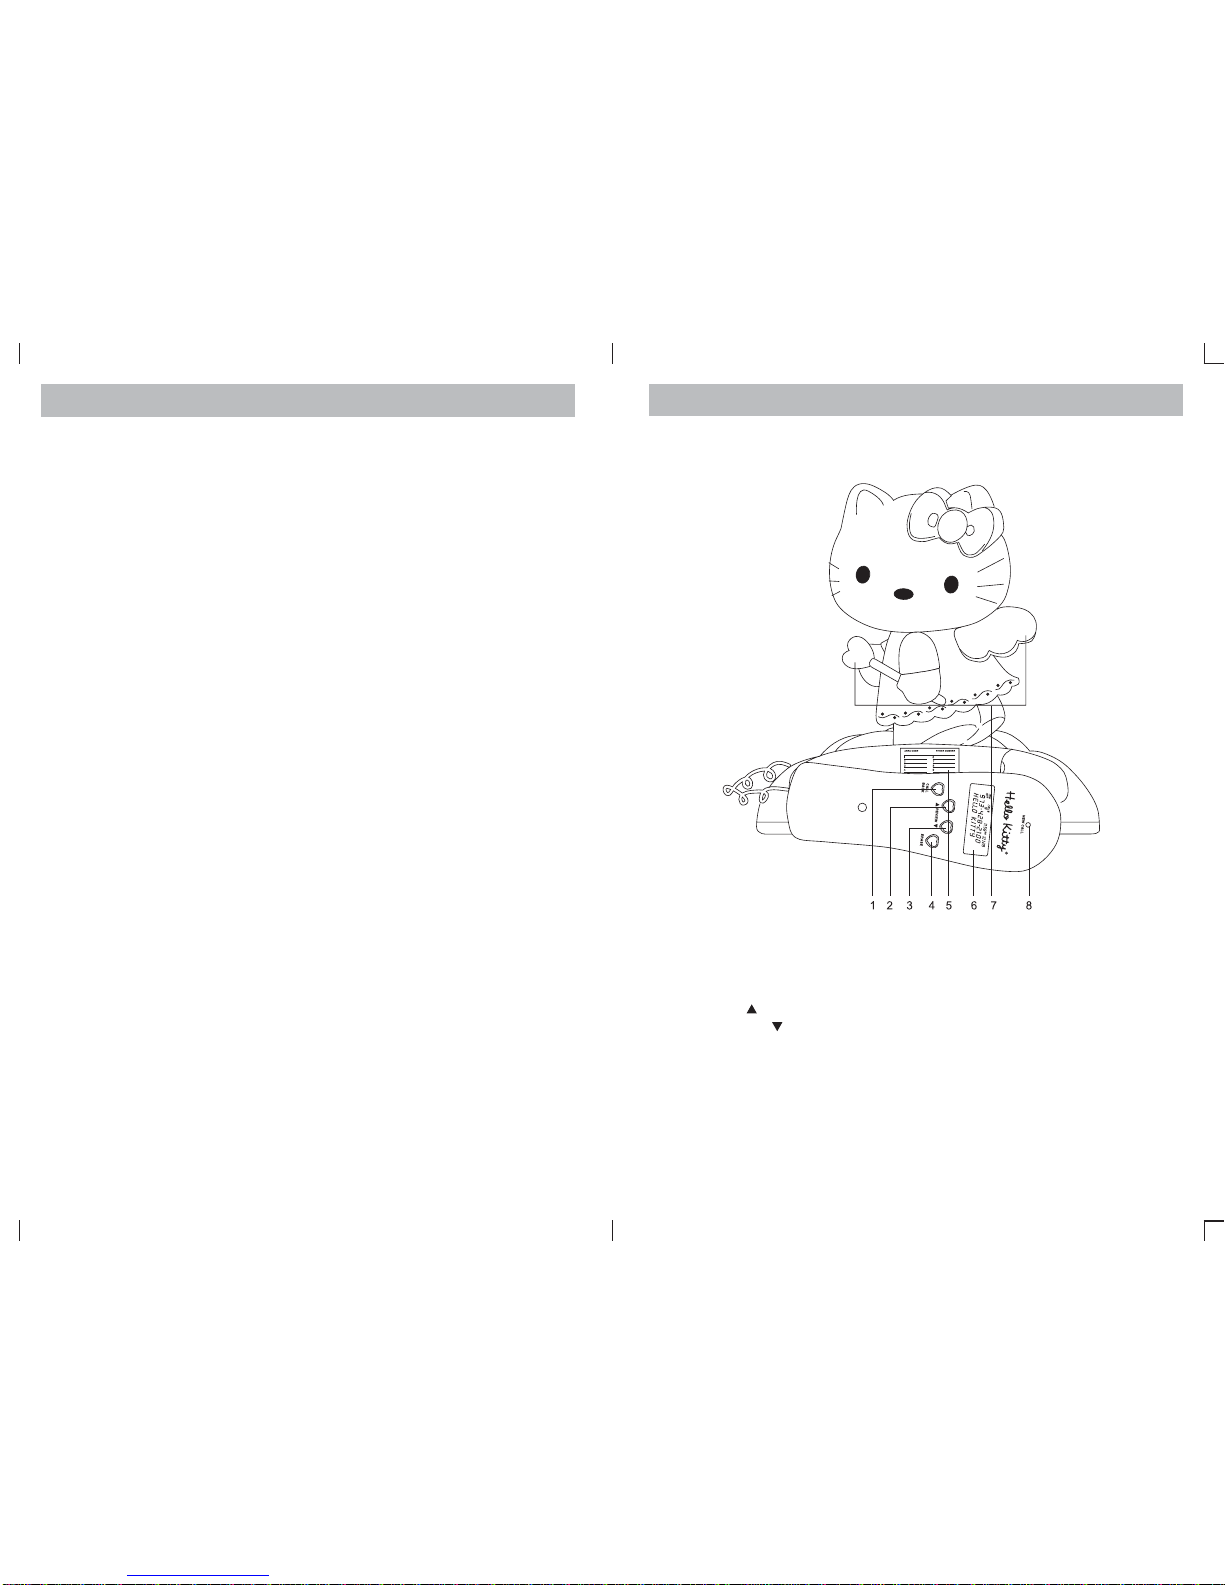
VIEWING THE CALLER ID MEMORY
To view the new calls (NEW CALL
indicator will blink), press the [ ] or [ ]
button.As they are checked, the CALL
# will decrease.
Whenallnew callshave beenchecked,
“ENDOFNEWCALL”willappearinthe
display. Press the[ ] toview theoldest
calls or the [ ] button to view the most
recent calls.
NOTES:
•After all calls are viewed, “ENDOF LIST” will appearin thedisplay.
•The NEW CALL indicator will blink until all new caller ID information has been
reviewed.
•TheRPTicon willappear inthe displayif youhave receivedmultiple newcallsfrom
the same number.
•If you receive acall froma numberpreviously viewedin thecaller IDmemory, the
data in memory will be replaced with the new call’s time and date, and the NEW icon
will light in the display.
•If no key is pressed within 20 seconds, the display will revert to normal display and
show the total call counter, new call counter, current time and date.
ERASINGTHE CALLERIDMEMORY
To erase a single call, press the [ ] or
[] button to select the call to delete,
then press the ERASE button twice
quickly. The information for that call will
be erased and the call # and caller ID
datawillbeupdated.
ALL NEW CALLS MUST BE
REVIEWEDBEFOREERASING
CALLER ID MEMORY. To erase all calls
in caller IDmemory, press and hold the
ERASEbutton forthree seconds.The
message“ERASE ALLCALLS” will
appear in the display. Press the ERASE
button again to confirm. All caller ID
informationwill bedeleted and“NO
CALLS” will appearin thedisplay.
16
BASIC OPERATIONS (CONTINUED)

COPYING CALLER ID INFO TO A MEMORY PRESET
Press the [ ] or [ ] button to locate a
caller ID call to be copied into a
memorypreset.
Press the STORE button twice:
“MEM” will be displayed on the display.
Press the Key buttons (0-9) to enter the
desiredmemory locationRepeat these
stepsfor additionalpresets.
CALLINGBACK ANUMBER FROM THECALLER ID MEMORY(ON-HOOK)
With the handset on the base, press the
[] or [ ] button to locate a caller ID
call to be dialed.
Press the CALL BACK button twice to
redial;thedisplay willshow “PICKUP
CALL”. Pick up the handset and the
numberwill beautomatically dialed.
Ifthecaller’s phonenumber is10 digits,
press the CALL BACK button once,
followed by the [ ] or [ ] button to add
the long distance dialing digit “1”.Press
the CALLBACK button again and pick
up the handset to dial.
17
BASIC OPERATIONS (CONTINUED) BASIC OPERATIONS (CONTINUED)
CALLINGBACK ANUMBER FROM THECALLER ID MEMORY(OFF-HOOK)
Pick up the handset and press the [ ]
or [ ] button to locate a caller ID call to
bedialed.
Press the CALLBACK button twice and
thenumberwillbeautomatically dialed.
Ifthecaller’s phonenumber is10 digits,
press the CALL BACK button once,
followed by the [ ] or [ ] button to add
the long distance dialing digit “1”.Press
the CALL BACK button again to dial.
18

19
TROUBLESHOOTING
20
PROBLEMS CHECK
No dial tone Is any plug disconnected from all modular
phone plugs? Is jack improperly wired?
Phone does not work Are all cords connected properly?
Phone does not ring Ringer Switch may be set to OFF?
Slide switch to ON position.
Cannot dial Check the Tone/Pulse Switch setting. You may
only have PULSE service.
Switch the Tone/Pulse switch to PULSE position
Other party cannot hear you Ensure Handset cord is connected properly.
Display showing erroneous
figures
OR
Display is corrupt or does
not work as intended
Setup the phone by pressing the and
Buttons together for a few seconds. After that,
reset the Language and LCD contrast. OR Your
phone must be reset by uninstalling all batteries
and unplugging the AC adaptor. Wait for 5
minutes before reinstalling the batteries or
plugging the AC Adaptor. This will also clear all
memories.
The display is faded
(Numbers are hard to see)
Adjust the contrast to a higher level by following
the setup procedure described above. Are
batteries correctly installed? Are the batteries
fresh? Change all 4 batteries.
Replace all 4 batteries at the same time.
Cannot store numbers into
memory No batteries are installed or batteries are weak
or installed incorrectly.
Caller ID does not work
Make sure the Caller ID service is active. The
phone is connected to a working walljack. All
line cord connections are correct and secure.
Your answering machine should be set to
answer after at least 2 rings and you should
only pick up the phone after 2 rings.
The Caller ID display is
blank
Press either or Button to see if “NO
CALLS” appears. Check if batteries are properly
installed. Check if you have received the first
Caller ID record.
The Caller ID display does
not show the caller's
information
The Caller ID unit will not function until you have
Caller ID service from your local telephone
company. Call your local telephone company to
have Caller ID installed on your phone line.
Check your phone line connections. Make sure
all connections are secure and connected.
If it is a private call or a blocked call, the caller's
name and/or phone number will not appear on
the display.
Cannot erase all records in
memory
The Erase Button must be quickly pressed twice
to erase a single call record. To erase ALL call
records, press and hold the Erase Button for at
least 3 seconds after you view all new calls.
Caller ID displays in the
wrong language
Reset the language by pressing the and
Buttons together until ENTER LANGUAGE
appears on the display. Press or
Button to choose the desired language. The
default language is English.
Memory Dialing does not
work
Check the phone if you have programmed the
numbers correctly by pressing that memory
number button. Also programming can only be
done if fresh batteries are installed correctly.
Cannot see the name or
number of the caller
Did you wait for the second ring before picking
up the phone? The Caller ID will only detect
information between the first and second ring.
Caller's information is not
registered
The caller may have an unlisted or blocked
number to prevent Caller ID identification or it
may be an overseas call or you may have noise
on the line during that call.
Did you or your answering machine answer
calls before the second ring?
Message Waiting does not
work
Check with your telephone company if this
service is available or if you have subscribed to
it.
Pressing a Memory button
does not display number
Your Memory button has no stored number.
Please store the number again by pressing the
Store Button, dial the number, press the Store
Button again and a numerical button to store it
to the desired location.

This equipment complies with Part 68 of the FCC rules and the requirements
adopted by theACTAOn the bottom of this equipment is a label that contains,
amongother information,a productidentifier ofUS: 2BFMT09BKT2010.
Ifrequested, thisnumbermust beprovided tothe telephone company.
The applicable jacks (i.e. RJ11C) for this equipment are provided in the packaging
witheach pieceof approvedequipment. Thejacks arecertified byUniversal Service
OrderCodes (USOC).
A plug and jack used to connect this equipment to the premises wiring and
telephone network must comply with the applicable FCC Part 68 rules and
requirements adopted by theACTA.A compliant telephone cord and modular plug
are provided with this product. They are designed to be connected to a compatible
modular jack that is also compliant. See installation instructions for details.
The REN is used to determine the number of devices that may be connected to a
telephone line. Excessive RENs on a telephone line may result in the devices not
ringing in response to an incoming call. In most but not all areas, the sum of RENs
should not exceed five (5.0).To be certain of the number of devices that may be
connected to a line, as determined by the total RENs, contact the local telephone
company.
Ifthis equipmentKT2010 causesharm tothe telephonenetwork, thetelephone
companywill notifyyou inadvance thattemporary discontinuanceof servicemay be
required.Butifadvancenoticeisn’tpractical,thetelephonecompanywillnotifythe
customer as soon as possible. Also, you will be advised of your right to file a
complaint with the FCC if you believe it is necessary.
The telephone company may make changes in its facilities, equipment, operations or
proceduresthat couldaffect theoperation ofthe equipment.If thishappens the
telephonecompany willprovide advancenotice inorderforyouto makenecessary
modificationsto maintainuninterrupted service.
If you experience trouble with this equipment, disconnect it from the network until the
problem has been corrected or until you are sure that the equipment is not
malfunctioning.
Pleasefollow instructionsfor repairingif any(e.g. batteryreplacement section);
otherwisedo notalter orrepair anyparts ofdevice exceptspecified.
Connection to party line service is subject to state tariffs. Contact the state public
utility commission, public service commission or corporation commission for
information.
Thisequipment ishearing aidcompatible.
NOTICE : Ifyour homehas speciallywired alarmequipment connectedto the
telephone line, ensure the installation of this ( equipment ID if any ) does not disable
youralarm equipment.If youhave questionsabout whatwilldisable alarmequipment,
consultyour telephonecompanyor aqualified installer.
WARNING : Changes or modifications to this unit not expressly approved by the party
responsiblefor compliancecould voidthe user’sauthority tooperate theequipment.
21
CONSUMER INFORMATION
22
CARE AND MAINTENANCE
1. Cleanyour phonewith adamp (neverwet) cloth.Solvent ordetergentshould never
beused.
2. Ifyour phonestops working,check tobe certainthat allmodular plugsare properly
“snapped”into theirjacks. Ifthephone stilldoesn’t workandyou haveother telephones
installed in your home, check to see if they are working. If they are, try using your
telephone on another outlet. If it still doesn’t work, it is more than likely that there is a
problemwith yourtelephone. Inthis case,return theunitfor servicein accordancewith
the instructions on your warranty card.
DONOT CALLTHE TELEPHONE COMPANY SINCEYOU MAY BE RESPONSIBLE
FORCHARGESFROMTHEM. CHARGESFROM THETELEPHONECOMPANYARE
NOTCOVEREDBYTHETERMSANDCONDITIONS OFTHE WARRANTY.
3. If other telephones in your house have also stopped working, the problem is most
likelywith yourtelephonelineservice. Donot returnyourtelephone forservicesince
most likely there is nothing wrong with it. You should however, consult with your
telephone company to see if there has been any interruption to your line service.
4. If it is determined that your telephone is malfunctioning, FCC requires that it be
disconnected from the modular outlet until the problem has been corrected.
5. Alwayshave yourunit repairedby anexperienced technicianor returnit forservice
to:
ServiceDepartment
SpectraMerchandising International,Inc.,
ChicagoIndustryTechPark
4230North NormandyAvenue,
Chicago,IL60634, U.S.A.
Tel: (773)202-8408or toll-freehotline 1-800-777-5331
Table of contents