Spedal NaviCam CL518 User manual

CL518
034C3825-EN
Spedal NaviCam User Manual
Portable Car Stereo with Dashcam
1. Safety Guidelines
· Do not operate this product while driving.
· Do not install or operate this product with wet hands.
· Do not install this product in a place with high
temperature, humidity, flammable, explosive gas or
liquid.
· Do not install this product in an area that interferes
with the driver's sight or driving safety.
· Do not install this product on the airbag cover or
within the working range of the airbag.
· Do not leave this product in a closed vehicle with high
temperature for a long time.
· Do not operate this product over rated voltage.
· Do not use non-original cables and accessories.
· Do not use sharp objects such as awls or scissors to
cut this product and its accessories.
· Do not disassemble, repair or modify this product and
accessories by yourself.
· Do not install, use or place this product within the
reach of children under 16 years of age.
1.1 Warnings
· Do not press the lens too hard to avoid
damage or dislocation of the lens.
· Do not directly touch the lens surface, so as
not to affect the recording effect.
· Do not remove the memory card during the
shutdown process to avoid file damage.
· When using the memory card for the first time,
please format it on this product to ensure
stable reading and writing.
· When not using the product for a long time,
please pull out the memory card to ensure the
performance of the memory card.
1.2 Precautions
Scan the QR code, select the
corresponding model, and
view the User Manual.
https://spedal.cc/html/support/
download/navicam.html
01

02
2. User Manual
Note
Do not use cables and
components that are not
original. Gifts and acces-
sories are not covered
under warranty. The
package contents of this
product may change with-
out prior notice, and the
actual contents of the
package shall prevail.
2.1 Package List
◆ Audio Cable
◆ Suction cup bracket
(Optional)
◆ Device ◆ Power Cable
◆ TF Card(Optional)
◆ Camera(Optional) ◆ Rear Camera(Optional)
◆ Camera Cable
(Optional)
◆ Quick Guide
◆ Dash Mount
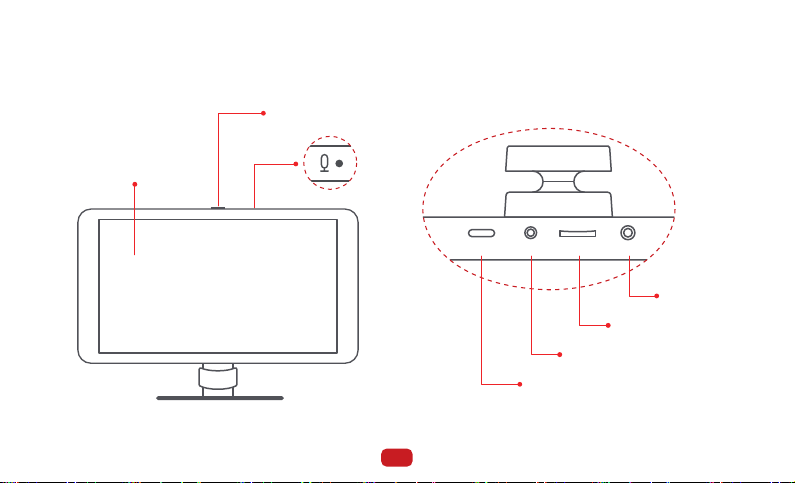
2.2 Product Illustration
Power Interface
AUX Audio
TF Card Slot
Camera Interface
TYPE-C AV-IN TF AUX
Screen
Turn off/on screen
Mic
03
Note
The installation position of equipment should not block the
driver's sight and affect driving safety.
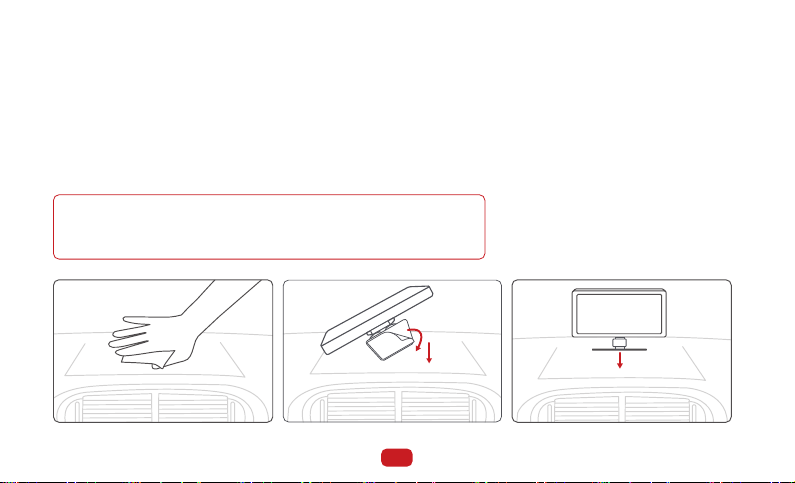
2.3 Device bracket installation(Dashboard)
1. Thoroughly clean and dry the surface of the car dashboard, removing any dust or debris and
ensuring a smooth surface.
2. Peel off the protective film from the bottom adhesive of the device bracket.
3. Stick the device onto the appropriate position on the dashboard.
4. Press down on the bottom bracket of the device to ensure a secure adhesive bond.
5. Adjust the device screen to the desired angle.
04

Note
The installation position of equipment should not block the
driver's sight and affect driving safety.
2.4 Device bracket installation(Windshield)
1. Select an appropriate installation position and wipe the installation position thoroughly.
2. Remove the protective film at the bottom of the suction cup.
3. Secure the suction cups to the windshield.
4. Turn the locking knob on the sucker support to secure the sucker.
5. Rotate the device to a proper Angle.
05

Note
Depending on the vehicle,
the cigarette lighter
socket may be located in
a different position. The
figure provided is for
reference only.
TYPE-C AV-IN TF AUX
2.5 Device Installation
Insert the power cable into the car cigarette lighter, and connect the other end to the power interface of
the device.
2.6 Audio Cable Installation
1. Insert the audio cable into the car AUX port, and connect the
other end to the AUX OUT port of the device.
2. Set the car's audio input mode to AUX audio input. After the
connection is successful, you can play music, navigation, calls
and more through your car's audio system.
06
Note
Please confirm if your car supports AUX IN and note that the location of the AUX may vary depending
on the car model. Please consult your manufacturer for more details.
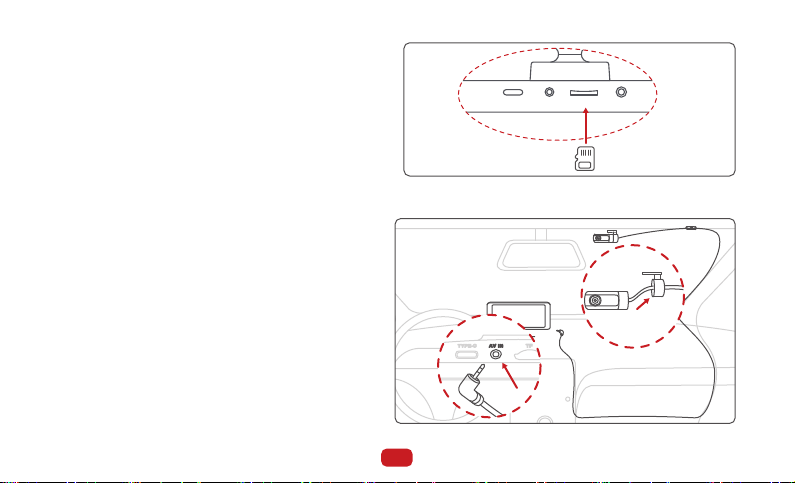
TYPE-C AV-IN TF AUX
2.7 TF Card Installation(Optional)
· Insert the TF card into the TF card slot.
·The self-provided TF card should meet the
following requirements: Class 10 or above, the
capacity does not exceed 128GB.
2.8 Camera Installation
2.8.1 Windshield(Optional)
1. Thread the camera's wire through the hole on
the adhesive bracket, and secure the camera
tightly to the bracket.
2.Peel off the protective film from the adhesive
bracket, and attach the bracket to the vehicle's
front windshield. Press firmly to ensure it
adheres securely.
3.Use the camera extension cable to connect the
camera to the device.
4.Adjust the angle of the lens.
07

08
2.8.2 Rear Windshield(Optional)
1. Thread the camera's wire through the hole on the
adhesive bracket, and following the direction of the
arrow, tighten and rotate the bracket with the camera,
ensuring they are securely fastened together.
2.Peel off the protective film from the adhesive bracket,
and attach the bracket to the vehicle's rear windshield.
Press firmly to ensure it adheres securely.
3.Use the camera extension cable to connect the
camera to the device.
4.Adjust the angle of the lens.
2.8.3 Headrest Support Rod(Optional)
1. Thread the camera's wire through the two wire holes on
the support pole bracket.
2.Following the direction of the arrow, tighten and rotate
the bracket with the camera, ensuring they are securely
fastened together.
3.Attach the bracket to the headrest support pole.
4.Secure the bracket using the screws provided in the
accessories.
5.Use the camera extension cable to connect the camera to
the device.
6.Adjust the angle of the lens.

09
2.8.4 Rear Camera(Optional)
1. Connect the rear camera to the Rear camera cable, and insert the other end into the rear camera
port (AV-IN) of the device;
2. Use the rear camera bracket to fix the rear camera above the license plate;
3. Please tear off the rear camera lens protective film before use;
4. Please adjust the lens to a suitable angle.Tighten the screws.
TYPE-C AV-IN TF AUX
3. Features and Settings
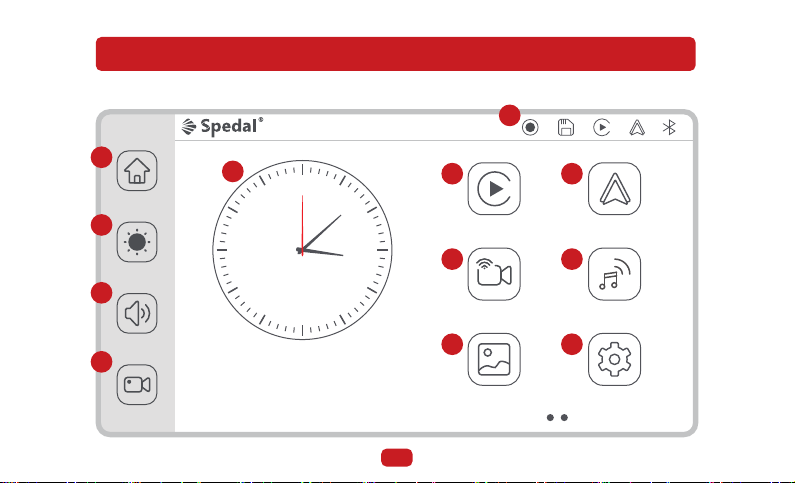
3.1 Home Screen
12 1
2
3
4
5
6
7
8
9
10
11
15:18
2023-07-28 Fri
Apple CarPlay Android Auto
Wifi Video Audio output
Playback Setting
1
6
57
9
11
8
10
12
2
3
4
10

Homepage
Adjusting screen brightness
Adjusting speaker audio output volume
DVR Mode
System time
TF card inserted
1
2
3
4
5
6
TF card not inserted
Apple CarPlay Connected
Android Auto Connected
Bluetooth Status Blue : Connected
Android Auto Mode
Wi-Fi Video
Audio Output
Video Playback Mode
Setting
7
8
9
10
11
12
Apple CarPlay Mode
Recording On
11

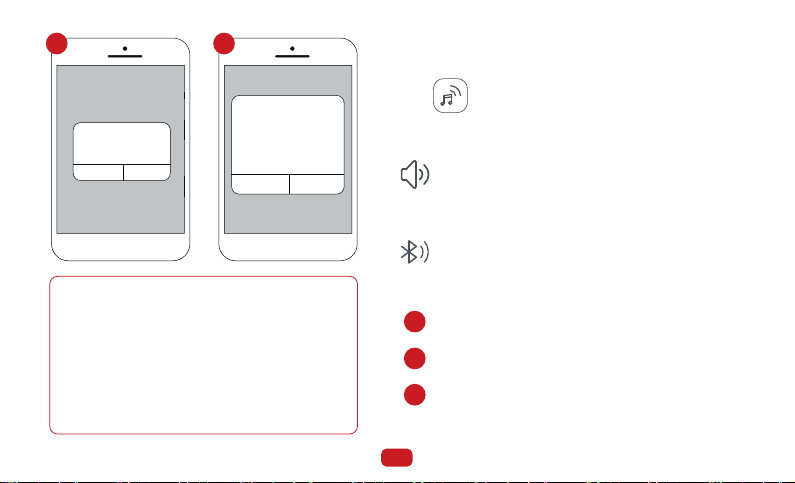
3.2 Apple CarPlay
3.2.1 Apple CarPlay wireless connection
Requirements for phone versions that support
wireless CarPlay:
iPhone running iOS 9 or later. (For example, iPhone
XR and later, iPhone 11 and later, iPhone SE (second
generation) and later, etc.)
Both CarPlay in-car and iPhone voice system need
to be turned on, please check if Siri is enabled;
For the first time connecting to wireless CarPlay,
the connection time is about 30 seconds, please be
patient.
For more detailed information, please visit:
http://www.apple.com/ios/carplay
Note
1. Go to Settings on your iPhone, turn on “Bluetooth”
and “Wi-Fi”
Click” ”on the home screen to enter the CarPlay.
2.Enter the “Bluetooth ”menu and select the Bluetooth
device starting with "Spedal-*****" from the list of
“Other DEVICES” Bluetooth devices.
3. Wait for about 20-30 seconds, and a prompt
"Bluetooth Pairing Request" will pop up on your
phone. Select "Pair" to successfully pair your
phone with the device.
4.Then, a prompt "Use CarPlay with"SmartScreen"?"
will pop up on your phone. Select“Use Carplay”.
5. Please wait for a moment and you will enter the
CarPlay mode.
1
2
3
4
5
Sign in to your iPhone
Airplane Mode
>
On
>
On
Settings
Wi-Fi
Bluetooth
Mobile Data
Bluetooth
Now discoverable as “X6”.
MY DEVICES
Other DEVICES
******
******
Spedal-******
******
<Settings
Bluetooth
1 2
12
Bluetooth
Not connected
Not connected
Now discoverable as “X6”.
MY DEVICES
Other DEVICES
******
******
Spedal-******
******
<Settings Bluetooth
Bluetooth Pairing Request
******
Cancel Pair
Bluetooth
Not connected
Not connected
Now discoverable as “X6”.
MY DEVICES
Other DEVICES
******
******
Spedal-******
******
<Settings Bluetooth
Use Carplay with
“SmartScreen”
CarPlay automatically connects
your iPhone to your car’s
built-in display,and can access
your phone while it is locked.
Not Now Use CarPlay
Note
1.Different versions of iOS may display differ-
ently, please refer to the actual situation.
2.The first connection may take a longer time,
please be patient.
3.If you want to switch to Android Auto or
AirPlay, you need to turn off Bluetooth and
Wi-Fi on your phone to disconnect the Apple
CarPlay connection mode.
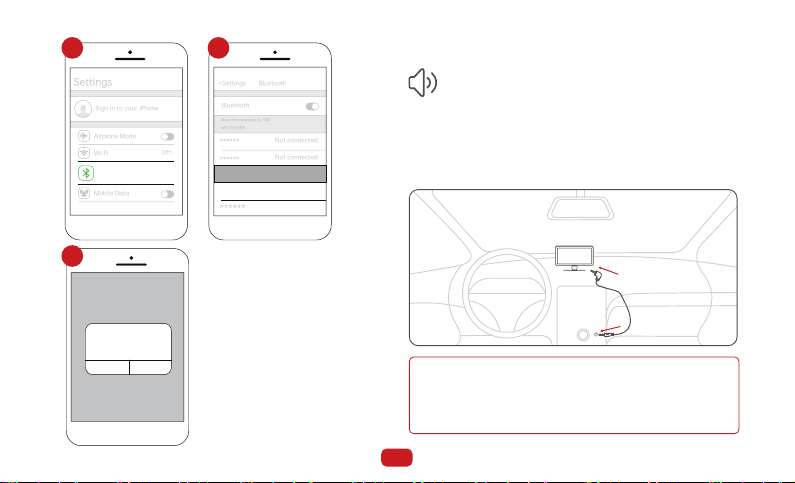
3 4 3.2.2 Apple CarPlay Audio Out
In CarPlay/Android Auto mode, the phone is directly
connected to the car's Bluetooth (if the phone has
been paired with the car's Bluetooth before, there is
no need to repeat the connection operation).
2. Bluetooth
1. Built-in Speaker
Click“ ”on the home screen to enter the Audio Out.
The sound is played from the speaker of the device.
2.2 In the “Other Devices” Bluetooth device list, select
the Bluetooth name of your car.
2.3 A prompt will pop up on the phone, choose "Pair",
and the phone will pair successfully with the car's
Bluetooth.
2.1 Go to Settings on your iPhone > Bluetooth,turn on
the “Bluetooth”.
1
2
3
13
Sign in to your iPhone
Airplane Mode
>
On
>
Off
Settings
Wi-Fi
Bluetooth
Mobile Data
Bluetooth
Not connected
Not connected
Now discoverable as “X6”.
MY DEVICES
Other DEVICES
******
******
Car******
******
<Settings
Bluetooth
Bluetooth
Not connected
Not connected
Now discoverable as “X6”.
MY DEVICES
Other DEVICES
******
******
Spedal-******
******
<Settings Bluetooth
Bluetooth Pairing Request
******
Cancel Pair
1 2
3
Connect to the car through an AUX cable, and
the sound will play from the car's speakers.
3. AUX Connection
3.1 Insert the audio cable into the car AUX port, and connect
the other end to the AUX OUT port of the device.
3.2Set the car's audio input mode to AUX audio input. After
the connection is successful, you can play music,
navigation, calls and more through your car's audio system.
Please confirm if your car supports AUX IN and note that
the location of the AUX may vary depending on the car
model. Please consult your manufacturer for more details.
Note
AUX
14

Connect through FM to play sound through
your car's audio system.
4. FM Transmitter
4.1 Adjust the car FM to a frequency that is not occupied by
the broadcast, and adjust the device FM to the same
frequency; for example, adjust the car FM to 91.0MHz (if
not occupied), and then adjust the the FM frequency of
the device to 91.0MHz, as well, and the FM function is
turned on; after the connection is successful, the
sound on the device will be transmitted to the car
speakers.
4.2 When the FM is on, you can select the button or slide
the pointer to adjust the frequency.
Scale&Pointer
FM Frequency
TUNING +/- 0.1
1
2
3
FM MHz
98.5
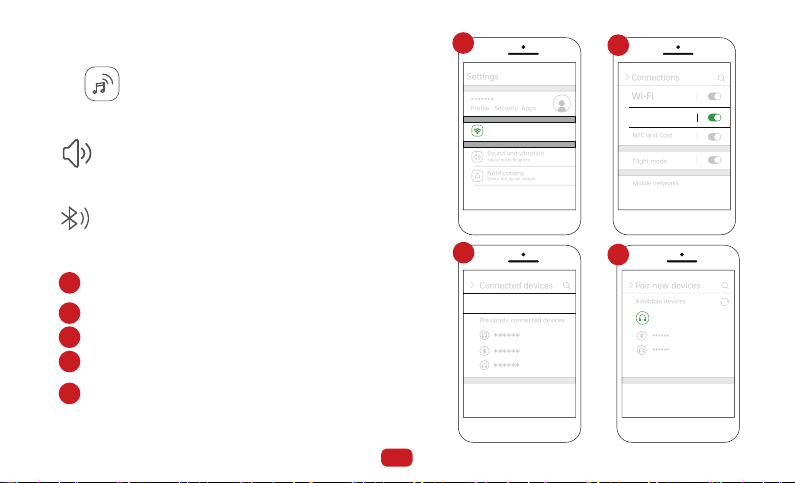
3.3.1 Android Auto Wireless Connection
Note
1. Any phone with Android 11.0.
2.A Google or Samsung phone with Android 10.0.
3.A Samsung Galaxy S8, Galaxy S8+, or Note 8,
with Android 9.0.
What you need:
A compatible Android phone with an active data
plan, 5 GHz Wi-Fi support, and the latest version
of the Android Auto app. Wireless projection is
compatible with these Android versions:
3.3 Android Auto
FM
15
FM MHz
98.5
Speaker
BT Audio
FM AUX
1
2 2
3
FM

1.Go to Settings on your phone, turn on "Bluetooth" and "Wi-Fi".
2.Click on "Bluetooth" to enter the Bluetooth search page.
3.After entering the “Bluetooth” menu, click "Pair new
devices" to search for new Bluetooth devices.
4.Select the Bluetooth device starting with "Spedal-*****"
from the list of "Other DEVICES" Bluetooth devices.
5.Wait for about 20 seconds, a prompt box will pop up on
the phone with "Pair with Spedal-*****", click "Pair" (as
shown below), and wait for the Bluetooth pairing to
complete. After the Android Auto connection is complet-
ed, it will automatically enter the Android Auto mode.
1
2
3
5
4
Profile Security Apps
*******
Connections
Wi-Fi,Bluetooth,Flight mode
Settings
Sound and vibration
Sound mode,Ringtone
Status bar,do not disturb
Notifications
Flight mode
Connections
Mobile networks
Wi-Fi
Bluetooth
>
NFC and Cast
Connected devices
Pair new devices
Previously connected devices
>
+
******
******
******
Pair new devices
Available devices
>
Spedal- ******
******
******
Pair new devices
Available devices
Pairing...
>
Spedal- ******
******
******
Pair with Spedal- ****** ?
Allow access to your contacts
and call history
Cancel Pair
Note
Different models of Android
phones may display
differently, please refer to
the actual situation.The first
connection takes a longer
time, please be patient.
If you want to switch to
CarPlay/AirPlay/Android
Cast, you need to turn off
Bluetooth and WIFI on your
phone and disconnect from
Android Auto connection
mode.
21
3 4
5
16
3.3.2 Andorid Auto Audio Out
In CarPlay/Android Auto mode, the phone is directly
connected to the car's Bluetooth (if the phone has
been paired with the car's Bluetooth before, there is
no need to repeat the connection operation).
2. Bluetooth
1. Built-in Speaker
Click“ ”on the home screen to enter the Audio Out.
The sound is played from the speaker of the device.
2.1 Go to Settings on your phone > Bluetooth,turn on
the “Bluetooth”.
2.2 Enter Bluetooth search page.
2.3 Click“Pair new devices”to search new Bluetooth device.
2.4 Select your car's Bluetooth name pairing from the list
of searched Bluetooth.
2.5 Wait for about 20 seconds, the phone pops up the
box "Pair with "Car******"", click "Pair", wait for the
Bluetooth pairing to finish. The audio will be played
from the car.
Pair new devices
Available devices
>
Car******
******
******
Profile Security Apps
*******
Connections
Wi-Fi,Bluetooth,Flight mode
Settings
Sound and vibration
Sound mode,Ringtone
Status bar,do not disturb
Notifications
Flight mode
Connections
Mobile networks
Wi-Fi
Bluetooth
>
NFC and Cast
Connected devices
Pair new devices
Previously connected devices
>
+
******
******
******
1
1
2
2
3
3
4
4
5
17
Pair new devices
Available devices
Pairing...
>
Spedal- ******
******
******
Pair with Car****** ?
Allow access to your contacts
and call history
Cancel Pair
The same as the page 15--3.2.2--4.FM Transmitter.
The same as the page 14--3.2.2--3.Aux Connection.
3. AUX Connection
4. FM Transmitter
Note
1. Due to differences in
Android phone models,
the display may vary.
Refer to your specific
device for accuracy.
2.The initial connection
time might be relatively
long, please be patient.
3.3 Wifi Video
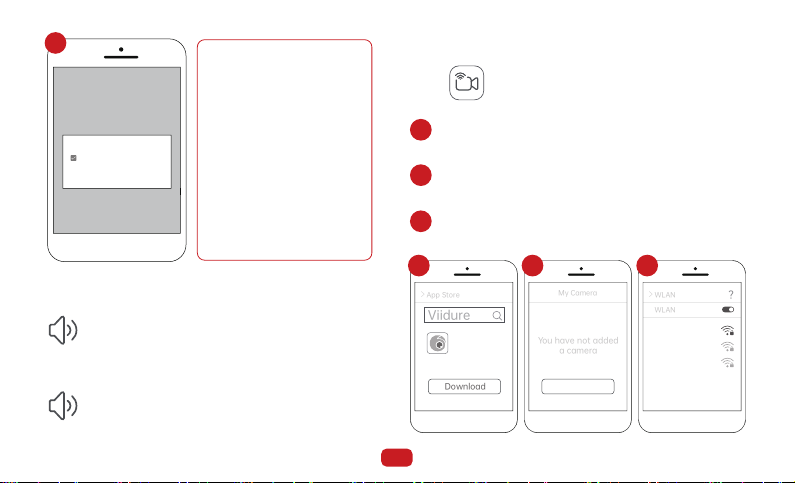
Click " " on the main screen to enter the Wifi Video
mode.
1. Scan the QR code on the screen of your mobile phone
to download and install the "Viidure" App, or search
"Viidure" in the App Store and install it.
2. Run the "Viidure" App, add the camera, and connect to
the device's Wi-Fi as prompted. The Wi-Fi name is
"Spedal-******" and the default password is "12345678".
3. The connection is successful, and the phone and
device enter the DVR mode.
App Store
Viidure
Download
>
Viidure
My Camera
You have not added
a camera
Add Camera
WLAN
WLAN
Spedal-******
>
Abcdef
ABC123
?
5
1
1
2
3
2 3
AUX
FM
18

3.4 DVR
Click " " on the home screen to enter the DVR.
Date and Time
Recording in progress
Unlocked video
Locked video
Take Picture
Back to homepage
Audio output
Stop sound recording
Start sound recording
Recording stopped
1
1
5
6
7
4
3
2
10:07
Thur, 17 Aug 2023
PM
3 4 5 6 72
10:07
Thur, 17 Aug 2023
PM
19
Table of contents
Other Spedal Car Receiver manuals


 operating instructions")


