Spedal CL796W User manual

Smart Car Stereo
Spedal NaviCam User Manual
CL796W/CL797
025C3316-EN 01 02
03 04 05 06
07 08 09 10
11 12 13 14
15 16 17 18
19 20 21 22
23 24

Content
1. Safety Guidelines.........................................01
1.1 Warnings.......................................................01
1.2 Precautions.................................................01
2. User Manual...................................................02
2.1 Package List................................................02
2.2 Product Introduction.................................02
2.3 Suction Bracket Installation....................03
2.4 Device Installation.....................................03
2.5 Audio Cable Installation............................04
2.6 TF Card Installation....................................04
2.7 Camera Installation-1................................04
2.8 Camera Installation-2...............................04
3. Functions And Settings........................05
3.1 Home Screen............................................05
3.2 Apple CarPlay..........................................07
3.3 Android Auto.............................................14
3.4 Apple AirPlay............................................19
3.5 DVR.............................................................22
3.6 Playback....................................................23
3.7 Settings.....................................................24
3.7.1 System Settings...................................24
3.7.2 Video Settings.....................................24
01 02
03 04 05 06
07 08 09 10
11 12 13 14
15 16 17 18
19 20 21 22
23 24

· Do not press the lens too hard to avoid damage or disloca-
tion of the lens.
· Do not directly touch the lens surface, so as not to affect
the recording effect.
· Do not remove the memory card during the shutdown pro-
cess to avoid file damage.
· When using the memory card for the first time, please
format it on this product to ensure stable reading and writ-
ing.
· When not using the product for a long time, please pull out
the memory card to ensure the performance of the
memory card.
1.2 Precautions
1. Safety Guidelines
· Do not operate this product while driving.
· Do not install or operate this product with wet hands.
· Do not install this product in a place with high tempera-
ture, humidity, flammable, explosive gas or liquid.
· Do not install this product in an area that interferes with
the driver's sight or driving safety.
· Do not install this product on the airbag cover or within
the working range of the airbag.
· Do not leave this product in a closed vehicle with high
temperature for a long time.
· Do not operate this product over rated voltage.
· Do not use non-original cables and accessories.
· Do not use sharp objects such as awls or scissors to cut
this product and its accessories.
· Do not disassemble, repair or modify this product and
accessories by yourself.
· Do not install, use or place this product within the reach of
children under 16 years of age.
1.1 Warnings
Scan the QR code, select the corresponding model,
and view the User Manual.
https://spedal.cc/html/support/download/dashcam.html
For any questions please contact [email protected]
01 02
03 04 05 06
07 08 09 10
11 12 13 14
15 16 17 18
19 20 21 22
23 24

2. User Manual
◆ Audio Cable
Note
Do not use cables and components that are not original. Gifts
and accessories are not covered under warranty. The pack-
age contents of this product may change without prior notice,
and the actual contents of the package shall prevail.
◆ Quick Guide
◆ Dashboard Pad
Mounting Disk
2.1 Package List
◆ Device ◆ Suction Bracket ◆ Power Cable
◆ USB Type-C Cable
(Optional)
◆ TF Card(Optional)
◆ Camera(Optional)◆ Camera Cable
(Optional)
2.2 Product Introduction
Screen
Charger/Wired Android Auto port
USB-C Port TF Card Slot
AUX OUT PortAV IN Port
01 02
03 04 05 06
07 08 09 10
11 12 13 14
15 16 17 18
19 20 21 22
23 24

Note
The installation position of equipment and brackets
should not block the driver's sight and affect driving
safety.
2.3 Suction Bracket Installation
1.Align the suction bracket clips with the holes on the back of
the device and push them up to secure the bracket.
2.Thoroughly clean and dry the car dashboard surface, remove
dust or debris, and make sure the surface is flat.
3.Remove the 3M adhesive release paper from the dashboard
pad mounting disk and adhere it to a clean instrument panel
surface.
4.Allow to sit for 3 hours or more to ensure a strong bond.
Then remove the protective film from the dashboard pad.
5.Tear off the protective film from the suction bracket, place
the suction cups firmly in the center of the dashboard pad
mounting disk, and press the lock button.
6.Adjust the angle of the device screen.
Note
Depending on the vehicle, the cigarette lighter
socket may be located in a different position. The
figure provided is for reference only.
2.4 Device Installation
Insert the power cable into the car cigarette lighter, and
connect the other end to the power interface of the
device.
01 02
03 04 05 06
07 08 09 10
11 12 13 14
15 16 17 18
19 20 21 22
23 24

2.7 Camera Installation-1(Optional)
1. Tear off the protective film
of the camera lens.
2. Peel off the 3M adhesive
release paper from the
camera mount, attach the
camera to the windshield,
and press firmly to secure it.
3. Connect the device via the
camera connection cable.
4.Adjust the angle of the
camera lens.
2.8 Camera Installation-2(Optional)
1.Tear off the protective film
of the camera lens.
2.Peel off the 3M adhesive
release paper from the
camera mount, attach the
camera on car rear wind-
shield, and press firmly to
secure it.
3.Connect the device via the
camera connection cable.
4.Adjust the angle of the
camera lens.
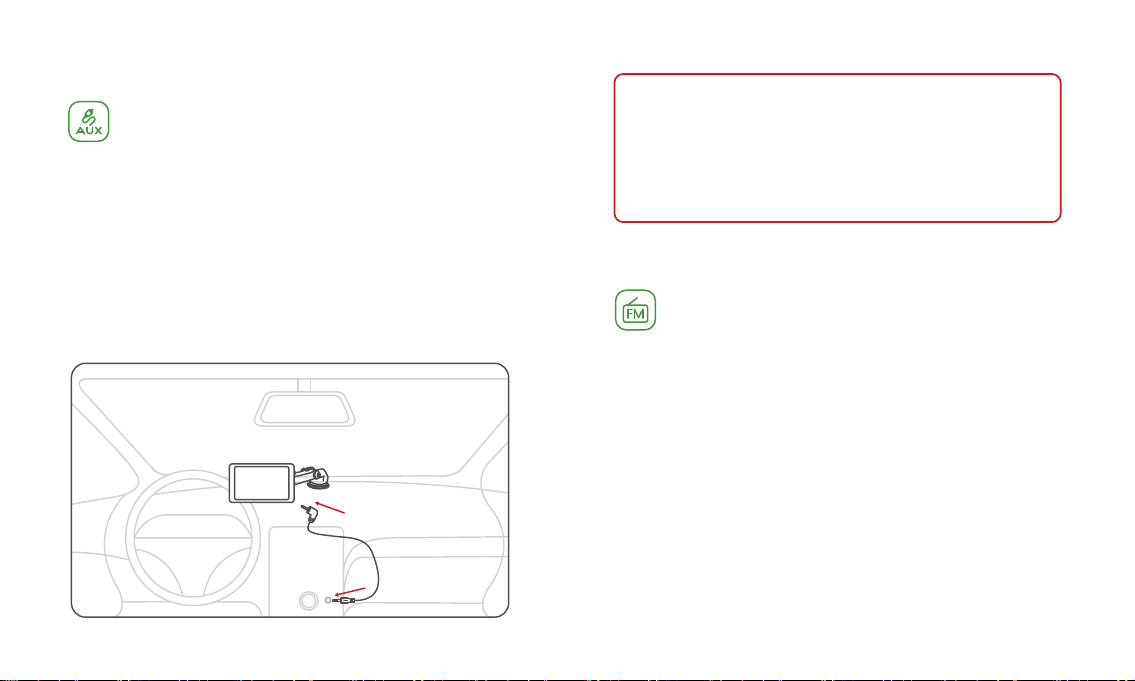
2.5 Audio Cable Installation
1. Insert the audio cable into the
car AUX port, and connect
the other end to the AUX OUT
port of the device.
2. Set the car's audio input
mode to AUX audio input.
After the connection is suc-
cessful, you can play music,
navigation, calls and more
through your car's audio
system.
2.6 TF Card Installation(Optional)
· Insert the TF card into the
TF card slot.
· The self-provided TF card
should meet the following
requirements: Class 10 or
above, the capacity does
not exceed 128GB.
Note
Please confirm if your car supports AUX IN and note
that the location of the AUX may vary depending on
the car model. Please consult your manufacturer for
more details.
01 02
03 04 05 06
07 08 09 10
11 12 13 14
15 16 17 18
19 20 21 22
23 24

3.1 Home Screen
Recording Status
Android Auto Status
Red Flash: Recording On
Green: Connected
Video Sound Status
Video Lock Status
Lock Unlock
Recording Mute
1
1
3. Features And Settings
Android Auto CarPlay AirPlay DVR
Audio Out
04/20/2023 12:30:24
1
2 3 4 5
6
7 8 9 10
CarPlay Status
Green: Connected
Speaker Status
System date
FM Status
TF Card Status
System time
04/20/2023
12:30:24
Green: Connected
On Off
Normal Not Inserted
01 02
03 04 05 06
07 08 09 10
11 12 13 14
15 16 17 18
19 20 21 22
23 24

DVR Audio Out
Android Auto
connected to the
device.
Apple CarPlay
connected to the
device.
Apple AirPlay
connected to the
device.
Apple CarPlay
not connected.
Apple AirPlay not
connected.
Android Auto not
connected.
Android Auto
Android Auto
DVR
Audio Out
Apple CarPlay
Apple CarPlay
Apple AirPlay
Apple AirPlay
5
7
6
Sound plays from the device built-in speaker.
Sound plays from the car via Bluetooth connection.
Sound plays from the car via AUX connection.
Sound plays from the car via FM Transmitter.
Recording On.
Recording Off.
3 4
Adjust the screen bright-
ness.
Brightness adjustment
Adjust the system
volume.
Volume adjustment Playback
View photos and
videos.
System settings and
Video settings.
Settings
8 9 10
2
01 02
03 04 05 06
07 08 09 10
11 12 13 14
15 16 17 18
19 20 21 22
23 24

3.2 Apple CarPlay
3.2.1 Apple CarPlay Wireless Connection
·iPhone is running iOS 9 or higher. (such as
iPhone XR and above; iPhone 11 and above;
iPhone SE (second generation) and above, etc.)
·It also requires the CarPlay system and the
iPhone's voice system to be turned on. Please
check if Siri is enabled.
·When using wireless CarPlay for the first time,
the connection time may take around 30
seconds, please be patient.
For more details visit:
http://www.apple.com/ios/carplay
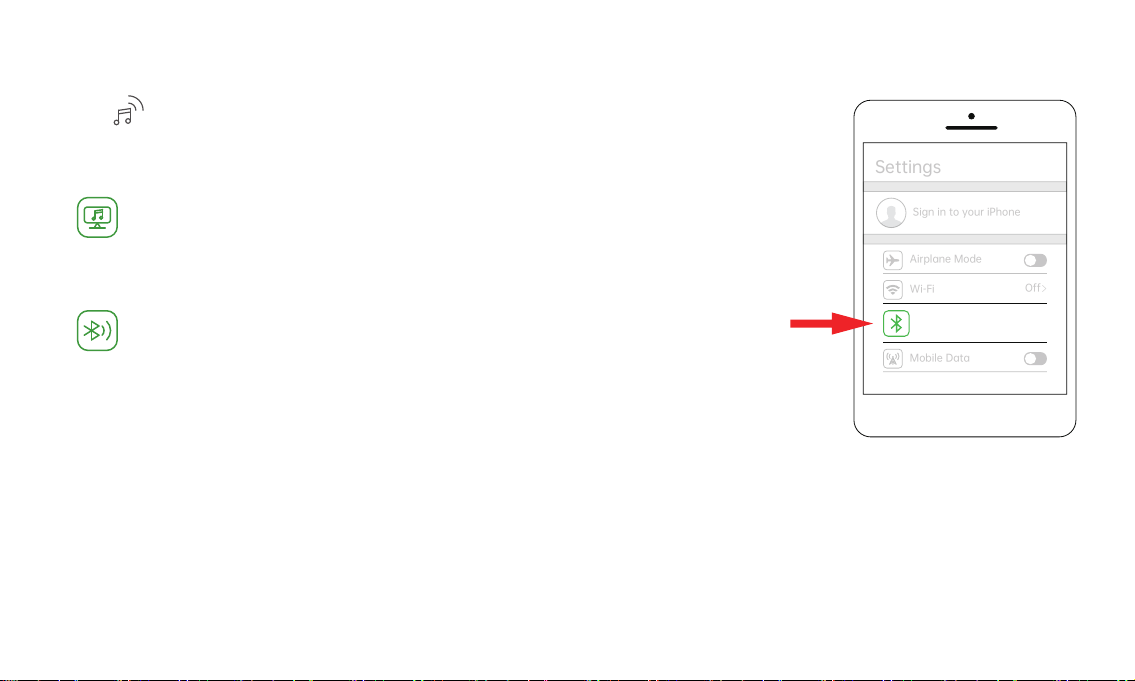
1.Go to Settings on your
iPhone, turn on “Bluetooth”
and “Wi-Fi”.
Sign in to your iPhone
Airplane Mode
>
On
>
On
Settings
Wi-Fi
Bluetooth
Mobile Data
01 02
03 04 05 06
07 08 09 10
11 12 13 14
15 16 17 18
19 20 21 22
23 24
Note:
The iPhone version that supports wireless
CarPlay requires the following:

2.Enter the “Bluetooth ”
menu and select the
Bluetooth device starting
with "Spedal-*****"
from the list of “Other
DEVICES” Bluetooth
devices.
Bluetooth
Now discoverable as “X6”.
MY DEVICES
Other DEVICES
******
******
Spedal-*****
******
<Settings
Bluetooth
3.Wait for about 20-30
seconds, and a prompt
"Bluetooth Pairing Request"
will pop up on your phone.
Select "Pair" to successfully
pair your phone with the
device.
Bluetooth
Not connected
Not connected
Now discoverable as “X6”.
MY DEVICES
Other DEVICES
******
******
Spedal-******
******
<Settings Bluetooth
Bluetooth Pairing Request
******
Cancel Pair
01 02
03 04 05 06
07 08 09 10
11 12 13 14
15 16 17 18
19 20 21 22
23 24

Bluetooth
Not connected
Not connected
Now discoverable as “X6”.
MY DEVICES
Other DEVICES
******
******
Spedal-******
******
<Settings Bluetooth
Use Carplay with
“NaviCam”
CarPlay automatically connects
your iPhone to your car’s
built-in display,and can access
your phone while it is locked.
Not Now Use CarPlay
4.Then, a prompt "Use
CarPlay with"NaviCam"?"
will pop up on your phone.
Select“Use Carplay”.
5. Please wait for a moment and you will enter the
CarPlay mode.
Note:
1.Different versions of iOS may display differ-
ently, please refer to the actual situation.
2.The first connection may take a longer time,
please be patient.
3.If you want to switch to Android Auto or
AirPlay, you need to turn off Bluetooth and
Wi-Fi on your phone to disconnect the Apple
CarPlay connection mode.
01 02
03 04 05 06
07 08 09 10
11 12 13 14
15 16 17 18
19 20 21 22
23 24
3.2.2 Apple CarPlay Audio Out
The sound is played from the speaker of the
device.
In CarPlay mode, the phone is directly con-
nected to the car's Bluetooth (if the phone
has been paired with the car's Bluetooth
before, there is no need to repeat the connec-
tion operation).
1. Built-in Speaker
2. Bluetooth
Sign in to your iPhone
Airplane Mode
>
On
>
Off
Settings
Wi-Fi
Bluetooth
Mobile Data
2.1 Go to Settings on your
iPhone > Bluetooth,turn
on the “Bluetooth”.
01 02
03 04 05 06
07 08 09 10
11 12 13 14
15 16 17 18
19 20 21 22
23 24
Click " " on the home screen to enter the Audio Out.

2.2 In the “Other Devices”
Bluetooth device list,
select the Bluetooth
name of your car.
Bluetooth
Not connected
Not connected
Now discoverable as “X6”.
MY DEVICES
Other DEVICES
******
******
Car******
******
<Settings
Bluetooth
Bluetooth
Not connected
Not connected
Now discoverable as “X6”.
MY DEVICES
Other DEVICES
******
******
Spedal-******
******
<Settings Bluetooth
Bluetooth Pairing Request
******
Cancel Pair
2.3 A prompt will pop up on
the phone, choose "Pair",
and the phone will pair
successfully with the car's
Bluetooth.
01 02
03 04 05 06
07 08 09 10
11 12 13 14
15 16 17 18
19 20 21 22
23 24
Connect to the car through an AUX
cable, and the sound will play from the
car's speakers.
3. AUX Connection
1.Insert the audio cable into the car AUX port, and
connect the other end to the AUX OUT port of the
device.
2. Set the car's audio input mode to AUX audio
input. After the connection is successful, you can
play music, navigation, calls and more through
your car's audio system.
Connect through FM to play sound
through your car's audio system.
4. FM Transmitter
1. Tune the car radio to an unoccupied FM frequency
and set the device to the same frequency, such as
89.2MHz (if unoccupied). Turn on the FM function
to transmit sound from the device to the car
speakers. After successful connection, audio from
the device will play through the car speakers.
2. While in FM mode, use the button or slider to
adjust the frequency.
Note:
Please confirm if your car supports AUX IN
and note that the location of the AUX may
vary depending on the car model. Please
consult your manufacturer for more details.
01 02
03 04 05 06
07 08 09 10
11 12 13 14
15 16 17 18
19 20 21 22
23 24

Scale&Pointer
88 90 93 98 103 108
FM Frequency
TUNING +/- 0.1
Save Current Frequency Status
Save Current Frequency Status
Saved
To Be Saved
103.0
MHz
0.0
MHz
89.2 MHz
1
2
3
4
5
10:25
89.2MHz
FM1
10:25
89.2MHz
FM1
04/20/2023 12:30:24
FM Transmitter
Please operate the
volume adjustment
on the mobile
phone/car side
103.0
MHz
0.00
MHz
89.2 MHz
0.00
MHz
Refer to [3.1 Home Screen]
1
2 23
4 5
01 02
03 04 05 06
07 08 09 10
11 12 13 14
15 16 17 18
19 20 21 22
23 24

3.3 Android Auto
3.3.1 Android Auto Connect With USB
Type-C Cable (Optional)
Android
What you need:
1.An Android phone with Android 8.0 (Oreo) and up, an
active data plan, and the latest version of the
Android Auto app.
2.An original USB cable.
Before you connect your phone for the first time,
turn on your car. Make sure your car is in park (P)
and allow time to set up Android Auto before you
start your drive.
Note:
01 02
03 04 05 06
07 08 09 10
11 12 13 14
15 16 17 18
19 20 21 22
23 24
1.Plug a USB cable into the USB port on cigarette
charger, plug the other end of the cable into your
mobile phone.
2.Your phone might ask you to download the Android
Auto app or update to the newest version of the app.
3.Follow the on-screen instructions to complete setup.
Your phone’s Bluetooth is turned on automatically when
Android Auto is connected to the car via USB.
For more details visit:
https://www.android.com/auto

3.3.2 Android Auto Wireless Connect
1. Any phone with Android 11.0.
2.A Google or Samsung phone with Android
10.0.
3.A Samsung Galaxy S8, Galaxy S8+, or Note 8,
with Android 9.0.
Note:
What you need:
A compatible Android phone with an active
data plan, 5 GHz Wi-Fi support, and the
latest version of the Android Auto app.
Wireless projection is compatible with these
Android versions:
1.Go to Settings on your
phone, turn on "Blue-
tooth" and "Wi-Fi".
Profile Security Apps
*******
Connections
Wi-Fi,Bluetooth,Flight mode
Settings
Sound and vibration
Sound mode,Ringtone
Status bar,do not disturb
Notifications
01 02
03 04 05 06
07 08 09 10
11 12 13 14
15 16 17 18
19 20 21 22
23 24

2.Click on "Bluetooth" to
enter the Bluetooth
search page.
Flight mode
Connections
Mobile networks
Wi-Fi
Bluetooth
>
NFC and Cast
3.After entering the “Blue-
tooth” menu, click "Pair
new devices" to search for
new Bluetooth devices.
Connected devices
Pair new devices
Previously connected devices
>
+
******
******
******
01 02
03 04 05 06
07 08 09 10
11 12 13 14
15 16 17 18
19 20 21 22
23 24

Note:
Different models of Android phones may display differently, please refer to the actual situation.
The first connection takes a longer time, please be patient.
If you want to switch to CarPlay or AirPlay, you need to turn off Bluetooth and WIFI on your
phone and disconnect from Android Auto connection mode.
5.Wait for about 20
seconds, a prompt box
will pop up on the phone
with "Pair with
Spedal-*****", click "Pair"
(as shown below), and
wait for the Bluetooth
pairing to complete. After
the Android Auto connec-
tion is completed, it will
automatically enter the
Android Auto mode.
Pair new devices
Available devices
Pairing...
>
Spedal- ******
******
******
Pair with Spedal- ***** ?
Allow access to your contacts
and call history
Cancel Pair
4.Select the Bluetooth
device starting with
"Spedal-*****" from
the list of "Other
DEVICES" Bluetooth
devices.
Pair new devices
Available devices
>
Spedal- ******
******
******
01 02
03 04 05 06
07 08 09 10
11 12 13 14
15 16 17 18
19 20 21 22
23 24

3.3.3 Android Auto Audio Out
Click " " on the home screen to enter the Audio Out.
The sound is played from the speaker of the device.
1. Built-in Speaker
2. Bluetooth
To connect through Bluetooth and play audio
through the car:
(1) Turn on Bluetooth on the car.
(2) Click "Scan" on the device page. After a moment,
the car Bluetooth name will appear in the "Avail-
able Devices" list (as shown in the figure below).
(3) Click on the Bluetooth name to connect.After the
connection is completed, the status will change
from connecting to connected.
04/20/2023 12:30:24
Bluetooth
Device discoverable as “Spedal-*****”
Saved devices
Please operate the
volume adjustment
on the mobile
phone/car side.
Scan
Available devices
TOYOTA
Refer to [3.1 Home Screen]
04/20/2023 12:30:24
Bluetooth
Device discoverable as “Spedal-*****”
Saved devices
Please operate the
volume adjustment
on the mobile
phone/car side.
Scan
Available devices
TOYOTA
Refer to [3.1 Home Screen]
Connected
01 02
03 04 05 06
07 08 09 10
11 12 13 14
15 16 17 18
19 20 21 22
23 24
Other manuals for CL796W
2
This manual suits for next models
1
Table of contents
Other Spedal Car Receiver manuals


