Speed Link SL-8237 User manual
Bedienungsanleitung
User manual
Mode d‘emploi
Instrucciones de manejo
Manuale d‘istruzioni
Artikelnr.: SL-8237
FULL METALL 5.1 SYSTEM

D
3
Fehlerbeseitigung/Reparatur:
Versuchen Sie nicht, das Gerät selbst zu warten
oder zu reparieren. Überlassen Sie jegliche
Wartungsarbeiten dem zuständigen Fachpersonal.
Nehmen Sie keine Veränderungen am Gerät vor.
Dadurch verlieren Sie jegliche Garantie-ansprüche.
Feuchtigkeit und Wärmequellen:
Verwenden Sie das Gerät nicht in der Nähe von
Wasser (z.B. Waschbecken, Badewannen oder
Schwimmbecken), und halten Sie es von Feuchtigkeit,
tropfenden oder spritzenden Flüssigkeiten sowie
Regen fern.
Stellen Sie die Lautsprecher nicht in der Nähe
von Wärmequellen auf, um Schäden am Gerät zu
vermeiden.
Reinigung
Benutzen Sie zum Reinigen des Gerätes bitte ein
weiches, trockenes Tuch. Lassen Sie das Gerät nie
mit Benzol, Verdünner oder anderen Chemikalien in
Berührung kommen.
Standort:
Die Lautsprecher müssen auf einer stabilen
Unterlage stehen, um zu verhindern, dass sie
herunterfallen und dabei Personen oder das Gerät
zu Schaden kommen.
Belüftung:
Verdecken Sie die Öffnungen der Lautsprecher-
gehäuse nicht, führen Sie keine Gegenstände in die
Öffnungen ein, und achten Sie darauf, dass zwischen
den Lautsprechern und anderen Geräten bzw. der
Wand ein ausreichender Abstand besteht.
Abwesenheit:
Bei längerer Abwesenheit oder Nichtgebrauch
sollten Sie das Stromkabel des Systems aus der
Steckdose ziehen.
Lautstärke:
Zu große Lautstärke kann zu Hörschäden führen.
Gewitter:
Um die Lautsprecher bei einem Gewitter zu schützen,
ziehen Sie den Netzstecker des Subwoofer, und
schalten Sie den Computer aus.
Bestimmungsgemäßer Gebrauch:
Das Gerät darf nur mit den dafür vorgesehenen
Originalteilen verwendet werden.
Das Produkt darf nur in geschlossenen und
trockenen Räumen verwendet werden.
Die bestimmungsgemäße Verwendung beinhaltet
das Vorgehen gemäß der Installationsanleitung.
Für Schäden, die durch unsachgemäßen Gebrauch
entstehen übernimmt der Hersteller keine
Haftung.
Bei Verwendung von elektronischen Geräten in der
Nähe dieses Produktes besteht die Möglichkeit,
dass es zu Störungen der Geräte kommt. Versuchen
Sie in diesem Fall die Distanz zwischen den Geräten
zu vergrößern.
Betreiben Sie das Gerät nicht in der Nähe von
Funkgeräten (wie z.B. Handys, etc.), um eventuelle
Störungen mit diesen Geräten zu vermeiden.
Sicherheitshinweise
Bevor Sie dieses Produkt verwenden, lesen Sie bitte die Sicherheits- und Warnhinweise im Handbuch.
Bewahren Sie dieses Handbuch auf, um zu einem späteren Zeitpunkt darauf zurückgreifen zu
können.
Geben Sie acht, dass Verpackungsmaterialien nicht in Kinderhände gelangen, da beim Spielen
Erstickungsgefahr droht.

D
4
Einleitung
Vielen Dank für den Kauf des FULL METAL 5.1 SYSTEM. Mit diesem Heimkino-Set
haben Sie sich für ein optimales System zur Wiedergabe von 5.1 Sound entschieden.
In elegantem Design passt es optimal in jedes Wohnzimmer.
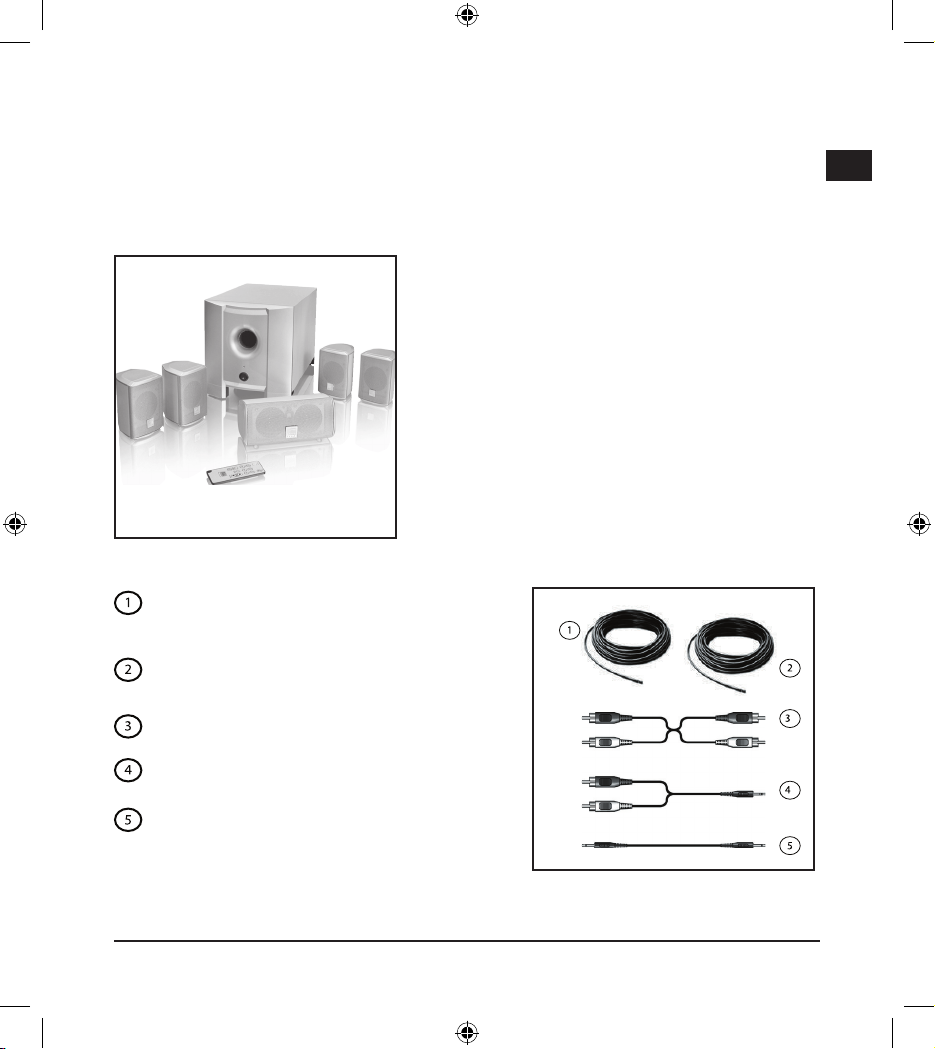
Lieferumfang:
• Vier Satelliten (2 Front-Satelliten,
2 hintere Satelliten)
• 1 Center-Satellit
• 1 Subwoofer
• 1 Fernbedienung
• AC 13,5V/5A Netzteil
Drei Kabel (3m Länge) zum Anschluss der
Front-Satelliten
Zwei Kabel (8m Länge) zum Anschluss der
hinteren Satellite
3x Stereo Cinch auf Cinch-Kabel
3x Stereo auf 3,5mm Klinkenstecker
1x Klinke auf Klinke für IR-Verbindung
zwischen Center und Subwoofer
D
5
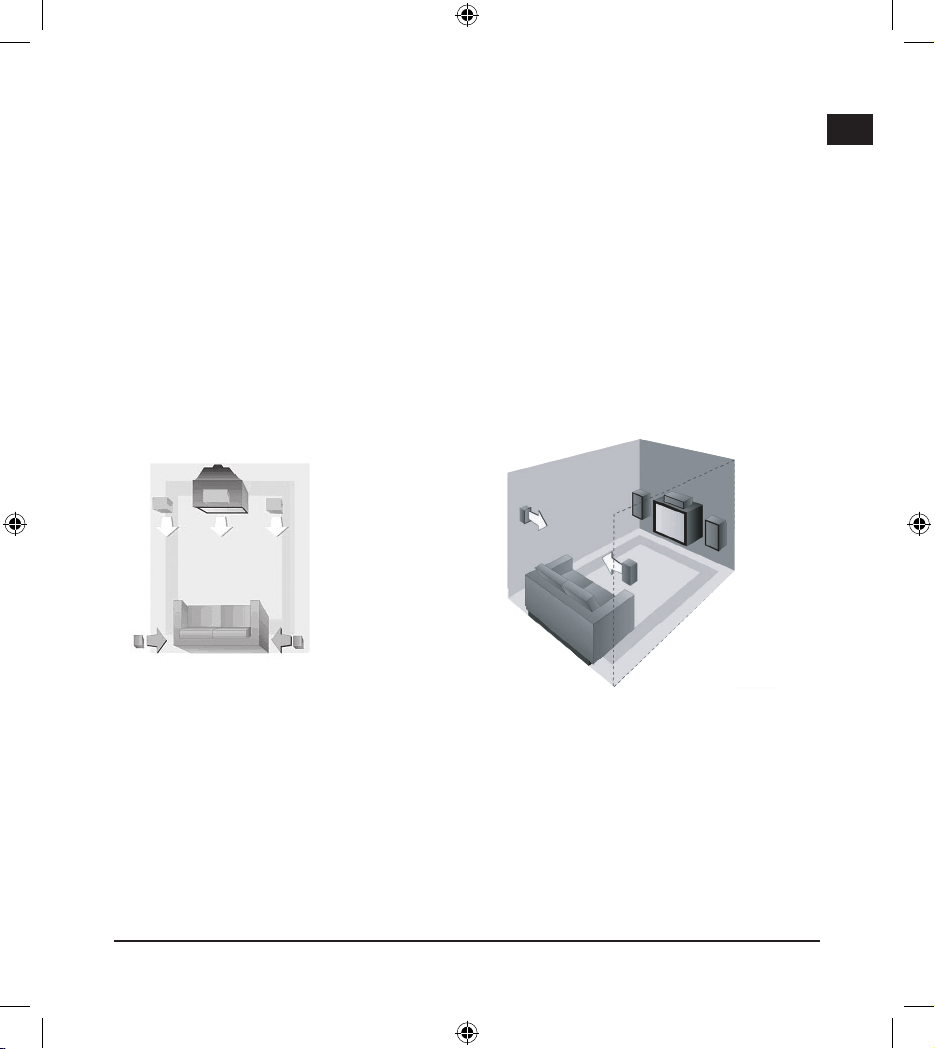
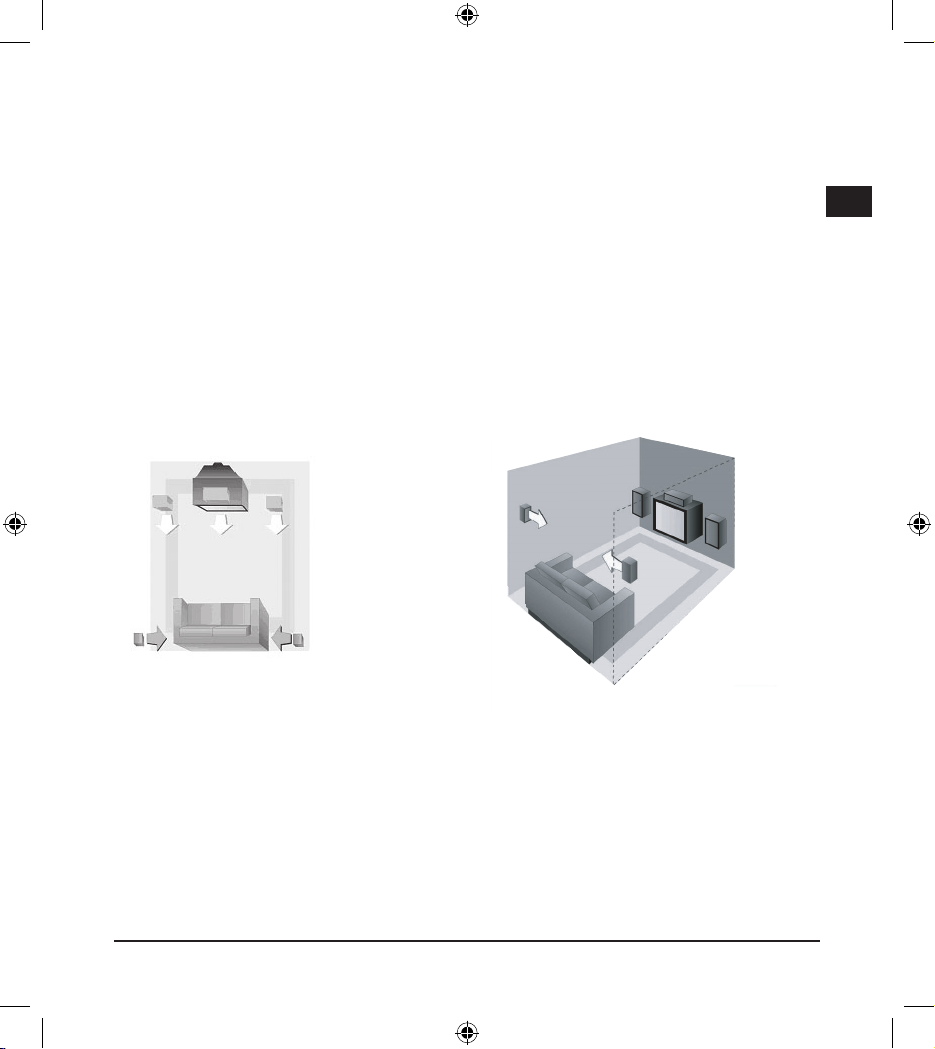
Aufstellen der Lautsprecher
Front-Lautsprecher:
Die vorderen Lautsprecher (Front-Lautsprecher) sollten vor Ihnen, am besten links
und rechts von dem Fernsehgerät oder Monitorbildschirm aufgestellt werden.
Die vorderen Lautsprecher sollten ungefähr in gleicher Höhe positioniert werden.
Da der Center-Lautsprecher bequem auf dem Fernsehgerät untergebracht werden
kann, könnten Sie die beiden Front-Lautsprecher auf Ständern oder Tischen in
Fernsehhöhe anzubringen (siehe Abb. unten).
Rear-Lautsprecher (hintere Lautsprecher):
Platzieren Sie die hinteren Lautsprecher neben den Sitzgelegenheiten und leicht
hinter der Sitzposition. Die Lautsprecher sollten nicht in Ohrhöhe, sondern etwas
darüber angebracht werden, um optimalen Surround-Effekt zu erhalten
(siehe Abb. unten).
Anschluss
Hinweise:
• Vergewissern Sie sich, dass sich der Ein-/Ausschalter am Subwoofer in Position
„Off“ befindet, bevor Sie das Lautsprecher-System anschließen.
• Verwenden Sie ausschließlich das mitgelieferte Netzteil. Die Verwendung eines
anderen Netzteils kann bei Beschädigung zum Garantieverlust führen.
• Achten Sie darauf, dass Sie alle Lautsprecher mit der richtigen Polarität
anschließen.
D
6
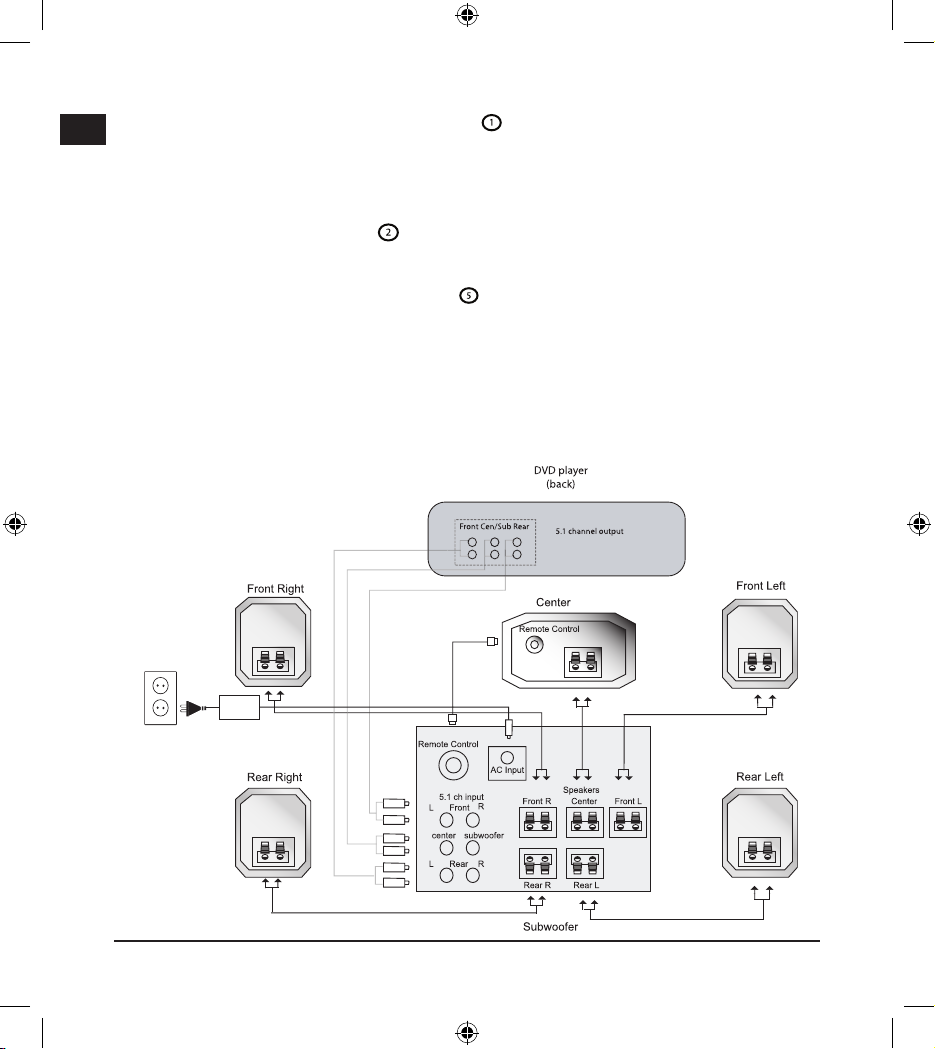
1. Verwenden Sie die mitgelieferten Kabel (s. „Lieferumfang“) zum Anschluss
der Front-Satelliten (vorne links (Front Left)/vorne rechts (Front Right)/Mitte
(Center). Schließen Sie die Kabel entsprechend der Farbmarkierungen richtig
gepolt an die Eingänge „Front Left/Center/Front Right“ an der Rückseite des
Subwoofers an.
2. Schließen Sie nun die Kabel (s. „Lieferumfang“) für die hinteren Lautsprecher
entsprechend der Polarität an die Eingänge „Rear R“/“Rear L“ an der Rückseite
des Subwoofers an.
3. Schließen Sie das mitgelieferte Kabel (s. „Lieferumfang“) mit Klinkenstecker
an den Eingang „IR Sensor“ auf der Rückseite des Subwoofers und das
andere Ende an die entsprechende Buchse auf der Rückseite des Center-
Lautsprechers an.
4. Verwenden Sie das mitgelieferte Netzteil zum Anschluss an die
Stromversorgung. Schließen Sie das Netzteil dabei an die Buchse „AC Input“
auf der Rückseite des Subwoofers an und das andere Ende an die
Stromversorgung.
13,5V
5A Adapter

D
7
Anschluss an einen DVD-Player:
Sie können das Sound-System zum Beispiel an einen DVD-Player oder Dolby Digital
Decoder anschließen.
1. Schließen Sie dazu die mitgelieferten Cinch-Kabel (s. „Lieferumfang“) an
die dafür vorgesehenen 5.1 Eingänge (L Front R/Center/Subwoofer/
L Rear R) an. Das andere Ende der Kabel schließen Sie an Ihre Soundquelle
(z.B. DVD-Player) an.
Hinweis: Der Gebrauchsanweisung Ihres DVD-Players können Sie die Steckplätze
der Kanäle entnehmen.
Konfiguration des DVD-Players
Um optimalen 5.1 Sound ausgeben zu können, muss Ihr DVD-Player ggf.
konfiguriert werden und die Ausgabe von 5.1 Sound eingestellt werden. Bitte
lesen Sie für genauere Informationen die Bedienungsanleitung Ihres DVD-Players.
Anschluss an eine Soundkarte:
Zum Anschluss an eine Soundkarte verwenden Sie die beiliegenden Klinke auf
Cinch-Stecker (s. „Lieferumfang“).
Hinweis: Der Gebrauchsanleitung Ihrer Soundkarte können Sie die Steckplätze der
Lautsprecher entnehmen.
1. Schließen Sie die Cinch-Stecker an die 5.1 Eingänge auf der Rückseite des
Subwoofers an und verbinden Sie die Klinkenstecker mit Ihrer Soundkarte.
Inbetriebnahme:
Schalten Sie das System über den Power On/Off-Schalter an der Vorderseite des
Subwoofers ein.
D
8
Funktionen der Fernbedienung:
Hinweis: Der Sensor für die Infrarot-Fernbedienung befindet sich
im Center-Lautsprecher. Richten Sie die Fernbedienung immer
auf den Center-Lautsprecher, um Einstellungen vornehmen
zu können. Bis auf die Funktion der Power-Taste werden alle
Einstellungen durch Blinken der LED am Center-Lautsprecher
angezeigt.
Power:
Drücken Sie die „Power“-Taste, um das System ein-/
auszuschalten.
Das Gerät wird beim Ausschalten in Standby-Mode versetzt.
Um das System komplett auszuschalten, drücken Sie bitte den
Schalter auf der Vorderseite des Subwoofers.
Mute:
Drücken Sie die „Mute“-Taste, um das System stumm zu schalten. Drücken Sie die
Taste erneute, um den Ton wieder einzuschalten
Volume:
Drücken Sie die Pfeiltasten, um die Gesamtlautstärke einzustellen.
Rear/Center/Bass
Über die „+“ und „-„Tasten können Sie die Ausgabe für die Rear-Lautsprecher, den
Center und den Bass einstellen.
Default Settings
Drücken Sie die Taste, um die Standard-Einstellungen wieder herzustellen.
Virtual Surround On/Off:
Über die Virtual Surround Taste können Sie Stereo-Sound über die Front-Lautsprecher
und den Subwoofer wiedergeben. Deaktivieren Sie diese Funktion („Off“), wenn Sie
eine 5.1 Soundquelle angeschlossen haben.

D
9
Problembehebung:
Kein Sound
• Vergewissern Sie sich, dass das System korrekt angeschlossen und
eingeschaltet wurde.
• Überprüfen Sie, ob der Sound stumm geschaltet wurde.
• Legen Sie ggf. eine andere DVD in den DVD-Player ein, um zu überprüfen,
ob die DVD abspielbar ist.
• Falls Sie das System an den PC angeschlossen haben, vergewissern Sie sich
bitte, das die Lautstärke nicht in der Lautstärkeregelung von Windows stumm
geschaltet wurde.
Technische Daten
Modelnr.: SL-8237
Subwoofer Satelliten Center
Ausgangs-
leistung 25W RMS 4x10W RMS 10W RMS
Frequenzbereich 35Hz~180Hz 180Hz~20kHz
Treiber 6“ 2,5“
Abmessungen
(mm) 370x240x230 122x80x80 193.5x80x80
Stromversorgung 13,5V 5A AC (230V AC/AC-Adapter beiliegend)
3,5mm Stereo-Klinkenstecker (beiliegend)
Signaleingang
Garantie
Für dieses Produkt gewähren wir Ihnen eine Garantie von zwei Jahren ab Kaufdatum
auf Verarbeitung und alle eingebauten Teile.
Falls Sie Hilfe benötigen...
Bei technischen Problemen wenden Sie sich bitte an unseren technischen Support.
Die Hotline-Nummer finden Sie auf der Rückseite dieser Bedienungsanleitung.

GB
10
Troubleshooting& Servicing:
Do not attempt to service or repair the device
yourself. Refer all servicing to qualified service
personnel.
Do not attempt to modify the device in any way.
Doing so could invalidate your warranty.
Moisture and heat sources:
Do not use this apparatus near water (for example,
sinks, baths, pools) or expose it to rain, moisture,
or dripping or splashing liquids.
Place the speakers away from all heat sources.
Cleaning:
When cleaning the device, please use a soft, dry
cloth. Never use benzine, paint thinner, or other
chemicals on the device.
Location:
Place the speakers in a stable location so they will
not fall causing damage to the speakers or bodily
harm.
Ventilation:
Do not block the openings in speaker cabinets, never
push objects into speaker vents or slots because of
fire or electric shock hazards, and provide sufficient
space around thespeakers for proper ventilation.
Periods of absence:
During longer periods of absence please unplug the
speaker system from electric power.
Volume:
Prolonged listening at high volume levels may cause
hearing damage.
Lightning storms:
For added protection during lightning storms,
unplug the speakers from the elctrical outlet and
turn off the computer.
Intended use:
The product may only be used with the original
parts intended for it.
The product may only be used in closed and dry
rooms.
The intended use includes adherence to the specified
installation instructions. The manufacturer accepts
no liability for damage arising due to improper use.
If you use electronic devices such as mobile phones,
etc. close to the product, you may experience
problems with these devices. If this happens, try
increasing the distance between the devices.
To avoid problems with radio transmitting or
receiving devices, do not use the product near
such devices.
Important Safety Information
Before using this product, read the instruction manual for important safety information. Please
retain this manual for future reference.
Make sure packaging materials do not get into the hands of children as there is a danger of asphyxiation
if they play with them.
11
GB
Introduction
Thank you for purchasing the FULL METAL 5.1 SYSTEM. This home cinema set is
an optimal system for the reproduction of 5.1 sound. With its elegant design, it fits
perfectly into any living room.
Supplied with product:
• Four satellites (2 front satellites, 2 rear
satellites)
• 1 centre satellite
• 1 subwoofer
• 1 remote control
• AC 13.5 V/5 A mains adapter
Three cables (3m) for connecting
front satellites
Two cables (8m) for connecting rear
satellites
3x stereo cinch to cinch cables
3x stereo to 3.5 mm stereo jack
1x jack to jack for IR connection between
centre and subwoofer

GB
12
Setting up the speakers
Front speakers:
Position the front speakers in front of you, preferably to the left and right of the TV
or monitor.
Position the front speakers at roughly the same height. Since it is practical to
position the centre speaker on the TV, consider mounting the two front speakers on
stands or tables at TV height (see fig. below).
Rear speakers:
Position the rear speakers next to the seats and slightly behind the sitting position.
To obtain optimal surround effects, do not mount the speakers at ear height but
slightly higher (see fig. below).
Connecting
Notes:
• Make sure the on/off switch on the subwoofer is in the “Off” position before you
connect the speaker system.
• Only use the supplied mains adapter. The use of a different mains adapter can
invalidate the guarantee in the event of the damage.
• Make sure you connect all speakers with the correct polarity.

13
GB
1. Use the supplied cable (s. „Supplied with product) for connecting the front
satellites (Front Left/Front Right/Centre). Connect the cables according to
the colour markings with correct polarity to the inputs “Front Left/Centre/
Front Right” on the back of the subwoofer.
2. Connect the cables for the rear speakers , (s. „Supplied with product)
according to polarity, to the “Rear R”/“Rear L” inputs on the back of the
subwoofer.
3. Connect the supplied cable (s. „Supplied with product) with jack plug to the
“IR Sensor” input on the back of the subwoofer and the other end to the
corresponding socket on the back of the centre speaker.
4. Use the supplied mains adapter for connection to the power supply. Connect
the mains adapter to the “AC Input” socket on the back of the subwoofer and
the other end to the wall socket.
13,5V
5A Adapter

GB
14
Connecting to a DVD player:
You can connect the sound system to a DVD player or Dolby Digital Decoder.
1. To do this, connect the supplied cinch cable (see „Supplied with product) to
the 5.1 inputs (L Front R/Centre/Subwoofer/L Rear R) provided for this.
Connect the other end of the cables to your sound source (e.g. DVD player).
Note: The socket for each channel should be shown in the user manual of your
DVD player.
Configuration of the DVD player
To be able to output optimal 5.1 sound, you may have to configure your DVD player
and adjust the output of 5.1 sound. Read the user manual of your DVD player for
more details.
Connecting to a sound card:
To connect to a sound card, use the supplied jack to cinch connector .(see
„Supplied with product).
Note: The sockets for the speakers should be shown in the user manual of your
sound card.
1. Connect the cinch plug to the 5.1 inputs on the back of the subwoofer and
the jack plug to your sound card.
Switching on:
Switch the system on with the Power On/Off switch on the front of the subwoofer.

15
GB
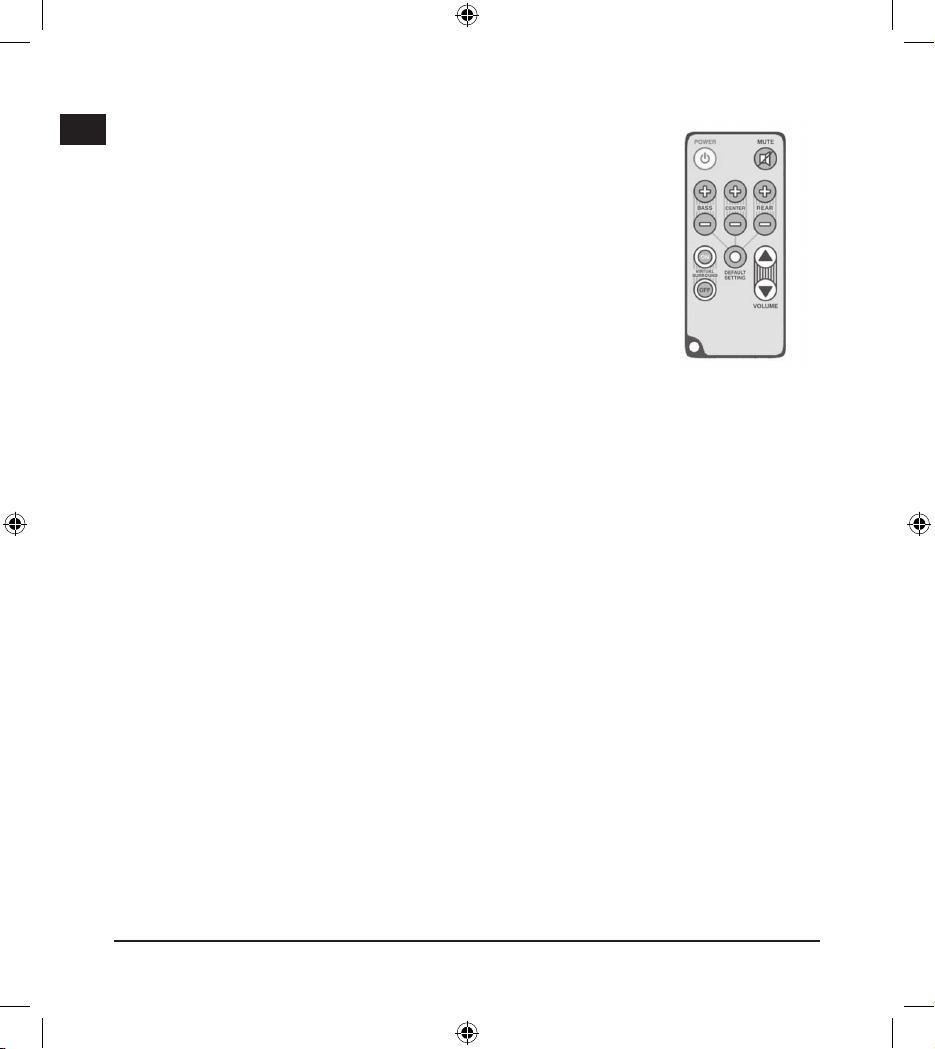
Functions of the remote control:
Note: The sensor for the infrared remote control is located in
the centre speaker. Always direct the remote control towards
the centre speaker to adjust settings. Apart from the “Power”
button, all other commands are indicated by the flashing of the
LED on the centre speaker.
Power:
Press the “Power” button to switch the system on/off.
The system goes into standby mode when switched off. To
switch the system off completely, press the switch on the front
of the subwoofer.
Mute:
Press the “Mute” button to switch the system sound off. Press the button again to
switch sound on again.
Volume: ▲ / ▼
Press the arrow buttons to adjust the overall volume.
Rear/Center/Bass
Use the “+” and “-“ buttons to adjust the output of the rear speakers, the centre
speaker and the bass.
Default Settings
Press the button to re-establish the standard settings.
Virtual Surround On/Off:
The Virtual Surround button allows you to reproduce stereo sound via the front
speakers and subwoofer. Deactivate this function (“Off”) when you connect a 5.1
sound source.

GB
16
Troubleshooting:
No sound
• Make sure the system is correctly connected and switched on.
• Check if the sound has been muted.
• Insert a different DVD in the DVD player to check that the DVD can be played.
• If you have connected the system to your PC, make sure the volume has not
been muted in the volume control panel of Windows.
Technical specifications
Modeln°.: SL-8237
Subwoofer Satellite Center
Output power 25W RMS 4x10W RMS 10W RMS
Frequency
range 35Hz~180Hz 180Hz~20kHz
Driver unit 6“ 2.5“
Dimensions
(mm) 370x240x230 122x80x80 193.5x80x80
Power supply 13.5V 5A AC (230V AC/AC adapter joint)
3.5mm Stereo jack (enclosed)
Signal entrance
Warranty
This product is warranted for the period of two years parts and labor from the
original date of purchase against defective materials and workmanship.
If you need help..
In case of technical problems don’t hesitate to contact our technical support. Please
find the hotline number on the back page of this manual.

17
F
Entretien:
Ne tenez pas d‘effectuer vous-même l‘entretien
du dispositif ni de le réparer. Pour les opérations
d‘entretien, adressez-vous à du personnel qualifié.
N‘essayez jamais d‘apporter une quelconque
modification au dispositif. Cela pourrait annuler
votre garantie.
Humidité et sources de chaleur :
Évitez d‘utiliser l‘appareil à proximité de l‘eau (évier,
baignoire ou piscine par ex.) ou de l‘exposer aux
intempéries, à l‘humidité, ou à des écoulements ou
des projections de liquides.
Eloignez les haut-parleurs de toute source de
chaleur.
Nettoyer l‘unité
Pour nettoyer l‘unité, veuillez utilisez un chiffon doux
et sec. N‘appliquez jamais de benzine, de diluant ou
autre produit chimique sur le dispositif.
Emplacement:
Placez les haut-parleurs de manière à ce qu‘ils
soient stables, car toute chute risquerait de
les endommager ou de cuser des dommages
corporels.
Ventilation:
Ne bloquez pas les ouvertures des haut-parleurs.
N‘enfoncez jamais d‘objets dans les ouvertures
ou les fentes des haut-parleurs, du fait du risque
d‘électrocution ou d‘incendie, et laissez un espace
suffisant autour des haut-parleurs pour assurer une
ventilation correcte.
En cas d‘absence:
En cas d’absence ou de non-utilisation prolongée,
débranchez le câble d’alimentation électrique de la
prise.
Volume:
Un volume trop élevé peut entraîner des troubles
de l’audition.
Foudre:
Pour une meilleure protection contre la foudre,
débranchez les haut-parleurs de la prise électrique
et mettez l‘ordinateur hors tension en cas d‘orage
Utilisation conforme:
L’appareil ne doit être utilisé qu’avec les pièces
originales prévues à cet effet.
Le produit ne doit être utilisé que dans des locaux
fermés et secs.
L’utilisation conforme implique de respecter les
instructions d’installation. Le fabricant décline toute
responsabilité en cas de dommages dus à une
utilisation incorrecte.
En cas d’utilisation d’appareils électroniques (tels
que des téléphones portables, etc.) à proximité de
ce produit, il est possible que le fonctionnement des
appareils en question soit perturbé. Dans ce cas,
essayez d’éloigner les appareils.
N’utilisez pas l’appareil à proximité d’appareils radio
pour éviter d’éventuelles interférences avec ces
appareils.
Instructions de sécurité
Avant d‘utiliser ce produit, consultez le manuel d‘instructions. Vous y trouverez des informations
importantes sur la sécurité. Conservez ce manuel pour une référence ultérieure.
Faites attention à ce que les matériaux d’emballage ne tombent pas entre les mains d’enfants, car ils
risqueraient de s’étouffer en jouant.

F
18
Introduction
Merci d’avoir choisi le SYSTÈME FULL METAL 5.1. En optant pour cet ensemble
home cinéma, vous avez fait l’acquisition d’un système offrant un rendu du son
optimal en 5.1. Son design élégant se fond dans n’importe quel salon.
Éléments fournis :
• Quatre satellites (2 satellites avant,
2 satellites arrière)
• 1 satellite central
• 1 caisson de basses
• 1 télécommande
• Cordon d’alimentation CA 13,5 V/5 A
Trois câbles (3 m de long) pour le
raccordement des satellites avant
Deux câbles (8 m de long) pour le
raccordement des satellites arrière
Trois câbles cinch-cinch stéréo
Trois câbles cinch stéréo-fiche jack 3,5 mm
Un câble à double fiche jack pour la liaison
par infrarouges entre le satellite central et
le caisson de basses
19
F
Disposition des enceintes
Enceintes avant :
Les enceintes avant (« front ») doivent être positionnées devant vous, de préférence
à gauche et à droite du téléviseur ou du moniteur.
Les satellites avant doivent être placés à peu près à la même hauteur. Si vous
décidez de poser le satellite central sur le téléviseur, il est conseillé de disposer
les deux satellites avant sur des supports ou des tables qui se trouvent à la même
hauteur que le téléviseur (voir illustration ci-dessous).
Enceintes arrière (« rear ») :
Placez les enceintes arrière à côté de l’endroit où vous vous assiérez, légèrement
en arrière par rapport à vous. Les enceintes ne doivent pas être à hauteur d’oreille,
mais un peu au-dessus pour obtenir un effet surround optimal (voir illustration
ci-dessous).
Raccordement
Remarque :
• Assurez-vous que l’interrupteur marche-arrêt du caisson de basses est en
position « Off » avant de raccorder le système d’enceintes.
• Utilisez exclusivement le cordon d’alimentation fourni. L’utilisation d’un autre
cordon d’alimentation peut entraîner l’annulation de la garantie en cas de
dommage.
• Faites attention à la polarité en raccordant tous les câbles des enceintes.

F
20
1. Utilisez les câbles fournis (voir « Éléments fournis ») pour raccorder les
satellites avant (avant gauche (Front Left)/avant droite (Front Right)/centre
(Center). Raccordez les câbles aux entrées « Front Left/Center/Front Right »
au dos du caisson de basses en faisant attention aux codes de couleur pour
respecter la polarité.
2. Raccordez ensuite les câbles (voir « Éléments fournis ») des enceintes
arrière aux entrées « Rear R »/« Rear L » au dos du caisson de basses en
respectant la polarité.
3. Reliez le câble fourni (voir « Éléments fournis ») à double fiche jack à l’entrée
« IR Sensor » au dos du caisson de basses et branchez l’autre extrémité sur
la prise correspondante au dos du satellite central.
4. Utilisez le cordon d’alimentation fourni pour le raccordement à la prise de
courant. Reliez le cordon d’alimentation à la prise « AC Input » au dos du
caisson de basses et l’autre extrémité à la prise de courant.
13,5V
5A Adapter

21
F
Raccordement à un lecteur de DVD :
Vous pouvez par exemple raccorder le système audio à un lecteur de DVD ou à un
décodeur Dolby Digital.
1. Reliez pour cela les câbles cinch fournis (voir « Éléments fournis »)
aux entrées 5.1 prévues à cet effet (L Front R/Center/Subwoofer/L Rear R).
Reliez l’autre extrémité des câbles à votre source audio (par ex. un lecteur de
DVD).
Remarque : pour connaître les emplacements des canaux, reportez-vous au mode
d’emploi de votre lecteur de DVD.
Configuration du lecteur de DVD
Pour obtenir un son 5.1 optimal, votre lecteur DVD doit être éventuellement
configuré en conséquence et réglé pour une sortie du son en mode 5.1. Pour plus
d’informations, veuillez vous reporter au mode d’emploi de votre lecteur de DVD.
Raccordement à une carte son :
Pour raccorder le système à une carte son, utilisez les câbles cinch-fiche jack
fournis (voir « Éléments fournis »).
1. Reliez les fiches cinch aux entrées 5.1 au dos du caisson de basses et les
fiches jack à votre carte son.
Remarque : pour connaître les prises des enceintes, veuillez vous reporter au
mode d’emploi de votre carte son
Mise en marche :
Allumez le système en actionnant l’interrupteur Power On/Off à l’avant du caisson
de basses.
Table of contents
Languages:
Other Speed Link Speakers System manuals

Speed Link
Speed Link Full Metal 2.1 System User manual

Speed Link
Speed Link Selene SL-8123 User manual

Speed Link
Speed Link Titan SL-8121 User manual

Speed Link
Speed Link Gravity SL-8231 User manual

Speed Link
Speed Link Ganimed SL-8115 User manual

Speed Link
Speed Link Apollo 2.1 SL-8210 User manual

Speed Link
Speed Link Daimos SL-8105 User manual

Speed Link
Speed Link sl-8240 Perseus User manual

Speed Link
Speed Link Apollo 2 SL-8211 User manual

Speed Link
Speed Link Galatea SL-8136 User manual


