SPEX CertiPrep 8000D MIXER/MILL User manual

8000D MIXER/MILL®
OPERATING
MANUAL

8000D Mixer/Mill
Page 2of 21 SPEX CertiPrep 8.21.03
SN and Higher
TABLE OF CONTENTS
SECTION
DESCRIPTION
PAGE
1. Introduction ...............................................................................................................................3
2. Specifications ............................................................................................................................4
3. Unpacking..................................................................................................................................5
4. Setting Up..................................................................................................................................6
5. Operation...................................................................................................................................8
6. Maintenance ............................................................................................................................10
7. Accessories..............................................................................................................................11
8. Parts List & Item Locator........................................................................................................15
9. Assembly Diagrams & Parts ........................................................................................... 17 -19
10. Trouble Shooting.....................................................................................................................20
11. Warranty..................................................................................................................................21

8000D Mixer/Mill
Page 3of 21 SPEX CertiPrep 8.21.03
SN and Higher
1. INTRODUCTION
SPEX CertiPrep Mixer/Mills are a variant of the ball mill or jar mill, which grinds samples by
placing them in a container along with one or more grinding elements, and imparting motion to
the container. Generally the containers and grinding elements are made from the same material.
As the container is swung, the inertia of the grinding elements causes them to move
independently, into each other and against the container wall, grinding the sample.
The 8000D Dual Mixer/Mill is an efficient two-clamp laboratory mill. The 8000-series
Mixer/Mills have been used for pulverizing rocks, minerals, sand, cement, slag, ceramics,
catalyst supports, and hundreds of other brittle, often hard samples in the 10-gram range.
Functionally described as a shaker mill or a high-energy ball mill, the 8000D Dual Mixer/Mill is
capable of rapidly shaking containers back and forth several thousand times a minute. This
multi-purpose mill is capable of rapidly reducing hard, brittle samples to analytical fineness,
blending powders, or making emulsions. It is also very effective for mechanical alloying.
With two clamps for increased throughput, the 8000D also features a variable-range electronic
timer, sleek modern design, forced-air cooling, a safety interlock, and a choice of steel, tungsten
carbide, agate, zirconia, silicon nitride, alumina, and plastic vials which are purchased separately.
This mill duplicates the pulverizing, blending, and alloying action of the proven, reliable 8000
Mixer/Mill. The vial, containing the sample and a ball or balls is secured in the clamp and swung
energetically back and forth. The back-and-forth shaking motion is combined with lateral
movements of the ends of the vial, so that the vial appears to be describing a figure-8 or infinity
sign as it moves. The length of that swing is the same as the internal length of the vial, about two
inches. With each swing of the vial the ball impacts against the sample and the end of the vial,
both milling and mixing the sample. Because of the amplitude and velocity of the clamp’s swing,
each ball develops fairly high G-forces, enough to pulverize the toughest rocks, slag and
ceramics.
The dual clamps of the 8000D Mixer/Mill not only allow twice as many samples to be ground in
a given time, but they also move in balance, reducing vibration and extending the life of the
mill’s components. A fan keeps the motor and clamp mechanisms cool during operation.
For assistance in choosing the SPEX CertiPrep grinding or blending containers which would be
best for your application, please call SPEX CertiPrep Sample Preparation at 1-800-522-7739 or
732-549-7144.

8000D Mixer/Mill
Page 4of 21 SPEX CertiPrep 8.21.03
SN and Higher
2. SPECIFICATIONS
Type of mill: High-Energy shaker mill
Grinding container: Canister with balls
Weight (empty, without vial): 68 lbs. (31 Kg)
Dimensions: 22 in (56 cm) x 15 1/4 in (39 cm) x 11 in (28 cm)
Grinding Vials Available (see pages 16-19):
8001 Hardened Steel Vial Set.
8003 Alumina Ceramic Vial Set
8004 Tungsten Carbide Vial Set
8005 Zirconia Ceramic Vial Set
8006 Methacrylate Vial Set
8007 Stainless Steel Vial Set
8008 Silicon Nitride Vial Set
8009 Round-Ended Hardened Steel Vial Set
8014 Agate Vial Set
Smaller Vials also available:
3114 Stainless Steel Vial Set
3117 Hardened Tool Steel Vial Set
3127 Hardened Tool Steel Vial Set
3118 Agate Vial Set
5004 Tungsten Carbide-Lined Vial Set
NOTE: Smaller vials are to be run in Multiple-Sample Adapters (see page 13 & 14)
Electrical: available in 115V 60Hz (8 amp fuse) or 230V 50Hz (5 amp fuse).
Cord: 115V 60HZ version, 3-prong grounded cord supplied.
230V 50HZ version, with European two-prong plug supplied.
NOTE: Operator is responsible for supplying alternate line cord/plug if required.
Fuses:115V 60HZ version, 8-amp slow-blow fuse in inlet module,
230V 50HZ version, 5-amp slow-blow fuse in inlet module.
Motor: 1/3 Hp
Clamp Movement: 2¼ in. back-and-forth, 1 in. side-to-side
Clamp Speed: 1060 back-and-forth cycles at 115V/60Hz or 875 at 230V/50Hz
Safety Features: Lid Interlock prevents mill from running if lid is not closed. The latch also
prevents the lid from being opened until the clamps come to a stop.
Controls: start, stop/pause, and stop buttons; programmable timer with digital display, factory-
set for 100 minute range but adjustable to 10, 100, 1000, 10,000 minute ranges.
8000D Mixer/Mill
Page 5of 21 SPEX CertiPrep 8.21.03
SN and Higher
3. UNPACKING
Any visible damage to the shipping container should immediately be reported to the carrier. If
there is no visible damage, remove all packing documents from the exterior of the box, and after
completion of your inspection, file with your records.
Open the top of the shipping box. Remove the foamed-in-place packing material. Carefully grasp
the straps on the mill from both sides, exercising caution while using proper lifting techniques to
remove the unit from the carton (the unit weighs 68 lbs). Place the mill on the bench top where it
will likely stay, and open the lid. Look for any hidden damage that may have occurred during
shipping.
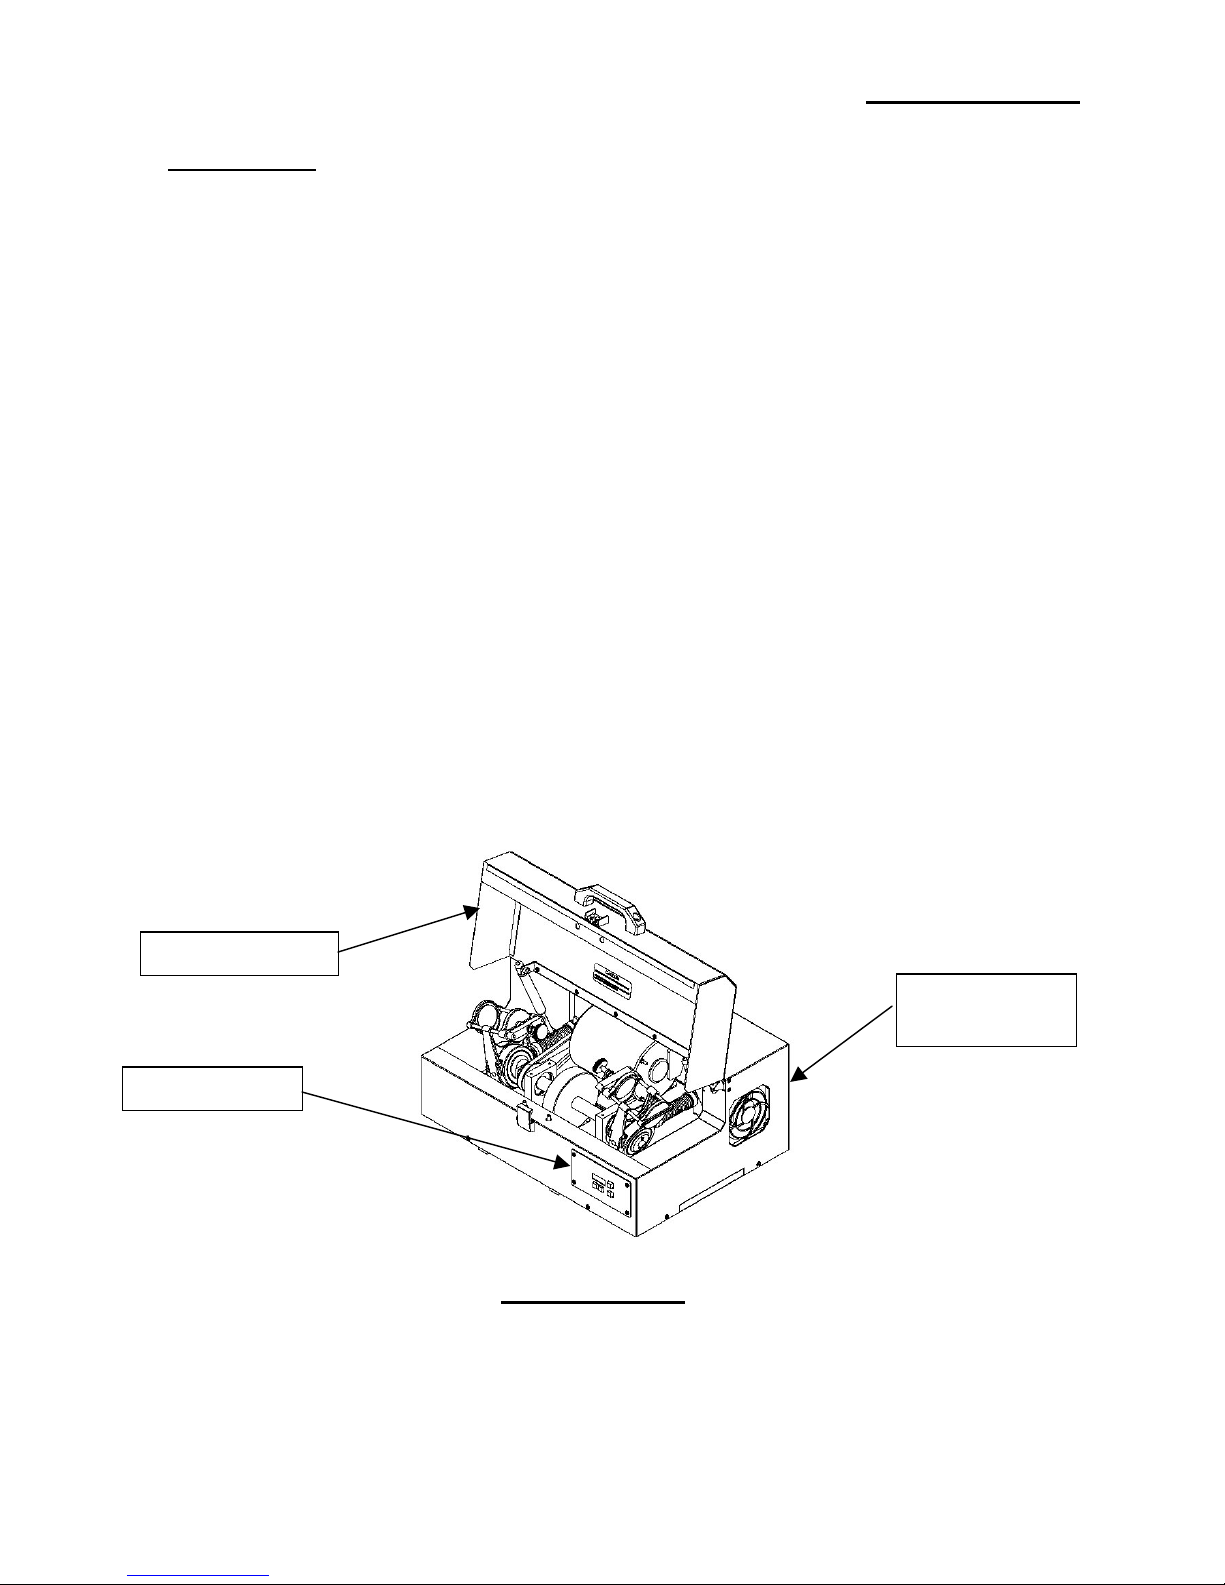
Follow a logical sequence of steps as you inspect the unit (see Figure 2). For example:
1. Inspect the outside of the cabinet for any visible damage.
2. Are any of the switches damaged?
3. Is the latch mechanism damaged?
4. Inspect the interior of the mixer.
5. Is the motor damaged?
6. Do all the springs and mounting points seem okay?
7. Inspect the accessory pack. Compare with the packing list.
If everything seems to be okay, proceed to the section, “ SETTING UP,” on page 11
Lid Assembly
Control Panel
Electrical Inlet
Module at back
(Figure 2)
8000D Mixer/Mill

8000D Mixer/Mill
Page 6of 21 SPEX CertiPrep 8.21.03
SN and Higher
4. SETTING UP
Remove the plastic bag containing the instructions and spare fuses. Then loosen the locking tab
on the clamps, and unscrew the clamps a few turns. Cut and remove the tie holding the clamps
together.
Tilt the cabinet about 45 degrees, and note the four bolts on the underside of the cabinet. They
hold the floating base plate to the cabinet for shipping. Remove these bolts, the rear ones first,
and save them in case you have to re-ship the mill. NOTE: Never ship or transport the 8000D
Mixer/Mill without the shipping bolts.
4.1 Electrical Hookup
The power inlet, a fuse tray, and the On/Off switch (controlling power to the motor and timer),
are located at the back of the unit. The On/Off switch is a rocker switch marked with a circle (0)
and a bar (-). To turn on the power, press down the bar (-) side of the switch. Before plugging in
the mill, set the power to Off by pressing down the zero (0) side of the On/Off switch, then plug
the power cord into the mill’s power inlet. Plug the mill into a standard 3-prong grounded
electrical outlet; we recommend that it be a fused 20-amp circuit for the 115V/60 HZ version.
The mill uses 8-amp “slow-blow” fuses. The 230 V 50 HZ model uses 5-amp “slow-blow” fuses
and comes with a European-style polarized plug; outside of Europe the cord should be adapted to
local requirements.
The fuse tray is next to the power inlet and includes two fuses in parallel. It can be opened with
a knife-blade or small screwdriver.
4.2 Standard Safety Features
Manual Lid Latch - The lid has a manual latch, just below the lid handle, which should be
closed whenever the mill is run. To close the latch, pull the tab up and out, engage it with the lid,
and push the tab down. To open the latch, pull the tab up and out.
Pneumatic Cylinders -When you raise the lid all the way, the pneumatic cylinders brace the lid
open, and keep it from being closed accidentally or abruptly. However, when you raise or lower
the lid you should always keep your hand on the handle.
Clamp Locking Tab - The clamp is opened and closed by a knob on the end of its threaded
shaft. Whenever the clamp is closed on a vial, lock the clamp by tightening the locking tab
clockwise against the clamp crossbar (The locking tab is on the shaft between the knob and the
clamp crossbar.) When opening the clamp, first loosen the locking tab.

8000D Mixer/Mill
Page 7of 21 SPEX CertiPrep 8.21.03
SN and Higher
4.3 CE Safety Features
CE directives require that electricity to the motor and timer be interrupted whenever the lid is
open, and that the clamp arm must have stopped completely before the lid can open.
Safety Interlock - The Safety Interlock cuts off power when the lid is opened; the switch is
under the lid on the upper right-hand side. Do not disconnect or damage this switch!
Time-Delay Latch - The Time-Delay Latch keeps the lid latched while the mill is running, and
until the clamp stops moving. The Time-Delay Latch consists of two pins, one on either side of
the manual lid latch, powered by a solenoid, to engage two holes in the lid. When the mill is
started the Time-Delay Latch locks the lid immediately, and there is a delay before the motor
starts. When the timer has cycled to zero, and the motor stops, the latch stays locked for about
ten seconds so the clamp will stop moving before the lid can be opened. The latch locks and
unlocks with an audible click. After a run always wait for the click before undoing the manual lid
latch and opening the lid.
NOTE: Never try to force open the lid before the Time-Delay Latch unlocks.
4.4 Control Panel
The four-digit timer is used to set the exact running time of the mill. The 8000D timer’s factory-
set range is 00:01 (one second) to 99:59 (99 minutes and 59 seconds). The default setting, which
always appears when the power is first switched on, is 01:00, or one minute and no seconds.
Electronic Timer - the two buttons underneath the display change the timer setting. The left-
hand button advances the minutes and the right-hand button advances the seconds. To advance a
setting one digit at a time, push a button and release it. If you hold a button down the setting will
advance slowly for a few seconds, then rapidly. The minutes setting will advance from 00 to 99
to 00 again, and the seconds setting from 00 to 59 to 00 again. Any setting other than the default
setting will be retained only as long as the power is switched on. While the mill is running the
timer counts down and displays the minutes and seconds left in a run.
Start Button - Once the timer is set (and the vial is clamped and locked in place, and the lid is
shut and latched) the mill can be started by pushing the Start button. The timer counts down as
the mill begins its run, so that the timer displays the time left to run in a grinding cycle. When
the timer reaches zero (00:00) the motor stops. After a ten-second delay for the clamp to stop
moving, the time-delay latch opens and releases the lid and the timer also re-sets.
Stop/Pause Button - To interrupt (not cancel) a cycle, push the Stop/Pause button once. The
motor will stop, and the display will flash the time left in the cycle; this is the Pause Condition.
During a Pause Condition the lid cannot be opened. This Pause Condition is indefinite, but the
run cycle can once again be resumed at the point where it was stopped, by once again pressing
the Start button. To cancel a cycle in progress, press the Stop/Pause button twice. This will stop
the motor and re-set the timer, and after ten seconds the Time-Delay latch will disengage,
allowing the lid to be opened.

8000D Mixer/Mill
Page 8of 21 SPEX CertiPrep 8.21.03
SN and Higher
5. OPERATION
Plug the power cord into the mill’s electrical inlet, and then into an approved grounded outlet.
Ensure that the On/Off switch (next to the power inlet) is in the off position, before plugging the
unit in. After the unit is plugged in, switch the power on by means of the rocker switch.
After loading each vial with the sample to be mixed or ground, place it in a clamp. Tighten each
clamp with the knob, and lock each clamp with the locking tab. Close the lid and fasten down the
lid with the manual latch.
NOTE: Two vials of the same material must be loaded onto the clamps, in order to assure
proper balance of the grinding mechanism.
Adjust the timer setting as described above under Electronic Timer.
Start the mill sample run by pushing the Start button. To stop the mill during a run (e.g., an
emergency stop), push the Stop/Pause button twice, or cut off power by pressing the power
switch on the back of the mill to 0. If you want to interrupt a run but keep the current position in
the timer sequence, push the Stop/Pause button once only, and the mill will stop. After a pause,
the milling cycle can be resumed by pushing the Start button. It is important to note that the lid
latch will not release when the mill is in the Pause Condition.
NOTE: When the 8000D timer cycle has ended and the motor stops, wait until the lid latch
releases before opening the lid.
Loosen the locking tabs, then open the clamps and remove the vials.
5.1 MIXING AND GRINDING
Mixing is usually done in a plastic vial with plastic balls. Depending on the nature and amount of
material to be mixed, one or several balls may be used. With a small amount of material and
more than one or two balls, the impact may break the bottom of the plastic vial, so keep the
number of balls to a minimum. Plastic vials and balls can also be used to grind soft metals (e.g.
antimony), carbon, and other easily friable materials.
For samples that cake during mixing, a slurry with water or alcohol may be helpful. Water may
be dried out afterwards by heating plastic vials in a very low oven. If caking is due to static
charges, a small amount of graphite can added to the vial.
Grinding is done in the metallic and ceramic containers: steel, tungsten carbide, alumina,
zirconia, agate, and silicon nitride. Dry grinding is the simplest approach and is most often used.
The criteria for container selection are usually those of grinding efficiency vs: contamination;
steel and tungsten carbide grind more rapidly than ceramics or agate, but contaminate more.
Most 8000-series vials accept 3 to 10 ml of sample for grinding.

8000D Mixer/Mill
Page 9of 21 SPEX CertiPrep 8.21.03
SN and Higher
5. OPERATION
(Continued)
A typical mixing load is up to 25 ml, or about 40% of the vial’s volume.
If a sample is not being ground fine enough, one can decrease the amount of sample, increase
grinding time, use a denser grinding medium, and/or add a grinding aid or a liquid. Wet grinding
keeps the sample from caking and will give a smaller final particle size, but there are handicaps:
an extra drying step is required, the fluid used for wet grinding must be chosen carefully not to
alter the sample or attack the container, and not all the vials are leak-proof. The steel, tungsten
carbide, and plastic vials have screw tops, and are more or less watertight. The alumina vial
(8003) has optional clamps (8014) for slurry grinding. Other 8000-series grinding containers are
not suitable for use with liquids.
Avoid grinding small loads (less than 3 grams) in brittle containers such as alumina and agate. If
there is not enough material to cushion the impact of the balls, they will generate excess
contamination and can in extreme cases chip the container.
Caution: always use grinding balls that match the material of the container, e.g. steel balls for a
steel container, agate balls for an agate container, etc. This will limit contamination. An
inappropriate choice of balls, such as tungsten carbide balls in an alumina container, can damage
the container.
Two balls are standard for most grinding containers, though some users feel that only one ball
should be used in the most brittle containers (alumina and agate). Three balls can hasten grinding
in the strongest containers, the steel ones.
When using grinding containers with threaded aluminum caps (steel and tungsten carbide), be
careful to keep the threads clean. Over time, if care is not exercised to maintain the threads clean,
as sample accumulates in the threads it can jam the caps. Also be careful not to drop these caps
on edge, as if they are knocked out of round they can be very difficult to use.

8000D Mixer/Mill
Page 10 of 21 SPEX CertiPrep 8.21.03
SN and Higher
6. MAINTENANCE
The 8000D Mixer/Mill has been designed to provide trouble-free operation over a long period of
time. To assure proper performance, perhaps an important factor is overall cleanliness. Any spilled
powders or liquids should be wiped up immediately. This should minimize the buildup of any
powders, mold/mildew, or unsightly gunk.
To maintain the exterior of the unit, first disconnect the 8000D Mixer/Mill, then spray it with a mild
window cleaner or similar product, and wipe it down. REMINDER: unplug the Mixer/Mill before
any cleanup or maintenance work.
The threads of the clamp screw should be kept clean. The foam pads in the clamp should be
replaced when damaged, worn, or missing.
If the drive belt becomes loose, tighten it by moving the motor back: loosen the motor mounting
bolts, move the motor, and tighten the bolts. If the drive belt breaks or becomes heavily worn,
replace it. A properly tensioned drive belt can be depressed about ½” midway between the
sprockets.
The flywheel and motor sprockets should be checked from time to time to make sure that they
are tight on their shafts; if either sprocket loosens it must be realigned with the other, and the set
screws tightened.
The sealed ball bearings in the clamp and pillow block assemblies are lubricated for life and
require no maintenance. The shaft bearings of the motor are lubricated for ten years of
intermittent use or one year of heavy use.
The clamp retaining spring assembly includes two open ball-and-socket joints that are lubricated
with heavy-duty automotive-type lithium grease. If these bearings dry out they should be taken
apart and re-greased.
The 8000D Mixer/Mill is intended for intermittent use with running times that are typically 5 to
20 minutes long. Under those conditions it should run for many years without maintenance other
than that described above. Prolonged periods (over 100 min.) of continuous running, as when
the mill is used for mechanical alloying, require extra maintenance
The 8000D Mixer/Mill is warranted against defects of materials and workmanship for a period of
one year from date of shipment. Extreme uses of the mill, such as mechanical alloying, may
modify or void the warranty. Contact us for further information about operating your mill under
unusual circumstances.
Tungsten carbide, ceramic, and agate vials cannot be warranted against breakage.
If you have any questions about the operation and maintenance of your 8000D Mixer/Mill,
please contact our specialists by phone at 1-800 LAB-SPEX (522-7739) or 732-549-7144, or by
e-mail at sampleprep@spexcsp.com

8000D Mixer/Mill
Page 11 of 21 SPEX CertiPrep 8.21.03
SN and Higher
7.0 Accessories: Grinding/Mixing Vials
(If not included in your order, they are available for purchase at additional cost)
8001 Hardened Steel Vial Set
Vial size 2 ¼n. dia. x 3 in. Vial body and cap liner of
hardened tool steel. Set includes screw-on cap with O-ring
to allow wet or dry grinding/ mixing, two ½in. and four ¼
in. steel balls. Grinding load 3–10 ml; mixing load approx.
25 ml.
8003 Alumina Ceramic Vial Set
For dry grinding/mixing. Vial size 2¼in. diameter x 2¾
in. High purity 99.5% alumina ceramic vial body and two
slip-on caps with one ½in. ball; set includes eight
corprene gaskets. Grinding load 2–8 ml; mixing load
approximately 20 ml.
Note: Although the various accessory packages are Shown for your information, your unit will
arrive only with the accessory package that you have ordered.
8015 Clamp for 8003
Clamps permit slurry grinding in 8003 vials; sold in pairs.
One pair required for each 8003.
8004 Tungsten Carbide Vial Set
For wet or dry grinding/mixing. Vial size 2¼in. diameter
x 2½in. Tungsten carbide-lined body, two screw-on
tungsten carbide-lined caps, two 7/16 in. tungsten carbide
balls, eight corprene gaskets. Grinding load 3-10 ml,
mixing load approximately 25 ml.

8000D Mixer/Mill
Page 12 of 21 SPEX CertiPrep 8.21.03
SN and Higher
7.0 Accessories: Grinding/Mixing Vials
(If not included in your Order, they are Available for Purchase at Additional Cost)
8005 Zirconia Ceramic Vial Set
Vial size 2 ½in. diameter x 2-11/16 in. Solid zirconia ceramic
vial, cap, and two 1/2 in. balls; seven corprene gaskets. Grinding
load approximately 2-8ml; mixing load approximately 20 ml.
8007 Stainless Steel Vial Set
Vial size 2 ¼in. diameter x 3 in. Vial body and cap liner
made of hardened 440C stainless steel. Two ½in. and four
¼in. stainless steel balls are included. Set includes screw-on
cap with O-ring to permit wet or dry grinding/mixing.
Grinding load 3–10 ml; mixing load approx. 25 ml.
8008 Silicon Nitride Vial Set
Vial size 2 ½in. diameter x 2-11/16 in. solid silicon nitride
vial, cap, and two ½in. balls; seven corprene gaskets.
Grinding load approximately 2-8ml; mixing load
approximately 20 ml.
8009 Round-Ended Hardened Steel Vial Set
Vial size 2-3/8 in. diameter x 3 in. Hardened steel vial body
has grinding chamber with rounded ends for more efficient
grinding/mixing. Includes screw-on cap and O-ring for wet
or dry use, two ½in. and four ¼in. steel balls. Grinding
load 3-10 ml; mixing load approximately 25 ml.
To Order any of these
accessories, call Customer
Service at 800-522-7739

8000D Mixer/Mill
Page 13 of 21 SPEX CertiPrep 8.21.03
SN and Higher
7.0 Accessories: Grinding/Mixing Vials
(If not included in your Order, they are Available for Purchase at Additional Cost)
8014 Agate Vial Set
For dry grinding and mixing. Vial size 2 ¼xin. diameter x 2
¾in. All-agate vial body, two slip-on caps, two ½ in. agate
balls, and eight corprene gaskets. Grinding load 3-8 ml;
mixing load approximately 20 ml.
8006 Methacrylate Vial Set
2 ¼in. diameter x 2-5/8 in. Vial body of heavy-gauge
methacrylate with methacrylate-lined aluminum screw-on
cap. Set includes corprene gasket, two 8006A (½in.) and
four 3112 (3/8) in. plastic balls. Allows grinding of soft
materials without metallic contamination. Grinding load 3-8
ml; mixing load approximately 20 ml.
3114 Stainless Steel Vial Set
½ in. diameter x 1 in. long. Made of 303 stainless steel;
includes slip-on cap and ¼in. steel ball; grinding load 0.2-
0.6 ml, mixing load 1ml.
3117 Hardened Tool Steel Vial Set
½in. diameter x 1 in. long. Made of Worpliss tool steel.
Includes slip-on cap and ¼in. steel ball. Grinding load 0.2-
0.6 ml, mixing load 1ml.
8010 Multiple Sample Adapter
Can be used in 8000D Mixer/Mill with 3116 vials, or with
3111, 3114, and 3117 vials if 8012 adapter is also used.
8000D Mixer/Mill
Page 14 of 21 SPEX CertiPrep 8.21.03
SN and Higher
7.0 Accessories: Grinding/Mixing Vials
(If not included in your Order, they are Available for Purchase at Additional Cost)
8011 Multiple Sample Adapter
Can be used in 8000D Mixer/Mill with 3118, 5004, and
6133 vials. To use 3127 vials in 8000D, 8012 adapter is also
necessary.
3127 Hardened Tool Steel Vial Set
¾in. diameter x 1-7/8 in. long. Made of Worpliss tool steel;
includes center cylinder with two slip-on caps and ¼in. steel
ball. Grinding load 0.5-1.0 ml, mixing load 2 ml.
3118 Agate Vial Set
Handmade from flawless Brazilian agate; must be run inside
cushioned SPEX CertiPrep 6133 vial (included); includes
stopper and ¼in. agate ball. Grinding load 0.2-0.6ml,
mixing load 1 ml.
5004 Tungsten Carbide-Lined Steel Vial Set
¾in. diameter x 2-1/8 in. long. Includes two slip-on Delrin
caps with tungsten carbide inserts, six disposable
methacrylate center cylinders, and two 5/16 in. tungsten
carbide balls. Grinding load 0.5-1.5 ml; mixing load 3ml.
6135 Plastic Vial
8002 Plastic Vial
6134 Plastic Vial
Vial
To Order any additional accessories, call Customer
Service at 800-522-7739

8000D Mixer/Mill
Page 15 of 21 SPEX CertiPrep 8.21.03
SN and Higher
8.0 PARTS LIST & ITEM LOCATOR
Item
Part No.
Description
Location
(Diagram, Page #)
1
37356
Single Clamp Assembly
A, 17
2
50013
Bearing for Clamp (2 required per clamp)
A, 17
3
33297
Clamp Retaining Spring Assembly
A, 17
4
37347
Motor Pulley
A, 17
5
10023
Motor, 1/3 HP, 115/230 volt
A, 17
6
50140
V-Belt
A, 17
7
60226
Bushing for Movable Clamp Face
A, 17
8
37362
Lock Nut
A, 17
9
37501
Clamp Screw
A, 17
10
37360
Tie Bar
A, 17
11
60152
C-Clip for Screw
A, 17
12
37363
Movable Clamp Face
A, 17
13
37361
Rod
A, 17
14
22606
Fixed Clamp Face
A, 17
15
53069
Rubber Pad for Clamp Face
A, 17
16
22604
Clamp Body
A, 17
17
37344
Eccentric
A, 17
18
50014
Bearing for Pillow Block
A, 17
19
50525
Retaining Ring for Bearing
A, 17
20
37348
Shaft
A, 17
21
37345
Flywheel
A, 17
22
37346
Pillow Block
A, 17
23
37350
Shaft Pulley
A, 17
24
92941
Relay (115V)
B, 18
25
92942
Relay (230V)
B, 18
26
96092
Fan
B, 18
27
96004
AC Input
B, 18

8000D Mixer/Mill
Page 16 of 21 SPEX CertiPrep 8.21.03
SN and Higher
8.0 PARTS LIST & ITEM LOCATOR
(Continued)
Item
Part No.
Description
Location
(Diagram, Page #)
28
96005
Fuse Holder
B, 18
29
93850
Fuse, 8 amp (for 115 Volt)
B, 18
30
93840
Fuse, 5 amp (for 230 Volt)
B, 18
31
92703
Rocker Switch
B, 18
32
92912
Hinge Switch
B, 18
33
51208
Handle
B, 18
34
38567
Gas Spring
B, 18
35
92701
Roller Switch
B, 18
36
92965
Solenoid (115V)
B, 18
37
92968
Solenoid (230V)
B, 18
38
37483-D
Display Board
B, 18
39
37483-P
Power Board
B, 18
40
22640
Ball Seat
C, 19
41
60156
Retaining Ring For Ball Seat
C, 19
42
21519
Spring For 33297
C, 19
43
33297R
Pivot Assemblies (1 Pair)
C, 19
50152
Vibration Mount
37349
Rear Spring Bracket
93719
Rubber Feet for Cabinet (4 required)
8000D Mixer/Mill
Page 17 of 21 SPEX CertiPrep 8.21.03
SN and Higher
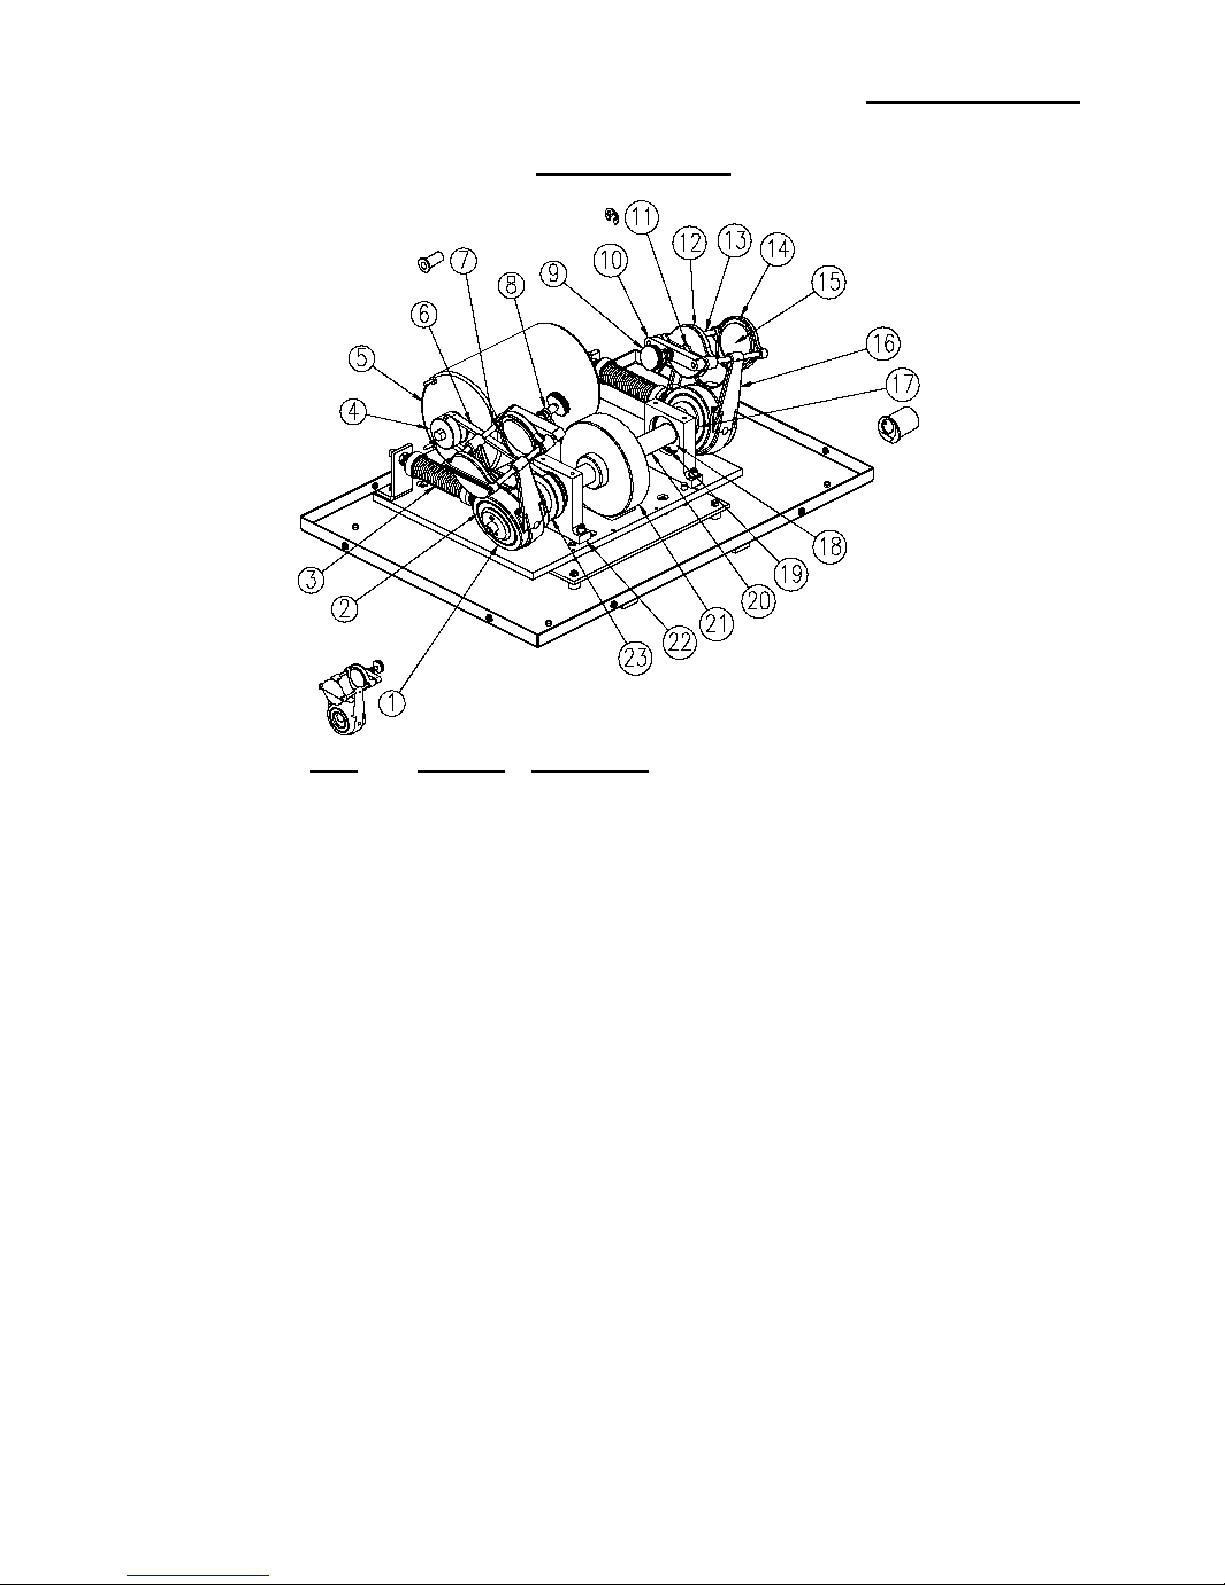
9.0 DIAGRAM “A”
Item
Part No.
Description
1
37356
Single Clamp Assembly
2
50013
Bearing for Clamp (2 required per clamp)
3
33297
Clamp Retaining Spring Assembly
4
37347
Motor Pulley
5
10023
Motor, 1/3 HP, 115/230 volt
6
50140
V-Belt
7
60226
Bushing for Movable Clamp Face
8
37362
Lock Nut
9
37501
Clamp Screw
10
37360
Tie Bar
11
60152
C-Clip for Screw
12
37363
Movable Clamp Face
13
37361
Rod
14
22606
Fixed Clamp Face
15
53069
Rubber Pad for Clamp Face
16
22604
Clamp Body
17
37344
Eccentric
18
50014
Bearing for Pillow Block
19
50525
Retaining Ring for Bearing
20
37348
Shaft
21
37345
Flywheel
22
37346
Pillow Block
23
37350
Shaft Pulley
8000D Mixer/Mill
Page 18 of 21 SPEX CertiPrep 8.21.03
SN and Higher
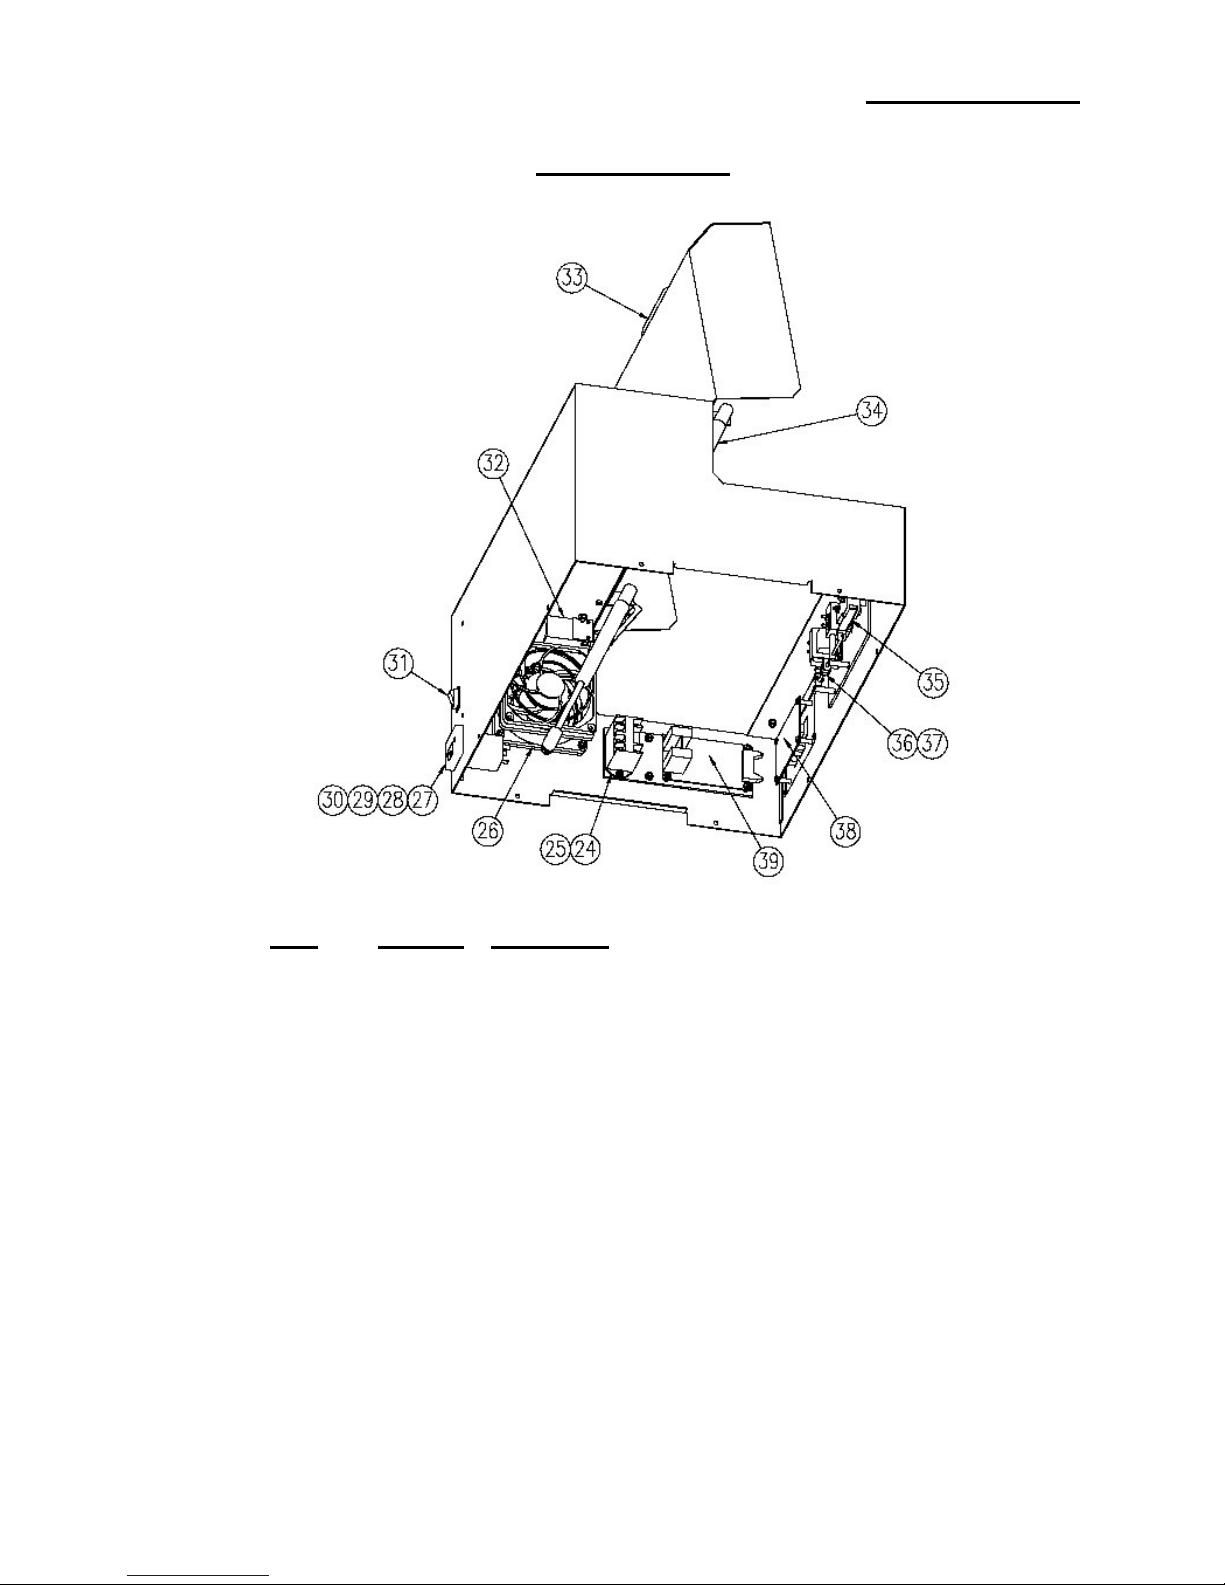
9.1 DIAGRAM “B”
Item
Part No.
Description
24
92941
Relay (115V)
25
92942
Relay (230V)
26
96092
Fan
27
96004
AC Input
28
96005
Fuse Holder
29
93850
Fuse, 8 amp (for 115 Volt)
30
93840
Fuse, 5 amp (for 230 Volt)
31
92703
Rocker Switch
32
92912
Hinge Switch
33
51208
Handle
34
38567
Gas Spring
35
92701
Roller Switch
36
92965
Solenoid (115V)
37
92968
Solenoid (230V)
38
37483-D
Display Board
39
37483-P
Power Board
8000D Mixer/Mill
Page 19 of 21 SPEX CertiPrep 8.21.03
SN and Higher
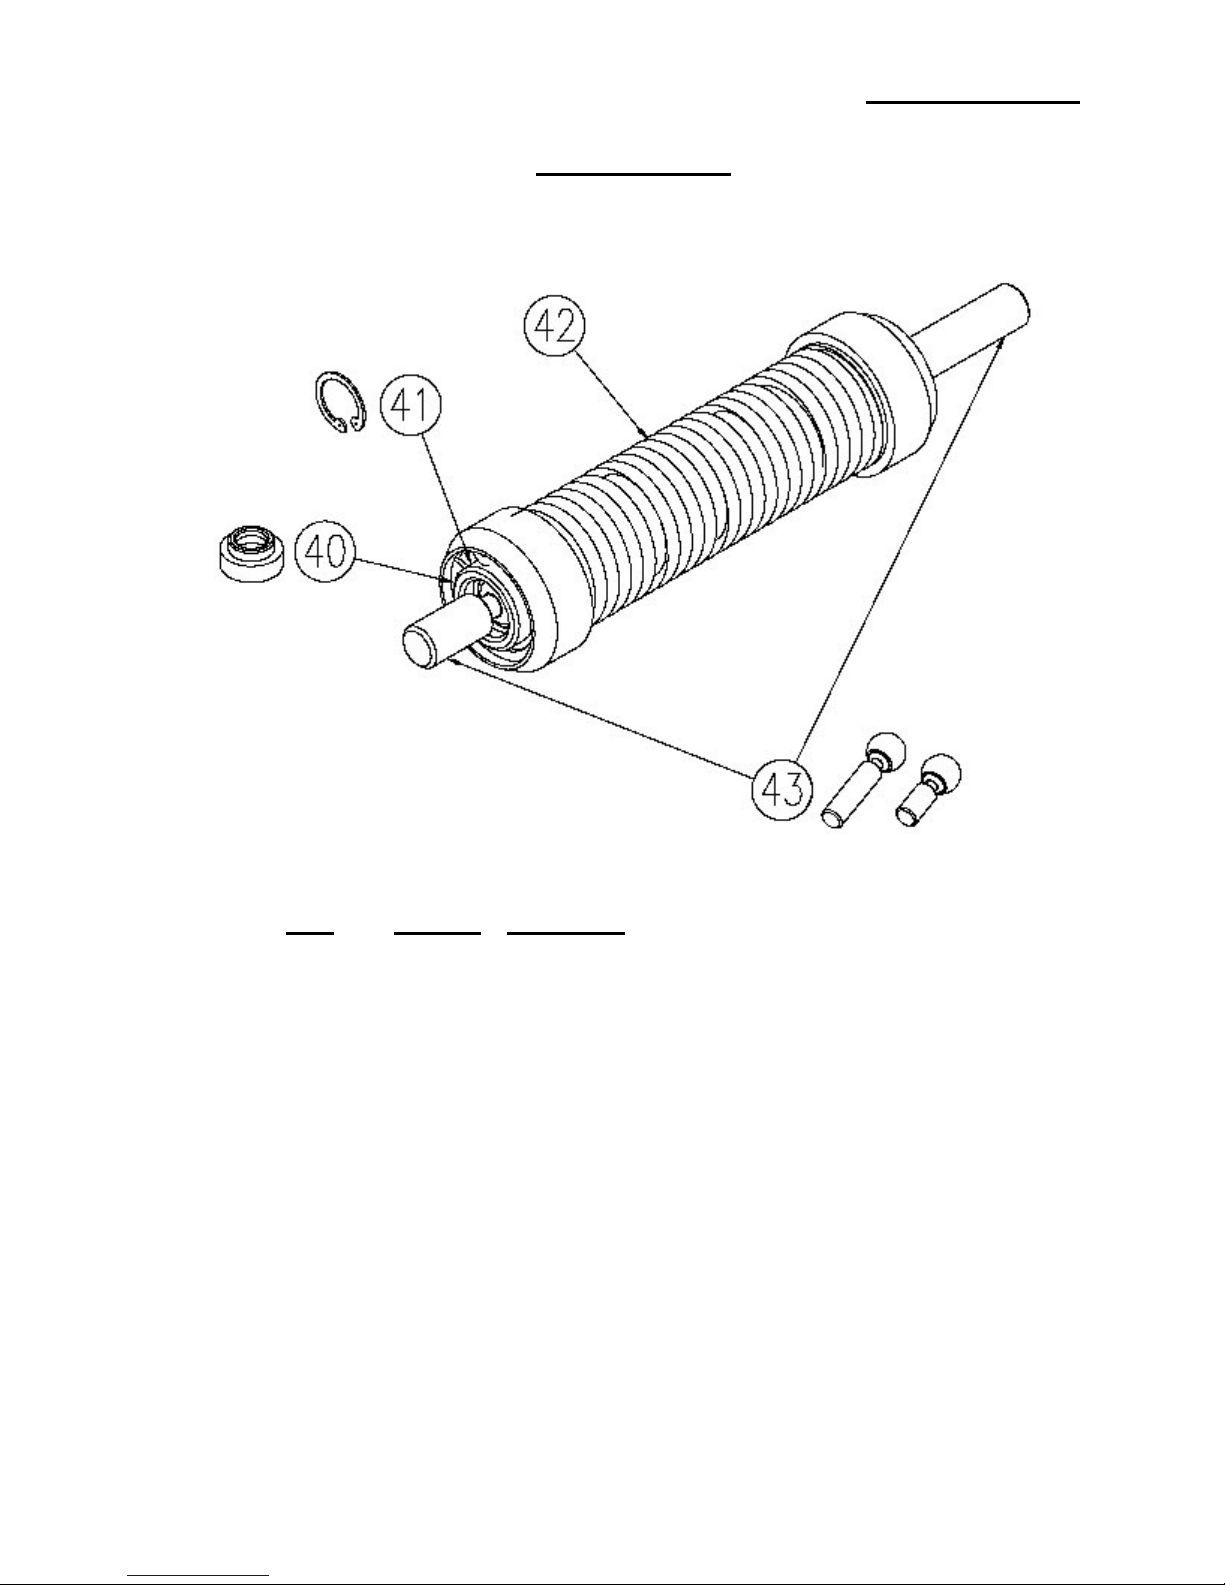
9.2 DIAGRAM “C”
Item
Part No.
Description
40
22640
Ball Seat
41
60156
Retaining Ring For Ball Seat
42
21519
Spring For 33297
43
33297R
Pivot Assemblies (1 Pair)

8000D Mixer/Mill
Page 20 of 21 SPEX CertiPrep 8.21.03
SN and Higher
10.0 TROUBLESHOOTING GUIDE
PROBLEM
CAUSE
SOLUTION
1
The unit does not turn on
No AC power
Make sure power cord is
plugged into outlet and check
outlet for power and correct as
required
2
The unit does not turn on
Blown fuse
Replace fuses
3
The unit does not turn on
Power switch not
turned on
Depress power switch
4
Unit does not run
Lid is open
Close the lid and be sure that
the latch is locked
5
Unit does not run, lid is
closed and timer counts down
Safety interlock switch
Adjust safety interlock switch
6
Unit does not run
Disconnected harness
Re-connect wiring harness to
motor
7
The lid does not open
Unit may be paused
Depress start/stop button
8
The lid does not open
Safety catch has not
released
Depress start/stop button or
turn off unit to open
9
Grinding ball doesn’t shuttle
back and forth
Too much sample is in
the vial or sample
pieces are too large
Remove some sample from the
vial and start again
10
Excessive Vibration
Shipping bolts still in
place
Remove shipping bolts
Table of contents
Popular Power Tools manuals by other brands


jbc
jbc advanced Series manual

Greenlee
Greenlee GATOR CLS60GL instruction manual

CHP
CHP AT-6500 instruction manual

PCB Piezotronics
PCB Piezotronics J353B34 Installation and operating manual

Porta-Nails
Porta-Nails PORTAMATIC 470 owner's manual

Parkside
Parkside 353260 2007 Translation of the original instructions


