Sphere 8 Series User manual

Series 8
18.5"/21.5"/23.8"
18.5"
18.5"
18.5"
18.5"
TV Wall mounting Screws BM4*8mm 4pcs
BB4*14mm 4pcs
8
8
8
8
HAKO Android TV box (included in Smart TV Optioned models only)
HAKO Android TV box also available separately.
manual
LED TV
LED TV
LED TV
LED TV
The Manual Applies to below models:
S8LED185, S8LED185S.
S8LED215, S8LED215S.
S8LED238, S8LED238S.
Note: The Smart TV OPTION models (S8LED185S, S8LED215S and
S8LED238S) include the HAKO Android TV box inside. Bluetooth functions
and Smart TV functions are available for these Smart Optioned models only.
The Smart TV box are available separately if you wish to option up your
Non-Smart TV at a later date.

LED TV
LED TV
20
2
3
4
5
7
11
12
14
15
17
18
19
21
21
22
23
24
24
25
34
26
27
28
29-33
34
36
38
39
39-42
Channel Menu
Picture Menu
Sound Menu
Time Menu
Option Menu
Lock Menu
PVR
EPG
Photo Menu
Music Menu
Movie Menu
Text Menu
SMART TV SMART TV(HAKO androidtv box connect)
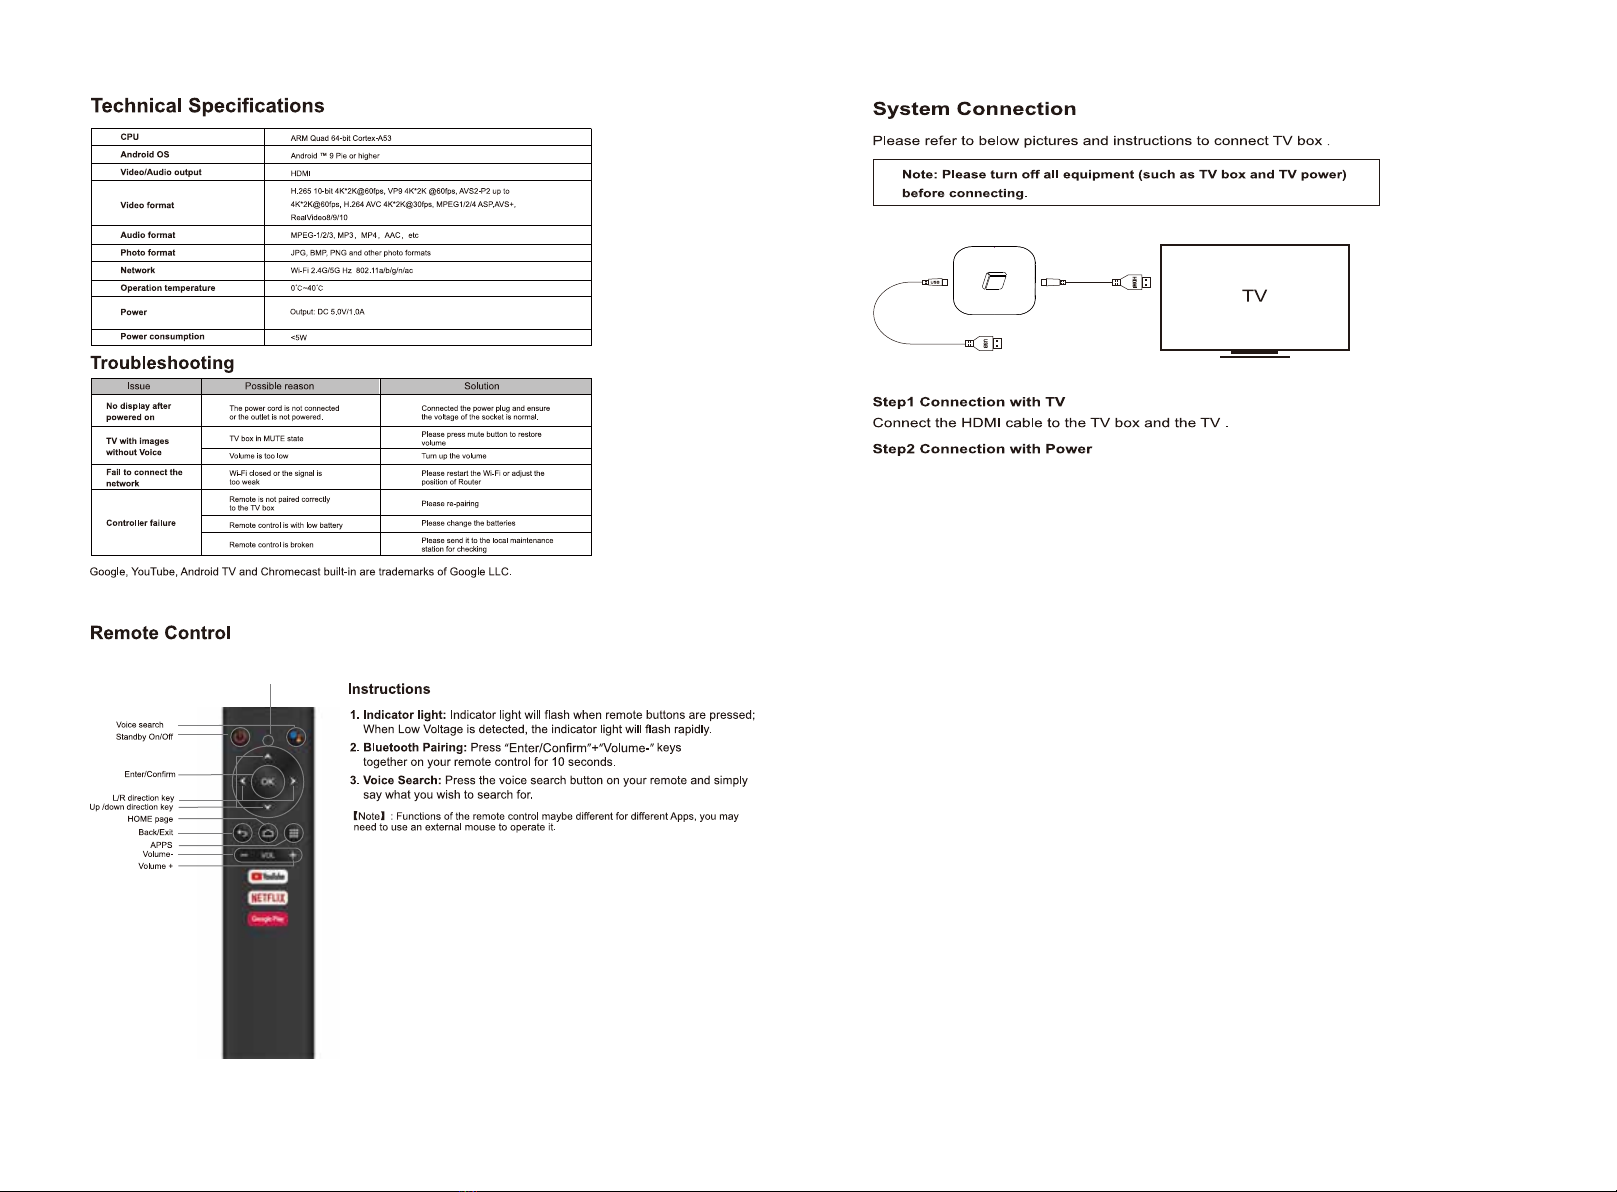
Technical Specifications
Remote Control
System Connection
Google Account Setup
APPLE/IOS Setup
Android Setup
Screen Shot Guide
Home Menu
Setting Menu
DVD
7URXEOHVKRRWLQJ
,PSRUWDQW6DIHW\,QVWUXFWLRQV
:DUUDQW\,QIRUPDWLRQ

ANT IN
DTV
ANT IN Coaxial Earphone Mini YPbPr
Mini AV
PC AUDIOCISAT
CVBS
LINE OUT
ARC IN
OUT
There are two selections: ONand OFF,when you choose ON,you can operate a compatible HDMI-CEC
controlled device.
There are two selections: ON or OFF, it is avaliable when the Speaker Preference is set to Amplifier. When
selected to ON, sound from will be heard, when selecting OFF, no sound from the Amplifier will be heard.
This TV is fitted with the worldwide standard IC solution for ARC compatibility. There may be some slight
compatibility issues in head units with non-standard IC solutions installed. You may need to switch the
Head Unit off/on again in order for ARC to reconnect in some cases.
C
Digital Audio output for surround sound/sound bars etc.
Coaxial:
Digital Audio output for surround sound/sound bars etc.
Earphone:
Component Video in.
Mini YPbPr:
Connect the PC audio output of the PC to the Audio input
jack on the TV.
PC audio:
Common Interface Input
CI:
Insert the USB flash drive into the USB slot on the TV.
This slot can also be used to supply power for HAKO
Android TV box.
USB:
Composite Video & Audio in.
Mini AV:
Power:
Connect the AC power pack or 3M 12V RV lead to
the 12VDCIN connection on the TV.
CVBS OUT:
This mirrors the Video Signal from Input 12 (A/V) ONLY.
The output is Video only.
LINE OUT:
Audio output for external devices such as Head Units, amplifiers etc.
HDMI:
Connect the HDMI output of the accessory device to the HDMI
input on the TV. Select the HDMI input source using the
INPUT button on the remote.
VGA:
Connect the RGB output of the PC to the VGA input on the TV.
ANT IN:
Connect the antenna to the RF IN connection. Please refer to the
QRWHV below.
EC:
AmpliĮer Support ARC:
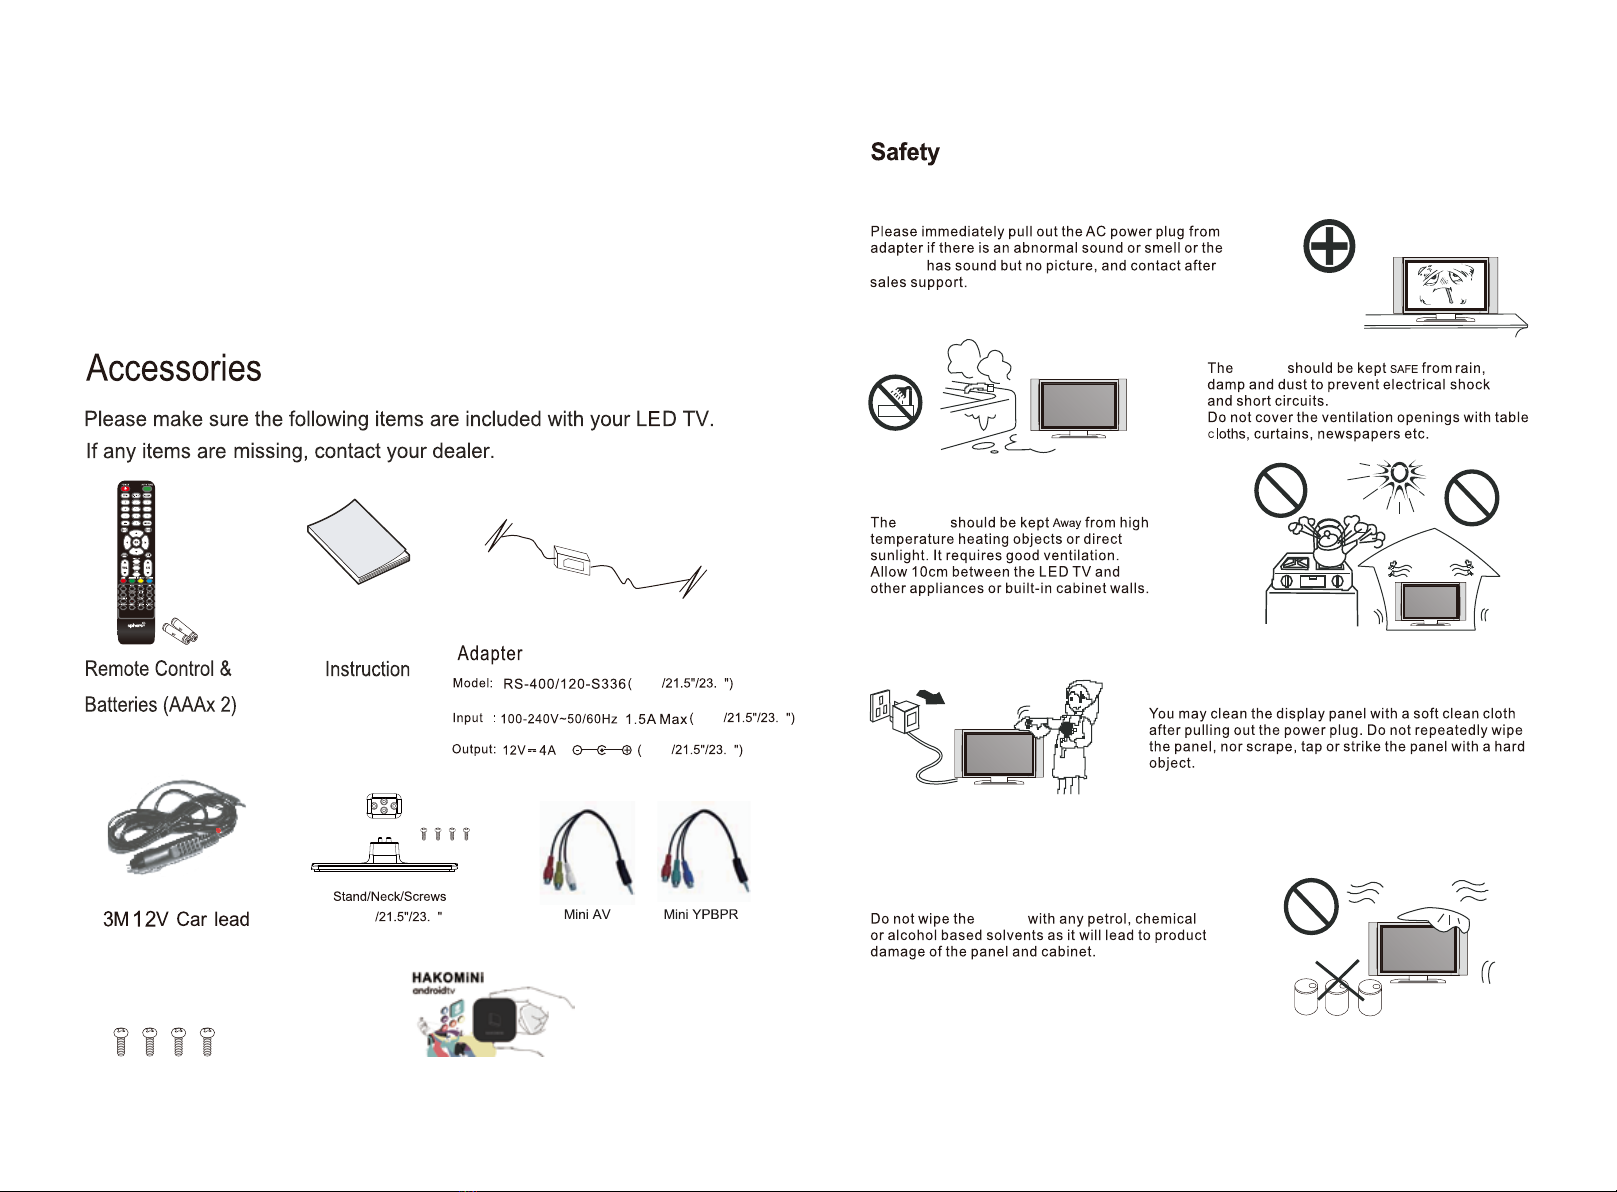
Thank you very much for your purchase of this product. Please read this manual carefully and keep it safe for reference.
Please use the power cord designated for the product. When an extension cord is required, use one with the correct
power rating. The cord must be grounded. The product should be installed on a flat surface to avoid tipping. Space
should be maintained between the back of the product and the wall for proper ventilation.If you would like to mount
the TV to the wall, please see “Preparing the LED for Wall Mounting”below for additional information. Avoid installing
the product in the kitchen, bathroom or other places with high humidity.
The HDTV can either be kept on the stand or mounted to the wall for viewing. If you choose to
mount the HDTV to the wall, please follow the instructions below.
Unplug all the cables and cords from your LED TV.
Place the LED TV face down on a soft and flat surface(blanket,foam,cloth,etc) to prevent any
damage to the display.
Remove the stand screws allowing the stand to be removed.
The mounting bracket is made up of two parts-the wall bracket and the TV bracket. Attach the TV bracket to the TV via
the included screws.*ncluded with your wall mount kit(Please check the instruction manual of the wall mount for further
information)Attach the wall bracket to the wall with appropriate screws. Ensure the wall issuitable to hold the weight of
the TV. (Please check the instruction manual of the wall mount for further information)
Slide the TV bracket into the wall bracket
Ensure the wall mount is secured and locked in travel position when the RV is in transit
RESET:
Like any product controlled by microprocessors this TV may hang or becomeunresponsive.*n the unlikely
event this occurs simple disconnect the power and reconnect after 10 seconds.
REMOTE:
To prevent leakage which may result in bodily harm or damage to the remote:
1. Install AAA batteries correctly, and make sure polarities are correctly aligned with the battery
compartment markings.
2. Do not mix batteries (OLD and NEW or CARBON and ALKALINE,etc)
3. Remove batteries when the remote is not used for a long time.
DLJŵƵƐŝĐŵŽǀŝĞŽƌŝŵĂŐĞĮůĞƐĚŽŶŽƚĚŝƐƉůĂLJ
Due to the large variation of file sizes, compression formats and codec available,playback of all files
cannot be guaranteed.
/ĐĂŶŶŽƚƌĞĐŽƌĚŽŶƚŽŵLJh^ŇĂƐŚĚƌŝǀĞ
FAT 32 formatted flash drive is required.
dŝŵĞ^ŚŝŌĨƵŶĐƟŽŶĂůŝƚLJĚŽĞƐŶŽƚǁŽƌŬ
FAT 32 formatted flash drive is required
tĂƌŶŝŶŐŽŶŽƚŬĞĞƉŝŵĂŐĞƐŽŶƚŚĞƐĐƌĞĞŶĨŽƌĂůŽŶŐƟŵĞ
To prevent the screen from burn in, do not leave static images including menu screens displayed for a period of time.
Burn in is not covered under warranty provision.
ATTENTION:
Do not try to update the TV unless directed by a service technician. Product misconfigured by an
incorrect update is not covered under warranty.

POWER: Switch between Standby and On.
AUTO TUNE: AUTO TUNE “DTV” ONE TOUCH TUNE.
W'WƌĞƐƐƚŽĚŝƐƉůĂLJW'ŝŶĨŽƌŵĂƟŽŶ;ůĞĐƚƌŽŶŝĐWƌŽŐƌĂŵ'ƵŝĚĞͿ;dsŽŶůLJͿ
^d/d>WƌĞƐƐƚŽĚŝƐƉůĂLJƐƵďƟƚůĞƐŽŶƚŚĞƐĐƌĞĞŶŽƌƚƵƌŶŽīƚŚĞƐƵďƟƚůĞƐ
^>W^ĞƚƚŚĞdsƚŽƚƵƌŶŽīĂŌĞƌĂƐƉĞĐŝĮĞĚƟŵĞ
EhDZhddKE^WƌĞƐƐϬͲϵƚŽƐĞůĞĐƚĂdsĐŚĂŶŶĞůĚŝƌĞĐƚůLJǁŚĞŶǁĂƚĐŚŝŶŐds
dŚĞĐŚĂŶŶĞůĐŚĂŶŐĞƐĂŌĞƌϮƐĞĐŽŶĚƐŽƌƉƌĞƐƐĞŶƚĞƌƚŽĐŚĂŶŐĞŝŵŵĞĚŝĂƚĞůLJ
ͺͺͺ^ǁĂƉďĞƚǁĞĞŶƐŝŶŐůĞĚŽƵďůĞƚƌŝƉůĞĂŶĚƋƵĂĚƌƵƉůĞĚŝŐŝƚŝŶƉƵƚ
Z>>ZĞƚƵƌŶƚŽƉƌĞǀŝŽƵƐůLJǀŝĞǁĞĚƉƌŽŐƌĂŵ
DhdWƌĞƐƐƚŽŵƵƚĞƚŚĞĂƵĚŝŽWƌĞƐƐĂŐĂŝŶŽƌƉƌĞƐƐsK>нƚŽƌĞƐƵŵĞ
^KhZ^ĞůĞĐƚƚŚĞdsŝŶƉƵƚƐŽƵƌĐĞ
K<ůůŽǁƐLJŽƵƚŽŶĂǀŝŐĂƚĞƚŚĞŽŶͲƐĐƌĞĞŶŵĞŶƵƐĂŶĚĂĚũƵƐƚƚŚĞ
ƐLJƐƚĞŵƐĞƫŶŐƐƚŽLJŽƵƌƉƌĞĨĞƌĞŶĐĞ
DEhĐĐĞƐƐƚŚĞŽŶͲƐĐƌĞĞŶŵĞŶƵ
y/ddžŝƚƚŚĞŵĞŶƵŽƌƐƵďͲŵĞŶƵ
sK>нͲWƌĞƐƐƚŽŝŶĐƌĞĂƐĞŽƌĚĞĐƌĞĂƐĞǀŽůƵŵĞ
/^W>zWƌĞƐƐƚŽĚŝƐƉůĂLJƚŚĞĐƵƌƌĞŶƚƐŽƵƌĐĞĂŶĚĐŚĂŶŶĞůŝŶĨŽƌŵĂƟŽŶ
&ZWƌĞƐƐƚŽĨƌĞĞnjĞĐƵƌƌĞŶƚƉŝĐƚƵƌĞ
,нͲWƌĞƐƐƚŽĐŚĂŶŐĞĐŚĂŶŶĞů
h^WƌĞƐƐƚŽĞŶƚĞƌŵĞĚŝĂƐŽƵƌĐĞ
E'>WƌĞƐƐƚŽĐŚŽŽƐĞĂĚŝīĞƌĞŶƚĂŶŐůĞ;sͿ
>E'h'WƌĞƐƐƚŽĐŚŽŽƐĞĂĚŝīĞƌĞŶƚůĂŶŐƵĂŐĞ;sͿ
s^dhWWƌĞƐƐƚŽĚŝƐƉůĂLJƚŚĞsƐĞƚƵƉŵĞŶƵ
sDEhWƌĞƐƐƚŽƌĞƚƵƌŶďĂĐŬƚŽƉƌĞǀŝŽƵƐsŵĞŶƵ
ZĞĨĞƌƚŽƚŚĞƐĐƌĞĞŶƚŽƐĞĞŝƚƐĨƵŶĐƟŽŶ
dydWƌĞƐƐƚŽƚƵƌŶƚŚĞdĞůĞƚĞdžƚŽŶŽƌŽī
/EyWƌĞƐƐƚŽƌĞƚƵƌŶƚŽƚŚĞŝŶĚĞdžŝŶŝƟĂůƉĂŐĞ
Zs>ZĞǀĞĂůŽƌŚŝĚĞƚŚĞŚŝĚĚĞŶǁŽƌĚƐ
^/ŚĂŶŐĞƚŚĞƐŝnjĞŽĨĚŝƐƉůĂLJŝŶƚĞůĞƚĞdžƚŵŽĚĞ
,K>WƌĞƐƐƚŽŚŽůĚŽŶŽīƚŚĞĐƵƌƌĞŶƚƉĂŐĞĚŝƐƉůĂLJŝŶdĞůĞƚĞdžƚŵŽĚĞ
^W'ŝƐƉůĂLJĂƐƵƉͲƉĂŐĞŽĨƵƉƉĞƌdĞůĞƚĞdžƚŽƉƟŽŶƐ
d^,/&dWƌĞƐƐƚŽƐǁŝƚĐŚƚŽƟŵĞƐŚŝŌŵŽĚĞ
WůĂLJĨĂƐƚďĂĐŬǁĂƌĚĨŽƌǁĂƌĚ
WůĂLJƉƌĞǀŝŽƵƐŶĞdžƚŵĞĚŝĂĮůĞ
WůĂLJƉĂƵƐĞ
^ƚŽƉƉůĂLJŝŶŐ
ũĞĐƚƚŚĞsƐŽƵƌĐĞ
hdKƵƚŽŵĂƟĐĂůůLJĂĚũƵƐƚƐƚŚĞƉŝĐƚƵƌĞŝŶWŵŽĚĞ
sd/d>WƌĞƐƐƚŽĚŝƐƉůĂLJsƟƚůĞŝŶĨŽƌŵĂƟŽŶ
dsZ/KWƌĞƐƐƚŽƐǁŝƚĐŚďĞƚǁĞĞŶdsĂŶĚƌĂĚŝŽƉƌŽŐƌĂŵƐ
ZWƌĞƐƐƚŽƌĞĐŽƌĚƚŚĞƉƌŽŐƌĂŵŝŵŵĞĚŝĂƚĞůLJ
REPEAT: Press to select the repeat mode in USB / DVD mode.
R.LIST: Press to display the recorded list.
ͲZĞƉĞĂƚƚŚĞƐĞŐŵĞŶƚďĞƚǁĞĞŶĂŶĚ
&sWƌĞƐƐƚŽĚŝƐƉůĂLJĨĂǀŽƌŝƚĞƉƌŽŐƌĂŵƐ
E/DϮh/KLJĐůĞƐƚŚƌŽƵŐŚ>Z>>ZZƐŽƵŶĚŵŽĚĞƐŝŶdsdsh^
mode.
ASPECT: Select the screen aspect.
WDK^ĞůĞĐƚƚŚĞƉŝĐƚƵƌĞŵŽĚĞ
^DK^ĞůĞĐƚƚŚĞĂƵĚŝŽŵŽĚĞ
VOL-INPUT
INPUT
MENU
MENU
CH+
POWER
VOL+ VOL-
CH-
CH+ CH- VOL+

06 07
Press source on the remote, then use the arrow / keys to select your desired source.
Press OK on the remote to select the source.
(The Satellite source only applies NZ TV models)
Once you select a sub-menu, use the / buttons to select an option in the sub-menu.
You can press MENU button to save and return back to the previous menu, and press EXIT button to
exit the entire menu.
MAIN MENU
Channel Menu
(When DTV is selected as the source)
- Channel
- Picture
- Sound
- Time
- Option
- Lock
Auto Tuning
Press the /buttons to select Auto Tuning. After pressing the
OK
button, the auto tuning
interface will be displayed. Auto Tuning can also be activated by pressing the AUTO TUNE
button on the remote control while in DTV mode.
NOTE: You will need to press
OK
on the remote to confirm the country and language selection
first before starting the Auto tune process.
Media

Channel Menu
(When Satellite is selected as the source)
Note: the use of DVB-S has limited functions or use depending on the country this is used in.
For your convenience, this sphere TV is pre-tuned with Free to Air New Zealand Satellite TV
Channels as transmitted on the Optus D1 Satellite.
If you reset the TV or accidentally delete a Satellite Channel, you can easily re-load them by
selecting the scan mode to Preset.
Satellite: Select an available Satellite.
Channel Type: Select a Channel type.
Service Type: Select a service type.
Scan Mode: Select a Scan mode including Blind Scan, Preset and Auto Scan.
Unicable: Select Off.
Search: Select Search and press OK on the remote control to start auto tuning.
Auto Tuning
Press the /buttons to select Auto Tuning. After pressing the
OK
button, the auto tuning
interface will be displayed. Auto Tuning can also be activated by pressing theAUTO TUNEbutton
on the remote control
Use the coloured buttons on the remote to edit the channels.
First press the / buttons on the remote to highlight the channel you want to select, then:
Press the button to delete the channel from the program list.Red
Press the selected channel (this channelBlue button to skip the will be skipped when using channel
up/down on the remote.)
Press the Fav button on the remote to add or remove the channel from your favourite list.
Signal Information
This displays the current signal information of the TV Signal. This option can be useful to help
you position your RV’s antenna.
5V antenna power
3UHVVŻŹEXWWRQVWRWXUQ9DQWHQQDSRZHURQRII, the default setting is off. This option can provide
a 5V output voltage to other antenna appliance when you turn on it.
LCN (Logical Channel Number)
This setting makes sure that the Channels tuned in to the TV represent the actual channel
number. For example, the main Channel 7 feed will be tuned in as Channel number 7 on the
TV, rather than the order the Channel is Tuned in. It is recommended that this setting is always
set to “ON”.
Software Update (USB)
Software updates may become available for this TV form time to time. TRupdate the Software, copy
WKHXSGDWHG6RIWZDUHILOHRQWRDQHPSW\86%GULYHDQGLQVHUWLQWRWKH793UHVVWKHźŸEXWWRQVand
OK to start the update process. The power LED on the TV will begin to flash slowly. When it starts
flashing fast, disconnect the power from the TV, remove the USB drive, reconnect power and turn the
TV back on.
08 09

Picture Menu
DVB-S Manual Tuning
3UHVVWKHźŸEXWWRQVWRVHOHFW'9%60DQXDO7XQLQJ$IWHUSUHVVLQJWKHOK button, the tuning
interface will be displayed.
ATV Manual Tuning
3UHVVWKHźŸEXWWRQVWRVHOHFW$790DQXDO7XQLQJ$IWHUSUHVVLQJWKHOK button, the tuning
interface will be displayed.
Program Edit
3UHVVWKHźŸEXWWRQVWRVHOHFW3URJUDP(GLW3UHVVWKHOK button to enter.
Satellite Edit
3UHVVWKHźŸEXWWRQVWRVHOHFW6DWHOOLWH(GLW3UHVVWKHOK button to enter.
Satellite parameters can be entered such as the name, orbit position, LNB type etc.
Multiple Satellite Transponders can be added in the Transponder sub-menu as per
below:
Programme Edit allows you to Delete, Rename, Move (change the channel order) or Ignore certain
channels when selecting channels using the up/down arrows on the remote control. This is useful if
you have just performed an Auto or Blind scan for instance.
Use the colour keys as displayed to perform the following operations:
Red: Delete selected Channel.
Yellow: Use the up & down arrows to select the channel to move. Press OK on the remote to
select, then the arrows to move. Press OK to save the channel in the new position.
Skip: Select a channel the press to skip.
10 11
Picture Mode
PresVź/ŸEuttons to select Picture mode, and go into next interface by pressing the
button. Then you can change picture mode to standard/mild/dynamic/personal
using thHź/ŸEuttons.
Contrast, Brightness, Colour, Tint, Sharpness
Note that you can only adjust the Contrast, Brightness, Colour,
Tint & Sharpness settings when the User Picture Mode is selected. Press the ź/Ÿ
buttons to select the picture adjustment you would like to make then press the / buttons
to adjust the desired setting.
Colour Temp
PresVź/ŸWo select the Colour Temp menu item, and then the button to take you to next
menu where you can change Colour Temperature. Modes available are standard, warm,
cool and personal. You can alter colour temperature with thHź/ŸEuttons.
Aspect Ratio
Press the ź/Ÿbuttons to select the Aspect Ratio you would like to make then press the /
buttons to select the Aspect Ratio from: Auto (Default), 4:3, 16:9, Zoom1, Zoom2.
Noise Reduction
Noise reduction helps filter out and reduce image noise which can improve the picture quality
from poor video sources.
PresVź/ŸWo select the Noise Reduction menu option, and then the button to take you to
next menu. Then press the buttons to select off/low/middle/high.

Sound Menu
Sound Mode
Press thHź/ŸEuttons to select Sound Mode. Then press the button to select from a list
of sound modes. The sound mode can be switched between standard/music/movie/sports/
user using thHŻŹEuttons.
Custom Equaliser
These settings allow you to tailor the TV’s audio output to your preferred settings.
The frequencies adjust the following ranges: 120Hz - Bass, 500Hz - Midbass, 1.5KHz -
Midrange, 5KHz - Upper Midrange, 10KHz - Treble
These settings can only adjusted when the Sound Mode selection (above) is set to User.
Once this is set, Press thHź/ŸEuttons to select the setting you would like to adjust:
Then use buttons to increase or decrease the setting.ŻŹ
Balance
Press
/to select Balance and then press button to go into the Sub menu.
With theŻŹEuttons, the balance (between left & right speakers) can be adjusted.
Auto Volume (AVL)
This function when turned on will help even out the volume level between different A/V
sources so one is not greatly louder than another. It can also help reduce the volume of loud
TV ads compared to TV shows. The result depends greatly on the A/V source so this function
is set default to off. To turn AVL on, presVź/ŸEuttons to select Auto Volume and then press
buttons to turn AVL on/off.Ż Ź
Surround Sound
This mode is ideal for movies and simulates multi-speaker surround sound output.
Sound Menu cont’d
AD Switch
SPDIF Mode
AD Volume
This turns on the Audio Description function where available.
This function when turned on will help even out the volume level between different A/V sources so one is one
greatly louder than another. It can also help reduce the volume of loud TV ads compared to TV shows. The
UHVXOWGHSHQGVJUHDWO\RQWKH$9VRXUFHVRWKLVIXQFWLRQLVVHWGHIDXOWWRRII7RWXUQ$'9ROXPHRQXVHźŸ
EXWWRQVWRVHOHFW$'6ZLWFKDQGWKHQSUHVVŻŹWRWXUQ$'9ROXPHRQRII3UHVV0(18WRUHWXUQWRSUHYLRXV
VFUHHQVFUROOGRZQWR³$'9ROXPH´XVLQJźŸEXWWRQVDQGDGMXVWYROXPHXVLQJŻŹEXWWRQV
This setting selects the output mode for the coaxial digital lead. The default this should be
suitable for most amplifier connections. NOTE a coaxial digital connection is not required
with HDMI connections.
12 13
Time Menu Option Menu
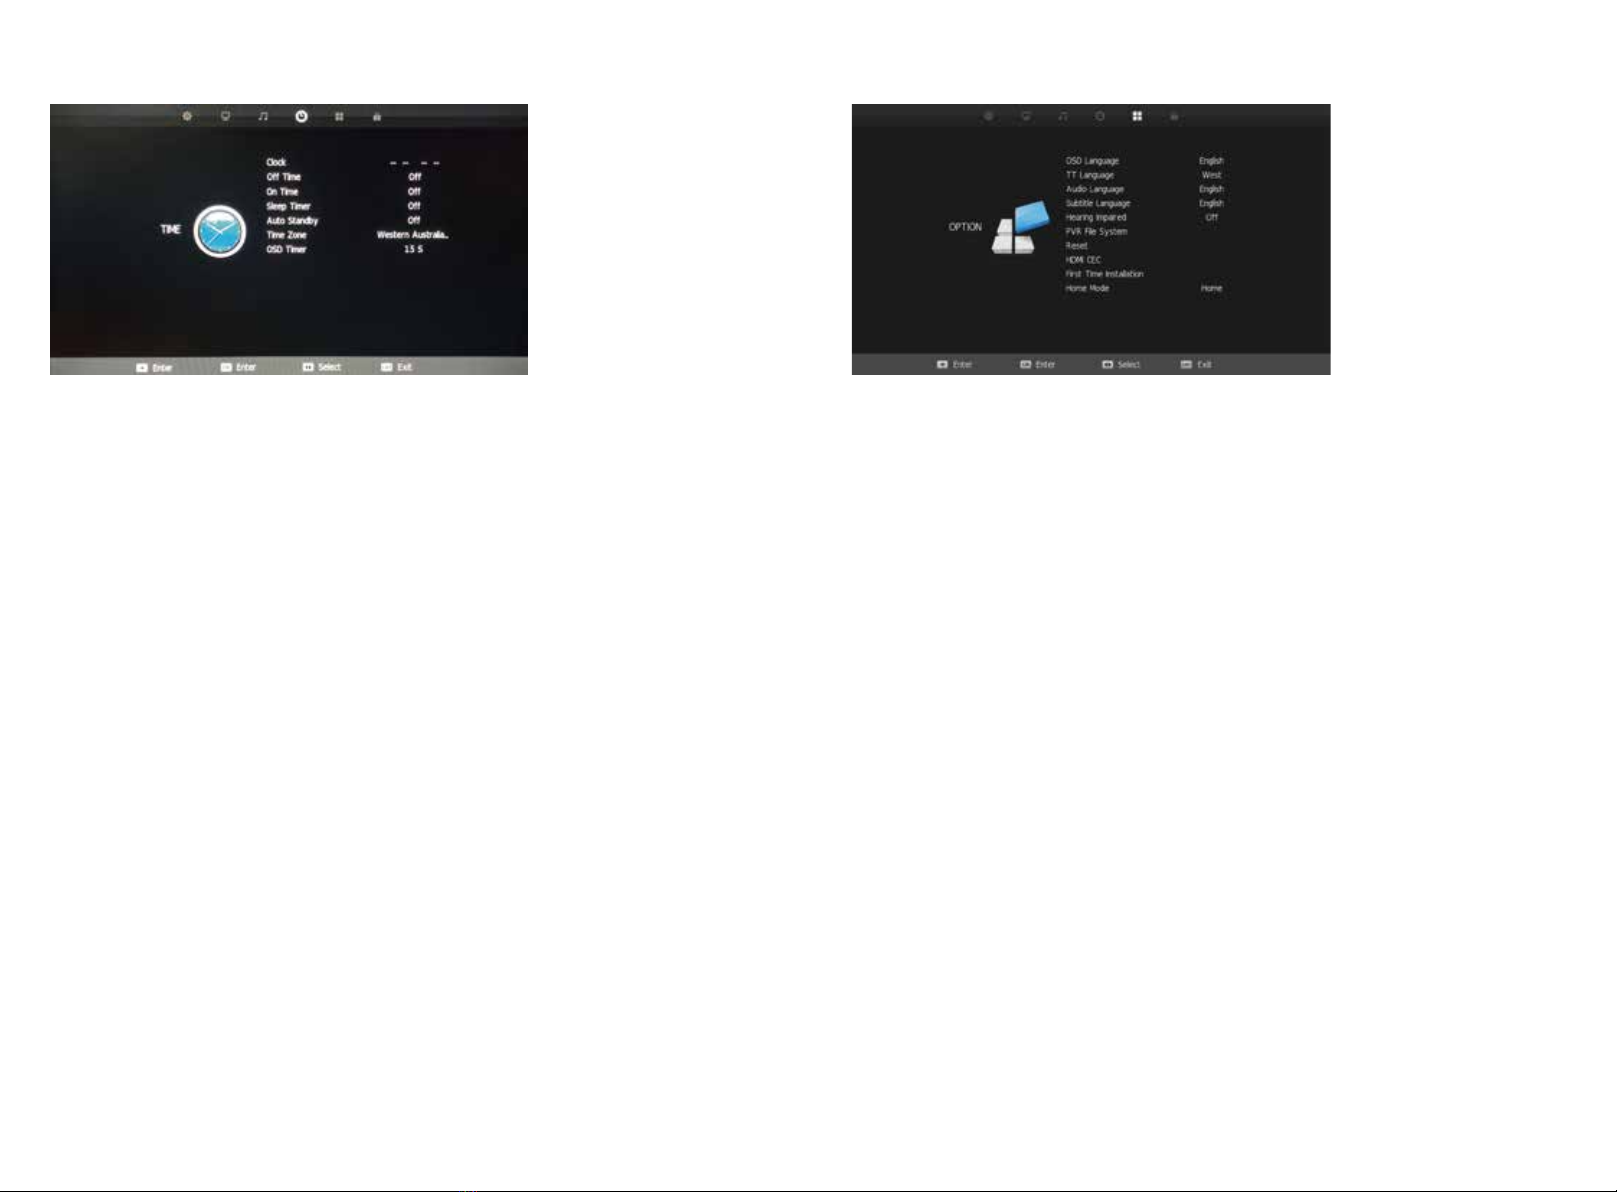
OSD Language
Select OSD Language with the /buttons then press OK to adjust the on-screen Language.
TT Language
This setting is not used in Australia & New Zealand.
Audio Languages
3UHVVźŸWRVHOHFW$XGLR/DQJXDJHDQGSUHVVOK to enter language selection menu. Adjust to
SUHIHUUHGODQJXDJHE\XVLQJWKHŻŹEXWWRQVDQGSUHVVOK to confirm. Press MENU to return to
previous menu.
3UHVVWKHźŸEXWWRQVDQGOK to select the Reset menu. Select Yes with the left arrow to reset
the TV to its factory settings which will erase all of the previous settings.
6HOHFW+HDULQJ,PSDLUHGZKHUHVXSSRUWHGZLWKźŸEXWWRQVDQGWKHQSUHVVWKHŻŹEXWWRQVWR
turn on or off.
.
Subtitle Languages
3UHVVźŸWRVHOHFW6XEWLWOH/DQJXDJHSUHVVOKWRHQWHUPHQXDQGVHOHFWODQJXDJHZLWKźŸ
RUŻŹEXWWRQV
Press OK button to confirm then press MENU button to return to the previous menu.
Hearing Impaired
PVR File System
To check the status of the USB drive, format a drive or change the maximum record/time
shift setting, select PVR File System with/buttons and then press the OK button enter.
Reset
14 15
Clock
The clock and date DUH automatically programmed from information received from DTV Channels.
You should not need to use this sub-menu once you have received a DTV signal, however this
can be manually changed if required.
Off Time
This setting allows you to set a specific time to turn the TV off. Once you enter the menu,
this function can be set to operate once only, Daily, Mon-Fri, Mon-Sat, Sat-Sun or Sunday
only.
On Time
As with the Off Time function, this setting allows you to select a time to turn the TV on.
In addition to the day settings, you can also select the source you would like selected when
the TV turns on and your desired volume level.
Sleep Timer
Select Sleep Timer with thHź/ŸEuttons and press the button to set the sleep timer
to automatically turn the TV off in 10/20/30/60/90/120/180 or 240 minutes.
Auto Standby
Select Auto Standby with thHź/ŸEuttons. Then with the buttons, select 3,4 or 5 hours.ŻŹ
The TV will turn off if there is no activity using the remote or buttons onthe TV for this period
of time.
Time Zone
You should not need to use this sub-menu once you have received a DTV signal, however
this can be manually changed if required.
OSD Timer
The OSD Timer sets the amount of time the on-screen menus are displayed on the TV. Thedefault
time is 15sbut should you wish to change this, select OSD Timer with the buttons. Then with the
Ż Źbuttons, select Always (on) or 5, 10, 15, 20, 25, 30 seconds.
Daylight Saving
Select Daylight Saving by using the /buttons and adjust daylight saving time on or off with
the ŻŹbuttons. With DST set to ON, the time will automatically be adjusted by setting the
time 1 hour forward. With Daylight Saving OFF, the time will be standard time set by the selected
time zone.
ŻŹ
Daylight Saving Kī

Lock Menu
16 17
HDMI CEC
H
HDMI CEC
3UHVVWKHźŸEXWWRQVWRVHOHFWILUVWWLPHLQVWDOODWLRQDQGSUHVVOK button to enter setting interface.
HDMI ARC
3UHVVWKHŻŹEXWWRQVWRWXUQ$XGLR5HFHLYHUFRPPXQLFDWLRQRQRURII
Auto Standby
3UHVVWKHŻŹEXWWRQVWRWXUQ$XGLR6WDQGE\RQRURII
Auto TV on
3UHVVWKHŻŹEXWWRQVWRDOORZ+'0,&(&FRQQHFWHGFRPSRQHQWVWRWXUQHDFKRWKHURII
Device control
3UHVVWKHŻŹEXWWRQVWRWXUQ+'0,&(&$XWR79SRZHUXSRQRII
Device list
3UHVVWKHŻŹEXWWRQVWRVKRZ+'0,&(&FRQQHFWHGFRPSRQHQWV
First Time Installation
3UHVVWKHźŸEXWWRQVWRVHOHFWILUVWWLPHLQVWDOODWLRQDQGSUHVVOK button to enter setting interface.
The options you can modify include OSD language, country, and TV connection. You should press
OK button to FRQILUP your setting.
Home mode
3UHVVWKHźŸEXWWRQVWRVHOHFWKRPHPRGHDQGWKHQSUHVVWKHŻŹEXWWRQVWRVHOHFWWKHKRPH
mode or shop mode.
Blue Screen
To have a Blue Screen background rather than Black when no input signal is available, select Blue
6FUHHQZLWKźŸEXWWRQVDQGWKHQSUHVVWKHŻŹ button to select on/off then the menu button to
return to the previous menu.
DMI CEC allows devices connected to the TV via HDMI to communicate back and forth
with the TV.
Please see below for specific CEC settings
Source Lock
Source Lock allows you to limit the input sources available on the TV - for example, just DVD
Default Source
Default Source allows you to select which input source is selected when the TV is first turned on.
DTV Channel Type
This allows you to set the default DTV channel when the TV Ls turned on.
Max Volume
Max Volume limits the maximum volume that the TV can be turned up to.
Default Volume
The Default Volume setting allows you to set the desired volume level for when the TV is turned on.
Clear Lock
Resets all settings.
Lock System
Select Lock System with the /buttons and press OK. Then enter the password
(default is “0000") to access the Block Program, Parental Rating Key Lock & Hotel Mode menus.
SET Password
Select Set Password with the/buttons. Then press the OK button to enter the old password
(default is “0000”) and then set a new password by entering it twice.
Block Program (TV only, TV must be selected as the source)
Select Block Program with /buttons, and press OK button. You can then add the channels you
wish to block.
Parental Rating (TV only, TV must be selected as the source)
Select Parental Rating with/button, and then pressŻŹEXWWRQVWKHSDUHQWDOJXLGDQFH
function can be set to G, PG, M, MA, AV, R, Block All, No Block.
Key Lock
This function disables the buttons on the back of the TV. To activate, select Key Lock with the
/buttons. Then with the ŻŹ buttons, the Key Lock function can be turned on or off.
Hotel Mode
Hotel mode allows you to select a number of features that make this TV also useful for shop displays,
promotions or where you are after simple operation from one source.
Select Hotel Lock with the /buttons and press OK.
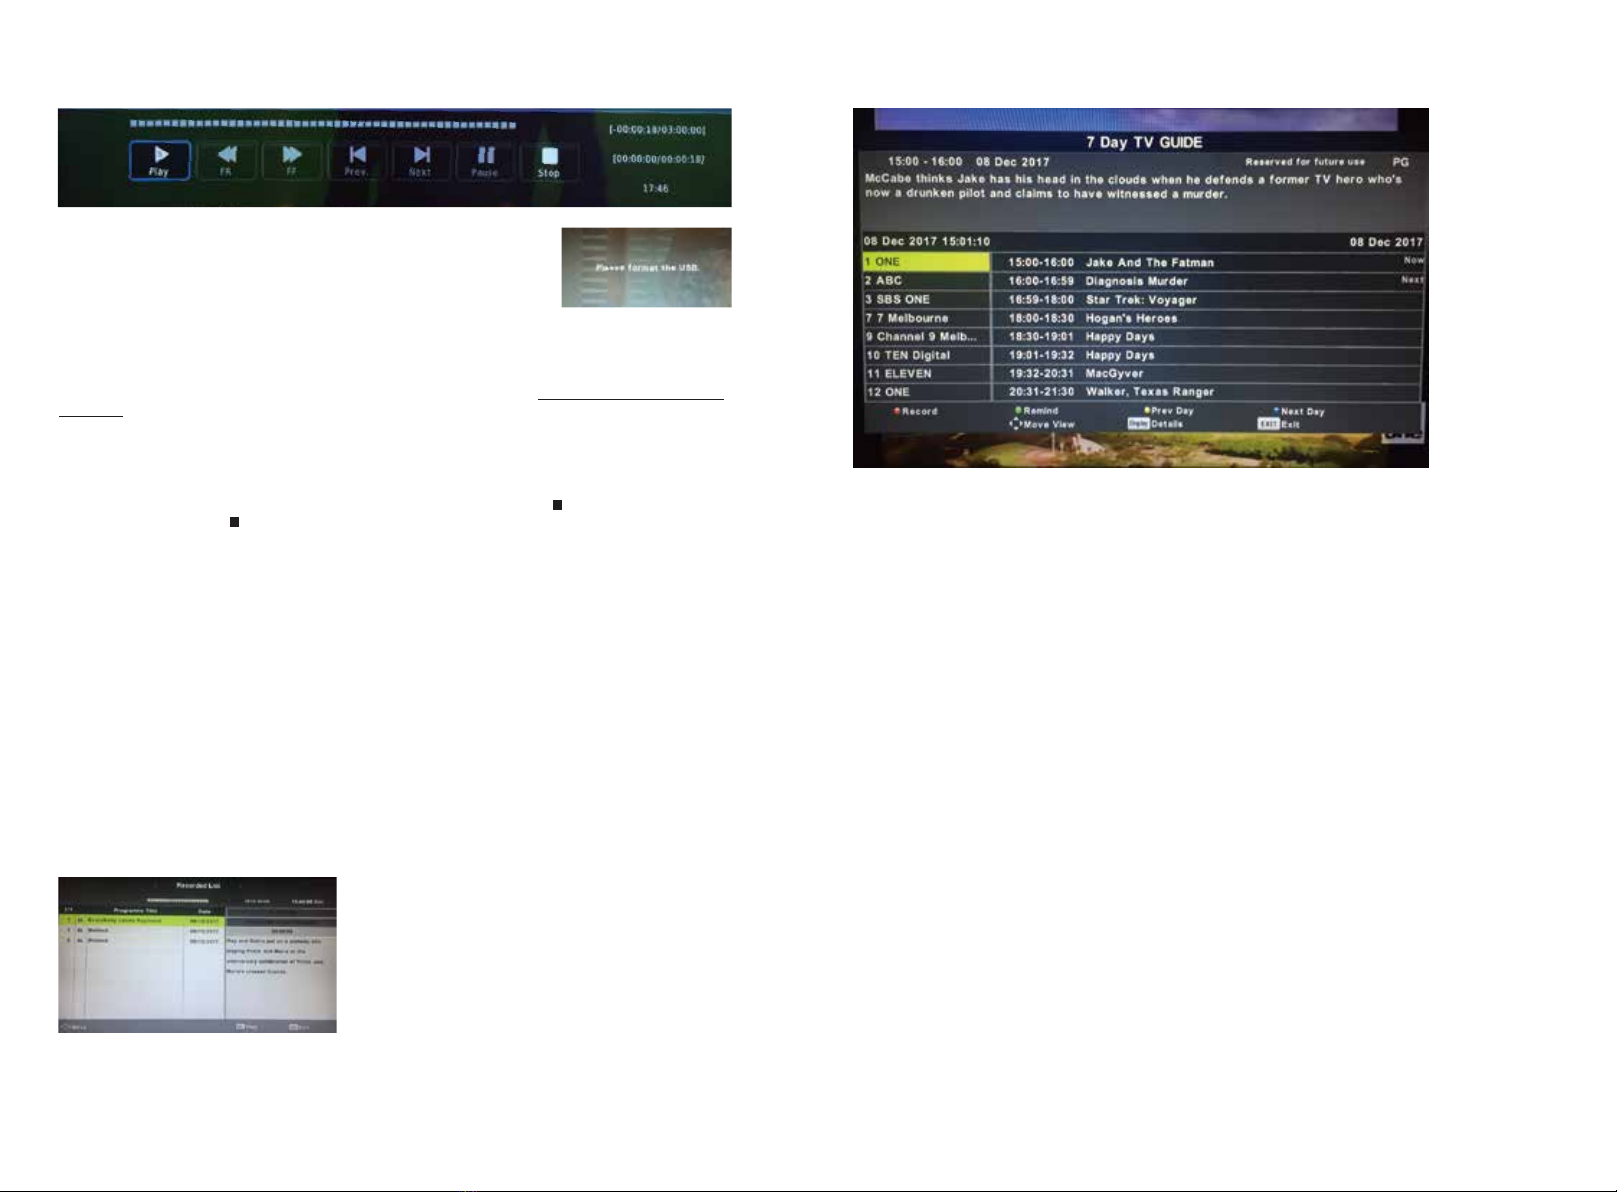
PVR EPG
Press the EPGbutton on the Remote control to access the Electronic Program Guide
(DTV only)
Use the /keys on the remote to select a channel. The current programme on that channel
will be displayed in the box on the right. You can then use the /keys to scroll up or down
to select a programme. Note programmes will be displayed until midnight of the current day.
You need to move to the next day by pressing the blue button on the remote to view
after midnight and for the next day. To view programmes from the previous day, press the
yellow button on the remote.
Record
Press the RED button on the remote control to enter the Recording sub-menu. You can set the
channel, start and end times of the program you want to record using the ŻŹDnd/
buttons. A USB drive must be inserted in the TV to record. For more information on recording,
please seemore information on the PVR function.
Info
Press the GREEN button on the remote to display detailed information about the program.
Schedule
Press theYELLOW button on the remote to display the Schedule List to display theprogrammes you
have scheduled to record or be reminded of.
Remind
Press the BLUE button on the remote control to set a reminder for a program you would like
to watch at a later date. Note this reminder which consists of a popup on the screen will only be
displayed if the TV is on and the source is DTV.
NOTE 1: If you select a channel in the EPG and the available programmes are not displayed,
briefly exit the EPG and quickly tune in to the channel. This will ensure the programme is
downloaded for that channel.
NOTE 2: The EPG for a particular channel will only work if you can tune in to the Channel
based on your location and TV signal area.
18 19
RECORD Live TV
Ensure you have a correctly formatted USB drive inserted in the TV
before recording. If the USB drive is not formatted properly, the TV
will display a message advising that the USB drive needs to be
formatted. To do this, go to the Option Menu, select PVR File
System and follow the steps in the PVR File System sub-menu to
format the USB Drive. Please ensure that you do not have any
valuable data on the drive before you do this.
When watching TV, you can press the •Record button on the remote to start recording a
programme. The Power light will also start flashing red/greento confirm that recording is in
progress. The TV will also display the recording control menu (shown above) when you
commence recording.
NOTE: If you want to display this menu at any time when recording, simply press the OK
button on the remote.
Stop Recording
Press OK on the remote to display the Record Menu then press the button to stop recording.
You can also press the button twice to stop recording (the first press will bring up the
Record Menu). The TV will then display a confirmation message to stop recording. Press Ż
on the remote to confirm. When the storage space of the USB drive is full, the TV will display a
warning message then stop recording and return to normal broadcast Television.
Time Shift/Pause Live TV
While watching DTV, press the “T.SHIFT” button on the remote control to Sause Oive
TV plus bring up the time shift control menu. The time shift control menu is similar to the
Record menu and you can perform various functions such as exit time shift, or fast forward
to catch up to the live program etc.
Pressing the “T.SHIFT” button again will continue the live program from where you
paused it (time shift).
NOTE: To display the Time Shift menu when the TV is either paused or on Time Shift
playback, press the “OK” button on the remote control.
NOTE. The PVR function is only available for the TV channel that is being viewed. If you
change the channel, the PVR function will stop. You cannot switch to another Source
while recording. If you change the source, the recording will also be stopped.
To view programmes already recorded on the USB or view upcoming reminders, press the
R. List button on the remote.

MEDIA MENU
20 21
Select “MEDIA” as a Source on the TV using the remote Control
Press buttons to select Photo/Music/Movie/Text, and then press the OK buttonthHŻŹ
to select the appropriate selection.
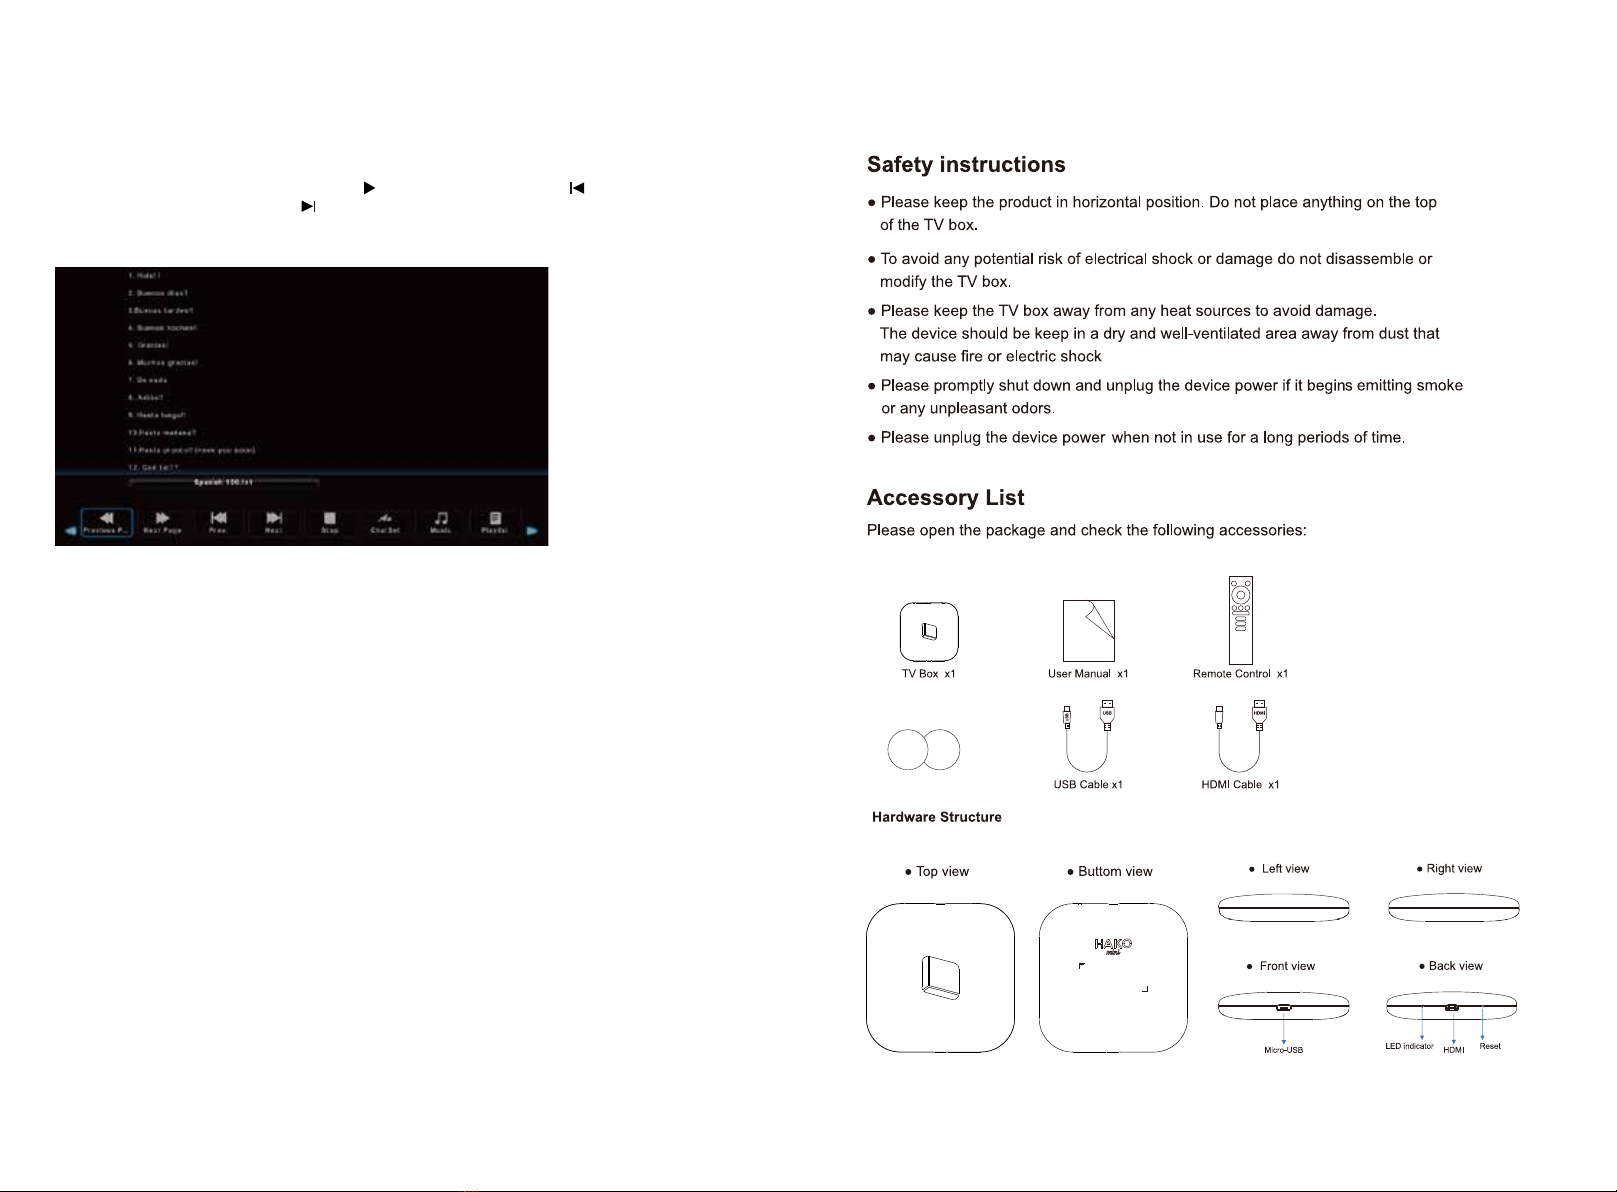
NOTE: A USB device must be plugged in to use these functions.
Important Advice on
86%
operation.
1. For best results, please insert the USB device after the TV has been turned on.
2. If a USB device is not recognised by the TV, please remove the USB and re-insert it.
3. It is recommended that your USB device be formatted to FAT32 for optimal Media playback.
To check the formatting of your USB device, on a Windows PC, right-click on it’s drive letter
and select Format. If the File System is shown as anything other than FAT32, the select FAT32
from the drop-down box, check Quick Format and click Start to re-format the USB drive.
Please remove any valuable data you may have on the USB before doing this.
Photo Menu
1.Select PHOTO with the buttons, and then press the OK button to enter sub_menu.ŻŹ
2.Select C:\, then press the OK button to select the USB drive.
3. Select the specific photo, and press button to view, press the button to
view the previous image, press the button to view the next image. A menu with further
options will also be displayed where you an use the arrow key to make further selections.
4. Press the Exit button to exit.
1.Select MUSIC with the buttons, and then press the OK button to enter sub_menu.ŻŹ
2.Select C:\, then press the OK button to select the USB drive.
3. Using the arrow keys, select a specific song, and press the button to play, press the
button to play the previous song, press the button to play the next song. Selecting
particular songs with the “OK” button will form a playlist of songs you want to play. Not doing
this will mean that all of the songs are played in order after your first selection.
4. Press the RED button to delete a selected song/track.
5. Press the Exit
Exit
button to exit.
Music Menu
Movie Menu
1.Select MOVIE with the buttons, and then press the OK button to enter sub menu.ŻŹ
2.Select C, then press the OK button to select the USB drive.
3. Highlight the specific video. When highlighted, the file information will be displayed and
a preview of the video will start playing in the middle of the screen.
Press the button to start playback.
To view the play menu, press DISPLAY on the remote and the play menu will be displayed
where you can select options such as repeating videos etc.
Select to play the previous title, select to play the next title.
4. Press the button to exit.
SMART TV
Quick Start & General Information
22 23
Text Menu
1.Select TEXT with the buttons, and then press the OK button to enter sub_menu.Ż Ź
2.Select C:\, then press the OK button to select the USB drive.
3. Select the specific file, and press the button to play, press the button to
play the previous file, press the button to play the next file.
4. Press the RED button to delete the selected file.
5. Press the Exit button to exit.
3M3M
3M Velcro
(HAKO Android TV box connect)
24 25
Connect the USB cable to the TV box and the TV USB port,
Step3 Fix the TV box on the back of the TV with 3M Velcro
using 3M Velcro to attach on the back of the TV and the front of the TV box.
Indicator Light

26 27
Before you start - Google Account Required
Check if you already have a Google Account
If you signed in to any Google product before, such as Gmail, Maps, or YouTube, you already
have a Google Account. You can use the same username and password you created to sign
in to any other Google products.
If you do not have a Google Account, you will need to create one (Free)
A Google Account gives you access to many Google products. With a Google Account, you
can do things like:
•Send and receive email using Gmail
•Find your new favorite video on YouTube
•Download apps from Google Play
Setting up a new Google Account – This can be done directly through the TV/HAKO box
or via the Google Account sign in web address in step 1 below.
1. Go to the Google Account sign in page - https://accounts.google.com/signin
2. Click Create account.
3. Enter your name.
4. In the "Username" field, enter a username.
5. Enter and confirm your password.
Tip: When you enter your password on mobile, the first letter isn't case sensitive.
6. Click Next.
Optional: Add and verify a phone number for your account.
7. Click Next.
Use an existing non-Google email address – This will need to be done via the web
address noted in step 1 below on an internet browser (Phone or PC)
1. Go to the Google Account sign in page - https://accounts.google.com/signin
2. Click Create account.
3. Enter your name.
4. Click Use my current email instead.
5. Enter your current email address
6. Click Next.
7. Verify your email address with the code sent to your existing email address.
8. Click Verify.
Protect your account with recovery info
If you forget your password or someone is using your account without your permission,
updated recovery info makes it much more likely you’ll get your account back. Refer to
your google account security settings to set up.
APPLE/IOS PHONE - Setting up your Android TV and Remote
Check that you have:
1. A Google Account
2. Access to a Wi-Fi Internet connection
Step 1: Connect your HAKO Android TV box
1. Turn off your TV or monitor.
2. Connect your Android TV device to your TV or monitor with the HDMI cable.
3. Plug your Android TV device into a USB port on the back of the TV - This will power the Android TV
box.
Step 2: Pair your remote
1. Turn on your TV.
2. To select the right input for your Android TV device, press the Source or Input. You should find an
image of a TV, a remote, and a timer.
3. Follow the on-screen instructions to pair your remote.
Step 3: Set up your HAKO Android TV
If you haven’t already, choose a language before starting the sign-up process.
1. When your TV says, “Quickly set up your TV with your Android phone?” Use your remote to choose skip.
2. Connect to an available Wi-Fi network.
Your system may need time to update.
3. Choose Sign in
Use your remote.
4. Sign in to your Google Account.
5. To finish setup, follow the on-screen instructions.

28 29
ANDROID PHONE - Setting up your Android TV and Remote
Check that you have:
1. A Google Account
2. Access to a Wi-Fi Internet connection
Step 1: Connect your HAKO Android TV box
1. Turn off your TV or monitor.
2. Connect your Android TV device to your TV or monitor with the HDMI cable.
3. Plug your Android TV device into a USB port on the back of the TV - This will
power the Android TV box.
Step 2: Pair your remote
1. Turn on your TV.
2. To select the right input for your Android TV device, press
the Source or Input. You should find an image of a TV, a remote, and a timer.
3. Follow the on-screen instructions to pair your remote.
Step 3: Set up your HAKO Android TV
There are 2 options to set up your TV:
1. Quick Start with an Android phone
2. Set up with your remote
If you haven’t already, choose a language before starting the sign-up process.
Set up with Quick Start
1. When your TV says, “Quickly set up your TV with your Android phone?” use your remote
to choose Continue or Yes
2. On your Android phone, open the Google app
3. Type or say “set up my device.”
4. Follow the instructions on your phone until you get a code. Enter the code on your TV.
5. On your phone, tap the name of your TV when it shows up.
6. To finish setup, follow the instructions on your TV.
Tip:YourTVautomaticallysignsintoyourGoogleAccountandconnectstothesame
Wi-Fiasyourphone.
Set up with your remote
1. When your TV says, “Quickly set up your TV with your Android phone?” Use your
remote to choose skip.
2. Connect to Wi-Fi.
Your system may need time to update.
3. Choose Sign in
Use your remote.
4. Sign in to your Google Account.
5. To finish setup, follow the on-screen instructions.
Pair your Bluetooth remote
following on screen guide.
Select country.
Choose setup with Android
phone or chose SKIP to enter
google account details
manually.
Connect to your known and
secure Wi-Fi network.

30 31
If you selected Quick Setup
via Android device, follow the
on-screen prompts
If you selected Skip to sign in
manually, sign in per the on-
screen prompts.
Enter your credentials.
Read and accept terms and
conditions
Choose your Location
Services preference.
Choose your Android
Diagnostic information
preference
Continue.
Read “Services and your
privacy” and select
“Continue”.

32 33
Select your “Personal
Results” preference.
Select your “Google
Assistant” preference.
Select your “Recommended
Apps” preference. These can
be installed at a later date if
preferred.
Follow on screen prompts.
Follow on screen prompts.
Follow on screen prompts.
Follow on screen prompts.
Welcome to the home page.
Here you can access the APP
Store or browse your installed
APPs

Home Menu
After the HDMI cable and USB power cable are connected to the TV successfully, power on the device.
The Smart TV home menu will display, which includes Apps, Netflix and YouTube. Once you have successfully
connected to an internet source, users can access the Google Play Store to search and download compatible
Apps.
Setting Menu
Network & Internet
WLAN: Activate or deactivate the WLAN function.
Available networks: Shows available WiFi networks.
Other options: Add new network: Add a new network manually.
Scanning always available: Set whether apps and Google services should search for networks even when
WLAN is deactivated.
Accounts & Sign In
Take control of your accounts or sign in to apps.
Apps
In this menu you can view and manage all installed apps and define permissions.
Device Preferences
In this menu you can make general settings for the Android operating system.
System Update:In this menu you determine whether updates should be carried out automatically or check
whether an update is available.
TV Settings
In this menu you can set the display, HDMI CEC, Audio Output and picture setting.
Remote & Accessories
In this menu you can pair an external Bluetooth device (e.g. loudspeaker, soundbar) with the TV set in order
to transmit the TV sound to another device.
1. Go to Add Accessories to pair a device.
2. Select the desired device and press the OK button to pair the devices.
If a device is paired, it is displayed below. Click on the paired device to manage it.
3. The following options are available under the Add Accessories menu item:
Bluetooth: Set the Bluetooth function On or Off.
Bluetooth devices: The devices found are displayed here. Click on the desired device to pair it with the TV set.
34 35
This manual suits for next models
6
Table of contents


