Sphere CP11-AF200V User manual

CP11-AF200V
WEBCAM
USER GUIDE

2
We hope you enjoy your purchase!
SPHERE products are carefully designed and produced to
the highest standards of performance and safety, backed
by our comprehensive 1 Year Warranty.
This user guide will provide all the information required
for you to setup and use your new product.
Welcome

3
Contents
Welcome 2
General Safety Warnings 4
Product Overview 7
Operation 9
Troubleshooting 11
Specifications 13
Compliance and Responsible Disposal 14

4
General Safety Warnings
This product complies with Australian Safety
Standard AS/NZS 62368.1 to ensure the safety
of the product.
Location: Make sure the location for the product is well
ventilated, and away from damp and cold, protected
from overheating and away from direct sunlight, away
from moisture drips or splashes and protected from
excessive dust or grease.
Heat: Do not place the product set near heat sources
(eg. radiators, stoves, electrical equipment, amplifiers).
Water: Do not place containers with liquids (eg. vases)
or with small metallic objects on top of the product.
Fire: Do not place any naked flame sources (eg. lit
candles, cigarettes) on the product.
Children: Supervise young children to ensure they do
not play with the product.

5
Cleaning and Maintenance
Unplug or turn off the product before cleaning it.
Cleaning: Only use a soft, dry cloth for cleaning the
product; do not use a damp cloth. Never clean with
industrial strength polish, wax, benzene, paint thinner, air
freshener, lubricant, detergent or other chemicals. Wipe
off any moisture, dirt or dust on the power plug pins with
a clean, dry cloth.
Privacy and Security
Always ensure your computer has the latest software
updates which helps patch vulnerabilities in your
software that could allow hackers access to your device.
Install and run security software.
Use a secure login password for your computer.
Unplug the webcam when not in use.

6
Recycling and Disposal
The National Television and Computer Recycling Scheme
was established in 2011 to provide Australian households
and small businesses with access to free industry-
funded collection and recycling services for televisions
and computers, including printers, computer parts and
peripherals.
Please dispose of the product responsibly by taking
it to a recycling drop-off point. Planet Ark maintains a
database of free television and computer drop-off points.
Search for recycling near you at:
https://recyclingnearyou.com.au/ewastescheme/

7
A. Webcam
B. User Guide
C. Warranty Card
What’s in the box:
Product Overview
BC
A
8
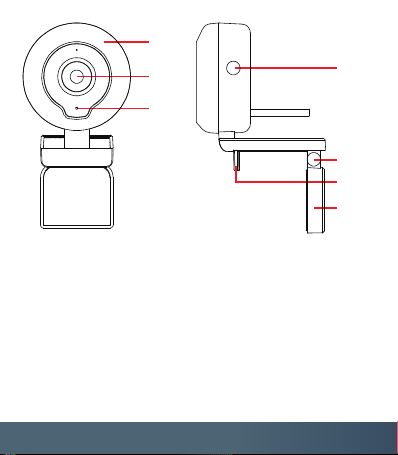
1. LED light
2. Camera lens
3. Microphone
4. Touch button
Front view Side view
1
24
5
7
6
3
5. Adjustable mounting clip
6. Mounting clip edge
7. Mounting base

9
Operation
Setting up the webcam
You can place the webcam either on top of your
desktop or mount on your monitor using the
adjustable mounting clip.
To mount onto your monitor, hold the webcam as
pictured above and open up the mounting base.
Mount the webcam, ensuring the mounting clip edge
is flush with the back of your monitor. Adjust the
angle of the webcam to your desired direction.
The illustrations are for
reference only. Actual
image of product may
be different.
1
3
2

10
Plug in the webcam’s USB cable into the USB port of
your computer/laptop. The webcam will automatically
start installing, it will take around 1 minute.
To ensure that the webcam has been installed
successfully, on your laptop/computer go to:
For Windows: Computer Management > Device
Manager > Cameras and USB camera should appear.
For Mac: Applications > Photo Booth > and USB 2.0
Camera should appear.
Your webcam is now ready to use. When using the
webcam for video calling, ensure that both you and
the other party:
- Have a speaker or headset.
- Microphone (the webcam has a built-in microphone).
- Internet connection.
The webcam also has a built in LED light. Press the
touch button on the webcam to turn the light on/off,
and press repeatedly to change the brightness.

11
Troubleshooting
Problem Solution
Camera not
working on
some video
calling apps
• Some applications including
Skype use a different camera
by default. Go to the video
settings on the app and select
the correct camera as the
video resource.
• Some applications require
enabling from the Chrome
browser. Go to Settings >
Search Camera > Site Settings
and select the applications you
want to enable and change the
camera permissions to “allow”.
• Ensure the USB cable is
connected to the USB port of
your laptop/computer

12
Problem Solution
Camera
is not
recognized
by operating
system
• After connecting the USB
cable to the USB port of
your laptop/computer, go to:
Control Panel > System and
Security > System > Device
Manager.

13
Resolution 2 megapixel
1932 x 1088 resolution
Viewing angle 75°
Power supply DC 5V 160mA
Weight 105g
Dimensions
(W x D x H) 56 x 28 x 145mm
Specifications

14
Compliance and Responsible Disposal
Packaging
The packaging of your product has been selected from
environmentally friendly materials and can usually be
recycled. Please ensure these are disposed of correctly.
Plastic wrapping can be a suffocation hazard for babies and
young children, please ensure all packaging materials are
out of reach and are safely disposed of. Please recycle these
materials rather than throwing them away.
Product
At the end of its working life, do not throw this product out
with your household rubbish. An environmentally friendly
method of disposal will ensure that valuable raw materials
can be recycled. Electrical and electronic items contain
materials and substances which, if handled or disposed
of incorrectly, could potentially be hazardous to the
environment and human health.
This product complies with the Australian Safety Standard
AS/NZS 62368.1 to ensure the safety of the product.

15
Notes

Customer Helpline AU:
1300 886 649
Distributed by:
Tempo (Aust) Pty Ltd,
PO Box 6056,
Frenchs Forest
DC 2086
sphere
Table of contents


