SPIKECAM Z10 User manual

USER MANUAL
Model: Z10
https://www.spikecam.com
SPIKECAM Body Camera
R
o
H
S
01
SPIKECAM
Dear Valued Customer,
Thank you for choosing SPIKECAM.
Thank you for choosing our product. The Z10 is a new mini
camera from SPIKECAM with audio, video recording, and
night vision capabilities. It offers up to 200 minutes of
continuous video recording time. You can easily play back
the recorded video on your computer using the TF card
reader or Type C cable. To ensure that you use this product
correctly, please read the manual carefully and keep it for
future reference. For your convenience, we have prepared
a few minutes of video tutorials that can be accessed by
visiting https://www.spikecam.com/z10 or by scanning
the QR code below.
If you have any questions, please do not hesitate to
contact our customer service at , and info@spikecam.com
we will respond to you within 24 hours.
Best regards,
The SPIKECAM Team
Scan to watch training video
https://www.spikecam.com/z10
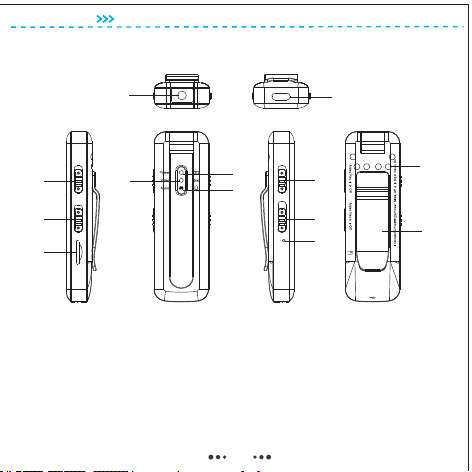
Diagram
01 Video Record Slider
02 Audio Record Slider
03 TF Card Slot
04 Video LED
05 Power LED
06 Audio LED
07 Night Vision Slider
08 Power Slider
09 Reset Button Hole
10 Infrared Lights
11 Back Clip
12 Rotational Lens
13 USB Type C Port
SPIKECAM
01
02
03
04 05
06 07
08
10
11
12 13
09
02

RECORDING
Video Resolution 1080P/ 720P
Video Format .AVI
Recording Angle 90 degrees
Audio High Quality Built-in Microphone
Water Mark Time and Date Stamp Embedded into Video
Video Duration 10 Mins
Audio Format WAV
Type Built-in 500mAH Lithium
Charging Time 120 minutes
Battery Life About 200 Mins at 1080P(Night Vision Off)
OTHERS
Storage Capacity 32 to 512GB(Depending on your version)
IR LED Lights 6 Pcs 940nm High Power Infrared LEDs
Night Vision Manual
Dimensions 87 mm *29 mm *17mm
28 gram
Working Temperature
Support
ACCESSORIES
Standard Accessories
Weight
USB Type C Cable, TF Card Reader, Type C OTG Cable, Manual
Specification
-20C° ~ 65C°
Loop Recording Support
Stealth Mode
SPIKECAM
03

2. How to use?
2.1 Power On
2.2 Power Off
(2) in the Off stateAll other three sliders (No. 1, 2, 7 Sliders) are .
Once these conditions have been confirmed, push and hold the
Power Slider to the top (No. 8) for 3 seconds, then release it. The
Power LED (No. 05) will light up in RED, indicating that the device
has been successfully powered on and is now in .standby mode
To ensure proper operation of the device, please confirm that the
following two conditions have been met before powering it on:
(1)The TF card has been correctly installed in the designated slot
(No. 3 TF Card Slot) with the .FAT32 format
If the Video LED(No.4) and Audio LED(No.6) is flashing blue and
yellow constantly, please ensure that the two conditions
mentioned above have been met before attempting to power it on.
To shut down the device, push and hold the Power Slider (No. 8)
for approximately 5 seconds while it is in standby mode. The
Power LED will flash red 2 times before turning off, confirming
that the device has successfully shut down.
04
SPIKECAM

2.3 Video Recording
2.4 Audio Recording
To begin recording video, ensure the device is in Standby Mode
(indicated by a solid red Power LED) and push the video record
slider up to the On state (No. 1, labeled with “Video Rec” text) .
The Video LED will start flashing blue slowly, indicating that the
device is recording video.
Once fully charged, the device can continuously record video for
about 200 mins at 1080P resolution with night vision turned off.
To , push the slider to the state. The stop recording video down Off
recording will stop, and the Power LED will return to a solid red,
indicating that the camera has returned to Standby Mode.
To , push the slider to the state. The stop recording audio down Off
recording will stop, and the Power LED will return to a solid red,
indicating that the camera has returned to Standby Mode.
To begin recording audio, ensure the device is in Standby Mode
and (No. 2, labeled with “Audio Rec” push the audio record slider
text) . The Audio LED will start flashing yellow up to the On state
slowly, indicating that the device is recording audio.
2.5 Night Vision
To activate night vision, ensure that the device is in Video
Recording Mode and (No. 7, labeled push the night vision slider
with "Night Vision" text) position.up to the On
SPIKECAM
05

2.6 Stealth Mode
In any mode, push the Power Slider to the down Indicator Off
position, and the camera will enter Stealth Mode, causing all
indicators to turn off. To exit Stealth Mode, push the Power Slider
back to the middle position. The light prompt will then reactivate,
showing the current camera status.
2.7 How to rotate the camera lens?
The camera lens supports 180-degree rotation, allowing you to
manually adjust it to your desired position. Be careful not to dirty
the lens when rotating it, as this can affect the video quality.
Please note that if you need to use the night vision function,
rotate the lens to the side with the infrared lights (No.10). After
rotating the lens, the recorded videos may appear upside
down(flipped). In this case, please refer to Section 4.Camera
Setting to set up the camera's flip mode as necessary.
--2.5 Night Vision
This will turn on the infrared lights, and the video will switch to
black and white mode. Please be aware that the 940nm infrared
lights are invisible, so you won't be able to see them. Also, using
night vision will significantly reduce your video recording time.
To deactivate night vision, push the slider down to the Off
position.
SPIKECAM
06

2.8 Charge The Camera
2.9 How to reset?
To charge the camera (No.13 USB Type C Port), use a USB
charger with a 5-volt output, such as a mobile phone charger or a
computer USB port. During charging, the Power LED (No.5) will
be red and then be off after fully charged. It takes approximately
2.5 hours to fully charge the camera.
For the first time use, we recommend charging the camera for 3
hours to ensure a full charge. Please note that in order to protect
the environment and reduce electronic waste, we do not provide
a charger with the camera. If you really need one, please contact
our customer support.
If the camera malfunctions, try power off the camera first, and
then power it on after a few seconds. If this method does not
work, use a pin to (No.9) located on press the reset button hole
the left side of the camera several times before attempting to
power it on again.
SPIKECAM
07
3.1 Via computer (recommended)
To playback and copy files, connect the camera to your computer
using a . This will allow the camera to function Type C data cable
as a USB flash disk. Alternatively, you can take out the TF card
3. Files Playback

--3.1 Via computer (recommended)
(No.03) and use a TF card reader to playback files on computer.
This camera belongs to the low-end series of SPIKECAM. If you
feel that the video quality is not meeting your needs, please
consider SPIKECAM Z15 or other more advanced models
SPIKECAM
08
3.2 Via Mobile phone
The camera supports OTG mode, which allows you to connect the
camera directly to your mobile phone using an OTG cable to view
and download videos. The package includes a Type C to Type C
OTG cable. If you have an Android phone with a Type C interface,
you can try using this cable to view and download videos.
However, iPhone users need to order an OTG cable separately.
1) Connect one end of the OTG cable to the Type C port on your
phone, and the other end to the Type C port on the Z10 body
camera.
2) Check if your phone prompts you with " " or open A10 USB drive
your phone's file manager to see if the drive is available. Click on
the drive to access the files. Please note that when you connect
for the first time, your phone may ask you to format the drive.
Backup your camera files before formatting to avoid losing data.
3.2.1 How to view videos on Android phones?

--3.2.1 How to view videos on Android phones?
Some Android phones may not support OTG or require manual
activation. Please research if your phone supports this feature.
SPIKECAM
09

3.2.2 How to view videos on iPhone?
2) Open the Files app to browse the current file directory on your
phone and check if there is a mobile disk named " ". Click No Name
on the disk to view the camera files. If your phone doesn't have
the Files App, you may need to download and install it from the
Apple Store.
1) For iPhone users, you need to order an OTG cable separately.
Connect one end of the OTG cable or adapter to your iPhone's
Lightning port, and the other end to the Type C port on the
camera.
SPIKECAM
10

The logic of the TIME.TXT settings: Each time the camera is turned on, it
checks if the contents of TIME.TXT have changed. If so, it reads the time
and parameters, applies them to the camera, and then restores the contents
of TIME.TXT to the default value of 2022-12-01 12:00:00 Y0Y0. If TIME.TXT
is not found, the camera will automatically generate this file.
The second digit: If set to 0, the camera video resolution is set to 1080P. If
set to 1, the resolution is set to 720P.
For example, if you want to disable the time stamp, set the video resolution
to 720P, enable loop recording, and flip the lens to the side with the clip,
your code should be N1Y0. Modify the TIME.TXT document and restart the
camera for the new settings to take effect.
Open the TIME.TXE document, which contains the following content:
The third digit: If set to Y, loop recording is enabled. When the camera's
storage space is full, the oldest videos will be automatically deleted to free
up space for new recordings. If set to N, loop recording is disabled. When
the camera's storage space is full, recording will stop automatically.
This camera is very easy to set up. You can adjust various settings by
editing the TIME.TXT file in the camera's root directory. You can make the
following changes:
Adjust the date and time, save the changes, and then restart the camera for
the new settings to take effect. For example, if the current time is 8:55:55
AM on August 1, 2023, modify the document as follows and save it before
restarting the camera:
The fourth digit: If set to 0, regular imaging is enabled. If set to 1, the image
is flipped 180 degrees. An easy way to remember this is that if you flip the
lens to the side with the clip, set it to 0. If you flip the lens to the side with the
indicator light, set it to 1.
The four-digit Y0Y0 code in TIME.TXT represents the following parameters:
2022-12-01 12:00:00 Y0Y0
4.1 Adjust The Time
4.2 Adjust Other Parameters.
The first digit: If set to Y, the time stamp will be displayed in the recorded
video. If set to N, the time stamp will not be displayed.
2023-08-01 08:55:55 Y0Y0
4. Camera Parameter Setting
Trouble Shooting
7. When viewing the video on a computer, we found a small
video segment that cannot be opened. Please note that
when you connect the camera to a computer, make sure that
the video recording slider is in the off position. If it is in the on
position, the camera will attempt to record a short segment,
but it will be terminated by the computer transfer program
before it can finish. This will result in a small segment of
video that cannot be opened. Simply delete this useless
video clip.
Note: If the above solutions cannot solve the problems,
please contact customer service email: info@spikecam.com
Our staff will response to your email within 24 hours. Thank
you for choosing SPIKECAM.
2. Camera can not respond. Please press the Reset Button
Hole to power off the camera and then restart the camera.
1. Camera can not boot. Please charge the camera battery
for more than 2 hours first then try to turn on the camera
again.
4. The power indicator light doesn't work even when
charging. Please check if you have turned on Stealth Mode
(Power Slider on the Indicators Off position). If so, please
exit this mode.
3. Device failed to connect to the computer. Please try
another USB port on computer or try another USB Type C
cable.
5. The recorded video is flipped. You might have manually
flipped the lens but didn't set it in TIME.TXT. Please refer to
Section 4.2 for details.
6. The recorded video appears to have a strong red color.
You may have accidentally turned on Infrared Lights, which
will make the video appear reddish when combined with
daylight. Please turn off Night Vision.
For more information about this body camera please visit:
https://www.spikecam.com/z10
SPIKECAM
11
Open the TIME.TXE document, which contains the following
content:
This camera is very easy to set up. You can adjust various
settings by editing the TIME.TXT file in the camera's root
directory. You can make the following changes:
4.1 Synchronize Date and Time
Adjust the date and time, save the changes, and then restart the
camera for the new settings to take effect. For example, if the
current time is , modify the 8:55:55 AM on August 1, 2023
document as follows and save it before restarting the camera:
2022-12-01 12:00:00 Y0Y0
2023-08-01 08:55:55 Y0Y0
4. Camera Parameter Setting

4.2 Adjust Other Parameters
The first digit: time stamp If set to Y, the will be displayed in the recorded
video. If set to N, the time stamp will not be displayed.
The second digit: camera video resolution If set to 0, the will set to 1080P. If
set to 1, the resolution will set to 720P.
The third digit: loop recording If set to Y, is enabled. When the camera's
storage space is full, the oldest videos will be automatically deleted to free
up space for new recordings. If set to N, loop recording is disabled. When
the camera's storage space is full, recording will stop automatically.
The fourth digit: If set to 0, regular imaging is enabled. If set to 1, the image
is . An easy way to remember is that when you flip the flipped 180 degrees
lens to the side with , set it to 0. If you flip the lens to the side the back clip
with the , set it to 1.indicator lights
The logic of the TIME.TXT settings: Each time the camera is turned on, it
checks if the contents of TIME.TXT . If so, it have changed reads the time
and parameters, applies them to the camera, and then restores the contents
of TIME.TXT to the default value of 2022-12-01 12:00:00 Y0Y0. If TIME.TXT
is not found, the camera will automatically generate this file.
For example, if you want to disable the time stamp, set the video resolution
to 720P, enable loop recording, and flip the lens to the side with the clip,
your code should be . Modify the TIME.TXT document and restart the N1Y0
camera for the new settings to take effect.
The four-digit code in TIME.TXT represents the following parameters:Y0Y0
SPIKECAM
12

5. Trouble Shooting
3. Device failed to connect to the computer. Please try another USB port on
computer or try another USB Type C cable.
7. When viewing the video on a computer, we found a small video segment
that cannot be opened. When you connect the camera to a computer, make
sure that the video recording slider is in the off position. If it is in the on
position, the camera will attempt to record a short video segment, but it will
be terminated by the computer transfer program before it can finish. This
may result in a small segment of video that cannot be opened. Simply delete
this useless video clip.
For more information about this body camera please visit:
https://www.spikecam.com/z10
2. Camera can not respond. Please press the Reset Button Hole to power off
the camera and then restart the camera.
5. The recorded video is flipped. You might have manually flipped the lens but
didn't set it in TIME.TXT. Please refer to Section 4.2 for details.
Note: If the above solutions cannot solve the problems, please contact
customer service email: info@spikecam.com
6. The recorded video appears to have a strong red color. You may have
accidentally turned on Infrared Lights, which will make the video appear
reddish when combined with daylight. Please turn off Night Vision in the day.
Our staff will response to your email within 24 hours. Thank you for choosing
SPIKECAM.
4. The power indicator light doesn't work even when charging. Please check
if you have turned on (Power Slider on the Indicators Off Stealth Mode
position). If so, please exit this mode.
1. Camera can not boot. Please charge the camera battery for more than 2
hours first then try to turn on the camera again.
SPIKECAM
13
Table of contents
Other SPIKECAM Digital Camera manuals


